怖いホラー 2:脱出ゲーム チャプター 2 ウォークスルー
はじめに
ホラーハウス Scary Horror 2 ビデオ ゲームの第 2 章で、第 1 章に続きます。そのため、パズルを完成させるために使用できるいくつかのアイテムがまだ在庫にあります。さらに、チャプター 2 を完了すると、別のチャプター (解放) のロックが解除されます。環境を検索し、隠されたオブジェクトを見つけてトリッキーなパズルを解いてください。
あなたは、あなたを怖がらせるためにもっと不気味なことが起こっている家にいます。さらに、家には複数の部屋があり、それぞれを探索するには、オブジェクトを操作してドアのロックを解除し、ロックされたエリアにアクセスしてさらに隠されたアイテムを探す必要があります。あなたは次の 4 つのアイテムを持ってゲームを開始します:フロック 、手紙 (S)、シャベル 、ボタン .
Scary Horror 2 脱出ゲーム チャプター 2 ウォークスルー – ホラー ハウス
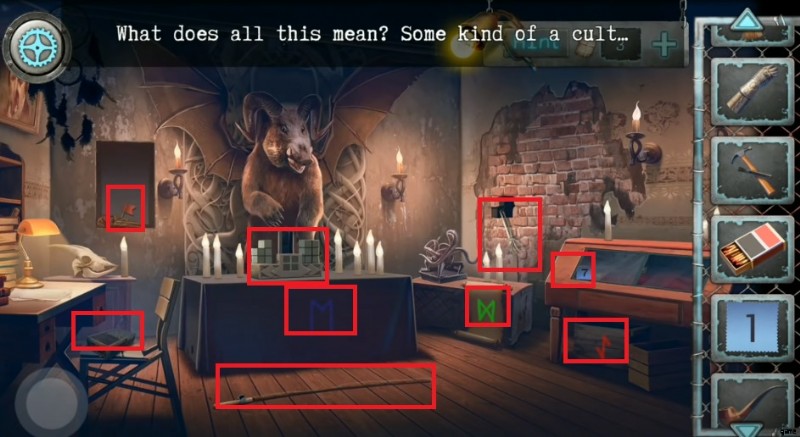
隠しオブジェクトを見つけるのが簡単ではない廊下でゲームを開始します。まず、文字を見つけて、それを使って左側のドアのロックを解除する必要があります。 怖いホラー 2 チャプター 2 ホラー ハウス ウォークスルーを読み続けてください すべての答えと解決策を得るために。前述のように、インベントリには 4 つのアイテムがあり、「ガーデン シャベル」を使用する必要があります。 」 植木鉢から文字「H」を取得します。その他の隠しオブジェクトを見つけるには、Scary Horror 2 エスケープ ゲーム ガイドをお読みください。
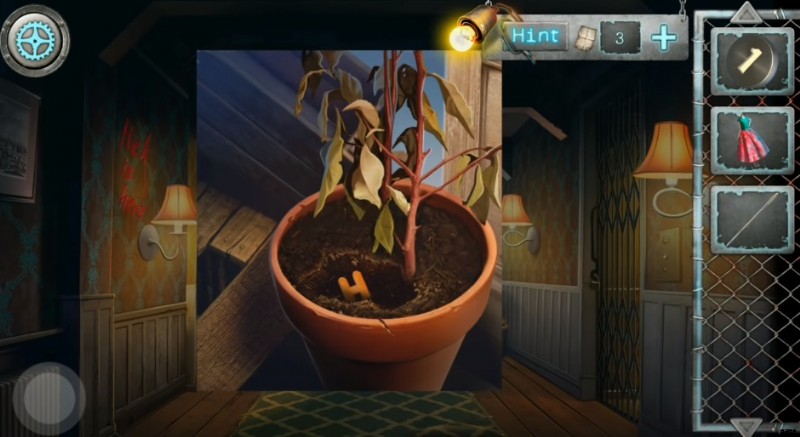
- まず、ガーデン シャベルを選択する必要があります インベントリから、それを使って植木鉢「3回」を掘る 」文字「H」の場合 .」
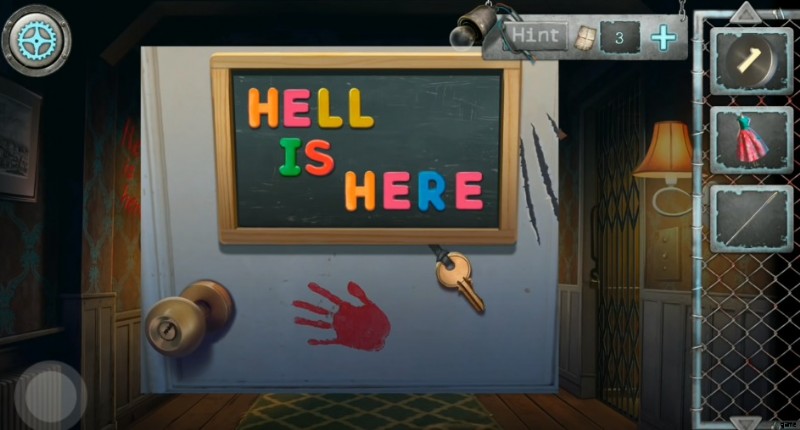
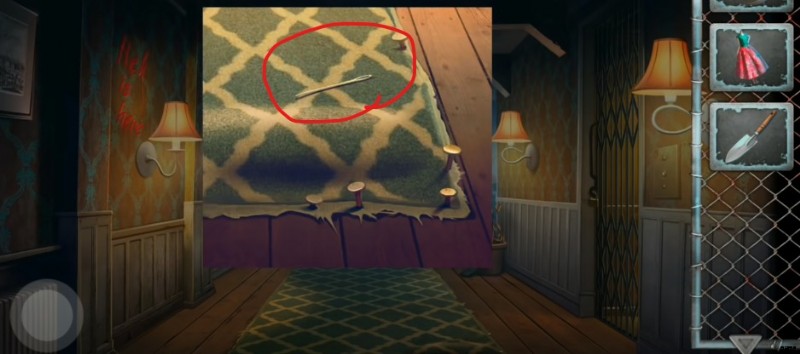
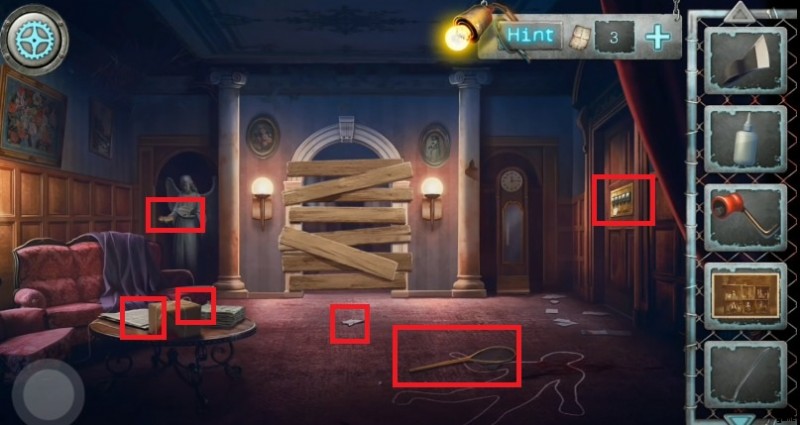
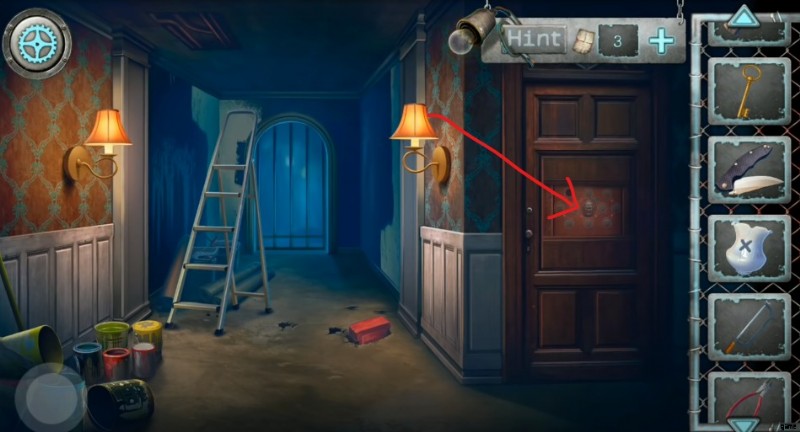
- 左の壁に向かい、「地獄はここにあります」を読みます 」カーペットをタップして針を見つけ、インベントリに追加してください。
- S という 2 つの文字があります そしてH あなたのインベントリに。左側のボードをタップし、両方の文字を追加して「Hell is Here」と書きます 」パズルを解いて鍵を入手し、それを使ってドアのロックを解除してください。
左側の部屋
左側のドアを通り抜け、隠されたオブジェクトを見つけ始めます。指輪を持って部屋に入ると右側からおもちゃの車が現れます。
- その場で最近登場した乗り物からリングを拾い、左側のポスターをタップします。手がかりを見つけるためにポスターを取り除くと、次のものが得られます:
- トライアングル – ブルー
- スター – 黄
- キューブ – 赤
- トライアングル – 黄
- スター – グリーン
- 左側のドールハウスをタップして、インベントリから人形を選択し、右上の部屋に置きます。

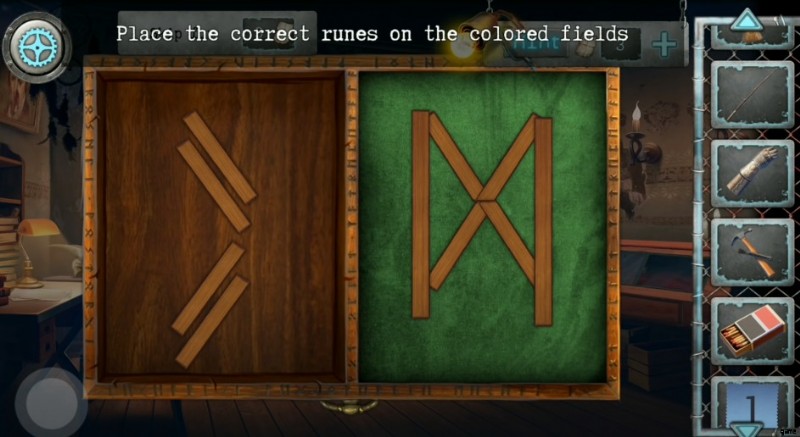
- では、戸棚をクリックして、同じ幾何学的形状を設定してロックを解除してください。

- すべての服を 2 番目のセクションから最初のセクションにドラッグします。バールを集めてインベントリに追加してください。
ジグソー パズル – ドールハウス
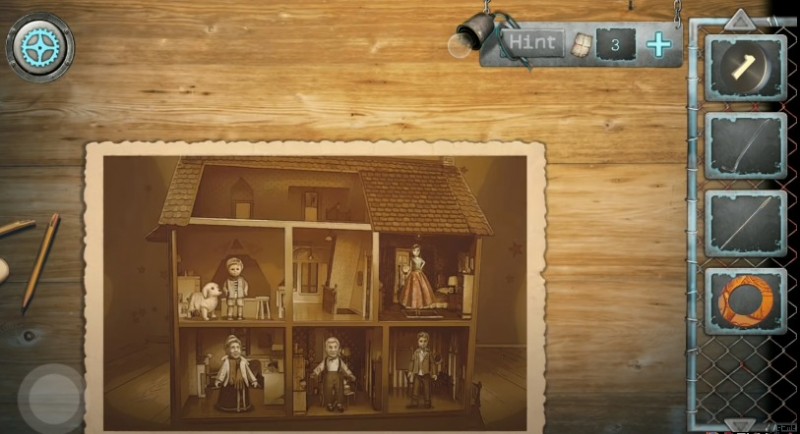
- テーブルに向かってジグソー パズルを見つけ、画像を完成させて手がかりを手に入れましょう。

- ミニゲームをプレイするには、ピースをタップして裏返すか、押して引っ張って移動する必要があります。
- パズルを完成させると、インベントリに追加されたドールハウスの画像がゲームに表示されます。
- 左側のエリアをクリックして 2 番目の部屋に入ります。ここには、ベッドや、おもちゃ、クモ、壊れた鏡など、さまざまなアイテムがあります。
ルーム 2
- カーテンをスライドさせます サッカーボールを見つけてタップすると、インベントリに追加されます。
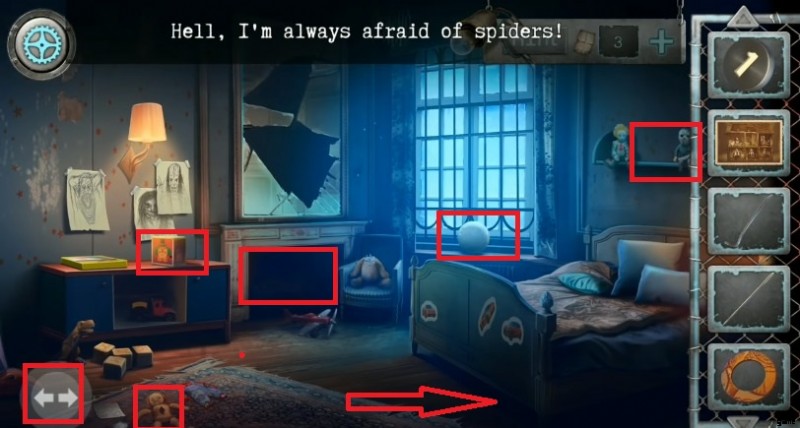
- Interact with the left side table and start playing a water game wherein you aim to throw the rings on the pins using two buttons . Remove the cover and obtain an Acid Bottle .
- See under the bed, tap the show to unravel a “thread, ” and click on it to add to your inventory.
- Head to your inventory combines the Needle and the thread to get a new item (needle and thread ).
- Click on the broken doll above the rug and repair it using the needle and thread . Next, drag the cloth to the doll 在庫に追加してください。
- A shelf above the bed where adding the recently collected doll may help you get a key .

- Click the arrow to reach the first room and tap the vault on the wall.
- キーを使用 from the inventory to open the vault and get a glue bottle .
Return to Hallway
- After collecting the items mentioned above, return to the hallway and head to the door on the right side. Select the Acid Bottle and pour it into the locker .
- Once you reach the hallway, select the crowbar and use it to bring nails out. Pick up the rug to discover a weight 在庫に追加してください。
- Going through the door will take you inside the elevator, wherein your objective is to tap the button and reach the first floor, but first, you have to collect “Ax Head .」
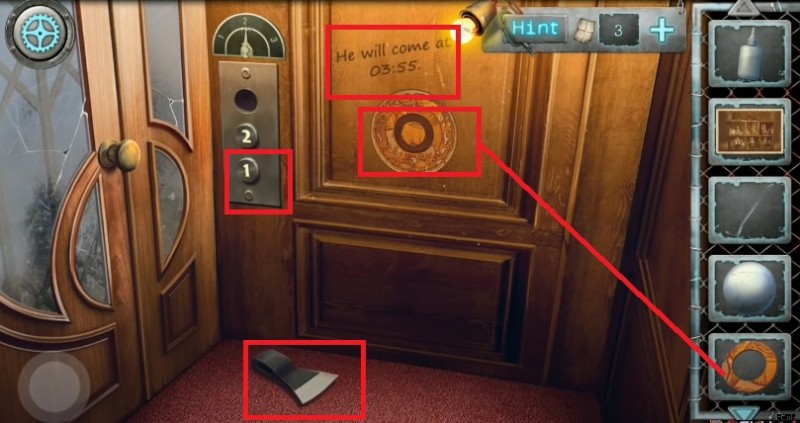
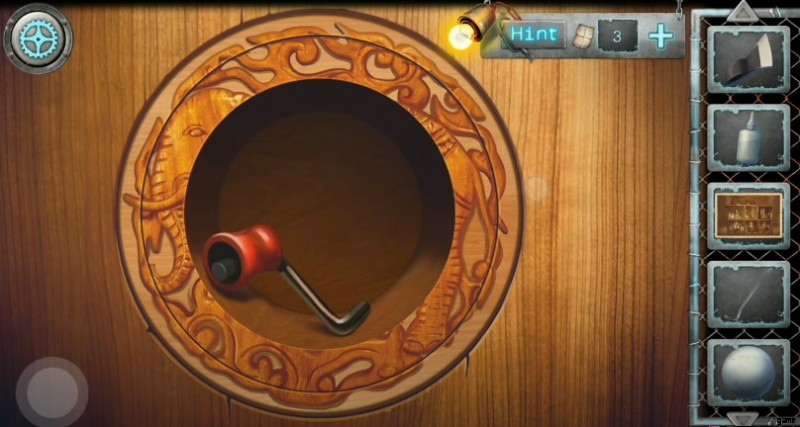
- Pay attention to timing printing on the wall, tap the wall rings, and set up the missing one available in your inventory.
- Rotate the rings to complete the picture of an elephant and obtain the handle . Add the button “1 ” in the panel and hit it to reach the first floor.
First Floor
Going through the elevator may lead you to the first floor, where you will discover a closed door and many other things, including Statue.
- Firstly, tap the “Catch Net ” from the floor and add it to your inventory.
- Tap the table on the left side and pick up the newspaper. Next, tap the statue on the left side of the closed door to get a paper clue from its hand.
- Select the ball from your inventory and put it on the statue’s hand to run a mini-game wherein your goal is to compare two pictures and click on extra details.
- After comparing both images, you will receive a note. Head to your inventory, select the weight and fix it inside it. Set the time as you have seen in the elevator (3:55) to unlock the box and collect a male doll .
Second Floor Second Room
- After collecting all items, your objective is to reach the elevator, tap the button “2,” and head to the left side room.
- Tap the left arrow to reach the bedroom and see under the bed. Use the net to catch the spider and open its head to collect a paper clue.
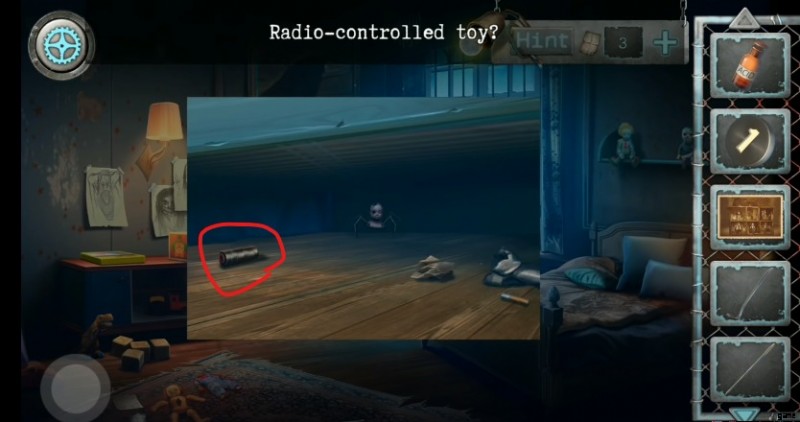
- Click on the table to discover the toy box, select the handle and fix it with the box to get a cassette.
- After that, tap the cupboard to discover the tape recorder and insert the cassette. Open the speaker of the tape recorder to find a Piano Key and return to the first room where you have left a dollhouse incomplete.

Head to the Dollhouse
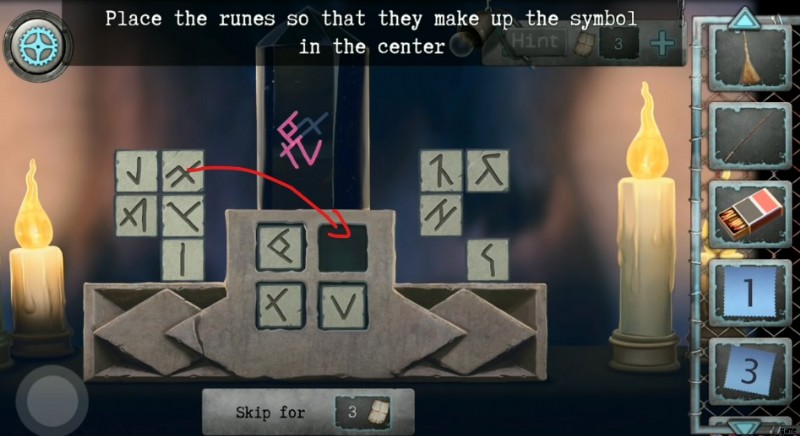
Go close to the door house, keep the dollhouse photo next, and start placing objects following the image.
- Once you set the dollhouse following the image, get the matchbox and add it to your inventory.
- Leave the second floor and reach the first floor using the elevator.
Return to First Floor
To reach the first floor, go to the elevator, tap the number 1, and head to floor 1, where your objective is to interact with the right side door and enter the code to unlock it.
- The code you need to unlock the door is the following:40213 .
First Floor – Library
Going through the door may lead you to a beautiful room where you discover several new things to interact with to solve tricky puzzles. If you are confused and don’t know how to solve tricky puzzles, read our Scary Horror 2 Chapter 2 Walkthrough guide.
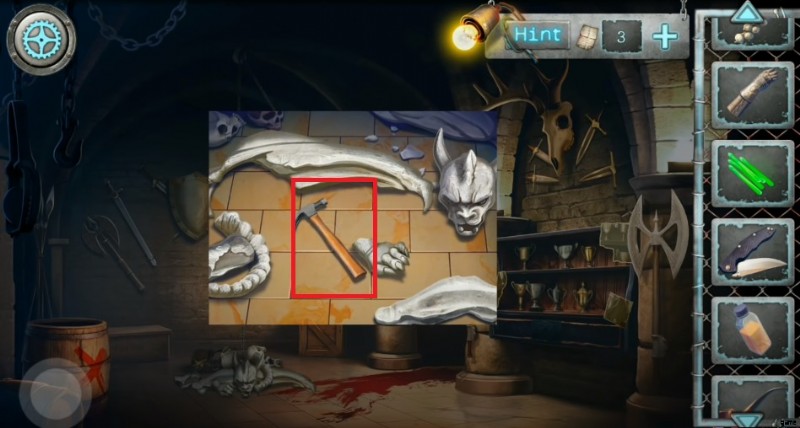
- Pick up the hammer from the floor and head to the armor suit to get its arm.
- Click on the fireplace, select the newspaper from your inventory and throw it into the fireplace. Use the matchbox to set fire and head to the treasure chest on the right side of the room.
- The treasure chest holds a mini-game wherein your objective is to place three angels in a row while preventing the demon do that.
- Once you solve the mini-game, the box gets opened, and you can pick up the key from inside it.
- Tap the fireplace again, and use the key to unlock the iron chain to pick up a Poker .
- Use the poker to bring a key out of the fire and add it to your inventory.
- There’s another room on the right side, but before leaving, don’t forget to notice the number “72 ” printed on the cushion.
First Floor – Piano Room
There’s a passageway on the right side of the room. You must go through it to reach the second room to discover the piano and other items.
- First, pick up a broken pot from the floor and add it to your inventory. Next, click on the table to get a foldable knife .
- Hit the back button and notice the number (1207 ) printed on the left side window.
- Return to the first room, use the knife to open up the package, and get an object you must use to the second room to find a clue, but first, use the knife to cut the sofa and obtain the rusted lock .
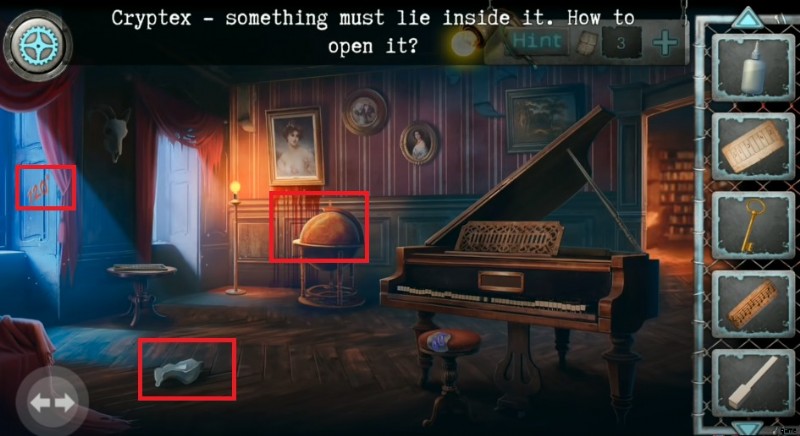
- Go to the second room, click on the globe map and set the diagonal coordinates as follows (70 , 120 , and 40 ).
- As the globe opens, pick up the wooden piece and attach it to the ax head.
- Click the table where you collected a foldable knife and place the object you recently collected from the package over there.
- Hold the right side button to move the object and find the alphabets you need to unlock the cryptex available in the first room.
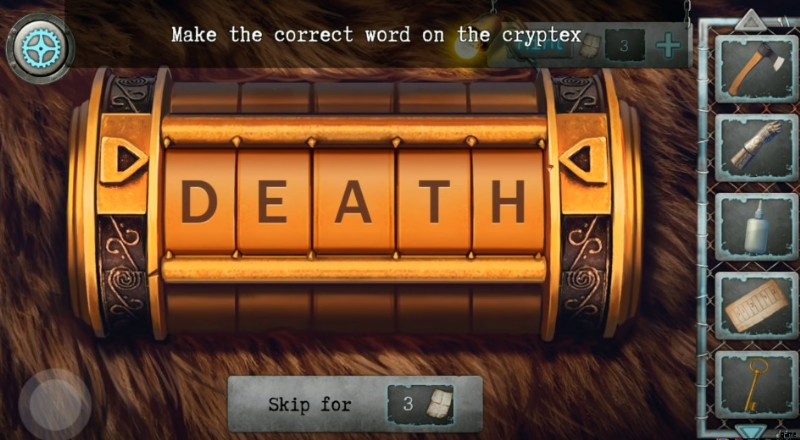
- Go to the first room, tap the box above the rug made up of Beer skin, and enter the following code (Death )。 Open the cryptex to get a button and add it to your inventory.
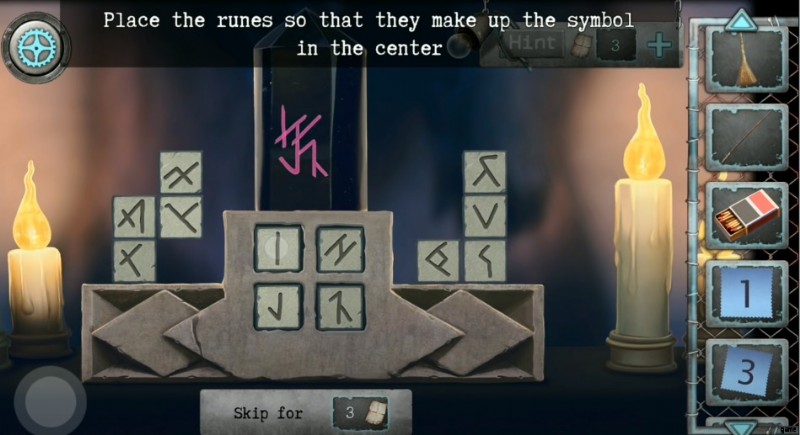
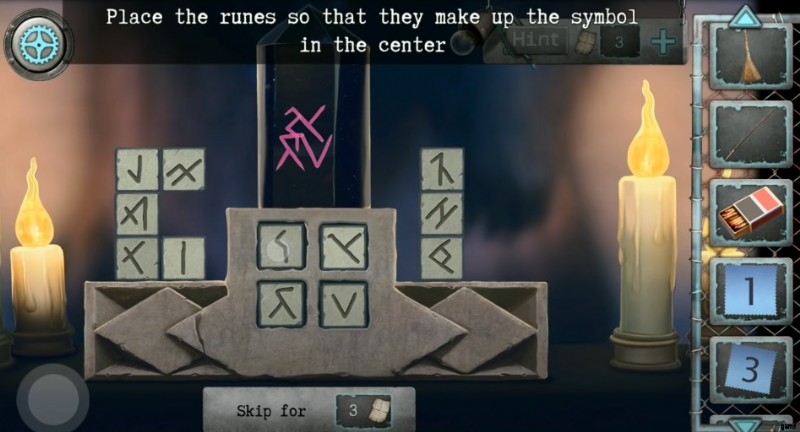
- Next, head to the cupboard behind the sofa and solve the Book Puzzle. The library keeps lots of secrets that you must unravel.
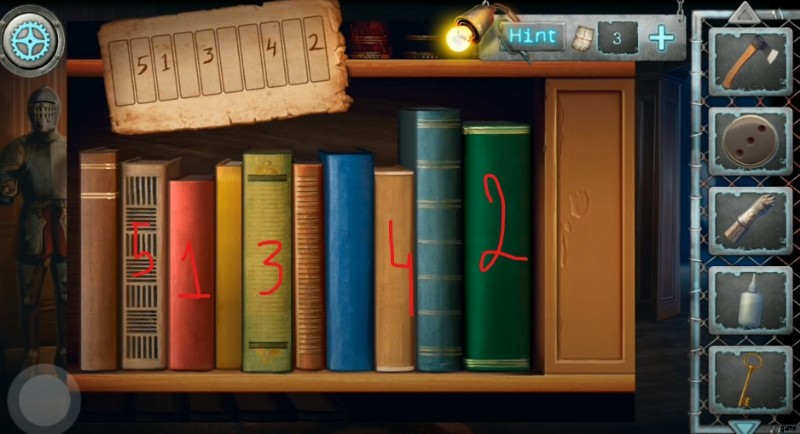
- Tap the books following the image below and obtain the next Piano Key .
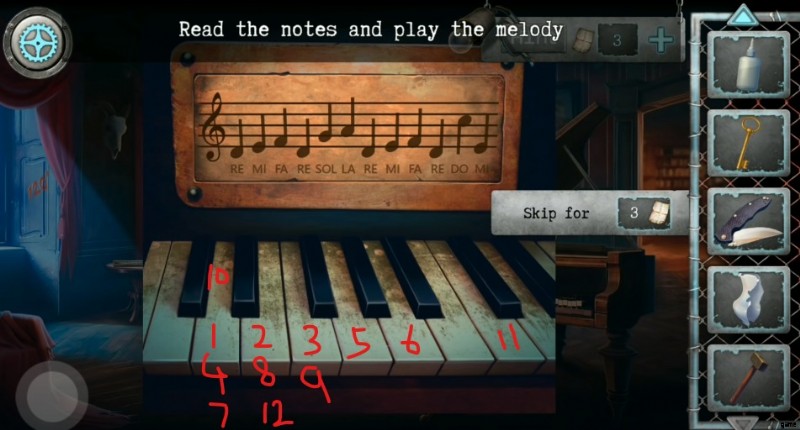
- Return to the Piano and add both keys; meanwhile, add the notes from your inventory to the piano and play the melody to get the trophy.
- After collecting the abovementioned objects, you should leave both rooms and head to the closed door near the statue.
Go back to the Hallway
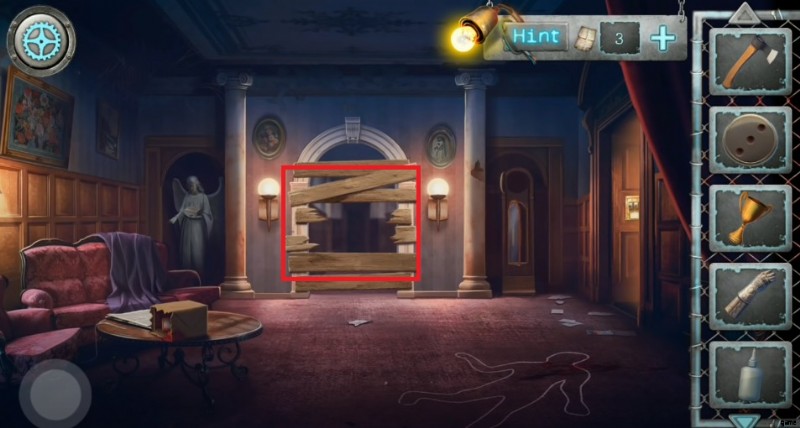
After getting a trophy, leave both rooms and reach the hallway, where you must use the ax to break the blockage fixed ahead of the passageway and go through it to get to the new room.
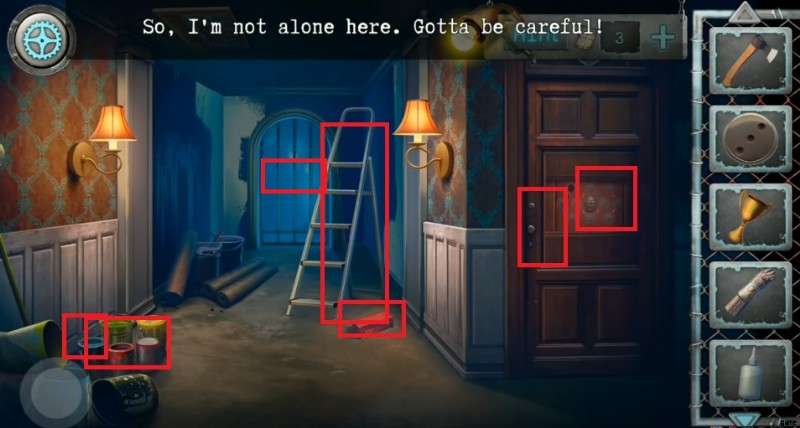
- As you go through the passageway, you will discover a mysterious man who disappears after a few seconds leaving you locked in the room.
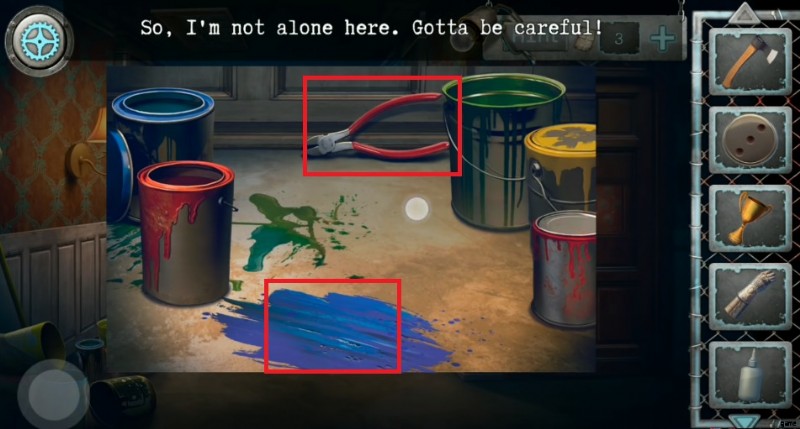
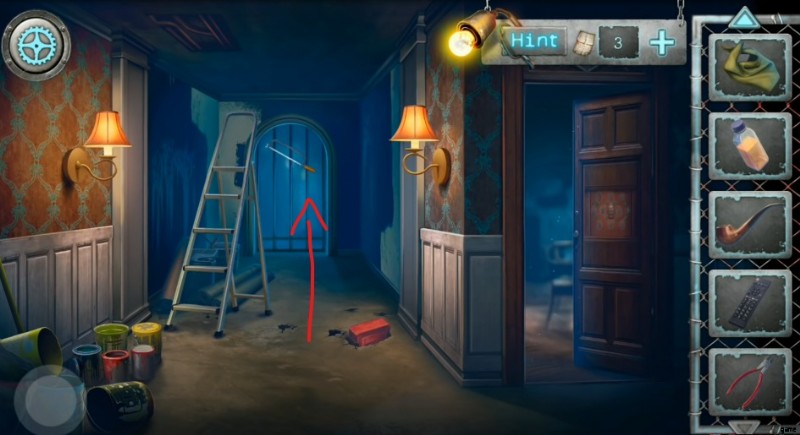
- Tap the paint buckets and pick up the wire cutter from the spot.
- Next, head to the half-buried foldable ladder and a box, use the hammer to break the blockage and move the ladder to reach the Ceiling Door .
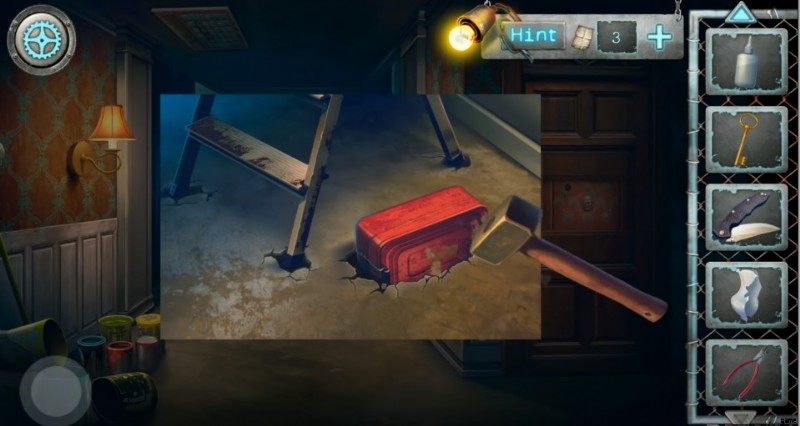
- Play the mini-game wherein you must move the rows vertically or horizontally to arrange the symbols correctly.
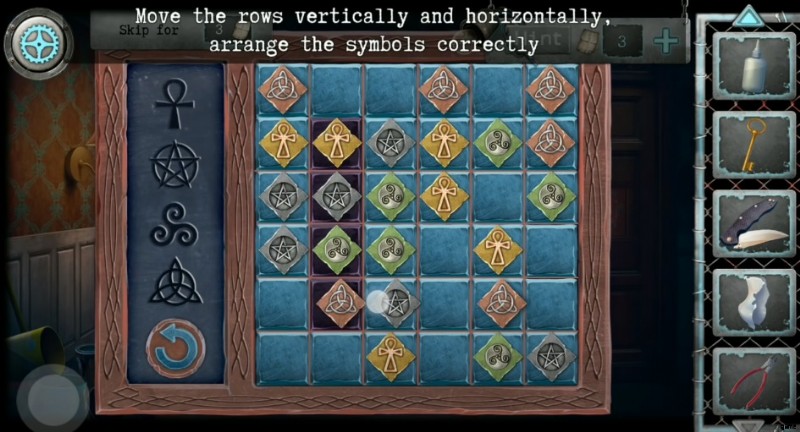
- Once you complete the puzzle, pick up the metal saw and broken Pot Pieces from the spot and add them to your inventory.
Repair the Pot
- Now, you have both pot pieces in your inventory and the glue bottle. Attach both pieces and use glue to repair the pot .
Office Door
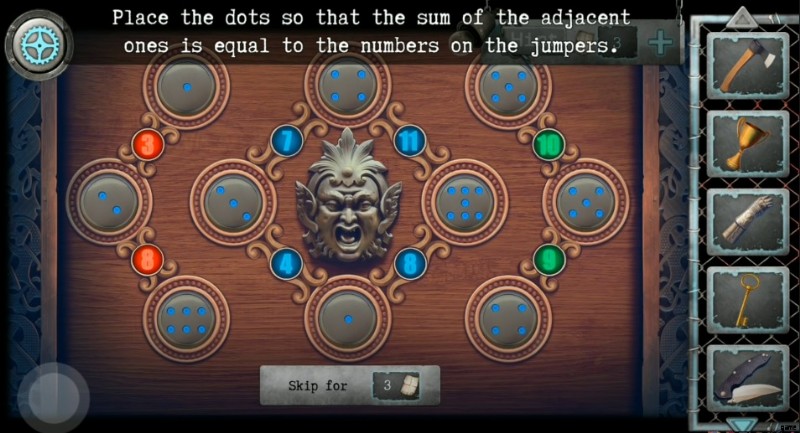
Head to the office door on the right side, install the button and place the mini-game.
- When playing the game, you aim to place the dots to make the adjacent ones equal to the number of jumpers.
Enter the Office
After unlocking the door, go through it to the office, where you will discover several objects and many office accessories.
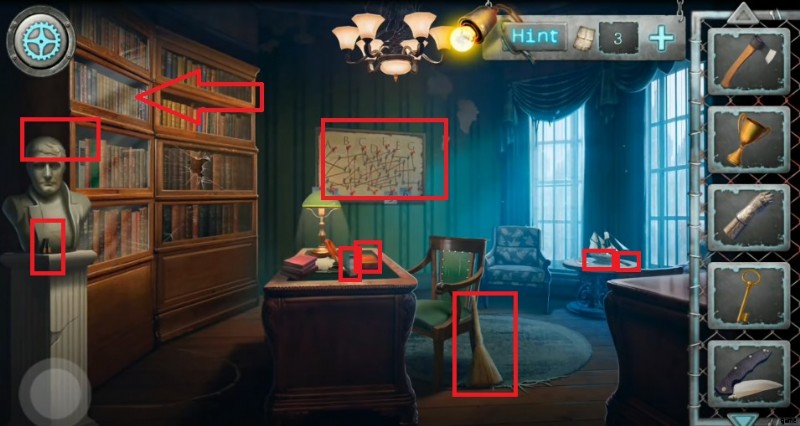
- Tap the table to discover a box, and use the key from your inventory to unlock the box before you have to solve another puzzle.
Restore the Picture
- You must swap parts and stop to restore the picture when the image is completed.
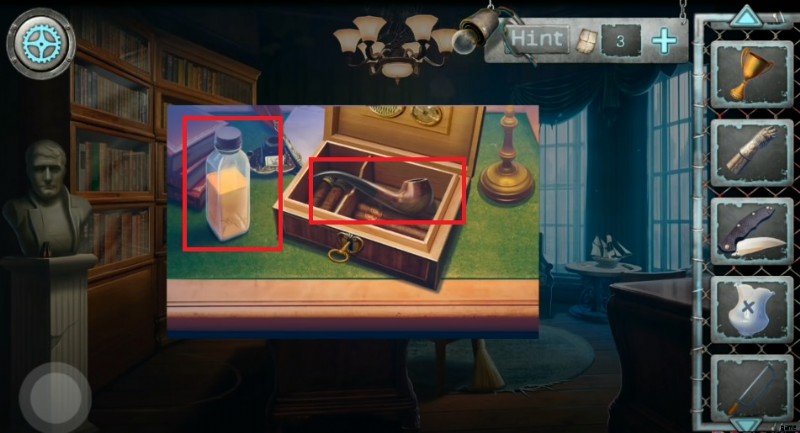
- After that, open the box to collect a smoking pipe and a bottle from the table.
- Before leaving the table, don’t forget to pick up the broom kept near the chair.
Afterward, head to the table where a ship and other items are available.
- Tap the table with the ship model and pick up a remote from the spot. Before leaving the table, fix the broken items of the ship and go close to the statue.
- Collect batteries from the statue and insert them into the remote .

Go to the Piano Room
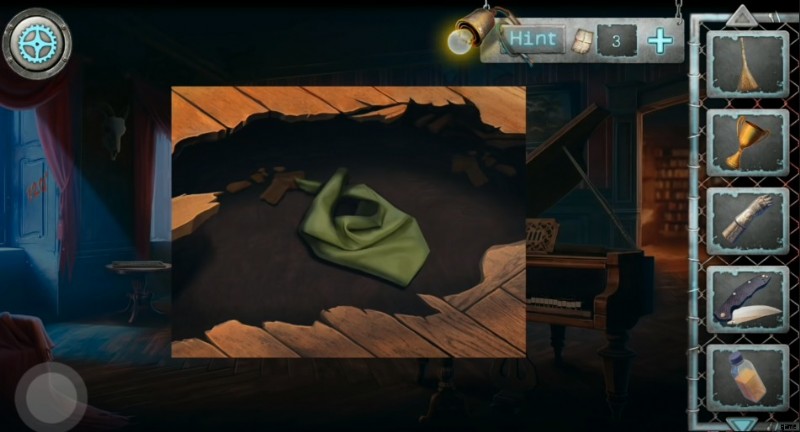
- Return to the Piano Room, select the flask (pot) and place it on the lamp to highlight the specific area with the “X ” sign.
- Use the ax to dig the highlighted area and discover a scarf .
Return to the Hallway

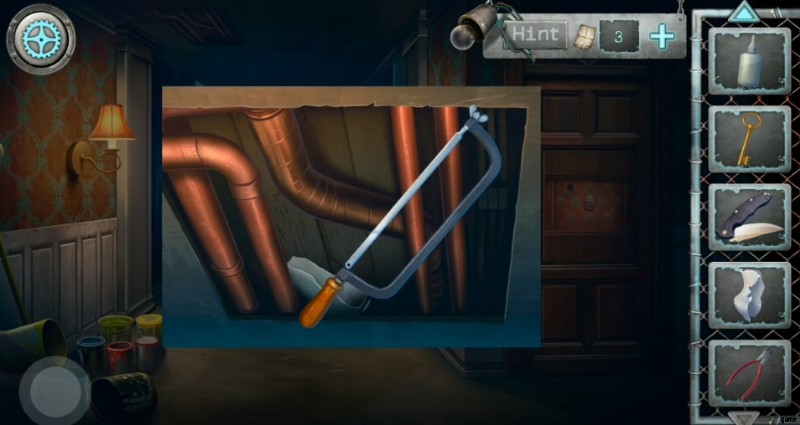
Go to the hallway on the left of the office, use the metal saw to cut the bars, and reach the Antique Room .
Enter the Antique Room
Going through the passageway you made recently may lead you to the Antique Room, where you discover lots of blood on the floor and several antique pieces.
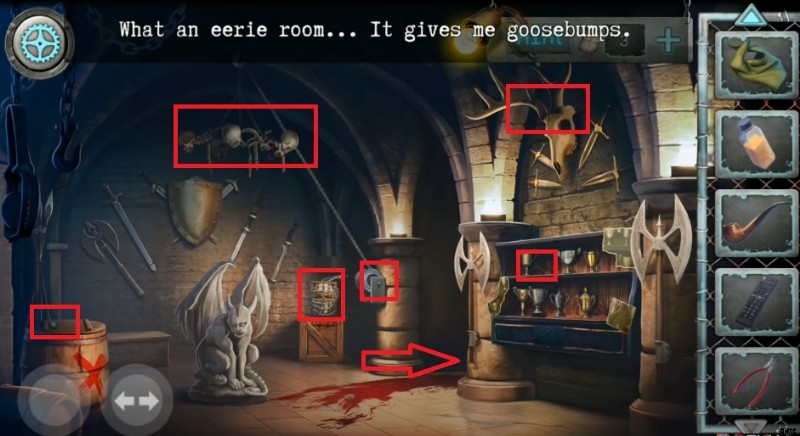
- Click on the drum to discover an Oiler, and tap the rack on the right side to find a Can Opener .
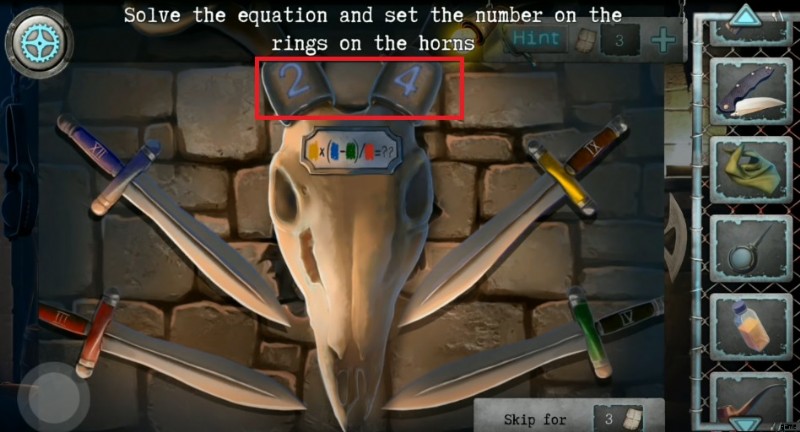
- After that, tap the skull above the rack, set the code (2 and 4) to reveal a secret area, and collect the garlic .
- Next, click on the head above the box covered with an iron chain and use the metal saw to cut the wire; meanwhile, remove the knife to open the box. Pick up the Paint Remover 在庫に追加してください。
- Head to your inventory, combine the scarf with the Paint Remover, and leave the Antique Room for a while.
Return to the Hallway
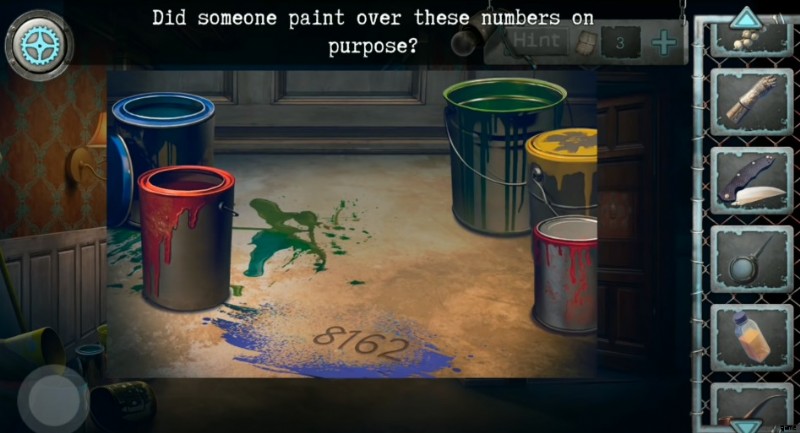
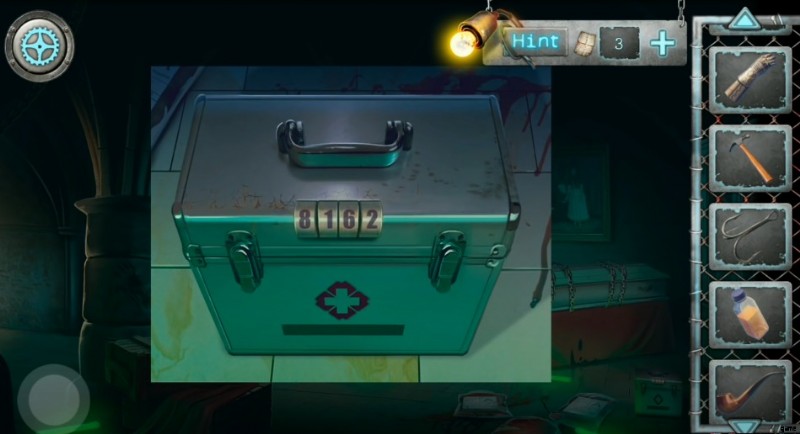
- Leave the Antique Room, head to the paint boxes, and use the cloth with Paint Remover to clean the floor to reveal the passcode (8162 ).
- Tap the red box and bring it out from the land. Use the “Can Opener” to open the box and collect green sticks.
Library
- Go to the library, head to the Armor Suit, and use Oil from your inventory to remove the rust from its helmet . Collect the handle from inside the helmet and add it to your list.
Antique Room
- You have to reach the Antique Room, select the handle, and attach it to the wheel on the right side.
- Tap the wheel to release the Chandelier and smash the Devil Statue .
- Click the demolished statue and remove the pieces to discover a hammer .
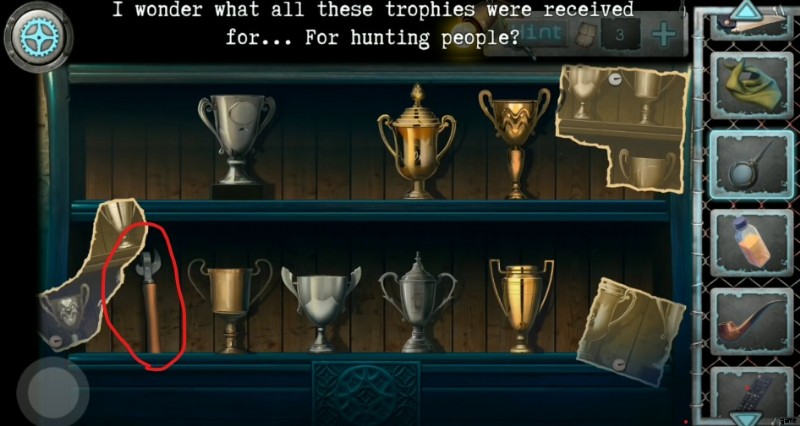
- Head to the rack, keep the trophy on the shelf and click the passageway on the right side.
- Going through the passageway may lead you to a dark room where you need Neon Sticks to light up the area.
暗室
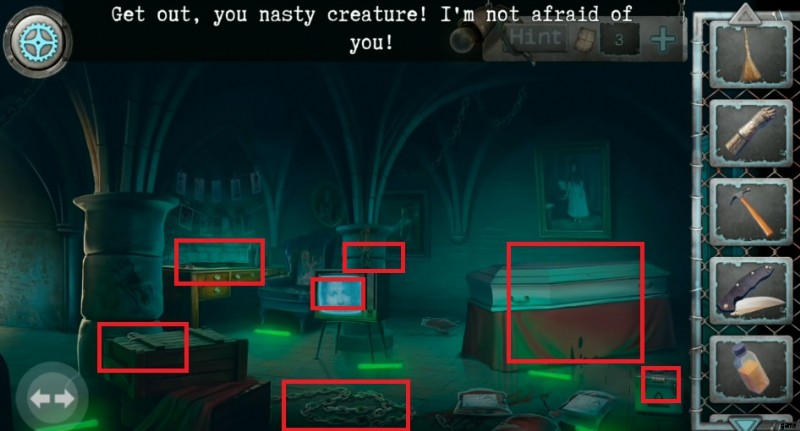
- A vampire appears on the scene as you reach the Dark Room and light it up using the Neon Sticks. This time, you have to select a set of Garlic and use it to keep the vampire away from you.
- Once the vampire runs away from the scene, collect the iron chain and tie the coffin . Next, select the lock and use it to lock the coffin.
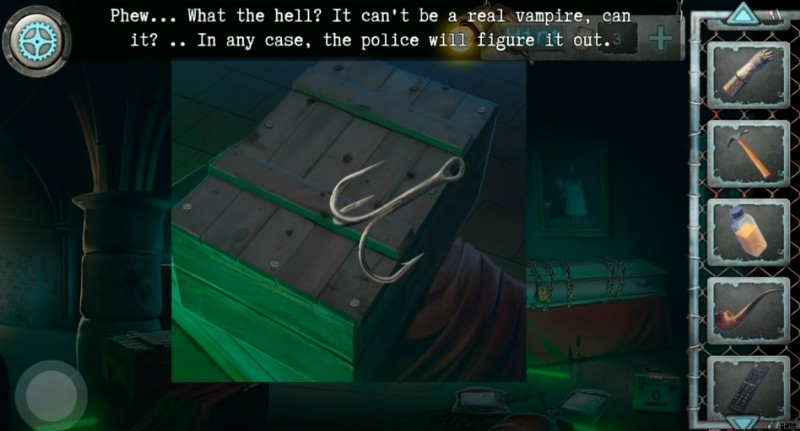
- Tap the box on the left side and pick up the hook . Now, click the box on the right side near the coffin and enter the passcode (8162 ) to unlock the box and obtain the piece of the ship model.
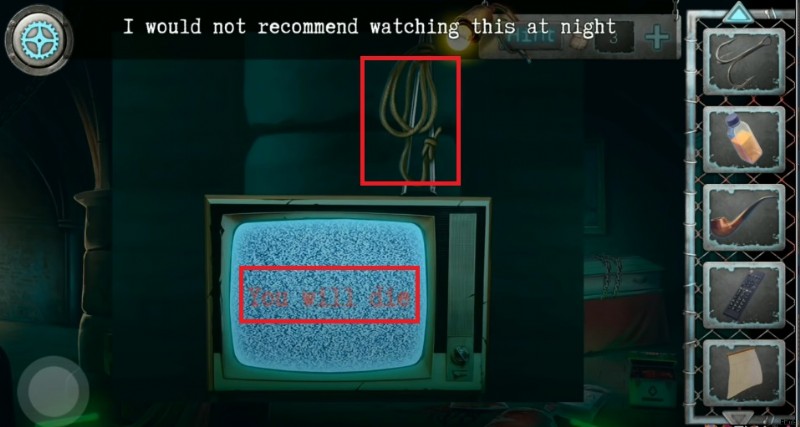
- Click on the TV to read the text “You Will Die ” and pick up the rope from the antenna .
- Select the remote from your inventory and use it to turn on the TV . After opening the TV, pick up a hat and head to the table on the left side to get a crowbar and find two trays.
- Select your inventory’s developer (Bottle) and pour it into the second tray. Use the tweezer to pick up the paper from the first tray and put it into the second one to find the image of the trophy.

- Now, use the crowbar to unlock the box and pick up the Chisel . Combine the hammer and Chisel to get a new item in your inventory for later use.
- Head to your inventory, select hook and rope to combine and get the Rope with Hook.
Antique Room
- Go back to the Antique Room and head to the drum, where you have to pick up an object using the Rope with Hook .
- Tap the cupboard on the right side and place the photo with trophies to solve puzzles. Once the puzzle gets solved, pick up a matchbox and paper from a secret drawer.
オフィス
- Go back to the office, head to the statue, select the hat, and put it on to discover a secret passageway behind the cupboard.
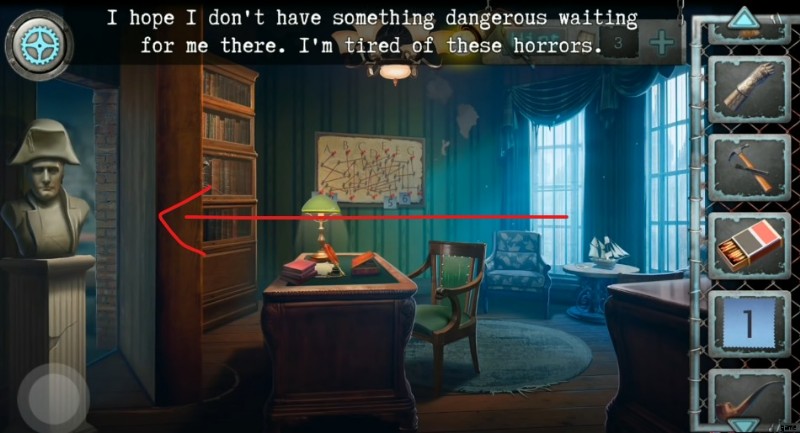
秘密の部屋
Go through the passageway to reach the secret room, where the game shows you scary visuals and lighting effects.
- Firstly, you must pick up the fishing rod from the floor and add it to your inventory.
- Discover a box on the chair and draw the same shapes using the wooden pieces you find on the scroll next to the right side table.
- So, you have to draw three different shapes and unlock the box to get a digit 3. Leave the area for a while, and head to the box fixed on the front wall.
- Select the armor suit arm and place it on the section to prevent the window from falling. Obtain the small flag from the spot and add it to your inventory.
- You have to use the Hammer and Chisel to break the wall on the right-side wall. After that, collect the necklace from the skeleton.
- Head to the right side table and pick up the digit 7 .
Return to Office
- You should go back to the office and head to the ship model. Select the flag and place it on the ship, along with a white-colored sheet.
- Once you complete the step mentioned above, the game reveals a tile for you to obtain.
- Return to the Secret Room and head to the monster’s blocks on the table. Select the tile and add it along with others to start the game. You have to draw three different shapes using the tiles, and they are the following:
First Puzzle
Second Puzzle
Third Puzzle
- After completing all three levels, get the button of 3 and keep it in your inventory for later use.
- Go back to the office and head to the board, where adding all the sticky notes with numbers is mandatory.
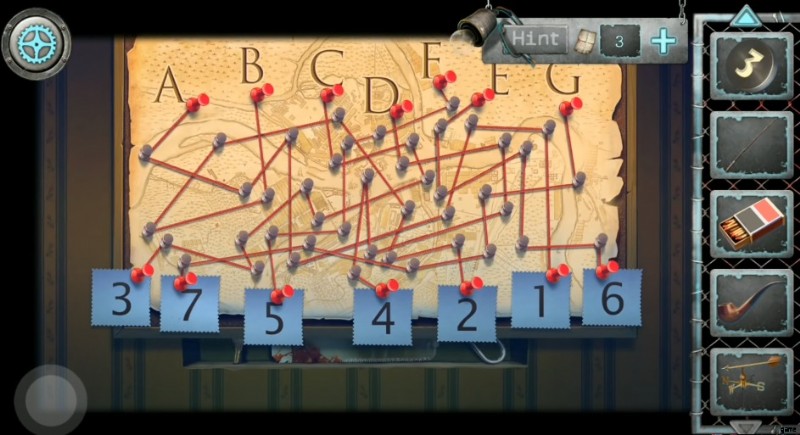
- After placing all numbers, your objective is to arrange them according to the letters in the alphabet.
- Once you solve the puzzle, collect the key and the saw from the recently-reversed area behind the board.
- Return to the Secret Room, head to the skeleton, and use the saw to remove the skull .
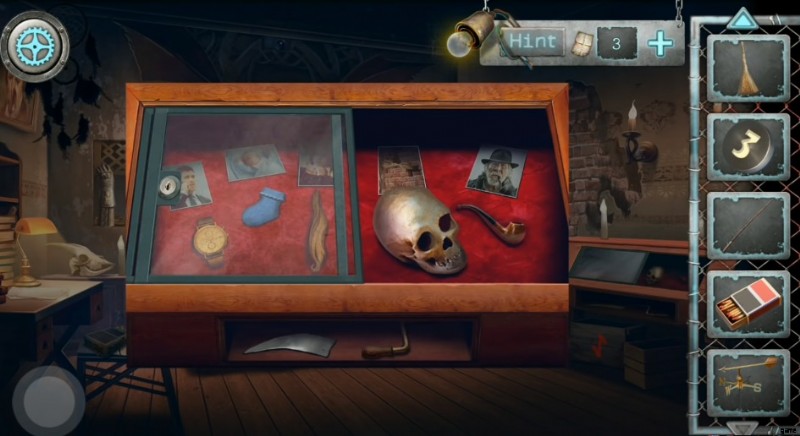
- Select the key and use it to open the showcase on the right side to keep both the skull and the smoking pipe. Open the secret drawer of the same table to get the handle and the mirror.
Go to the Elevator
After getting the key and handle, you should go back to the elevator, place button three, and press it to reach the roof. Now, you are in a new room where lots of frozen animals are kept and many other things to discover.

- First, you have to tab the mask to discover a knife and make it sharp with the help of a stone kept near the crow statue on the left side.
- Head to the bear on the floor and use the knife to cut it with a hook and a hammer .

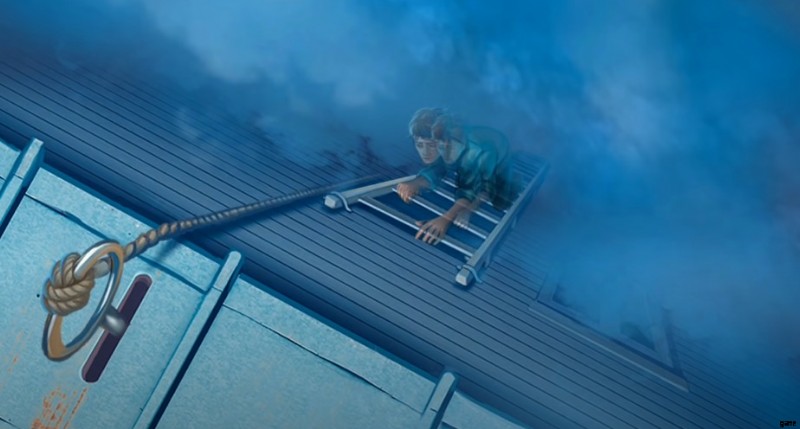
- Select the hook and the fishing rod in your inventory and combine them to bring the ceiling door down, along with the ladders.
- Climb the ladder to reach the Roof Room.
Explore the Roof Room
Now, you are in the Roof Room, wherein your objective is to search for hidden objects and utilize them to solve mysteries.
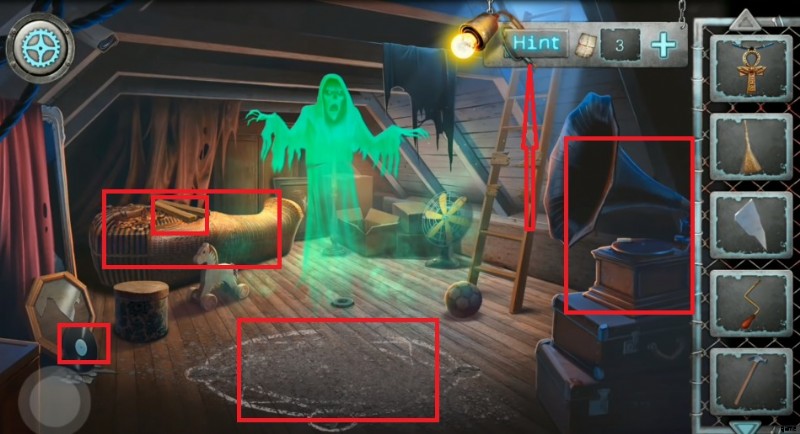
- Firstly, tap the record near the broken mirror and get it from there.
- Head to the trampoline, pick up chalk from the scene, select the handle, and place it on the box.
- Select the record and put it in the box. Rotate the handle to open the secret drawer and get some black candles.
- Use the broom to clean the floor and the chalk to complete the pattern on the floor.
- Now, select the black candles, put them on the floor, and use the matchbox to burn them all.
- As you light up all the candles, the fan will turn on and push the ghost away from the targeted place.
- Now, you are free to collect hidden objects. Therefore, tap the coffin to get some planks; select the necklace and place it on it to open and collect the plasma cutter. Leave the roof room for a while and go down.
Third Floor
- Take downstairs to reach the room where you have discovered a mask. Tap the mask and use the Plasma Cutter to open the mask and collect nails.
- Click on the ladder, obtain the key , select hammer to remove broken steps, replace them with planks and fix them using the nails you collected from inside the mask.
- Go back to the third room, select and insert the key into the crow statue box and pick up the mirror as the music stops.
- Go back to the Roof Room and add the mirror pieces to the frame on the left side.
Roof
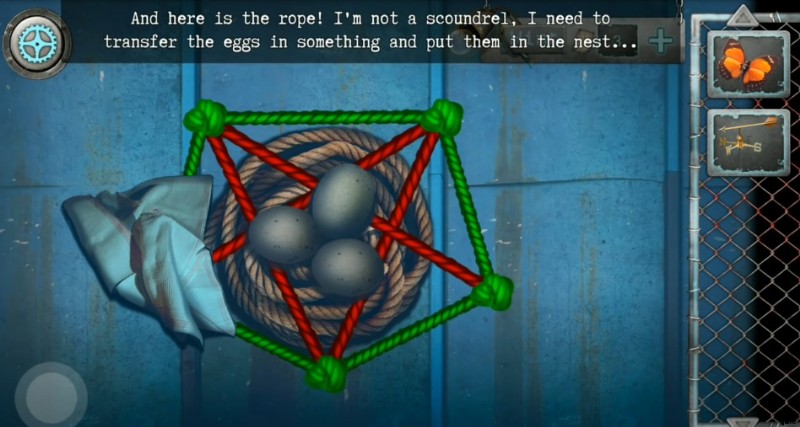
- Climb the ladder to reach the roof, tap the nest to collect the butterfly, and then head to the ropes, where you will discover a handkerchief .

- Select the vane from your inventory and place it on the top of the house to get a paper clue. Tap the statue on the right side to discover a scissor and return to the Roof Room.
Roof Room
- Go close to the mummy, use the scissor to cut the cloth, and get the final piece of mirror. Leave the Roof Room for a while, and head to the room below, where you will discover a frame full of butterflies.
- Select a butterfly from your inventory and add it to the board to identify the identical butterflies.
- Once you solve the puzzle, the game gives you a bucket to collect and take to the Roof Room.
- Head to the mirror frame and connect all pieces to solve the puzzle.
- After repairing the mirror, see the paper clue in it to discover the clue “MCMILD .」
Go to the Roof
- Go to the roof, head to the statue, and tap the particular tiles following the alphabet printed on the paper.
- As you solve the puzzle, the game opens a small wall section to offer you a ring you must tap to collect.
- Head to the ropes and put all eggs into the bucket you have in your inventory. Drag ropes one by one to turn them green and pick up the rope length from below it.
- Head to your inventory, attach the ring with the rope, and keep the bucket back on your list.
- Put the eggs into the best, and connect the ring with the rod next to the nest to escape the Scary Horror 2 Chapter 2 Walkthrough.
That’s the End of Scary Horror 2 Horror House Walkthrough.