エリート デンジャラス:最高の完全に設計された PvE 戦闘艦建造
エリート デンジャラス は、目を見張る効果、リアルな物理学、満足のいく武装により、エキサイティングで没入型の PvE 戦闘体験を提供します。賞金稼ぎ、紛争地帯、資源サイトなど、PvE 戦闘に参加する方法もさまざまです。 Elite Dangerousで船を装備する 多くの試行錯誤を伴う、楽しくて価値のある経験です。
残念ながら、必要なアップグレードを取得するには、天文学的に急な材料の粉砕が必要です.探査用の船を建造するのと同じように、船長はグラインドを通過する最適な方法を探しており、実証済みの建造物から始めて、好みに合わせて調整する必要があります。以下は、PvE 戦闘用の最上位ビルドの 1 つです:レールガード。
レールガード

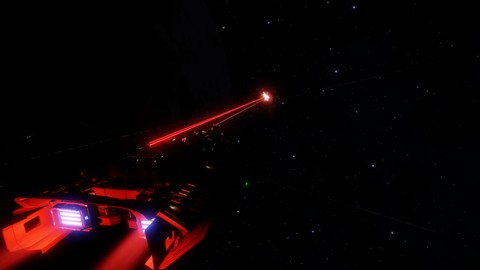
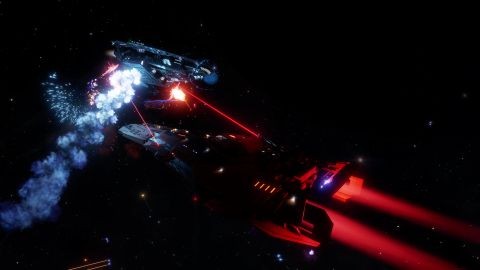
このビルドは、ゲームで最もタフな PvE ターゲットを支配することに優れています。 Thargoid を倒すには特別な装備が必要なため、Xeno Hunting だけはできません。レールガードは、高強度の紛争地帯に無期限にぶら下がることができます.ファラガット級巡洋戦艦からの横一斉射撃を、シールドを壊すことなく一度に数分間受けることができます。艦載戦闘機の熱心なパイロットの助けを借りて、このビルドは巡洋戦艦自体に対抗できます。
レールガード | ||||
|---|---|---|---|---|
| 速度 | ジャンプ範囲 | シールドと船体 | 貨物 | 機能 |
| 292 m/s 最大 379 m/s ブースト | 18 リー ロード 19 リー マックス | 4,139 mj シールド 2,197 船体 | 32t | <ウル> |
次の情報では、ビルドでの特定の選択肢について説明し、いくつかのカスタマイズ オプションを提供します。このビルドをコリオリでチェックして、より詳しく調べてください。
船
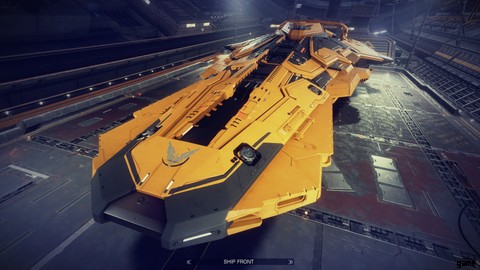
このビルドに最適な船は連邦コルベットです。コルベットは、ゲームで最高の大型船の 1 つであり、完全に戦闘に特化しています。その優れた回転半径により、司令官は印象的な一連のハードポイントを目標に合わせ続けることができます。ハードポイントは、巧妙な射撃グループ管理により、複数の武器が単一のターゲットに収束できるように配置されています。
インペリアル カッターは、特にその信じられないほどの潜在的なシールド強度を考慮すると、このビルドでも機能します。ただし、回転半径が限られているということは、NPC に対する馬上槍試合の試合が長くなりすぎる可能性があることを意味します。
ハードポイント
Elite Dangerous をしっかりと位置づける多くの機能の 1 つ 最高のSFビデオゲームのリストには、その幅広い未来的な武器があります.コルベットには 7 つのハードポイントがあり、指揮官はさまざまな武器を一度に試すことができます。ハードポイントは、船の周りの便利な場所に配置されています。 2 つの巨大なハードポイントが船の上部で隣り合っているため、ターゲットを簡単に収束させることができます。 2 つの小さなハードポイントは、同様に船の前部に配置されています。大きなハードポイントは船の腹にあり、これには欠点がありますが、最終的には役に立ちます。 The only significant difficulty comes from the two medium hardpoints that are placed on either side of the ship. They can’t converge except at long range, so weapons in those hardpoints need to be in separate fire groups to prevent wasting ammo.

The right hardpoints for this build are the following:
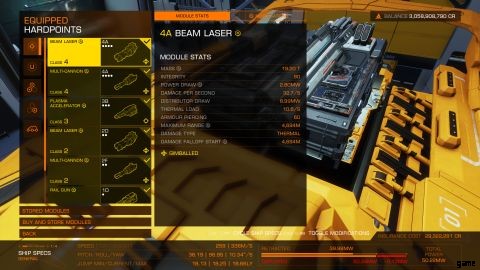
- 4A Gimballed Beam Laser with Long Range and Thermal Vent. This laser, with the help of its Class 2 counterpart, can tear apart a shield from up to 6km away. 4km would be better because of the Jitter, but anything over 1km is a stellar improvement over the debilitating Damage Falloff of an otherwise engineered Beam Laser. For example:at 2km, a Long Range Beam Laser outperforms an Overcharged one by 7 DPS (26 vs 19), and it can do that all the way up to 6km. Thermal Vent also enables these lasers to function as heatsinks that’ll keep the ship cool while spinning up Shield Cell Banks.
- 4A Gimballed Multicannon with Overcharged and Autoloader. Autoloader keeps this Multicannon constantly reloaded, so it can have maximum up-time. It’s most effective out to 1.75km.
- Wildcard:(Recommendation:3B Plasma Accelerator with Overcharged and Oversized.) This weapon slot can be filled with anything. Commanders looking to experiment with a new weapon can slot it in here to give it a spin. A Plasma Accelerator would do best. It isn’t easy to hit with, but it can end a battle outright. A Seeker Missile Rack or Fragment Cannon would both do well here too, but it doesn't matter all that much. This gun should be firing along with the Multicannons, and they don't need much help. Put something here to optimize for fun.
- 2D Gimballed Beam Laser with Long Range and Thermal Vent. Alongside the Class 4 laser, this Beam Laser can vent heat and snipe opponents with impressive accuracy. It also goes well shooting alongside the Multicannons to squeeze out a bit more DPS when it can while the distributor isn’t so busy.
- 2F Gimballed Multicannon with Overcharged and Corrosive. This multicannon mostly functions just to apply the Corrosive status effect on the opponent. It adds a bit of DPS, but the Class 4 definitely does most of the heavy lifting.
- 1D Rail Gun with Long Range and Feedback Cascade. Feedback Cascade severely damages Shield Cell Banks if the hit is delivered while a bank is being deployed.
- 1D Rail Gun with Long Range and Super Penetrator. Super Penetrator makes sniping modules a breeze. With its impressive accuracy and incredible Armor Penetration, the Rail Gun is the perfect weapon to deliver this effect.
Fire Groups
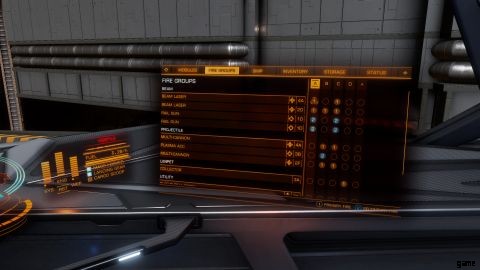
Building good Fire Groups is one of many important skills for new players. For this build, in light of the hardpoint placement on the Corvette, it’s best to split the ship into two halves. Then, we make Fire Groups that take advantage of that placement. The huge and medium hardpoints on either side can be grouped together to create a devastating combination. To achieve this, the Beam Lasers and Multicannons need to be placed on the same side of the ship.
For this build, the Fire Groups should be set up as follows:
Fire Group A
- 4A and 2D Beam Lasers
- Both 1D Rail Guns
Fire Group B
- 4A and 2F Multicannons
- 2D Beam Laser
- 3B Plasma Accelerator
Fire Group C
- 4A and 2D Beam Lasers
- 4A and 2F Multicannons
- Both 1D Rail Guns
Fire Group D
- 3A Collector Limpet Controller
- Discovery Scanner
When breaking down an enemy’s shield, use Fire Group A. Keep the target to the side of the ship with the Beam Lasers to give the lasers the best possible chance to hit. When it’s time to break down an opponent’s hull, switch to Fire Group B and keep the enemy on the Multicannons’ side of the reticle to ensure they have a good chance to hit. All the while, line up shots with the Rail Guns and Plasma Accelerator whenever possible, especially when the enemy launches chaff that confuses the gimballed weapons. If an enemy tries to jump away, switch to Fire Group C to throw everything at them at once. Fire Group C is a lot of fun and can create some really cinematic moments for screenshots.
コアの内部
The following Core Internals give this build the power, maneuverability, and endurance it needs to dominate Conflict Zones and high-threat pirates:
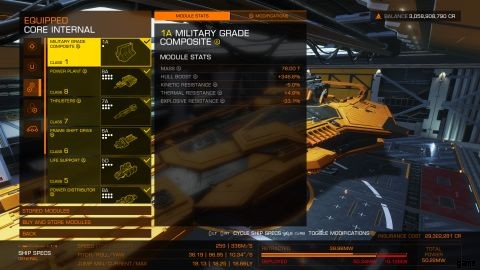
- Military Grade Composites with Heavy Duty and Reflective Plating. Ideally, nothing should break through the shields in this build. However, some NPC’s, especially those using top-tier medium ships, have weapons that use Phasing Sequence. This penetrates the shield and hits the hull directly. Most of the weapons that have this effect deal thermal damage, so Reflective Plating is the best way to mitigate it.
- 8A Power Plant with Overcharged and Thermal Spread. Overcharging is necessary to get all the power needed for this build and Monstered could make it so no power priorities are needed. However, Thermal Spread is best considering that this build doesn’t use any heatsinks and instead relies on its lasers to vent heat.
- 7A Thrusters with Drag Drives and Dirty Drive. These enhancements improve the already impressive turning radius of the Corvette. With all pips in ENG, it turns 109 degrees per second at a 45-degree angle.
- 6A Frame Shift Drive with Increased Range and Mass Manager. This FSD squeezes out the highest possible Jump Range for a ship of this size, which isn’t much.
- 5D Life support with Lightweight. Lightweight helps reduce the mass of the ship for improved speed and maneuverability.
- 8A Power Distributor with Weapon Focused and Super Conduits. Opting for Long Range on the Beam Lasers rather than Efficient means a lot is being demanded of the distributor. With the Weapon Focused enhancement though, it isn’t necessary to keep four pips in WEP at all times. Keep some in SYS to bolster the shields.
- 5C Fuel Tank. Reducing the size of the Fuel Tank does save some weight, but not much. Keeping the 5C is a stronger choice.
ユーティリティ マウント
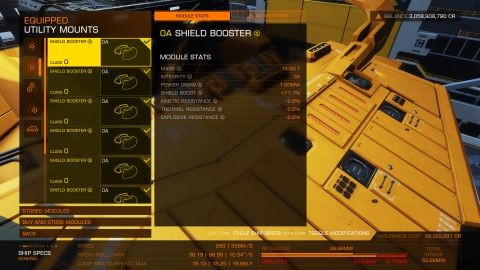
The Utility Mounts for this build are pretty straight-forward:eight A-rated Shield Boosters. It takes a laboriously long time to get to a point in the game where you can fully engineer this many A-rated Shield Boosters. However, once there, it's possible to create nigh impenetrable shields. There’s a delicate balance of engineering upgrades that will achieve the best results. Here's the right mix for this build:
- 3x 0A Shield Boosters with Heavy Duty and Super Capacitors.
- 2x 0A Shield Boosters with Resistance Augmented and Thermo Block.
- 3x 0A Shield Boosters with Thermal Resistant and Thermo Block.
This specific balance, all fully-engineered and supported by the Shield Reinforcements in the Optional Internals, provides an indomitable 4,139mj of shields with all resistances over 50%. For a Bi-Weave shield that recharges 5mj per second, that’s an incredibly powerful shield.
オプションの内部
The following Optional Internals provide the best range of defense and utility for this build. Many of them require making quite a bit of money and some require unlocking.
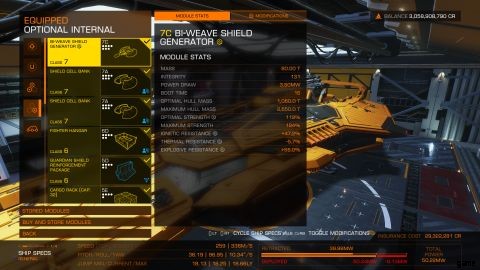
- 7C Bi-Weave Shield Generator with Reinforced and Fast Charge. The Bi-Weave sets itself apart from other Shield Generators by having an incredibly fast recharge rate. This gives it a chance at recharging between fights. Coupled with the abundance of Shield Boosters and Reinforcements, this shield pumps out a generous 4,139mj of shield and recharges 5 times faster than its Prismatic counterpart.
- 2x 7A Shield Cell Banks with Specialised and Boss Cells. In order for the ship to have enough power, only one of these can be turned on at a time. They’re great for recharging the shield during a fight.
- 6D Fighter Hangar. This Fighter Bay has room for two fighters. The most effective Ship-launched Fighters to bring are:The Lance (XG9), the Condor (Aegis F), or any Rogue F human ship. Regardless, a well-trained NPC crew pilot is a must.
- 5E Cargo Rack. This Cargo Rack is for holding Collector Limpets.
- 4x 5D Guardian Shield Reinforcement Packages. These Shield Reinforcements do take up quite a lot of power, but they work in conjunction with the Boosters to raise the Shield levels to such a high degree.
- 4D Guardian Module Reinforcement Package. Modules can be overheated or occasionally exposed to certain weapons. Commanders looking to hang in a tough fight for as long as it takes can rest easy if they have at least one Module Reinforcement Package.
- 4D Hull Reinforcement Package with Heavy Duty and Reflective Plating. This helps improve the Thermal Resistance against penetrating weapons and overall strength of the hull in the unlikely event the shields are brought down.
- 3A Collector Limpet Controller with Lightweight. Gathering loot after a fight, especially in a Conflict Zone, is a hassle. Using Collector Limpets saves much needed time and focus.
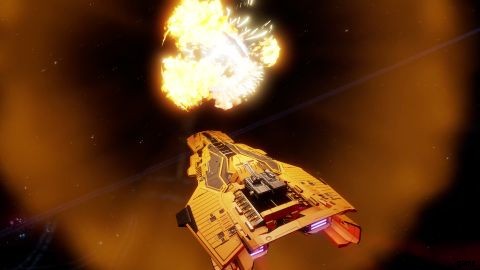
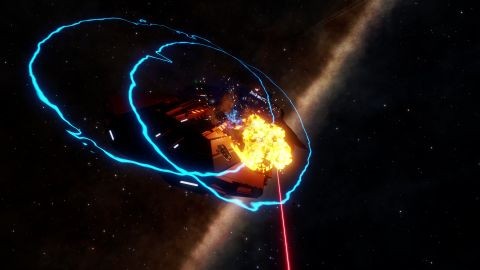
The Railguard has been tested again and again to ensure optimum PvE combat effectiveness. It isn't for traveling around to see the most beautiful sites in the galaxy. The Railguard is tuned for all-out combat. It's optimized for cruising through many short engagements against the toughest NPCs in Elite . It's excellent at crushing defenses, canceling Shield Cell Banks, and ripping apart hulls with impunity. This build enhances the features that make the Corvette fun to fly while maintaining its combat superiority in any PvE engagement. It has a wildcard hardpoint for trying out new weapons, Collector Limpets for maximum looting efficiency, and it's surprisingly maneuverable. With this combat ship in a commander's armada, they'll never need to outfit another.
Elite Dangerous:Odyssey は PC で利用できます。