Dead by Daylight:10 のベスト キラー ビルド (2022)
Dead by Daylight のキラー すべてがユニークな裏話と能力を持っており、その名簿は混乱したサイコから非人間的なモンスターまでさまざまです。すべてがそれぞれの方法で恐ろしいものであり、すべてがゲーム内で驚くべき不利な立場にあります.生存者よりも信じられないほどの強さと能力を持っているにもかかわらず、多くの場合、殺人者は試合に勝つために戦っています.生存者の良いグループは、まともな殺人者でさえ新しいプレーヤーのように見せることができます.
そのため、キラーはゲームで得られるアドバンテージを必要とします。現在、90 を超える使用可能なキラー パークがあり、これらをいくつかの異なるビルドに組み合わせることができます。キラーはすべて非常にユニークであるため、すべてのビルドが 1 つのキラーに対して他のキラーと同じように効果的であるとは限りません。さまざまな特典を調べて、プレイヤーが最も好むキラーを中心に構築することをお勧めしますが、一般化されたビルドの中には、ほとんどのキラーに対して非常に効果的なものもあります。
2022 年 11 月 11 日更新 :Dead by Daylight の恐怖感は主に、特に発電機をオンにしようとしているときに、殺人者がプレイヤーに向かってくるという期待から来ています。 Dead by Daylight で最高のキラーになるために、このガイドでは最高のキラー ビルドについて説明します .実際、Dead by Daylight の 2022 年のメタに合わせてこの投稿を更新しました。 、できるだけ新鮮で最新の状態にします。
一般的なメタ ビルド
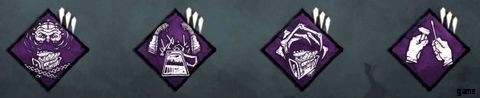
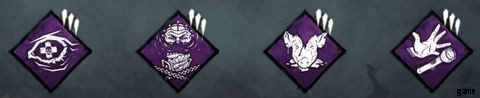
一部の特典は、すべてのキラーに対して単純にうまく機能します。これらの特典は、勝利の組み合わせを探しているキラーにとって常に安全なオプションです.これらは、スローダウン、情報、およびマップ コントロールを 1 つの堅実なパッケージに組み合わせています。現在、キラーの一般的なメタ特典は次のとおりです:
- デッドロック (セノバイト) - 発電機が修理された後、最も進行度の高い発電機が 30 秒間ブロックされます。
- ノー ウェイ アウト (トリックスター) - トライアルの最後に、サバイバーが出口ゲートと対話すると、ユーザーはノイズ通知を受け取り、出口ゲートは 12 秒間ブロックされます。さらに、フックされたサバイバーごとにさらに 12 秒間ブロックされます
- 腐敗介入 (ペスト) - トライアルの開始時に、キラーの開始位置から最も遠い 3 つの発電機が 120 秒間、または最初の生存者がダウンするまでブロックされます。
- Tinkerer (ヒルビリー) - 発電機の進行状況が 70% に達すると、ユーザーはノイズ通知を受け取り、16 秒間、検出不可のステータス効果が付与されます。
これらの特典により、プレイヤーはキックを止めることなく発電機の進行をブロックし、サバイバーが離れるのを防ぎ、試合の開始時に発電機をブロックし、発電機がほぼ完成したことを通知することができます。このビルドは、キラーに善良なサバイバーと戦う機会を与え、特典はほとんどに適しています
テロ半径ビルド
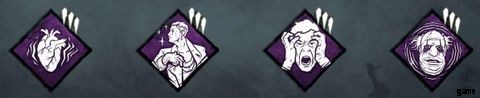
Dead by Daylight の各キラー 恐怖半径を持っています。これは、生存者が自分のハートビートと選択したキラーの音楽を聞くことができるキラーの周りの円です.殺人者が近づくにつれて、心臓の鼓動が速くなり、音楽はより激しくなり、音量も大きくなります.したがって、特典で恐怖範囲を最大化することはニッチなビルドであり、マスターマインドのようなすでに大きな恐怖範囲を持つキラーにうまく機能します.
- 苦痛 (一般特典) - キラーの恐怖半径を 26% 増加させます。
- Starstruck (トリックスター) - サバイバーを運んでいる間、Terror Radius 内の他の人は 30 秒間さらされます。
- 不気味な存在 (トラッパー) - Terror Radius 内の生存者は、スキル チェックをトリガーする可能性が 10% 高く、60% 小さくなります。
- 電信恐怖症 (ピエロ) - Terror Radius 内の生存者の回復が 50% 遅くなり、スキル チェック速度が 50% 速くなります。
情報ビルド
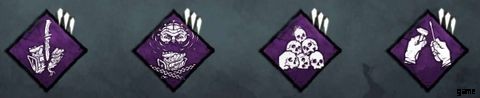
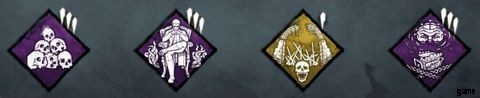
生存者の所在に関する情報は、Dead by Daylight 内の殺人者にとって重要です。 .生存者を見つける場所を知ることは、殺人者として勝つための戦いの半分です。サバイバーは、怪我をしていても、隠れて自分の位置を隠そうとすることがよくあります。生存者を迅速かつ一貫して見つけようとするプレイヤーは、優れた情報特典を集めてみてください。このビルドにより、プレイヤーはジェネレーターで作業しているサバイバーをすばやく見つけることができます。
- 不協和音 (レギオン) - 2 人以上の生存者が作業している 128 メートル以内の発電機は、黄色で強調表示されます。
- デッドロック (セノバイト) - 発電機が修理された後、最も進行度の高い発電機が 30 秒間ブロックされます。
- 誰も死を逃れることはありません (General Perk) - 最後の発電機が完成した後、すべての生存者は露出状態異常に苦しみ、ヘックス トーテムが浄化されるまで、ユーザーは 4% のヘイスト効果を獲得します。
- Tinkerer (ヒルビリー) - 発電機の進行状況が 70% に達すると、ユーザーはノイズ通知を受け取り、16 秒間、検出不可のステータス効果が付与されます。
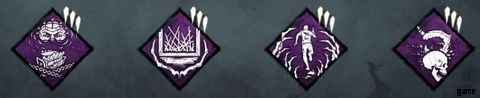
ジェネレーター コントロール ビルド
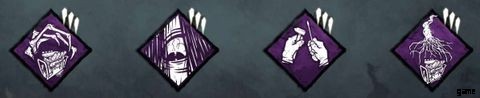
Completing generators is the main goal for the survivors in a match. As such, the killer will want to do everything they can to prevent this goal from being achieved. This can be done in a multitude of ways, including directly damaging the generators. Players using this build will be able to quickly identify generators that are almost complete and generators that are being worked on by two or more survivors.
- Corrupt Intervention (The Plague) - At the start of the trial, the 3 generators furthest from the killer's starting location are blocked for 120 seconds or until the first survivor is downed.
- Call of Brine (The Onryo) - After kicking a generator, over the next 60 seconds, it will regress at 200% normal speed, and each time a Survivor completes a skill check on it, users will receive a noise notification.
- Tinkerer (The Hillbilly) - When a generator reaches 70% progress, users receive a noise notification and are granted the Undetectable status effect for 16 seconds.
- Eruption (The Nemesis) - After kicking a generator, its aura will be highlighted in yellow. Upon downing a survivor, all highlighted generators will lose 10% progress, and any survivors working on them will be subject to the Incapacitated status ailment for 30 seconds.
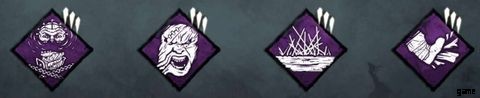
The Anti-Healing Build
If damaging generators is considered to slow down the survivor's game, then healing could be considered the survivors slowing down the killer's game. Numerous perks make healing faster and more effective, and the Hour of the Witch update buffed healing even more with the inclusion of Boon Totem perks. Killers tired of survivors instantly healing should consider using the following build:
- A Nurse's Calling (The Nurse) - Survivors who heal within a 28-meter range will have their auras revealed.
- Deadlock (The Cenobite) - After a generator is repaired, the generator with the most progress is blocked for 30 seconds.
- Sloppy Butcher (General Killer Perk) - Basic attacks cause the Mangled and Hemorrhage status ailments, slowing down healing by 25% and regressing healing progress when left unfinished.
- Franklin's Demise (The Cannibal) - Basic attacks cause survivors to drop their items where their charges will regress over the next 90 seconds.
This build allows the killer to see survivors when they heal and slows down healing progress in general. It also causes survivors to drop their held items when taking damage from basic attacks. The items will lose their charges if not picked up in time, thus ending the healing benefits of items like medkits.
The Early Game Build

Killers can sometimes capitalize on good early-game control and snowball. Quick hooks can lead to more hooks and more survivors being injured. Most importantly, early game snowballing often causes survivors to focus on saving and healing rather than doing generators or cleansing totems.
The early build is risky because it suffers as the game goes on, but putting pressure on survivors early on never hurts. This build aids the killer in hopefully being able to snowball their pressure into a fast win.
- Lethal Pursuer (The Nemesis) - At the start of the trial, all survivor's auras are revealed for 9 seconds. This perk also increases the duration of other aura-reading abilities by an extra 2 seconds.
- Corrupt Intervention (The Plague) - At the start of the trial, the 3 generators furthest from the killer's starting location are blocked for 120 seconds or until the first survivor is downed.
- Deadlock (The Cenobite) - After a generator is repaired, the generator with the most progress is blocked for 30 seconds.
- Save The Best For Last (The Shape) - For every basic attack dealt to survivors who aren't the Obsession, gain a 5% decreased attack cooldown, up to a maximum of 40%.
The Late Game Build
Like the early game build, this build focuses solely on control of a certain section of the game. This build is even riskier than the early game build, as it assumes that the survivors have finished all the generators and are trying to open exit gates to win the game for themselves. Playing with this build is risky, but nothing feels more rewarding than swiping victory right from underneath the team of survivors.
- No One Escapes Death (General Perk) - After the final generator is completed, all survivors suffer from the Exposed status ailment, and users gain a 4% Haste effect until the Hex Totem is cleansed.
- Terminus (The Mastermind) - Once the final generator is complete, all injured survivors receive the Broken status ailment until the exit gates have been open for 30 seconds.
- Blood Warden (The Nightmare) - Once per match, hooking a survivor while the exit gates are open will block the exit for 60 seconds.
- Deadlock (The Cenobite) - After a generator is repaired, the generator with the most progress is blocked for 30 seconds.
While this build can feel satisfying to use and win with, it is also seen as a bit of a toxic build by some survivors. Expect some disgruntled survivors in the endgame lobby after winning with this build.
The Anti-Loop Build
The largest advantages survivors have are their numbers and their mobility. Killers can often find themselves in endless chases with survivors who know what they're doing. This can frustrate the killer and lead to the game ending quickly, with all the generators getting completed in one or two chases. Killers have to learn the loops just as much as survivors do, but some perks help the killer resist the looping of survivors.
- Deadlock (The Cenobite) - After a generator is repaired, the generator with the most progress is blocked for 30 seconds.
- Bamboozle (The Clown) - Vault speed is increased by 15%, and performing a vault will block the window for 16 seconds.
- Hex:Blood Favor (The Blight) - Injuring a survivor blocks all pallets from being pulled down within a 32-meter radius for 15 seconds.
- Coup de Grace (The Twins) - For each generator completed, this perk gains a token. Use one token to increase the lunge distance by 80%.
This build allows killers to block windows and pallets and extend lunging attack ranges. These can all be critical in ending loops early and hooking the survivor instead of chasing them.
The Destruction Build
Many maps in the game are filled with very safe pallets for survivors to drop. Some pallets can even be pre-dropped because the killer will be forced to break them, as there is no path to simply walk around it.
Killers tired of being slowed down by constantly having to break things should look no further than this destruction build. This build will help killers stick to chasing survivors down rather than breaking pallets and generators.
- Deadlock (The Cenobite) - After a generator is repaired, the generator with the most progress is blocked for 30 seconds.
- Enduring (The Hillbilly) - Pallet stun duration is reduced by 50%.
- Spirit Fury (The Spirit) - After breaking 2 pallets, the next pallet stun will instantly break it.
- Brutal Strength (The Trapper) - Performing break actions is 20% faster.
The Hex Build

Hex builds allow killers to transform the dull totems placed throughout the maps into powerful Hexed Totems. These totems offer some of the best killer perks in the entire game, but at the risk of them being cleansed by survivors. Hex builds are the ultimate gamble, as they offer the best perks, but the killer has to hope that the totems get placed in good areas and aren't cleansed by survivors.
- Hex:Pentimento (The Artist) - Cleansed Totems can be rekindled for an additional effect, each decreasing repair, healing, recovery, and exit gate opening speeds by 30%.
- Hex:Undying (The Blight) - Once per trial, when a Hex Totem is cleansed, the effect of that Hex is transferred to another Totem. Furthermore, survivors standing within 4 meters of a Dull Totem have their auras revealed.
- Hex:Devour Hope (The Hag) - When a survivor is unhooked from at least 24 meters away, this perk gains a token. At 2 tokens, gain a 5% Haste effect for 10 seconds after hooking a survivor. At 3 tokens, all survivors suffer from the Exposed status effect. At 5 tokens, any survivor, regardless of hook state, can be killed.
- Hex:Thrill of the Hunt (General Perk) - For each Dull and Hex Totem remaining on the map, survivors' cleansing and blessing speed is reduced by 10%.
Dead by Daylight is available on Mobile, PC, PS4, PS5, Switch, Xbox One, and Xbox Series X/S.