マイ サマー カー – ゲームプレイのヒントと初心者向けのヒント
このガイドは、基本的な情報、一般的なアドバイス、およびいくつかのプロのヒントをまとめたものです。これは、新しいプレーヤーだけでなく、バンとトラックがすぐに利用できなくなった 2019 年 5 月以前にプレーしていなかった古いプレーヤーも対象としています。
役立つヒントとヒント
主な概念と機能
このガイドは、生き残り、妥当な時間内にクールな薩摩を作るのに十分なお金を稼ぐ方法についてです.これは、新規プレイヤーと、1 年ほどゲームをプレイしておらず、その間の変更に迷っているプレイヤーの両方を対象としています。
- このガイドは、次のことを理解していることを前提としています。これをまだ知らない場合は、これらのネタバレを考慮しないでください。これらのことを理解するまで、ゲームのどこにも到達する見込みはありません。
- MSC をプレイする「正しい」方法はありません。 1995年の田舎のフィンランドを楽しむために、薩摩の「キット」に触れる必要はまったくありません。 Satsuma を構築することを選択した場合は、お金がある限り、それをストリート ロッド、ラリー レーサー、ドラッグ レーサー、または任意のピンプモービルにすることができ、自由に切り替えることができます。あなたは善良で勤勉な人にも、怠け者の酔っぱらいにもなり得ます。家を持つことも、路上で暮らすこともできます。 1995 年の田舎のフィンランドが提供する範囲内で、楽しいと思うものは何でも
- セーブ スロットは 1 つです。保存ファイルを安全な場所に手動でコピーしない限り、新しいゲームを開始すると以前の保存が上書きされます。
- クイックセーブなし。トイレ/離れ家でのみ保存できますが、そのうちのいくつかはマップ全体に散らばっています.奇妙なことに、これはあなたの膀胱を排出する必要性を減らしません.しかし、もっと重要なことは、時には多くのゲームプレイを経験しなければならず、保存する機会の間の途中でリスクを受け入れる必要があることを意味します.
- 保存すると、ゲームも終了してメイン メニューに戻ります。ゲームを続行すると、ゲーム内時間が 1 ~ 2 時間進みます。さまざまな NPC やイベントは 1 日の特定の時間帯にしか利用できないため、予約を維持するのが難しい場合があります。したがって、ゲームの世界で時間を節約するために、保存せずに長期間移動する必要がある場合があります。
- Permadeath はデフォルトでオンになっています (新しいゲームを開始するときに運転免許証の下部で切り替えます)。それをつけたまま死ぬと、最初からやり直します(ただし、前のキャラクターは教会で墓石を取得します)。また、かなりの数の実績は permadeath がオンになっている場合にのみ利用できます。 permadeath なしで死ぬことは (チートなしで) 多くの場合、回復プロセスの点で、ほぼ同じくらい苦痛です。だから死なないようにしてください。どちらにしても最悪です。
- 無数の死に方があります。ゲームにどれだけ誘惑されても、無謀で酔っぱらった馬鹿にならないようにすれば、多くのことを避けることができます。注意を払っていたとしても、いくつかの場合はただの BAM! であり、あなたは死んでいます (行き止まりの丘や曲がり角で無謀で酔っ払った AI バカに正面から遭遇するなど)。その他は、適切なリスク管理により (ほとんどの場合) 回避できます。しかし、肝心なのは、死ぬことを期待し、それが起こったときに動揺しないことです.過ちから学ぶか (過ちを犯した場合)、気まぐれな運命を呪い、最善を尽くしてください。
- サバイバルの側面があります。食料品を購入 (および消費) し、請求書を支払い、家を燃やさないようにする必要があります。これにはお金が必要であり、燃料 (お金が必要) と時間が必要です。それはまた、あなたが常に死ぬ危険にさらされている危険な道にあなたを置きます.これには、まともな薩摩を建設するために必要な莫大な追加資金は含まれていません。
- プレイヤー キャラクターの恋愛に関する完全にオプションのストーリーがあります。詳細を台無しにすることなく、それに従うとゲームが終了することを理解してください。したがって、その成果が必要な場合は、それを選択してください。それ以外の場合は、現在の保存でやりたいことがすべて完了するまで延期してください。
- 1 回のプレイですべての実績を達成することはできません。多くは愚かな方法で殺される必要があり、permadeath ゲームでのみ利用できます。
- モッドや「チート」の使用を恐れないでください。 MSC はアーリー アクセス ゲームなので、バグがあります。 permadeath をプレイして結果を受け入れたとしても、自分の愚かさとは対照的に、バグがあなたを殺す (または完全にホースで止める) 場合があります。ですから、そのようなことから回復する能力を持っています。このガイドの後半で、推奨されるモッドのリストを見つけることができます。そのうちの最初のいくつかは、そのような場合に特に存在します。
そうは言っても、開始方法に関する推奨事項を続けてください。
重要な健康と安全のヒント、およびその他の役立つヒント
ここでは、新しいプレイヤーと戻ってきた古いプレイヤーが、生き続けるため、および/または死の結果を回避するために知っておく必要があるいくつかのことを示します.
Alt-F4 で死をごまかす
パーマデスをオンにしているかどうかにかかわらず、死ぬのは最悪です。幸いなことに、ALT-F4 で死をごまかすことができます。画面が血で覆われ、叫び始めるので、いつ死ぬかがわかります。これは数秒間続きます。この間に ALT-F4 を押すと、ゲームを終了し、最後のセーブからリロードできます。しかし、ここでは素早くドローする必要があります。 「節約中」という言葉やあなたの死を知らせる新聞が画面に表示されたら、手遅れであり、その結果に苦しむ必要があります。
ゲーム内の昼光を無駄にしないように頻繁に保存しないようにする強い動機を考えると、ALT-F4 を使用すると、1 日の作業の大部分が失われることがよくあります。しかし、最初からやり直したり、墓地から家に帰って散らばった持ち物をすべて集めたりするよりはましです。
Ai ラリーカー
現在、土曜日と日曜日の両方で 1000 から 1800 までのレースを実行する 9 台の AI ラリーカーがあります。これらの人は、ペナのように悪いだけです。彼らはもっと多く、彼らははるかに速く走り、ためらうことなくあなたをひっくり返します.レース中は、トラクターやトラック以外で未舗装の道路を運転しないでください。運転する前によく考えてください。そのため、週末のほとんどの場合、家を出る唯一の安全な方法はボートです。
そのため、仕事をするのは主に週末です。ただし、この時間を MSC のナイトライフ (パブ、ダンス パビリオン、ベンティ) の社交的な側面に参加したり、島のサウナでストレスを解消したり、薩摩での作業に使用したりできます。
注:また、レース時間中はテレビ (デフォルトの開始チャンネル) でラリーが生中継されるため、AI ドライバーがクラッシュするのを見ることができます。
ヘルメット
あなたは今、オートバイのヘルメットを持っています。ゲームの横の机から始まります。焦点を合わせて F を押して装着します。まっすぐ下を見て F を押して取り外します。
ヘルメットについて知っておくべき基本事項がいくつかあります。
- 警察の検問所でヘルメットなしで Jonnez を操作すると、罰金が科せられます。
- ラリー レースに参加するときは、ヘルメットをかぶっていなければなりません。
- ヘルメットをかぶっている間は、飲食や喫煙はできません。
- ヘルメットは再塗装できます。
- あらゆる乗り物を破壊しても生き残りやすくなります。
しかし、ヘルメットの最も重要な点は、新しい死に方である蜂から目を保護することです。基本的に、顔を保護せずに高速で車を運転すると、ハチに襲われて突然死ぬ可能性があります.これはヨネスに限らず、フロントガラスのない乗り物全般に言えることですが、ボートでは問題なく、気になるほど高速で岐阜に乗るのは難しいです。
テイモストアの在庫限り
テイモのストアは、ゲームをロードするたびにではなく、週に 1 回のみ補充されるようになりました。 IOW、月曜日にソーセージをすべて購入しても、火曜日には店にソーセージがありません.
補充は木曜日の朝 0001 に行われます。ただし、その時にプレイヤーが店の近くにいる場合、補充は行われません。また、プレイヤーが水曜日の夜 2200 時以降にストアのプライベートで保存した場合、時間の進行によりプレーヤーが真夜中にストアに戻るため、ストアは補充されません。したがって、最善の策は、水曜日の夜に町に行かないことです.
家を焼き払うな
誤って家を全焼させる方法はたくさんあります。明らかなこと(家の近くで火をつけたり花火をしたりすること)に加えて、家の中の電化製品を使用することも火事を引き起こす可能性があります.したがって、安全のために次のことを行ってください:
- ポータブル グリルを移動し、家から十分離れた正面の生け垣にバレルを焼きます。コンロや室内コーヒーメーカーではなく、グリルで調理してください。
- テレビを長時間つけっぱなしにしないでください。
- 電気サウナは使用しないでください。サウナを利用する場合は、島のコテージにある薪ストーブを使用してください。
無料のもの
いいえ、車両またはその部品ではありません。それらがどこにあるかについては、wikiを参照してください。プレイヤーのサバイバルに関連するステータスの変化について話しているのですが、これはさらに重要です。
- 無料ドリンク: 古い台所の流しに加えて、マップのあちこちに新しい手押し式の井戸が散らばっています:ジョッケの家、お化け屋敷、ベンティの家、おばあちゃんの家、ストロベリー コンプレックスの北端。
- 無料の食事: 魚を釣って、料理して、食べる。また、ヘラジカを殺し(岐阜で狩るのが最善です)、肉を調理します。すぐか腐る。ポータブル グリルを持っていきましょう。
- 無料の疲労増加: 夜中、テレビをつける。すべてのステーションがオフエアで、テスト パターンが表示されています。これを見つめると、疲労が急速に増加します。 0200にジョッケから電話があり、また寝たい時にとても便利です。約 1/2 の疲労バーがあれば、06:00 ~ 07:00 頃まで眠ることができます。
- 無料疲労減少: おばあちゃんのコーヒーを飲み放題。おばあちゃんの家で天気の良い日に食料品を配達するときだけ利用できます。ああ、地図のどこかで雨が降っているかもしれませんが、彼女が住んでいる場所では太陽が出ているに違いありません。
- 無料のストレス解消: 島でたむろし、シャワーを浴び、薪を割り、おばあちゃんのコーヒーを飲みましょう。
代替交通手段
舗装された道を歩く場合は、バスに乗ることができます。バス停に座っているだけで、やがてバスが来ます。チケットを支払い、行きたい場所に最も近い停留所で降ります。ウォーキングに勝る。
未舗装の道路では、ヒッチハイクして、酔っ払った殺人のいとこである小さな緑色の車を運転しているペーナから車に乗ることができます。これは無料です。必ずシートベルトを着用してください。彼をひっくり返すことでも実績を得ることができますが、そうすると死ぬ準備ができています.
では、パーマデス以外のゲームで死亡し、墓地にいることに気付いたとしましょう。町営バス乗り場へ。未舗装の交差点のすぐ南にある、地図の SE コーナーにある停留所までバスに乗ります。ダートの交差点まで歩きます。家まで送ってくれるペナとヒッチハイク。できれば、飢えたり、喉の渇きで死んだり、ストレスを感じたりする前に。
その他の情報
このガイドでは、重要な概念の要点だけを取り上げ、詳細には触れません。より詳細な情報が必要な場合は、多くの wiki (公式、準公式、および reddit) と YouTube をチェックしてください。 2019 年後半より前のアドバイスはおそらく時代遅れであるため、日付を確認してください。
薩摩を建造する時期とその利点
薩摩を建造する時期
ここで考慮すべき 3 つの主な事項があります。
- Satsuma を 1 回目または 3 回目で構築する場合は、チュートリアルとガレージの旗に関する便利なガイドを備えていても、多くのプレイ時間と精神的な努力が必要です。この投資を失うことが、permadeath をオフにする主な理由です。しかし、車を作れば作るほど覚えやすくなり、作業が速くなるため、この初期投資は学習曲線とともに大幅に減少し、permadeath の怖さが軽減されます。
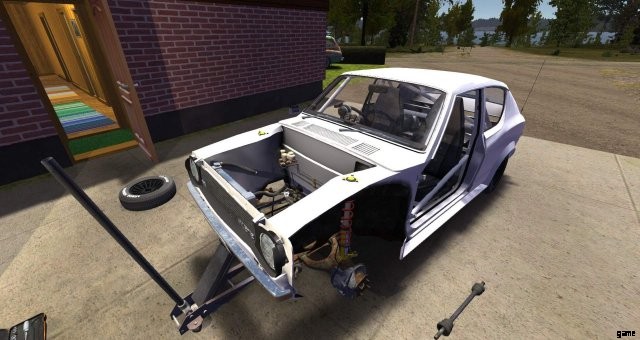
- Satsuma の多くの主要部品 (主にエンジン、一部はトランスミッション) は、使用と酷使によって摩耗し、最初から始めなければならない部品は、すでに寿命が尽きかけています。それらを使用して車を組み立てると、すぐに壊れてしまい、再構築するには再び分解する必要があります。 OTOH さん、Fleetari の新品のウェアラブル パーツで車を組み立てることができますが、フル セットの費用は約 7084mk です。
- Satsuma を初めて構築することは、ゲームの主要なフックであり、新規プレイヤーの個人的な大きな目標ですが、実際には終わりではなく、本当の始まりにすぎません。ゲームの真髄は、実行した後に何をするかです。
したがって、私の推奨事項は次のとおりです。
最初の「プレイスルー」
ここでの目標は、Satsuma の構築に関する学習曲線を下っていくだけでなく、食料品店の買い物や雑用中にフィンランドの道路を生き残るための多くの教訓を学ぶことです。ゲームで大きな進歩を遂げようとしているわけではありません。ただ、ゲームのプレイ方法を学んでいるだけです。したがって、permadeath をオフにして、安っぽい初期部品で車を組み立てることで、時間への投資を保護してください。登録することもできます(途中で故障しないと仮定して)。つまらない車を手に入れたので、やめて最初からやり直してください。ゲームの世界で、もっとうまくできたはずの多くのことに気付くでしょう.
その後のプレイスルー
薩摩建設、一般的なゲーム メカニクス、マップに慣れ、重要な NPC との出会いなどを理解したら、まるでフィンランド生まれの真のフィンランドの田舎者であるかのように、ゲームを適切にプレイできるようになります。ゲームの世界で、レンチを回し、非常に悪路で愚かな速さで運転することは、ほぼ 20 年間続きました。 permadeath をオンに戻して、すべてのウェアラブル パーツを交換するのに十分な資金が得られるまで (そして、車検に合格しないアフター マーケット パーツを入手するまで)、Satsuma の構築を開始しないようにすることができます。この時点で、早すぎる死によって薩摩建設の進行状況が失われても、それほど気にすることはなくなり、非永久的な死から回復するよりも苦痛ではないと考えるようになります。
薩摩の目的
プレイヤーが MSC で運転できるすべての車両には特定の目的があり、他のジョブではそれほど優れていません。 The Satsuma is unique in that you can configure it to serve 1 of 3 distinct purposes and, with enough money, can change it back and forth between these versions. These versions are:
- Street Rod: Essentially the default as you must initially build a street-legal vehicle to pass inspection. Cannot enter the rally. A pimped version of this is the only way to catch the girl of your dreams (which ends the game). In the meantime, you have a light utility vehicle that’s more fun but less-capable than either the van or the Ruscko, but you can sleep in the back seat so don’t have to get home before you die of exhaustion.
- Rallycar: Start with a street-legal, registered Satsuma then apply a bunch of expensive aftermarket parts to make it rally-legal, and a few more to make it faster, then go court death and bankruptcy competing in the weekend rally races. Otherwise, as a utility vehicle, you gain cargo space but lose the built-in bed, and the girl is not impressed.
- Dragster: Specialized to accelerate as quickly as possible in a straight line on pavement so not much good for anything else, like driving anywhere in Finland other than on a runway. However, it has the most cargo space due to being stripped down as much as possible to minimize weight. You CAN drag race in the other versions but won’t do as well as a specialized dragster.
Note, however, that the Satsuma is also unique in that everything on it can be damaged from wrecks or hard use, and wearable parts continually die slowly from just regular use. Thus, using the Satsuma for a utility vehicle saps its lifeforce, leading to increased maintenance costs and the time sunk in repairing/servicing its problems. It’s thus best to limit use of the Satsuma to pursuing one of the above goals unless money and doing repairs don’t bother you.
Useful Flags
Below are a couple of flags. One for building the car, one a wiring diagram. The car-building one I have modified heavily from an obsolete version. The wiring diagram is my own creation.
Other Vehicles and Their Uses
Besides the Satsuma, the player either begins with or can acquire a number of vehicles, each of which is useful in 1 or more ways in accomplishing the main goals of staying alive, making money, and getting the Satsuma into shape to accomplish one of the main game goals. These are:
- Jonnez ES “moped” (actually a minibike as it as no pedals): Available from the start. Cheapest vehicle to operate as it can circumnavigate the whole map on about 1/8 of a tank Runs on 2-cycle fuel. Unique in that you can pick it up and stow it inside larger vehicles, so you can use it to get home after staging the other vehicle away from home, then getting back to it when needed. Reasonably fast but can’t carry passengers and, unless you have the “Carry More” mod, you can only bring 1 item with you on a trip. Thus, without this mod, it’s pretty useless except to get home after staging a vehicle elsewhere, to get to the never-to-be-sufficiently-damned strawberry field, or to deliver adverts for Teimo or Fleetari. With the “Carry More” mod, however, it’s quite useful as a grocery-getter, bringing supplies to Grandma, picking up Satsuma parts from around the map, and making low-volume kilju runs (either delivering to Jokke or picking up the empty bottles at the landfill).
- Boat: Available from the start. Runs on 2-cycle fuel. Only way to get to the island where the kilju bucket, fish trap, camera, coffee pot, camera, wood-fired sauna, and fireworks are. Also allows direct trips from home to the dance pavilion and ventti house. Not much good for anything else at present You can, for example, toss the Jonnez in the boat and sail to the town, then use the Jonnez to move purchases from the store to the boat but this often doesn’t end well due to the Jonnez being a bit glitchy when put in other vehicles.
- Kekmet Tractor: Available from start. Burns diesel or fuel oil, reasonable fuel efficiency for a heavy vehicle. Only vehicle that can pull the firewood trailer, which can also be used for carrying wrecked vehicles (including the Satsuma), lots of groceries/kilju bottles, or large car parts. Has front forks that can upright overturned vehicles or put them in the trailer. Can tow junk cars to Fleetari for money but is slower at this than the Gifu truck. Essentially indestructible unless overturned.
- Hayasiko Van: Initially owned by your uncle and only available occasionally for short-term loan after playing the game a while. Eventually, however, you get it for keeps (see the Uncle section). Burns diesel or fuel oil but as you’ll frequently be on the policed roads, you should only run diesel. Good fuel efficiency–can circumnavigate the map on 1/8 of a tank. Can carry the most stuff and also 1 passenger but limited to 80kmph on the blacktop or you’ll get a speeding ticket. Can easily carry the Satsuma rear seat or the sketchy sofa found at the landfill so you can have a bed wherever you roam. Also good for high-volume kilju runs. Nice to have but, if you’ve got the “Carry More” mod, you won’t really miss it if you were used to having it from the start in earlier versions of the game.
- Gifu Sewage Truck: Initially owned by your Uncle and only available after he loses his license (see the Uncle section). Burns diesel or fuel oil but diesel recommended or your uncle will have to sell it, depriving you of it. High operating cost due to large fuel tank and burning nearly 1/2 of it circumnavigating the map. Indestructible (except for the windshield) unless overturned so fear no wrecks, which can be useful for meeting your girlfriend. Only vehicle that can suck septic tanks, which is a highly profitable job. Can also tow junk cars to Fleetari faster than the Kekmet. Has built-in sleeper cab and 1 passenger seat but otherwise not much cargo capacity–the Jonnez will fit inside but complains the whole trip.
- Ruscko: Can be acquired by theft or by gambling. Must be de-wasped prior to use. Burns gasoline. Has passenger seat. Not quite as much cargo space and rather worse performance than the van but you can sleep in the back without furniture. If you can’t get the van early enough to suit your needs, consider stealing this. Otherwise, not very useful, more a prestige item. And it looks like crap unless you use mods to pimp it.
- Other Vehicles: You can briefly come into control of various NPC-driven vehicles if you dispose of their drivers. However, these vehicles never pass into your permanent ownership and respawn with their resurrected NPC drivers when you save/quit/reload.
Your Uncle and Getting His Vehicles (minor spoilers)
The big change introduced in the late-2019 updates is that the van and sewage truck are no longer available from the start. This forces you to make due for some time with the Jonnez and tractor (and, optionally, steal the Ruscko). However, this is really not that big a deal–you’ll find you really don’t need the vehicles that much in the early going and you’ll get your hands on them soon enough anyway.
Borrowing the Van (minor spoilers throughout)
You can only get your uncle’s vehicles (van and truck) by talking to your uncle. He lives in the house between yours and the woodshed so you’ll be walking by his house frequently to chop firewood. However, when you start a new game and for an indefinite time thereafter, he’s not home, but he’s left you a present on the table behind his house.
Note:Your in-game actions affect how fast uncle-related events happen. See timing section below for details on that.
You can tell when your uncle finally comes home because the blue van will be parked behind his house (you can see this from your back porch so keep an eye out if you’re not chopping wood right then). He will also only be home that briefly and will then be gone again for some time, so if you need to use the van, ACT NOW. Knock on his back door repeatedly until he answers. He will give you the van keys and you can now run that major errand you’ve been needing the van for. Be sure to bring the van back to uncle’s house. Also, it will need fuel.
Once you have the van keys, you can simply borrow it again next time it’s there without knocking on the door. You will likely go through this sporadic, temporary borrowing process 2 or 3 times before you get the van for keeps.
Note:Borrowing the van is like being Cinderella–you have to get it back to your uncle pretty quickly, and you can’t sleep, save, or walk too far away from it, or it will despawn and leave you stranded.
Permanent Ownership of Van and Truck (minor spoilers throughout)
Eventually on your way to or from the woodshed, you’ll find uncle sitting at the table behind his house with a partial case of beer. The van will not be present. If you sit and have a beer with him, he’ll tell you his driver’s license has been revoked so he no longer needs his vehicles. They are now yours. You already have the van keys and uncle will tell you the truck keys are on the rack in the hall of his house. Now all you have to do is find the van and truck.
Both vehicles are in the town of Peräjärvi.
- Truck location:sewage treatment plant.
- Van location:next to closed shop adjacent to vehicle inspection shop.
Go to Peräjärvi on the Jonnez. Drive the truck to Teimo’s and park it behind the fuel pumps to be ready for the septic tank job. Refuel it now if possible. Throw the Jonnez in the van, refuel the van if possible, and drive home (doing any errands along the way).おめでとう! Now you have all the main vehicles. And you no longer have to talk to your uncle again, although he’ll still be there at the table and you still get free beer by sitting with him.
The Timing of Uncle-Related Events (all spoiler)
Your uncle first appears within a random time (1.5 to 3 gameplay hours) after you install 1 of 3 things on the Satsuma:
- Driver’s seat; or
- Engine Block; or
- Both trailing arms.
If you do none of these, he seems to appear anyway, after some further random time. Subsequent appearances also seem to be variable.
Teimo’s Store and Fleetari’s Shop
It’s important to understand the key differences between the 2 vendors, Teimo and Fleetari.
Teimo
Main purpose
Sells consumables for both vehicles (fuel, other fluids, batteries, oil filters, spark plugs, belts) and the player (food and drink, charcoal, mosquito repellant, etc.). Off-the-shelf items restock weekly but he never runs out of fuel.
Mail Order Parts
On your workbench your garage is a catalog of aftermarket Satsuma parts. When you complete an order form, you get an envelope which you must place in the mailbox next to Teimo’s shop door. A few days later, Teimo will call saying your order came in. He’ll call multiple times if you don’t pick it up right away. Go inside to pay for them, then pick the parts up outside.
Note:You can place the order before you have the money to pay for the parts because you don’t pay until the parts arrive a day or 2 later.
Social Aspects
At 2000, Teimo closes his store and opens the Pub Nappo next door. There, you can get drunk with the locals.
There are slot machines in both the store and the pub. You can also buy lottery tickets in the store.
Fleetari
Main Purpose
Performs major vehicle services (new tires, body repair, gear ratio change, repainting, etc). Also sells new replacement parts.
Note:Everything at Fleetari’s is cash in advance (the opposite of ordering parts from Teimo). If the service will take some time, you pay up front.
Servicing Whole Satsuma
This is for things like new paint, installing a roll cage, changing gear ratios, repairing body work, etc. Park in front of the shop, go in, select what you want from the catalog, and pay up front. Fleetari will loan you the Ferndale to get home. He will then call when the Satsuma is ready. You’d best get there quickly, returning the Ferndale, or Bad Things may happen.
Buying New Wearable Parts
First, make sure the part you want is not installed on the Satsuma (either it never has been, you’ve removed it, or it came off in a wreck). You do not need to bring the part to Fleetari. As long as it’s not on the Satsuma, a new version will appear on the shelf. Take the part from the shelf and move it to righthand part of Fleetari’s counter. Then click the cash register to pay for it.
Doing this deletes the old part from the world and the only one left is the new one you just bought. Now you have to carry the new part to the Satsuma to install it. This is the only Fleetari transaction where you get immediate results. The new parts are yours as soon as you pay for them. No waiting.
Getting Tires and Repairing Parts
To get tires, put the rims (which might already have tires on them) on the counter, then select the type of tire from the catalog on Fleetari’s desk. Pay the price and come back to pick them up once Fleetari says they’re done.
You can do the same thing to repair wearable parts. However, this is not at all recommended because repaired parts only get about 50% health, whereas new parts are (not quite) 100%.
Where’d All My Money Go? (Aka Expenses)
You Need Income!
You start the game with 3000mk (and 10-30% more in your present). This will barely cover your basic survival needs for a week or so, let alone get the Satsuma in basic working order, much less modified and pimped. Finland is an expensive place to live.
Cost of Living
- Bills: Every week, you have to pay bills for home electricity and telephone, which add up to about 300mk/week depending on use. These bills come on different days of the week so check your mailbox every time you pass it. Failure to pay bills will result in those services being cut off.
- Bodily Needs: Plan on 1 pack of sausage/day and 1 case of beer/week. That adds up to about 350mk/week. You can reduce the beer usage somewhat by drinking free water at home or from a few wells scattered about the map, but you’ll still drink a lot of beer just to survive.
- Fuel: You have to drive a lot to do the jobs to make the money to pay your bills and feed your body, plus make weekly supply runs to the store. This means you burn a lot of fuel. Expect to spend 300-500mk/week on fuel (mostly diesel) at the beginning when you just have the boat, Jonnez, and Kekmet. This increases as you get more vehicles (especially the Gifu).
So, your basic living expenses are going to be anywhere from 1000-1500mk/week. And if you can’t meet them, you starve in a dark house. MSC hates folks who don’t work.
Cost of Satsuma
You have quite a few options here and it quickly adds up, so it’s best to take this in stages:
Street-Legal with Original, Worn-out Parts (not recommended)
This is the bare minimum just to get the car assembled and inspected. But it won’t run very well. Get tires by dropping rims off with Fleetari. Other parts and fluids from Tiemo’s store.
- New road tires:(Standard 1750mk or Gommer Gobra 2110mk).
- Alternator belt:295mk.
- Motor Oil x2:298mk.
- Brake/Clutch Fluid x3:105mk.
- Coolant x2:490mk.
- New battery:495mk <– old battery is dead, just burn it.
- New oil filter:59mk <– old oil filter is junk, just burn it.
- Spark plugs:99mk.
Total:3591mk or 3951mk depending on tires, and it will just break down immediately.
Street-Legal with New Wearable Parts:(highly recommended)
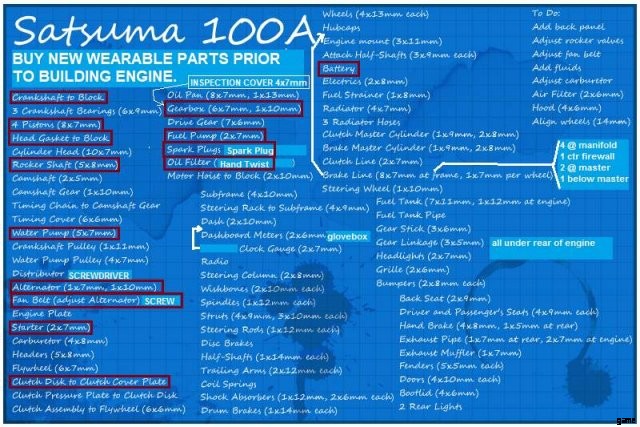
Before assembling any of the engine, go to Fleetari’s and buy every part on the shelf except the block and oil pan. The block and oil pan don’t wear out (although you can break them in wrecks or through engine abuse), so you don’t need them now. IOW, you need to buy:water pump, alternator, starter, 4x pistons, crankshaft, head gasket, rocker shaft, gearbox, fuel pump, and clutch disc.
- Sub-total for all new wearable parts:7084mk.
- Total (including parts, fluids, and tires in #1):10675mk or 11035mk depending on tires:
Street-Legal Aftermarket Parts (highly recommended)
The following parts will pass vehicle inspection and improve your experience by making your car faster, more reliable, and easier to tune. Thus, I recommend installing them in the initial build:
- Racing radiator:1215mk <– much better than stock radiator (but might prevent GT achievement).
- Fuel Mixture Gauge:549mk <– really helps tuning carburetor.
- Extra Gagues:299mk <– helps you spot engine trouble before major damage occurs.
- Twin Carburetor 1750mk <– improves speed and required for GT Restoration achievement.
- Subtotal for aftermarket parts:3813mk.
- Subtotal for new wearable parts:7084mk.
- Subtotal for basic required parts and fluids:3591mk or 3951mk.
Grand Total for Good Satsuma Build:14488mk or 14848mk
Throw in 20L of gasoline in the jerrycan just to get to the inspection shop, and the 325km inspection fee, and call it an even 15,000mk.
Going Further
So, for 15K mk you get a basic, street-legal Satsuma. Expect to spend about that much again turning into an effective racecar, and you can spend even more adding cosmetic features. And after all that, the car will still look like a rust-bucket. To fix that, you need a new paintjob, which will cost 11K-21K mk by itself.
And this is not even considering repairs to damage from wrecks and the inevitable need to replace the wearable parts. Basically, the Satsuma is a money pit. But that’s the basic trope of the game. You spend all this time and money fixing the car, the you wreck it and have to do it again, at great expense. It’s a pastime for those who enjoy doing this sort of thing.
Every Day I’m Hustlin’ Hustlin’ (aka Making Money)
So, you need 1000-1500mk/week just to survive and get around, and you need an extra 15,000mk to get a reliable, basic, street-legal, Satsuma (and a lot more for racing parts, pimping, normal wear and tear, and the inevitable crash damage repairs). Fortunately, this money isn’t that hard to come by if you’re willing to work.
Starting Income Opportunities
At the start of the game, you have the following main ways of making money. None of them are particularly profitable or pleasant by default, but the mods I recommended above really alter the balance. So I explain them with and without mods.
Firewood
This is a great job. It pays 3200mk and the trip is relatively short even in the slow tractor. Plus, chopping the wood eliminates stress so you don’t need to smoke as much. Problem is, by default it’s only available every 8 hours of playing time, which is about 1 week in the game world (1 real life hour is about 1 day in the game). Luckily, there’s the “Firewood Job Cooldown” mod, which lets you reduce the delay between jobs down to 1 real hour if desired. Understand this IS summer so firewood demand is low, but speeding this up to twice a week makes the early game suck a lot less.
Kilju
To make kilju, you need the bucket (from the lake cabin sauna room), 6 bags of sugar, 1 box of yeast, and 30L of water. To sell kilju, you must put it in empty fruit concentrate jugs and take them to Jokke. Then you retrieve the empty jugs at the landfill.繰り返す。 Each batch fills 20 jugs and requires about 2.5 real hours to make. You can make about 3200mk profit per batch and can ultimately produce 2 batches per week if you have 20 jugs. But you can only get 6 jugs per week at the store, which means making 2 or 3 delivery/retrieval trips per batch, which limits you to 1 batch/week for the 1st few game weeks. Still, good and easy money even to start with.
Problem is, you need a way to carry all those jugs at once. Without the van and without mods, your only options are the stolen Ruscko or the tractor’s wagon, both of which are relatively slow and burn a lot of fuel. With the “Carry More” mod, you can use the Jonnez to carry up to 10 (or 11) jugs at once, which will cover the 1st couple weeks of the game when you have at most 12 jugs. After that, you should have the van available at least periodically.
Towing Junk Cars to Fleetari
There are 4 junked car bodies scattered around the map. Prior to mid-2019, there were only 3 and they were always in the same places. Since then, they can be in any of a couple dozen places randomly chosen each new game. If you manage to drag them to Fleetari (using either the Kekmet or the Gifu), he’ll pay you from 1200-4500mk each. Thus, you can expect to get about 10K mk in total from this (less lots of diesel fuel and time), but each is a 1-time job.
Without mods, you’ll have to spend a lot of time looking for the wrecks, and will need to look everywhere, including in old, boarded-up barns. If you have MSCEditor, however, you can use its map function to show you where they are. Most will be far from Fleetari’s and moving them is slow, so depending on luck of the draw, this may or may not be worth the trouble. Or it may be better to wait until you have the Gifu instead of using the Kekmet, at least for certain wrecks.
Note:the 4th car is a GT Satsuma. Beside it will be the GT Console part, required if you want to get the GT Restoration achievement for building your own Satsuma.
Picking Strawberries
This job totally sucks and, if you use a few mods (“Carry More” and/or “Firewood Job Cooldown”), you can avoid it completely. Without mods, this job exists to give you a (marginally) productive way to spend your downtime between firewood and kiju jobs.
This monotonous job requires you to go to the strawberry field, grab an empty box, take it to the 1st bush, pick 1 strawberry at a time, drop it in the box, repeat until the bush is empty. Move the box to the next bush and repeat. It takes (slightly less than) 4 bushes to fill one box. Then throw the full box onto the stack of full boxes and take 40mk from cash box on the table. Pick up another empty box, go back to the 1st bush still having berries, repeat.
At first, it takes geologic time to pick berries but you develop a skill for it the more you pick, so eventually it only takes an annoying long time per box. There are 120 bushes (the 1st 3 rows of the field) you can pick between field resets (happens when you save) so that’s 30 boxes @ 40mk each =1200mk, plus a 1200mk bonus for getting them all in 1 go (and not wasting any berries). Problem is, until you do this A LOT, your low skill means you can’t fill but a few boxes per day, so you get only a few hundred mk per day of mind-numbing, soul-crushing monotony. Still, that’s more than you’ll make that day building the Satsuma, watching TV, or taking a sauna.
Other, Minor Things
Grandma will call about once a week wanting various food items delivered. This can include grilled fish so be sure to grab the fish trap from the island while getting the kilju bucket. She doesn’t pay with noticeable money (<100mk/trip) but provides a lot of lore and unlimited free coffee. Her coffee is special in not affecting your bladder much. Really useful for adjusting your fatigue level for free. However, she always wants more than 1 item, so you can’t use the Jonnez for this unless you have the “Carry More” mod.
Then there’s Jokke, who frequently calls you at 0200 wanting a ride home from the Peräjärvi bus stop, even before you have a passenger-carrying vehicle. So, until you have either the van, the Ruscko, or the Satsuma, all this does is throw off your day/night cycle for no purpose. But, if you do have a way to drive him home, he’ll pay you about 150mk.
Early Game Bottom Line
So, all in all, early in the game you can count on income as follows:
- 2x loads of firewood =6400mk.
- 1 batch of kilju =3200mk.
So you end up with a net income (after cost of living and fuel) of about 8000mk/week (with maybe a few windfalls from towing convenient wrecks). IOW, by the end of 1 week, you should be able to afford all the new wearable engine parts. In another week, you can afford the tires, fluids, and other consumables. And in the 3rd week, you should be able to get all the recommended aftermarket parts.
Later Income
All that really changes later in the game is that you have uncle’s van (for high-volume Kilju runs) and the sewage truck. The sewage truck opens up the septic tank job, which will net you about 3800mk for 2 days’ work once a week if you stay on the dirt roads, burn fuel oil, and only make the trip when all 5 tanks need pumping.
So, basically, once you have the van and the truck, you can set the firewood cooldown back to default. This leaves you with the following income:
- 2 days spent pumping septic tanks =3800mk.
- 1 load of firewood =3100mk (net).
- 2 batches of kilju =4100mk net.
So, it won’t take long to accumulate the wealth you need to build upgrade and/or repair the Satsuma however you want or need to.
Suggested Starting Strategy
OK, now that you understand the salient points of what’s in the world, what they cost, and how to make money with the tools provided, we can finally get on with strategic advice for getting off to a good start in a new game under the current rules (early 2020).
This advice assumes the following things:
- You’ve read the above sections of this guide or acquired that info elsewhere, so you know what to expect from the world.
- You have wikis and other sources of info available for all the detailed “how-to” instructions to accomplish specific tasks.
- You’ve tinkered with building the Satsuma a few times already in failed er, I mean practice saves, so you’re reasonably proficient at that and/or have proper tutorials available.
- You have my recommended mods installed to make your life a bit easier (do a mod-free game only when you’re really good at MSC).
- You intend to build the 15K basic Satsuma with all new wearable parts and the recommended street-legal aftermarket parts, so construction of the engine will be delayed until you can afford the new parts.
The First Day
Your life begins at 1400 so your #1 priority is to get to the store ASAP to stock up on supplies before it closes for the night. Your #2 priority is getting the kilju bucket and fish trap from the island. Because I’m assuming you have “Carry More”, you have 2 options:1) drive the Jonnez to the store tonight and visit the island tomorrow, or 2) put the Jonnez in the boat, sail to town, use the Jonnez to move groceries from store to boat, and also visit the island as you pass by coming or going. The boat option is rather risky. First, the Jonnez might glitch overboard and be lost. Second, you’ll be coming home in the dark, making it hard to find your home dock unless you’re really familiar with the map. So, I recommend driving the Jonnez to town (you get an achievement for this) and dealing with the island tomorrow.
Note:If you don’t have “Carry More”, then you’re only viable option is to drive the tractor to town (but you get an achievement for this, too).
So, put on your helmet, jump on the Jonnez, and head to the woodshed to grab the diesel jerrycan. The gasoline jerrycan can wait–you don’t need it until you’ve got the Satsuma completely built (or are stealing the Ruscko). Then hustle to the store. Fill the diesel jerrycan and pay for it before doing anything else. Now buy 1 pack of cigarettes, all the sausage packs, all the sugar, all the juice concentrate, 1 yeast, 2 milk, 3 coffee, 2x 2-cycle fuel, 2 charcoal, and 4 cases of beer. Perhaps some spraypaint in colors you like, if you’ve into that. You will now have 1 grocery sack and 9 things that don’t fit in sacks (diesel, 2-cycle, charcoal, and beer), for a total of 10 objects, the max you can carry with “Carry More”. Load up and head back home.
Upon return, check your mailbox and for uncle’s van just to get in the habit (nothing to see yet, just get in the habit). Then drop the diesel at the woodshed then pile your other loot in convenient places around the outside of your house (nothing needs refrigeration). Set the coffee, 3 sausage, 3 sugar, and the milk aside (for Grandma’s future orders). Drink the fruit concentrate and carry the resulting empty bottles, the remaining 6 sugar, and the yeast into the sauna (for later kilju production). Hit F on the cigarettes to have the pack on you when needed for stress relief.
And then be sure to install the trailing arms on the Satsuma body. This will start the random countdown to get your uncle to appear the 1st time. Then attend your physical needs, take a shower, and save/exit the game.
While outside the game, fire up MSCEditor to see where the junk cars and GT parts are on the map. This allows you to plan trips to acquire them, if any look doable with your current means. Write the locations down and restart the game. Then immediately go to bed because you’re still tired.
The Second Day
You have 2 main tasks for today:raiding the island and filling the trailer with firewood. The order in which you do these depends on whether Jokke woke you up at 0200 during the previous night. If he did, either stare at the TV to get sleepy and go back to bed, or chop firewood first so the sun will be up by the time you’re done. This makes it easier to navigate the boat. If Jokke didn’t call, go to the island first thing in the morning.
Either way, immediately upon your return from the island, set the fish trap beside the dock. Then take the bucket inside and mix up a batch of kilju in the shower. While you’re home today, expect a phone call from the firewood guy. Depending on your level of fatigue when you get the call, you can probably deliver the firewood this same day, too. If not, consider drinking coffee. But in general, you should be able to do all these things:chop and deliver the wood, raid the island, and start the kilju. You might even be able to get a second load of firewood chopped before it’s too dark to see.
Thereafter
Every few days (depending on your “Firewood Job Cooldown” setting), you’ll deliver firewood. Every few days, you’ll have a batch of kilju complete, which you must deliver and then go to the landfill to reclaim the empty jugs. You will also periodically need to deliver groceries to Grandma. Make resupply runs (like to refill the diesel can) to the store as needed.
What About the Satsuma?
Apart from the vital step of installing the trailing arms to meet Uncle, remember that any time spent on the Satsuma is non-profit. Concentrate on getting the 7084mk needed for all new parts. You can, however, build the suspension and interior if you have some spare time with nothing else to do.
Mainly though, you’ll need to collect the rims. The stock ones are in the haunted mansion and the GT ones are in a barn near the Ventti house. You’ll need to make a trip out there to get them, so you Fleetari can be putting tires on them (which takes a day or so).
(Re)-Building the Engine
You need to replace a total of 13 parts, which is more than you can carry with “Carry More” if you buy them all at once. If you don’t have the van or Ruscko, and don’t want to risk them falling out of the tractor’s trailer, you’ll have to make at least 2 trips. Fortunately, you don’t need all the parts at once and buying them in batches lets you get started sooner, before you have the money for all of them.
To even get started on the engine, you need the following 7 parts all at once:crankshaft, 4x pistons, head gasket, and rocker shaft (total 3369mk). So that’s half the number and half the money. Then, when you have the rest of the money, go back and the rest of the parts.
General Advice
Make the most efficient use of your time, remembering that every time you save and reload, you lose hours of gametime. This is sometimes useful to get your day/night cycle back on track after Jokke hoses it, but in general you want to avoid this due to its impact on you getting to time-sensitive destinations before they close.
The best overall strategy is to plan your moves carefully. If you need to go to the store, maybe go in the tractor to snag a junk car on the way home, perhaps visiting Grandma and picking up empties at the dump along the way, too. Every game is different for many reasons so there’s real way to do a walkthrough for it. Just have fun and don’t die.