ストーンズハード – ジオマンシーのヒントとコツ
これは、このスキル ツリーでジオマンシーまたはミックス ビルドを開始してプレイするための基本的なヒントです。
ジオマンシー基本ガイド
はじめに
ソーサリー スキル ツリー - ジオマンシー。ジオマンシーを表す言葉があるとすれば、それはコントロールという言葉です。これに興味があるが、いくつかのヒントが必要な場合は、この作品を読んでください。
情報は次のカテゴリになります:
- ギアと属性
- スキル紹介
- ゲームプレイ。
- レベル 1 の例
- ギアと属性
まだ選択肢があまりないので、当然のことです。
武器
- ウィッチ スタッフ / ハーミット スタッフ [ボルダー トスを最大にする場合] / ジオ スタッフ [スタッフ スキル ツリーを使用しない近接戦闘用].
- 魔女の杖が欲しくない/入手できないが、お金に余裕がある場合は、巡礼者の杖が良いプレースホルダーです。 -コストと -CD は見習いカウルよりもジオ カウルを手に入れるのと同じです。
武器エンチャント
- 近接戦闘に参加しない場合は、-スペル コスト +MP エンチャントを取得してください。
- 近接攻撃を行う場合は、+魔法ダメージ エンチャントを取得します。 +shock、+prionic、または +frost が望ましい。他も悪くない。この種のダメージは MP に比例します。
アーマー
- ジオカウル / ウィッチハット
- ジオマントル。
- -CD のあらゆる種類のアクアマリン リング。
- あらゆる種類のアメジスト リングで -spell エネルギー コストを獲得できます。
- 再生とMP(魔力)のためのゴールドサファイアリング。
- 異教のお守り / サファイアのペンダント。
Runic Boulder (RB) が 1 ターン CD に到達するのに十分な -CD が必要です。
そのためには、クールダウン期間が 75 未満である必要があります。 74.5でうまくいきます。ステータス ウィンドウでは切り上げられますが、正確な値が使用されます。その後、-50% のスペル エネルギー コストと、可能な限り多くの +エネルギー再生/+最大エネルギーを取得します。ティックごとに再生される量は、最大エネルギーの 5% です。つまり、ティックごとに +1 エネルギーを得るには 7 バイタリティに投資する必要があり、エネルギー再生速度も向上します。少しのバイタリティーは、RB のアップタイムから枯渇するのを防ぐために非常に有益ですが、すべてを意志力にぶつけることも実行可能な選択です。どちらも非常にインパクトがあります。
スキル紹介
ジオツリーのスキル
ルーンボルダー[RB]
- パンとバターのスキル。ビジョン内の空きセルに配置すると、周囲の敵をノックバックする可能性があります。視界も遮る壊れやすい地形です。ノックバックだけでなく、射手からの盾として使用したり、近接敵を遠くまで歩き回らせたりすることもできます。創造力を働かせてください。
- 3 ターンの気絶も恐れないでください。
- 攻撃を受けた RB に SS を使用しても、気絶しません。
- 別の RB を召喚し、攻撃された昔の RB が消えても、気絶することはありません。
- RB が完全に破壊されるか、手動で (右クリックして) キャンセルしようとしたか、LoS のために消失した場合、気絶します。
- しかし、責任ある敵がすでに死んでいる場合は、すべて問題ありません。
弱体のルーン[弱体]
- 受身の野獣。
- -10% 物理耐性、-15 ノック/気絶各 RB の周り。
- 現在、スタックも可能です。 RB で敵を囲むと、物理耐性が -30%、ノック/スタンが -45% になります。正気じゃない
- 唯一の欠点は、起動が遅すぎることです。
- つまり、RB->SS の場合、エンフィーブルの効果はありません。
- Enfeeble が作動するまで、RB->任意のアクションまたは待機->SS を実行する必要があります。
- 異常な攻撃を効果的にする
束縛のルーン
- しようとも思わないでください。見ないでください。これは終盤のパッシブです。 Runic Explosion と Boulder Toss はこちらです。 SS が RB の後に続く場合、SS で 8 マナ節約できます – スキル ポイントの価値はありますか?
- また、現在バグのあるエンフィーブルは、このパッシブとの相乗効果が非常に低いです。
- ちなみに、それでは無料キャストを取得できません。
- エネルギー コストの上限は 20% です。
ストーンスパイク[SS]
- OK dmg と敵をトラップ/ブロックする能力を備えた使いやすい呪文。ノックバックの可能性も RB よりもレベルが高くなります。
- 実際にはバグがあります。特定の位置に複数の RB が立っている場合、新しい RB で SS を使用しようとしているときに、古い RB から敵をノックアウトしようとします。スパイクは正しい RB から着地しますが、その前に、敵が押しのけられ、予期しないセルに着地する可能性があります。注意してください。
以下に例を示します:

- 最初の RB を使用し、攻撃し、後退し、2 番目の RB を使用しました。
- その後に SS を使用すると、敵が間違った方向にノックバックされます。
- このバグを避けるために、SS は最初に接触した RB (弱体デバフの範囲) から敵を遠ざけることに注意してください。
吸収のルーン
- わずかなエネルギー補給。ここでの魔法は、たとえわずかなエネルギー補給でも、私たちのために多くをもたらすことができるということです.
強化のルーン
- SS の粉砕ダメージの +60% など見ないでください。価値がない
- このパッシブの実際の用途は、ストーン アーマーを支援することです。
- 最後の部分 (+ RB とスパイクの耐久性) は、AI のリワーク後に登場する可能性がありますが、まだ必要でないことは明らかです。
- 1 つのスキルにランダムな要素が多すぎて、すべてのマイナー要素が多すぎます。
ストーンアーマー
- 現段階では不要
- 実際、パイロにとって実行可能な選択肢です。
- Stone Armor + Fumble from Burning – そしてあなたは非常にタンキーです.他のものに加えて、非常に優れた耐火性も得られます。
石化
- 優れた CC スキル。敵が多すぎて RB と SS だけでは対応しきれない場合は、RB と SS を投げれば、そのターンの間さらに強力になります。
地震
- 大きなCCとデバフスキル。エネルギー燃焼もいいです。
- これは、気絶/ノック耐性が非常に高い敵と戦うためのスキルです。
- Daze の上に Daze があるのは気絶です。
- ただし、踏み込まないでください。
- エッジを保持し、敵を内部に留めます。
- 欠点は、使用するのが少しトリッキーになる可能性があることです。トップ DP には破壊不可能な地形が必要です。このスキルの位置付けには、少し工夫が必要です。
スタッフ ツリー スキル
一撃の雹 [雹]
- -dmg部分は物理ダメージのみに適用されます。スタッフとエンチャントによる魔法のダメージは、最大 3 回まで敵にフル パワーで命中します。
- また、不安定化ヒットを使用すると、ヒットごとにノックバックできます。そして、各ヒットはクリット =クリーブできます。
不安定化ヒット[+ノック]
- Enfeeble から莫大な利益を得ることができます。
バトルトランス[+クリティカル]
- いいね
- バグ:クリティカルはマナを回復します。
離れて! [SA!]
- 素晴らしいギャップ クローザーと AoE ノックバック。
その他のスタッフのスキル
- ジオ/スタッフのコンテキストで言及する価値があるのは、揺るぎないスタンスだけです.
- バフを落とさなければ、スタックをかなり高くすることができます。ピースメーカーは地震を抑えるのに役立ちます
スキルオーダー
ジオスタッフ
ローリングするには、不安定化ヒットによる弱体化と+ノックバックのチャンスが必要です。それがあなたが本当に必要としているものです。あとでバトルトランスもゲット。その後 – 何でもありです。
ピュアジオ
SS以外では弱体化も優先。そして、実際にはこれで終わりです。これらのパッシブはすべてまあまあです。ほとんど必要ありませんが、ペトリは優れています。自分の目で確かめてください。 RBからMPを取得しながら、パイロを取得して燃やすことができます。アーチェリーを混ぜて、閉じ込められた無力な敵を撃つことができます。ペトリをつかんだ後、ジオスタッフは後のレベルでも地震を望んでいるので、スタッフツリーに戻ることもできます.別のスタートを切るだけです。
生の呪文表
呪文のダメージと効果は、呪文の基本値とあなたの魔力と風水力によって決まります。
ダメージの種類によって、ダメージ計算に若干の違いがあります。
呪文による物理ダメージの計算式は次のとおりです。
- 呪文の物理ダメージ =Basic_Value * (Magic_Power + School_Power)/100.
呪文による魔法ダメージの計算式は次のとおりです。
- 呪文の魔法ダメージ =Basic_Value * Magic_Power/100 * (1 + School_Power/100).
現在、原則として、ノックバック チャンスやイグナイト チャンスなどの呪文への追加効果は、次の式でスケーリングされます:
- Effect_Value =Basic_Value * (Magic_Power + School_Power)/100.
ゲームプレイ
初めに。マウスの中ボタンの機能を知っていますか?カメラを一緒に動かすことができます。
そして今、ガイドで最も役立つヒント:
- 煩わしい RB を取り除くには、Rest を使用して視野を狭めてください。RB は崩壊します。
- すべての岩を右クリックして破壊するよりもはるかに便利です。
- または、木の陰に隠れてください。
- ジオマンサーのゲームプレイは、ノックバック メカニズムと密接に関連しています。
- 何かに対するノックバックに成功すると、2 ターンの間気絶し、ダメージを与えます。
- 破壊不可能な地形に対して敵をノックバックすると、敵の max_hp 物理ダメージの 15% を与えます。
- 敵を生きているターゲットまたは破壊可能なエンティティにノックバックすると、ほとんどのダメージは 2 番目のターゲットに与えられます。この場合、最初のターゲットへのダメージは無視できます (ただし、2 番目のターゲットが 1 番目のターゲットよりも大きい場合は異なります)。
- しかし、本当にそのスタンを通過させる必要がある場合は、ためらわずに敵を自分自身にノックバックしてください。
Geo のどのバリアントでも、気絶した敵にいくつかの近接攻撃を当ててエネルギーを節約するのは良いことです。ただし、何をしようとしているのかによって、ポジショニングの方法にわずかな違いがあります。
If you are playing around SS (Stone Spikes), you’ll want to avoid getting hit by your own SSs. This sometimes makes it hard to go into melee at all. But that is sometimes. While you can finish enemies only with RBs and SSs, it takes a decent amount of energy and time, but safer. Try to understand what enemies you want to kill like that and when you want to change your position and mix in melee attacks.
Also, starting with SS is slightly easier, as it has higher basic Knockback chance making things more reliable on low MP&GP. Other than that, in case all that still failed – you have blocked the way with Spikes and it’s still safe (if you planned accordingly).
If you are playing around Staff skills – you are the Knockback source too. Rather, after getting Destabilizing Hits – you are the finishing touch (+25% dmg for 2 turns on each Knock).
The synergy is solid:
- Your RBs provide you with MP, increasing the magic dmg on your Staff attacks, Enfeeble empowers the Knockback (both chance and dmg) and other Phys dmg. With that, each hit of Hail can Knock and even normal attacks can do so too.
- Sometimes you need to step aside to place RB on the spot you were standing or move away to pull the enemy into other obstacles (walls).
- Sometimes, for more CC (Crowd Control), you can cancel existing RB and place a new one in its place next turn.
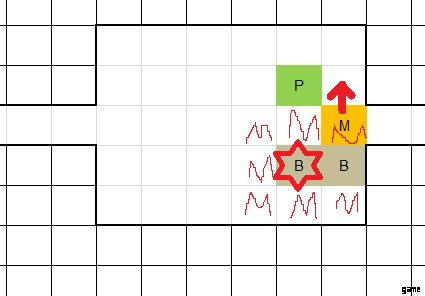
For example, when you are confident in your RBs connecting, while hugging a wall you can wait for enemy to engage you in melee:
- RB on your side to Knock enemy diagonally into a wall.
- Hit.
- Step back.
- RB on your side the same way.
You can repeat it until you are satisfied or have 3 Enfeeble debuffs for big SS or 2 Enfiible into SA! and/or Hail. This pattern works with RB on a 2s CD, so it works from lvl 1.
If you are not confident in your RB connecting you can start from distance. That they 1st Boulder even though it can do dmg, mostly we’ll think of it as a buff/debuff for the upcoming 2nd Boulder. Like that, if you already have 1s CD on RB – your next RB will come, while enemy is in Enfeeble from first RB. Or, if you don’t have that CDR yet – you can use your own body to stop enemy there, in the Enfeeble.
- Upon reaching 1s CD on RB (or by taking some hits) there’s an excellent setup you can make using a corridor.
- You’ll need a clear 3×3 space at the exit of the corridor.
- Use first 2 Boulders diagonally, while enemy is on the last cell of the corridor.
- Step back diagonally, letting the enemy move 1 step forward.
- Boulder 3rd time.
- And land a massive staff finisher (SA!>Hail) on top of the gorgeous triple Enfeeble.
Sadly this setup doesn’t work well with SS, due to a bug, mentioned in the skill description above. You can simply SS after just 2 Boulders. Or make use of another setups using the unfortunate bug.
The rule is:
- Mob will be Knockbacked by Spike from the first Boulder that started “touching” it.
Like this:
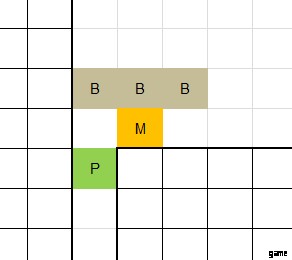
Boulders were places from left to right. Now, if we use SS on the Right one – enemy will be Knockbacked to the bottom-right – into the wall.
If there’s no convenient wall for the easiest setup – you can always use random unbreakable obstacles. Just try calculating a little. For example, 2 trees placed in a Knight Chess-Piece movement pattern – is an excellent spot for a triple RBs. Which can be altered (if 1 of them is see-through) into triple RB (with 1 of Knockbacks being into RB, which doesn’t deal 15% max_hp damage to the target) into StepAside!->Hail on the 3 Enfeeble stacks. That’s an overkill setup.
- Or 2 trees on a line with 1 space between them for 2 RBs with Enfeeble. Into SS.
- Or 2 trees on a line with 2 space between them…
- 2 long Bush.
- 3 space trees.
You can use just a single tree for double Enfeeble (1 Knock against RB) into attack->StepAside!->Hail
Or the plainest of the plain, using the same single tree:
Non-diagonal RB> SS>> RB> cancel_RB> RB> etc, with normal attacks weaved in, while standing next to the same tree.
Or you can transition patterns, though there’s no need for that yet…
Boulders and LoS
That being said, there’s another mechanic you might want to pay attention to. RBs need to be in your Line of Sight (LoS) to be kept alive. Once you LoSed your RB – it’ll disintegrate after 1 turn (though there’s a high chance it’s a bug and it should disappear sooner).
The cost of keeping up RB depends on Spell Energy Cost. Which is decreased by said RBs. Once you stack enough – your regen will be able to keep up, allowing you to take on prolonged fights.
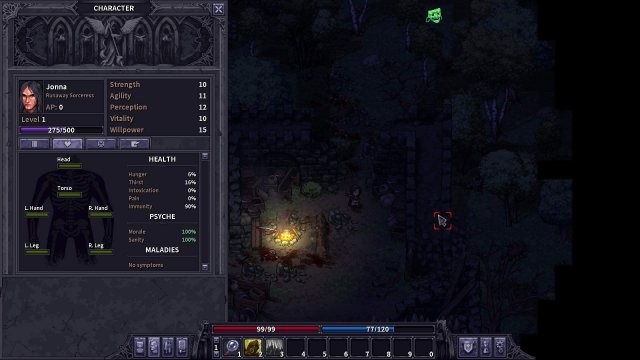
- As RB increases your MP and GP (and other attributes) – your spells will always have a swimming parameters.
- To make it clear, let’s take SS for example.
- In idle state your tooltip on SS will always be a lie.
- It says it’s 19piercing+4crushing with 74% Knockback chance for 25 energy.
- But you’ll always be using SS after you have at least 1 RB.
- With 1 RB it’s 22piercing+4crushing with 89% Knockback chance for 22 energy.
Since your Knockback chance on RB and SS depends on itself there’s a way to make use of it.
Stable Pull Example
At the beginning your energy regen / spell cost allows you to Rest and still regen energy. That is used in a stable pull strategy. To increase the chances of your combo (RB-SS) connecting on desirable surfaces (i.e. Stunning on initial RB) – you pre place RB close to yourself. And Rest. On full mana you make your next move just like that. Ideally you place the extra RB in a way that allows you to get rid of it using LoS while moving where you wanted, without wasting your turn on destroying it or burning mana keeping it up. Or you can make use of it later – it’s all situational.
Here’s an example of making use of all the stated above.
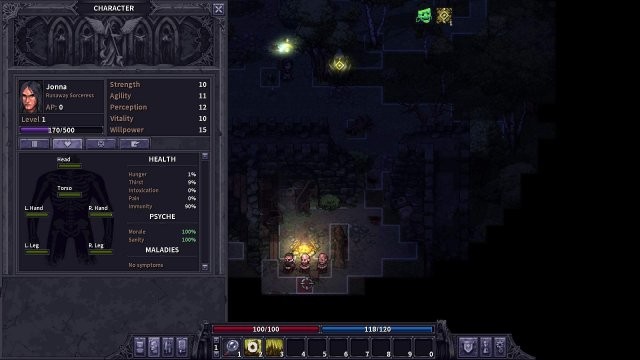
We pre-placed RB almost behind the tree and Rest’ed till full energy, while bandits were out of sight. Then we walked closer. RB is currently out of LoS and it’ll disappear next turn, but we a landing our RB this turn with higher chances, than idle-state. We use SS immediately after that, this time Stunning all of them.

After that we use 2 more RBs – one in the same spot we used to hit all 3 of the enemies and another one on the fat bow-Outlaw to finish him off, while Enforcer and Goon are making their way towards us. After that we move upwards one step to clear up 2 existing RB with 1 turn.
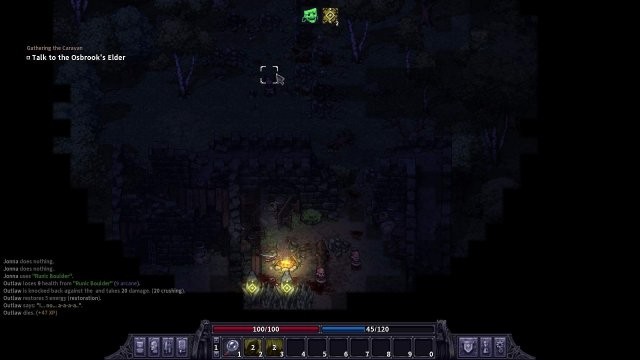
This step actually didn’t matter, since we had enough time to destroy them manually, but as a demonstration of using your turns efficiently – it is worth mentioning.
- The rest of the fight is simple, so we’ll end the example here.
- In the example we didn’t wait between RB -> SS, because we didn’t have Enfeeble. We won’t be waiting either, if the Enfeeble bug is fixed.
Being Ambushed from all sides with not even a single unbreakable terrain in sight
That’s actually the most interesting thing that can happen to you at this stage on the game. Knockback enemies into each other. Maneuver with your RBs in the middle, hide behind them from archers. Just take note that if you are Knocking 2 living targets the damage will be spread – Spell dmg to 1st, most of the Knock to 2nd. But that’s better than Knocking against your Boulders or Spikes. Be creative. Sometimes it’s nice to use a Boulder to reposition enemies to land even better move with your next spell.