プリズン プリンセス – チュートリアルと達成ガイド

全実績の入手方法
はじめに
プリズン プリンセスは、ポイント アンド クリック操作と 5 つのエンディングを備えた短いビジュアル ノベルです。また、21 の実績があり、すべて以下のチュートリアルに記載されています。
- 特に明記されていない限り、必ず 1 回目以内に行ってください。
- 問題を回避するために、ガイドに完全に従ってください。
- 所要時間:50 分
第1章
新しいゲームを開始
- 壊れた壁を調査する
- テーブルをクリックしてから椅子をクリックしてください。
- ドアをクリックしてください。
- 部屋の左側に向かいます。
- 馬とナイトスタンドをクリックしてください。
- 魔法を使って (画面の右下隅)、待ってください。
- 馬をクリックしてパズルを始めましょう。
- 次の順序でボタンをクリックしてパズルを解いてください:
- レッド
- ブルー
- 黄
- 白
- 緑
パズルをすばやく完成させると、次のものが得られます:
ゼナの信頼
- ゼナを彫像から降ろして、スタッツ!
- 椅子をクリックしてください。
- 壊れた壁の後ろに現れた石をクリックしてください。
- 次の順序で下部にあるボタンをクリックしてください:
- 左
- ミドル
- ミドル
- そうですね
- 左
ゼナの脱出
- ゼナのダンジョンから脱出する。
第 2 章
- バケット [Thin Key] をクリックします。
- 椅子 [本] をクリックしてください。
- 部屋の右側に向かいます。
- ベッド [予約] をクリックしてください。
- 画面の右下隅にあるカエルの像をクリックします。
- パズルを解く:
- レッド
- 緑
- 黄
- ブルー
- オレンジ
すぐに解決した場合は、次のことが得られます。
アリアの賛美
- 急いでアリアを彫像から追い出してください!
- 画面の左下隅にあるアイテムをクリックしてインベントリを開きます。
- [長くて細い鍵] を選択し、それを使用して本棚を開きます。
- 真ん中の本の 2 番目の矢印 [Slip of Paper] をクリックします。
- インベントリから [本] を装備し、一番上の棚で使用してください。
- 本を次のように並べ替えます:
- 栄光
- 敗北
- 忘却
- 稼ぐ
- いいね
- 学習
- 本の右側に現れた赤いレバーをクリックしてください。
- パズルを解く:
G – D – O – E – N – L
アリアの脱出
- アリアのダンジョンから脱出する。
第3章
- 左側のドアをクリックして開き、もう一度クリックして通り抜けます。
- 女の子と話さないようにするには、上部をクリックする必要があるかもしれません。
- じゅうたんを調べます。
- 4:00 をクリックしてパズルを解いてください。

- あなたは[スタッフ]を獲得します。
- インベントリを開き、[スタッフ] を選択してください。
- 譜表を持ったまま右のソファを 2 回クリックします。
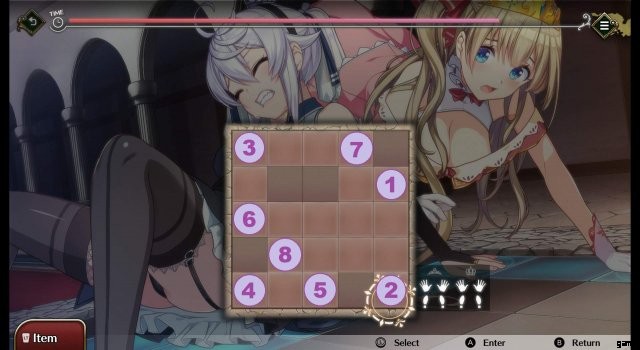
- ミドル ゴブリンをクリックして消灯パズルを始めましょう。
- 次の順序でボタンを押して解決してください:
- 1 – 5 – 8 – 7 – 3 – 5 – 6
パズルをすばやく完成させると、次のものが得られます:
戦術家
- ソファー トラップから一瞬で脱出する。
- [大きな鍵] を受け取ります。
- 左上隅にある樽を調べてください。
- 左の壁にあるランタンをクリックしてください。
- 部屋の右側に向かい、青いキャビネットのインベントリから [スタッフ] を使用してください。
- [紙の羽ペン]、[本]、聖杯[丸い金属片]を手に入れてください。
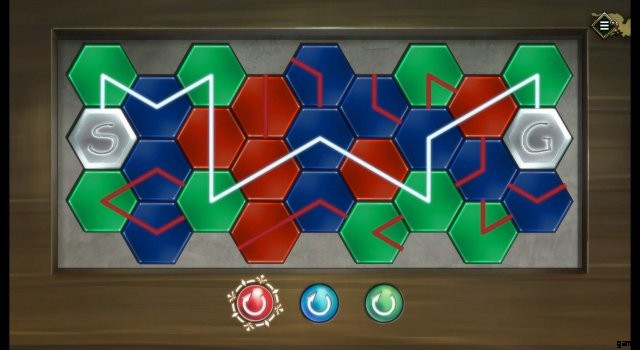
- ヘックス ボードをクリックして、ミニゲームを開始します。
- 画面の下部にあるボタンを次の順序でクリックしてパズルを解いてください:
- 3 – 2 – 1
- 前のパズルの上にある花瓶のセットをクリックして、別のミニゲームを開始します。
- 次の順序で花瓶を並べ替えます:
- レッド
- ブルー
- 緑
- 紫
- ゴールド
- [銀の欠片]を受け取ります。
- インベントリを開き、ドアの聖杯 [丸い金属片] を使用して通過します。
- 左側の光る石のモニュメントをクリックして [パターン] を取得します。
- 右側のドアの [大きな鍵] を使用して開き、もう一度クリックしてドアを通り抜けます。
- シーンの後、客室を出て、大部屋の右側に向かいます。
- 浴室に戻り、バケツ [浴槽の欠片] をクリックします。
- 噴水 [ネックレス] を調べます。
- 更衣室 (画面の左上隅) をクリックして、ゼナのダンジョンに向かいます。
- 表をクリックして拡大してください。
- [パン] と [ノート] を手に取ります。
- (RMB を押して) バックアウトし、部屋の左側に向かいます。
- 独房の窓をクリックして鳥を引き寄せ、インベントリの [パン] を使って [小さな鍵] を受け取ります。
- ナイトスタンドをクリックし、一番下の引き出しを開けて [チェス盤] を取ります。
- インベントリから [非常に小さな鍵] を装備します。
- それを使って中段の引き出し [Even Smaller Key] を開きます。
- 一番上の引き出しを開けて、ボックスを操作してミニゲームを開始します。
- 次のようにアイコンを並べ替えます:
◆ – ♥ – ♠ – ♥
- [チェスの駒] を受け取る。
- インベントリを開き、[チェス盤] をナイトスタンドに置きます。
- ボード上の [チェスの駒] を使用して、別のミニゲームを開始します。
- ピースを次の位置に配置します:

- ベッドをクリックしてください。
- 選択:
- 受け取ってください。
いたずら本
- とてもエッチな本を手に入れる
- 部屋の右側に向かい、壊れた壁の後ろにある石をクリックしてください。
- 次の順序でボタンを押します:
- 黄
- ブルー
- レッド
- 黄
- レッド
[Shackles] を床から拾います。
- それを取る
- ドアのハッチ [Base of Dagger] をクリックしてください。
- たいまつを調べる
- 壊れた椅子 [椅子の脚] をクリックします。
- 松明の[椅子の脚]を使って火をつけます。
- 部屋の左側に戻ります。
- ゲームを保存します (Save 1)。
- 馬と対話して、さらに別のミニゲームを開始します。
- 次の順序でボタンを押します:
- 緑
- 黄
- ブルー
- 白
- レッド
すぐに解決した場合は、次のことが得られます。
パスワードを知っています
- ゼナを銅像から引き離すためにレースをしましょう。
第3章
- 画面の左上隅にある部屋の変更をクリックして、アリアのダンジョンを選択してください。
- [バケツ] を手に取ります。
- 大きな瓶 [青い宝石] をクリックしてください。
- 椅子 [Green Gem] をクリックしてください。
- 部屋の右側に向かいます。
- ベッド [白い宝石] をクリックしてください。
- セルのウィンドウ [Red Gem] をクリックします。
- ナイトテーブルを調べて、一番上の引き出しを開いて [ブラウン ジェム] を見つけてください。
- 一番下の引き出しを開けて[謎の台座]を入手。
- ジェムを5つ集めると、[ふしぎな台座]が[ブレスレット]になります。
- 真ん中の引き出しを開けて、ボードをクリックしてください。
- ナイトスタンドの上のボードをクリックして、ミニゲームを開始します:
- 次のように宝石を配置します:
- 本棚を調べて、赤いレバーをクリックして別のパズルを始めましょう。
- 次の順序でスポットをクリックしてください:
- G – O – L – D – E – N
- もう一度本棚を調べてください。
- ロック [ミキシング ブック] のインベントリから [Even Smaller Key] を使用してください。
- ゲームを保存します (Save 2)。
- 戻って、画面の下部にある青いカエルを調べて、別のパズルを始めましょう。
- すぐに解決:
- ブルー
- ブルー
- ブルー
- 黄
- オレンジ
- レッド
- レッド
機知に富んだ!
- すぐにアリアを像から出してください。
ベッドをクリックしてください。
- それを取る
美についてのエッセイ
- 美に関するエッセイを手に入れる
- ドア [キャンディ] のハッチをクリックしてください。
- 部屋の左側に向かい、床から [シャックル] を拾います。
- それを取る
特別な趣味
- 両方の枷を手に入れる
- 左上隅にある [Change Rooms] をクリックして、ゲスト ルームに移動します。
- 部屋の左側に行き、バレルのバケツを使用してください。
- すばやくパズルを解いてください。
注:アニメーションが終了するまで待ってから、次のバルブをクリックしてください。
- ブルー
- 緑
- レッド
- 緑
- レッド
ミクソロジスト
- 一瞬でシャイニング・リキッドを手に入れよう。
- インベントリを開いて [Torch Flame] を選択してください。
- 壁のランタンを照らすために使用してください。
- [更衣室] をクリックして、アリアのダンジョンに向かいます。
- 大瓶 [賢者の書] のインベントリから [バケツ] を使用してください。
- [更衣室] をクリックして、入浴室に移動します。
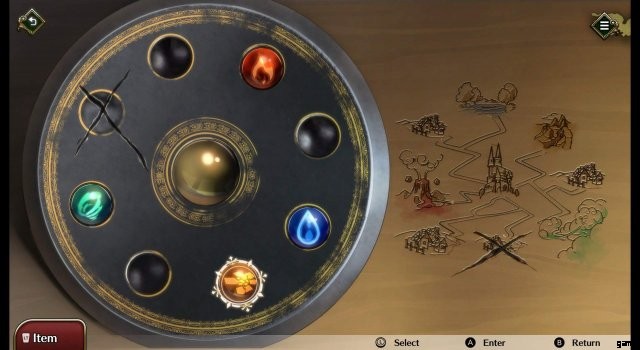
- 彫刻のある壁をクリックしてください。
- インベントリを開き、壁にある [ブレスレット] を使用してください。
- 次のように歯車を配置します:
- レッド
- 緑
- ブルー
- ライトブルー
- 黄
- 紫
- 大きな赤いボタンをクリックしてください。
- 左側の開いたドアに入ります。
- 左右の宝箱をクリックして開きます。
- 部屋の真ん中にあるガーゴイルを調べる
- 次に、歯をクリックして、下のスクリーンショットのように終了します:

- 部屋を出る
- 噴水の近くにあるガーゴイルを調べる
- パズルをすばやく解く:
- ブルー
- 緑
- ブルー
- レッド
- 緑
温泉マスター
- バスタブから素早く出る
- 再びサウナに入る [小さなおもちゃの棺]
- 立ち去る
- Click on Change Rooms and go to the Guest Room.
- Examine the cabinet and pick up the [Coins].
- Back out and use the [Coins] on the left table.
- Click on the table again to start a puzzle.
- Place the coins in the following order:

- Click on the blue flame behind the painting.
- Click on Change Rooms and head to the Grand Chamber.
- Interact with the Dragons and choose:
- Use all the items that interest you.
- This action will destroy both dragons.
- Interact with the four glowing monuments [Pattern].
- Click on the tiles at the center of the room to start another puzzle.
- Solve the jigsaw puzzle:
Note:Swap the two tiles at the bottom right corner to win.

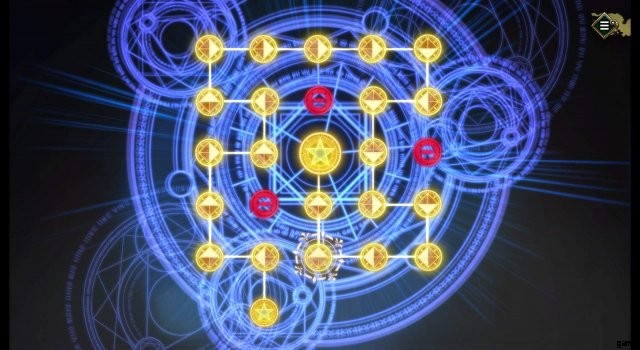
- Approach the altar in the background.
- Solve the puzzle:

- Interact with the tiles at the center of the room to start yet another mini-game.
- Click on the floor and solve the puzzle quickly:
Dance Master
- Speedily solve the pedestal puzzle.
Ending 1
- Save your game (Save 3).
- Click on the staircase and choose:
- Escape the castle.
- Solve the puzzle:
The Pair’s Determination
- Ending 1/5:Complete the normal route.
Note:Force close the game (Alt+F4) to skip the credits.
Ending 4
- Load Save 3.
- Click on Change Rooms and head to Zena’s Dungeon.
- Interact with the table and use the [Blue Flame] on the symbol.
Relic of Power
- Obtain the Sacred Sword.
- Back out and head to Aria’s Dungeon.
- Interact with the table and use the [Blue Flame] on the symbol.
Relic of Wisdom
- Obtain the Sacred Goblet.
- Back out and go to Bathing Room.
- Go to the right side of the room and interact with the windows.
- Save your game (Save 4).
- Take it
Forbidden Book of Poetry
- Obtain the Forbidden Book of Poetry.
- Load Save 4.
- Leave it behind.
- Return to the Grand Chamber and escape through the staircase.
- Escape the castle.
Solve the puzzle:

- Save your game (Save 5).
- Need More Strength.
The Two Heroes
- Ending 4/5:Complete the Demon King route.
Note:Force close the game (Alt+F4) to skip the credits.
Ending 5
- Load Save 5.
- Don’t Need Anything.
On A New Journey
- Ending 5/5:Complete the true ending.
Note:Force close the game (Alt+F4) to skip the credits.
Ending 2
- Examine the Blue Frog at the bottom of the screen to start another puzzle.
- Quit the mini-game by clicking on the top left arrow.
- Start it again and solve the puzzle:
- Blue
- Blue
- Blue
- Yellow
- Orange
- Red
- Red
Click on the bed.
- Take it
- Click on the hatch at the door [Candy].
- Click on Change Rooms at the top left corner and head to Guest Room.
- Go to the left side of the room and use the bucket on the barrels.
- Solve the puzzle quickly:
Note:Wait until the animation is over before clicking on the next valve.
- Blue
- Green
- Red
- Green
- Red
- Open your inventory and select the [Torch Flame].
- Use it on the lantern on the wall to light it up.
- Click on Change Rooms and head to Aria’s Dungeon.
- Use the [Bucket] from inventory on the big jar [Sage’s Book].
- Click on Change Rooms and go to Bathing Room.
- Click on the wall with carvings.
- Open your inventory and use the [Bracelet] on the wall.
- Place the cogs as follows:
- Red
- Green
- Blue
- Light Blue
- Yellow
- Purple
- Click on the big red button.
- Enter the now open door on the left.
- Click on the left and right chests to open them up.
- Inspect the gargoyle at the middle of the room.
- Click on its teeth so it ends like the screenshot below:
- Leave the room.
- Inspect the gargoyle near the fountain.
- Solve the puzzle quickly:
- Blue
- Green
- Blue
- Red
- Green
- Head inside the sauna again [Small Toy Casket].
- Leave.
- Click on Change Rooms and go to the Guest Room.
- Examine the cabinet and pick up the [Coins].
- Back out and use the [Coins] on the left table.
- Click on the table again to start a puzzle.
- Place the coins in the following order:
- Click on the blue flame behind the painting.
- Click on Change Rooms and head to the Grande Chamber.
- Interact with the dragons and choose:
Use all the items that interest you.
- Interact with the four glowing monuments [Pattern].
- Click on the tiles at the center of the room to start another puzzle.
- Solve the jigsaw puzzle:
Note:Swap the two tiles at the bottom right corner to win.
- Approach the altar in the background.
- Solve the puzzle:
- Interact with the tiles at the center of the room to start yet another mini-game.
- Click on the floor and solve the puzzle quickly:
- Click on Change Rooms and head to Zena’s Dungeon.
- Interact with the table and use the [Blue Flame] on the symbol.
- Back out and head to Aria’s Dungeon.
- Interact with the table and use the [Blue Flame] on the symbol.
- Return to the Grand Chamber and escape through the staircase.
- Escape the castle
Solve the puzzle:

Escape With Zena
- Ending 2/5:Complete Zena’s route.
Note:Force close the game (Alt+F4) to skip the credits.
Ending 3
- Load Save 3.
- Interact with the Horse to start yet another mini-game.
- Quit the mini-game by clicking on the top left arrow.
- Start it again and solve the puzzle:
- Green
- Yellow
- Blue
- White
- Red
- Click on Change Rooms at the top left corner of the screen and choose Aria’s Dungeon.
- Pick up the [Bucket].
- Click on the large jar [Blue Gem].
- Click on the chair [Green Gem].
- Head to the right side of the room.
- Click on the bed [White Gem].
- Click on the cell’s window [Red Gem].
- Inspect the nightstand and open the top drawer to find [Brown Gem].
- Open the bottom drawer to get [Mysterious Pedestal].
- If you collected all five gems, your [Mysterious Pedestal] will turn into a [Bracelet].
- Open the middle drawer and click on the board.
- Click on the board on top of the nightstand to start a mini-game:
- Place the gems as follows:
- Examine the bookshelf and click on the Red Lever to start another puzzle.
- Click the spots in the following order:
- G-O-L-D-E-N
- Examine the bookshelf one more time.
- Use the [Even Smaller Key] from inventory on the lock [Mixing Book].
- Back out and examine the Blue Frog at the bottom of the screen to start another puzzle.
- Solve it quickly:
- Blue
- Blue
- Blue
- Yellow
- Orange
- Red
- Red
- Click on the bed.
- Take it.
- Click on the hatch at the door [Candy].
- Click on Change Rooms at the top left corner and head to Guest Room.
- Go to the left side of the room and use the bucket on the barrels.
- Solve the puzzle quickly:
Note:Wait until the animation is over before clicking on the next valve.
- Blue
- Green
- Red
- Green
- Red
- Open your inventory and select the [Torch Flame].
- Use it on the lantern on the wall to light it up.
- Click on Change Rooms and head to Aria’s Dungeon.
- Use the [Bucket] from inventory on the big jar [Sage’s Book].
- Click on Change Rooms and go to Bathing Room.
- Click on the wall with carvings.
- Open your inventory and use the [Bracelet] on the wall.
- Place the cogs as follows:
- Red
- Green
- Blue
- Light Blue
- Yellow
- Purple
- Click on the big red button.
- Enter the now open door on the left.
- Click on the left and right chests to open them up.
- Inspect the gargoyle at the middle of the room.
- Click on its teeth so it ends like the screenshot below:
- Leave the room.
- Inspect the gargoyle near the fountain.
- Solve the puzzle quickly:
- Blue
- Green
- Blue
- Red
- Green
- Head inside the sauna again [Small Toy Casket].
- Leave.
- Click on Change Rooms and go to the Guest Room.
- Examine the cabinet and pick up the [Coins].
- Back out and use the [Coins] on the left table.
- Click on the table again to start a puzzle.
- Place the coins in the following order:
- Click on the blue flame behind the painting.
- Click on Change Rooms and head to the Grand Chamber.
- Interact with the dragons and choose:Use all the items that interest you.
- Interact with the four glowing monuments [Pattern].
- Click on the tiles at the center of the room to start another puzzle.
- Solve the jigsaw puzzle:
Note:Swap the two tiles at the bottom right corner to win.
- Approach the altar in the background.
- Solve the puzzle:
- Interact with the tiles at the center of the room to start yet another mini-game.
- Click on the floor and solve the puzzle quickly:
- Click on Change Rooms and head to Zena’s Dungeon.
- Interact with the table and use the [Blue Flame] on the symbol.
- Back out and head to Aria’s Dungeon.
- Interact with the table and use the [Blue Flame] on the symbol.
- Return to the Grand Chamber and escape through the staircase.
- Escape the castle.
- Solve the puzzle:
Escape With Aria
- Ending 3/5:Complete Aria’s route.
Note:Force close the game (Alt+F4) to skip the credits.