NBA ボール スターズ ガイド:すべてのゲーム モードで一貫して勝つための 15 のヒント、コツ、戦略
韓国のデベロッパー Netmarble は、マーベル フューチャー ファイト、ザ キング オブ ファイターズ オールスター、BTS ワールドなど、さまざまなジャンルの幅広いモバイル ゲームで知られています。同社の米国オフィスにも、NBA ファン向けのかなりユニークなモバイル ゲームがあり、それは NBA ボール スターズと呼ばれています。 iOS および Android デバイスで利用できるこのゲームでは、NBA の 30 チームから最高の選手を集めたり、過去の時代のレジェンドを選択したりできます。
しかし、従来の 5 対 5 の設定でそれらを操作する代わりに、ジョイスティックを動かして画面上のボタンでシュート、ジャンプ、またはパスさせるのではなく、パズル ボード上のジェム クラスターを壊してパワーアップすることで操作します。スキルを向上させ、ボールをシュートしたり、相手のシュートをうまく防御したりする可能性を高めます。
これは実在の選手とチームが登場する NBA ゲームですが、このジャンルの通常のモバイル ゲームとは異なるメカニズムのセットであることを考えると、ここで解き明かすことがたくさんあるかもしれません。はい、パズルゲームの仕組みは非常に単純ですが、ゲームに勝つ可能性を高めるためにこれらのパズルに関して行う必要がある特定のことがあります。また、議論する必要がある多くの機能とゲームモードもあります.
以上のことを踏まえて、NBA Ball Stars ガイドに飛び込みましょう。このガイドでは、ゲームの多くの機能とモードについて知っておく必要があるすべての情報と、これらのさまざまなモードでより多くのゲームに勝つためのヒントと戦略について説明します.
1. NBA ボール スターの基本
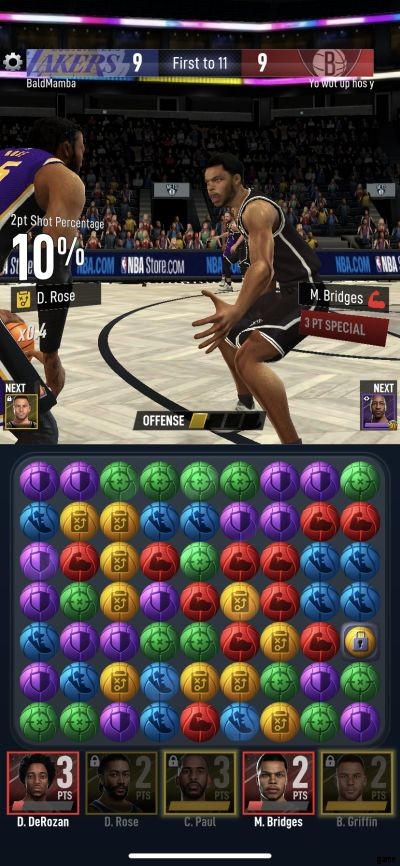
現実の NBA チームや選手が登場する他のほとんどのモバイル ゲームとは異なり、NBA ボール スターズは、パズル ゲームプレイとバスケットボール アクションを組み合わせているため、間違いなくよりユニークです。ただし、ご想像に反して、私たちが話しているパズル ゲームプレイはマッチ 3 ではありません。それでもいくつかの宝石を破裂させる必要があります。これを行うには、赤、黄、緑、青、紫など、同じ色の接続された宝石を少なくとも 2 つ破裂させる必要があります。
ジェムをバーストするたびに、オフェンスで可能なシュート率を増やすか、ディフェンスでガードしているプレーヤーのシュート率を減らすかのいずれかになります — 実際の NBA 統計はここでは重要ではありません。シュート率を 100% まで (またはそれにできるだけ近づける) し、対戦相手のシュート率をどれだけ早くゼロにできるか。
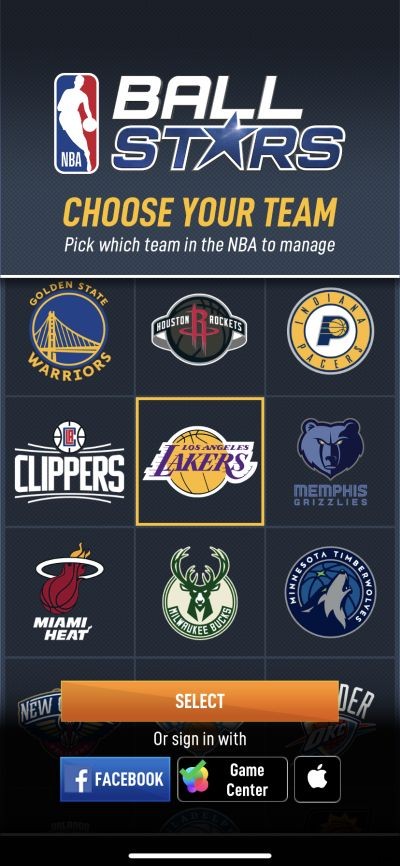
ゲームの開始時に、お気に入りのチームを選択するように求められます — 他の多くのモバイル スポーツ ゲームと同様に、チームの選択は 5 人の名簿には影響しません。ロサンゼルス・レイカーズを選ぶならアンソニー・デイビス。代わりに、5 人のランダムな NBA スターのラインナップが得られます。スターとは、実際のスター級の選手を意味し、フリンジ スターター、セカンド ストリンガー、サード ストリンガーではありません。
これは、対戦する相手チームにも当てはまります。実際のさまざまなチームのプレイヤーがランダムに混在し、それぞれが独自の総合評価と星 1 ~ 5 のレアリティを持っています。最初は 1 つ星または 2 つ星のプレイヤーで満足する必要がありますが、序盤は対戦相手がはるかに弱いため、問題ありません。
アシスタントの GM カラと一緒にチュートリアルを進めていくと、特定のサイズのジェム クラスターをクリアするとパワー ジェムが生成され、それを使用してさらに多くのボードをクリアできることがわかります。作成できるパワー ジェムにはさまざまな種類がありますが、チュートリアル ポップアップのクラスター内のジェムの色は無視してください。これはすべての色に当てはまります。 5 つのジェム クラスターは、指を上に向けたパワー ジェムになります。これがコラム クリア ジェムです。
6つのジェムクラスターをクリアすると、指が左を指しているパワージェムが得られます。これは、ご想像のとおり、行クリアとして知られています. 7 ~ 9 個のジェム クラスターがあると、爆弾またはエリア クリアが発生します。それをアクティブにすると、爆弾を囲む 3×3 エリアが破壊されます。最後に、10 個以上のジェムのクラスターをクリアすると、同じ色のジェムをすべて壊すチャンピオン リングまたはカラー クリアが手に入ります。これは、アクティブ化されている場合、ボード上のどこにあるかに関係なく.
チュートリアル ステージでは、シーズン モードをプレイしているときは、ゲームの最後の 2 分間 (最初) から開始し、AI 制御のチームと 5 対 5 で対戦することも説明されています。ここでのアクションはターン制で、各ターンは自分のシュート率を 100% にできるだけ近づけるために 4 回の試行、または対戦相手のシュート率をゼロにするための 4 回の試行、またはそれに近づけるための試行で構成されます。
プレイヤーのアップグレードに使用されるプレイヤー ファンド、プレイヤー ファンドと組み合わせて使用されるリソースであるトレーニング XP、および GM レベルを上げるのに役立つ GM XP を獲得できます。特定のレベルで新機能のロックを解除することもできるため、さらに多くの報酬を獲得できます。また、シーズン モードの試合は、チームのレベルを上げて改善し続けるにつれて、最初は最後の 2 分間から最後の 3 分間まで長くなることにも注意してください!
ゲームの本質的な要素を理解したところで、ゲームの初期段階で役立つその他の簡単なヒントや指針に移りましょう。
2.選手のクラスと同じ色である必要はありません
チュートリアルの段階で、壊していた宝石のすべてではないにしても、ほとんどがプレイヤーのクラスと同じ色であることに気付くでしょう。最終的にわかるように、毎回同じ色のマッチを探す必要はありません。ボールを持っているプレイヤーのクラスと同じ色のクラスターを壊したり、ボールで対戦相手のプレイヤーを防御したりすることでボーナスを得ることができますが、別の色の宝石を壊しても問題ありません。パワージェム。
全体像を考えることがすべてであるため、Chris Paul や Blake Griffin などの黄色の宝石クラスターが見つからない場合は、問題を無理やり押し込まないでください。どちらも黄色のプレーヤー クラスに分類されます。たとえば、カラー クリアまたはエリア クリアを作成するチャンスが見つかった場合は、色について考えないでください。クラスターを壊すことで、オフェンスのポゼッションで得点したり、ディフェンスでバッド ショットを強制したりするのに役立つ可能性が高いためです。
オフェンスでボールを持っているプレーヤー、またはディフェンスでアクティブなディフェンダーのクラスと同じ宝石の色だけに焦点を当てることを強くお勧めする別の理由があります。これについては、まさに次のヒントで説明します。
3.破壊された各クラスターは、プレイヤーの特別なスキルを充電します
ゲームは早い段階でこれを表示しますが、見逃した場合に備えて、ゲーム画面の下半分にあるラインナップを見ると、各プレイヤーが作成するたびにいっぱいになるチャージバーがあることに気付くでしょう.
無骨クラス(紫)のプレイヤーを操作していても、黄色のクラスターを壊すことができ、それはもちろん黄色の宝石に対応する決定クラスのプレイヤーの特別なスキルをパワーアップさせます.では、これらの特別なスキルとは何であり、NBA ボール スターズでより多くのゲームに勝つためにどのように役立つのでしょうか?
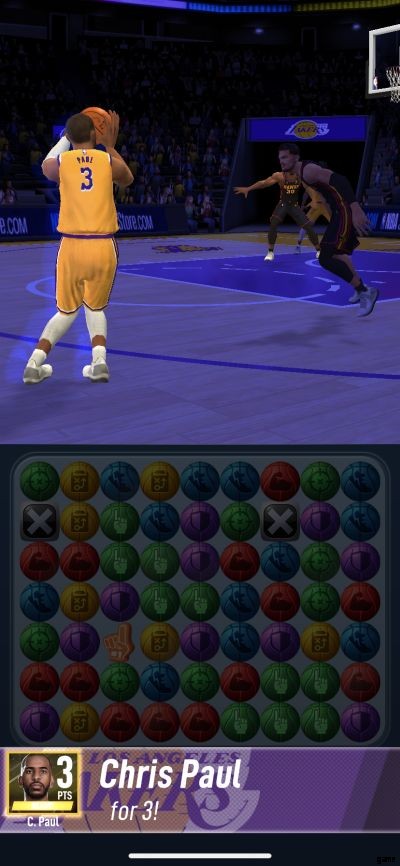
繰り返しになりますが、これらの特殊スキルはプレーヤーとそのクラスに依存する可能性があり、攻撃または防御に使用できます。最終的には、特殊スキルがフロアの両端で機能するプレーヤーがいることがわかります.ほとんどの場合、スペシャル スキルは、確実に 2 ポイントまたは 3 ポイント シュートを記録するのと同じくらい簡単です。これを有効にすると、それまでアクティブだったプレーヤーがスペシャル スキルを使用してチームメイトにボールをパスし、チームメイトがシュートを決めます。 100% の精度で。守備では、特別なスキルにより、大柄な選手が相手をブロックしたり、小柄な選手や運動能力の高い選手がボールを奪ってターンオーバーを強要したりできます。
最終的に、対戦相手もスペシャル スキルを起動できることがわかります (もちろん可能です!)。名前の下にメーターが表示され、スキルとチャージにどれだけ近づいているかが示されます。通常、その特殊スキルを停止するチャンスは通常 4 回ではなく 1 回だけであり、期待される射撃率をゼロにすることができない限り、そのスキルはその率に関係なく発射されたものと同じです。 !
関連するメモとして、ショットを逃した後、あなたと対戦相手の両方が攻撃的なリバウンドをつかむチャンスがあり、通常は誰かがショットを逃した後、ゲーム画面でもその確率が表示されます.オフェンスとディフェンスの両方の評価が、オフェンシブ リバウンドの成功の可能性に影響を与えるように見えますが、誰かが 2 回目のチャンスの試みのためにそのボードをつかむと、ほとんどのオフェンシブ スペシャル スキルが機能するのと同様に、2 ポイントが保証されます.
4.プレイヤーをレベルアップすることを忘れないでください
シーズンモードの最初の数人の対戦相手は簡単に選ぶことができるので、最初はそれほど重要ではないように思えるかもしれません.しかし最終的には、シーズン モードだけでなく他のゲーム モードでも、競争に遅れずについていくためにかなり頻繁にプレイヤーをレベルアップする必要があります。そしてそれは、あなたが現実のお金を喜んで支払わない限り、あなたが受け取るすべてのプレイヤーは 1 つ星または 2 つ星のプレイヤーであり、彼らが良いものになるまでにはかなりの時間がかかるという事実にも当てはまります.
できる限り全員をレベルアップする必要があると言っているわけではありません — プレイヤーをアップグレードするには、プレイヤー ファンドとトレーニング XP が必要です。シーズン モードの勝利で多くを獲得できますが、無限の供給があるわけではありません。これらのリソース。代わりに、最高の基本レーティングや最高のスターレアリティを持つものに焦点を当て、そこから取得する必要があります.しかし、とにかくプレイヤーをアップグレードすることの何が重要なのでしょうか?
その質問への答えは簡単です。各プレイヤーは、防御しているプレイヤーの防御レーティングと比較して、攻撃レーティングに基づいて乗数を持ちます。逆もまた同様です。どちらかのレーティングでアドバンテージを持つプレイヤーは、そうでないプレイヤーよりも高い乗数を持ち、その乗数は、期待されるシュート率を決定する上で大きな役割を果たします — 3 倍の乗数を持つプレイヤーは、3 倍の乗数を持つプレイヤーよりもシュート率がはるかに速く増加します。倍率は約 1 倍以下です。
逆に、マルチプライヤーが 1x ではなく 3x の場合、対戦相手の射撃を防ぐ可能性がはるかに高くなります。 (1x 未満の場合、それは不利な立場にあることを意味します!) 倍率が低い場合、そのパーセンテージを 50% まで上げるのは簡単ではありません。 a more consistent advantage on both offense and defense!
As a bonus tip, each player’s maximum level is capped based on your GM level, so if you’re trying to upgrade a certain player on your team and you’re at GM level 10, you can only upgrade up to level 10 for the meantime while you haven’t leveled up to GM level 11.
5. Know Your Players And Review Their Stats And Skills Regularly
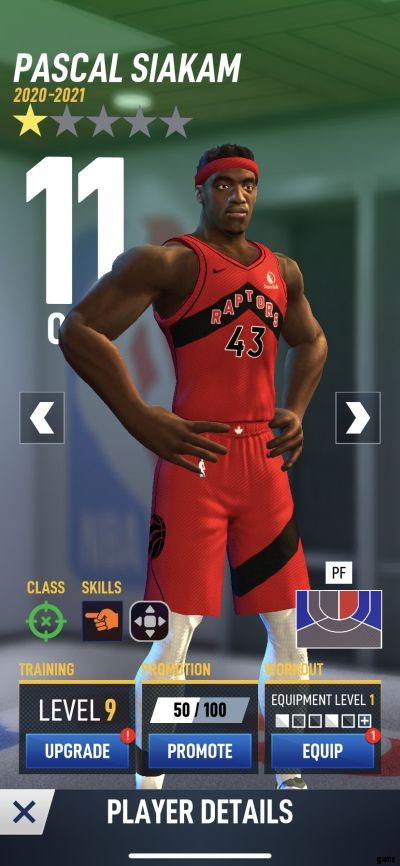
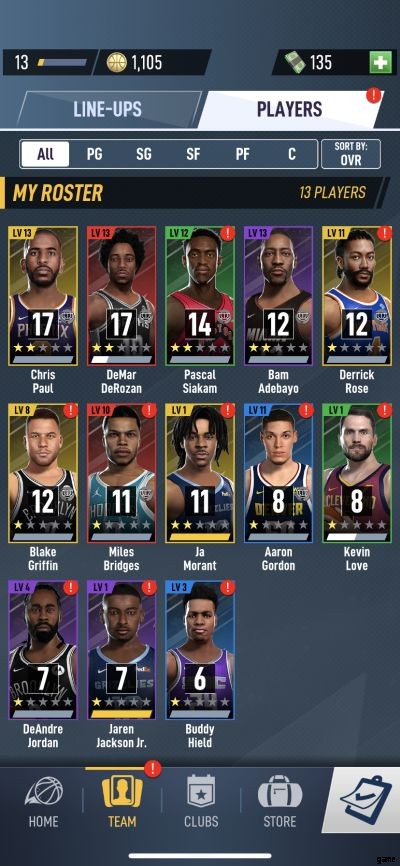
Aside from upgrading your players in NBA Ball Stars, you should also review your player profiles, which you can do by tapping on the Team tab, going to Players, then tapping on any of the players you currently have unlocked. By default, all players are sorted based on their overall rating, though you can also sort them based on position if you wish. Tap on a player and you’ll see their name, star rarity, overall rating, and more valuable information that could help you make a more informed choice when selecting your lineups for the next game.
Regarding the information that can be found when reviewing each player’s profile, you will see their class, which can be Agile (blue), Mighty (red), Precise (green), Decisive (yellow), or Rugged (purple). Agile players are usually the more athletic ones, Mighty players are supposed to have good physical strength, Precise players are known to be good shooters, Decisive players are usually the playmakers, and Rugged players are typically defensive specialists.
Next to that, you’ll see their Special Skill — some players have this and others don’t, but those that have such a skill may be able to swap rows or columns, destroy them, or create more gems of a certain color, among other effects. You will also see their Versus Skill, which is yet another type of skill that allows players to create special gems once they are fully charged — we will discuss this in greater depth later, but some of these gems may include Obstacle Gems, which simply “get in the way,” thus making it harder for opponents to break matching clusters, and Color Lock Gems, which prevent opponents from breaking gems of a certain color.

Next to the class and skills, right above the Workout section on the right side, you’ll see the player’s Preferred Zones — these are where players are most and least effective with their shooting. Areas highlighted in red are hot zones where a player may have a better chance of scoring than what their expected percentage indicates, while those in blue are those where their chances of scoring will be lower than expected. Gray zones are more neutral than anything else, while orange ones are extremely hot zones that are considered the most optimal for the player in question.
Right below those areas, you’ll see the Training, Promotion, and Workout sections — under Training, you can perform player upgrades or, if you choose not to level them up just yet, you can go there simply to check a player’s offensive and defensive rating. You can promote players to the next highest rarity level if you’ve collected enough shards to do so, while in the Equipment section, you can equip players with various items in order to boost their offensive or defensive rating.
Make it a habit to visit the Players section in the Team menu, because that won’t just help you familiarize yourself with your own players — if an opposing team has them as well, that’s just as good as scouting them ahead of the game!
6. Load Up On Player Funds And Training XP By Redeeming Your Merchandise Collections
Aside from playing more games in the various modes, including Season Mode, you can earn more Player Funds and Training XP by heading to the Merchandise Collections section — you can find this in the main screen by tapping on Collect on the right side of the screen. You can actually redeem the Player Funds and Training XP at any time you wish, but it would be best if you space it out every four hours or so, because that’s how long it takes for the Merchandise Collections to fully load up.
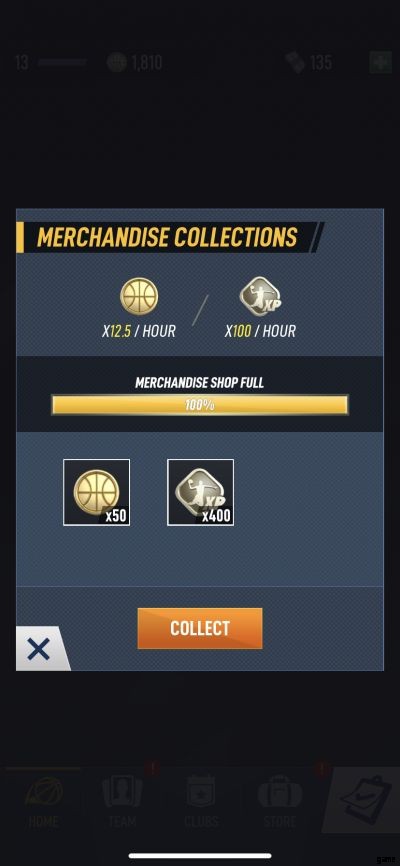
That means you can access this about three or four (or even five, if you’re having an especially sleepless night) times a day if you stick by the four-hour rule; it might not sound like much, considering the maximum amount of resources you can redeem is 50 Player Funds and 400 Training XP, but trust us when we say that’s going to keep adding up as long as you remember to wait four hours — or turn on your game notification so you’re informed anytime that the Merchandise Collection has filled up.
7. Watch Out For Those Versus Skills
As the game will let you know once the time comes, opposing teams, may they be AI or human-controlled, can try to get the upper hand on you by placing certain types of gems on the board after they’ve successfully pulled off a Special Skill. This is what NBA Ball Stars calls Versus Skills, and they may include allowing players (or allowing you as well) to place basic obstacles on the board to make it more difficult to successfully break those big clusters — or any other kind of match.
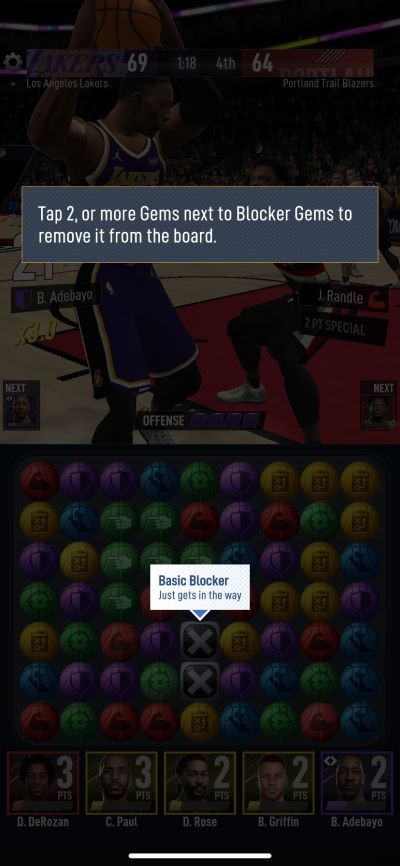
Certain players can blast entire rows or columns of gems with their Versus Skill, while others are so deadly that they can prevent certain colors from being matched (Color Lock) or prevent players from using their Special Skills. These may make it rather challenging and sometimes frustrating once you’ve leveled up sufficiently as a general manager, but there is a way to get rid of them.
In order to get rid of the blocker gems that appear whenever an opposing player converts on a Special Skill and activates his Versus Skill, you’ll need to break clusters around them or use one of your Power Gems, though that won’t always be easy — the AI tends to act quite smartly when it comes to the placement of blocker gems! Similarly, you too can set up blocker gems with a Special Skill, though you won’t be able to choose where to place the gems — this is done randomly by the AI, which is just fine as you won’t be able to view your opponent’s board anyway.
8. You Can Combine Multiple Power Gems For A Greater Effect
As good as it is to create a Power Gem by breaking a cluster of five or more gems, how about if you’ve got at least two of them in there, all next to each other or in the same row/column with one of those Row or Column Clear gems in place? Fortunately, you can combine these Power Gems to come up with an even greater effect where more gems are broken and more Special Skills are charged for more players on your team.
For example, if you’ve got an Area Clear and a Row Clear next to each other, activating the Row Clear wouldn’t just eliminate the row where it’s located; as you’re using it in conjunction with the Area Clear, you can break even more gems in the process, as the ones in the upper and lower rows will also be affected.

Another simple example would be if you use a Column Clear on a column where there’s a Row Clear or vice versa; either way, you’re going to be taking out every single gem in that row and column, instead of all the gems in just one of those two!
Whenever you’ve got the opportunity, make sure you’re trying out those Power Gem combos; they just might turn out to be enough to help you score a crucial shot or make a key defensive stop against your opponent. Besides, we can’t help but admit it’s cool to watch all those gems get broken whenever two or more Power Gems are combined in the same move.
9. Why Should You Complete The GM Prep List?
On the bottom right corner of the main screen, you’ll see a button with a checklist icon, and that will lead you to the GM Checklist, which is a list of introductory tasks that you will need to complete in order to unlock a new player and help you earn items to improve your players and team as well — these include Draft Tickets, pieces of gear, and Contract Shards, all of which shall be discussed later on in this guide in more detail.
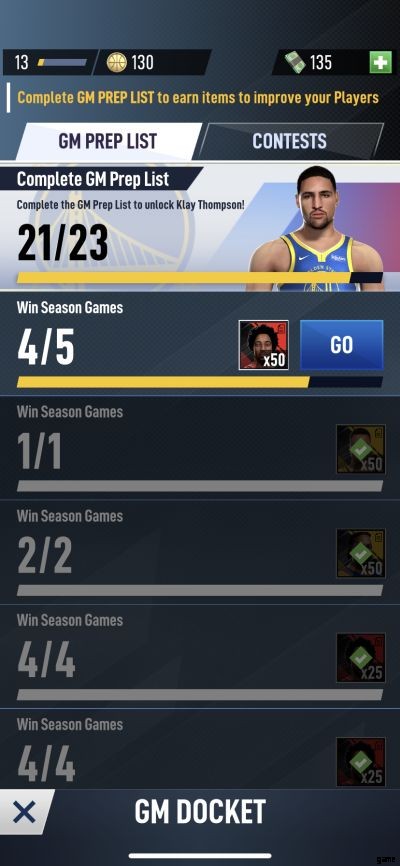
The tasks are things that you can complete organically while playing the game — you will be asked multiple times to win a certain number of Season Mode games, trigger Player Skills during a game in any mode, update one of your team’s formations, level up your players, and win games in other modes. You can tap on the checklist to review the active tasks at any time, though not all of the tasks will be available — these shall be slowly revealed as you continue making progress toward the checklist’s completion.
Once you have completed the checklist, you will unlock a new player in Klay Thompson, who’s currently sitting out yet another season for the real-life Golden State Warriors but available in the game to help any GM that may need a shooting guard. You will also unlock the Contests feature once you make it to GM level 14 — this can be found next to the checklist, and this offers limited-time events where you can potentially win more of the rewards we mentioned earlier on in this tip, even if you’ve already completed the checklist!
10. About Versus Mode – Competing Against Other Human GMs
Once you reach GM level 5 in NBA Ball Stars, Versus Mode will be unlocked, and as the name suggests, this is the mode where you can compete against other human-controlled teams. Unlike Season Mode, where you get to jump in during the final minutes of the fourth quarter and the final scores are fairly close to how actual NBA scores look like (they’re actually closer to late ‘90s NBA scores).
Both teams in Versus Mode games play to 11 points — you may end up with 12 or 13, but as long as you reach at least 11 points before your opponent does, you win the game and earn Player Funds, Training XP, and Ranking Points — the latter determines your placement in your current league or whether you will get promoted to the next one.
Based on your placement at the end of the week, you can earn more rewards — those in the Unranked league, for instance, will earn 100 Player Funds and 500 Training XP, while those who are high up in the Diamond League I (that’s 2,200 to 2,399 Ranking Points, in case you’re wondering) will earn five Sealed Duffle Bags (packed with mostly high-end items), 70 Instant Rematch Tickets (for quickly replaying previous games), and 450 Premium Player Draft Tickets.
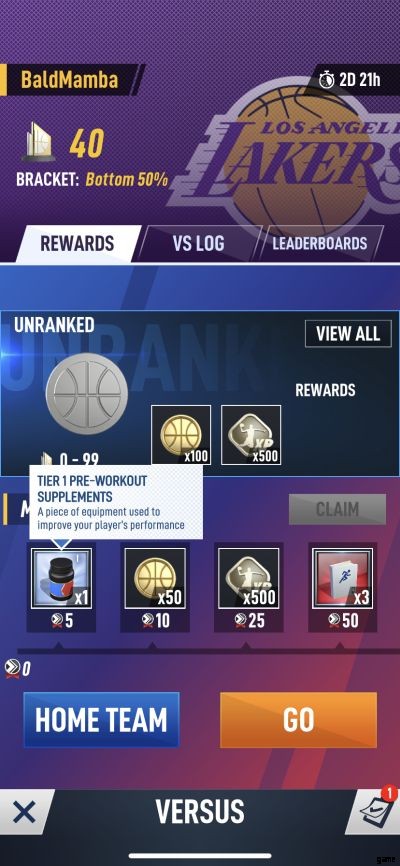
On the Versus screen, you will also see a couple other tabs next to the default Rewards tab — Vs Log allows you to view the results of your previous matchups, while Leaderboards shows you the latest local, global, and club rankings. Below your ranking and league information, you’ll see the Milestones section, where you can claim certain rewards, including Player Funds, Training XP, equipment/gear, and more, once you reach a certain number of Ranking Points.
Next to Go, you can tap on Home Team if you want to start the game with a small lead over your opponent; this is only available for those at GM level 16 or higher, so if you aren’t, you’ll have no choice but to start out with your score at zero and the opponent holding a lead of one to three points.
Right before committing to a game, you can change your team’s five-man lineup or formation by tapping on Edit and Change respectively. If you think your opponent’s overall rating is too high compared to yours (this can happen quite a lot), you can re-roll for a new opponent, albeit at the cost of 100 Player Funds per re-roll. Hit Play once you’re ready to hit the court, but keep in mind that each game costs one Versus Ticket. Versus Tickets refresh automatically until you’ve reached the maximum allowable of five, though you can pay cash to buy new Versus Tickets at the in-game store at any time.
11. RPG Hierarchy Applies When It Comes To Formations And Player Classes
You’ve probably seen it multiple times in many an RPG — it’s the elemental system or hierarchy, where A is stronger than B, B is stronger than C, and C is stronger than A. That also applies in NBA Ball Stars, and you will first be informed of this when Kara discusses the different formations that are available in the game. 5 Out beats Big Man, Big Man beats Stretch Big, Stretch Big beats Triple Point Guard, and Triple Point Guard beats 5 Out.
And once you reach level 13, the colors of each player class will become far more relevant, with a similar hierarchy coming into play. Mighty (red) beats Precise (green), Precise beats Decisive (yellow), Decisive beats Rugged (purple), Rugged beats Agile (blue), Agile beats Mighty — it’s pretty simple to memorize, and as we had noted above, this isn’t too different from the hierarchies you may be familiar with from any given RPG.
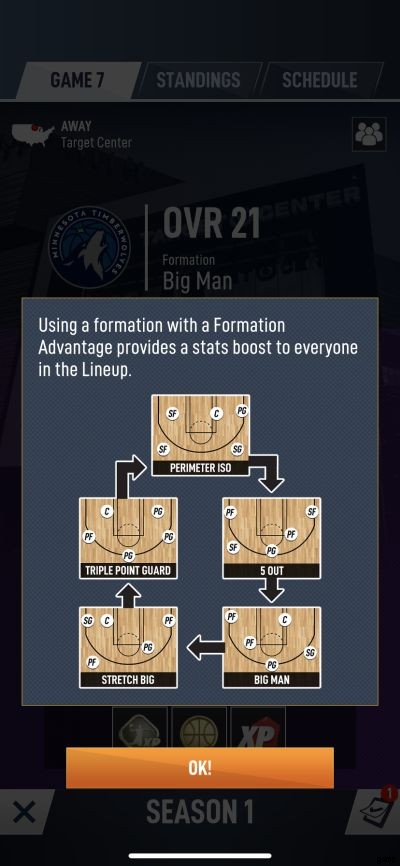
When it comes to the formations, it should be easy to see which formation is better than the other, simply by seeing how your team rating is affected depending on the formation you choose. That means you should choose the formation that gives you the best team rating — and the widest gap from the opposing team’s overall rating.
The player class hierarchy should also give you an idea of which players will have higher multipliers than others when being defended, or defending someone from the opposing team. This is good information to know in the early goings, and while we’re not sure why such details are only available once you reach GM level 13, it’s still very useful nonetheless.
12. Have At Least Three Player Classes Represented In Your Lineup
Although it may make the most sense to start your highest-rated players regardless of their class, that might not be the most practical approach if you’re trying to win more consistently. If you have, say, only Mighty (red) and Decisive (yellow) represented, that leaves three colors essentially wasted as far as charging up Special Skills goes — sure, breaking blue, green, or purple gem clusters could help raise your shooting percentage or decrease that of your opponent, but those gems won’t count toward anybody’s Special Skills. That could make it harder for you to have enough Special Skills ready for a big come-from-behind rally, or to end the game faster than expected.
Instead of merely looking at overall ratings and disregarding gem color/player class, it would be much more preferable to field a lineup that has at least three classes represented; four may be most ideal, and five, while sometimes a bit too many, is also fine. That leaves you with enough, or more than enough options for charging Special Skills, and if you’ve also got players whose Special Skills are only for use on defense (such players seem to be rarer in NBA Ball Stars), that allows you to win a game on either end of the floor!
Granted, your gem-breaking strategy and the ratings of the players on both teams will still have more bearing on who wins the game, but if you’ve got as many bases as possible covered, you can be more confident of a positive outcome once the final buzzer rings — or once 11 points has been reached by one team.
13. Earn Contract Shards And More By Playing In Showdown Mode
Showdown Mode becomes available to players who have reached GM level 9, and as you keep leveling up, new challenges in this mode will get unlocked as well, giving you different ways to load up on your basic resources while also earning Contract Shards.
As we haven’t talked about this resource yet in depth, you’ll need Contract Shards in order to collect most of the players available in the game, with more common players requiring fewer shards to unlock and rarer players requiring more. Also, if you have enough Contract Shards for an existing player, you can promote them to the next highest star rarity, which improves their Offensive, Defensive, and overall ratings immediately.
The available challenges in Showdown Mode may change on a daily or weekly basis, but the concept of games in this mode is similar to Versus Mode, except for the fact you’ll be playing against AI opponents. Essentially, you’re entering a tournament in this mode, with each of the three games requiring that you score at least 11 points to win. But since this is a tournament, each team you face will be progressively harder to beat than the last, with a higher overall rating.
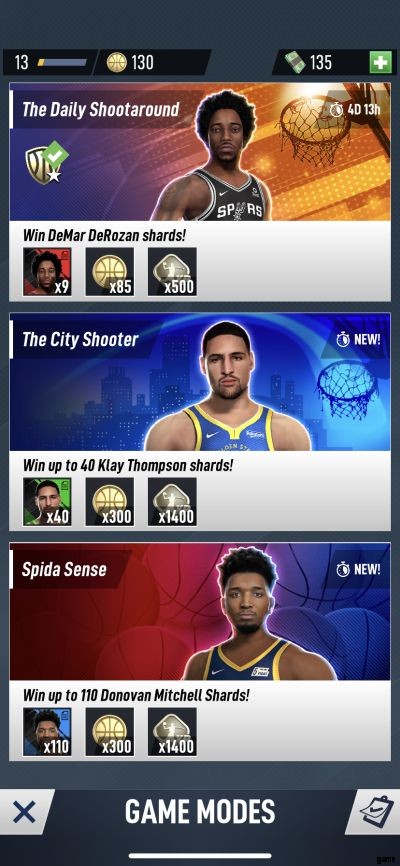
You don’t need to worry too much, though, as each challenge allows you to choose your preferred difficulty; as the game will inform you, higher difficulty levels mean better prizes! (At the moment, the game’s challenges include The Daily Shootaround with DeMar DeRozan shards, The City Shooter with Klay Thompson shards, and Spida Sense with Donovan Mitchell shards.)
Your prizes will also depend on how far you reach in the tournament — reaching the quarterfinals in Novice difficulty gets you more XP than Funds, reaching the semifinals gets you more Funds than XP, and winning the Finals gets you Player Funds, XP, and Contract Shards of the featured player. Opting for the higher difficulties could also earn you some Equipment Tokens, on top of the XP, Funds, and Shards we already mentioned. Make sure you aren’t aiming too high, because it costs 10 Showdown Tickets per tournament to enter! (These tickets, much like Versus Tickets, refill automatically.)
The game will warn you about this, but be sure you’re choosing your starting lineup carefully — once you’ve chosen your starting lineup, you cannot change it in the middle of the tournament! Also, you can replay Showdown challenges and automatically simulate them once you’ve completed them, so that should save quite a bit of time if you’re gunning for the same top prize the second time around.
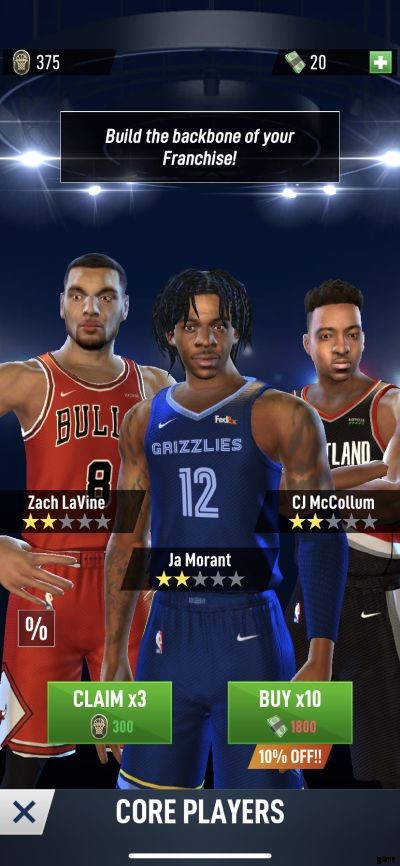
14. Adding New Players To Your Roster With Draft Picks
The Draft tab is the default one in the Store menu, and it is at this point where we should mention that there are different types of Draft Tickets you can use to make a selection. Core Player Draft Tickets are used in the Core Player Draft, and these would usually yield one-star or two-star players that might not have much use or upside once your overall team rating reaches the 100 mark or thereabouts.
Premium Player Draft Tickets will oftentimes be good for a two- or three-star player, though chances are you won’t be able to unlock the player just yet with the Contract Shards you earn. Lastly, Legendary Draft Tickets can get you two-star players and above, with a greater chance of fully unlocking the player — for the last two, it’s still possible you will end up with one-star Contract Shards, so keep your expectations reasonable!
Aside from the GM Checklist and Contests, some of the other ways you can acquire Draft Tickets are as a level-up reward, or as a milestone reward for winning games in Versus Mode. You can also purchase them with cash, though this premium form of currency is a bit hard to come by; you can get more cash as part of your daily login rewards (including the third to fifth-day rewards) or by purchasing it with real money in the store. Additionally, the sixth-day daily rewards as of this writing include seven Premium Player Draft Tickets, so that should be something to look forward to as well!
15. Outfit Your Players With Equipment To Improve Their Stats
Much like you should be outfitting your heroes with new armor and weapons in RPGs, your players in NBA Ball Stars also need certain pieces of equipment to improve their Offense or Defense stats (depending on the item) and increase your chances of winning matches, regardless of the game mode.
As we mentioned earlier, these items can be earned as Versus Mode and Showdown rewards, by completing GM Checklist tasks, or as part of your rewards for increasing your GM level, but you can also buy Gear Bags at the store with your Equipment Tokens, which can be earned by completing the non-novice tournaments in Showdown Mode. These come in six tiers of increasing rarity (and cost), and could be a great way for you to load up on items to outfit on your best players.
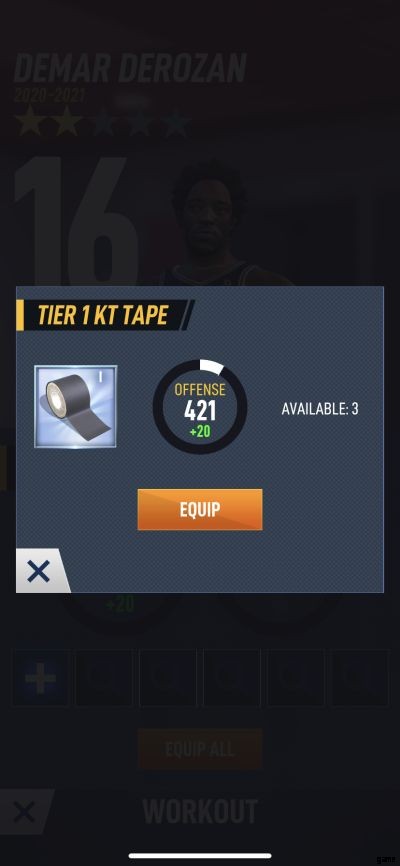
Depending on the type of item, you can equip it in one of the six available slots per player — gear is not player-specific, but you will need to fill up all of those six slots in order to increase a player’s equipment level. That means you can only equip Tier 1 equipment on an equipment level 1 player, Tier 2 equipment on an equipment level 2 player, and so on.
We would suggest focusing mainly on your top players when equipping items, as that should allow you to fill up those slots faster and consequently increase their Equipment Level so you can make use of the more premium gear and keep increasing their Offense and Defense stats and overall rating.
And this wraps up our comprehensive guide of Netmarble’s basketball game NBA Ball Stars. If you have discovered any other tips or strategies, feel free to drop us a line in the comment area below!