驚くべき栽培シミュレーター – 手動気バーストリング
このガイドでは、手動 Qi バーストの意図しない機能とその使用方法について説明します。このガイドで使用されている配列は、使用されるアイテムやその要素に関する他の考慮事項がなく、純粋に最大の気を収集するためのものであるため、例としてのみ使用されています.このガイドでは、同じ範囲の 4 つのノードを使用して、手動 Qi バーストの最も基本的なバージョンについて説明します。
ACS マニュアル Qi バースト
このガイドでは、手動 Qi バーストの意図しない機能とその使用方法について説明します。このガイドで使用されている配列は、使用されるアイテムやその要素に関する他の考慮事項がなく、純粋に最大の気を収集するためのものであるため、例としてのみ使用されています.このガイドでは、同じ範囲の 4 つのノードを使用して、手動 Qi バーストの最も基本的なバージョンについて説明します。 8 ノードを使用したり、混合範囲アイテムを使用したりするなど、他の方法もありますが、現在、このガイドの範囲外です。
手動気バースト
Manual Qi Bursting は、意図しないメカニズムを使用して、タイルの気の量を増やすことです。主に終盤の栽培アレイとゴールデン コアのブレークスルーに使用されますが、気の「空隙」 (タイルに最小限の気しか含まれていないが、多くの気の集まりがある状況) をクリアするためにも使用できます。
手動 Qi Bursting は、アレイの周囲のタイル (中央のタイルではなく) の Qi 収集をリセットして、中央のタイルの Qi の量を増やします。
なぜそれが機能するのかを理解するには、培養アレイの機能を説明する必要があります.
栽培アレイ
栽培アレイは、タイルの気を高めるために構築されています。タイル上の気の量は、タイルに集まる気の量に関連しています。近くに気の集まるアイテムがあると、気の集まりが増えます。
[テクニカル]
- Qi と Qi 収集の関係については、XiaWorld.LingMapData.UpdateLingUnit() で触れています。詳細については、inari によるコード ダイビングを読むか、自分でコードを掘り下げてください。
- さらに詳細については、Qi リンクのガイドをご覧ください。
[テクニカルの終わり]
栽培アレイには単一の中心があり、近くの気収集アイテムによって気の収集量が増加します。気収集アイテムには考慮すべき多くの価値がありますが、このガイドでは範囲と価値のみを見ていきます。
注意すべき重要なことは、気は複数の要因に基づいて更新されることです。そのうちの 1 つは、近くのタイルの気収集の違いです。気は通常、気の集まりが高い正方形に集まります。タイルの気採集値の差が大きいほど、より多くの気が転送されます。手動 Qi Bursting は、中央近くのタイルの Qi 収集をリセットします。これにより、小さい (中央に 2000、近くに 1800、200 の差) から巨大な (中央に 2000、近くに 0、2000 の差) までの差が生まれます。
範囲
気採集アイテムは、範囲内の気採集値を増加させます。以下は、気収集範囲が 5 のアイテムの例です:
範囲が何であるかを理解するために、以下にそれらを説明する画像を示します:
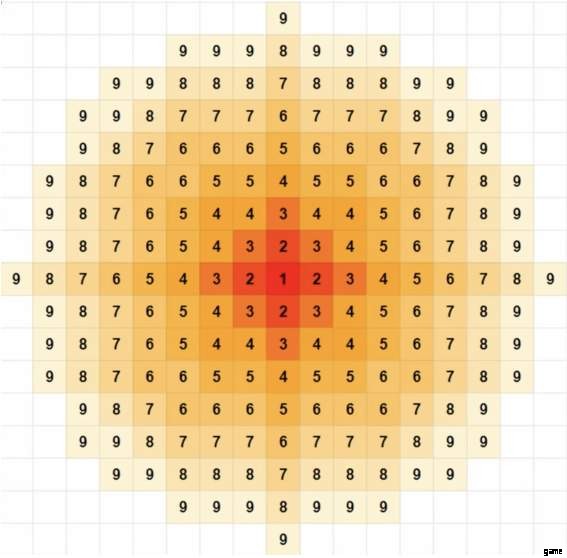
範囲 1 はアイテムのタイルです。現在、範囲 1 のアイテムにバグがあります。幸いなことに、ゲーム内の唯一の範囲 1 アイテムは Qi クッションです。そのため、Range 5 気収集アイテムを Range 5 タイルに配置して、最大限に活用する必要があります。
上の画像を別の方法で見ると、Holy Stone Flooring のある中央のタイルが範囲 1 です。範囲 2 – 赤いファブリック カーペット。範囲 3 – ブルー ファブリック カーペットなど
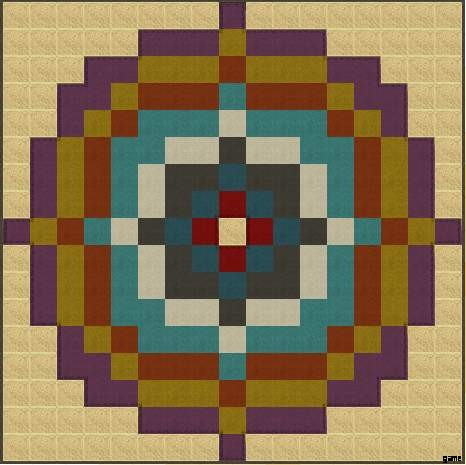
値
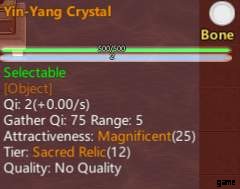
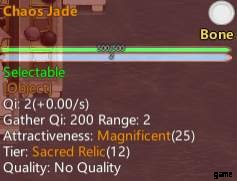
気の採集値は、アイテムが提供する気の採集の量です。通常、効果は距離によって減少しますが、主な概念は、高いほど良いということです。ボスの秘密のドロップの例:
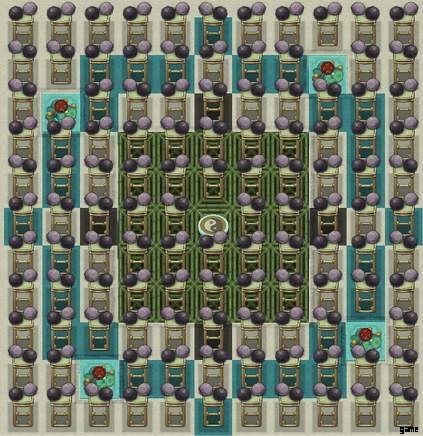
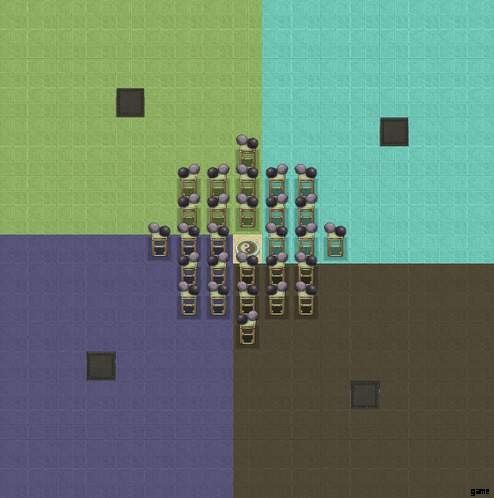
エンドゲーム配列の例
Qi Bursting を説明するために、エンド ゲームの栽培アレイがどのように見えるか (使用されるアイテム) の例を次に示します。

この配列は、昇天した仙道像や遺物 (精霊塔) を使用しません。使用アイテム:
- 範囲 1 (1 アイテム):クッションの下のカオス ジェイド
- 範囲 2 (4 アイテム):カオス ジェイド
- 範囲 3 (8 アイテム):ドラゴンの糞
- 範囲 4 (16 項目):ホワイト スケール
- 範囲 5 (20 アイテム):陰陽クリスタル
最終結果は、中央のタイルに約 3.5K の Qi が集まるようになります。
気の集まりのリセット
アイテムを配置または削除すると、近くのタイルの気の収集がリセットされます。影響を受けるタイルの範囲は、アイテムの気収集範囲に基づいています。
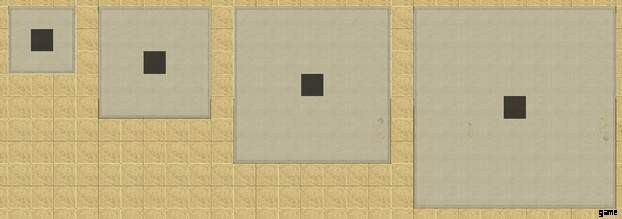
- 範囲 2 のアイテムは、アイテムを中心とした 3×3 の正方形 (黒い正方形) に影響します。
- 範囲 3 のアイテムは、アイテムを中心とした 5×5 の正方形 (黒い正方形) に影響します。
- 範囲 4 のアイテムは、アイテムを中心とした 7×7 の正方形 (黒い正方形) に影響します。
- 範囲 5 のアイテムは、アイテムを中心とした 9×9 の正方形 (黒い正方形) に影響します。
- 計算に基づくと、範囲 7 のアイテムは 13×13 の正方形に影響します。
- 計算に基づくと、範囲 9 のアイテムは 19×19 の正方形に影響します。
影響を受ける範囲の式:
- 平方直径 =(気の収集範囲 * 2 – 1)
リセットのトリガー
リセットをトリガーする方法は複数ありますが (インベントリからドロップする、スタンドからドロップする、禁止されていない状態でピックアップする)、マイクロ管理を最小限に抑えた簡単な方法があります。
まず、アイテムを地面に置き、禁止します。アイテムを配置するには、弟子のインベントリからドロップするか、スタンドからドロップします。邪魔にならない限り、常に 1 タイル南にドロップされます。ドロップしたら、アイテムを禁止します。ディスプレイの配置方法の例を次に示します。カーペット敷きのタイルは、アイテムが禁止される場所です。
アイテムが禁止された後、表示を削除します。リセットをトリガーするには、項目の上に Tic-tac-toe (Leisure の下にあります) を作成します。材料費がかからず、すぐに建てられるので、一時停止中でもできます。
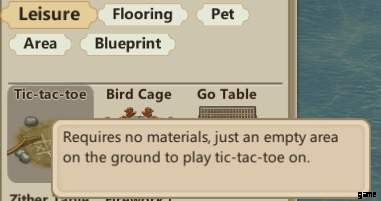
リセットを再度トリガーするには、Tic-tac-toe を再構築します。 While the reset won’t happen when you remove the Tic-tac-toe, keeping the Tic-tac-toe will be a reminder which items have already been reset.Using the Tic-tac-toe will let you save space, since you don’t need to mess with walls near the array.
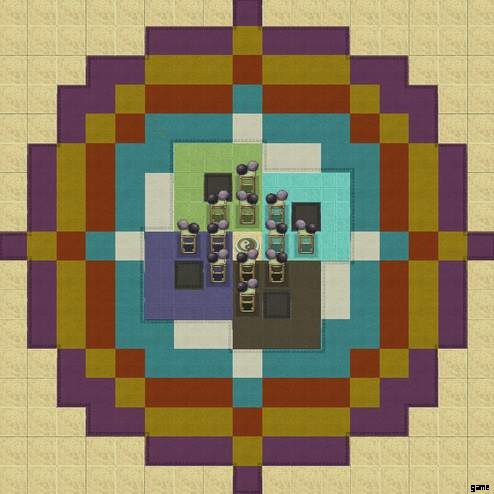
Resetting Item Placement
While it’s important to know how to reset the gathering, knowing where to place the item is important as well. Since we know the amount of tiles affected, we can take that into consideration when placing the item. The items are placed off-center, going clockwise. The exact position is dependent on your cultivation array. While the example array above is using Range 5 items, you can also use Qi bursting with smaller arrays, even with one using only range 2 items. The important thing to consider:
If your array is using range X, you’d need the resetting item to have a range of X-1 or greater. So if your array is up to Range 4 and filled with Spiritwood, then you’d need to use items with a Qi gathering range of 3 or greater. While you could go below it by removing some Displays, it’s not something you should be doing (explained further in the Cultivation Array guide [Link TBA]). Spiritwood is cheap and can be used even with the example end-game array.
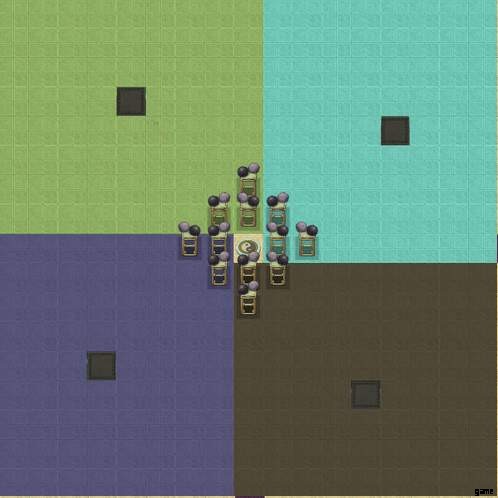
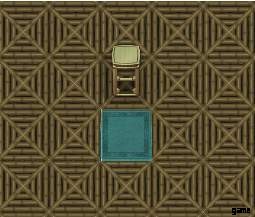
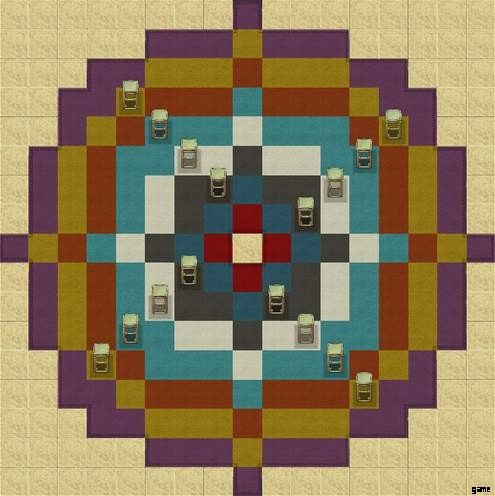
To give a better visual example, here’s where you’d place the resetting item for a 4 Node Manual Qi Burst.
Range 2 items
The black carpet tiles, at Range 4, is where the items should be placed when using Range 2 items for resetting. While it is an option, I wouldn’t suggest it due to there being no cheap Range 2 items.
Range 3 items
The black carpet tiles, at Range 5, is where the items should be placed when using Range 3 items for resetting. Useful if you’re not using Range 5 Qi gathering items in your array and you’re lacking space.
Range 4 items

The black carpet tiles, at Range 6, is where the items should be placed when using Range 4 items for resetting. This is the most common method, due to the low cost of Spiritwood. Needed for the end-game arrays using Range 5 items.
Range 5 items
The black carpet tiles, at Range 8, is where the items should be placed when using Range 5 items for resetting. This should be used if you’re using end-game arrays with Xiandao statues at Range 9.
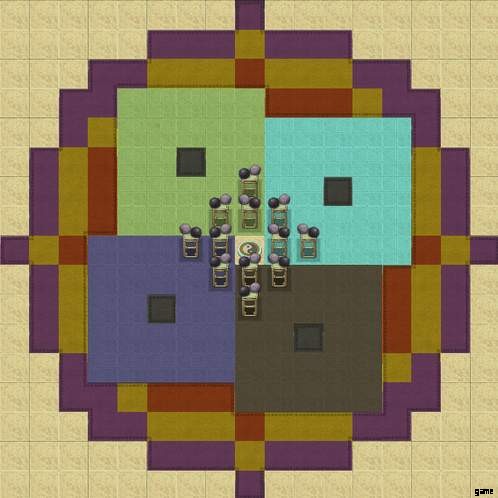
To clear things up, here’s another version of those images. The Displays mark the place where the items should be placed on the ground. The ones on Black carpet for Range 2, White Carpet for Range 3, etc.
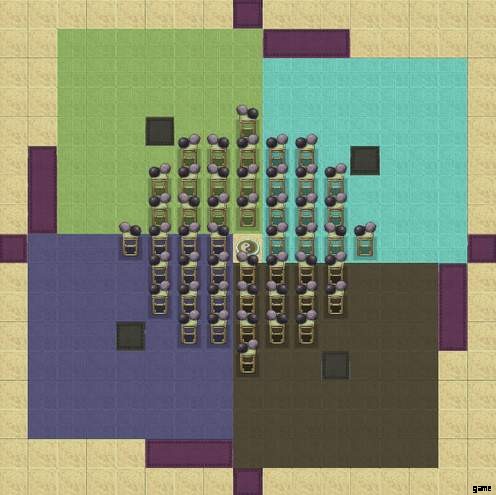
Preparing for Manual Qi Bursting
Taking the knowledge of making arrays, and resetting the tiles of it, we can now look at the bursting process. Taking another end-game array as a base, the first step is adding the resetting items. Since the array is using Range 5 (Yin Yang Crystals) items, you’d need at least Range 4 items for resetting. For this example, Spiritwood will do fine. Now to place the Spiritwood where it needs to be.
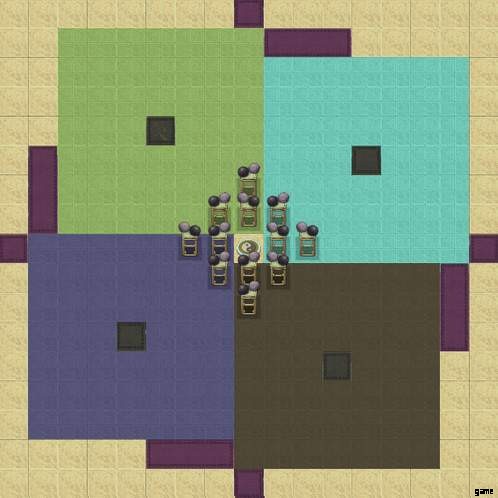
For that, I’m using the method of placing them on Displays, then dropping the item where it needs to be. The Spiritwood flooring is where the items will end up being.
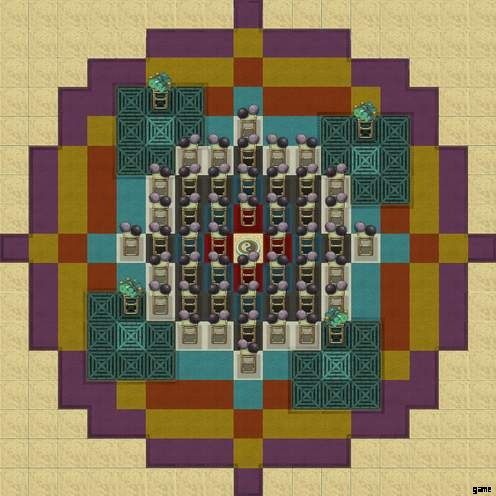
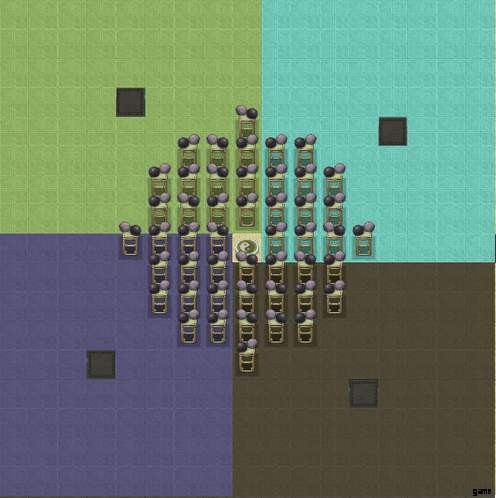
While the game is still paused, I’ll remove the Spiritwoods from Displays and then ban them.
Since I have no need for the empty displays, I’ll remove them. Now it’s only a matter of waiting until the Qi gathering reaches the peak value. That’ll take 5 days, which you can always check with MoreGridInfo or a similar mod.
This is the end result, and it’s now ready for Manual Qi Bursting.
Manual Qi Bursting
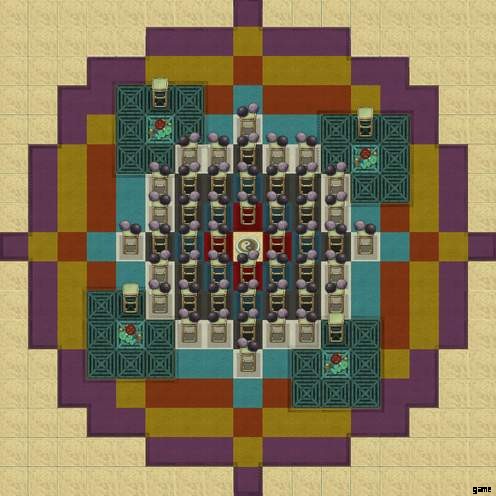
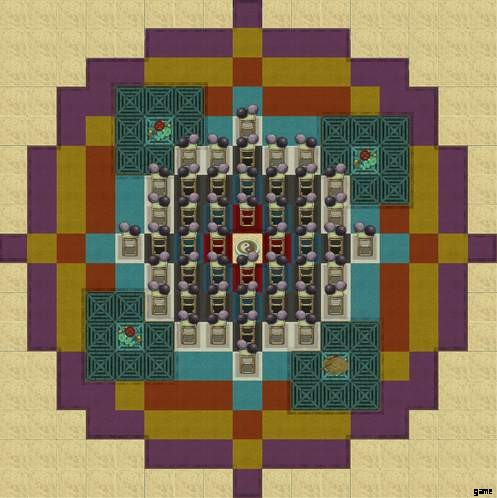
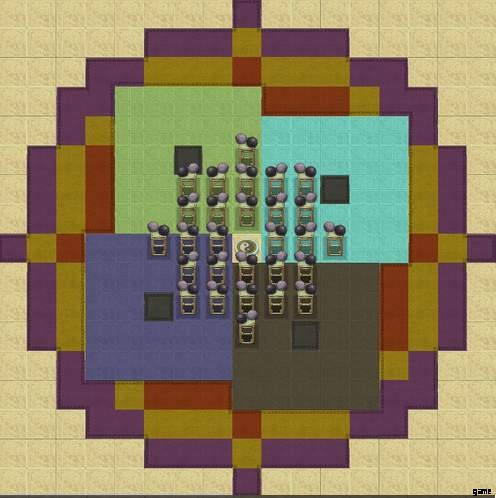
At this point, we have our array ready and the cultivator is using it. Whether you plan to use manual Qi bursting for cultivation or breakthroughs, the method is the same. The Qi on the center tile is around 1.9K (Qi and not Qi gathering).
First, build a Tic-tac-toe over the bottom right item. Now the area surrounding the Spiritwood will have its Qi gathering reset. You might also notice the Qi on the center tile jumping up.
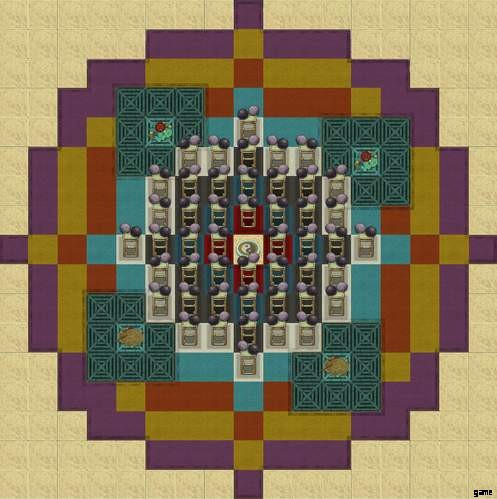
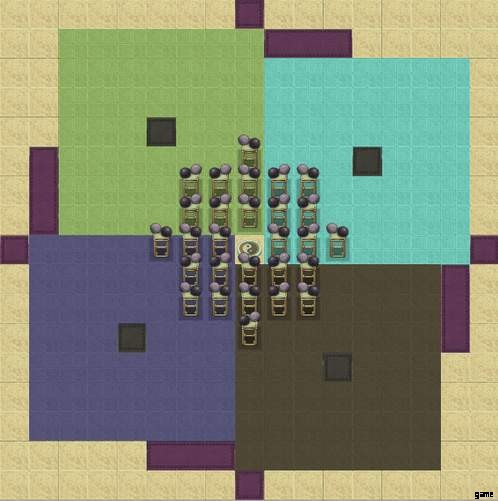
Now wait an ingame hour. The previous image was done at 12:00, the next will be at 13:00. Build a Tic-tac-toe over the bottom left item (since we’re going clockwise). Now the area surrounding that Spiritwood will have its Qi gathering reset.
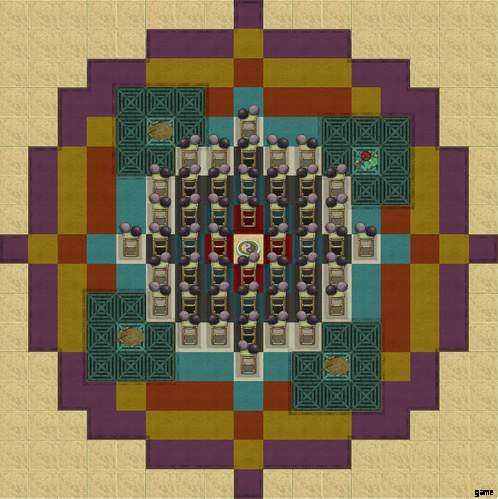
Now wait another ingame hour. At 14:00, build a Tic-tac-toe over the top left item. The area surrounding that Spiritwood will have its Qi gathering reset.
Now wait another ingame hour. At 15:00, build a Tic-tac-toe over the top left item. The area surrounding that Spiritwood will have its Qi gathering reset.
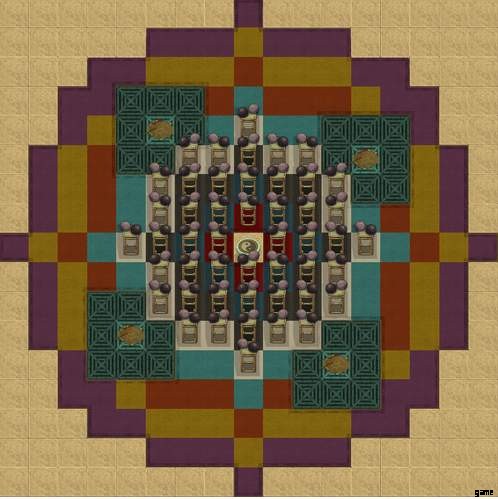
At this point a full circle has been done, and the original 1.9K Qi on the center tile has turned into 4.7 Qi. If the breakthrough continues, you can also keep going with manual Qi bursting. While you can continue right after building the last Tic-tac-toe, I suggest you wait until the Qi gathering increases a bit. That way the results will be greater. This would be a good point to remove the placed Tic-tac-toes in preparation for the next manual Qi burst.
For that purpose, I’ll wait 24 ingame hours, from the moment the first Tic-tac-toe was added. It’s 12:00, and the center tile has 5.4K Qi. Now build a Tic-tac-toe over the bottom right item. Then wait another hour and build a Tic-tac-toe over the bottom left item. And so on and so on.
Qi Void and Other Anomalies
While the technical part was touched upon by the Code diving guide, the most common anomaly you could face is when the highest amount of Qi on a tile is not on the center tile. The so-called Qi void will have similar symptoms, so I’ll be treating it as the same thing.
It will happen when the Qi gathering in the array is unbalanced, two ways in particular:
- The highest Qi gathering value occurs on multiple tiles away from the center.
- The center and 3×3 square surrounding it have identical Qi gathering values.
The main reason for the anomaly is messing up the ranges. To illustrate the example here’s what an “array” with incorrect ranges looks like:

That mess of an array has the highest Qi Gathering on multiple tiles, with the highest Qi on the edges. The middle has over 3K Qi gathering, but due to the Qi void, there’s a 5×5 square with 0 Qi. The four corners of Bamboo flooring get 2.5K Qi every once in a while, but it isn’t spread any further.
To avoid the anomaly happening, don’t mix up the ranges. Have the Range 5 items at Range 5 from the cushion, have the Range 2 items at Range 2, and so on. Another way of solving that is building asymmetrical arrays and|or having Qi Corridors.
While there are reasons you might want to go against that, like when you lack the more appropriate materials or when you’re using a full 48 Mortal Bodies, you will have a higher chance of experiencing the Qi anomalies.
To fix the anomaly, trigger a manual Qi Burst. That will make the above “array” usable for cultivation.
Other Concepts
While the previous should be enough to explain Manual Qi Bursting, there are other factors to consider as well.
8 Node Bursting
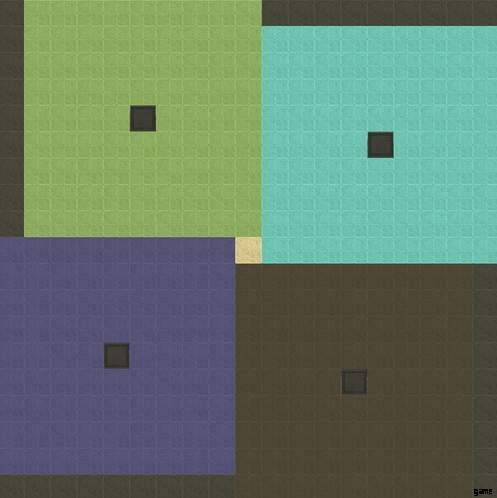
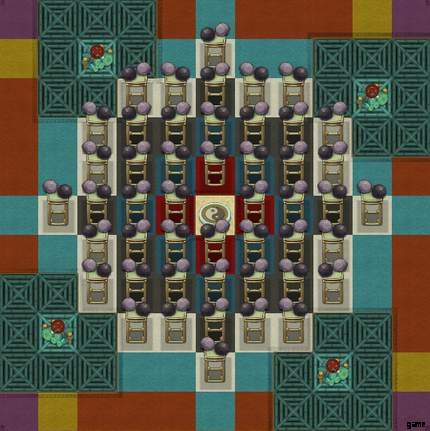
A tile has 8 surrounding tiles. The order that Qi is transferred goes from incrementally on the horizontal axis, then on the vertical axis. To put it in simpler terms, here’s an image illustrating it:
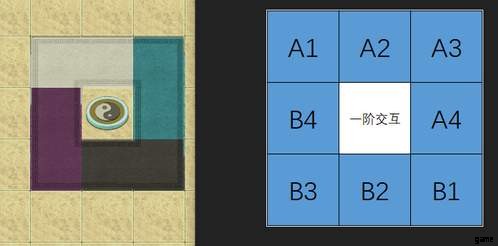
So the order goes B3>B2>B1>B4>Center>A4>A1>A2>A3. The A|B separation is related to the Flow and Return Directions (complex topic, out of scope for this guide). The order is also why the resetting starts from the bottom right and goes clockwise. The image on the left displays the affected tiles surrounding the cushion if you’re using a 4 Node Manual Qi Bursting design.
While it’s not a big issue, there are slight inefficiencies, since you’re resetting two tiles near the cushion at once. To fix that, you need to use an 8 Node Manual Qi Bursting Design, which will make the affected tiles more like this:
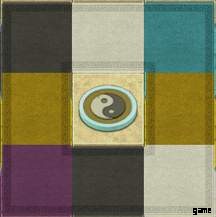
To illustrate, here’s what an AR 5 BR 4 would look like if it’s using 8 Node Manual Qi Bursting Design:
To utilize it, the same logic applies as a 4 Node Design. Start at bottom right and go clockwise.
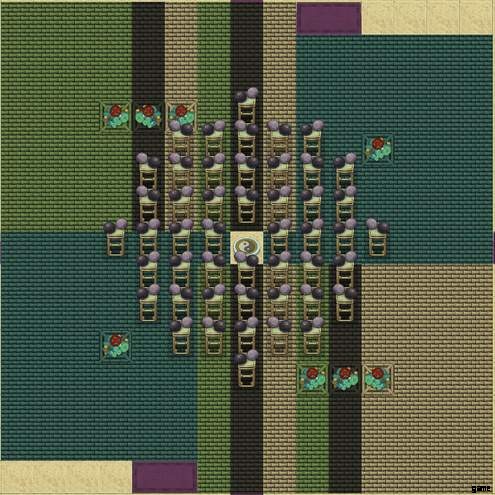
In this example, the Spiritwood on Holy Stone(light flooring) would be triggered first, as it resets the B1 tile.
- Then trigger the Spiritwood on Graystone (dark flooring), as that resets B2. Waiting an hour before you trigger the next one still applies.
- Then trigger Spiritwood on Bamboo (green flooring), as that resets B3.
- Then trigger the Spiritwood on the bottom left corner, as that resets B4.
- Then trigger the Spiritwood on Bamboo (green flooring) in the top left, as that resets A1.
- Then trigger the Spiritwood on Graystone (dark flooring), as that resets A2.
- Then trigger the Spiritwood on Holy Stone (light flooring), as that resets A3.
- Finally, trigger the Spiritwood in the top right corner, as that resets A4.
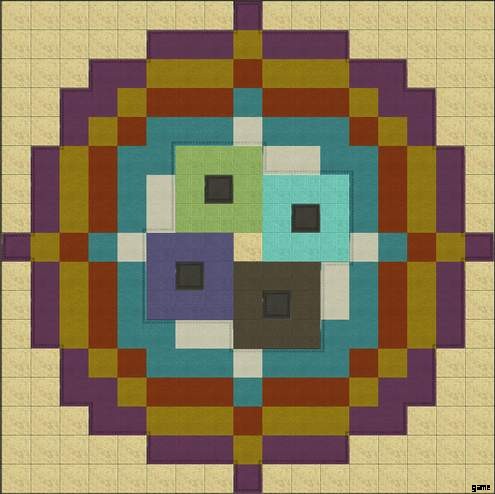
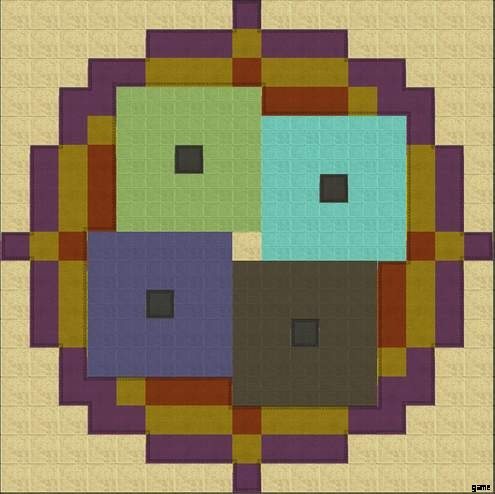
Examples
The example arrays with manual Qi bursting capabilities are built with Yin Yang Crystals, assuming a symmetrical array. The colored squares are the tiles reset, while the Black carpeted tiles are where the resetting items should be placed.
This is using a simple 4 node design.
AR for Array Range, based on the highest range items used in the array.
BR for Burst Range, based on the range of the Qi resetting item. (Qi Gather Range of the item)
AR 5 BR 4
AR 5, BR 5
AR 4, BR 3
AR 4, BR 4
AR 4, BR 5
AR 3, BR 2
AR 3, BR 3
AR 3, BR 4
AR 3, BR 5