Far Cry Primal – 適者生存:サバイバー、エキスパート、パーマデス
Ubisoft ポートフォリオの中で最も困難な実績 / トロフィーを簡単に (っぽい) 作成しました。
Expert Survivor でゲームに勝つ
先に進む前に、Permadeath なしで Expert 難易度と Survivor モードでゲームをクリアしていない場合は、停止してください。
何時間ものゲームプレイを実行に注ぎ込んで、すべてのレッスンを難しい方法で学習しても、自分に有利になることはありません。 Expert Survivor を倒した後でも、ほとんどの人は Survival Of The Fittest を獲得するまでに permadeath で少なくとも数回実行する必要があります。このガイドの残りの部分は引き続き適用されますが、適切な注意を払い、最初にフード チェーンのトップを獲得することを楽しんでください。
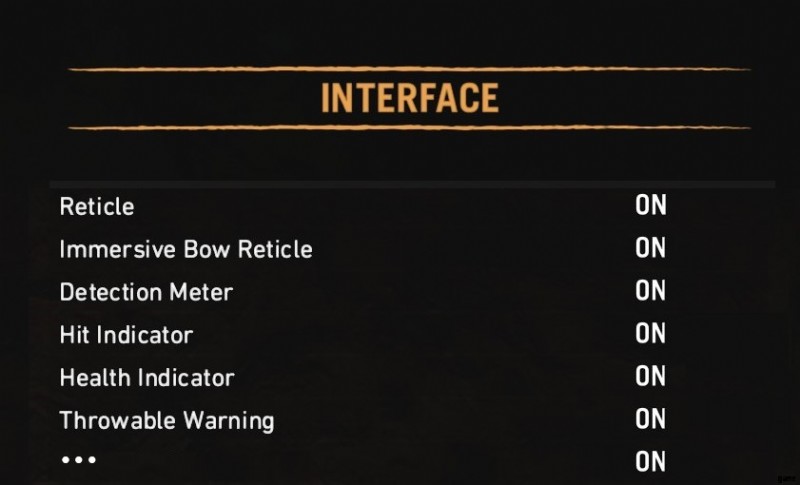
重要な設定
新しいゲームを開始
適者生存のロックを解除するために必要な設定は次のとおりです:
- サバイバー モード:オン
- パーマデス:オン
- ゲームの難易度:エキスパート
アニメーションの検索:オフ
これがないと、リソースを拾うたびに 1 秒間アニメーションが停止します。強制アニメーションは人を殺す可能性があります。フル スプリントでリソースを獲得できるようになる必要があります。
ハンター ビジョン持続時間:無限
プレイスルーのほぼ全体で、ハンター ビジョンをアクティブにしたいと思うでしょう。
音楽オフ
捕食者はハンターの視界に現れないので、見る前に聞くことができます。
明るさ (+)
夜でも見えるほど明るい。
ハンター ビジョンのグレー表示を相殺するために、コントラストとガンマも操作できます。
視野スケーリング (~105)
これは側面攻撃から保護しますが、設定が高すぎると金魚鉢効果が生じます。病気になったり、目標を失ったりすることなく、できるだけ高くしてください。私の場合、スイート スポットは 105 です。
インターフェース オプションはすべてオン
情報を制限する理由
これらのいくつかは非常に貴重です。私がスキップするのは、ツールチップ / チュートリアルの更新 (これらが必要な場合は、間違ったガイドを読んでいるということです) と、気を散らすと思われるしゃがみインジケーターだけです。
戦略
大雑把に言えば、私の戦略はできるだけリスクを少なくして序盤のゲームを切り抜け、セイバートゥースを飼いならすという目標に向かってまっすぐ進むことです。セイバートゥースを味方につけると、ゲームは劇的に寛容になります。
そこから、ストーリー ミッションを進めながら、最小限のリスクの XP の機会で、最も影響力のあるフル スキルと装備を最初にターゲットにする戦略です。
最後の 2 つのミッションは、Ull と Batari を殺すことです。完全装備でも、どちらも危険な戦いです。
序盤のゲームを乗り切る
Far Cry Primal は、ペットと一緒にプレイするように設計されています。あなたがそれを手に入れるまで、あなたは非常に、非常にぐにゃぐにゃです。最初の目標は、あなたを殺す可能性のあるすべてのものに気を取られることなく、白いオオカミを飼いならすことです.したがって、ルール 1 は、そのオオカミを飼いならすまで、できる限りの遭遇を避けることです。
オロスへの道
ありがたいことに、プロローグ自体はそれほど致命的ではありません.実際、ゲーム内でリソースを収集するのに最も安全な場所の 1 つです。キャンプを作って棍棒を作った後、ヤギを狩った場所に戻ると、従順なバクがたくさんいることがわかります。先に進む前に、必ずリソースをいっぱいにしてください。
セイラの足跡をたどる際にも、あらゆる機会に調査してください。各調査サイトは、リスクのない XP を提供します。
洞窟システムに入る前に、3 匹のオオカミを追い越す必要があります。火でそれらを怖がらせて先に進みます。自分のオオカミを飼うと、オオカミを狩るのがずっと簡単になります。
深い傷
ゲームのこの時点で自分がどれほど弱いかを過小評価することはできません。公正な戦いはありますか?あなたは負けます。それで逃げたいの?通常は遅すぎます。唯一の選択肢は、テイクダウンか完全回避です。
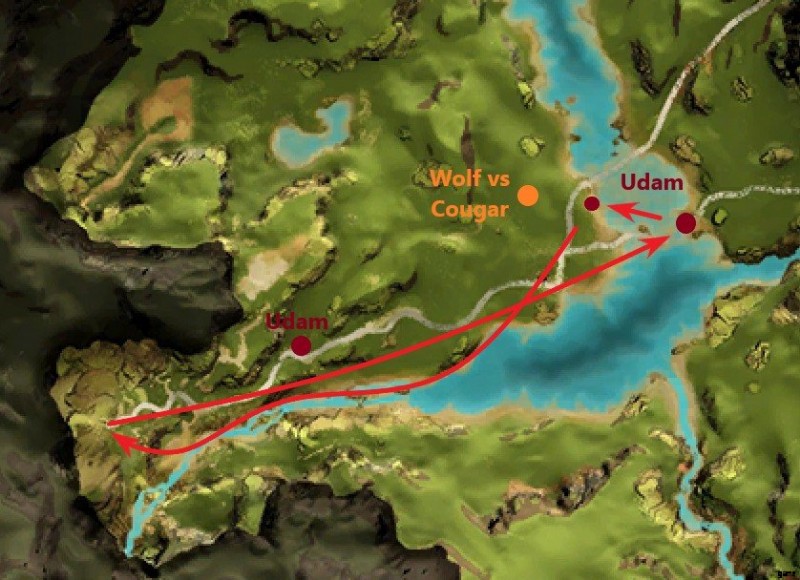
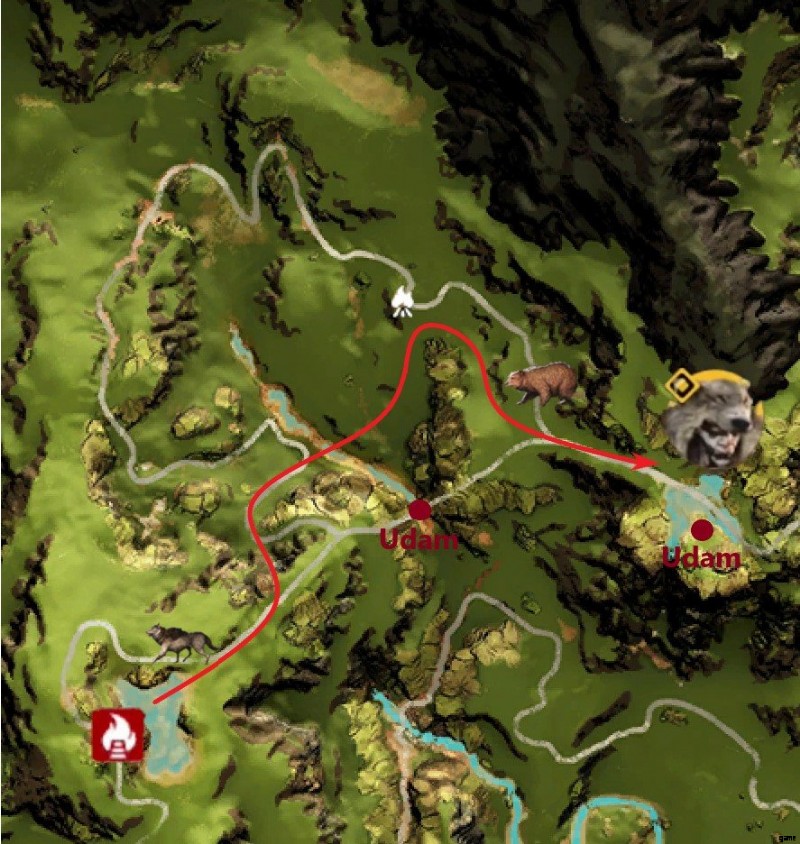
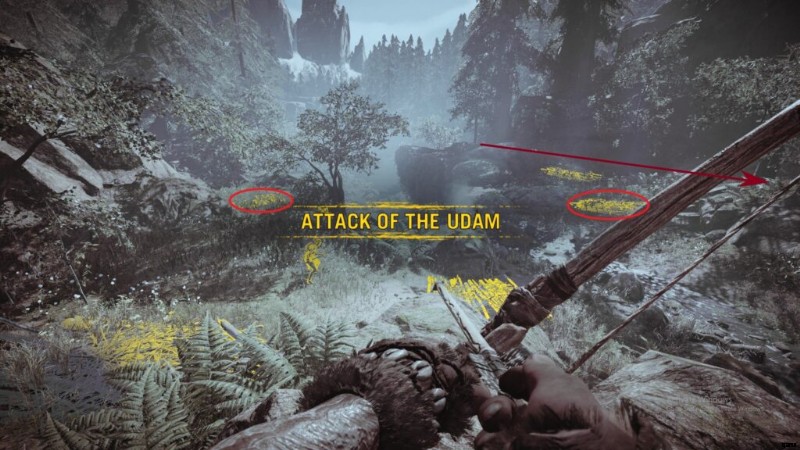
村から出てくる小川をたどって川に降りると、反対側に 2 つのウダムがあり、左側 (川の手前) に 1 つが見えます。最初に川の向こう側にある 2 つに向かいます。素早く近づき、最後の 20 フィートかそこらだけこっそりと忍び寄ります。最初に右側のウダムを倒し、すぐにもう一方を倒します。緑の葉を収穫し、死体を略奪してください。
いずれかの体に緑の葉がある可能性があり、その場合は村にまっすぐ戻ることができます.それ以外の場合は、川の村側に戻り、最後のウダムを殺さずにグリーンリーフを後ろに連れて行きます.避けたいオオカミの先に、ジャガーがオオカミと戦っています。
緑の葉を手に、村から出てくる小川に戻る。右側のブドウの木を登らないでください。散歩中に 3 つのウダムの真ん中に出てしまいます。川床を歩き続け、左側の最後のブドウの木を登ります。
シャーマンのテンセイ
初めて、ミッションの外でスクリプト化されていない自由が得られます。これは悪いことです:チェックポイントからのリロードがなく、遭遇はランダム化されます.
川床に戻り、クエスト マーカーに従ってナクティかがり火に向かいます。ここでの唯一の本当の脅威は、イノシシ、ウェンジャ イベント、そして放浪するドールの可能性です。シカやヤギを狩るのをやめてください。
篝火を手に入れたら、バンテージを使って徘徊するオオカミを探しましょう。クエスト マーカーをたどると Prashrawa's Birth に向かいますが、そこには 3 つの Udam がキャンプしている可能性があります。代わりに、丘を左に滑り降りて、下の谷を渡ります。反対側を登り始めたら、クマに耳を傾けてください。それがあなたを見つけたら、谷に滑り降りて、Prashrawa's Birth の反対側に回ってください。
余談ですが、丘を滑り降りることは非常に重要で、特に序盤のゲームでは重要です。スプリント フォーエバー スキルを使用できるようになるまでは、多くの場合、敵を追い越す唯一の方法です。それでも、マンモスやライノの突撃から逃れる唯一の方法は、上ったり下ったりすることであり、通常、「上に」いる時間はありません。
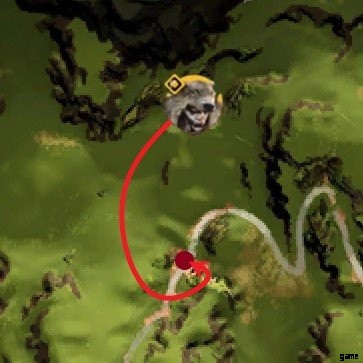
Tensay の洞窟に近づくと、Stone Fingers でキャンプしている 3 つの Udam に出くわすことがあります。彼らがそこにいない場合は、近くにある 2 つの Daysha の手を拾ってから入ります。Vision of Beasts の後、Tensay の洞窟から出るときは注意してください。3 つの Udam またはクマがスポーンしている可能性があります。北西への 2 番目の Tensay ミッション。
百獣の達人
このミッションには 3 つの部分があります:ウダム ウルフ ハンター、ホワイト ウルフの飼いならし、ウダムの狩猟です。
3 人のウダム ウルフ ハンターに対処することは、あなたの最初の本当の避けられない戦いです。右に疾走し、彼らの後ろを一周します。こっそりする必要はありません。ただ歩いて、彼らの真上の岩に登ってください。トリックは、ショット間で素早くすることです。最初に整列し、きれいなヘッドショットを取得するようにしてください.通常、何が起こっているのかを理解するのに 1 秒ほどかかりますが、これはもう 1 回撮影するのに十分な時間です。射手のために槍を取っておきます。
その後、白いオオカミを飼いならすための短いハイキングがあり、小さな小競り合いを乗り切るために必要なボディガードがついにできました.
マルサ洞窟
ペットができたので、次はペットをアップグレードします。

Fast travel back to the village and upgrade Tensay’s hut. DO NOT also build Sayla’s hut, until you are ready to trigger the Attack Of The Udam mission. First, we need to visit magical Marsa Cave, so named because three rare beasts spawn there.
When you visit Marsa Cave, you will encounter one of the following (each variant has equal probability of 20%):
- 1 Black Jaguar;
- 1 Stripe Wolf + 2 gray wolves;
- 1 Black Lion;
- 1 Brown Bear;
- 3 Udam – one armed with a club, one with spears and the 3rd one with poison bombs (in an early stage of the game you shouldn’t mess with the last one if you’re not 100% sure that you’ll get an arrow to the head of a moving target in a split second;).
The technique to find all animals at that location is … when you see something you no longer need, save and quit to menu, then reload the game and travel back to the cave from nearest discovered/conquered resting point.
That’s 3 rare and 2 common animals to tame just in the cave. There are also Jaguars by Roaring Falls Bonfire and Cave Lions that lurk near the entrance to Marsa Cave, for a total of 7 tamable animals.
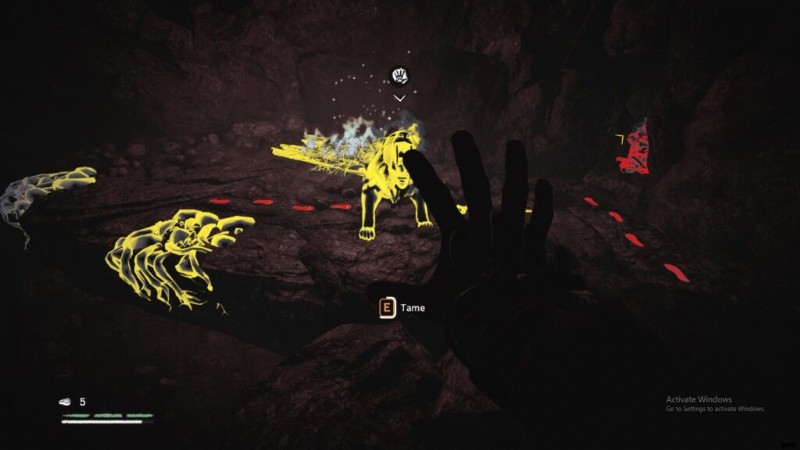
Taming Beasts
A couple tips on taming beasts. I’d argue the most useful thing about having a pet is their ability to scare off wildlife. Animals can generally scare off other animals of their tier or lower, with those tiers being:
- Tier 1 – Dhole, Wolf, Jaguar, Leopard
- Tier 2 – Cave Lion, Brown Bear
- Tier 3 – Sabretooth, Cave Bear
- Tier 4 – Badger (Mammoth, Rhino)
With your White Wolf, taming the rest of the Tier 1 animals is fairly easy. Just be careful of hit-and-run tactics of Jaguars and Leopards. Taming a Cave Lion, on the other hand, is a whole other story. If it locks onto you, flaming arrows or your pet attacking won’t stop it. It can climb onto elevation. You might be able to kill it with a spear to the head, but that doesn’t help taming. Your best defense is actually your bait. Also worth noting that Brown Bear, Cave Bear, and Sabretooth all require half-health before tamable, which is difficult if they aren’t scared by your pet.
The strategy, then, is to try to get the drop on a Cave Lion and tame it before it kills you. Use the Cave Lion to protect you while you tame a Brown Bear (or the Rare Black Lion at Marsa). But how are you supposed to tame a Sabretooth? Answers lie at the lucky Bone Cave. For now, keep farming the Bone Cave until you have at least a Cave Lion. Then we’re back to the village.
But one other word of warning, as long as we’re here…
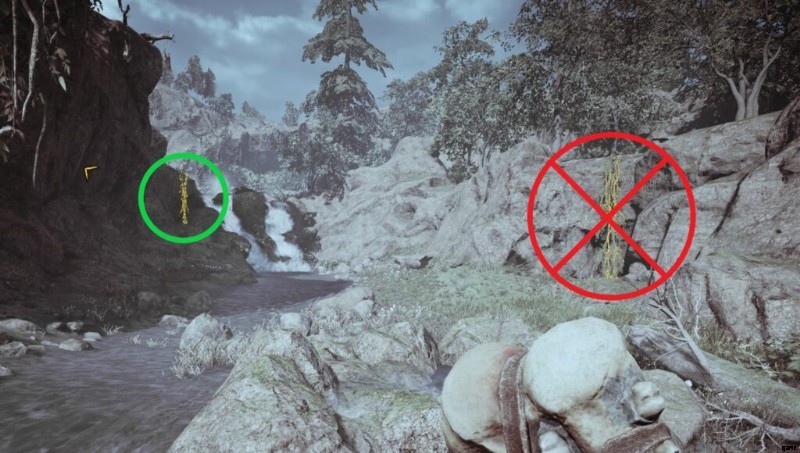
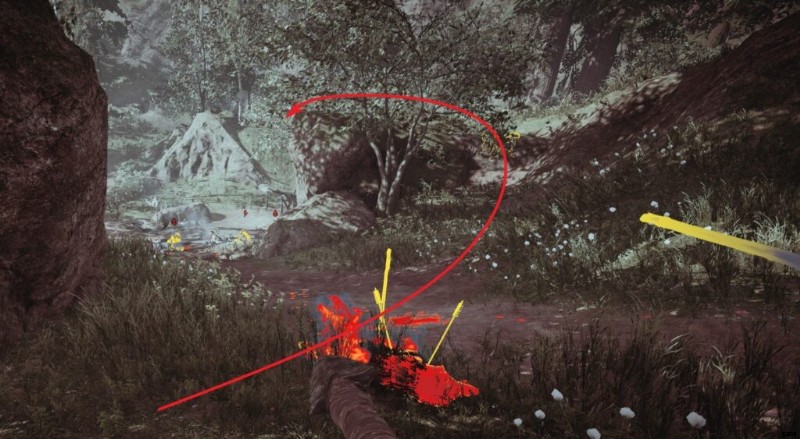
The cave painting at Marsa Cave is a trap. When you light the vines on fire to clear them, the flames run up the wall to the roots in the ceiling and catch the stalactite right above you. In about ten seconds it’ll come crashing down right where you’re standing. So back up!
You’re welcome.
Attack of the Udam
A Choice
I recommend you tame every beast, upgrade all your equipment, and unlock every skill you can before progressing the main quest. I prefer to advance to the Bone Cave, where you have an opportunity to safely tame a sabretooth. With a sabretooth at your side, the rest of game is easier and waaaay safer.
Attack of the Udam:defending the village
Time to prepare for a battle. Top off your meat and weapon stores, summon your best pet (hopefully the Rare Black Lion), and lock in any skill points. I recommend both ‘Extra Health I’ and ‘Sprint Heal’. Once you’re ready, upgrade Sayla’s hut and follow the prompts.
The strategy is to not be a hero and let your pet and Wenja allies do the heavy lifting while you support with spears and arrows. When you do melee, it should be to revive your pet or peal off Warriors who are pinning down your ranged Wenja. Look for safe Takedown opportunities, where a Udam turns his back to you, either because he ran past you or is attacking a Wenja on the front line. If anything starts going sideways, remember:this is a mission. You can reload from last checkpoint anytime.
You start with 3 Wenja archers and 2 Spears.
There are 19 Udam that come in four waves:
- 1st Wave I (front):4 Warriors, 3 Archers
- 2nd Wave II (cave):3 Warriors, 1 Archer, 1 Spear, 1 Scourge (poison bomber)
- 3rd Wave III (front):2 Warriors, 2 Spear, 1 Scourge
- 4th Wave IV (cave):1 Scourge
1st Wave
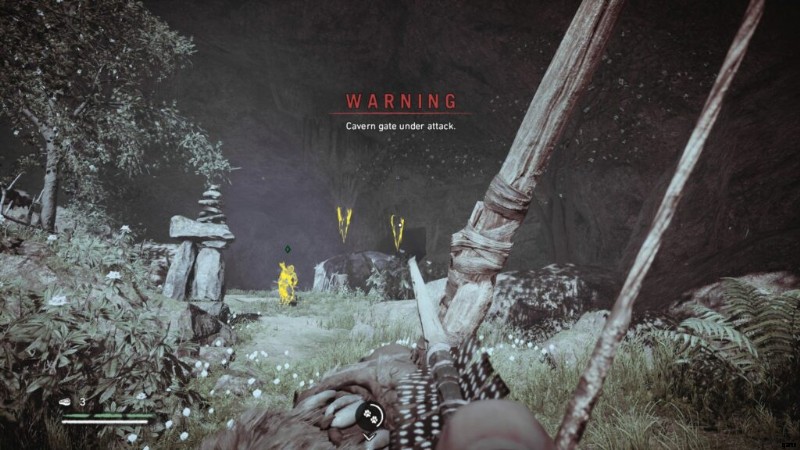
Right away, light these two barricades on fire. The right one will divert the first wave into a kill zone up to the right, while the left one will help with the third wave. You can light all on fire if the third wave is giving you trouble. This is a chaotic melee, with the Udam hitting almost all at once, so take care not to get drawn into a cluster. When there are only 2 Udam remaining, you will hear a war horn signaling the next wave is on its way from the cavern entrance.
2nd Wave
The Udam will spawn in three sets of two:2 Warriors, Archer/Spear, then Warrior/Scourge. The temptation is to lead out with the stalactite overhanging the barrier for an easy double-kill, but because the last set doesn’t spawn until the barrier is down, doing so will prematurely trigger the third wave. Instead, wait for them to break down the barrier and charge. Use stalactites to kill Udam lingering in the cave, and hit the Scourge with your pet once it spawns. When there are only two left, the third wave will trigger.
3rd Wave
Udam will spawn all over the front part of the village, and if you lit all of the fire barricades, a few will be boxed in. Because they are so scattered, this wave is perfect for mopping up with Takedowns and your pet. As always, when there are only two left, the final wave with trigger.
4th Wave
A single Scourge spawns from the cavern entrance. Take your time.
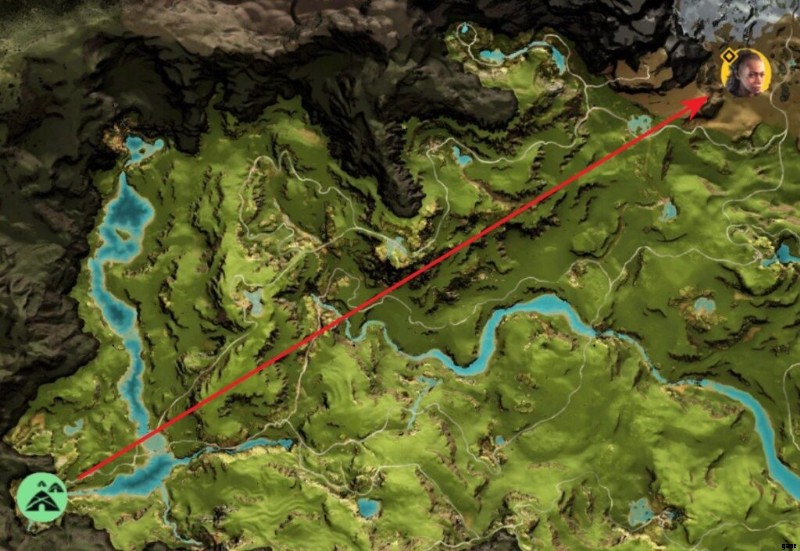
Attack of the Udam:the Udam camp
Once the Udam attack is repelled, Sayla tells you to go take the fight to their camp. Keep a low profile and avoid random skirmishes or wildlife.
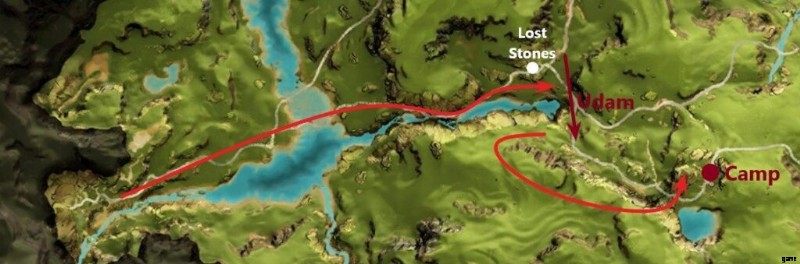
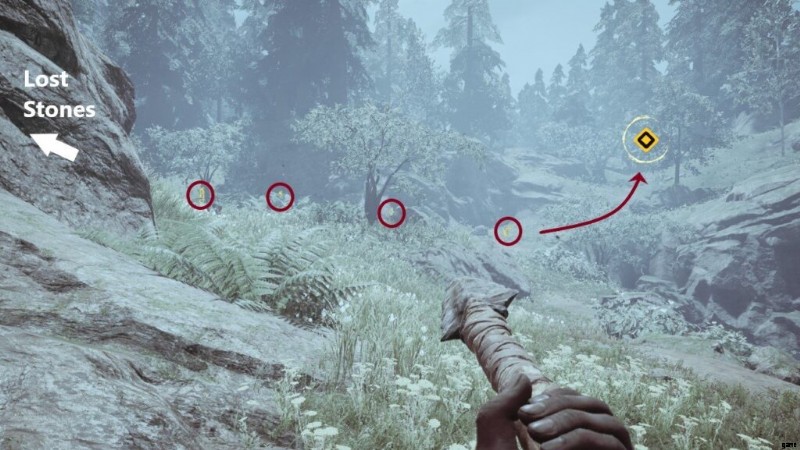
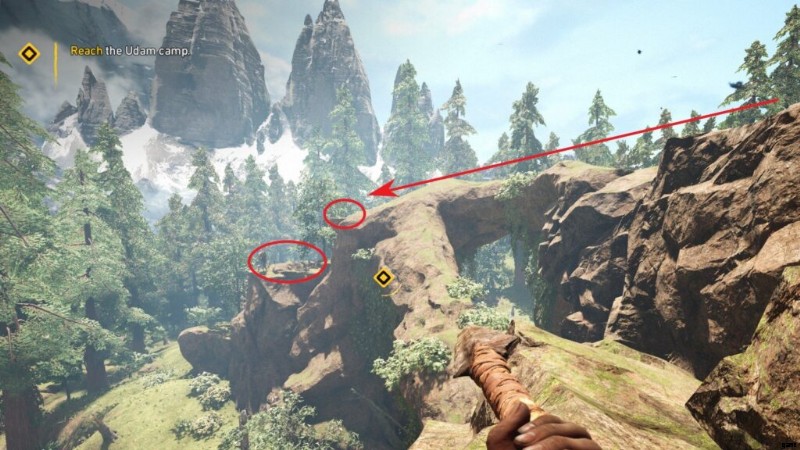
As you round the bend at the Lost Stones, you will see four Udam running away in single-file, heading for their camp. When you first encounter them, they will be too far ahead to stop, but if you reload from the last checkpoint, you can catch them. Send your pet to attack the first in line to slow them down, then sprint behind the last and Takedown them one at a time.
Up the hill to your right is a ridge. Circle all the way back to get on top of it (you’ll get a warning that you are leaving the mission zone). This will let you enter the camp from a perfect sniping position. If you succeeded at the Lost Stones, there should only be four Udam left to deal with, and the first one is served up on the middle ledge below you. Pick them off one at a time from this ledge, and if they notice you, climb the vine to the higher platform or hide in the bushes to finish them off.
Each bone tree will spawn 3 Udam, but the first will also summon 4 Wenja to join you. Stay back and let your pet and the Wenja mop them up, one wave at a time. Once it’s done, you will travel back to the village to plan your next move.
The Bone Cave
Speak with Tensay to complete Vision of Ice, then speak with Sayla to trigger The Bone Cave mission in the north. Go there, and be ready to tame a sabretooth.
There are two Cave Lions to deal with in the first large chamber of the cave. Bring a Cave Lion or Brown Bear to deal with one, and be ready to kill (or tame) the other.
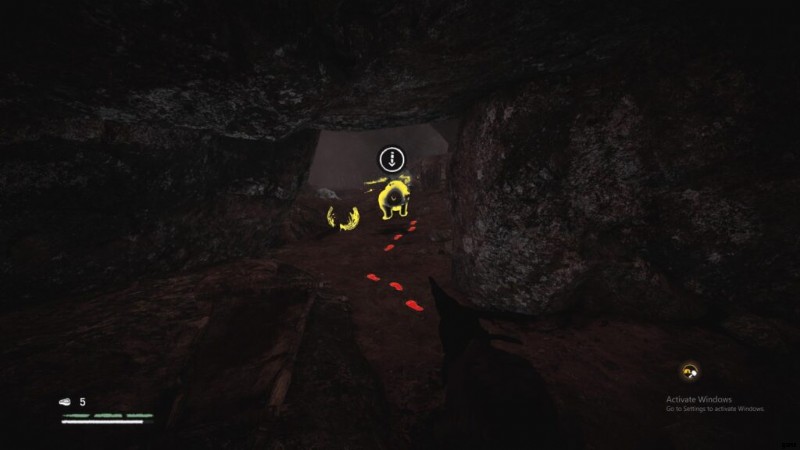
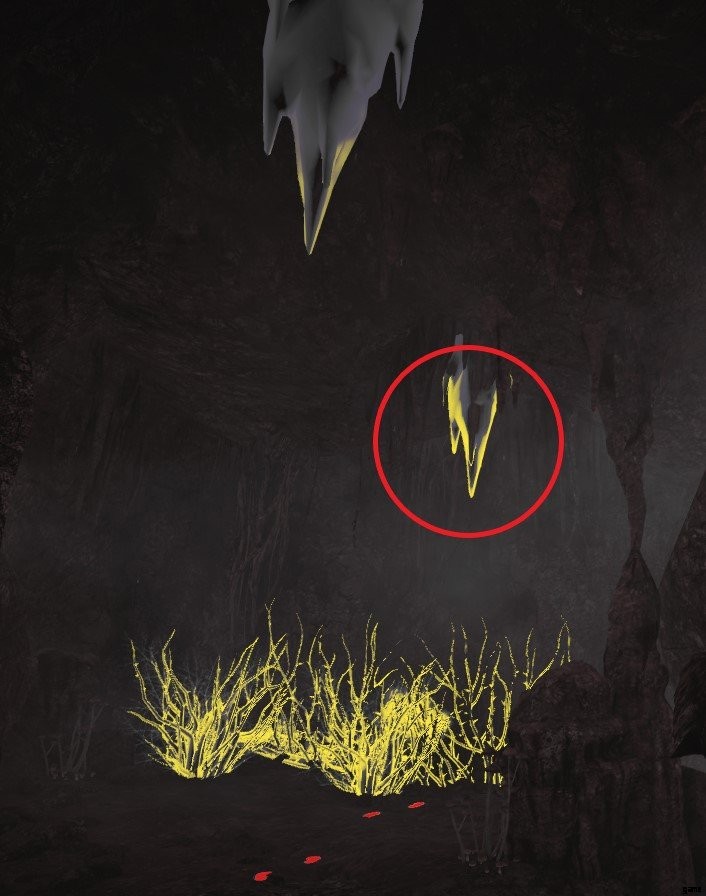
Once they’re dispatched, keep climbing up until you reach the back of the cave, where a wounded Wenja is hiding in a narrow gap in the rock. Before talking to him, turn around and scout the platform. There is a ‘V’-shaped outcropping the rises up to the ceiling. Walk as far up as you can go, and you will be safe and out of reach. Go back, talk to the Wenja, move back to safety, and wait.
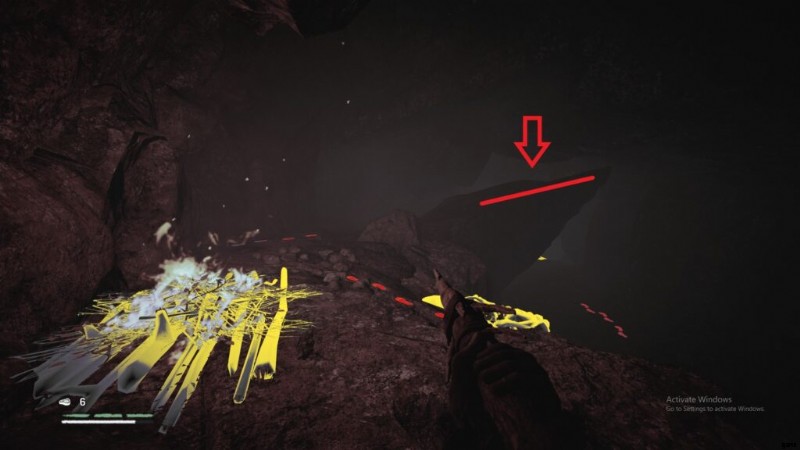
Another Cave Lion and your future best-friend Sabretooth will come into view. You can ignore the Cave Lion for now, and focus on bringing the Sabretooth down to half health.我慢して。 You can lure both cats into view by backing down to the main platform. Keep all three entrances to the cavern in view so you know when to run back up to the “safe” zone.

The Sabretooth usually notices you much faster than the Cave Lion, which is helpful in pealing him off. Once you’ve stuck him with 2-3 spears or flaming arrow headshots, throw bait on the platform right outside the “safe” zone, so that the Cave Lion doesn’t get to you while taming.
If any part of the plan goes sideways, remember you can always restart the quest. If you accidentally kill the Sabretooth, restart the quest. If you run out of arrows, restart the quest. If you take a hit from any of the cats, restart the quest (a second hit will kill you). If you’re patient, you will eventually be rewarded with a bodyguard that can take you through the end of the game.
Surviving the Middle Game
ウィップ
Cheating
Primal is a AAA game, but it’s not perfect. I’ve had Bloodfang vanish permanently, and died from a myriad of glitches ranging from true technical issues to poor game design. I’ve died from grappling hook failure, melee auto-aim launch me over a cliff, once in the middle of a field from nothing, a stalactite that didn’t stun Ull, etc., etc. If any of that would ruin your enjoyment of the game, consider these alternatives:
- Restart a Mission. A surprising amount of a playthrough is going on missions. While on a mission, you can restart or load the last checkpoint at any point. You can, for example, restart any time you break stealth or take damage (most enemies take two hits to kill you). You can choreograph every move until you can play the mission perfectly, as long as you’re quick on the ‘Escape’ key. To my mind, this is squarely fair game, as it’s how the developers made it.
- Save and Quit. Also fair game. As long as you aren’t taking damage, you can usually quit and reload normally. For example, when a herd of Rhinos are inches away from trampling you to death, or a moment before hitting the ground in a fall.
- Force Quit. During combat, you can still hit ‘Esc’, and force quit the game through the task manager. Sometimes you can quickly Alt-Tab as Tekkar is falling dead and still force quit with your game intact. I consider all of this cheating. But when the game actually glitches, like a tamed Bloodfang just disappearing permanently out of nowhere, for myself I’m okay doing this.
- Copy Your Save Files. There are a number of guides about how to do this, including the link below. Basically, you opt out of cloud-based saves and copy the save files somewhere safe. This is the only way to resurrect a game after the death screen. On one hand, this effectively negates the Permadeath setting. On the other, Primal is pretty glitchy game for an AAA title. Choice is yours.