ヴァンパイア サバイバー – 成功する方法 (戦略、ティア リスト、パワーアップ、キャラクターなど)

レベルを完了するのに失敗していますか?虚弱な吸血鬼ハンターの体を死神に食べさせてもらいたいですか?さて、あなたは正しい場所に来ました。
成功へのガイド
はじめに
レベルを完了するのに問題がありますか?モブの巨大な画面をクリアするのに苦労していますか?勝利を目指して統計を強化するためにコインを不必要に磨いていませんか?
それは、あなたが間違ったアイテムを選んでいるからです。
基本戦略
Vampire Survivors で成功するには、1 つの真実を理解する必要があります。すべての防御アイテムと生活の質のアイテムは価値がありません。それらのすべて。防御はエンドゲームにスケールしません。防御は画面をクリアしません。防御は、あなたが遭遇する道を切り開くことはありません。
ゲームには、プレイヤーに保証されたダメージを与える敵はいません。つまり、適切なポジショニングと適切な武器があれば、攻撃を軽減したり、体力を補充したりする必要はありません。
防御は無意味です。攻撃は防御です。
防御アイテムの完全な弱点を克服し、ヴァンパイア ミニオンを倒しながら安全を確保するには、3 つの特定のカテゴリの攻撃アイテムが必要です:範囲 (AOE) ダメージ、方向性ダメージ、ノックバックです。 6 つの武器スロットから選択できます。これらのカテゴリのそれぞれから少なくとも 1 つを選択し、運が示すように残りを埋めることで、ポジショニングの失敗や一連の不運を除けば、ほぼすべての実行が成功します。
ティア別アイテムとその選び方
アイテムには、武器とパッシブの 2 つのカテゴリがあります。武器はダメージを与え、パッシブはレベル 8 の武器をアップグレードし、ステータスを強化するために使用されます。
以下は、Vampire Survivors のすべてのアイテムで、Tier ごとに分類され、説明されています。任意の実行で、すべての最高のアイテムを選択できるとは限りませんが、それは問題ではありません.ダメージを選択する限り、次善の選択で 30 分間を簡単に持ちこたえることができます。
S ティア
王の聖書
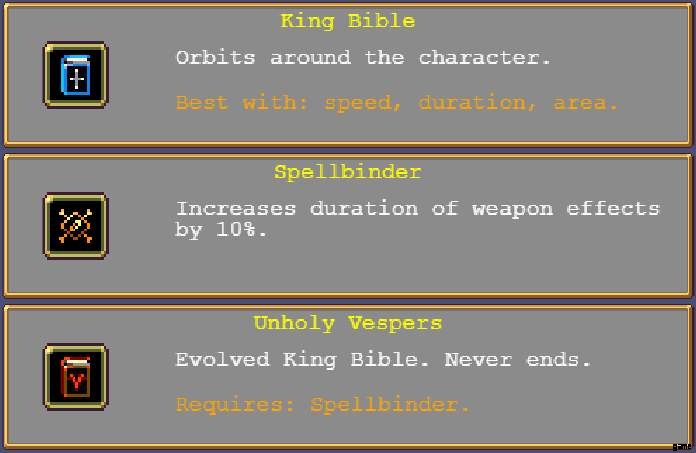
Spellbinder によって Unholy Vespers にアップグレードされた King Bible は、Vampire Survivors で唯一の S ティアの武器です。
キングバイブルは定期的にキャラクターの周りを一周し、敵を攻撃して通り抜けます。 Unholy Vespers にアップグレードすると、この定期的なアクティベーションは、回転する発射体の継続的にアクティブな壁になります。これらの発射物はまともなダメージを与えると同時に、敵のヒットをノックバックし、敵がそれらをかわしてプレイヤーに到達するのを防ぐのに十分な速さで回転します。 Unholy Vespers は、防御としての攻撃の原則を完全に体現しています。
悲しいことに、キングバイブルをアップグレードするために必要なパッシブ触媒アイテムであるスペルバインダーは、ほとんど価値がありません.スペルバインダーは、すべての最高の武器で無視される統計であるスキル持続時間をスケーリングします。ただし、Vespers は非常に強力であるため、この無駄な統計は問題になりません。
キングバイブルを見つけてアップグレードする必要はないことに注意してください。一度実行すれば、ほぼ保証されます。
複製機
デュプリケーターは、武器のアップグレード パスとの直接的な相乗効果がないパッシブ アイテムです。代わりに、文字通りゲーム内のすべてのものと完全に相乗効果を発揮します。説明は必要ありません。ゲーム内のすべての (優れた) 武器は、追加の発射体を備えています。
投射物が多いほど、ダメージが大きくなりますが、ノックバックとクラウド コントロールが向上します。画面上を飛び回るものが多いほど、より安全になります。
必須アイテムです。
Aティア
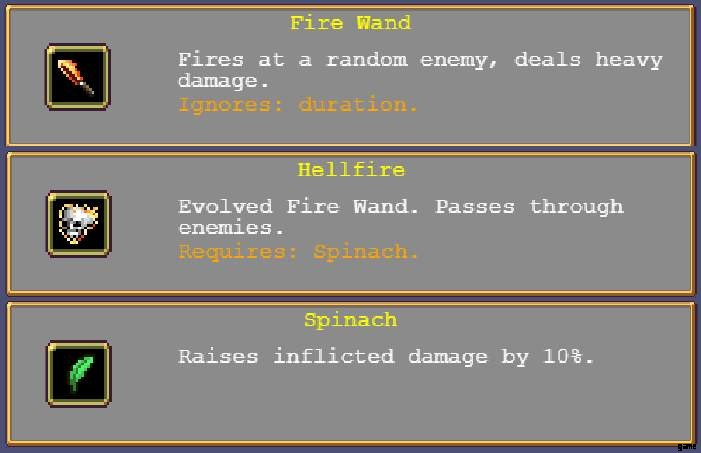
ファイアワンド
ヘルファイアにアップグレードされたファイア ワンドは、あらゆるものとシナジーを発揮するホウレンソウで、アンホーリー ヴェスパーに次ぐ好感度です。ワンド自体は序盤は平凡ですが、攻撃した敵に吸収される投射物でまともなダメージを与えますが、アップグレードするとダメージの強大な力になります.
ヘルファイアの発射物はすべてのターゲットを貫通し、途方もないダメージを与えます。それらはまた、キャラクターの位置から発生するため、ヘルファイアがモブのグループに頻繁に穴を開け、その方向に走ることができます.これは主な用途ではありませんが、値引きすべきではありません。

ご覧のとおり、ヘルファイアは完全にランダムではなく、信じられないほどのダメージを与えます.
火の杖を武器として、ほうれん草をパッシブとして選択してはいけない状況はありません。
魔法の杖
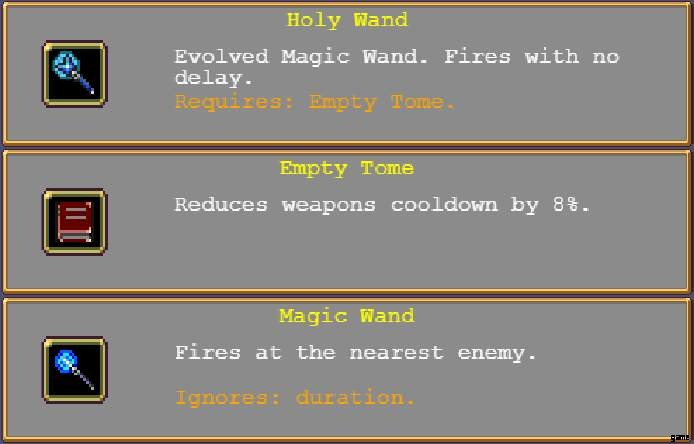
Empty Tome によって Holy Wand にアップグレードされた Magic Wand は、Fire および Hellfire とは非常に異なるワンドです。それは迅速かつ自動的に攻撃し、目立たないダメージを与えますが、その有用性はノックバックと空の書物に内在する優れた相乗効果の形でもたらされます.
聖なる杖は、ゲーム内でボスから身を守るための最良の方法です。アップグレードすると、攻撃が非常に速くなるため、安全のためにボスをカイトする必要はほとんどありません。これは、エリア ダメージがオンラインになるのを待っている間に防御を突破する可能性のある個々の小さな Mob にも当てはまります。
ただし、このコンボが真に輝くのは空の書物です。 Tome は、レベルごとにすべての武器のクールダウンを 8% 短縮し、40% にスケーリングします。これは、ほうれん草が提供する純粋なダメージと同じかそれ以上ではありません. Empty Tome が最大値の場合、攻撃のダウンタイムはほとんどありません。ホーリー ワンドと組み合わせることで、命中する前にすべてが消滅し、命中しないものは継続的に後方に押し出されます。
B ティア
斧
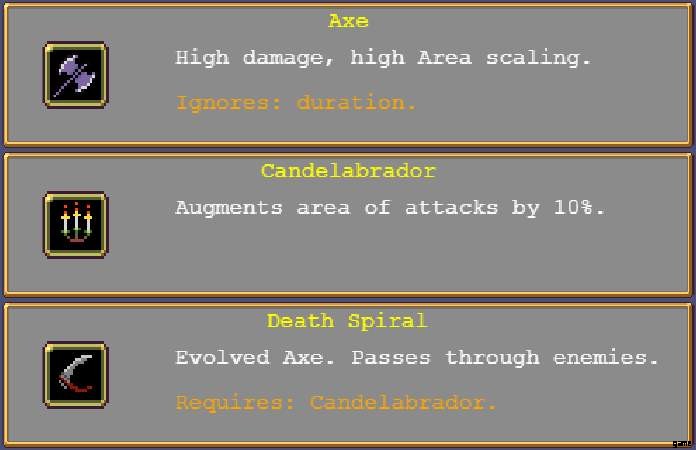
Candelabrador によって Death Spiral にアップグレードされた Axe は、非常に単純なアイテムです。アップグレード前は、弧を描いて航行し、限られた範囲を攻撃する高ダメージの武器です。アップグレード後、Death Spiral はキャラクターから外側に爆発し、周囲のすべてにダメージを与えます。この AOE ダメージは、お尻を保護し、画面をきれいにするのに優れています。
Axe のアップグレードの触媒アイテムである Candelabrador は値引きしないでください。武器のサイズと AOE スキルの半径をスケーリングし、貫通武器がより多くのモブを攻撃できるようにします。これは、すべての S および A ティアのアイテムと非常によく相乗効果を発揮します。
ナイフ
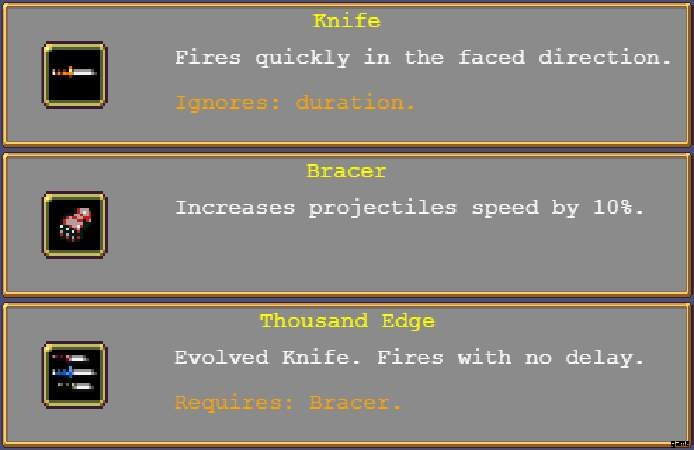
ブレーサーによってサウザンド エッジにアップグレードされたナイフは、優れた武器ではありません。実際、これは魔法の杖の完全に悪いバージョンです。しかし、時折必要になる非常に特殊な機能を提供します。
ナイフはキャラクターが向いている方向を撃ちます。これはよく聞こえますが、実際にはひどいものです。 You often need to move away from the mobs you’d like to attack, and in this scenario the knife is worse than useless, shooting into the empty space you’re running towards. However, if your build lacks sufficient knock back to keep you safe, the massive speed and sheer number of projectiles of an upgraded Thousand Edge can shove any number of mobs backwards while dealing high single-target damage.
As for the synergy item of the Knife, the Bracer, it’s awful. The speed of your projectiles is irrelevant in all but one case:the Runetracer (see below). Otherwise, it’s a wasted item which could instead be a passive that offers damage.
The Knife and its upgrade exist only to punch a hole or shove a boss, and should only be chosen if you need them for that purpose. The only thing that stops it from being a C-tier item is that the Knife is non-random:you can point it where you want the damage to go.
C-Tier
All the items in C-tier are characterized not so much by being bad as they are by being random. Being able to put damage where you need it is very important to your survival.
The Birds
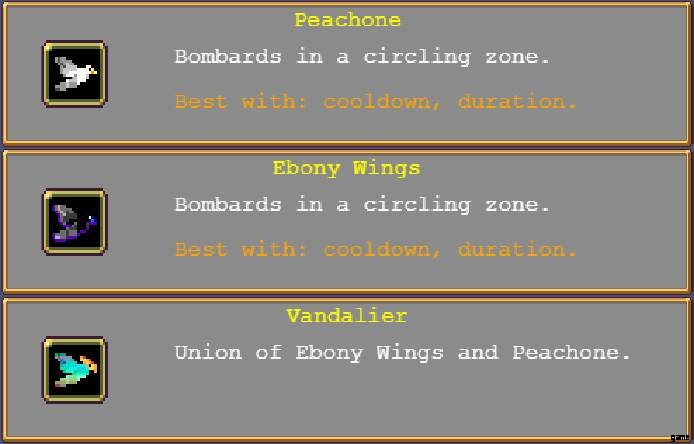
Special mention at the top of the C-tier, Peachone and Ebony Wings together upgrade into Vandalier, becoming a single weapon and refunding you a weapon slot. Both the base birds and their upgrade attack enemies within a circular radius which continually orbits around your character.
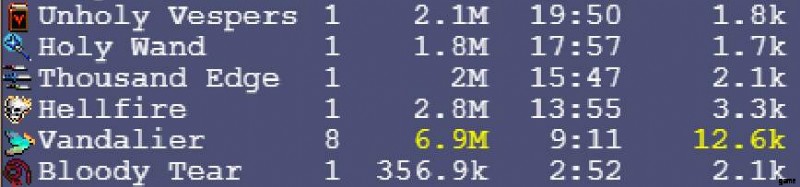
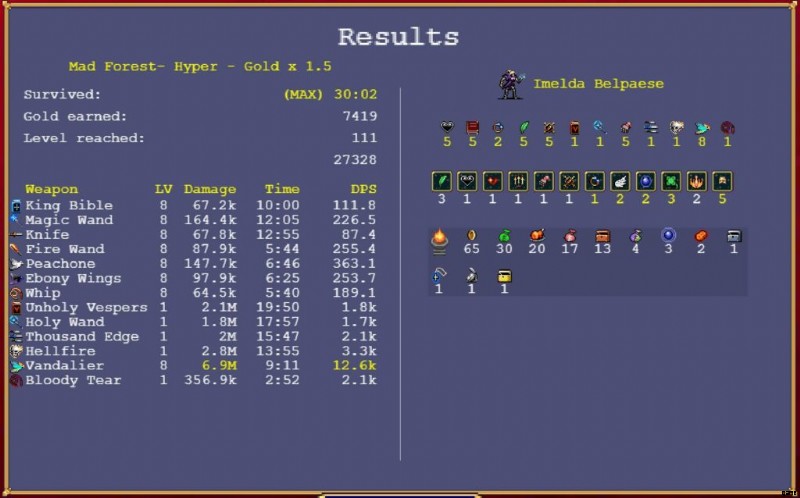
On paper, they do a tremendous amount of damage once upgraded, as you can see from this hyper forest run.
However, in practice, the birds are both random and investment-heavy. The rotating circle within which they damage enemies is basically impossible to position in any way; practically, they just hit what they hit, not what you want. They also require a tremendous amount of experience to fully upgrade, given that you need to upgrade each individual bird eight times, then upgrade the combined bird another eight times.
This experience point requirement isn’t necessarily a bad thing; it just needs to factor into your planning on a run, and you need to have other tools to deal with specific mobs threatening you while the birds mete out damage to the masses.
A possible choice, but there are less risky options.
P.S.:The birds also absolutely fill the screen with projectiles, making it hard to see anything.
Runetracer

The Runetracer is another highly situational weapon that isn’t bad so much as it is random and narrowly synergistic. The Runetracer shoots a very thin projectile that bounces around the screen, piercing enemies and scaling with projectile speed and duration.
With full investment in its scaling, the Runetracer does decent damage, but it does completely randomly, often killing enemies at the very edges of the screen whose experience drops you’re unable to pick up. It can’t punch a hole or protect you; in fact, the Runetracer very often shoves enemies into you while it bounces.
Because of these factors, and because it has no upgrade path, the Runetracer is only ever taken if no other options present themselves.
Cross
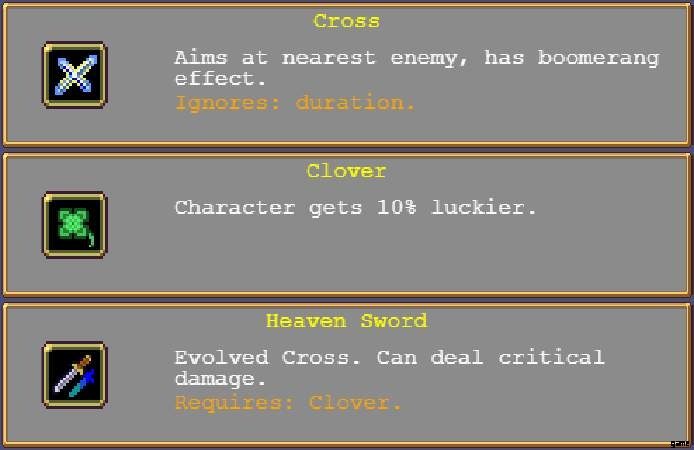
The Cross, upgraded into the Heaven Sword via the Clover, is another overly-random weapon with poor synergy. The Cross flies out from the character a short distance, then boomerangs backwards, dealing most of its damage behind you.
It’s a prime example of yet another weapon that won’t hit where you need it to, and that drops experience gems where you aren’t going. But worse than that, the Cross upgrades with the mostly useless Clover.
The Clover increases the luck stat by 10% per level. Luck scales two things of import:the number of options you have when leveling up, and the Pentagram, the worst possible weapon in the game. In any decent run, you’ll level up at least 70 times; you don’t need more options. And you should never, ever pick the Pentagram in any run. Luck does seem to affect drops from light sources, allowing you to take some real risks, but this isn’t a strong enough benefit to recommend the item.
With no synergy with any decent weapon and random damage, the Cross should only be taken if every other option is worse.
D-Tier
Lightning Ring
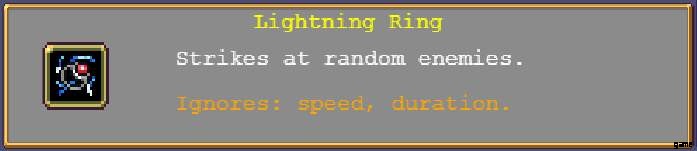
Functionally quite similar to the birds, the Lightning Ring deals random damage in circles on the map. It differs in that the circles are truly random, rather than orbiting around the character. This means you have even less (zero) control over where it strikes.
The Lightning Ring also deals mediocre damage and has no upgrade path. Not a recommended item.
Santa Water

Like the Lightning Ring and the birds, the Santa Water damages enemies in an area in a random location on the map. Unlike those other options, however, the Santa Water requires enemies to stay in its area to be damaged. This is worthless.
You should be moving continually in order to take minimal damage and have optimal positioning. Enemies will follow you as you move. An item that needs enemies to be stationary in its effect will never be effective.
With no upgrade path and the above drawbacks, the Santa Water should not be chosen. It’s not useless (still damage) but it’s not at all good.
Whip
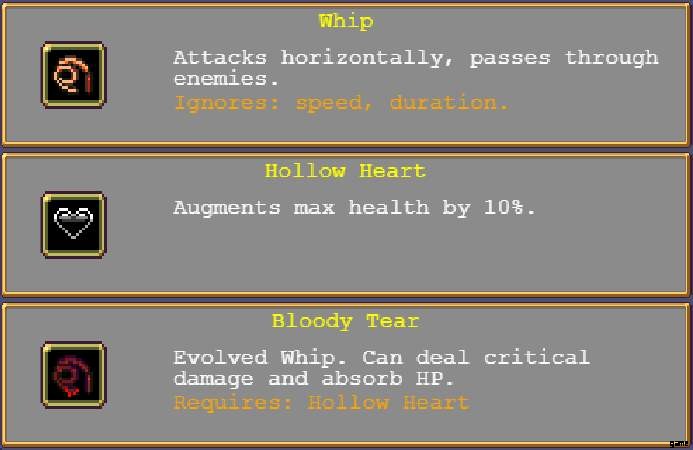
The Whip, upgraded to the Bloody Tear via the Hollow Heart, is the starting item in Vampire Survivors. The first thing weapon you use on the first character.
It’s worthless.
The Whip and its upgrade attack horizontally in front of your character and, with some upgrades, behind. But enemies come from all 360 degrees, so your top and bottom are left incredibly open to damage. With extra projectiles, the Whip attacks more times, rising vertically, but it still doesn’t protect well.
On top of this, the Whip requires the Hollow Heart to upgrade, and the Hollow Heart is also worthless, merely increasing your maximum health. Increased health doesn’t scale the damage of your other weapons or synergize with anything in any way. It just allows you to be a little sloppy. So play better and build damage.
The final nail in the Whip’s coffin is the upgraded version. It deals slightly more damage (but the Whip’s damage is incredibly bad anyway) and leeches life. Again, you don’t need to leech if you kill before you’re hit.
Do not pick unless you’re desperate.
Garlic

The Garlic, upgraded to the Soul Eater via the Pummarola, is a deceptive item. It deals pulsing area damage around your character and is always active, right from level one. It seems like the perfect item.
But it doesn’t benefit from additional projectiles, so it scales like trash.
The Garlic is only effective in the early-to-mid game. The pulsing damage is a lifesaver in the early rounds, especially when you’re new to Vampire Survivors, but it falls off strongly, and the pulses are slow, lacking the ability to push back enemies once you’re truly being mobbed.
But the death knell for the Garlic, like the Whip, is its upgrade path. The Garlic upgrades with the Pummarola, which increases your passive life regen.価値がない。 This stat, again like the Whip, doesn’t synergize with anything or scale any damage. If you’re hurt, move the screen to generate light sources and then kill them for floor chicken.
The Garlic’s upgrade, the Soul Eater, is another life leech item that allows you to be sloppy. Once more, play better and build damage; don’t rely on leech or regen.
A strictly worse version of the King Bible.
F-Tier
The items of F-tier offer no damage, or offer quality of life that can be found elsewhere.
Wings
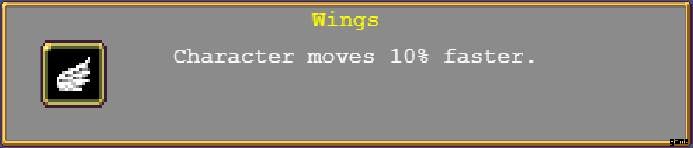
The Wings increase the speed of your character. In the very first few runs of Vampire Survivors, before you can unlock passive movement speed from the gold shop, they can be taken to help you evade damage.
Once you have purchased one level of passive movement speed, the Wings are worthless.
Attractorb

The Attractorb increases the pick-up range of your character. In the very first few runs of Vampire Survivors, before you can unlock passive pick-up range from the gold shop, it can be taken to help you collect experience gems more easily.
Once you have purchased one level of passive pick-up range, the Attractorb is worthless.
Pentagram

The Pentagram is a uniquely worthless weapon. When activated, it wipes out the entire map. Unfortunately, it cannot be activated at will; it activates on a timer. And when it wipes out all the mobs on the map, it also wipes out all the experience gems the mobs would drop. With levels and with increased luck, it has a chance to leave the experience gems instead of destroying them.
However, Vampire Survivors continually fills the screen with mobs. That’s literally the game. So wiping that screen out gives you nothing more than a few seconds of reprieve before the screen fills once more.
Completely useless, and actively steals experience points from you. Never, ever take the Pentagram.
Clock Lancet
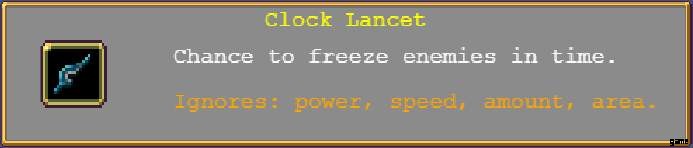
The Clock Lancet freezes mobs in a straight line shot from the player. It does no damage; frozen mobs do not shatter on their own, or explode to damage their nearby allies; they just get slow, then start walking again.
As you can see from the image, it also ignores basically all scaling in the game:no power, speed, amount, or area. It is a single, narrow beam that slows something you would have otherwise killed with any other (better) weapon.
Almost as useless as the Pentagram.
Laurel
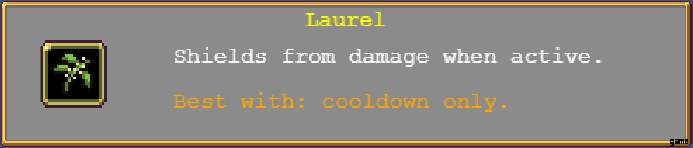
The Laurel is a temporary invulnerability shield that activates when you take damage, allowing you to charge through groups of mobs without being chipped to death.
You know what else allows you to charge through mobs? Any decent weapon. You don’t need to be invulnerable for a tiny amount of time. You need to kill everything you see.
アーマー
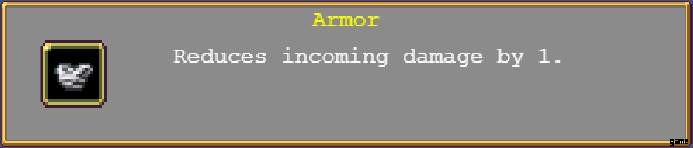
The Armor reduces the damage you take from mob hits.
You already know what I’m going to say. You can’t be hit by a dead mob. Make mobs dead; don’t make yourself a worse killing machine.
Crown
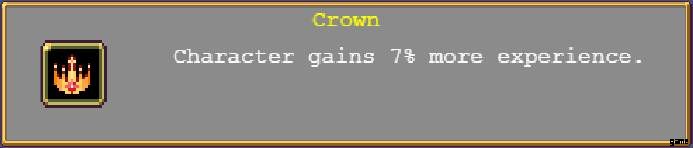
The Crown increases the experience you gain. This seems tempting; fast levels means more weapons, faster. But killing more mobs also increases the amount of experience you gain via more dropped experience gems.
What’s more, once you reach the endgame and are fully decked out, you’ll wish you had one more damage passive, rather than more levels that you don’t need. Remember, you’re going to level up at least 70ish times without any experience boosting at all.
Z-Tier (Special Mention)
Stone Mask
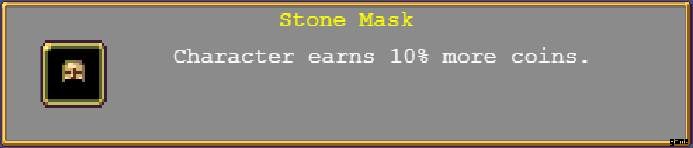
The Stone Mask increases the number of coins you collect during a run. This is fantastic for grinding out the passive boosts in the coin-based upgrade shop, but it’s worthless to waste a passive item slot that could be damage.
Well, the Stone Mask has a secret:to unlock it, you must find it in the Library. But after you’ve unlocked it you can still find it in the library. So, if you’re playing in the library and have selected all six of your passives, you can run left or right until you find the Stone Mask floating and then pick it up for a seventh passive, going over the soft cap for passives.
In this sense, the Stone Mask is actually an excellent passive, but it’s not worth taking outside of getting it for free in the library.
Choosing Power Ups
The Power Up store allows us to build power over time via successful runs with high coin totals. Everything in it is worth buying eventually, but several upgrades stand out.
Remember: you can refund your purchases at any time with no penalty. Never leave coins unspent.
Early Power Ups
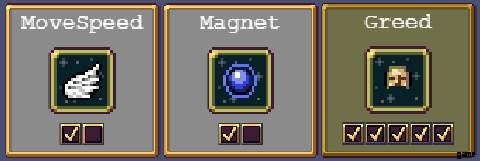
- Movement Speed:1 level
- Magnet:1 level
- Greed:5 levels
A single level of each movement speed and pick-up radius allows us to ignore those passive items in any run, and is borderline mandatory. Without those levels, you move quite slowly compared to mobs and have a tiny little pick-up radius.
After that, five levels of greed allows us to prioritize high coin totals and makes everything else in the shop more easily acquired.
Middle Power Ups

- Amount:1 level
- Luck:3 levels
- Movement Speed:1 level
- Magnet:1 level
- Growth:5 levels
- Might:5 levels
Amount is the most powerful upgrade on the board. Everything of any worth scales with additional projectiles. Refund your other upgrades and buy amount as soon as you feel safe doing so.
Three levels of luck means we have a decent chance of having four choices with every level up, allowing for better selection of skills. Finishing the last point in both movement speed and pick-up radius allows for more quality of life, making runs smoother. Five levels of growth for faster level-ups does the same.
Might is damage, damage is safety, safety is long runs with more coins.
Late Power Ups
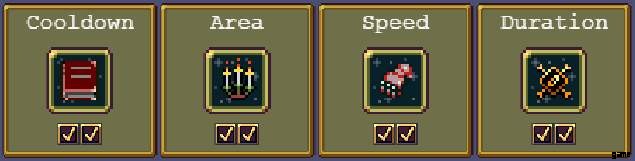
Cooldown, Area, Speed, Duration:your preference.
All of these passives are decent, but the increases they offer are very, very small, so they don’t make much difference. Speed is the worst one, though.
Final Power Ups
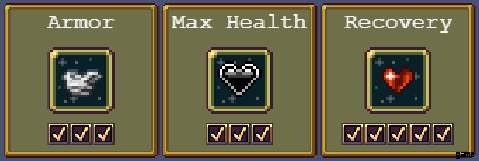
- Armor:3 levels
- Max Health, Recovery:your preference.
As always, defense does not win games. Armor does let you bull your way through mobs in the early game, however, and is better than the other two options in this tier.
Choosing a Character
When selecting your character there are only two variables:starting weapon and passive. The best weapons are those with upgrade paths, and the best passives are damage-related. This makes selection easy, and also eliminates most characters.
Top Tier
Imelda Belpaese

Imelda starts with the A-Tier Magic Wand. Her passive is experience gain, which is mediocre compared but others, but she excels during early playthroughs as you’re unlocking all the items and initial coin shop passives.
Recommended, but outclassed by later characters.
Arca Ladonna

Arca starts with the A-Tier Fire Wand and offers a passive 15% weapon cooldown reduction, an excellent stat. The early game can be difficult with just a slow Fire Wand, but that downside is outweighed by Arca’s kit.
All-round excellent choice.
Mortaccio

Mortaccio’s passive is +3 additional projectiles, a stat so good I’m surprised he was allowed to have it. It literally outclasses every other passive in the game. Without upgrades from the coin shop he may be difficult early game, since he needs 20 levels for his first +1 projectile.
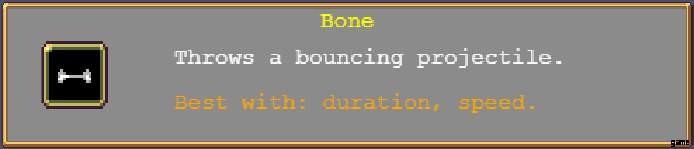
Mortaccio’s starting weapon is unique to him; no other character can find or use it. The bone lacks an upgrade path, but is decent. It’s a bouncing projectile that acts like the ball from the game Breakout, striking enemies and then bouncing away. It scales very well with speed and duration, making it work with both the build recommended by this guide (Vesper Wall, see below) and less optimal builds (Quickest Bone in the West, see below).
Mortaccio is the best character in the game. Full stop. Always choose him.
Everyone Else
Antonio Belpaese

Antonio’s passive is more damage, which is good, but he uses the Whip, which is awful.
As soon as you unlock anyone else, stop using Antonio.
Pasqualina Belpaese

Pasqualina uses the Runetracer, which is only situationally good, and her passive is projectile speed, which only benefits the Runetracer.
Might actually be worse than Antonio.
Gennaro Belpaese

Gennaro uses the Knife, which is a decent weapon. His passive is +1 total projectiles (non-scaling).
He’s a strictly-worse version of Mortaccio.
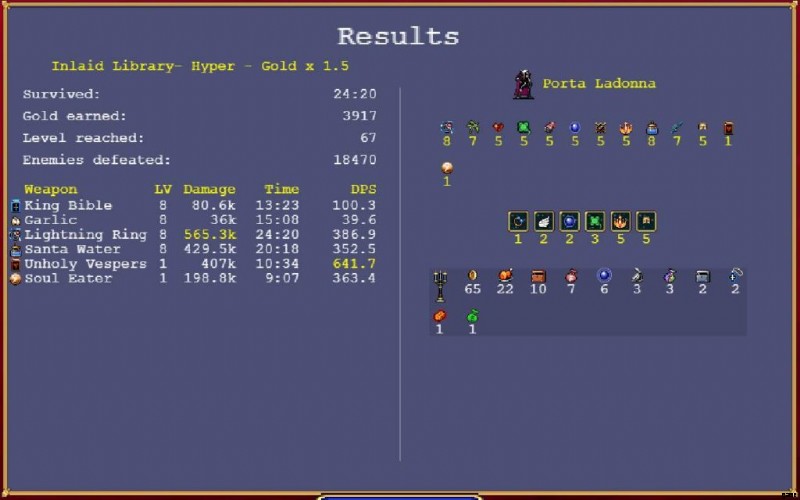
Porta Ladonna

Porta starts with the Lightning Ring, which doesn’t even have an upgrade path and is very hard to use in the early game. Porta’s passive is increased area, which is decent, but not good enough.
Pick Arca instead.
Poe Ratcho

Poe starts the game with the Garlic, making the early game incredibly easy. His passive is increased pick-up radius, making him a treat to start with, but ultimately Garlic is a dead-end item. His negative initial health is meaningless if you’re following this guide and playing for damage.
A fun pick, but not good enough.
The Secret Challenge Character
Exdash Exiviiq
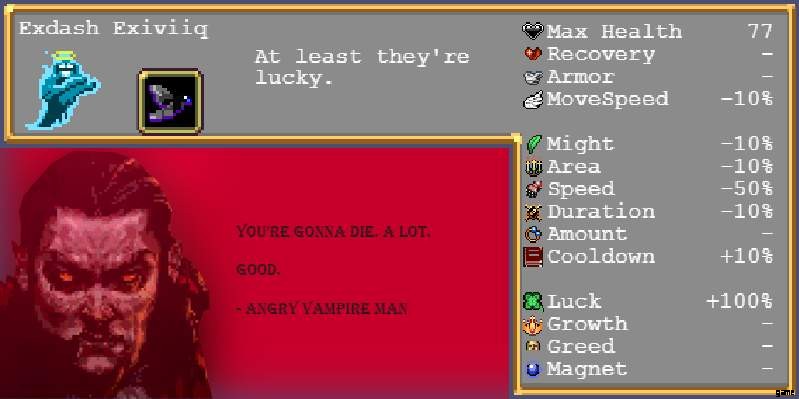
Exdash Exiviiq is a secret, ultra-challenging character. It is unlocked by typing “x-x1viiq” (without quotes) into either the starting screen or the credits screen of the main menu.
Exdash is not a character designed to complete runs. Exdash exists solely to challenge yourself to complete a run with major downsides coming directly from your character. As you can see from the above picture, Exdash has the following stat penalties:less health, less movement speed, less damage, less area of effect, massively slower projectiles, less skill duration, and longer cooldowns. It does, however, have 100% increased luck, allowing for some interesting strategies.
Beyond the stat penalties, Exdash starts with Ebony Wings. This is an absolutely terrible starting item and makes the early game incredibly punishing. To play effectively, you will have to seek out light sources for health and rely on luck to overcome early disadvantages.
All told, Exdash is a welcome challenge that forces you to play differently and mix up your builds. I recommend you have many, many levels in your Power Up shop before attempting him, however.
Choosing a Level
At time of writing there are only two levels in Vampire Survivors, the Mad Forest and the Inlaid Library, and a hyper mode for each level which offers 50% increased gold and, for the Library, 10% increased luck.
Choosing a level is easy:choose the Library.
The Mad Forest
The Mad Forest is the first level of Vampire Survivors and, strangely, the harder level. Mobs come from any direction, making movement more difficult than in the Library. The mobs are also more difficult, particularly the vampire bats, who have a slightly wonky hitbox that allows them to damage you from farther away than expected.
Bosses are also more difficult, with particular mention going to the Preying Mantis boss, who surrounds you with a ring of living flowers and fills that ring with high-health mobs. An unprepared vampire hunter can die very quickly in this ring.
The Inlaid Library
The Inlaid Library is the second level of Vampire Survivors and is significantly easier than the Forest. The Library has walls to the north and south of the screen, meaning mobs can only approach from the east and west. This makes positioning much easier.
The Library also has easy bosses that are little more than moving health bars without mechanics. On top of this, it also has the Stone Mask item available for free, sitting on a random desk. This makes a Library run the absolute go-to for gold grinding.
Choosing a Build
The most important part of Vampire Survivors picking items that synergize with each other. This means that there are two main builds that you can choose from and customize, as well as a third omni-build.
Vesper Wall

Choose Mortaccio (or Imelda or Arca). Prioritize the King Bible, Magic Wand, and Fire Wand, as well as their passive upgrade items. Take the Duplicator whenever it appears. This is the core of the build, and will work no matter what else you chose.
The King Bible/Unholy Vespers keep you safe from masses of mobs. The Magic/Holy Wand keeps you safe from individual strong enemies and those that slip past the Vespers. The Fire Wand/Hellfire is your main damage dealer and punches safety holes. With a Duplicator and Mortaccio’s passive you’ll output a tremendous number of projectiles for complete safety.
The birds and the axe are added simply because they’re the best possible damage. If you intend to go both birds you need to delay taking the axe until you’ve leveled both to eight and upgraded them to Vandalier. You can take the axe passive, the Candelabrador, while waiting for the birds to upgrade.
This build leaves one passive item slot open, thanks to the birds not needing one. This slot can go to the Bracer, to synergize with Mortaccio’s Bone, or any quality of life item you choose.
Quickest Bone in the West
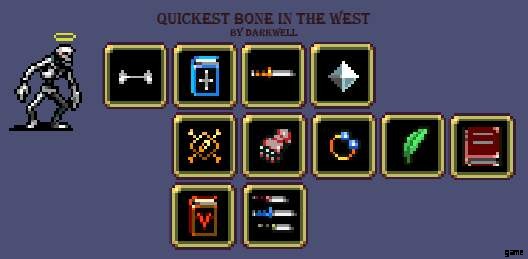
Choose Mortaccio (or possibly Pasqualina, but also definitely not Pasqualina). Prioritize the King Bible, Knife, and Runetracer, as well as the Bracer. Take the Duplicator whenever it appears. This is a far less safe build than the Vesper Wall, but once you have the Bible upgraded you should be alright.
Mortaccio’s Bone and the Runetracer both scale very well with speed and duration. Since we’re already taking the Bracer and Spellbinder for them, we might as well take the King Bible and Knife to get the extra protection of the Unholy Vespers and Thousand Edge.
This build only needs three passive items for upgrading, so we take the Spinach and Empty Tome for pure damage. Because of this, we might as well take the Magic Wand and Fire Wand, but we don’t have to.
Once again a passive slot is also left open for whatever you choose.
The Omni-Build
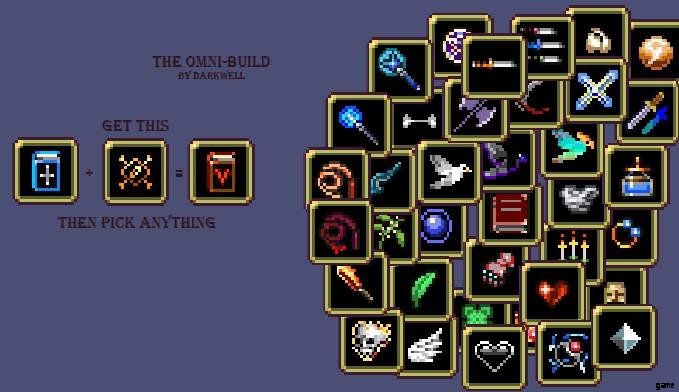
- Step 1:Get the Unholy Vespers
- Step 2:Pick literally anything else
The Unholy Vespers are, in a word, overpowered. Literally any selection of skills on any character will work once you upgrade the King Bible.
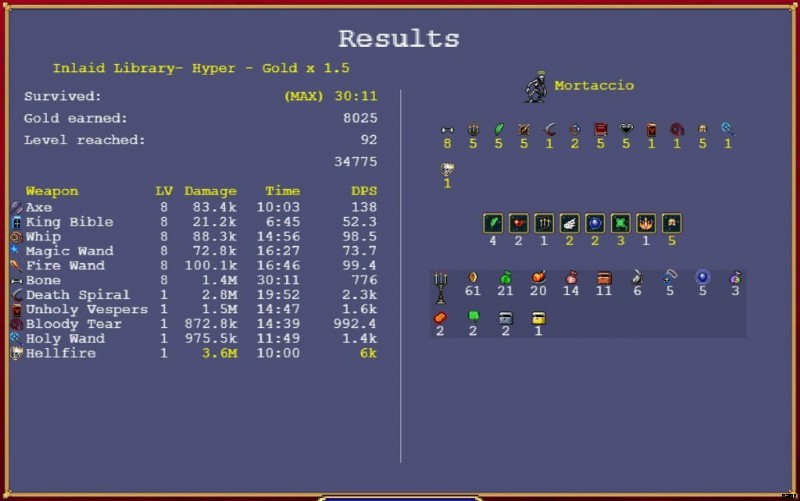
As you can see from this screenshot, I attempted to pick the worst possible items in a hyper library run while upgrading the King Bible. There’s virtually no synergy in my item choices and no damage from my coin shop, and I still lasted 24 minutes. My damage was abysmal, but the insane knock back protection from the Vespers made it irrelevant.
Anything works with the Vespers.
A Typical Run
Regardless of your chosen build, level, or character, your strategy for a Vampire Survivors run is always the same:
- Acquire a knock back weapon
- Acquire an AOE damage weapon
- Acquire a targeted, hole-punching weapon
- Acquire the passive items that upgrade your chosen items
- Acquire any further items that synergize with your previous choices.
Beyond this strategy lies the tactics you use to accomplish your goal. There are no universal tactics – as they come down to player ability and choices – but there are some general tips.
- You don’t need to run in one direction continually to spawn light sources for their drops. As soon as a room is off screen it can spawn a light source when you reenter it.
- Different weapons require different kiting movement. The Whip and Knife favor left and right strafing. The Garlic and Bible require stutter-stepping. Everything else works well with circular movements.
- Moving diagonally will cause mobs to clump as they come towards you. You can then move around them and they’ll often open a channel for you to slip into. Don’t be afraid to take a couple small hits instead of pushing through a large pack of mobs.
- Don’t over-upgrade passive items. You only need one level of a passive to upgrade a level eight weapon to its better version.
- Except the Duplicator. Always upgrade that first.
- Prioritize your AOE damage weapon (preferably the Bible) levels. You can get by without strong single-target damage initially, but if you get mobbed, you’re dead.
- Don’t spread upgradable weapon levels around. One upgraded weapon is worth three or four low-level, non-upgraded weapons.
- Don’t rush when selecting weapons and passives. You don’t need to grab all six of each before you start upgrading.
- If you need to, level or select a new passive to avoid picking something bad. It’s not as big a waste to level a passive as it is to pick the Armor or a Laurel.
and finally
If your first several levels offer up only garbage, just restart the run. There’s no penalty. Don’t punish yourself.
Example Runs
Below are several runs exemplifying the lessons taught in this guide.