Adventure Escape:Hidden Ruins ウォークスルー
はじめに
アドベンチャー エスケープ:隠された遺跡 は、Haiku Games によって作成された脱出ゲームです。 Adventure Escape シリーズのクリエイター! このゲームには、興味深い手がかりと幅広いパズルが満載の 7 つのチャプターがあります。 あなたはバーンズ教授としてプレイします 、神秘的なクマリ文明の発見を決意した男 永遠の命の鍵があると噂されている 彼の夢を実現しようとしています! 隠された廃墟を生き延びられるか見てみましょう!
ウォークスルー
第1章
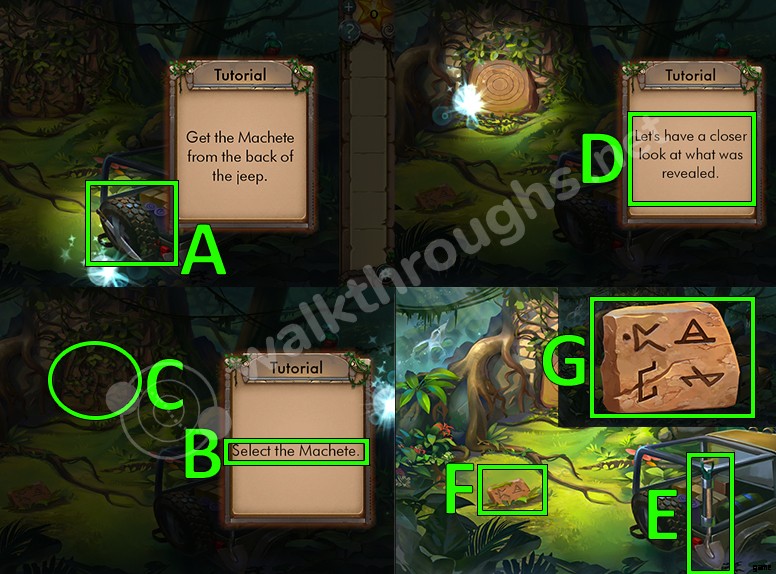
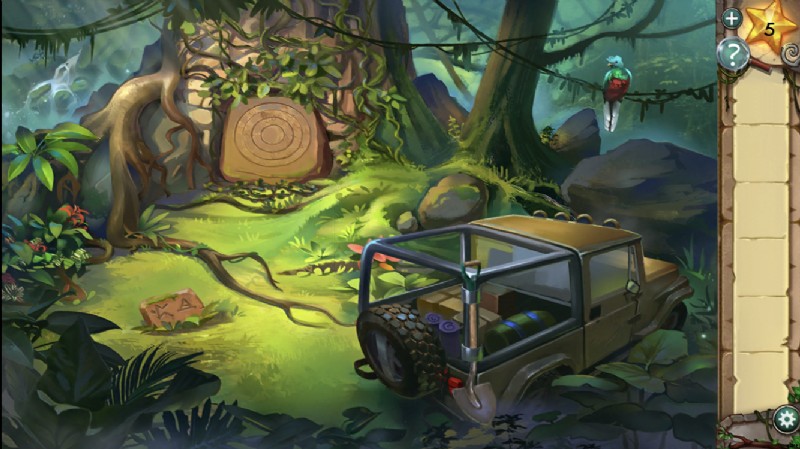
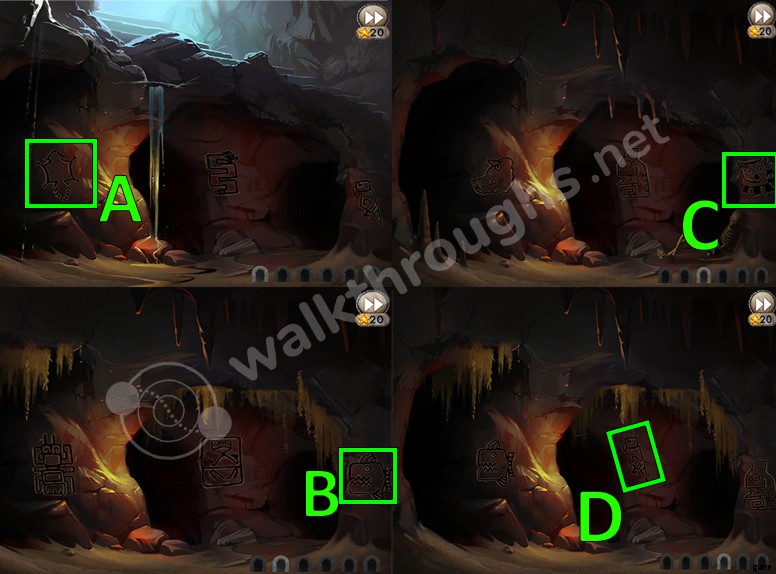
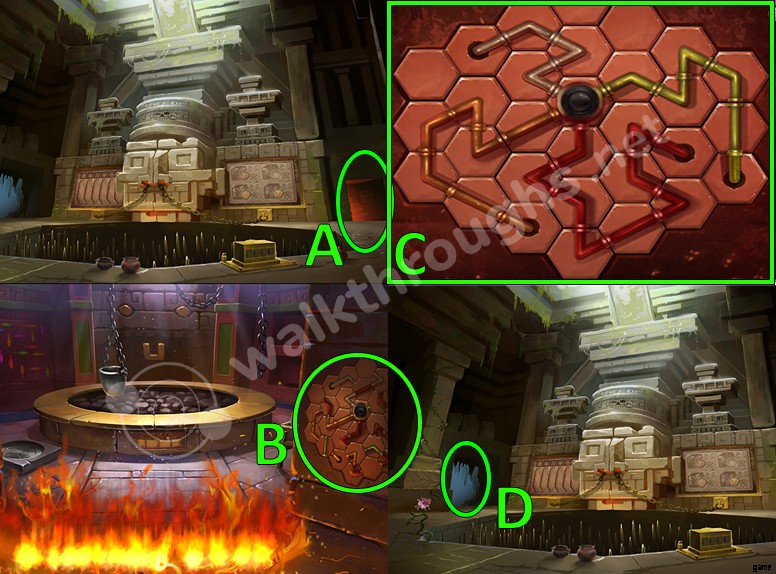
- マチェーテを集める ジープの後ろから。 (A)
- なたを選択します。 (B)
- つるを切る。 (C)
- 木の切り株をクリックします。 (D)
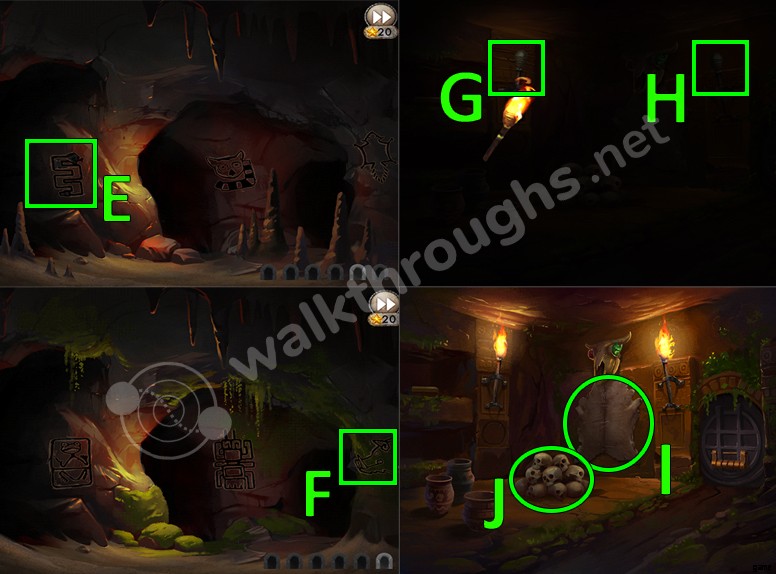
- シャベルを集めてください。 (E)
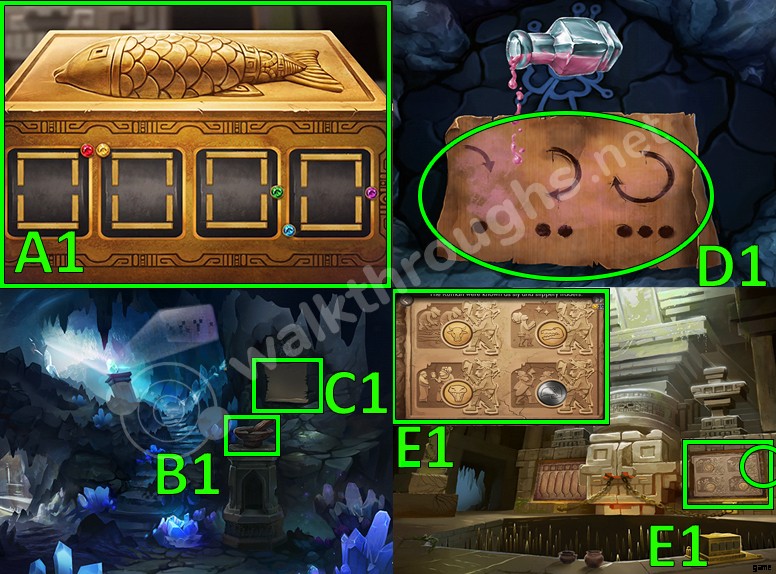
- シャベルを使う 動かなくなったタブレットで 地中に。 タブレットをクリックします。 (女)
- シンボルを覚えておいてください タブレットから。 (G)
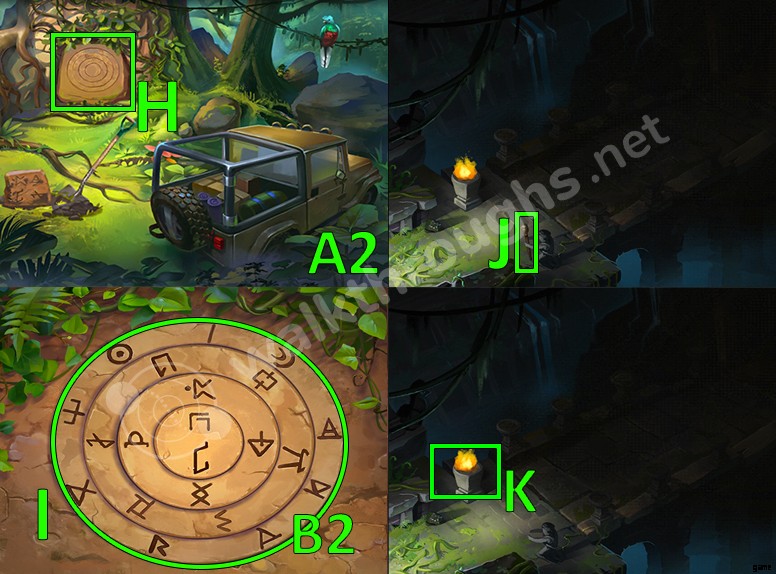
- 木の切り株をクリックします。 (H)
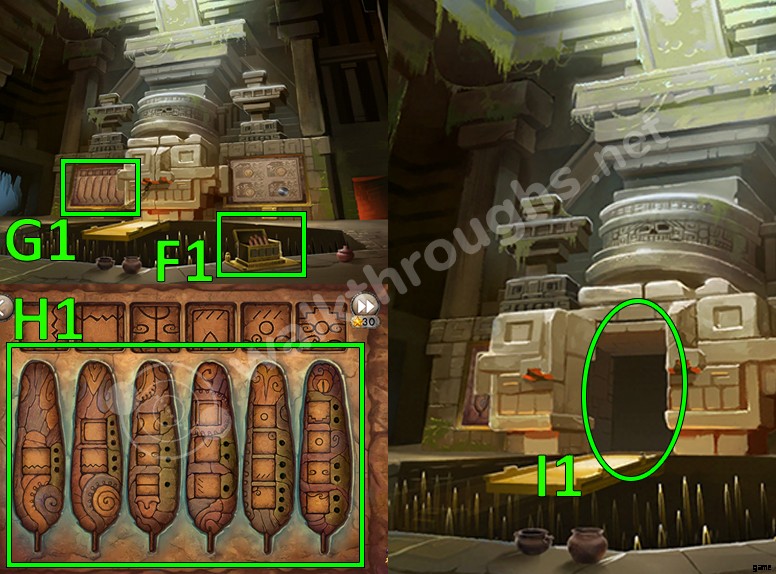
- パズルの正しい解き方 タブレットの記号を使用中。 入り口を通り抜けます 開いたばかりです。 (私)
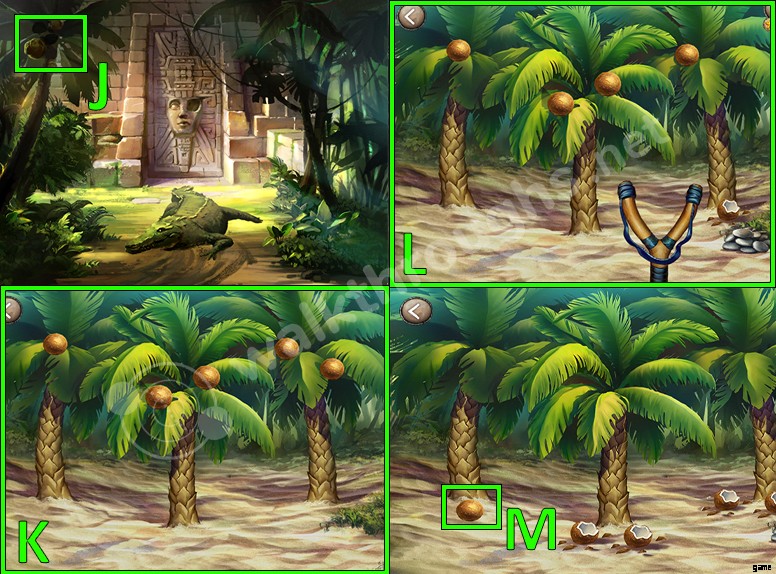
- たいまつを持ってください。 (J)
- たいまつに火をつけて。 (K)
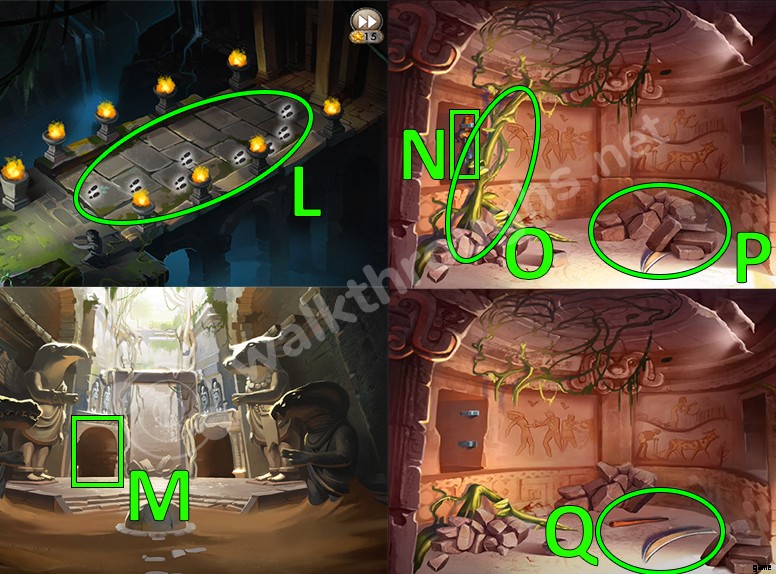
- オイルに火をつける 暗闇を透視するために橋に沿って並んでいます。 石をタップ 画像に表示されているもの 橋を渡る 落ちることなく。 (L)
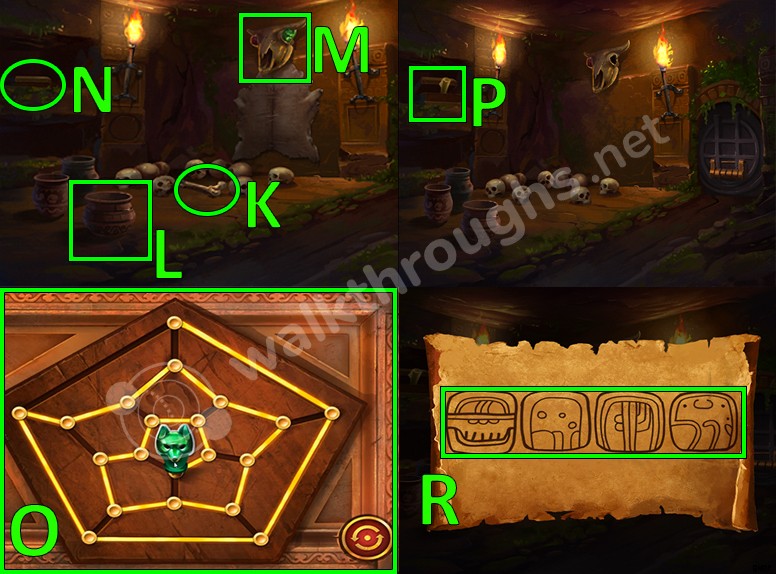
- 左側のドアをクリックします。 (M)
- 短剣を集めてください。 (N)
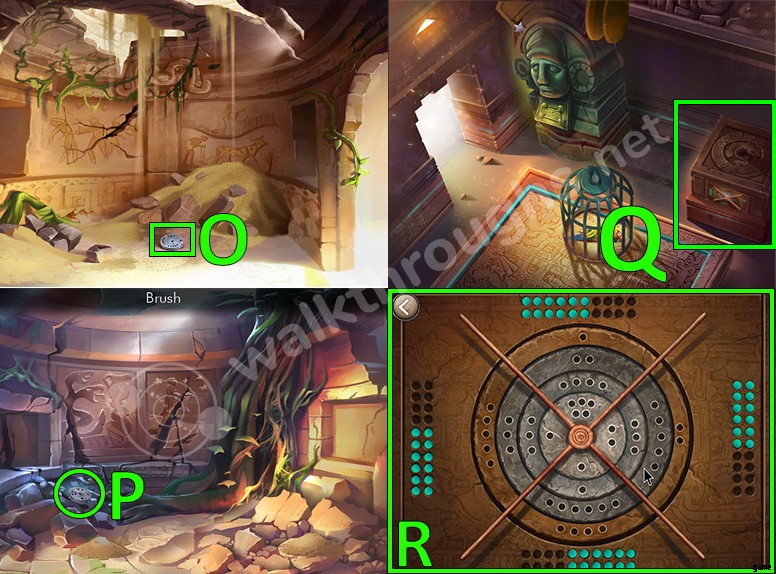
- 短剣を使う つるを切り落とします。 つるを拾ってください。 (O)
- 瓦礫の山を動かしてください。 2 つの大鎌の部分 現れる。 (P)
- つるを使う それらを組み合わせて大鎌を修正します。 (質問)
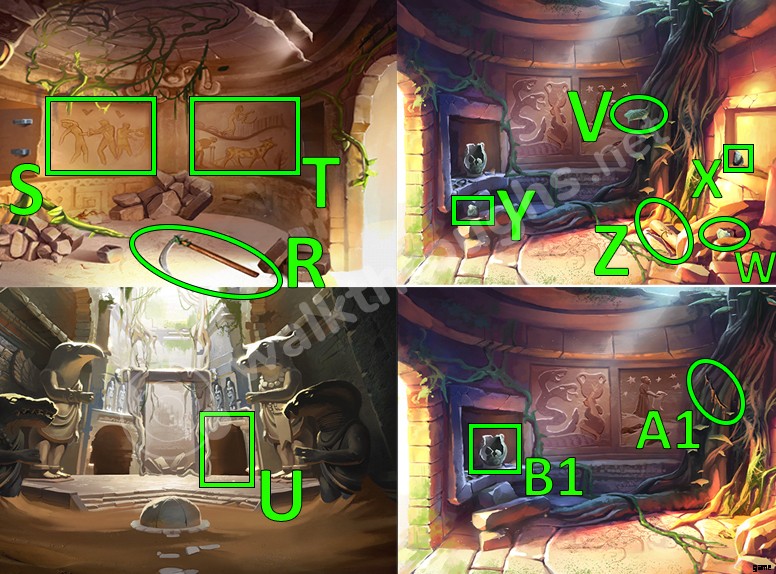
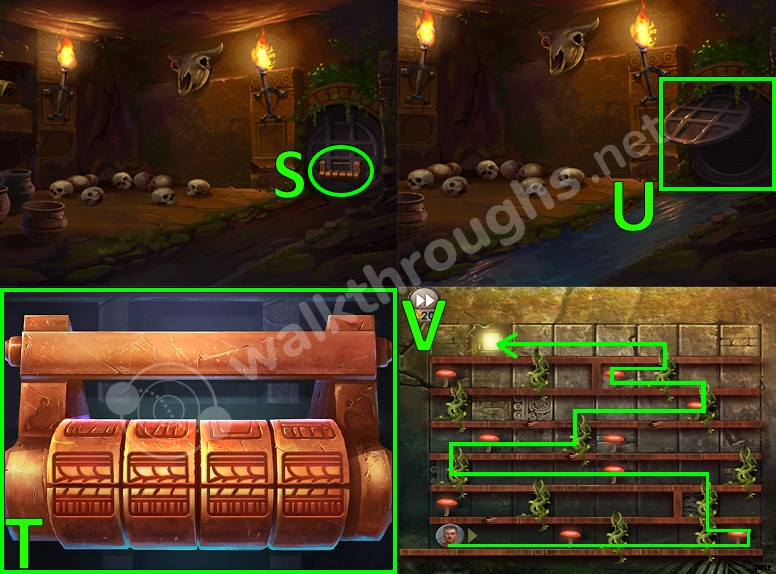
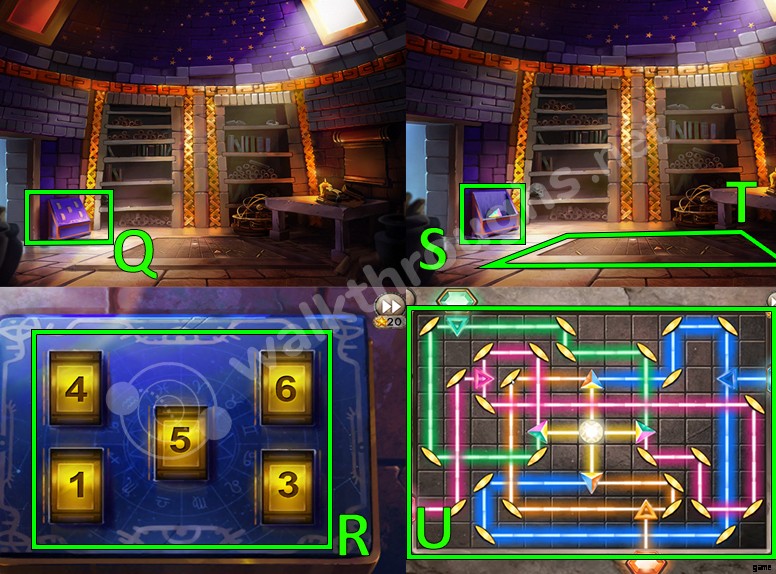
- 最初の絵をクリックします 壁に。 (S)
- 2 番目の絵をクリックします 壁に。 (T)
- 固定鎌を集めましょう。 (R)
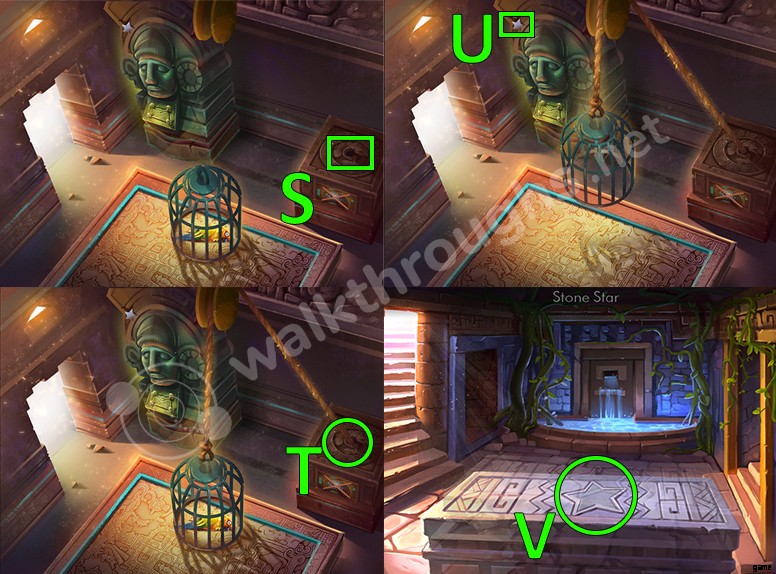
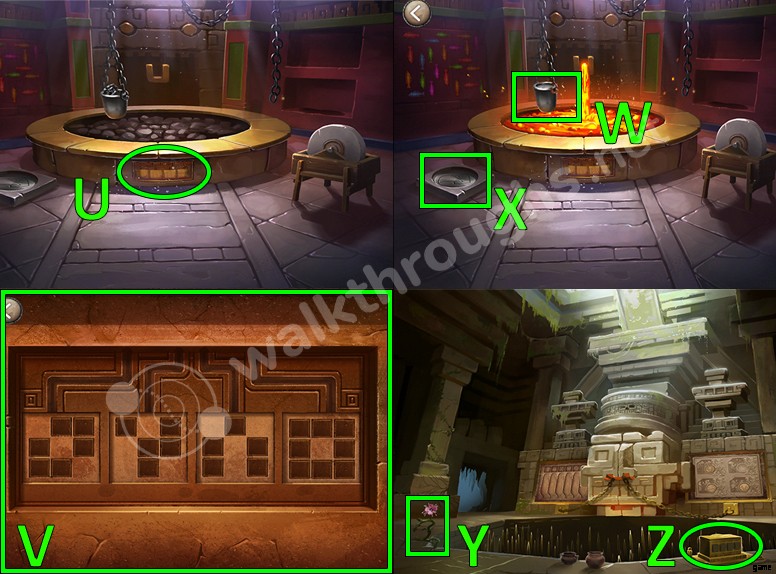
- 右のドアをクリックしてください。 (U)
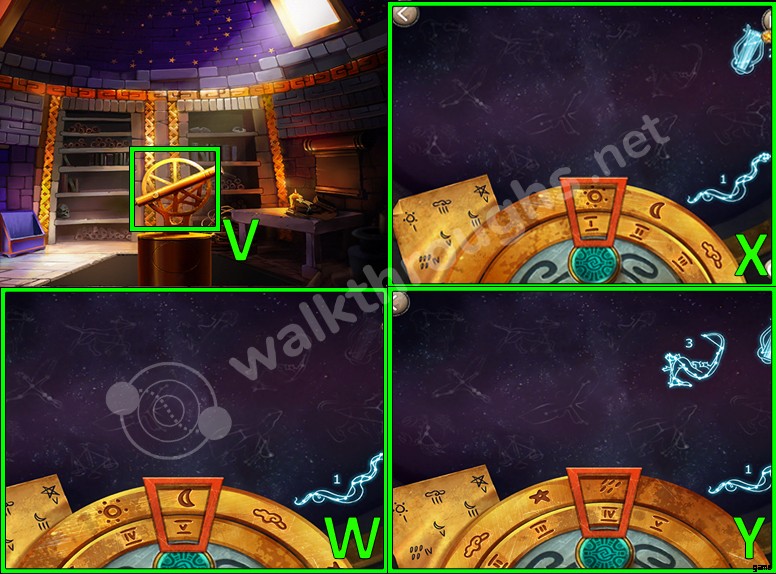
- 葉を拾います。 (V)
- 最初の陶器の破片を集める。 (W)
- 2 つ目の陶器の破片を集めましょう。 (X)
- 3 つ目の陶器の破片を集めましょう。 (Y)
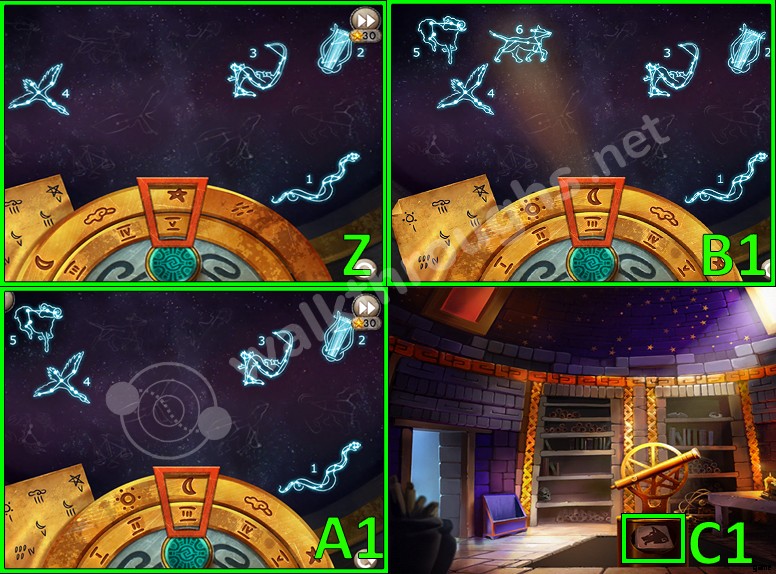
- スクロールを集めます。 (Z)
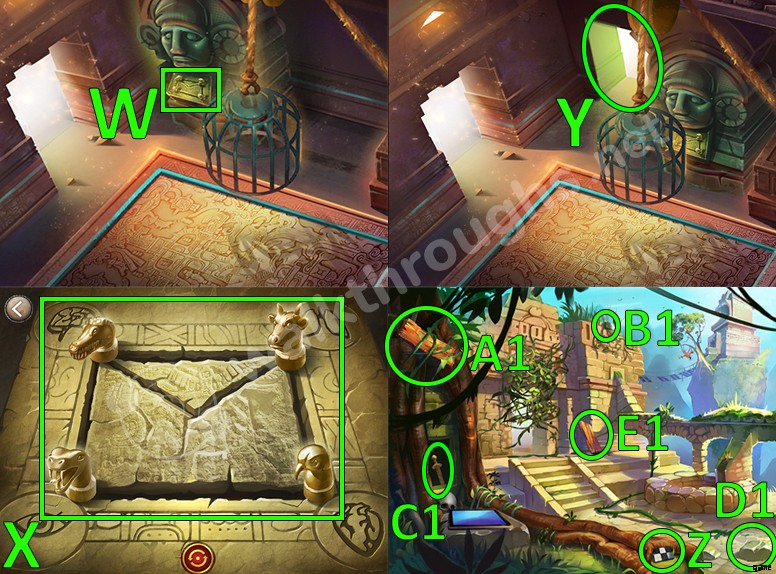
- 短剣を使う スリットを切る ツルで。 樹液を集める つるから あなたのリーフで。 (A1)
- ポットをクリックします。 (B1)
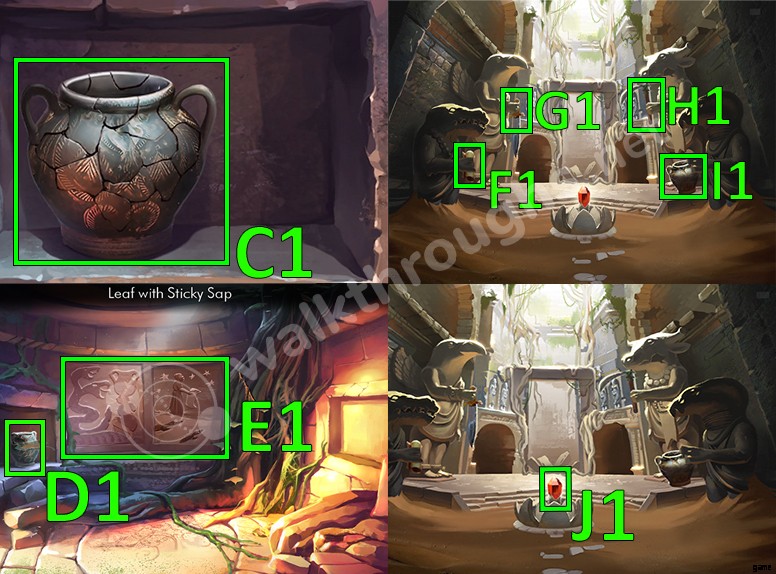
- 鍋を入れます 一緒に戻ります。 (C1)
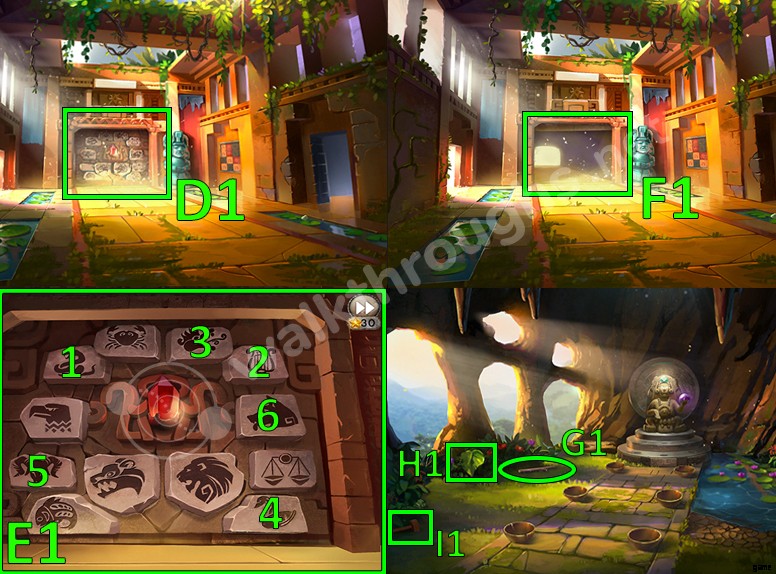
- 鍋を接着する 葉っぱで ねばねばした樹液を含む . (D1)
- 図面をクリックします 壁に。 (E1)
- 巻物を渡す ワニの像へ。 (F1)
- 儀式用短剣を渡す 鷹の像へ。 (G1)
- 大鎌を渡す 牛の像へ。 (H1)
- ポットをあげる 蛇の像へ。 (I1)
- 時代の鍵を手に入れましょう。 (J1)
- チャプターを完了しました。
第 2 章
前半
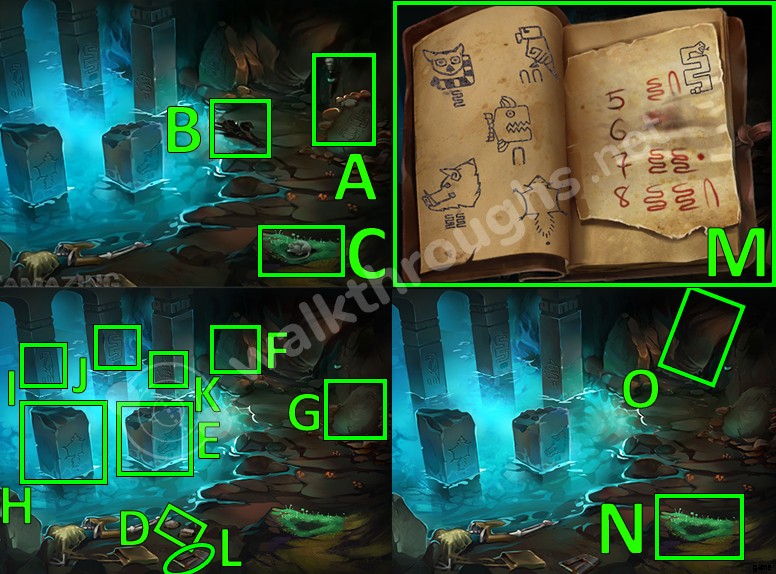
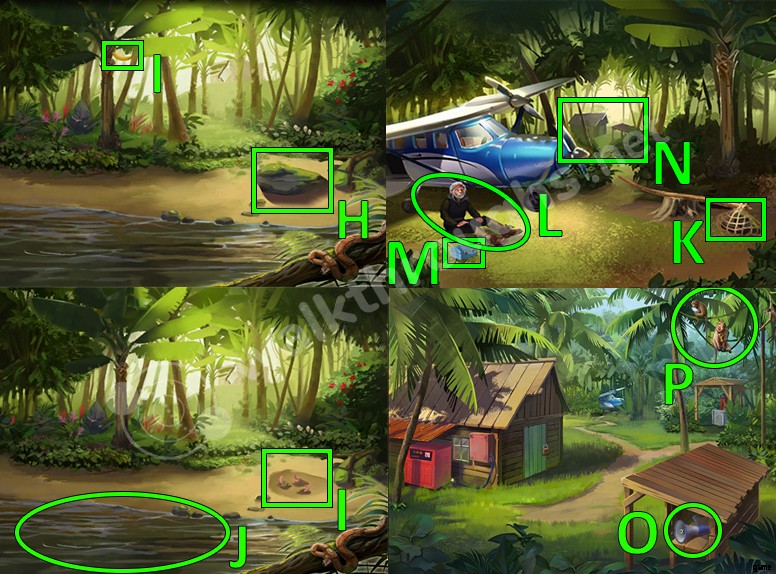
- たいまつを手に取りましょう そしてキノコ。 (A)
- 流木を集める。 (B)
- キノコに餌をやる それが去るようにマウスに。 (C)
- 死体のパックを開けてください。 火打石を集めましょう。 (D)
- 最初の石を見てください。 (E)
- 2 つ目の石を見てください。 (女)
- 3 つ目の石を見てください。 (G)
- 4 つ目の石を見てください。 (H)
- 5 番目の石を見てください。 (私)
- 6 番目の石を見てください。 (J)
- 7 番目の石を見てください。 (K)
- 本をクリックします。 (L)
- 記号を読む ノートブックに。 (M)
- 火打石を使う 乾いたコケで、 その後、流木を追加します たいまつに火をつけます。 (N)
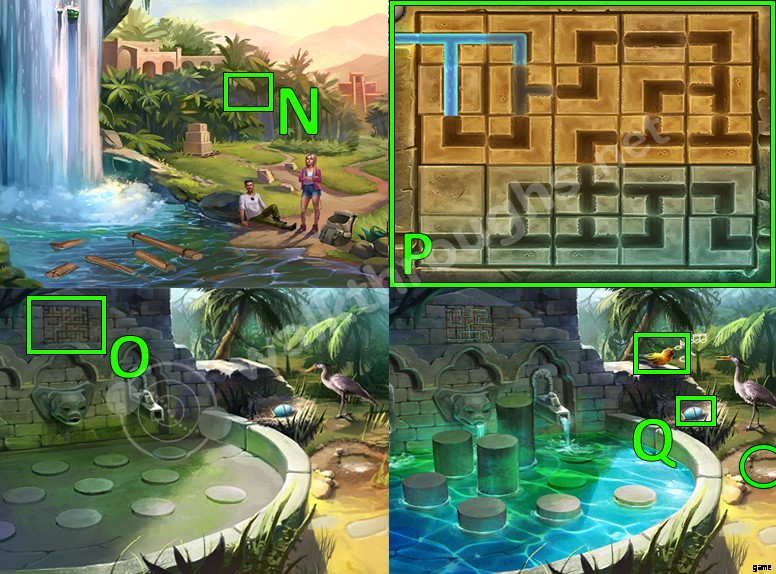
- 入口を通り抜けます。 (O)
第二部
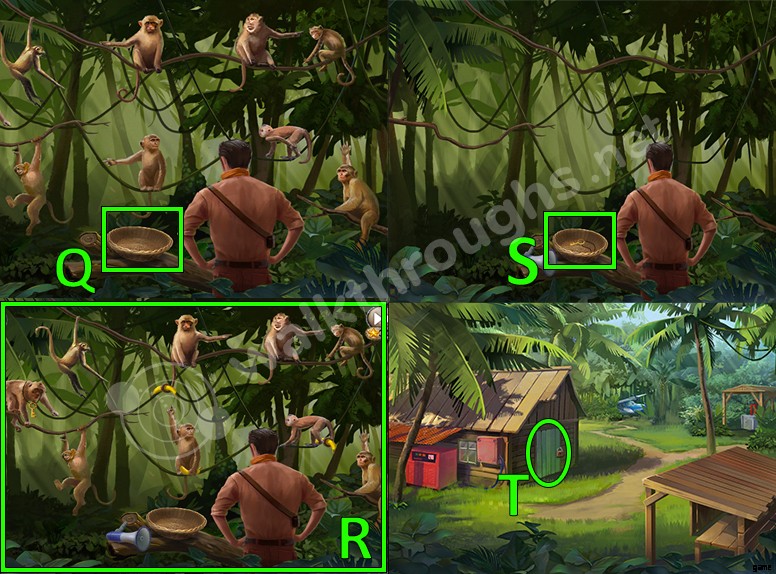
- オリエンテーション 洞窟の入り口から 正しい入り口に行く必要があります 次のフェーズに進むために。 最初の入場では、 ムササビをクリックしてください。 (A)
- 魚をクリックします 2 つ目の入口です。 (B)
- キツネザルをクリックしてください。 (C)
- オウムをクリックします。 (D)
- 蛇をクリックします。 (E)
- イノシシをクリックします。 (女)
- 2 つのたいまつに火をつけます 部屋で。 (G, H)
- 動物の皮を取ります。 (私)
- ドクロの山を倒してください。 (J)
- 骨を取る 頭蓋骨の山に隠れていました。 (K)
- 動物の皮を浸す 魚油で。 (L)
- 脂っこい動物の皮を使う 牛の頭に。 玉狐の頭を集める 地面に落ちるとき。 (M)
- 骨を使う 箱を引く クローザー。 ボックスをクリックします。 (N)
- キツネの頭を入れて 箱に。 画像 パズルの正しい解き方を示します。 (O)
- 巻物を集めます。 (P)
- 読んで。 次のパズルのヒントを示しています。 (R)
- コンビネーション ロック パズルをクリックします。 (S)
- 記号を使用する 巻物から パズルを解決します。 (T)
- 下水道を通り抜けます。 (U)
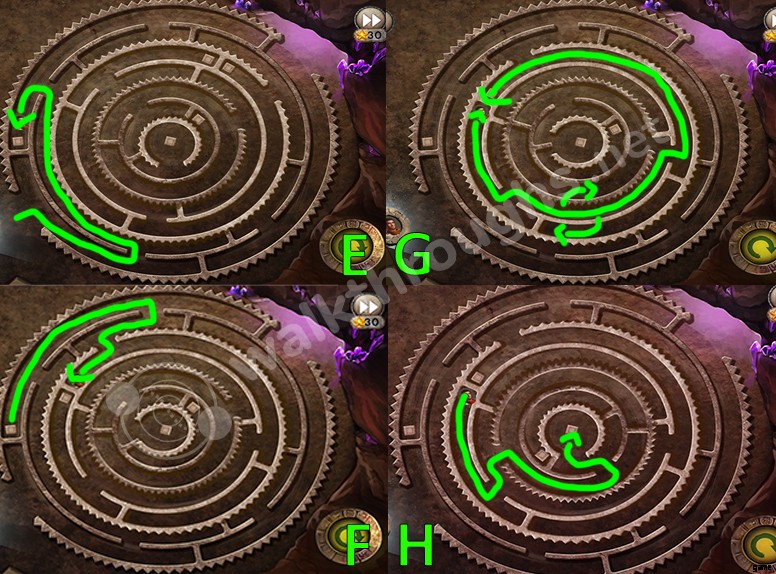
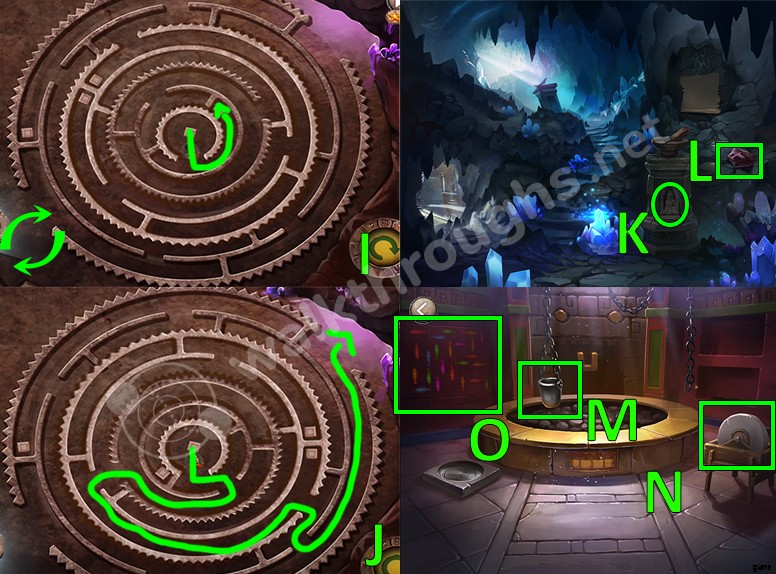
- 2 つの迷路から脱出する時が来ました 第 2 章を完了するために! この画像は、迷路 1 からの正しい脱出経路を示しています。 (V)
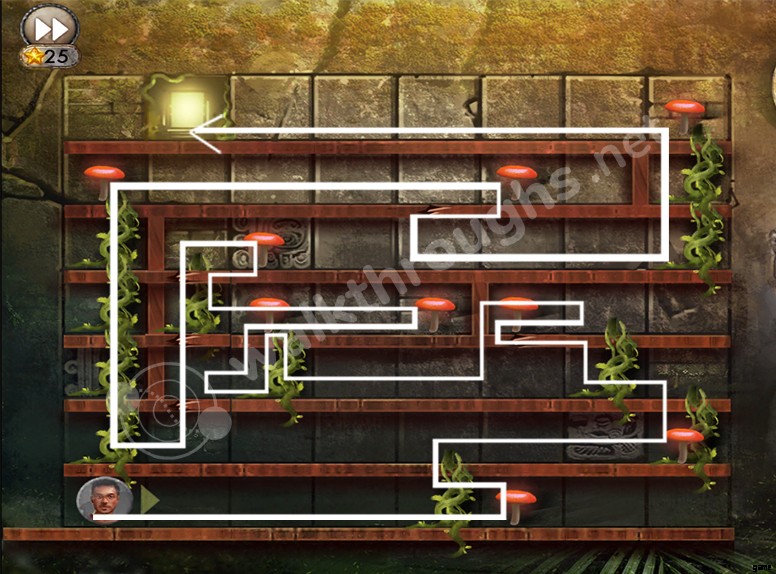
- この画像 Maze 2 から脱出するための正しいパスを示します。
- チャプターを完了しました。
第3章
前半
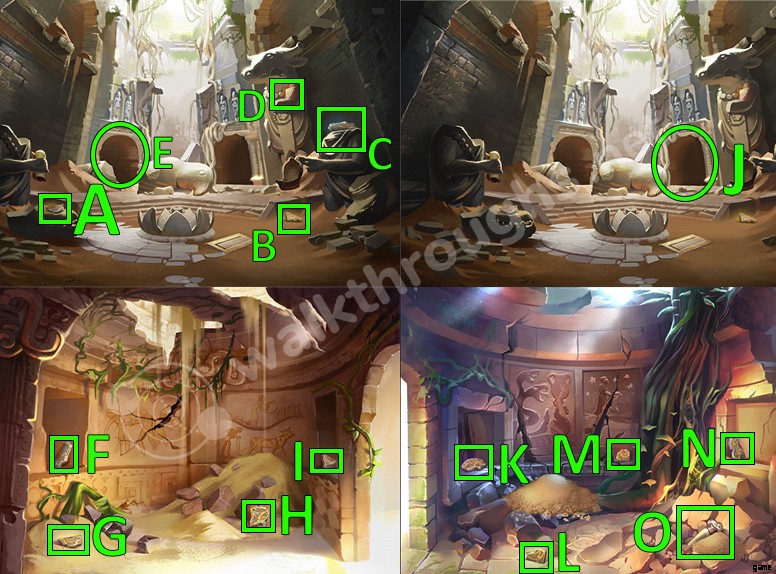
- 最初のフラグメントを拾います。 (A)
- 2 番目のフラグメントを拾います。 (B)
- 3 番目のフラグメントを拾います。 (C)
- 4 番目のフラグメントを収集します。 (D)
- 左の出入り口を通り抜けます。 (E)
- 5 番目のフラグメントを収集します。 (女)
- 6 番目のフラグメントを集めます。 (G)
- 7 番目のフラグメントを集めます。 (H)
- 8 番目のフラグメントを集める。 (私)
- 右の戸口を通り抜けます。 (J)
- 9 番目のフラグメントを集めます。 (K)
- 10 番目のフラグメントを集める。 (L)
- 11 番目のフラグメントを収集します。 (M)
- 12 番目のフラグメントを集める。 (N)
- ホークジャーを手に入れてください。 (O)
第二部
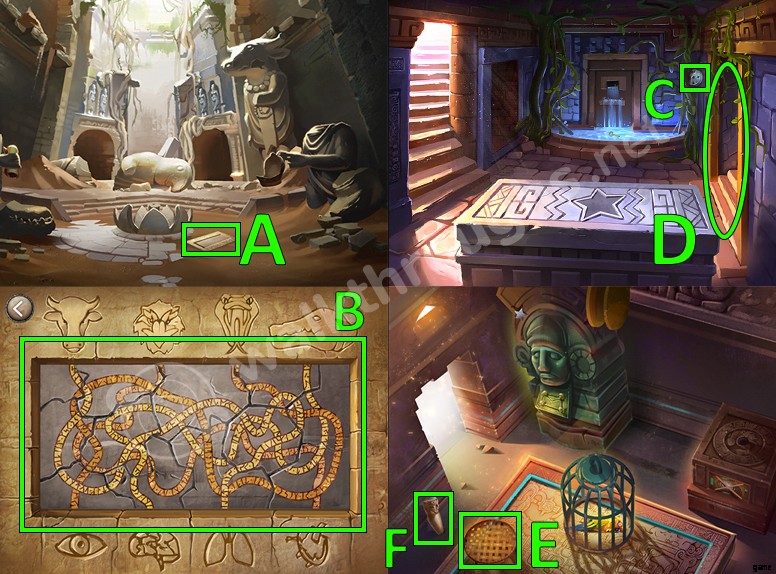
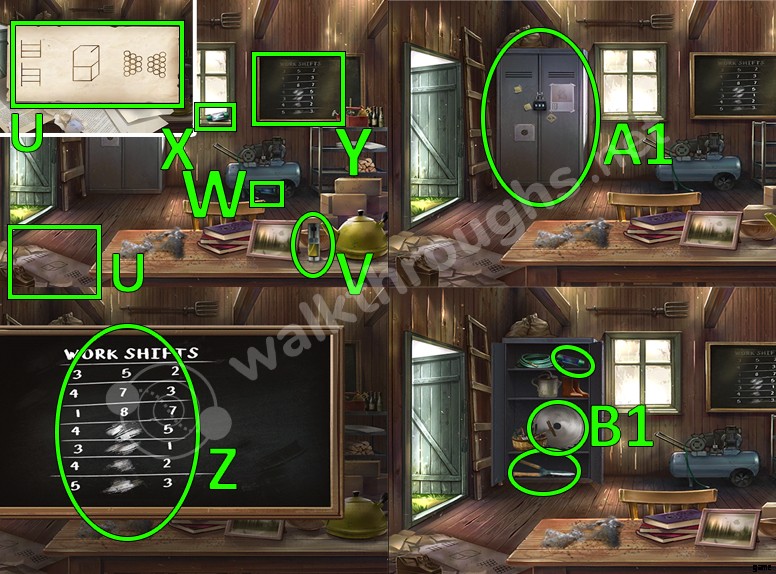
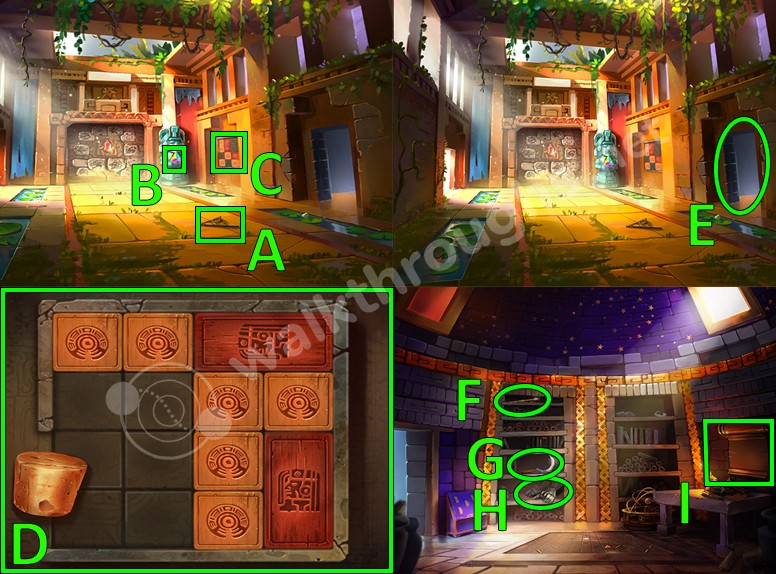
- 石の飾り板をタップしてください。 (A)
- 断片をつなぎ合わせる あなたはちょうど一緒に集めました。 フラグメントを回転させることもできます それらをつなぎ合わせる正しい方法が見つからないように思われる場合。 画像 フラグメントをつなぎ合わせる方法を示します。その後、開いた階段を下ります。 (B)
- ギアを集めましょう。 (C)
- ドアを通り抜けてください。 (D)
- ふるいを集めます。 (E)
- スネークジャーを集めてください。 (女)
- ふるいを使う 鍵を手に入れる 噴水から。 (G)
- ドアを通り抜けます 左に。 (H)
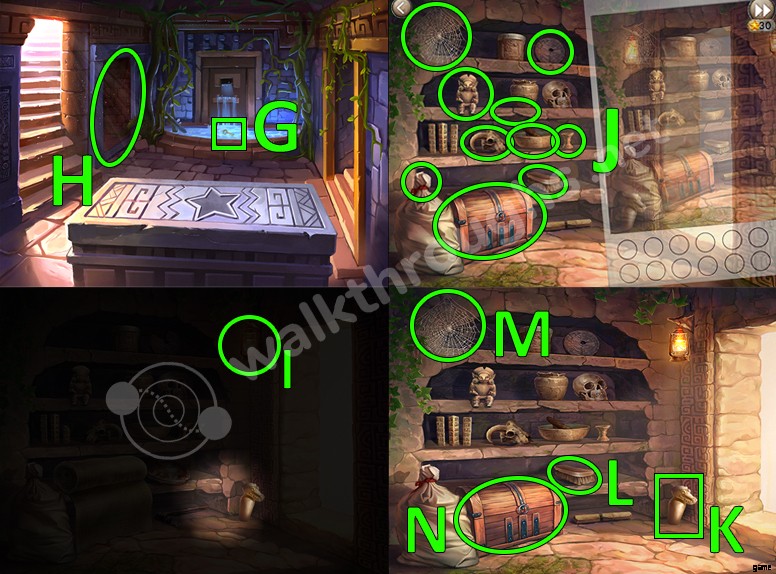
- ランプを狙う ライトをオンにします。 (私)
- 写真のすべてのものをタップします 違います。 (J)
- その後、スネーク ジャーを取ります。 (K)
- ブラシを取ります。 (L)
- クモの巣を手に入れよう。 (M)
- キーを使用 噴水で見つけたもの 胸を開くこと。 ロープを集める 胸の中に。 (N)
- セカンド ギアを集めましょう。 (O)
- 右の出入り口を通り抜けます。 3 番目のギアを集めましょう。 (P)
- 階下へ行きます 左のドアを通り抜けます。 レバー機構をクリックします。 (質問)
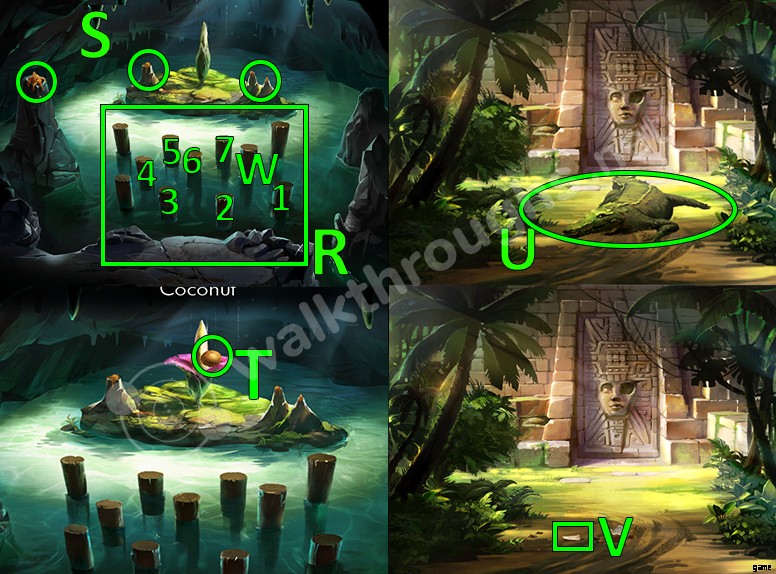
- すべての歯車を配置する レバー機構について。 画像 パズルの正しい解き方を示します。 (R)
- ロープをつなぐ レバー機構で。 (S)
- ケージ 持ち上げます。 蜘蛛の巣を使う 鳥の出血を止めます。 鳥を集める 、Bart という名前になります。 (T)
- Bert という名前の鳥を選択してください インベントリでスターをクリックします 鳥にスターを集めさせる そしてあなたにそれを与えます。 (U)
- スタを配置する ストーンファガスのr。 (V)
- パズルをクリックします。 (W)
- 飾り板を見てください 各動物から器官または体の部分への経路をもう一度確認します。 雄牛 肺に行き、 タカ ハートに行き、 へび 目に入る そしてクロコダイル 脳に行きます。 (X)
- 入り口を通り抜けます。 (Y)
- 市松模様を集めてください。 (Z)
- バートを使う つるにたどり着きます。 板を集める それが落ちます。 (A1)
- バートを使う 市松模様にたどり着きました。 (B1)
- 剣を集めてください。 (C1)
- 剣を動かす 市松模様のピースを集めてください。 (D1)
- 木の板を集める。 (E1)
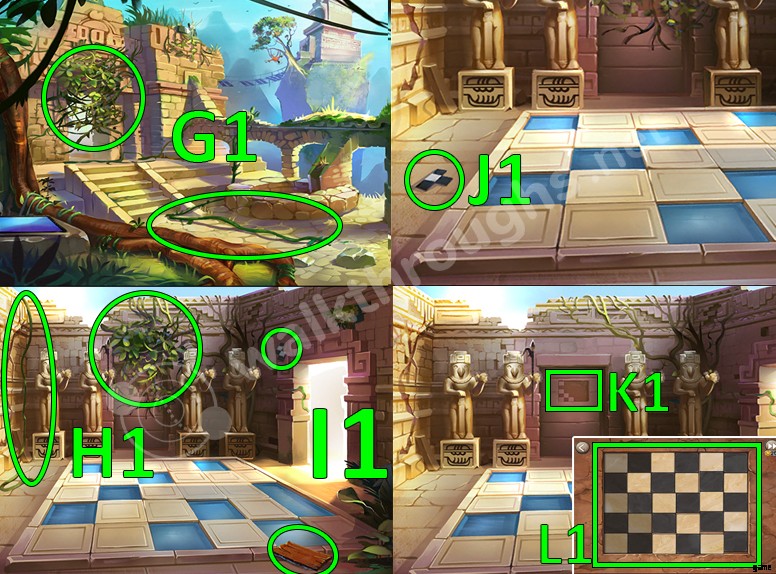
- 剣を使う 2 本のつるで。 ツタを 2 本集めてください。 アーチ型の出入り口を通り抜けます。 (G1)
- 剣を使う ツタをあと 2 本手に入れましょう。 (H1)
- 木の板を集める そして市松模様。 (I1)
- 市松模様を集める つるの下に隠れていました。 (J1)
- パズルをクリックします。 (K1)
- すべての市松模様を追加します パズルへ。 最終結果はチェッカーボードのようになります それを解決するために。 (L1)
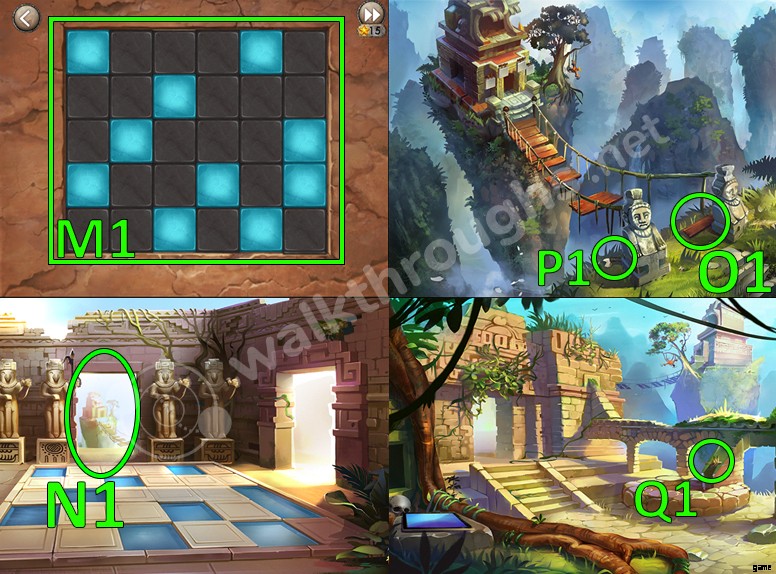
- ボタンをクリックします 画像に示されています。 パズル 青いブロックに基づいています プールに。 (M1)
- 戸口を通り抜けます。 (N1)
- 木の板を集めてください。 (O1)
- 鳥の爪を集めましょう。 (P1)
- 鳥の爪を使う 井戸に突き刺さった物体の中。 最後の板を集める。 (Q1)
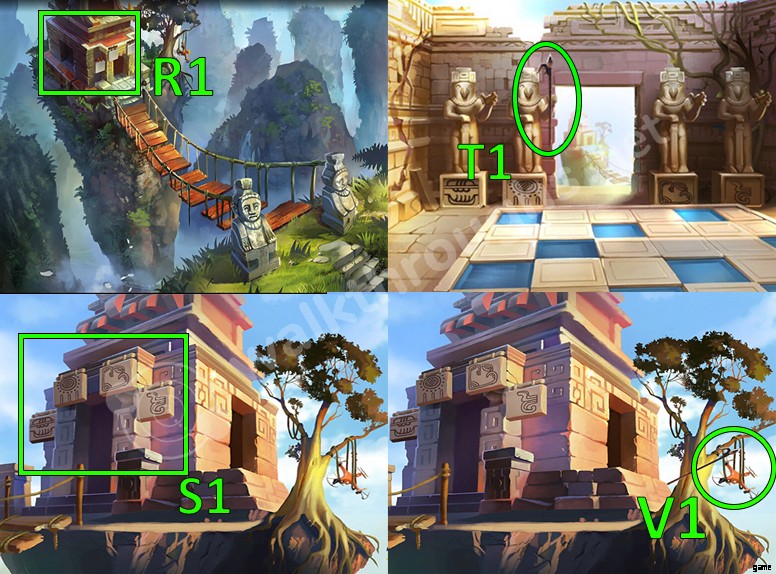
- 橋で再建 厚板で そしてつる 収集したばかりです。 塔に行きます。 (R1)
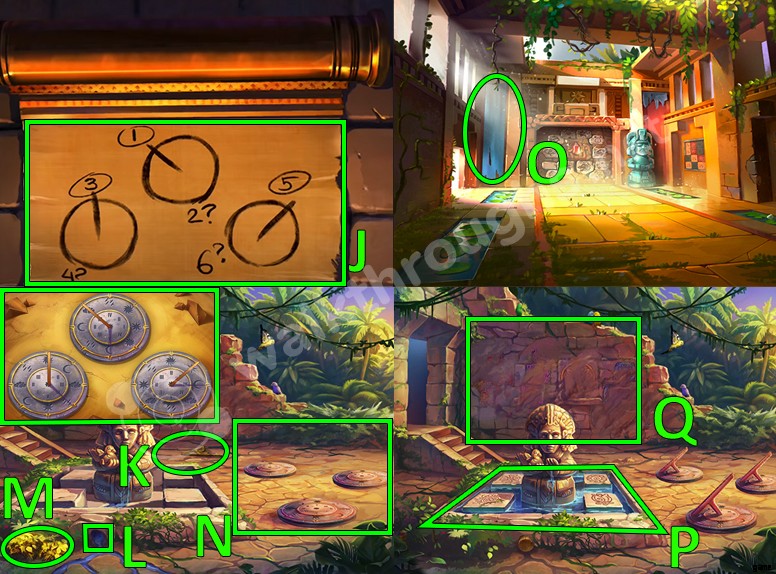
- 記号を覚えておいてください 神社からぶら下がっています。
- 彫像の部屋に行きます。 記号を変更する シンボルに合わせて彫像の下に 神社からぶら下がっています。 槍を集めてください。 (T1)
- 槍を使う ドローンとコンピュータ チップを手に入れるために。 (V1)
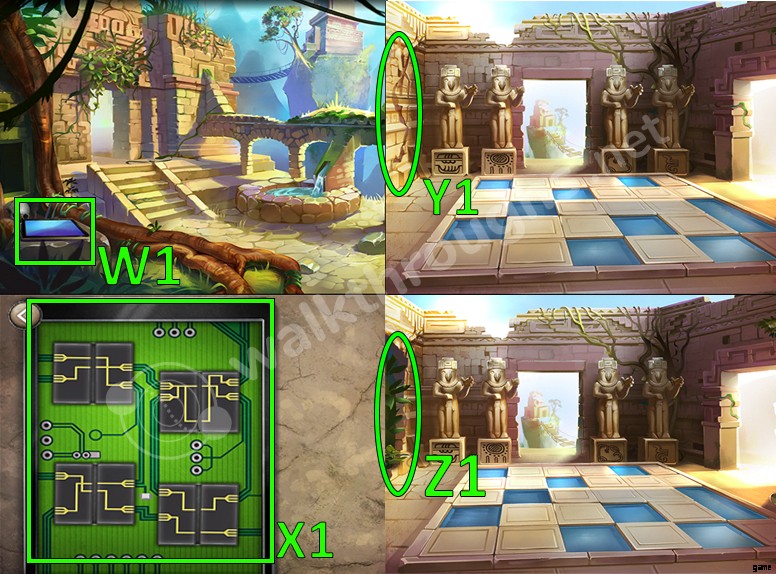
- 最初の場所に戻る タブレットをクリックします。 (W1)
- 画像 ドローン タブレットを修正するための正しいスロットを示します。 (X1)
- 像の部屋に行く ドローンで壁を爆破してください。 (Y1)
- 壊れた壁を通り抜けます。 (Z1)
- チャプターを完了しました。
第4章
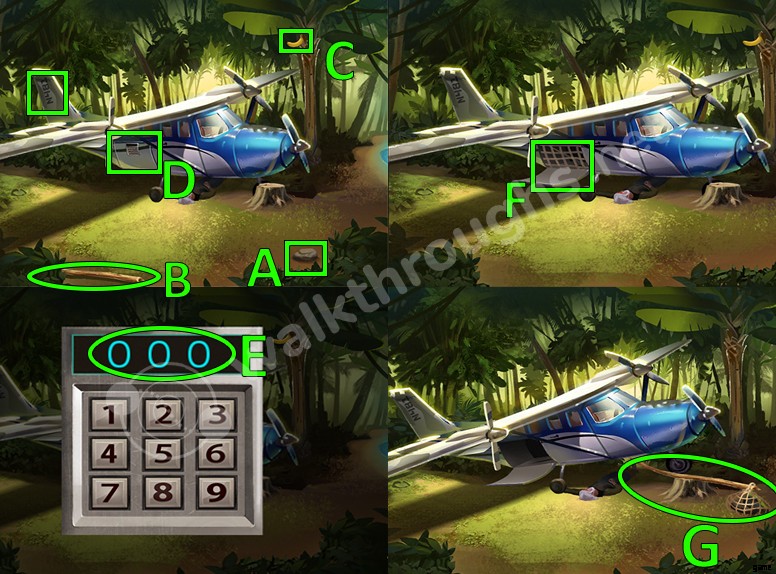
- 岩を集める . (A)
- 倒れた木の枝を集めてください。 (B)
- バートを使う バナナを手に入れる ツリーから。 (C)
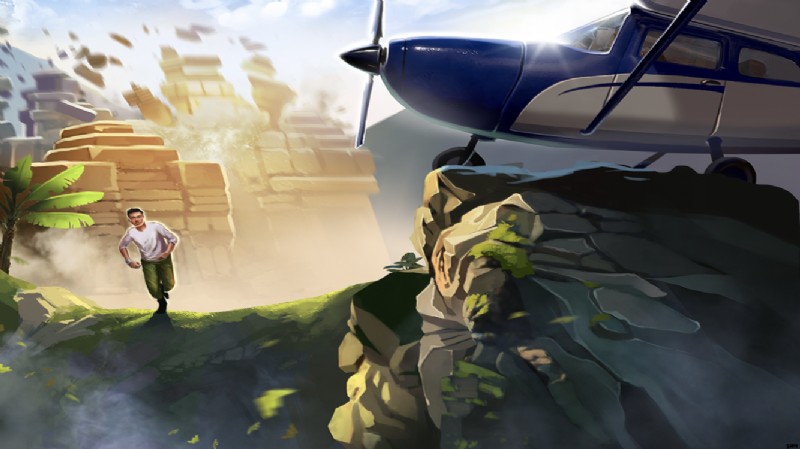
- 飛行機の尾翼にある数字を読んで、 N481 と表示されています。 キーパッドをクリックします 機内にあります。 (D)
- 飛行機の尾翼を使う キーパッドの数字、481。 今度は貨物室 が開かれます。 (E)
- カーゴネットを集める そして釣り竿 貨物室の中。 (女)
- 木の枝を置く 切り株に。 それから右に行きます。 (G)
- 石を集めてください。 (H)
- バナナを集めてください。 (私)
- 釣り竿を使う ワームと 岩の下でした。 (私)
- 釣り竿を使う 魚を捕まえるために水中で。 (J)
- ネットを置く 倒れた木の枝に 2 つの岩を追加します 飛行機の下に閉じ込められた男を救うためにネットの中に入った。 (K)
- 閉じ込められた男を救った後、 お弁当 現れる。 魚をあげる バナナと引き換えに男に。 (L)
- お弁当を開けて、 バナナを集めてください。 (M)
- 木々の間を抜ける 建物に行きます。 (N)
- 拡声器を集めましょう。 (O)
- サルをクリックしてください。 (P)
- 3 本のバナナを配置します かごに 拡声器を配置します カゴの横。 (質問)
- 正しいサルを教えてください バナナ、拡声器 鍵を作るために一撃です バスケットに収まります。 画像のようになります パズルを解くには、以下をご覧ください。 (R)
- 鍵を集めます。 (S)
- キーを使用 ドアを開けてください。 それを通過してください。 (T)
- 黒板をクリックします。 行に記入してください 478 という番号が表示されます。 (U)
- オイル スプレーを集めます。 (V)
- 導火線を集めてください。 (W)
- 2 つ目の導火線を集めます。 (X)
- 黒板をクリックします。 それを見て、最初の数字を合計してください そして3番目の数字 2 番目の数字を見つけます。 欠落している 2 番目の数字は次のとおりです: 9、4、6、8。 これらの数字は今後のパズルで使用するので覚えておいてください。 (A1)
- キャビネットをクリックします。 番号 478を使用してください それを開くために。 (A1)
- のこぎりを集めて、 ヒューズ そしてハサミ。 (B1)
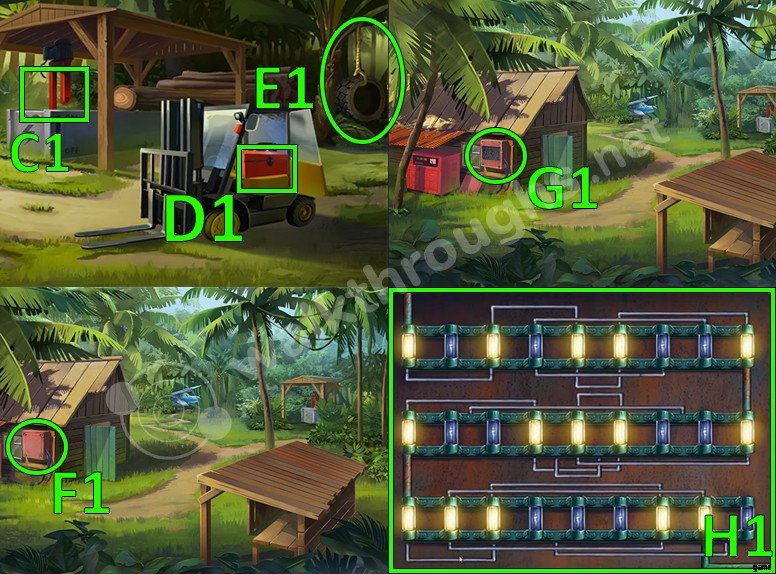
- Place the blade on the machine. (C1)
- Use the code 9468 to open the forklift. Use the oil spray to open the toolbox. Collect the screwdriver その中。 (D1)
- Use the shears to cut the rope that is holding the tire. After that, collect the tire and the rope. (E1)
- ドライバーを使用します to open the fuse box. (F1)
- Click on the fuse box. (G1)
- Place the three missing fuses on the box. The image shows the correct way to move the brackets to get electricity flowing.. (H1)
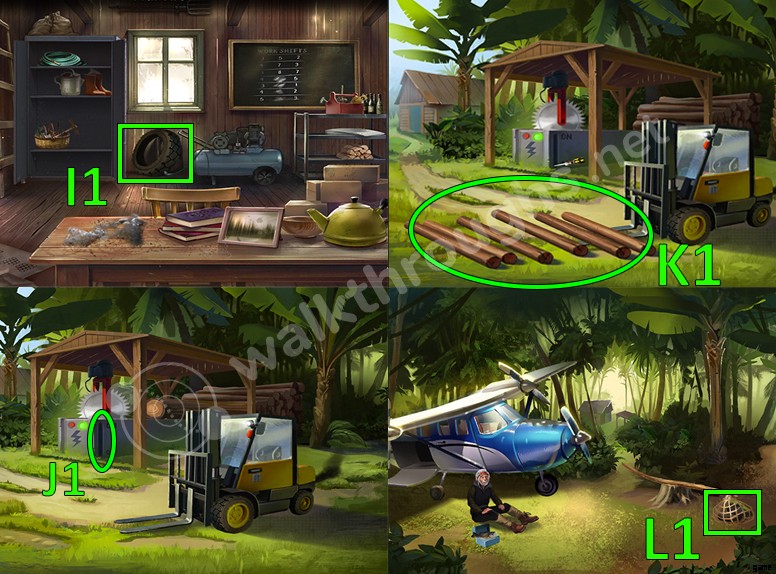
- Go inside the shed. Inflate the tire. After that, collect it. (I1)
- ドライバーを使う as a level to turn on the logger. Doing that with make the logger cut some wood. (J1)
- Use the first rope to tie them up together. We need another rope to tie them up into a raft, so lets find it. (K1)
- Go back to the plane and use the shears on the net to collect another rope. (L1)
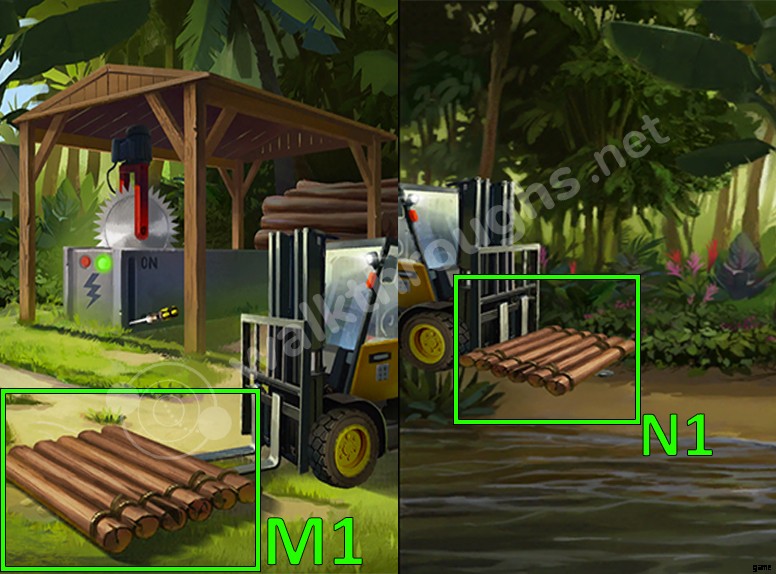
- Use the final rope to tie them up into a raft. Then place the inflated tire to the forklift to make the forklift move into the river. (M1)
- Chapter Completed. (N1)
Chapter 5
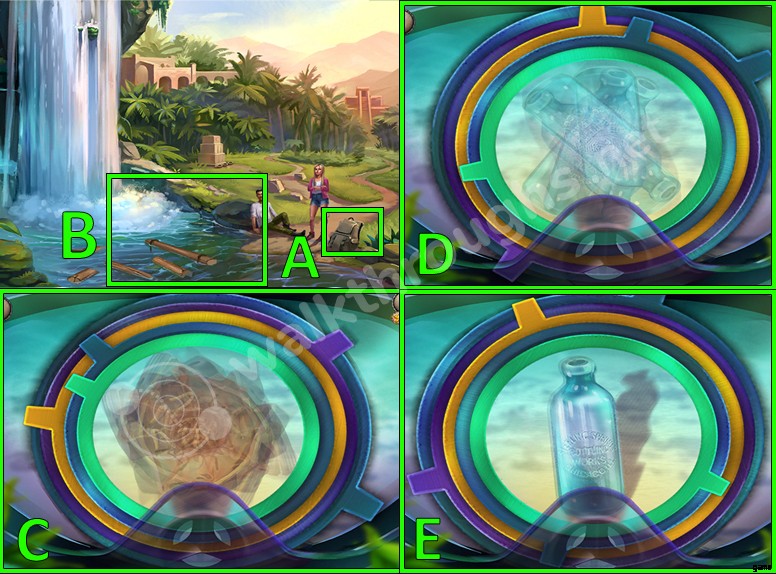
- Open the backpack. Collect the diving mask and slingshot. (A)
- Use the diving mask on the water. (B)
- Match up all the layers of the shoe. (C)
- Match up all the layers of the bottle. (D, E)
- Match up all the layers of the necklace. (女)
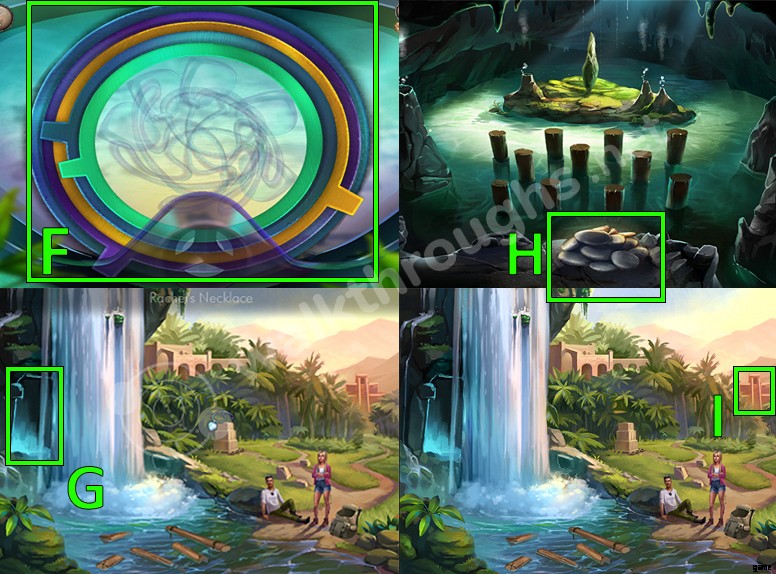
- Enter the cave located behind the waterfall. (G)
- Collect the pile of pebbles. (H)
- Get out of the cave and go to the temple. (私)
- Tap on the cocunut tree. (J)
- Place the pile of pebbles alongside the tree. (K)
- Use the slingshot and pebbles to shoot the coconuts. (L)
- Take the last coconut. (M)
- Click on the middle of the trees. (N)
- Click on the puzzle. Stones will rise up after doing this puzzle, giving you a hint for the pegs located in the waterfall area. (O)
- パズルの正しい解き方。 (P)
- Have Bart sing the crane to collect the egg. After Crane gets distracted, collect the blue egg. Also, pick up the puddle of mud. (質問)
- Click on the pegs in the correct order to solve the pegs puzzle. (R)
- Stuff some mud in the spouts because after doing the puzzle, the spouts will steam. (S)
- Place the coconut into the meaty smelling flower to get a meaty smelling coconut. (T)
- Give the meaty smelling coconut to the crocodile. (U)
- Collect the crocodile tooth. (V)
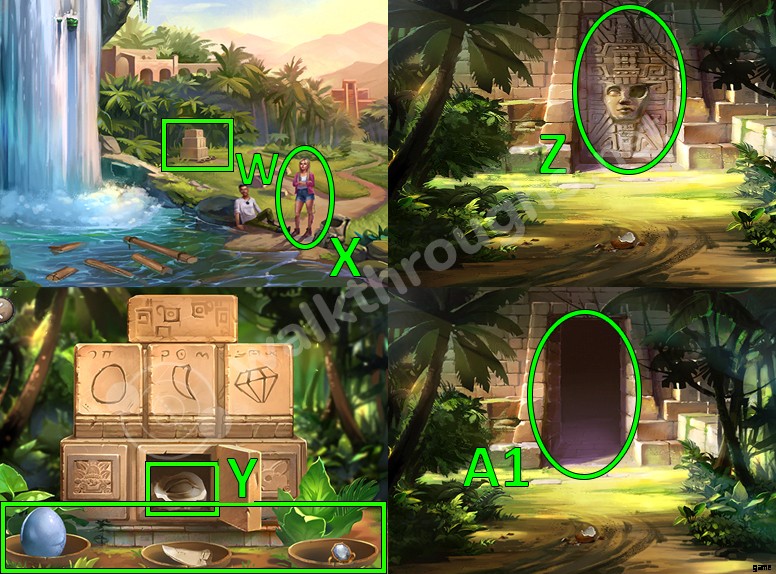
- Tap into the offering area. Place the tooth and the blue egg into the bowls, but we also need Rachel’s diamond to take the final item in order to complete this chapter. (W)
- Give the necklace to Rachel in exchange for the diamond. (X)
- Place all of the three items and take the stone eye. (Y)
- Go back to the crocodile area. Place the stone eye on the pharaoh’s eye in order to make the door open. (Z)
- Go through. Chapter Completed. (A1)
Chapter 6
- Tap on the red doorway. (A)
- パズルをクリックします。 (B)
- パズルの正しい解き方。 (C)
- Click on the blue doorway. (D)
- The images show the correct path in order to progress through this maze puzzle. (E, F, G, H)
- These images show the correct final paths in order to solve the maze puzzle. (私、J)
- There is a ore hiding inside the pedestal. それを収集します。 (K)
- Collect the chunk of obsidian. (L)
- Place the ore into the crucible. (M)
- Use the grinding stone to sharpen the chunk of obsidian. (N)
- Click on the fish on the wall. (O)

- The fish on the wall are a clue for a future puzzle. You need to figure the shape of numbers for each fish color by the direction they are facing. For the red fish, the number 5. For the yellow fish, the number 0. For the green fish, the number 9 , and for the blue fish, the number 8. These numbers will be used for the next puzzle. (P)
- Go to the crystal area また。 Use the sharpened obsidian to get a crystal. (質問)
- Use the crystal on the pedestal to get a clue for another puzzle. (R)
- Click on the clue. (S)
- Read the clue. It will be used for the puzzle located in the smelting room. (T)
- Click on the smelting room puzzle. (U)
- Use the clue from the crystal area to solve the puzzle. (V)
- Take the melted ore. (W)
- Pour the ore into the mold 床に。 Collect the shield that gets created from it. (X)
- Collect the pink flower. (Y)
- パズルをクリックします。 (Z)
- 数字を使用する from the fish on the wall パズルを解決します。 The number is 5098 . Collect the stone quills . (A1)
- Place the pink flower in the mortar and pestle to create a liquid vial. (B1)
- Add liquid vial to the parchment to get a clue for a future puzzle. (C1)
- ヒントを読んでください。 We are going to use this clue for a puzzle involving stone quills. The clue means that, 1 dot means one turn clockwise, 2 dots mean two turns clockwise and three dots mean three turns clockwise. (D1)
- Click on the shields. Place the new shield with the other shield. (E1)
- Make sure you have collected all of the stone quills. (F1)
- Click on the stone quill puzzle . Use the clue from the parchment to solve the puzzle. (H1)
- Go through the unlocked entrance. (I1)
- Chapter Completed.
Chapter 7
- Collect the dial from the floor. (A)
- Collect the prism. (B)
- Click on the sliding block puzzle. (C)
- Get the cork out through the opening on the left. (D)
- Go through the doorway. (E)
- Use Bert to collect the dial. (女)
- Collect the sickle. (G)
- Collect the gloves. (H)
- Click on the parchment. (私)
- The clue is going to be used for a future puzzle. (J)
- Collect another dial. (K)
- Use the cork to stop the water from draining. (L)
- Use the gloves on the plants to find another prism. (M)
- Place the three dials you collected on the sundials. Set the sundials so they match the clue we just found on the parchment. Collect the note after matching the sundials. (N)
- Use the sickle on the banner 左に。 Collect the piece of banner. (O)
- Wet the piece of banner in the fountain. (P)
- Use the wet cloth to clean the dirty wall. Doing that, will allow you to read a hint for the next puzzle. You have 4 red symbols, 3 pink symbols, 1 orange and 6 blue symbols. Match the symbols to the ones on the walls with the ones in the fountain, and you will get the number 4613. Also there are 5 birds in the background, so remember these 5 numbers since they are going to be used for the next puzzle. (質問)
- Go through the room on the doorway 右側に。 (質問)
- Use the numbers 4, 6, 1, 3 and 5 チェストを開く。 (R)
- Collect the prism. (S)
- Place the three prisms you collected on the light reflecting puzzle. After that, click on the puzzle. (T)
- The correct way to solve the puzzle. (U)
- Tap on the telescope. (V)
- Place the sundial note by the side. The image shows the first combination for the first constellation. (W)
- The image shows the second combination for the second constellation. (X)
- The image shows the third combination for the third constellation. (Y)
- The image shows the fourth combination for the fourth constellation. (Z)
- The image shows the fifth combination for the fifth constellation. (A1)
- The image shows the sixth combination for the sixth constellation. (B1)
- Collect the dog tile. (C1)
- Click on the tile wall. (D1)
- Place the dog tile with the other tiles. Click the tiles in order to open the entrance. (E1)
- Go through the entrance. (F1)
- Collect the stick. (G1)
- Collect the leaf. (H1)
- Collect the mallet. (I1)
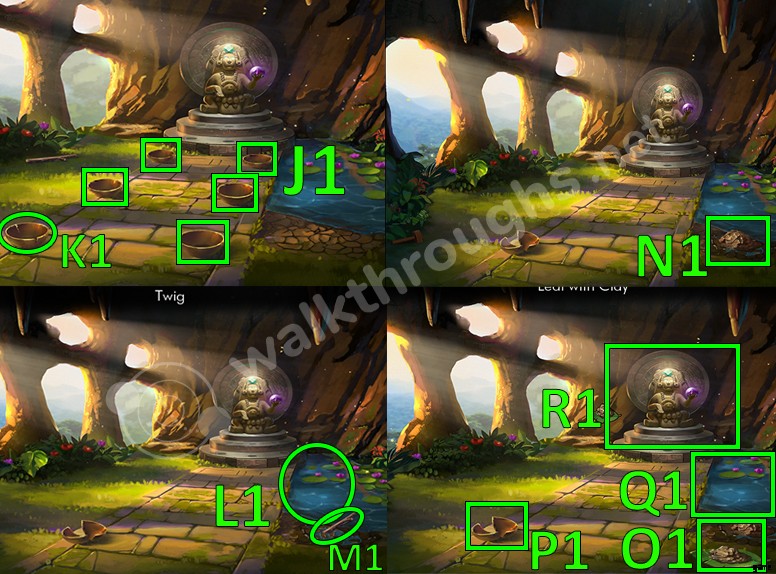
- Collect the five bowls. (J1)
- Click on the last bowl. That one breaks. (K1)
- Collect some water on one of your bowls, then pour it into the dirt. (L1)
- After that, use the stick to mix it up into clay. (M1)
- Use the leaf to collect some of the clay. (N1)
- Collect the leaf holding clay. (O1)
- Use the leaf holding clay in the broken bowl to fix it. Collect the bowl. (P1)
- Fill every bowl 水で。 You should have 6 bowls with water. (Q1)
- 銅像をクリックします。 (R1)
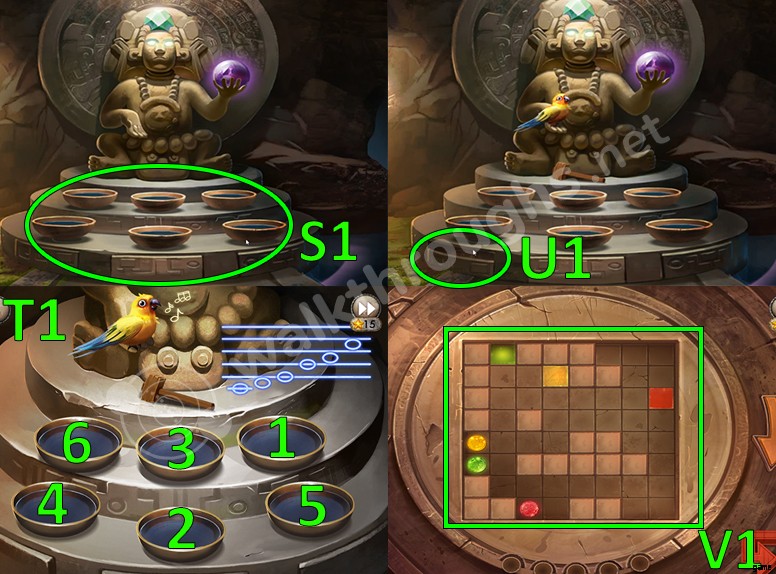
- Place the bowls on the statue. (S1)
- Place the Mallet and Bert in the statue to have him sing a tune. Hit the bowls with your mallet in the correct order as shown on the image. (T1)
- Use the stick to open the panel. (U1)
- To solve this puzzle. You need to turn the board in order to have the balls land in the correct matching squares. The five moves are:Right, Right, Right, Left, Left. (V1)
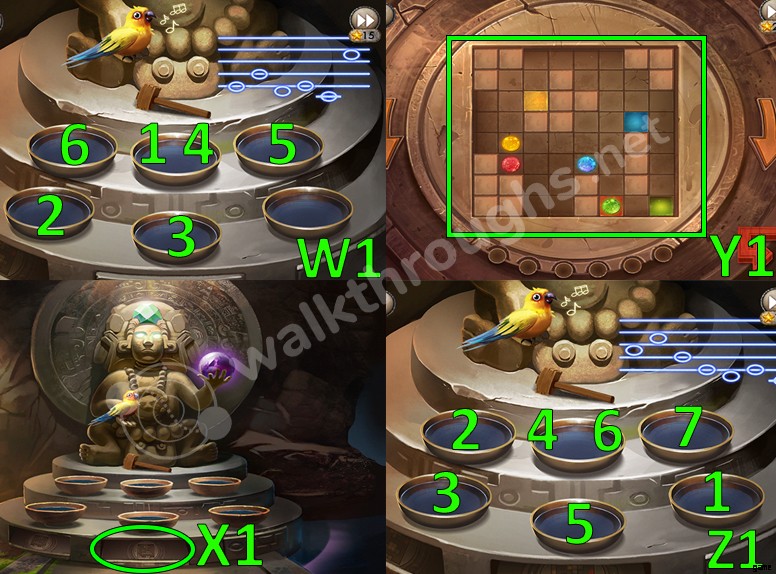
- Have Bert sing another one. Hit the bowls with the mallet in the correct order. (W1)
- パズルをクリックします。 (X1)
- The moves in order to solve the second puzzle are:Right, Right, Right, Right, Right, Left. (Y1)
- Have Bert sing the third and final tune. Lastly, hit the bowls with the mallet in the correct order. (Z1)
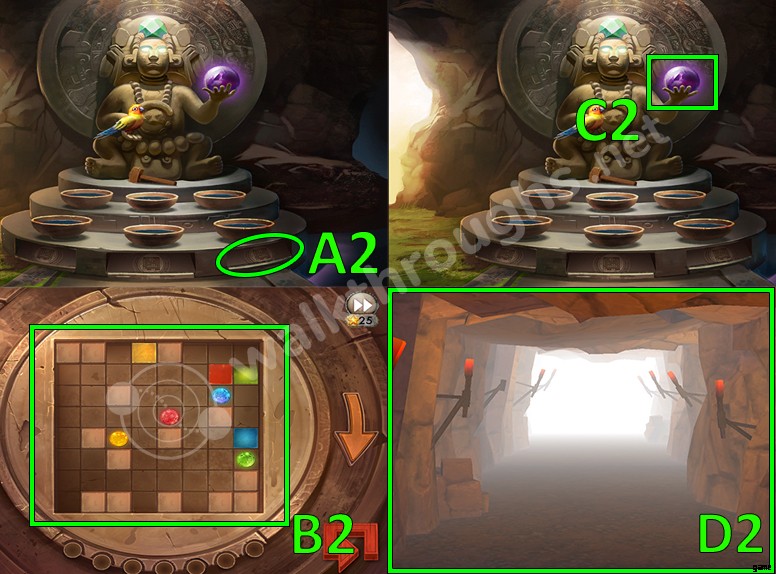
- Click on the third and final panel. (A2)
- The moves in order to solve the final puzzle are: Left, Right, Right, Right, Left. (B2)
- Collect the Elixir of Life. (C2)
- The cave is getting destroyed, so you have to escape. Swipe left and right to avoid the stalactites. (D2)
- Congrats, You completed the game!
結論
Haiku Games always make escape games that are worth playing, and this is one of them! The jungle environment, the beautiful graphics and the massive amount of puzzles and riddles make it one of the best in the Adventure Escape Franchise. The beautiful ancient civilization art style , the story and the characters make it one of the best quality escape games in the market right now! You shouldn’t miss out on this one if you are looking for escape games to play!