アドベンチャー エスケープ:アサイラム ウォークスルー
はじめに
アドベンチャー エスケープ:アサイラム は、Haiku Games によって作成された謎の亡命脱出の名作です。 あなたはアンナとしてプレイします。 彼女は、過去のぼんやりした思い出を持った後、自分自身を怖がらせて不気味な亡命で目を覚ます.彼女の過去を解明し、この恐ろしい亡命から逃れることができますか?もしそうなら、複雑なパズルと興味深いなぞなぞ、そして最も重要なことに、見つけるための手がかりとアイテムの広い範囲に備えてください.
ウォークスルー
第 1 章 – 覚醒
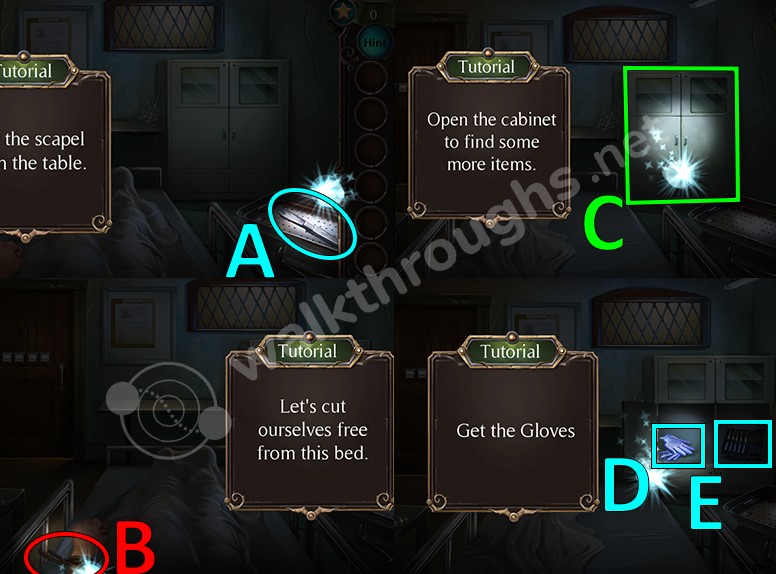
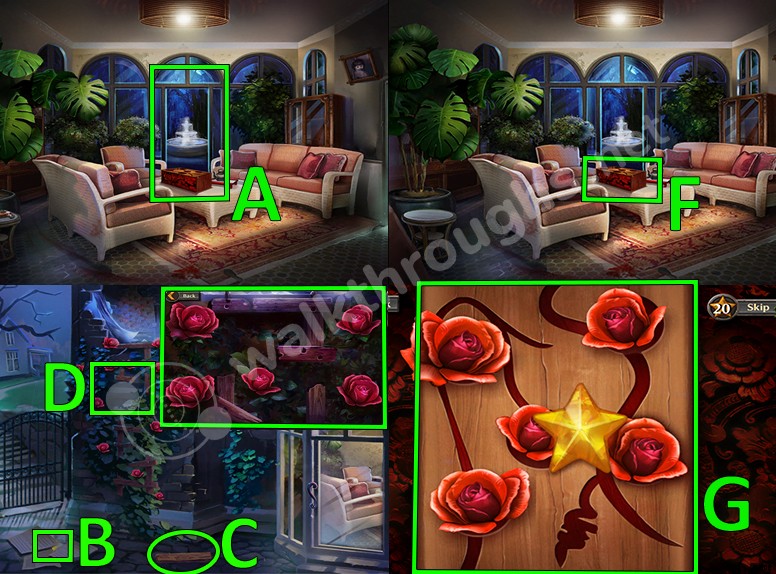
- メスを集めてください。 (A)
- ベッドから解放されます。 (B)
- キャビネットを開けます。 (C)
- 手袋を集めてください。 (D)
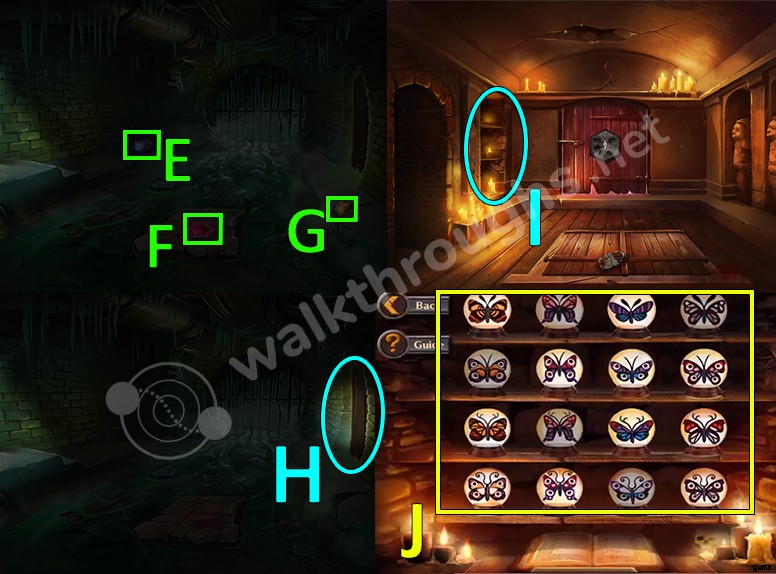
- ロックピックセットを集める。 (E)
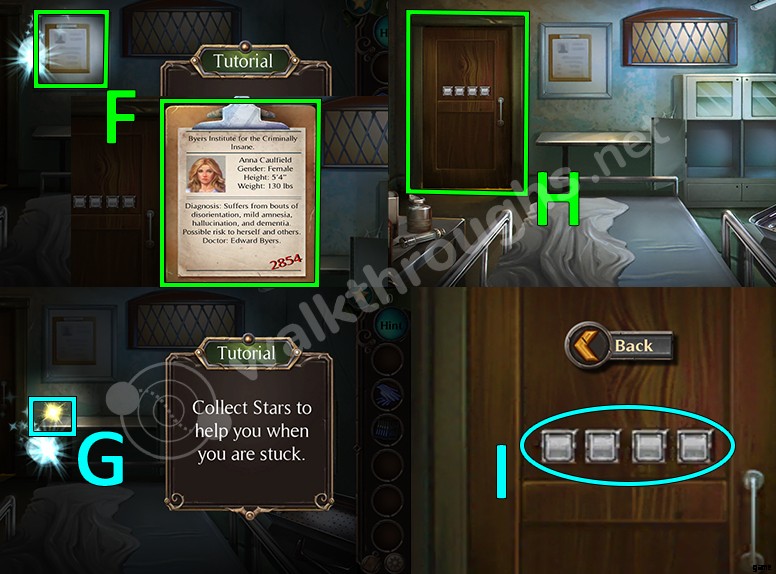
- クリップボードをタップします アンナについて読むために壁に。 番号 2854 手紙の中には、次のパズルのヒントがあります。 (女)
- 星を集めましょう。 (G)
- ドアをクリックしてください。 (H)
- 番号 2854を使用 ドアのロックを解除します。 (私)
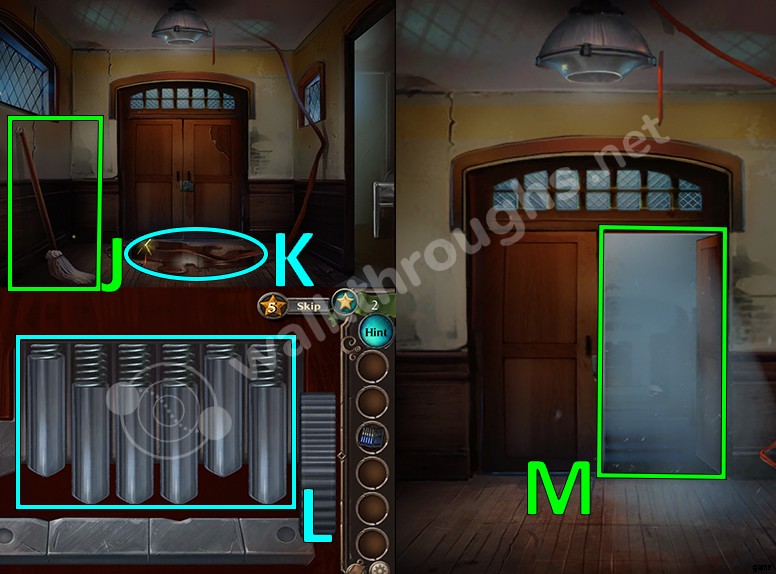
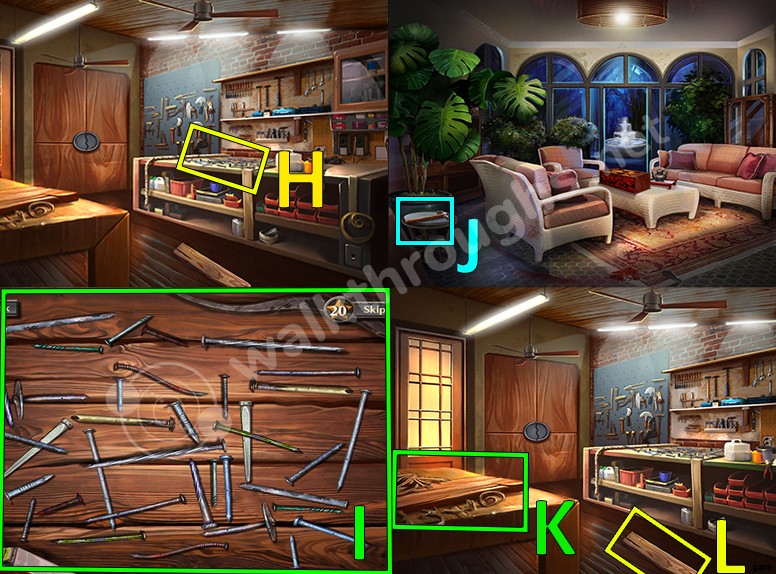
- モップを集めます。 (J)
- モップを使う 濡れた床をきれいにします。 その後、手袋を使用してください 電線をきれいにする 邪魔にならないように。 (K)
- ドアをクリック 鍵のパズルを見る。 ロック ピック セットを使用する すべてのバレルを移動するには ロック機構で 全員が同じ位置になるまで。 (L)
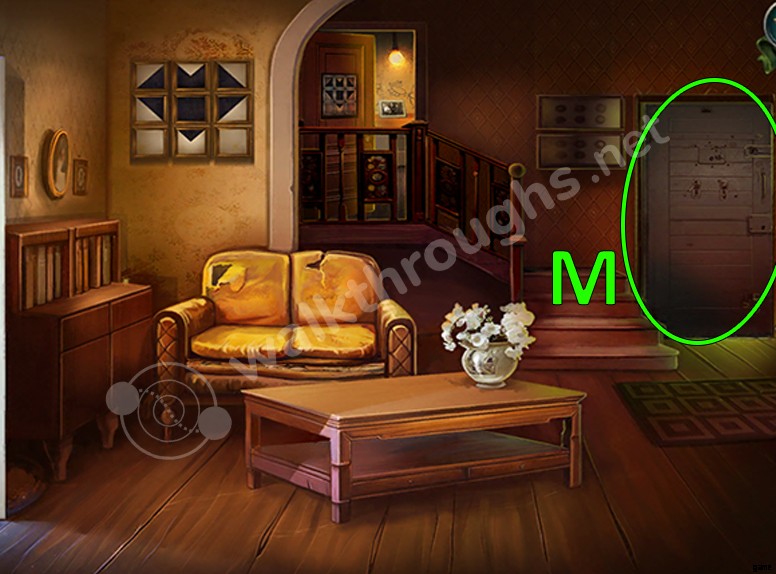
- 部屋から脱出する。 (M)
第 2 章 – 研究所
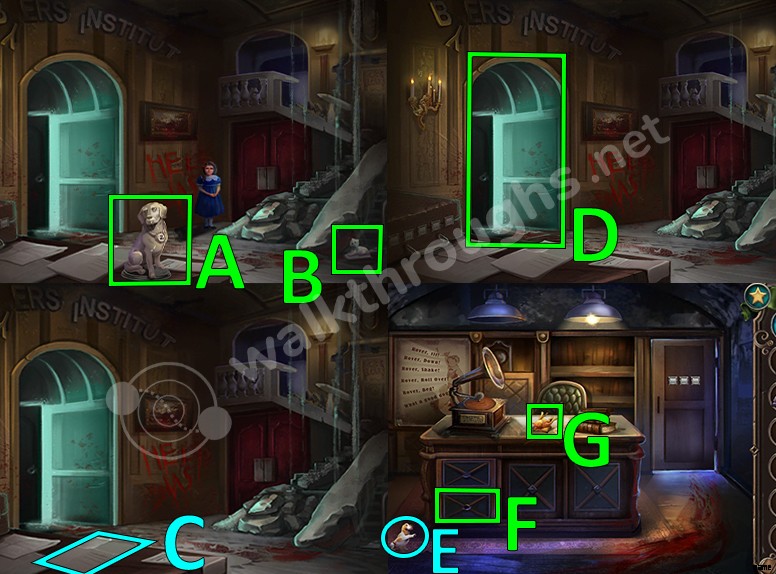
- 犬の置物を集めましょう。 (A)
- 猫の置物を集めましょう。 (B)
- 新聞を読みます。 (C)
- 次の部屋に行きます。 (D)
- 3 つ目のフィギュアを集めましょう。 (E)
- 左の引き出しをクリックします フィギュアを集める その中。 (女)
- 5 番目のフィギュアを集めましょう。 (G)
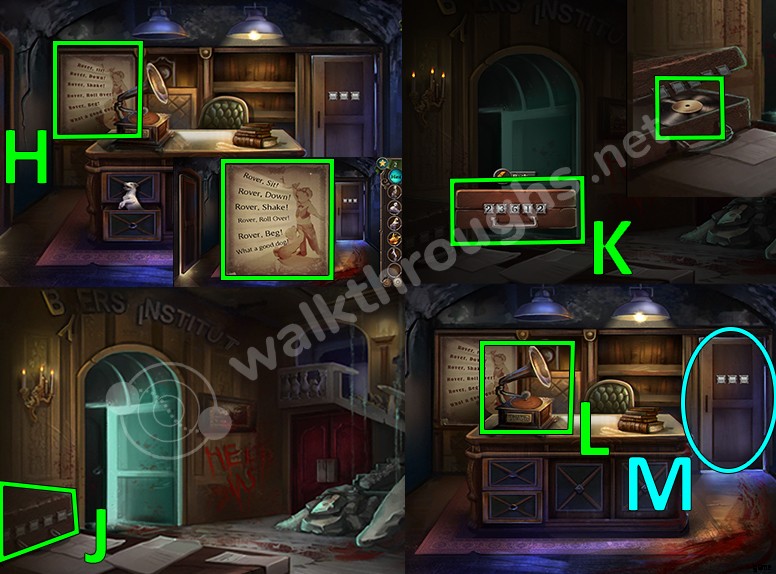
- ポスターをクリックします。 (H)
- ヒント: すべてのフィギュア 番号を持っています それに付属しています。 フィギュアを合わせると ポスターにするために、 23612 という番号が表示されます。
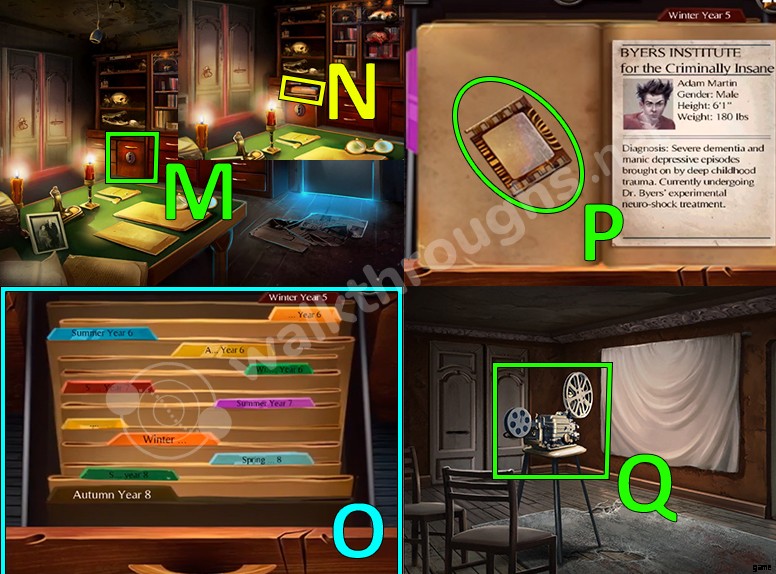
- 廊下に行きます。 スーツケースをクリックします。 (J)
- 番号 23612 を使用 スーツケースのロックを解除します。 レコード盤を集める その中。 (K)
- 事務室に行きます。 レコード盤を置く 蓄音機に。 しばらくすると、パス コードが表示されます 事務室からの脱出に使用されます (314). (L)
- 番号 314 を使用 ドアのロックを解除します。 それを通過してください。 (M)
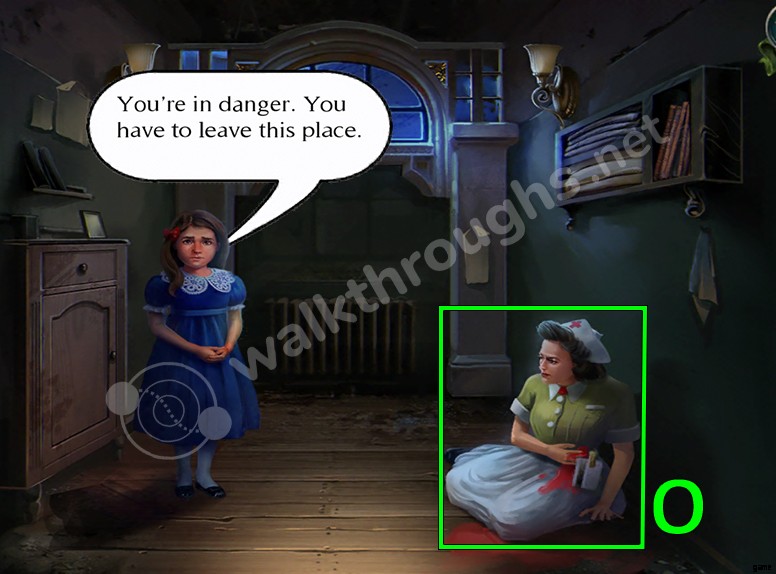
- 磁気キーカードを集める 看護師から チャプターを完了してください。 (O)
第 3 章 – 警告

- カード リーダーをクリックします。 (A)
- 看護師のカードキーを使用してください 次の部屋に進みます。 (B)
- 楽譜を集めます。 (C)
- 2 枚目の楽譜を集めます。 (D)
- 棚をクリック それらを整理します。 (E)
- ソリューション。 (女)
- 棚を整理した後。 オレンジ色のバイオリンを動かしてください ギアを見つけるために。 それを収集します。 (G)

- ダイニング エリアに移動します。 (H)
- 3 枚目の楽譜を集めます。 (私)
- 取扱説明書 次のパズルに役立ちます あなたは解決しなければなりません。 (J)
- トレイをクリックします。 (K)
- パズルの正しい解き方。 (L)
- トレイを渡す おばあさんに。 彼女は移動し、4 番目の楽譜を明らかにします。 (M)
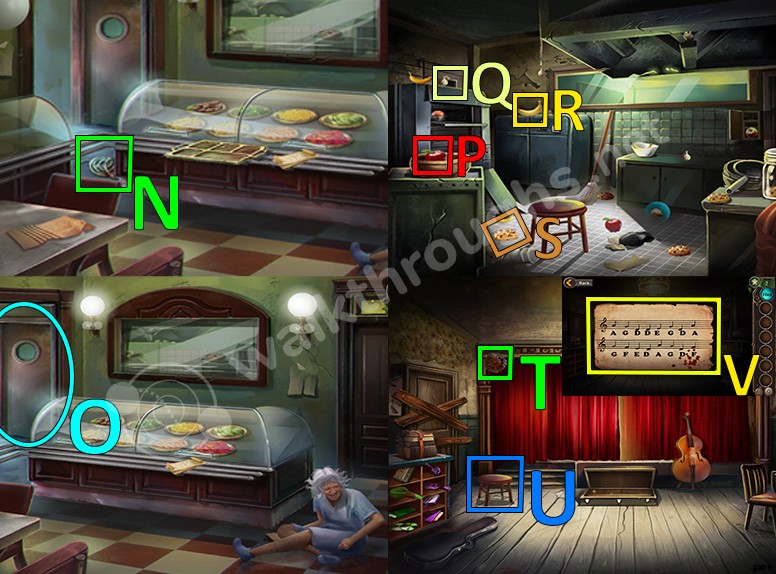
- ロープを集めてください。 (N)
- キッチンに行く . (O)
- まず、スツールを集めます キッチンにあります。
- すべてのりんごを移動します ボウルにあります。 (P)
- にんにくを動かします ガーリック ロープに入れます。 (質問)
- バナナ 白いボウルに入ります。 (R)
- そして最後に、Cookie 白い瓶に入ります。 (S)
- 場所を整理したら、8 枚の楽譜 すべて集めてください。 12 持っていない場合 今までにそれらのうちのどれかを見逃していないか確認してみてください。
- 音楽室に行ってください。 スツールを置く 錆びたギアにたどり着きます。 (U)
- 錆びたギアを切り替えます 新しい装備で あなたはちょうど見つけました。その後、ステージが固定されます。 (T)
- 譜面台をクリックします ステージで別のパズルを明らかにします。 楽曲をすべて追加 スタンドにある既存のものを見つけて並べ替え、完全な楽譜を完成させます。 (V)
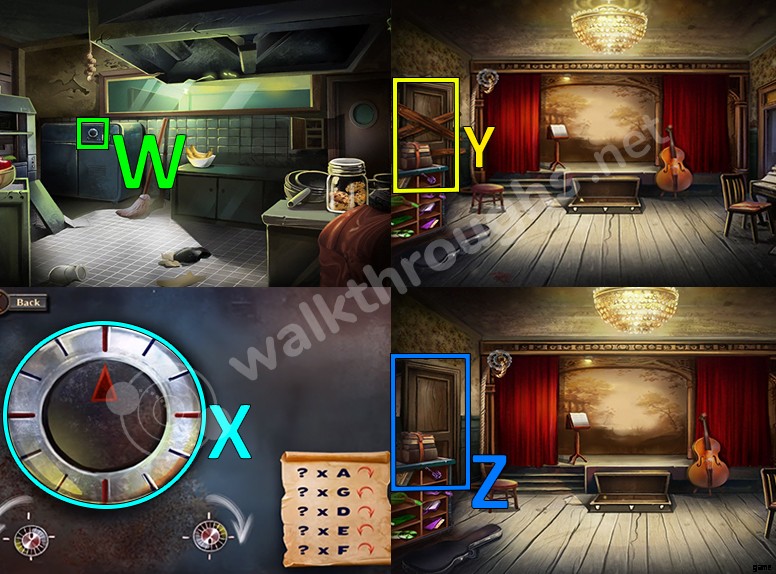
- キッチンに行きます。
- 金庫をクリックします。 楽譜を配置する 金庫に パズルを解くためのヒントだからです。 (X)
- 解決策:時計回りに 3 回 (A)、反時計回りに 4 回 (G)、時計回りに 5 回 (D)、反時計回りに 2 回 (E)、時計回りに 2 回 (F)。>
- ハンマーを集める その中。 (X)
- ハンマーを使う 障壁を破壊する ドアをふさいでいる 音楽室で。 (Y)
- 部屋から脱出する。 (Z)
第 4 章 – 夢と現実
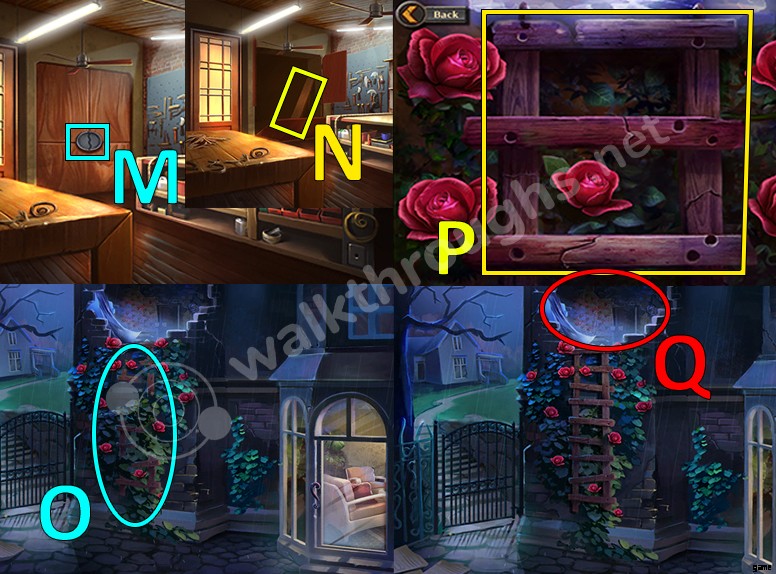
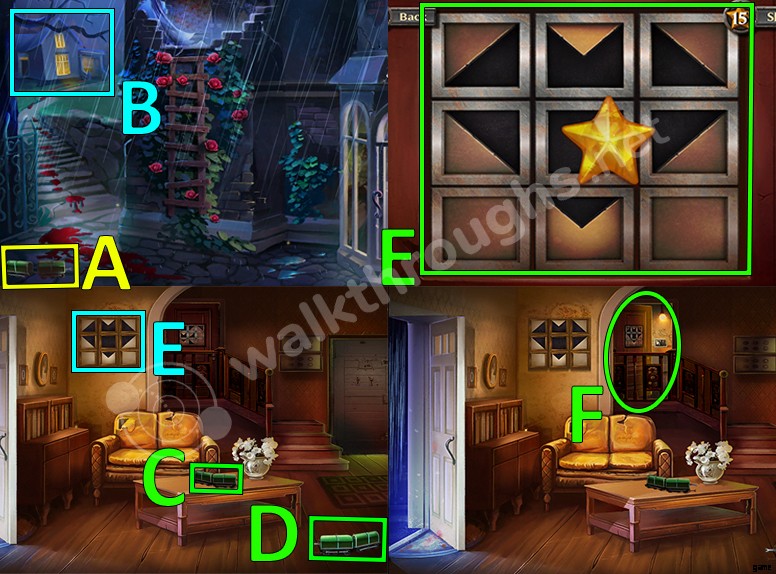
- パティオに出かけましょう。 (A)
- 月のかけらを集めましょう。 (B)
- 木の板を集める。 (C)
- 壊れたはしごにズームインします。 つるバラの位置を覚えておいてください。 その位置は次のパズルのヒントとして使用されるためです。 (D)
- 中に入る また。 ボックスをクリックします。 (女)
- パズルの正しい解き方。 2 つ目のムーン ピースを集める パズルを解いた後。 (G)
- ワークショップに行く。 (H)
- 爪をクリックします。 釘を集める それらをタップして、一致するすべてのペアを組み合わせます。 次に、釘の箱を集めます。 (私)
- リビングルームに行きます。 ハンマーを集めてください。 (J)
- 2 つ目の木の板を集めます。 (K)
- 3 つ目の木の板を集めます。 (L)
- Go to the workshop. Place the moon pieces on the slots located on the large door. (M)
- Collect the fourth wooden plank. (N)
- Go outside again. Zoom on the ladder. (O)
- Place the planks and the nails on the broken ladder. ハンマーを使う はしごを修正します。 (P)
- Tap above the ladder to climb in order to complete Chapter 4. (質問)
Chapter 5 – The Mad Scientist
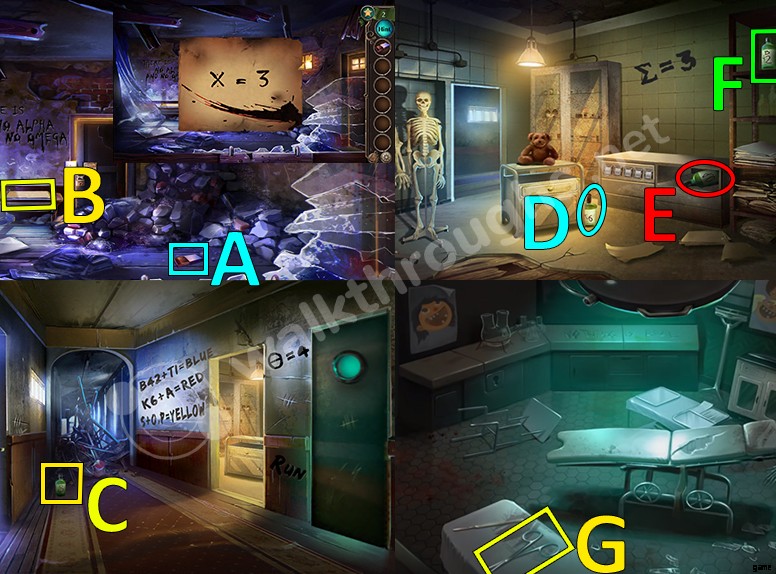
- Collect a box of matches. (A)
- Click on the letter hint. それを読んで。 (B)
- Go to the hallway. Collect the chemistry bottle. (C)
- Read all of the writing on the walls.
- 次の部屋に行きます。 Notice the writing on the wall.
- Collect the second chemistry bottle. (D)
- Collect the third chemistry bottle. (E)
- Collect the fourth chemistry bottle. (女)
- Go to the green surgical room. Collect the scissors. (G)
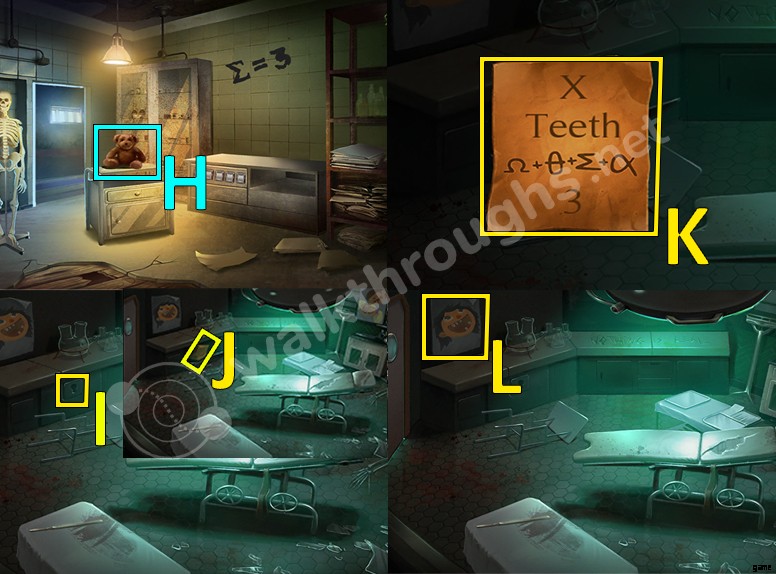
- Go to the orange room. Use the scissors on the teddy bear to cut it, you are going to find a key その中。 (H)
- Go to the surgery room. Use the key to open the locker. (私)
- Collect the letter inside the locker. (J)
- Read the letter. (K)
- Tap on the teeth poster 壁の上に。 There are 2 other ones located on the right side. (L)
- HINT: X =3 + Teeth (5 + 3 + 8 =13) + Sum of values excluding alpha and omega ( 4 + 3 =7) + 3. The result number is 31373.
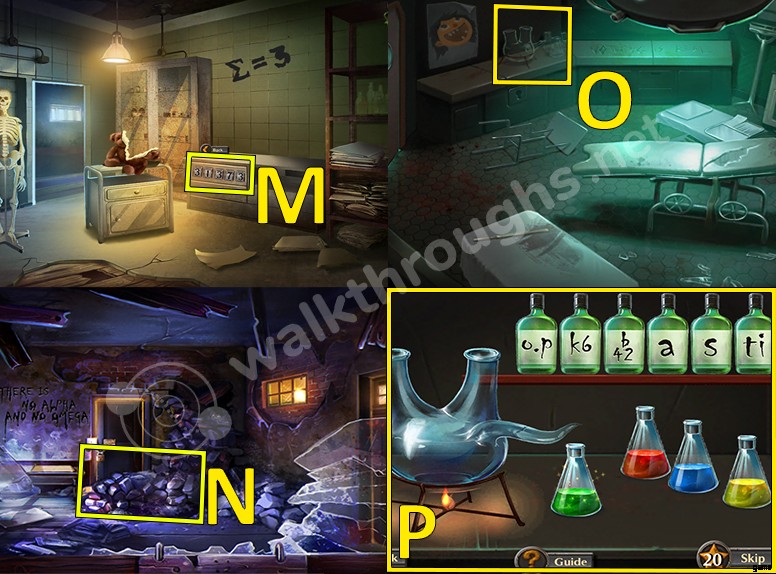
- Go to the orange room. Use the number 31373 in the combination lock. シャベルを集めてください。 (M)
- シャベルを使う to dig through the rubble located in the starting room. Collect the fifth chemistry bottle. (N)
- Go to the surgery room. Click on the chemistry equipment. (O)
- Firstly, place all the bottles on the shelf, one is already there. There should be 6 in total. Use the matches you found in the beginning to light the fire under the mixing beaker. (P)
- Drag B42 and Ti into the mix to get a blue mixture.
- Drag K6 and A to get a red mixture.
- Drag S and O.P to get a yellow mixture.
- Now, mix the blue and yellow solutions to get the most important out of them all, the green acid.
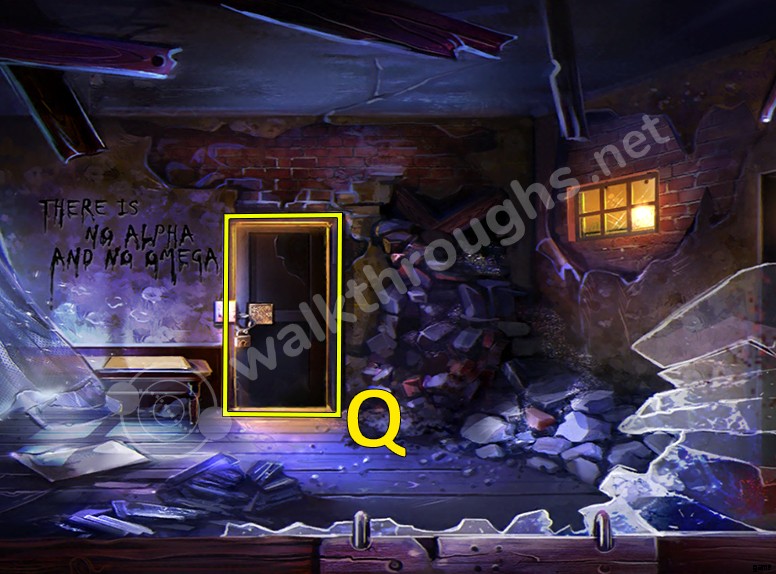
- Go to the starting room. Pour the acid into the door lock to destroy it, after that you can escape the room. (質問)
Chapter 6 – Wrath

- Collect the film strip fragment. (A)
- Collect the second film strip fragment. (B)
- ドアを通り抜けます 左に。 (C)
- Pick up the third film strip fragment. After that, go through the door located on the right to go to the bathroom. (D)
- Open the cabinet door under the sink. (E)
- Open the mirror cabinet. (女)
- Collect the list of chemicals その中。 (G)
- パズルをクリックします。 (H)
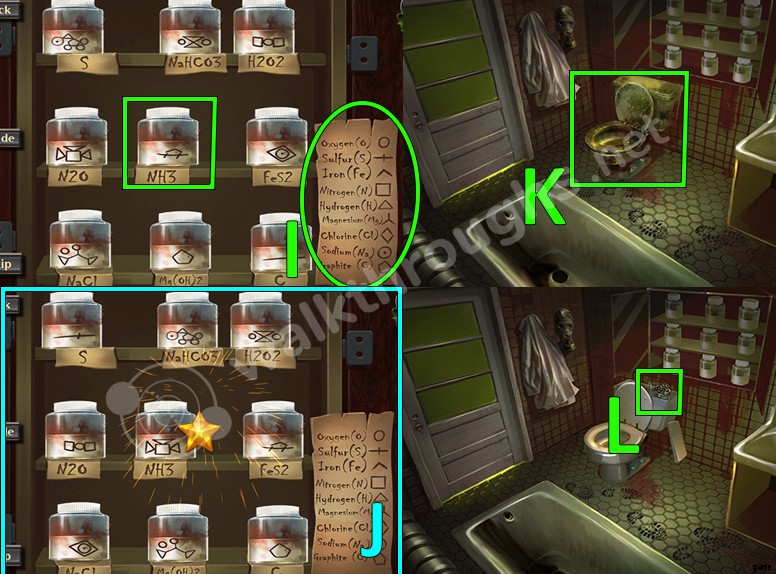
- Place the list of chemicals with the bottles that are displayed to you. You need to match the bottle labels to the chemical formulas on the shelves while using the list of chemicals. We need to get the correct NH3 bottle. (私)
- The correct way to solve the puzzle. After completing it, collect the NH3 bottle (Ammonia). (J)
- Use the bottle of ammonia to clean the toilet. (K)
- Tap on the tank 鍵を見つける その中。 Collect it. (L)
- 最初の部屋に行きます。 キーを使用 to unlock the cabinet drawer. (M)
- Click on the files. (N)
- The correct way to organize the files. (O)
- Collect the fourth film strip fragment. (P)
- Go to the movie projection room. Click on the projector. (質問)
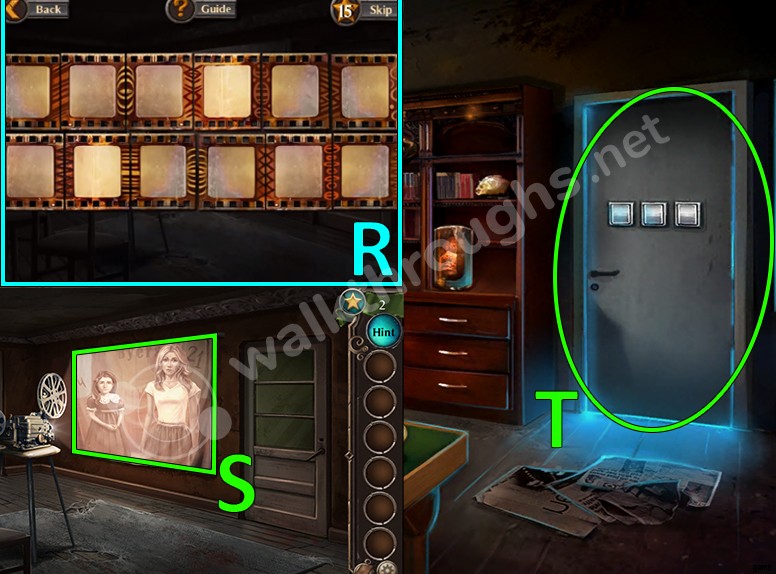
- Place all of the film strips in the projector. Each piece has shapes on each side that will match with the other piece そしてそれらを組み合わせます。 画像 パズルの正しい解き方を示します。 (R)
- After completing the puzzle, a scene will be shown on the screen. See the numbers 4 and 21 on the screen? They are the numbers that will be used to escape this room. (S)
- ドアをクリックしてください。 Use the number 421 ロックを解除します。 (女)
- Escape the room.
Chapter 7 – Secrets
- Collect the toy train. (A)
- Go to the house pointed on the screen. (B)
- Collect the second toy train. (C)
- Collect the third toy train. (D)
- Click on the heart pattern picture 壁の上に。 Tap each time until you create a black heart shape. (E)
- 寝室に行きます。 (女)
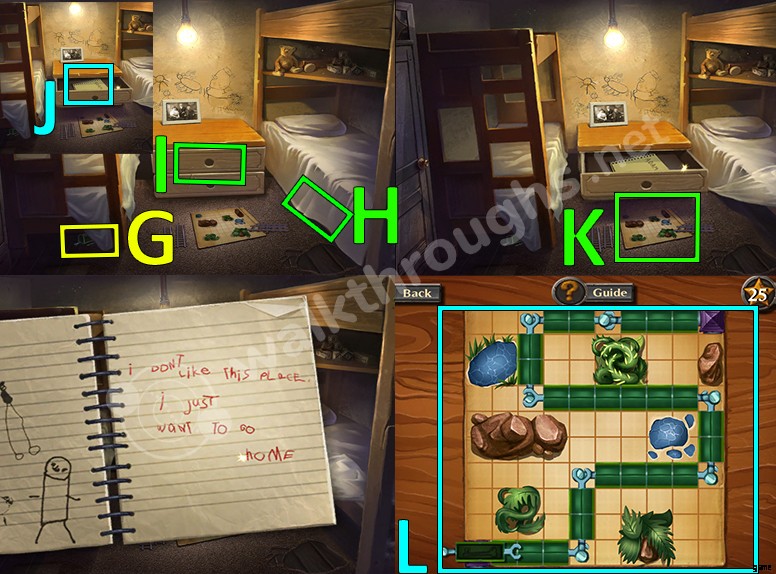
- Collect the toy train below the bed. (G)
- Collect the toy train that is below the bed on the right side of the room. (H)
- Click on the drawer. (私)
- Collect the notebook inside the drawer and read it. (J)
- パズルをクリックします。 (K)
- パズルの正しい解き方。 Collect the key after completing it. (L)
- キーを使用 ドアのロックを解除します。 (M)
- Escape the room.
Chapter 8 – Trial

- Click on the riddle. (A)
- Solve the memory riddle. Find all of the cards that match with each other to complete the puzzle. (B)
- 金の鍵を集めてください。 (C)
- Click on the scale puzzle. The image shows the correct way to solve the riddle, place all of the objects you have on the correct place to balance each side of the scale. (D)

- Collect the next key. (E)
- 次のパズルをクリックしてください 右側に。 The pieces need to be placed in order to match the colors on each side. 画像 shows the correct way to solve the riddle. ( F)
- Collect the third and final key. (G)
- Use the three keys ドアのロックを解除します。 (H)
- Escape the room.
Chapter 9 – Into the Nightmare
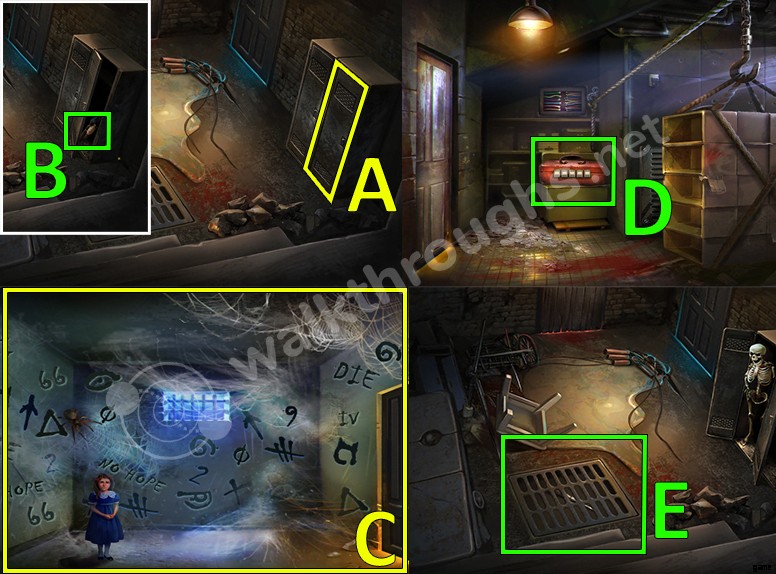
- Click on the right locker. (A)
- Collect the flamethrower. (B)
- Go through the blue room. Use the flamethrower to get rid of the spider webs. Tap to match the pairs of the words and symbols on the wall to remove them. After removing all of the pairs that match, only 5 numbers will be left, which are 2 6 9 1 and 4. These numbers will be used as a hint for the next puzzle. (C)
- 次の部屋に行きます。 Click on the red toolbox. Use the number 26914 ロックを解除します。 バールを集める その中。 (D)
- Go to the starting room and open the metal grate in the floor by using your crowbar. Collect the screwdriver その中。 (E)
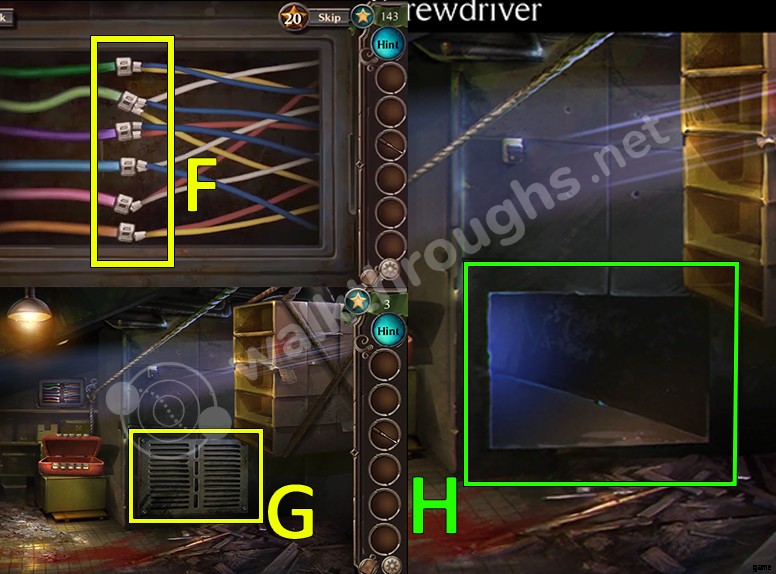
- Go to the red room and click on the coloured wires. Combine the wires on the right to make the colors 左に。 The image shows the correct way to solve それ。 (女)
- Remove the vent ドライバーで。 (G)
- Escape the room. (H)
Chapter 10 – Rebirth
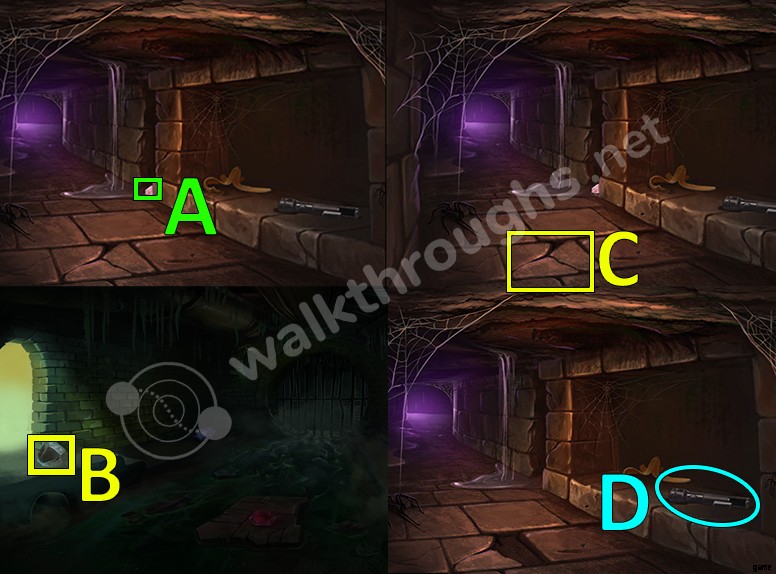
- Collect the gem. (A)
- Go to the end of the tunnel. Collect the large rock. (B)
- Use the rock on the cracked tile in order to find a battery. それを収集します。 (C)
- Collect the flashlight. (D)
- Collect the blue rock while using your flashlight. (E)
- Collect the red rock while using your flashlight. (女)
- Collect the orange rock while using your flashlight. (G)
- 次の部屋に行きます。 (H)
- パズルをクリックします。 (私)
- 画像 パズルの正しい解き方を示します。 鍵を集めてください。 (J)

- Collect the purple rock. (K)
- Collect the green rock. (L)
- Place all of the rocks on the slots located in the door to unlock it. Go through the door. (M)
- パズルをクリックします。 (O)
- Use the number 134128 to solve the puzzle. (P)
- Pull the lever to drop Adam through the trap door. (質問)
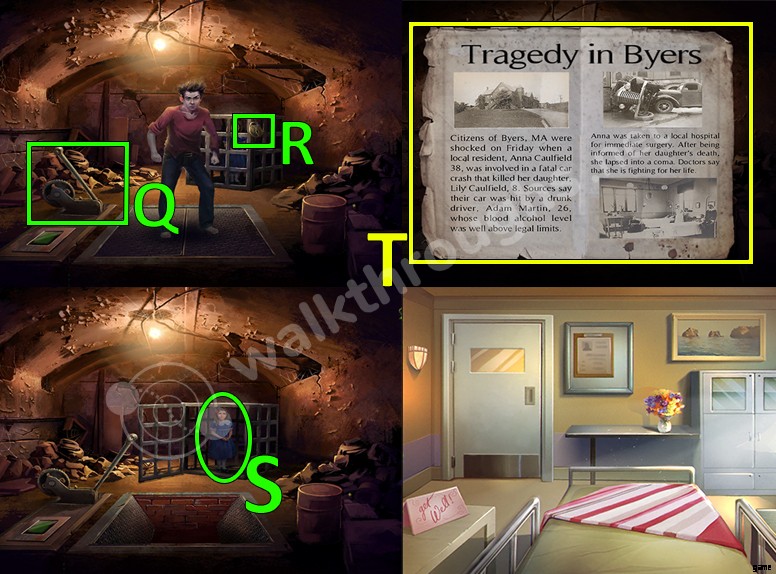
- キーを使用 to free the girl. (R)
- She will then give a disordered newspaper article that you need to rearrange. (S)
- The correct way to rearrange the newspaper article. (T)
- Game is completed.
結論
Adventure Escape:Asylum is an amazing escape game. The vibe it gives is very intriguing. The ambient music and it’s art style are beautifully crafted and well put together. The challenging puzzles, the diary entries and movie-like writing make it a classic among the escape game community! I have played a lot of escape games and this honestly is my favorite, the story line alone makes it really exciting for me. I sincerely recommend everyone to enjoy this masterpiece, as you will not be disappointed.