AI:ソムニウム ファイル – 完全な実績リスト

AI のすべての実績のガイド:ソムニウム ファイル。
ストーリー関連の実績
これらの実績は、ソムニウムを完了するか、いずれかのエンディングを取得することで取得できます。彼らにとっては、ストーリーを普通にプレイするだけです。バッド エンディング (ゲーム内でバッド エンディングと呼ばれるもの) では実績が得られないことに注意してください。
BRaiN:夢に隠された記憶
1 日目:金曜日 – デイトのソムニウムをクリアした。
PaiN:母と血と秘密
2日目:土曜日 – ミズキのソムニウムをクリアした.
VaiN:切り離されたペルソナ
3日目:日曜日 アイリスのソムニウムをクリアした。
SWaiN:マイ ヒーロー
4日目:月曜日 – 太田のソムニウムをクリアした。
SUSTaiN:消えない思い出
5日目:火曜日 まゆみのソムニウムをクリアした。
CAPTaiN:公開された絆
6 日目:水曜日 – デイトのソムニウムをクリアした。
CURTaiN:黒いカーテンの向こう側
4日目:月曜日 – #89のソムニウムをクリアした。
REFRaiN:殺人の残響
5 日目:火曜日 – ボスのソムニウムをクリアした。
VILLaiN:Evasive Memory
3日目:日曜日 – ソウのソムニウムをクリアした。
MainN1:二律背反論
4日目:月曜日 – アイリスのソムニウムをクリアした.
MainN2:永遠の儀式
5日目:火曜日 – アイリスのソムニウムをクリアした.
MOUNTaiN:コープスフラワー
5日目:火曜日 – ヒトミのソムニウムをクリアした.
チェーン:%s !ニカ
6日目:水曜日 斎藤のソムニウムをクリアした。
太田ルート:END
太田の調査を終えた。
水木ルート:END
ミズキの調査を終えた。
殲滅ルート:END
殲滅ルート調査終了。
虹彩ルート:END
アイリスの調査を終了しました。
解決ルート:END
最終調査を終了しました。
ドキュメンテーション業務の実績
これには 3 つの異なる実績があり、それらはソムニウムで「B」の写真を取得することに関連しています。ソムニウムごとに合計 26 枚の B フォトがあり、通常は最後から 2 番目と最後のメンタル ロックの間で見つかります (ただし、常にそうであるとは限りません)。写真は、AI のように見える眼球と対話することで得られ、その周りに輝く効果があります。
また、残りの 26 個を取得すると、「アルバムが完成しました」という追加の写真が表示され、総合計が 27 個になります。これに関連する 3 つの実績をリストし、残りのセクションの場所が記載されているガイドを更新します。完了しました。
夢記録担当:インターン
ソムニウムで隠しアイテムを 1 つ見つけました。
夢記録担当:マネージャー
ソムニウムで 6 つの隠しアイテムを見つけました。
夢の記録担当:CEO
ソムニウムの隠しアイテムをすべて見つけた。
射撃イベントの実績
ゲームには 5 つの射撃イベントがあり、キーを押すか、キーの組み合わせを押すか、キーを繰り返しタップするか、動いているターゲットに照準を合わせて CTRL を 1 回押します。ショットは完全に「ロード」されています。 QTEが発生すると時間は遅くなりますが、反応するのに数秒しかありません.キーを 1 つ押し忘れないことで成果が得られます。キーを 1 回押しても、いずれにせよバッド エンディングになるからです。
QTE を見逃した場合は、メニュー (タブ) に移動し、[フローチャート] を選択して、現在の調査にズームインし、[調査を再開] をクリックして、利用可能な最後の項目を選択します。これにより、撮影イベントを最初から開始できます。
これには 5 つの実績があります (ベアボーン ガイドが完成したら、イベントの詳細を更新する予定です):
ヤクザの妻たちの秘密の生活
熊倉事務所の撮影会をノーミスでクリアした。
下院議員秘書の温かい歓迎
妹島邸の撮影会をノーミスでクリアした。
H***y Housewives in H***
サガン邸の射撃イベントをノーミスでクリアした。
筋肉盛りだくさん! Men’s Gymnastics Routines
Cleared the shooting event at Golden Yokocho with no misses.
The Erotic Legend of Atlantis
Cleared the shooting event at the Warehouse District with no misses.
Interrogation Achievements
There will be 4 Interrogation sequences during the story. Note that this ONLY includes the interrogations where you can present evidence. If you and the subject are sitting there and you can talk to them like you would talk to any other character and there is no evidence to present, you will not get an achievement out of this. In order to get the achievements, you have to clear the interrogations with no errors.
If you do make a mistake, go to Menu (TAB), Flowchart, zoom in on the current investigation (or whichever interrogation you need for the achievement), click on reopen investigation and select the ABIS HQ, Interrogation Room. There might be more than one, remember to select the one where you can present evidence.
I will list the achievements, the investigation name where they’re available and the correct responses. To minimize spoilers (although if you’re reading this and haven’t finished the game, it’d be best to stop) I will only list the order and item that you have to present:
Interrogation:Implicate Iris
Confronted Iris with the evidence with no mistakes.
Day 3:Sunday syokubAI (left branch of the flowchart, just before Iris’s Psync on this branch)
On Reopen Investigation, it will appear as the 2nd “ABIS HQ, Interrogation Room”.
<オール>Interrogation:Implicate Ota
Confronted Ota with the evidence with no mistakes.
Day 4:Monday jikAI (left branch, just after Ota’s Psync)
On Reopen Investigation, it will appear as the only ABIS HQ, Interrogtion Room available.
<オール>Interrogation:Implicate So
Confronted So with the evidence with no mistakes.
Day 3:Sunday gyoukAI (right branch, just before So’s Psync)
On Reopen Investigation, it will appear as the only ABIS HQ, Interrogtion Room available.
<オール>
Interrogation:Implicate Hitomi
Confronted Hitomi with the evidence with no mistakes.
Day 5:Tuesday jutAI (right branch, just before Hitomi’s Psync)
On Reopen Investigation, it will appear as the only ABIS HQ, Interrogtion Room available.
<オール>
Analyst Achievements
There’s 3 of them and they’re basically completionist achievements.
Persons Analyst
Collected all the “Persons” files.
This one is easy and should occur naturally as you finish your playthrough. You will meet every single character. I would suggest interacting with every character fully (select all their conversation options and “look” at them, then hover over them and make sure they’re greyed out) as some conversations will explore topics that will help you fill up your Appendix.
Appendix Analyst
Collected 100 “Appendix” files.
You do not have to fully completed the Appendix, as there are 142 entries. After the rest of the guide is done, I will compile a list and where to get them of all items on the Appendix. As a general rule of thumb, interact with everything and everyone as much as the game allows you to do so. This involves repeatedly checking the same objects, or checking objects again if you go back to the same scenario (you will, multiple times) in a later stage of the game. Certain objects will start conversations with the characters on screen. I would suggest also going down certain “bad endings”, like trying to shoot Saito in the True Ending (you have to REPEATEDLY say you’re going to shoot him), as this will give you extra terms for the appendix.
Dream Album Analyst
Collected all the “Dream Album” files.
You will get this once you get the 27th item of the Album (which you get by getting all other 26). Refer to the Dream Documentation section above.
Miscellaneous Achievements Part 1
Finally, the misc.成果。 For these, you will have to complete certain tasks/conversations.
Date’s Atami Date Route:END
Asked out the receptionist to Atami.
Location:Yellow branch (Mizuki route), Day 5:Tuesday seisAI
In Reopen Investigation, this will appear as “Talent Agent Lemnicaste”, highlighted in green (Free Move).
You will have to repeatedly talk to the receptionist.
<オール>
Boss Mania
Checked absolutely everything in Boss’s office.
Location:I personally used the very first time you’re in Boss’s office, Day 2:Saturday saikAI, just after the tutorial dream “Psync”.
In Reopen Investigation, this will appear as “Abis HQ, Boss’s Office” (I used the top one).
For this achievement, you will have to interact with every single item of the warehouse also known as “Boss’s Office”. Her room is a hoarder’s dream and you might miss some items just because of the sheer amount of them.
I’d suggest interacting with the item again if you and Boss have a conversation about it, as this will grey the item out and might help you find any missing items. My list should cover all items starting from the far left of the room (as far left as you can pan) and ending at the far right. Note that the list and its order will only grant you the achievement when your camera is positioned looking at Boss sitting on her desk. Results may vary or achievement may be unobtainable from different camera angles, if in doubt, just go to the very first time you’re in Boss’s office and follow the list.
List of items to interact with:
<オール>Phew!
I Wish Mine Were That Glorious
Admired the Sagan’s stereo equipment.
Location:Day 2:Saturday saikAI, just after the tutorial dream “Psync”.
In Reopen Investigation, this will appear as “Sagan Residence”
Easy achievement, pan all the way to the right of the room (you will be basically looking behind your back) until you see the “Speaker System”. Interact with it 4 times.
Miscellaneous Achievements Part 2
Your Name?
Enjoyed a fulfilling chat with Kagami.
This might be have 2-4 different locations where you’ll have to talk to Kagami in order for the achievement to pop up. I will list all 4. Just in case, talk about all the other topics with him and make sure he’s greyed out when you hover him (might have to use the “look” action).
Location 1:Day 1:Friday sigAI, this is literally the first location in the game.
In Reopen Investigation, appears as the second “Near the Merry-go-round in Bloom Park”
Talk to the police officer wearing a white mask in front of you. He’s crouching and has a notepad on his hand.
<オール>Location 2:Day 3:Sunday syokubAI, red branch just before Iris’s Psync.
In Reopen Investigation, appears as “Maid Cafe Sunfish Pocket”
Talk to the police officer wearing a white mask in front of you. He’s crouching and has a notepad on his hand.
<オール>Location 3:Day 4:Monday youdAI, red branch just before Ota’s Psync
In Reopen Investigation, appears as “Cold Storage Warehouse” green highlight.
Date and Kagami share another conversation about his name, not 100% sure it adds u for the achievement but since the conversation is fairly similar to the other two times, I will list it.
Talk to the police officer wearing a white mask in front of you. He’s crouching in front of a bloodstain and has a notepad on his hand.
<オール>Location 4:Day 5:Tuesday seisAI, yellow branch (Mizuki route)
In Reopen Investigation, apperas as “Cold Storage Warehouse green highlight.
Talk to the police officer wearing a white mask in front of you. He’s crouching in front of a bloodstain and has a notepad on his hand.
<オール>Bonephilia
X-rayed the Mermaid.
Location:Day 3:Sunday gyoukAI, purple (blue?) branch just before So’s Psync.
In Reopen Investigation, apperas as “Maid Cafe Sunfish Pocket” green highlight.
Talk to the blue haired mermaid. You will have to x-ray her several times.
<オール>Note:The 4th time might not be necessary, however if you do not get the achievement the first 3 times go for it! And if you want some extra flavor text, go for it anyways.
Cooler Heads Prevail
Kept your cool and did not shoot Saito.
Location:Day 6 Wednesday, hakAI pink route AKA “True Ending”, just before Epilogue / right after Date’s reverse Psync.
In Reopen Investigation, apperas as the 3rd “Kabasaki District, Abandoned Factory”.
<オール>Note:Selecting “Pull the trigger” repeatedly will result in a Bad Ending BUT it will also add a few things to the Appendix, so I highly recommend doing so at least once. After you get the bad ending, you can easily reload to this point using Reopen Investigation and press CTRL to fast forward.
Surprisingly Good Together
Discovered the marriage of the yakuza and the nurse.
Location:Three Months Later kassAI, end of pink branch AKA Epilogue.
Its possible that for this achievement you have to talk to characters in 2 different locations.
Location 1:Kumakura Office
Talk to Member B (pan to the right, he’s the skinny blond Yakuza…and apparently a doctor)
<オール>Location 2:Matsushita Diner
Talk to the Nurse.
<オール>The Dream Wanderer
Saw This Man twice in Somnium.
Location:Both of Iris’s Minecraft ShovelForge Psyncs.
Location 1:Day 4 Monday, PSYNCIN’ IN THE MaiN:1

After you open Mental Lock #2, go past Gate 3 (select Dig), then walk all the way down the hall until you get to Monitor D. There’s an entrance next to Monitor D and you can see a ??? inside.

Walk inside the building and Talk to ???.

You will see the man for the first time.
Location 2:Day 5 Tuesday, PSYNCIN’ IN THE MaiN:2:

As soon as you enter the somnium, go to the Chozuya and proceed to wash your belly button Investigate it.


You will see the man the second time and get the achievement.
Protect Your Head
Had Aiba wear the basket and the pot in Somnium.
There’s 2 Somniums you will have to enter for this, I would suggest entering them in the same order as the next achievement can also be gained in the 2nd somnium listed here and thus you will be able to obtain 2 achievements at once.
Location 1:Day 4 Monday, PSYNCIN’ IN THE CURTaiN AKA #89’s Psync

After you get past Mental Lock #2, go to the kitchen. There will be a pot on the stove.


Wear it with pride.
Location 2:Day 5 Tuesday, PSYNCIN’ IN THE SUSTaiN AKA Mayumi’s Psync
Note:The next achievement is obtainable in this somnium, do not exit after you’re done!
Once you get past Mental Lock #1, there will be a bucket on the floor.


Wear it to boost your defense to the max and to get the achievement.
Crazy Awful Customers
Saw three autographs of crazy customers in Somnium.
Location:Day 5 Tuesday, PSYNCIN’ IN THE SUSTaiN AKA Mayumi’s Psync

Note:If you’re following from the previous achievement, go to the opposite wall and interact with the calendar/clock in order to get rid of the 2x timie and gain a positive timie.
Once you get past Mental Lock #1, go to the wall above the bucket and interact with the autographs.
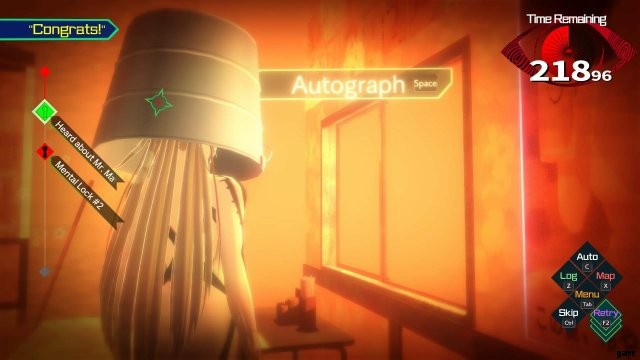

You will have to select all 3:The left, The middle and The right in order to get the achievement. I’d suggest leaving the right for last.
Miscellaneous Achievements Part 3
A…Do…Rab…Bit…
Almost got cursed by Adorabbit in Somnium.
Location:Day 6 Wednesday, PSYNCIN’ IN THE CAPTaiN AKA Date’s Psync

Once you get past Mental Lock #4, go to the Fridge and Lift it.
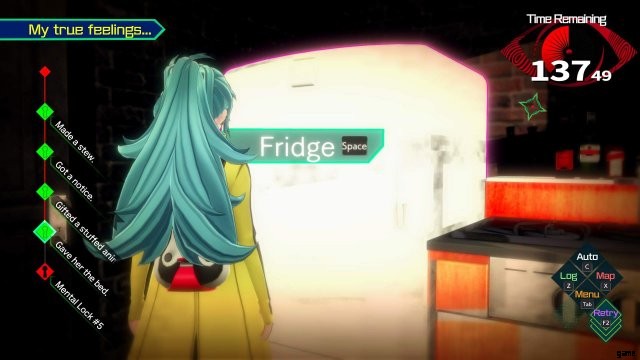

A pot will appear next to the fridge. Interact with it and turn up the fire.


