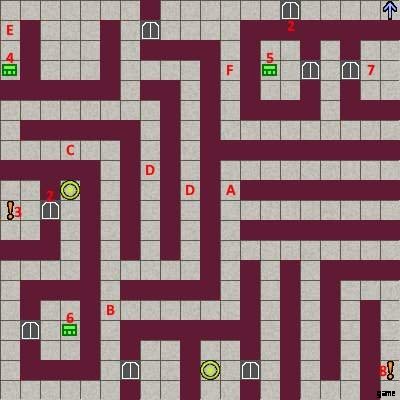
Lilitales – すべてのマップとギャラリー エントリのロックを解除する方法

すべてのマップのガイドと、すべてのギャラリー エントリのロックを解除する方法。
ウォークスルー (ネタバレあり)
プロローグと 1 日目
2 日目に到達するまでは、多くの間違いを犯すことはできません。
- バンディットに対しては、15 ラウンド持ちこたえるか、負けるかのどちらかです。
- ボラク リッジを通り、グナス川の橋を通り、マールバラ砂漠を通り抜けます。
- 都市では、次の場所のロックを解除するために、すべての場所で利用可能なすべてのことを行います。
共通ルート
- 2日目の始めに、クレスとサルマンに話しかけてください。
- 港に行き、青いターバンの男からお金を取り戻してください。
- 教会に行って、クレスとのシーンを見に行こう。
- メイン スレーブ プラザに行き、バイヤーと話してください。
- 大通りのステージに行ってダンスを観る
- シルバー ゴブレット バーに行き、バーキーパーと話してください。
- カナート B2 でザハドラを見つけて話しかける。
- ドーン シェパード バーに行く
- 酒場の主人からワインをもらう
- 寡黙な男と話す
- 奴隷ブローカーのバティルと話す (オプション:露出狂と H シーンに賭ける).
- エキゾチックなダンスと売春がアンロックされました。
- ルナの処女を売れば、すぐに 20 万を手に入れることができ、他の方法でお金を稼ぐ必要がなくなります。
- 港に行き、グリムセーラーと話してください。
- ドーン シェパード バーに戻ります。
- できるだけ多く賭けて勝ちましょう (80-100k を目指してください)。
残りのお金を稼ぐために他の仕事をします (アリーナ / ダンス / 狩り / 売春)。
- 十分なお金を手に入れた後、バティルはあなたに手がかりを求めてきます.
- 街を出てバルサ ワイルドに行き、北部エリアで待ち伏せスポットを見つけます。
- 手がかりをバティルに持ち帰り、サルマンの家に戻ります。
- クレスとサルマンと一緒にサファイア遺跡を一掃する。
- アンダーグラウンド マーケットに入り、B4 でラハドと対峙します。
- 注:8 日目の終わりまでにアンダーグラウンド マーケットに入場しないと、ゲーム オーバーになります。
カオスルート
- B6 でチョーカー ガードを倒す。
- B5 の物置からルナのものを取り戻せ。
- B4 で Rahad を倒す (負けるとゲームオーバー)。
- メイン ストリートにあるシルバー ゴブレット バーに行き、酒場の主人にクレスについて尋ねてください。
- 教会に行き、アイリの助けを借りて教会の地下 1 階に侵入します。
法ルート
- 港に行き、敬虔な若者と話してください。
- メイン ストリートのシルバー ゴブレット バーに行き、酔っぱらいと話してください。
- カナート B2 に行き、ビッグ G と話してください。
- カナート B3 に行き、クレスを探してください。
- 教会の地下室 B4 に進みます。
ダンス – 観客の規模、誇大宣伝、ヒントを最大化する方法
ダンスは7つの動きで構成されています。 4 番目と 6 番目の動きでは、聴衆は常にルナが脱ぐことを要求します。
視聴者の規模
- 午後 2 時 30 分まで:10 時~27 時
- 午後 2 時 30 分~午後 5 時:20 時~35 時
- 午後 5 時から午後 7 時 30 分の間:50-70
- 午後 7 時 30 分から午後 8 時の間:20 時~35 時
アイリのコメント:
- 0-14:「今日の聴衆はあまり多くありません。」
- 15-24:「これはまずまずかな?」
- 25~44:「平均的な規模の群衆」
- 45-64:「群衆はかなり大きいです。」
- 65+:「ここにはたくさんの人がいます!」
ハイプ
最初の誇大広告:半分の聴衆サイズ +10。ターンごとに 4 増加します。
視聴者への対応
- 適切な動きで応答すると、誇大広告とヒントが増えます。
- ヒントは、3 ~ 5 × 誇大広告 × (1 + 経験) + 6 ~ 8 × 聴衆によって増加します。
- ハイプが 4 ~ 6 増加します。
跳ね回る
– 神よ、あなたの t*ts は最高です。私のために振ってください!観客の目は私の胸を追う。
– 私はこれを取ることができません!商品を振ってください!
前かがみ
– 男、彼女はその服からこぼれています.そのブラは基本的にひもです。私は彼女の乳首を実際に見ることができます!
– それだけです。あなたの t*ts をよく見てください!
腰を振る
– ふへへ、今では彼女は上手なダンサーです。その *ss をつかんで、すぐに押し込めばよかったのに。
- それでおしまい! *ss をこちらに向けて振ってください!
開脚
–おい、足を広げて!あなたの股間をよく見てみたい!
–おい、足を広げて!そこにあるものを見せてください…へへ!
ストリッピング
ストリッピングは誇大広告とヒントを大幅に増やします。
ブラ:
- チップは 7 ~ 10 × 宣伝 × (1 + 経験値) + 12 ~ 20 × 聴衆、要求された場合は +1000 ずつ増加します。
- ハイプが 4 ~ 6 増加し、要求された場合は +6 になります。
パンティー:
- チップは 9-14×誇大広告×(1+経験) + 20-26×聴衆、要求された場合は +2000 ずつ増加します。
- ハイプが 4 ~ 6 増加し、要求された場合は +10 になります。
終了
- 最後に、誇大広告×5×(聴衆/10)+1000 の最後のチップを受け取ります。これは、前に 5 回踊った場合は 20%、前に 15 回踊った場合は 44% 増加します。
- 4 回目のダンスの後、「初心者ダンサー」の称号が与えられます。
- After the 7th dance you’ll learn the passive skill Dancer’s Footwork.
- After the 15th dance you’ll get the title “Popular Dancer”.
Prostitution – How to Get the Perfect Price
- Wait for a customer – Price ranges.
- Well-Dressed Merchant:15,000 to 20,000, +3000 if they recognize you.
- Middle-aged Citizen:13,000 to 17,000, +3000 if they recognize you.
- Young Traveler A (f*ck in alley):10,000 to 15,000, +3000 if they recognize you.
- Young Traveler B (blowj*b):5,000 to 8,000.
- Man with Bulging Eyes:4,000 to 18,000.
- +3000 if done prostitution at least 20 times (times Luna sold her body in sexual encounters window).
Note that before 2.30 pm and after 8pm there’s a 25% chance to get no customer.
Approach someone – Price ranges
- Middle-aged Citizen:8,000 to 12,000
- Young Traveler A (f*ck in alley):8000 to 10,000
- Sharp-eyed Man:4000 to 6000
- Heavily Bearded Man:4000 to 6000
- Young Traveler B (blowj*b):4000 to 7000
- +2000 if done prostitution 10-19 times
- +4000 if done prostitution at least 20 times
Responses
- “He looks about uncomforable”:too high by 1000 or 2000.
- “He asks you to lower your price”:too high by 3000, 4000 or 5000.
- “He shakes his head”:too high by 6000 or 7000.
- “The moment he hears your price, he shakes his head.”:too high by 8000 or more
- “He seems satisfied with your price.”:too low by 1000 or 2000.
- “He nods with a smile”:too low by 3000, 4000 or 5000.
- “Surprised, he instantly agrees.”:too low by 6000 or 7000.
- “He asks you to repeate the price”:too low by 8000 or more.
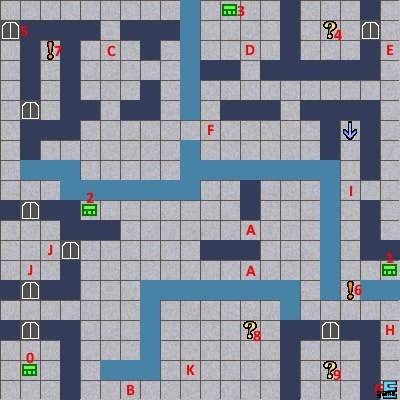
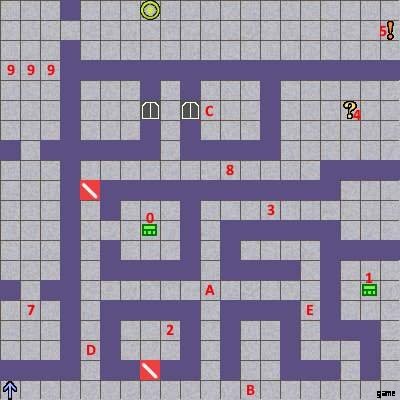
Borak Ridge
Enemies
- Grey Wolf (HP:110, weak to Fire)
- Weak Goblin (HP:100, weak to Fire, defeat in 3 turns or reinforcements appear, after 6 turns r*pe will start)
- Tough Goblin (HP:120, weak to Fire)
West
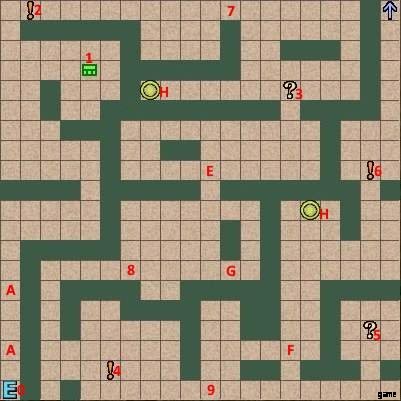
- 0 Exit (not functional)
- 1 Heal Drop (HP+120)
- 2 Grey Wolf (tutorial)
- 3 Weak Goblin
- 4 Sign about goblins
- 5 Heal Drop Tree
- 6 4×Tough Goblin (gameover)
- 7 Clear Drop (Recover status debuffs)
- 8 Weak Goblin Ambush, learn Vigilance (can’t be surprised)
- 9 Grey Wolf (level-up battle)
- A Dungeon movement explanation
- E Grey Wolf
- F Weak Goblin
- G Grey Wolf
- H HP and MP fully restored
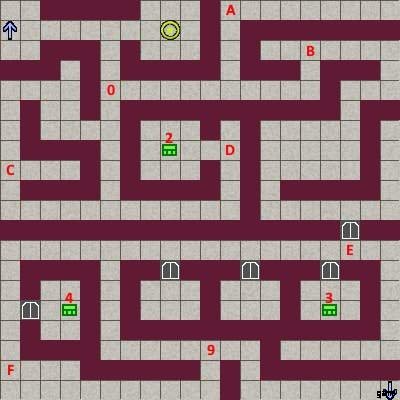
East
- 0 Chest:Small Mana Ring (MaxMP+1)
- 1 Chest:Wind Sprite Staff (ATK+20 M-ATK+10 M-DEF+35
) - 2 Jill scene “Torture at the Enemy Base”
- 3 4×Tough Goblin (gameover)
- 4 Chest:Heal Drop
- 5 Heal Drop Tree
- C 3×Weak Goblin
- D 2×Tough Goblin (gameover)
- E Grey Wolf
- F 2×Tough Goblin (gameover)
- G 3×Weak Goblin
- H Grey Wolf
- I Grey Wolf
- J Weak Goblin
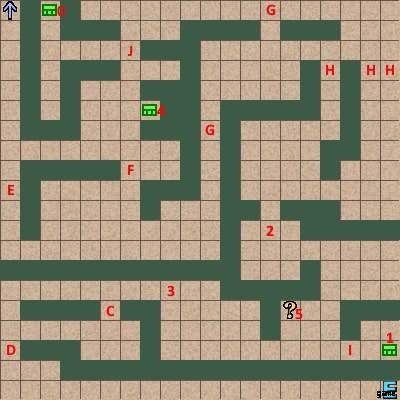
Gnath River
Either bribe the guard, or defeat the Kraken (HP:500, weak to lightning / wind. Use magic arrow to escape the tentacles)
Marlbara Desert
Enemies
- Scorpion (HP:150, poison attack)
- Ghurab (HP:100, weak to lightning)
- Sand Worm (HP:500, weak to water. Use lightning on self to get rid of small worms)
- Zahaf Scorpion (HP:160, poison attack)
- Slave Hunter (HP:430, counter attack)
West
- 0 Merchant (advice on Sand Worms)
- 1 Chest:Mana Drop (Recover 5 MP)
- 2 Chest:Clear Drop
- 3 Chest:Farih’almashi (+20 HP and +1 MP for every 5 steps, surrounding squares guarded by Sand Worms)
- 4 Chest:Heal Bottle (+250 HP, surrounding squares guarded by Sand Worms)
- 5 Chest:Heal Drop
- 6 Quicksand
- A Scorpion
- B Ghurab
- C 2×Ghurab
- D Scorpion
- E Scorpion, Ghurab
- F 2×Scorpion
- I Zahaf Scorpion
East
- 0 Chest:Travel Boots (AGI +20)
- 1 Chest:Mana Drop
- 2 Chest:2000 Dinar
- 3 Chest:Clear Drop
- 4 Heal Bottle
- 5 Heal Drop Tree
- 6 Shortcut
- 7 2×Ghurab, Scorpion
- 8 Sand Worm
- 9 3×Slave Hunter
- A Ghurab
- B 2×Scorpion
- C 3×Ghurab
- D 2×Scorpion, 2×Ghurab
- E 3×Scorpion
- F Quicksand
- G Quicksand
- H Quicksand
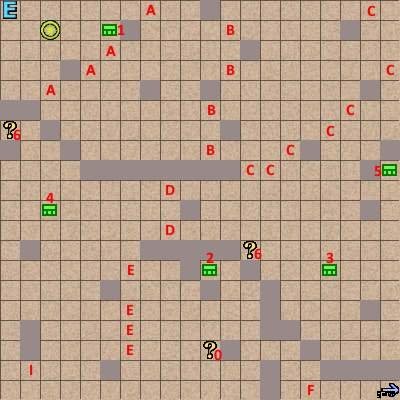
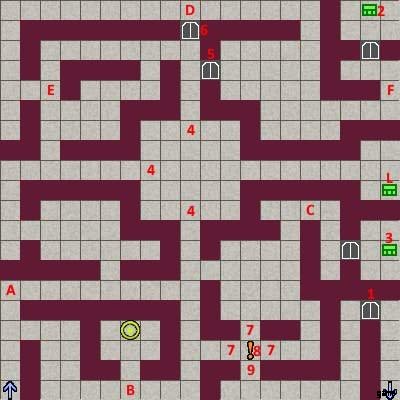
Qanat
Enemies
- Scorpion (HP:150, poison attack)
- Green Slime (HP:400, DEF:250, weak to fire)
- Farasha (HP:190, weak to fire, paralysis attack)
- Viper (HP:270)
B1
- 0 Chest:Void Emblem (Negates equipment effects during battle)
- 1 Chest:Awareness Amulet (Blocks sleep and confusion)
- 2 Chest:Heal Drop
- 3 Chest:Heal Bottle
- 4 Switch, opens 6
- 5 Rock Door
- 6 Drawbridge
- 7 Airi event, unlocks 5
- 8 Man
- 9 Man
- A Farasha
- B Scorpion
- C 2×Farasha
- D 2×Viper, Farasha
- E 2×Farasha, Scorpion
- F Viper, Farasha
- G Exit
- H Airi event
- I Green Slime
- J Green Slime
- K Life Seed (Revive and recover 40% of HP)
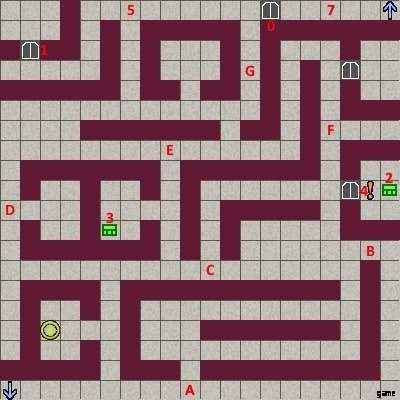
B2
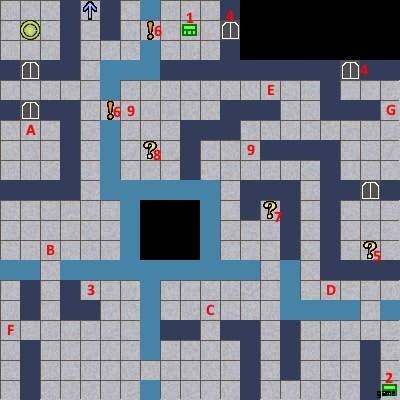
- 1 Chest:Water Guardian (Airi:ATK +34 DEF+18
) - 2 Chest: Heal Bottle
- 3 Ground: Mana Bottle
- 4 Locked Door
- 5 Big G chat
- 6 ! Drawbridge
- 7 Switch (opens 6)
- 8 Zahadola event
- 9 Farasha, 2×Viper, Scorpion
- A Viper
- B Scorpion, Viper
- C 2×Farasha
- D Green Slime
- E 2×Viper
- F Viper, Farasha
- G 2×Farasha
B3
Balsa Wilds
Enemies
- Alwald (HP:250, weak to fire, poison attack, paralysis attack, 250 D)
- Giant Snail (HP:410, weak to wind, physical counterattack, 220 D)
- Black Wolf (HP:360, 300 D, 55% Black Fur)
- Mirror Egg (HP:200, magic reflect, 100 D, 15% Reflect Ring)
- Mandragora (HP:1300, weak to fire, poison attack, 5000 D)
South
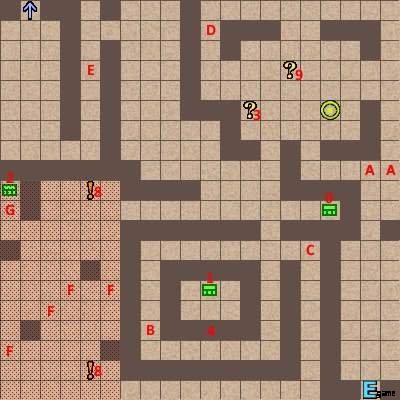
- 0 Chest:Heal Bottle
- 1 Chest:Life Elixir (+10 Max HP)
- 2 Chest:Spirit Pill (0 MP consumtion for 3 rounds)
- 3 ? Heal Drop Tree
- 4 Shortcut
- 8 ! Monster Warning
- 9 ? Man taking 10 Black Wolf pelts for Hunter’s Mark (Raises drop rate slightly)
- A Alwald
- B Giant Snail
- C Giant Snail, Alwald
- D Black Wolf
- E Black Wolf
- F Black Wolf
- G 2×Alwald
North
- 0 Chest:Heal Bottle
- 1 Chest:Clear Drop
- 2 ? Heal Drop Tree
- 8 ? Sealed Pot
- 9 ! Ambush area
- A Mirror Egg
- C Giant Snail
- E Black Wolf
- F Black Wolf
- G Giant Snail, Mirror Egg
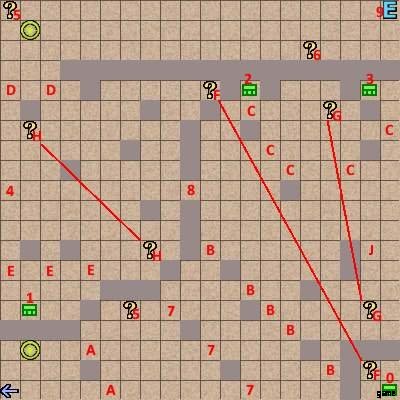
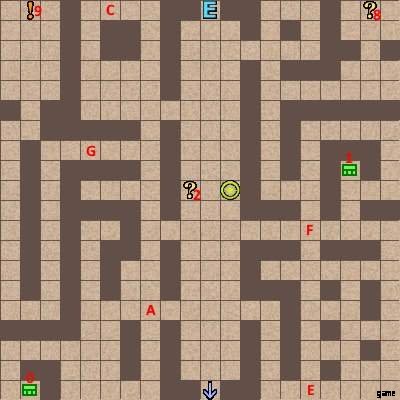
Sapphire Ruins
Enemies
- Green Slime, Farasha, Viper, Mirror Egg
- Wisp (HP:100, DEF:250, weak to dark, no physical attack)
- Mummy (HP:400, weak to fire, undead, 100 D)
- Creeping Coin (HP:50, ATK:215, weak to lightning, floating, 2000 D)
- Bandit Boss (HP:350, 1000 D)
- Underling 1 (HP:270, 750 D)
- Underling 2 (HP:180, 750 D)
- Machine Golem (HP:1200, weak to lightning, magic counterattack, 2500 D)
B1
- 0 Chest:Cursed Choker (Reverse stat boosts and debuffs)
- 1 Chest:25,000 Dinar
- 2 Chest:Empty
- 3 ? Remains of a fire
- 4 ? Caved in staircase
- 5 Ground:Life Seed
- 6 ! Switch (opens wall near 9)
- 7 ? Strange wall
- 9 2×Wisp, Viper
- A 3×Viper
- B Wisp, Farasha
- C Wisp
- D Wisp, Viper
- E Viper, Wisp, Farasha
- F Creeping Coin
- G ! Elevator pipes
- H ? Elevator Cless dialog
- I ? Elevator Salman dialog
- J ! Elevator
B2
- 0 ! Teleport Trap
- 1 ! Luna switch
- 2 ? Caved in staircase
- 3 ? Broken down door
- 4 ! Cless switch
- 5 Reunited
- 6 Chest:Empty
- 7 Chest:Flare Javelin (ATK+40
Additional Damage(S)) - 8 Green Slime
- 9 Bandit Boss, Underling 1, Underling 2
- A Wisp
- B Green Slime
- C Wisp
- D Mummy, Wisp
- E Wisp, Mummy
- F Mummy
- G 2×Mummy, Farasha
- J Chest:Fire Staff (ATK+47 M-ATK+8
+Additional Damage(S)) - K 3×Mummy
- L Ground:Heal Bottle
B3
- 0 Chest:Life Seed
- 1 Chest:Lucky Ring (LCK+10)
- 2 Ground:Life Elixir (+10 Max HP)
- 3 All walls unlocked
- 4 Professor Salman
- 5 ! Elevator
- 7 Archive room
- 8 Wisp, Mummy, Mirror Egg
- 9 Machine Golem
- A Wisp, Mirror Egg, Farasha
- B Mirror Egg
- C Creeping Coin
- D Mirror Egg, Mummy
- E 2×Mummy, Wisp
Underground Market
Enemies
- Crimson Elite (HP:300)
- Choker Guard (HP:1300, physical counterattack, 10% Life Elixir)
- Rahad 1 (HP:1600, skill counterattack, 10,000 D, 100% Yaqut (-1MP cost of Shortcut 1 (Fixed in battle)))
- Rahad 2 (HP:2100, skill counterattack, 10,000 D, 100% Yaqut (-1MP cost of Shortcut 1 (Fixed in battle)))
- Shadow Eater (HP:1100, weak to earth, magic counterattack, 2500 D, 5% Mana Crystal)
B3
- 0 Hint
- 2 Chest:Mana Bottle
- 3 Chest:Heal Bottle
- 4 Chest:Heal Bottle
- 9 Crimson Elite
- A Crimson Elite
- B Crimson Elite
- C Crimson Elite
- D Crimson Elite
- E Crimson Elite
- F Crimson Elite
B4
- 1 Locked Door
- 2 Chest:Yaqut (-1MP cost of Shortcut 1)
- 3 Chest:Unlimited Heal &Mana Bottles
- 4 Rahad
- 5 Oneway Door (east to west)
- 6 Oneway Door (north to south)
- 8 Airi (chaos route)
- A Crimson Elite
- B Crimson Elite
- C 2×Crimson Elite
- D Crimson Elite
- E Crimson Elite
- F 2×Crimson Elite
- L Chest:Life Elixir
B5
- 0 Locked Door
- 1 Storage Room
- 2 Chest:Mana Drain (Enemies M-ATK restores MP)
- 3 Chest:Heal Bottle
- 4 ! Shadow Eater
- 5 3×Crimson Elite
- 7 Crimson Elite
- A 2×Crimson Elite
- B 2×Crimson Elite
- C 2×Crimson Elite
- D Crimson Elite
- E Crimson Elite
- F 2×Crimson Elite
- G 2×Crimson Elite
B6
- 2 Locked Door
- 3 Choker Guard
- 4 Chest:Mermaid Tears (Revive and recover 100% HP)
- 5 Chest:Heal Bottle
- 6 Chest:Unlimited Heal Drops
- 7 Crimson Elite with Jail Key (unlocks 2)
- 8 Luna’s Cell
- A Crimson Elite
- B Crimson Elite
- C Crimson Elite
- D Crimson Elite
- E Crimson Elite
- F Crimson Elite
Church Basement
Enemies
- Believer (HP:550, weak to wind, 750 D, 30% Heal Bottle)
- Evil Book (HP:370, weak to fire/holy, 660 D)
- Skull Fencer (HP:1500, weak to holy, physical counterattack, HIT+, undead, 5000 D, 10% 2257)
- Bishop (HP:2300, 15,000 D)
Luna – Main Scenario
Prologue:Survived 15 Turns
- Use the ceremonial spear to survive for 15 turns.
- Lust Worm Progress +1%
Prologue:Defeated
- Number of Sexual Encounters +1
- Times Penetrated +1
- Times Ejaculated Inside Of +1
- Number of Times F*cked (Humans) +1
- Lust Worm Progress +5%
Chaos Route:Defeated – Became a Slave
- Lose in Underground Market
- Number of Sexual Encounters +1
- Times Penetrated +1
- Times Ejaculated Inside Of +1
- Number of Times F*cked (Humans) +1
- Lust Worm Progress +1%
Chaos Route:Sex Slave (Playable)
- Number of Sexual Encounters +5
- Times Penetrated +5
- Times Ejaculated Inside Of +5
- Number of Times F*cked (Humans) +5
- Lust Worm Progress +2%
Reunion with Airi
- Number of Sexual Encounters +100
- Times Penetrated +30
- Times Ejaculated Inside Of +30
- Number of Blowj*bs +30
- Number of Times F*cked (Humans) +30
- Number of Times F*cked (Monsters) +5
- Lust Worm Progress +10%
Sex Slave End
- Reply “…” to Airi
- Game Over
Luna – Town Events
Lust Worm Progression
- Progression 1
- Progression 2
- Lust Worm 100%
Dancing
- Lust Worm (0~49%)
- Lust Worm Progress +1%
- Lust Worm (80%~)
Drunk Gangr*pe
- Main Street – Silver Goblet Bar – Boorish men
- Number of Sexual Encounters +1
- Times Penetrated +3
- Times Ejaculated Inside Of +3
- Number of Times F*cked (Humans) +3
- Lust Worm Progress +5%
Deals with the Old Beggar
- Main Gate – Reward the Old Beggar for giving information
- Normal Equipment
- Damaged Equipment
- Number of Sexual Encounters +1
- Number of Times F*cked (Humans) +1
- Lust Worm Progress +1%
- Tights
- Damaged Tights
- Naked
Bishop’s Hypnotism
- Church – Ask the bishop to help you with the Lust Worm.
- First time
- Lust Worm Progress +1%
- Second time
- Lust Worm Progress +1%
- Third time
- Fourth time
- Game Over
Arena Defeat:Orc
- Number of Sexual Encounters +1
- Times Penetrated +1
- Times Ejaculated Inside Of +1
- Number of Times F*cked (Monsters) +1
- Lust Worm Progress +1%
A Bet with an Information Broker
Dawn Shepherd Bar – Keep Betting
Deals with the Pimp
- Wh*re District – Register as a prostitute
- Virgin
- Experienced
Virgin Prostitution – A Millionaire’s Toy
- Number of Sexual Encounters +1
- Times Penetrated +1
- Times Ejaculated Inside Of +1
- Number of Blowj*bs +1
- Number of Times F*cked (Humans) +1
- Lust Worm Progress +7%
Prostitution – All Events
The ‘2’ events are with Lust Worm Progress at 80% or higher
- First Prostitution
- Well-dressed Merchant
- Well-dressed Merchant2
- Middle-aged Citizen
- Middle-aged Citizen2
- Young Traveler A
- Young Traveler A2
- Young Traveler B
- Young Traveler B2
- Man with Bulging Eyes
- Man with Bulging Eyes2
- Sharp-eyed Man
- Sharp-eyed Man2
- Bearded Man
- Bearded Man2
Luna – Field Map
Defeated by Goblins (F*ck and Chuck)
- Number of Sexual Encounters +1
- Times Penetrated +1
- Times Ejaculated Inside Of +1
- Number of Times F*cked (Monsters) +1
- Lust Worm Progress +1%
Defeated by Goblins (Taken to Nest)
- Lose to Tough Goblins.
- Game Over
Bridge Guard Blowj*b
- Convince the Gnath River bridge guard to let you pass
- Number of Sexual Encounters +1
- Number of Blowj*bs +1
- Number of Times F*cked (Humans) +1
- Lust Worm Progress +1%
Defeated by Kraken
- Swim across Gnath River
- Number of Sexual Encounters +1
- Times Penetrated +1
- Times Ejaculated Inside Of +1
- Number of Times F*cked (Monsters) +1
- Lust Worm Progress +1%
Defeated by Sand Worms
- Number of Sexual Encounters +1
- Times Penetrated +1
- Times Ejaculated Inside Of +1
- Number of Times F*cked (Monsters) +1
- Lust Worm Progress +1%
Defeated by Slave Hunter, Slave Market
- Game Over
Defeated by Mandragora
- Game Over
Jill
Torture at the Enemy Base
- Borak Ridge East (14,12)
Whipping Girl
- After day 2
Aphrodisiac Training 1
- After day 3
Aphrodisiac Training 2
- After day 4
Virginity Auction
- After day 5
My Days as a Sex Slave
- After day 6
Fall into Corruption
- After day 7
Tentacle Broodmare
- After Underground Market
Reunion with Luna, as a Slave
- Follows scene Sex Slave End
- Game Over
Master’s Sex Slave
- After day 8
- Game Over
Cless
Defeated by Slime
- While playing as Cless in the Sapphire Ruins, get defeated by a Slime.
Raiders Gang Bang
- While playing as Cless in the Sapphire Ruins, get defeated by the Raiders.
- Game Over
Small Hand Devil Tickling
Defeated by Believers – Intense Drilling
Trap Room – Sleeping Gas
Defeated by Brainwashed Luna
Defeated by Bishop – Brainwashed Sex Slave
The Mirror World (Playable Replay Mode)
The Mirror World:Low Sanity Events
The Disgraced Saint
Defeated by Id, Possessed
Airi
Alley F*ck
- Visit the back alley in the wh*re district.
Dancer on the Stage
- Watch Airi’s performance on the Main Street Stage.
Tentacle Lover
- Event in Qanat B1
I Wanna Help Lunie
Torturing the Torturers
Reverse R*pe
Defeated by the Collar Keeper
Blowj*b from Hell
Caught by Pursuers