The Legend of Bum-Bo – 初心者向けガイド (ボス、ダンジョン、敵など)

開始するために知っておく必要があるすべて。
一般知識
Legend of Bum-Bo は説明が難しいゲームですが、最も基本的な形式は、Binding of Isaac スキンのパズル クエストです。
それぞれが異なる初期スキルとステータスを持つさまざまな Bum-Bos の 1 人としてプレイし、途中ですべてのボスを倒そうとします。
ゲームの大部分は次のようになります:

4×9 グリッドがあり、4 つ以上の同じシンボルを一致させようとします。一致するほど効果が高くなります (暗い領域を数えたい場合は 5×9 で、そのレーンに次にドロップするシンボルが表示されます)。
一致できるシンボルは、呪文の右上隅にある「マナ」を提供する一般的なものとして、骨、うんち、鼻くそ、歯、おしっこです。珍しいのは、ワイルド シンボルとして使用できるハート、スター (=他のシンボルの代わりに使用できます)、時には呪い (パープル スカル) です。
一致するほど効果が高くなります。 7 は、Ultimate Effect を提供します (そして、初めての実績です。現時点では、実績にはバグがありますが、Ed の Twitter によると、さかのぼってロックを解除する必要があります)
骨
4/5/6 を使用すると、任意のレーン (左/中央/右) で 1/2/3 個のボーンを発射できます。Dmg =パズル ピースに対してです。スクリーンショットの場合、1 Dmg になります (左隅、上から 2 番目の統計)。
7 ボーン:ランダムな敵をターゲットにして、ボーンの雨を降らせる死を召喚します。
うんち
4/5/6 は、消えるのに 1/2/3 ヒットかかるうんちバリアでレーンをブロックしましょう。
7 うんち:$hitstorm を召喚します…すべてのレーンに 3 つのうんこバリアが残り、それぞれ 3 HP になります。
鼻くそ
4/5/6 で 1/2/3 鼻くそを発射して対戦相手を気絶させ、次のアクションをフリーズさせます。 3 回までスタック可能。
7 鼻くそ:鼻くそ雨を召喚し、すべての対戦相手を 3 アクションの間気絶させます。
歯
1/3/5 ダメージの単一の歯の 4/5/6 ファイアー (パズル ダメージがアップグレードされた場合、より多くのダメージ)。
7 歯:黒い鉄の壁を召喚し、一度にすべての敵にダメージを与えます (4 DMG のようです)。
おしっこ
4/5/6 で、あと 1/2/3 回のムーブが得られます。
7 おしっこ:4 回の移動を与え、アイテムがあればすべて充電します。
ハート
4/5/6、1/2/3 赤い半分のハートを回復します。
7 Hears:完全に回復し、追加のハートとして機能する青いソウル ハートを 1 つ与えますが、ハートで回復することはできません。
呪い
4/5/6 はハート半分の 1/2/3 分のダメージを与えます。
7 呪い:アチーブメントを与えます。それ以外の場合は完全に殺されます。
ブンボス
すべての Bum-Bos は、独自の統計、1 つのパッシブ効果、2 つのアイテム / スペルから始まります。そのうちの 1 つはアタック スペル (剣のシンボル) で、もう 1 つはコントロール スペルで、ボードを操作することができます。
- Hearts:開始時の体力。各レッド ハートは 2 つのハーフ ハートで構成されます。
- 拳:攻撃呪文によるボーナス ダメージ
- ブーツ:ボード上で順番に実行できるアクション
- クローバー:あなたの運の統計。攻撃 / 呪文でクリティカルと 2 倍のダメージを与える可能性が決まるようです。
- パズルのピース:骨/歯で 4 つ以上連続して通常攻撃の基本ダメージ
勇者バンボ

- ハート:3
- こぶし:3
- ブーツ:2
- クローバー:1
- パズルのピース:1
- パッシブ: 彼のヘルスが低いほど、攻撃が難しくなります! (欠落しているレッド ハートごとに、ブレイブは拳 / パズル ピース +1 を獲得します)。
- 攻撃呪文の開始: バンボー スマッシュ、コスト:骨 4 個、攻撃 =3 (拳が多ければ多いほど)。
- 開始制御呪文: Bum-Bo Shake、コスト:2 歯、パズル ボードを再ロールします (この方法で組み合わせることは可能です)。
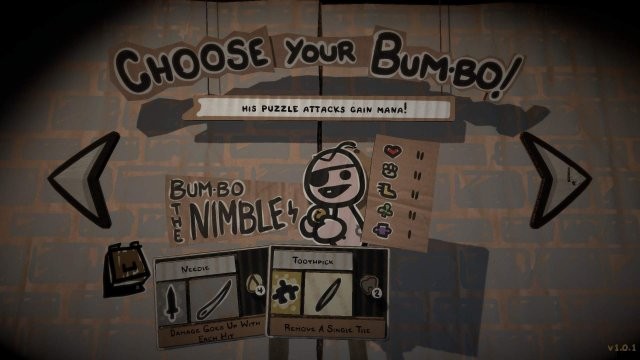
軽快なバンボー
チャプター1をクリアすることでアンロック(勇者バンボ使用)
- ハート:2
- こぶし:2
- ブーツ:2
- クローバー:2
- パズルのピース:1
- パッシブ: 彼のパズルアタックはマナを獲得します! (骨/歯で攻撃するたびに、すべての色の +1 マナを取得します)。
- 攻撃呪文の開始: 針、コスト:4 おしっこ、攻撃 =X+1 (ヒットが成功するたびに、ダメージの追加ポイントを取得します)。
- 開始制御呪文: つまようじ、コスト:歯 2 個、タイルを 1 つ削除します (より長いコンボ チェーンを準備するのに役立ちます。削除したタイルに対応するマナも得られます)。
バンボー ザ スタウト
チャプター 2 を完了するとロック解除されます (軽快なバンボーを使用)。

- ハート:2
- こぶし:2
- ブーツ:2
- クローバー:1
- パズルのピース:1
- パッシブ: ボーナス マナを獲得しますが、それを保存することはできません (マナを獲得するたびに、その「エレメント」で +2 を取得しますが、ターンが終了するとすべてを失います)。
- 攻撃呪文の開始: スティック、コスト:うんち 3、攻撃 =3。
- 開始制御呪文: ブレンダー ブレード、コスト:鼻くそ 3 個、タイルの破壊とタッチ。
選択したタイルが S の場合、基本的にすべての O を破壊します。
XOX
OSO
XOX
コンボを設定するには少し計画が必要ですが、ボードをきれいにするのに役立ちます.
変なバンボー
チャプター 3 を完了するとロック解除されます (スタウトのバンボーを使用)。

- ハート:赤 1 個、青 1 個 (ソウル ハートも 2 つのハーフ ハートで構成されますが、ハート シンボルでは回復できません)
- こぶし:1
- ブーツ:2
- クローバー:0
- パズルのピース:1
- パッシブ: 敵を倒すと移動力が得られます (敵を倒すたびに移動力が 1 増加します)!
- 攻撃呪文の開始: パズル フリック、コスト:骨 3 個 + 歯 3 個、1 つのシンボルのすべてのタイルを削除して投げる、攻撃 =削除されたタイルが多いほどダメージが高くなります (式はまだわかりません)。
- 開始制御呪文: マジック マーカー、コスト:4 おしっこ (シンボルを選択すると、ボード上にそれらのシンボルが約 3 つ追加されます)。
ブンボー・ザ・デッド

ゲームをクリアするとロック解除されます (チャプター 4 をクリアする。バンボのある地下室)。
- ハート:3 ソウルハート
- こぶし:1
- ブーツ:1
- クローバー:0
- パズルのピース:1 (ゲームでは 2 で開始します。バグの可能性があります)
- パッシブ: スペル コストは使用時に変化します (各部屋は各色 2 つで開始します。スペルを 1 つ使用するたびに、マナ コストが変化します。合計コストは同じままですが、別の色に分割できます。例:4 ボーン–> 2うんち 2 歯)
- 攻撃呪文の開始: アタック フライ、コスト:4 うんち (フライを送るカラムを選択します。フライは、敵と自分のターンの間に毎回最も近い敵を攻撃します)。
- 開始制御呪文: Buzz Right / Down、コスト:1 Bone / Tooth (タイルの行を 1 つ右に移動 / タイルの列を 1 つ下に移動)。
バンボー ザ エンプティ
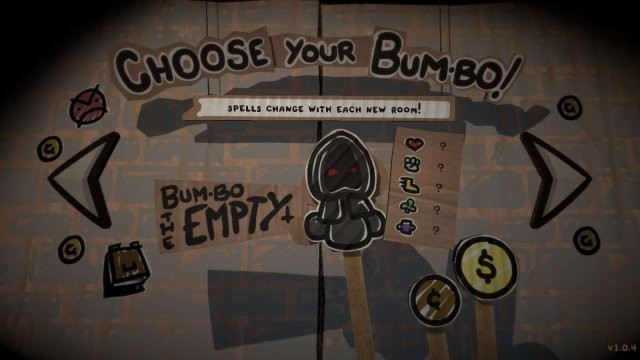
全キャラクターで 2 回クリアするとアンロック
- ハート:(1-5)
- こぶし:(1-4)
- ブーツ:(2-5)
- クローバー:(0-3)
- パズルのピース:(1-4)
実行ごとにランダムな統計を取得し、合計で最大 9 になるようです。上に、統計の範囲を示しました。
- 攻撃呪文の開始: ランダム
- 開始制御呪文: ランダム
それぞれ 1 つずつから始めますが、新しい部屋に入るたびにランダム化されます。
それにもかかわらず、それらは同じタイプのままであるため、攻撃呪文は別の攻撃呪文になり、制御呪文は攻撃呪文のままです。
カジノでは呪文のアップグレードを購入することはできず、代わりにそれぞれ 7 セントのトリンケットが提供されます。
個人的なヒント: 可能であれば、少なくとも 2 つのアタック スペルを持っていることを確認してください。そうしないと、ボード ダメージの影響を受けない敵によって、実行をやり直さざるを得なくなる可能性があります。それでも運が悪いかもしれません。
ダンジョン レイアウト + カジノ
Legend of Bum-Bo は The Binding of Isaac と同じで、敵を倒してダンジョンを進み、最後にボスを倒さなければなりません。
ただし、Isaac とは異なり、エクスペリエンスは直線的であり、どこに行くかを決めることはできません。
一般的に、レイアウトは次のようです:
- 最初の敵の部屋
- 2 つのアイテム / 呪文 / トリンケットから 1 つを選択できる 1 つ目の宝物部屋
- 2 番目の敵の部屋
- 3 番目の敵の部屋
- 2 つ目のトレジャー ツール
- ボス部屋 (ボスを倒した後、2 つのトリンケットから 1 つを選択できます)。
カジノ
チャプターの合間には、これまでに稼いだお金を使えるカジノにアクセスできます。
あなたの運の統計は、あなたが得るものに影響を与えるかもしれません.
左側にはスカル モンティが 3 体います。

5 セントで、ハートを 1 つ獲得するチャンスがあります (満タンの場合は、ソウル ハートを 1 つ獲得します)。
- お金 (私はいつもハートを手に入れるので、いくらかはわかりません)。
- トリンケット (あなたが彼に支払った後、彼はそれをシャッフルする前にドクロの 1 つに Trinket を入れます)。
中央にはスタット ホイールがあります (「レベルアップ」する唯一の方法です)。

あなたが得ることができる6つの異なるオプションがあります。糸車が 1 つのオプションを複数回持つ可能性があります:
- ハート: あなたを完全に回復し、追加の完全な赤いハートを与えます。
- こぶし: あなたの攻撃呪文は 1 追加ダメージを与えます。
- クローバー: クリティカルを行う可能性が高くなります。
- パズルのピース: ボード コンボは 1 追加ダメージを与えます。
- ブート: ボード上でもう 1 回移動できます。
- 20 セント: お金を獲得し、再びスピンできます。
右側には、呪文をポン引きできるユダがいます:

彼は 2 ~ 5 セントの針を 3 つ持っており、それぞれ 1 セントの赤いヒアを持っています。
改造時はすべての針を使い果たします。彼は次の針を持っています:
<オール>
敵
正式名称がわからないので、『イサクの縛り』で似たような敵が登場して名前が挙がっていないか見て、非公式な名前を付けようと思います。 (正式な名前を知っているか、より良いアイデアがあれば教えてください;),
ボード上の 3×3 グリッドで敵と戦います。
特に明記しない限り、敵は通常の地上タイプの近接敵です。つまり、前列に到着するまでアクションを使用して前進し、攻撃をチャージし、攻撃の次のターンにハートの半分のダメージを与えます。別の方法として、敵を遠隔攻撃することもできます。この場合、その行動はチャージアップ–>攻撃–>チャージアップ…
地上と飛行中の敵が同じタイルにいる場合、攻撃は常に飛行中の敵に命中します。
敵には独自のステータス効果があり、ゲームによって視覚化されます:
- 感嘆符 =敵が充電中で、次の起動時に攻撃します。
- 敵の静脈 =その敵は余分なアクションを持っています。
- 青いパズルのピース =その敵はパズル ボードのダメージによってのみダメージを受けることができます。
- 灰色の剣のシンボル =敵は呪文によるダメージしか受けることができません。
- バイオレット スカル =倒された後、敵はあなたを呪います。
- 緑の爆弾 =敵が死んだ後に爆発する
- スタンプ =倒された敵のマナはあなたを消耗させます。
- レッド クラウン =ターンごとに +1 ヘルスを獲得します (最大 9 ヘルス)。
- 黄色い王冠 =敵に余分なアクションがあります。
- ピンクの王冠 =敵は倒された後、コインを何枚も落とします。
- ブラック クラウン =不明
- 灰色のカミソリ / 電球 =敵が 1 ハート分のダメージを与えるか、HP が 2 倍になります (おそらくランダム効果)。
第 1 章:ドロスの下水道
1.吸う; 3 HP;遠隔

- 1 回の攻撃で Mana Drain を使用した後 (すべてのマナがゼロになります)。
2.トールボーイ 4 HP;遠距離;チャージアップなし

- Burps out a green Smog Cloud (if something flies through, the cloud attacks back, otherwise disappears after a round).
- Spawn a Small Poop every other round.
3. Dip; 1 HP

4. Tatokid:2 HP

5. Leaper:2 HP; Ranged

6. Fly; 1 HP; Flying

7. Pooter:2 HP; Ranged, Flying

8. Squat:3 HP; Ranged

9. Boomfly:2 HP; Flying

- Explodes on death. If in the Front Row can damage for 1/2 heart damage without Poop Shield.
Chapter 2:Forlorn Hollow
1. Greeding:3 HP; Enraged

2. Mask:2 HP; Immune to Spells

3. Dig-Dig:1 HP; Mob monster, appears in a group of 2-4 (rarely alone).

- After hitting one of them, they hide underground and are untargetable.
- When underground uses an action to become red, before it ascends the next turn.
- All members of the Colony have to be underground at the same time to kill it.
4. Longits:4 HP; Flying

- After getting hit by anything he shrivels up and becomes untargetable.
5. Larry:5 HP

- After getting damaged he leaves behind a green Smog Cloud (disappears after 2 rounds).
6. Blobby:3 HP; Ranged

- On the first hit, it takes no damage and loses its upper half.
7. Burfer :3 HP; Ranged

- When possible moves behind a meat shield.
- Favors safety even after charging its attack.
- Can heal the meat shield in front of it, by giving him 1 of his own HP.
8. Imposter:3 HP
Chapter 3:The Halls of Belial
1. Wisp:3 HP; Flying; Immune to Spells

2. Floater:5 HP; Flying

- Curses you.
- Can spawn a shopkeep (charged up).
3. Red Floater:5 HP; Flying

- On its turn buffs an enemy for a turn, giving it 1 extra move action (if he is alone).
- After he charges up he attacks twice.
4. Bib:2 HP; Enraged

5. Red Blobby:4 HP; Ranged

- On the first hit, it takes no damage and loses its upper half.
- Summons a red bubble, which only disappears after it absorbs one projecticle (bone/booger/tooth).
6. Cultist:5 HP

7. Spookie:2 HP; Flying, Ranged

- Steals 1 of your Moves for 1 turn (you are always left with at least 1 Move).
- Curses you when hit.
- Only takes one damage per hit.
8. Skully B.:3 HP; Immune to Spells

- Has 2 Actions.
9. Skully P.:4 HP; Immune to Puzzle Damage

- Has 2 Actions.
10. Meat Golum:7 HP; Enranged

- Has 2 Actions.
- Heals 1 HP each Action if below 7.
- Steals 1 Move each Hit.
11. Poofer:3 HP; Flying, Enraged

- Explodes on death, giving surrounding enemies +1 health.
Chapter 4:Basement
1. Nib:5 HP; Immune to Puzzle Attacks, Enraged

- After getting hit switches to Blue Homunculus.
2. Jib:5 HP; Immune to Spells, Enraged

- After getting hit switches to Red Homunculus.
3. Mega Poofer:6 HP; Flying, Enraged

- Explodes on death giving other enemies +4 Health.
4. Keeper:6 HP; Flying

- Moves forward and charges up, can attack even when not in Front Row.
5. Host:4 HP; Ranged

- Charges up and attacks, making his skull go up for one turn.
- Is immune to any damage while skull is down.
6. Curser:3 HP; Flying, Does not attack

- Curses you.
7. Daddy Tato:8 HP, Enraged

- 2 Actions.
8. Black Blobby:5 HP; Ranged

- On the first hit takes no damage but loses its upper half.
- Each hit mana drains you.
- Each attack dooms you.
9. Mirror:4 HP; Flying, Ranged

- Spawns with a Doppelganger.
- When the Doppelganger is hit, both respawn in new locations without taking damage.
10. Screecher:2 HP; Flying

- Steals 1 Move each turn.
11. Sucker:2 HP; Flying

- Mana drains you each turn.
12. Stoney:– HP; Ranged

- Only disappears when all other enemies are defeated.
13.. Isaac:4 HP; Enraged

- When killed, you get -1 Move the next turn.
Bosses
There are in total 10 Bosses.
Chapter 1

Loaf

This Boss starts out with 10 HP and has 2 Actions.
- He uses his Action to come closer to you. When he is in the Front Row, he uses one Action to charge up and another to attack.
- Whenever you attack him he gets pushed back a row (if possible), leaving behind a little 1HP Poop enemy in each unoccoupied lane in front of him. Be careful as there seems to be at least one which tries to attack you.
- When he comes towards you, he kills all the Poop Enemies (those who would have attacked still do) and dirties your board.

The Symbol underneath stays the same, so it is possible to use in a combination.
Otherwise you clean the board whenever move the row or lane of a dirty Symbol (if you play as Bum-Bo the Brave his Bum-Bo Shake, can be used to clean up the whole Board, by shuffling everything).
Duke of Flies

This Boss starts out with 10 HP and has 2 Actions.
- He stays in the Back Row and spawns 2 Attack Flys each turn.
- Otherwise he charges up and attacks.
- He begins the fight inflated (Size 3) and the first attack automatically gets reduced to 1 DMG. Afterwards he deflates to Size 2. If hit again he takes normal damage and deflates to Size 1.
- He seems to inflate at the end of every (other?) turn.
Peepers

This Boss starts out with 15 HP and has 3 Actions.
- The Boss also has 2 Peepers Eyes spawned on the Middle and Front Row.
- The real danger in this fight are the Eyes. The Boss stay in the Back Row cursing you each turn, whereas the Eyes go to the middle lane, shielding the Boss –> charge up –> attack you.
- The Eyes are invulnerable to attacks and spells, but once hit get moved to the site, opening up the way to damage this Boss.
Chapter 2

Dusk

This Boss starts out with 15 HP and has 4 Actions.
- He starts out on the Back Row and comes towards you.
- Whenever you attack him he gets pushed back a row. If your damage is too high, you scare him and get doomed (unsure if it’s 4 or 5 DMG).
- If you are doomed one of your spells is unusable for this room.
Shy Gal

This Boss starts out with 12 HP and has 6 Actions.
- There are 3 enemies on the board, each one with an Iron Mask.
- If you hit a wrong one, you get cursed, but the double disappears.
- If you hit the right one, Boss resists the attack, but loses its Mask.
- After you hit the Boss, it respawns on the Back Row with its doubles.
Gibs

This Boss starts out with 12 HP and has 1 Actions.
- On its own it does nothing at first.
- After it gets hit, it spawns 2 more oozes (for a maximum of 3), with 2 HP each.
- On its turn it heals 1 HP, if below max health.
Chapter 3

Gizarda

This Boss starts out with 20 HP and has 1 Action.
- The Boss has two sides, one blue the other red.
- His Blue Side, can only be damaged by using a Board Attack 4+ Bones / Teeth.
- His Red, can only be damaged by using an Attack Spell.
- Each time you attack him, he switches sides, and gets a reactive Action.
- When he switches from Blue–>Red, he spawns an attack fly.
- When he switches from Red–>Blue. he automatically attacks.
Sangre

This Boss starts out with 18 HP and has 3 Actions.
- After a successful hit, the Boss becomes immune for the rest of the round.
- If hit, it will curse you at the start of its turn (does not use up an Action).
- When he is right before you, he can attack you 2 times on his turn.
Pyre

This Boss starts out with 18 HP and has 3 Actions.
- When the Boss is surrounded by Flames he is immune to any kind of damage.
- To damage him, you need to make a combination corresponding to the colour of his flames (so Bones if he has white flames, Pee if he has yellow flames etc.).
- If has flames have been extinguinshed in the last turn he starts his turn with new flames.
Chapter 4

Bygone

This Boss start out with 18 HP and has 2 Actions.
- Spawns 2 Attack Flys and attack without a Charge Up.
- When hit, spawns 1 Attack Fly and dirties you Board.
- After it is killed spawn a Ghost, which has 6 HP and 2 Actions.
- Every time Ghost is hit, it receives only 1 Damage (unless you crit for 2) and curses you.
- Ghost can attack up to 2 times, alternatively it curses you, and can rob you of one movement for a turn.
