GemCraft – Frostborn Wrath – アチーブメント ジェム コードの使用方法
このガイドでは、実績にあるジェム コードを使用して、ゲーム内のさまざまなモッドのロックを解除する方法について説明します。
アチーブメント ジェム コードの使用ガイド
概要
このガイドでは、特定の実績の説明でジェム コードを使用し、ゲーム内でモッドのロックを解除する方法について説明します。このようなモッドは、GC2:CS の四隅のコードに似ており、戦闘にさまざまな効果をもたらします。アチーブメント ジェム コードの秘密を自分で知りたい場合は、このガイドに進まないでください!
このガイドは次のセクションに分かれています:
- アチーブメント ジェム コードとモッドについて説明します。
- Gem コードを含むすべての実績が一覧表示されます。
- 「コードの使い方」では、コードを見つけた後のコードの使い方について説明しています
- どの実績がどの MOD をアンロックするか知りたい場合は、「MOD ごとの実績」セクションを参照してください。
- 最後に、MOD だけが必要な場合は、コード自体が最後のセクションにリストされています。
アチーブメント ジェム コード
ゲーム内には、謎の宝石コードが添付された実績がいくつかあります:
各実績には 5 つの宝石のコードがあり、各宝石の形はその宝石の等級を表しています。参考までに、グレード 1 ~ 9 の宝石の形状をタイトル アイコンに示します。グレード 10 の宝石は六角形、グレード 11 の宝石は C 型、グレード 12 の宝石は円形です。上記のコードは、宝石の等級を使用して 9-4-6-9-1 として変換されます。
改造
GC:FW には 12 の MOD があり、それぞれがワールド マップの上端にボタンとして表示されます。モッドのロックを解除した後、それぞれのボタンをクリックすると、モッドのオンとオフが切り替わります。 MOD の効果は次のとおりです。
美容効果
- (1) 左右反転フィールド: フィールド全体を水平方向に反転します。
- (2) 上下反転フィールド: フィールド全体を垂直方向に反転します。
- (6) 緑の血: 緑の血を地面にこぼし、カウンターを倒します。
- (10) 灰色の木 すべての木が灰色に変わります。
- (11) 悪天候: 雨と雪がより強烈に見えるようにします (実際のダメージ増加と減速効果は影響を受けません)。
有害な影響
- (3) モンスターエッグハント: 約 30 個のモンスターの卵が戦場に出現します (卵はオーブから 30 タイル以内のパス タイルには出現しません)。
- (5) オムニビーコン: ヒーリング、シールド、クレンジング、ヘイスト ビーコンはオムニビーコンに変更され、各ビーコンは 4 つのプロパティすべてを持ちます。スタティック ビーコン、放電ビーコン、ビーコン プロテクター、およびそれらの効果には影響しません。
有益な効果
- (4) 裕福なモンスター: モンスターは時折、MP、XP、または追加のシャドウ コアをドロップします。
- (7) 爆発球: オーブレットを持ったモンスターを倒すとオーブレットが爆発し、一定範囲内の他のモンスターを即死させます。爆発したオーブレットは永久に失われます。
- (8) 呪文の準備: すべての呪文のチャージは、戦闘開始時に 200% から始まります。
- (9) スズメバチの殻 爆破された弾幕シェルは、着弾点に宝石のワスプを生成します。
- (12) 深層学習の宝石 ジェムのダメージを増加させるために必要なヒット カウントが大幅に減少します。
実績一覧
以下は、実績パネルでの位置によって並べ替えられた宝石コードを含む実績のリストと、それらを取得する方法に関する簡単なコメントです。 GC2:CS とは異なり、アチーブメントを取得するために実際にレベルを獲得する必要はないことに注意してください。これにより、持久力モードでの実績の多くがより簡単になります (基準を満たし、持久力を終了して戦闘から逃げる)。
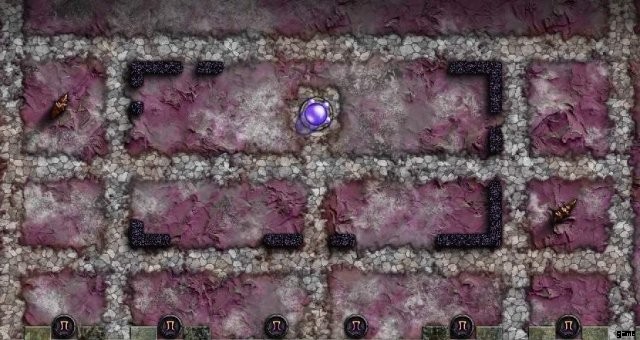
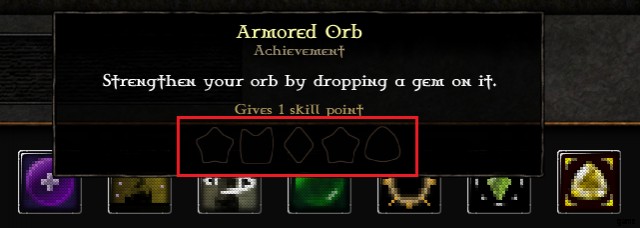
行:1 列:9 推奨 WL:1
アーマーオーブ
- 宝石をドロップしてオーブを強化します。
- オーブにジェム ボムをドロップするだけです。
行:2 列:6 推奨 WL:1
錯乱
- ジェムの射程距離を縮めます。
- マウス ホイールを使用して、タワー内のジェムの範囲を狭めます。
行:3 列:2 推奨 WL:25
乾いた水たまり
- マナのかけらからすべてのマナを収穫する。
- フィールド U3 に 900 mp のマナ シャードがあります。
行:3 列:9 推奨 WL:25
ダブルストライク
- 同じ祠を2回起動する
- フィールド U3 に祠があります。ウェーブ 20 まで生き残ると、2 つのチャージの準備が整います。最初の 20 ウェーブを一度にコールし、神社を発射して実行することもできます。
行:4 列:10 推奨 WL:1
植え込み!
- 低木の壁を配置します。
- 「Build Wall」スペル アイコンを複数回クリックして、使用可能な壁の種類を順番に切り替えます。
行:5 列:2 推奨 WL:1
完全点灯
- 3 つの戦闘モードすべてでフィールドを打ち負かす
- エンデュランス バトルに勝るものはありません。エンデュランス モードを有効にするために必要なのはゼロ以外の XP だけです。また、トライアル モードは必ずしも難しいものではありません。ぜひお試しください!
行:6 列:5 推奨 WL:50
つまずく
- 同じモンスターにトラップを 100 回当てる
- これは、トラップのみを構築できる P5J の完了中に実行できます。トラップの上でジャイアントをフリーズさせ、そのジャイアントを選択して、トラップが発砲し続けるようにします。途中でトラップを構築して、宝石を巨人にフォローアップさせます。巨人を倒すのが早すぎる場合は、グレードの低い宝石に切り替えてください。
行:7 列:5 推奨 WL:60
ジャグラー
- デモリションを 7 回使用する
- 解体は20ウェーブごとに与えられるため、X1JやL1Jなど、41ウェーブ以上のフィールドに入る必要があります。これは、持久力モードで一度に 41 波を送信する (持久力の長さが十分であると仮定)、解体スキルを 10+ に増やす (取得済みであると仮定)、または両方の組み合わせによっても実行できます。
行:9 列:1 推奨 WL:20
研ぎ澄まされた
- トラップで宝石を強化する
- 最初の強化呪文 (ボルト) は、フィールド Q1J から取得できます。
行:9 列:6 推奨 WL:1
ひかる
- 戦闘の早い段階ですべてのウェーブを呼び出します。
- W1J の早い段階ですべてのウェーブをコールするだけです。クラッシュしそうになったら、各ウェーブストーンをクリックします。最初のウェーブも早めにコールすることを忘れないでください。
行:9 列:9 推奨 WL:100
ダブルシャード
- 同じモンスターに氷のかけらを 2 つキャストする。
- 氷の欠片はH4から入手できます。その後、実際に氷のかけらを 2 つキャストしても問題ありません。
v. 1.0.15 より前では、実際の要件は同じモンスターに 2 つのフリーズをキャストすることです。その後、バグが修正されたかどうかは不明です。
行:9 列:11 推奨 WL:40
キラキラ雲
- ジェムボムで亡霊を倒す
- 幻影は、それが最初に紹介された第 1 四半期 J に登場するようにスクリプト化されています。ジェム ボムで直接倒すには、低 WL で大量の mp が必要になるため、トドメを刺す前にまずタワーを使用して HP を削りましょう。
行:9 列:15 推奨 WL:30
エッグノッグ
- 時間が止まっている間にモンスターの卵を割って開ける
- モンスターの卵は R3J にあります。
行:10 列:10 推奨 WL:100
バイバイ恐ろしい
- 尖塔を倒す
- 尖塔は、最初に導入された E2J に登場するようにスクリプト化されています。
行:11 列:10 推奨 WL:30
それほど速くない
- 亡霊を凍らせる
- スペクターは、それが最初に導入された Y4J に登場するようにスクリプト化されています。フリーズは Y3 から入手できます。
行:12 列:10 推奨 WL:50
複数行
- 少なくとも 5 つの異なるタリスマン プロパティを持っている。
- 生のフラグメントに固有のプロパティが十分にない場合は、フラグメントをアップグレードします。このゲームでは、低い WL で内側のフラグメントをドロップする変化が大きいため、この実績のためにエッジ スロットのロックを解除する必要はありません。
行:13 列:4 推奨 WL:50
また来る
- 追放されたモンスターを 190 体倒す
- これは、P5J の完了中に行うことができます。ここでは、スウォームリングが無傷でトラップを乗り越える可能性があります。追放されたモンスターが十分でない場合は、一時的に宝石を取り除き、いくつかの群れを通過させますが、常に mp に注意してください。
行:13 列:8 推奨 WL:20
ヴァンテージポイントダウン
- パイロンを破壊する
- パイロン スキルを取得していない場合、Q3J でパイロンを見つけることができます。
行:13 列:15 推奨 WL:40
弟子
- Have 10 fields lit in Trial mode.
- Different trial modes are very different in difficulty; the first few trial modes are not necessarily the easiest ones.
Row:14 Column:15 Recommended WL:90
Ages Old Memories
- Unlock a wizard tower.
- The only wizard tower is located in L5J. Acquire all the necessary spells before entering.
Row:15 Column:14 Recommended WL:100
What Are You Waiting For?
- Have all spells charged to 200%.
- The last strike spell (ice shards) can be obtained from H4. After that, actually charging to 200% should not be a problem.
Row:16 Column:5 Recommended WL:100
Blue Wand
- Reach wizard level 100.
- Endurance modes can be used to boost WLs, as well as some trial modes with special mechanisms (try sending all waves at once in X2T).
Row:16 Column:11 Recommended WL:50
Connecting the Dots
- Have 50 fields lit in Journey mode.
- Try to beat journey mode fields with fewer total waves first as the number of total waves is a good indication of how hard the field is. Also look for fields with crit hit gems as they make life much easier.
Row:17 Column:2 Recommended WL:120
Black Blood
- Deal 5.000 poison damage to a shadow.
- A shadow is scripted to appear in G3J, where it is first introduced. Put some skill points into the poison skill before entering. Build a tower next to the shadow, freeze the shadow and use beam on a poison gem (grade 5 or 6) to quickly stack poison damage. If one charge of beam is not enough use the next charge immediately. Be sure to remove other gems in the vicinity and avoid killing the shadow too early.
Row:18 Column:6 Recommended WL:200
Round Cut
- Create a grade 12 gem.
- The problem for this achievement is how to survive long enough to gather the required mana for a grade 12 gem. One way is to survive long enough in endurance mode (around wave 100-120). Another way would be beat all waves in A4J then kill the swarmlings before killing the gatekeeper. Mana stream and Fusion skills are important in lowering gem costs.
Row:18 Column:12 Recommended WL:60
By Three They Go
- Have 3 of your gems destroyed or stolen.
- A wizard hunter is scripted to appear in L4J, where it is first introduced. Keep inserting grade 1 gems into the buildings the wizard hunter is going to destroy (a mark will appear on top of the building indicating it is under fire). Specters are not good for this achievement as they only come infrequently. Shadows and watchtowers are not good either as they do other things most of the time rather than aiming at the buildings.
Row:18 Column:14 Recommended WL:60
Mana Trader
- Salvage 8.000 mana from gems.
- Simply destroy the gems after the last monsters are killed and before the outcome panel is up. Also, K3T is a good place offering high-grade gems that can be salvaged.
Row:19 Column:9 Recommended WL:40
Come Out, Come Out
- Lure 100 swarmlings out of a sleeping hive.
- A sleeping hive can be found in Y1. In endurance mode, kill as many swarmlings as the gems can handle. After that, keep firing at the hive until there are 100 swarmlings lured, then run. A more efficient method would be to get the beam spell first and beam the hive.
Row:20 Column:9 Recommended WL:70
Century Egg
- Reach 100 monster eggs cracked through all the battles.
- Monster eggs can be found in large quantities in K4J. Use gem bombs to crack them open. Naturally hatched eggs do not count toward the achievement.
Row:20 Column:10 Recommended WL:150
Forged in Battle
- Reach 200 battles won.
- This can be earned naturally during the journey. However, W1J is a good choice to boost the victory count if need be.
Row:21 Column:10 Recommended WL:120
Your Mana is Mine
- Leech 10.000 mana with gems.
- Mana leeching gems with tower beams generate a ridiculously large amount of mana. Use beam often.
Row:23 Column:3 Recommended WL:100
Early Bird
- Reach 500 waves started early through all the battles.
- This can be earned naturally during the journey. However, X2T as well as all endurance fields can boost the early wave count if need be.
Row:23 Column:9 Recommended WL:80
Is Anyone in There?
- Break a tomb open.
- Tombs can be found as early as J3J. This tomb has only 2000 hp and is not hard to destroy.
Row:25 Column:11 Recommended WL:150
Can’t Stop
- Reach a kill chain of 900.
- Make sure that the gems have something to fire at all the time so the kill chain keeps increasing. Towers can be moved towards the entrance so that giants take less time to walk into the gem’s range. Overcrowd and swarmling parasite traits can also keep the tower busy. There’s also a talisman fragment property that slows the kill chain cooldown.
Row:32 Column:12 Recommended WL:200
Feels Like Endurance
- Beat 120 waves.
- Wave 120 can only be seen in endurance modes. Use critical gems to keep up with the dps requirements and set up the skill point distributions accordingly. Set overcrowd trait to max and swarmling parasite to 1 as they help you gain extra mp from monsters without increasing the difficulty of the monsters. Then pray that tougher creatures (specter, wraith or shadow) does not come and interfere above wave 100.
Row:35 Column:1 Recommended WL:120
Out of Nowhere
- Kill a whited out possessed monster with bolt.
- Possessed monster (with three markings on the wavestone) can be found in E4J summoned by the Forgotten. Put the tower far enough from the monster so only bolt range covers the monster. Cast whiteout, cast freeze if needed, and select the monster to make it the highest priority. Shadows can also possess monsters but is less predictable.
Row:41 Column:11 Recommended WL:200
Purist
- Beat 120 waves and don’t use any strike or gem enhancement spells
- Hardest achievement on the list. In addition to all the measures taken to see wave 120, make sure all skill points are removed from strike and enhancement skills (these are banned anyway) and put it into somewhere else. Use a tape to seal off the 1-6 buttons on the keyboard if necessary.
How to Use the Codes
Within the credits of the game we find a mysterious figure at the bottom:three overlapping rectangles, each containing five dots, and starts and ends with a grade 1 gem shape.
The rectangles are obviously a reference to the 5-gem-long gem codes, and the diagram indicates that three pieces of gem codes should be stitched together, where the stitched part must match in different pieces, forming a 11-gem-long sequence starting and ending with grade 1.
For example, suppose we obtained 3 sequences reading 5-4-3-2-1, 7-9-6-5-4, 1-3-5-7-9. Then the stitched code should read 1-3-5-7-9-6-5-4-3-2-1, according to the diagram.
There are 36 pieces of codes total, and can be assembled into 12 11-gem-long codes, each code corresponding to one mod.
After the codes are figured out, it can be entered at the bottom border of the world map (visible after beating E4J). If the codes are entered correctly, a message will pop up, indicating that the mod has been unlocked and can be controlled from the top border of the world map.
Achievements Grouped by Mods
The following list gives the achievements required for unlocking the corresponding mods. Requirements of these achievements can be found in the previous sections or by looking up the name in the achievement list in Steam.
<オール>Note that Glitter cloud and Multiline are carrying the same gem code; it is not known if it is intentional or simply a bug.
List of Codes
A list of complete codes are listed below if anyone has made up their mind to skip the puzzle-solving steps altogether.
<オール>This is a very powerful mod that may boost the damage of gems by 30-40% and normally can only be obtained after a demonstration of outstanding gemcrafting skills. If you truly made up your mind to obtain this mod early then the code can be found below.