Unity of Command II – The Power of Supply
アマチュアは戦略を語る。プロが語るロジスティクス。それは古くて少し使い古された言葉ですが、それでも真実です。銃には弾薬、戦車には燃料、兵士には食料が必要です。このガイドでは、ユニットの供給を維持する方法について説明します。
はじめに
アマチュアは戦略を語る。プロが語るロジスティクス。 OK、ここではあまり独創的ではありませんが、古くて少し使い古された言い回しですが、それでも真実です.銃には弾薬、戦車には燃料、兵士には食料が必要です。ユニットが補給されていない場合、ユニットは弱くなり、防御も逃げることもできないため、敵に簡単に狙われます。
ゲームでの操作方法は次のとおりです。あなたのユニットは、各ターンの開始時に 1 回補給を受け取りますが、補給ヘクス位置にいる場合に限ります。そうでない場合、それらはターンの補給切れと見なされ、悪影響が発生し始めます。どのヘクスが補給され、どのヘクスが補給されないかについては、後で補給ネットワークがどのように機能するかを説明するときに詳しく説明しますが、最初に、いくつかの基本から始めましょう。
供給元
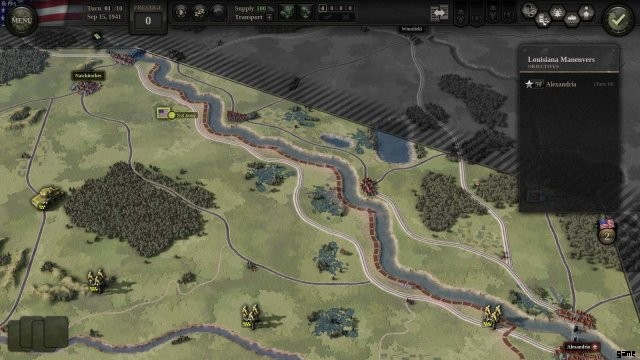
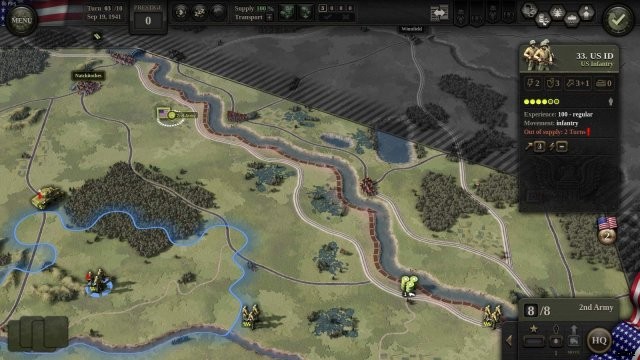
それでは、私たちが知っていることから始めましょう。画面 1 では、1941 年のルイジアナ作戦中に、3 つのアメリカ歩兵ユニットと 1 つのアメリカ機甲ユニットが見えます。ユニットはアレクサンドリア (右下) で目的を達成しようとしていますが、この説明の目的のために、次の数ターンの間、それらを所定の位置にとどめます。
ユニットは毎ターン補給する必要があります。さもなければユニットは弱くなり、効果がなくなります。彼らはターンの開始時に補給を受け取りますが、補給されたヘクス(場所)にいる場合に限ります。画面 #2 (下) で、補給ビュー ボタン (ホットキー V) を押して、どのヘクスに補給があり、どのヘクスが補給されていないかを確認します。
供給は供給源 (左上) から発生し、制限なくレールに沿って広がります。レール ライン自体のヘクスが供給されていることがわかります (バレル アイコン)。ただし、遠く離れた場所では、レール ラインに沿った狭いストリップのみが提供されます (水平バー アイコン)。マップ上の他のすべてのヘクスは補給されていません (赤い点)。
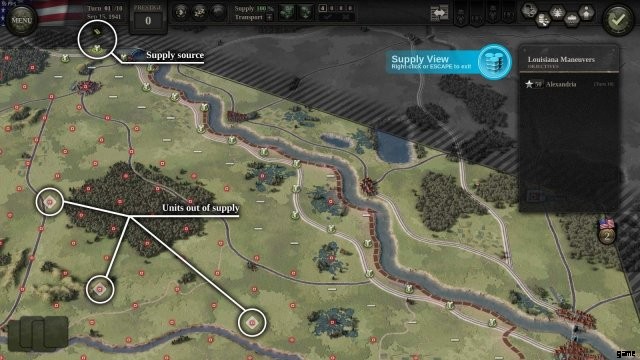
補給ビューは、ユニットのうち 3 つ (赤い点のあるひし形) が補給切れであることも示しています:装甲ユニット、および左側と中央の歩兵ユニットです。右側の歩兵ユニットは補給下のレールヘクス上にあるため、補給下にあります。 End Turn を押した後、画面 #3 はターン 2 で何が起こるかを示しています:3 つのユニットに赤い補給切れマーカー (感嘆符アイコン) が表示されます。
サプライ ハブ
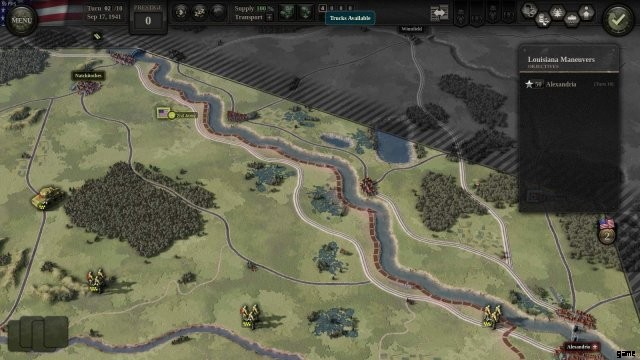
よし、今度は供給ハブを作成して、線路の周りの狭いストリップの外に供給を押し出す.画面 4 で、Create New Hub ボタン (トラックと矢印) を押して、配置できる場所を確認します。強調表示された場所のほとんどが線路自体 (白/青のバレル) にあることがわかります。これらのオンレールの場所に焦点を当てましょう。他の場所については後で言及することを忘れないでください。
アレクサンドリアの目的地の近くに補給ハブを配置することにしたので、オレンジ色の矢印が指している場所をクリックします。
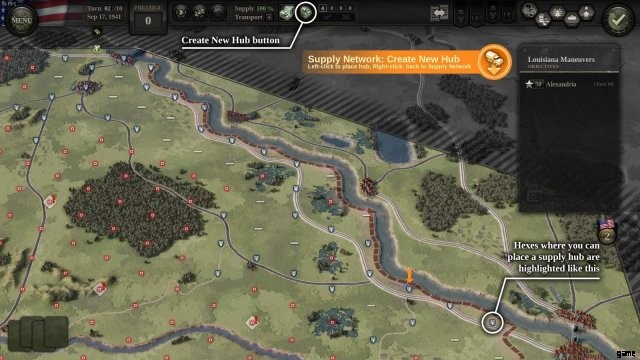
新しいハブを作成しました。すぐに (画面 #5 で) ハブが提供するエリアを確認できます。このハブの補給範囲は 5 MP (移動ポイント) または 1 トラックです。ユニティ オブ コマンド II では、射程は通常トラックを使用して省略形で示されます。1、2、3、4、または 5 台のトラックは、それぞれ 5、8、10、11、または 12 MP を意味します。
このハブによって供給されるエリアは、ハブの 5 MP を使用してトレースされます。5 から開始し、移動表の供給列のコスト値を使用して 1 までカウントダウンします。たとえば、沼地へクスに入るには 3 MP かかりますが、平坦な地形では 1MP しかかかりません。
私の中央歩兵ユニットがこのビューに表示されなくなったことに注目してください。これは、新しいハブがそれを供給できるためです!残りの 2 つはまだ供給されていませんが、後で対処します。 Enter キーを押して (重要!) ハブの配置を受け入れ、すぐに End Turn を押して次に何が起こるかを確認します。

補給切れのユニット
ターン 3 になり、私の装甲歩兵ユニットと左端の歩兵ユニットは 2 ターンの間補給切れになりました (画面 #6)。 On the first turn a unit is out of supply, the only effect is that it doesn’t recover from suppression like it normally would. On the second turn, two of its steps become suppressed and the unit loses its AP (action point), meaning it cannot attack.
It gets worse from there:a unit on its third turn out of supply becomes fully suppressed, it doesn’t receive full MPs for the turn (meaning it cannot cross rivers) and it doesn’t even capture territory when it moves. Additionally, on all following turns the unit will lose steps and specialists as stragglers. I would like to avoid this happening to my units, so let’s see what can be done.
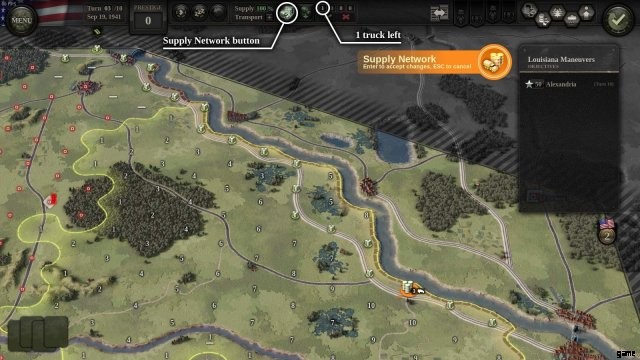
To supply my leftmost infantry unit, I will extend the range of the new supply hub by adding two more trucks. I press the Supply Network button (truck and barrels), select the supply hub, and use the mouse wheel to add trucks. I then hit ENTER to accept. You can see the result in screen #7:the leftmost infantry unit is now in-supply. Success!
So far so good, yeah? The snag is, we only have 1 truck left. Trucks are a limited resource, just like everything else in war. The game shows us how many we have available to use right now (1, highlighted) and how many are incoming on the next three turns (0, 0, and 0). I will use my last remaining truck on the next turn, so for now let’s just press End Turn and see what happens.
Supply over Roads
Unity of Command II treats roads separately from rail. Both roads and rail allow for quick passage through rough terrain:notice how, when using the road, we’re able to trace through forest hexes for just 1 MP in screen #7.
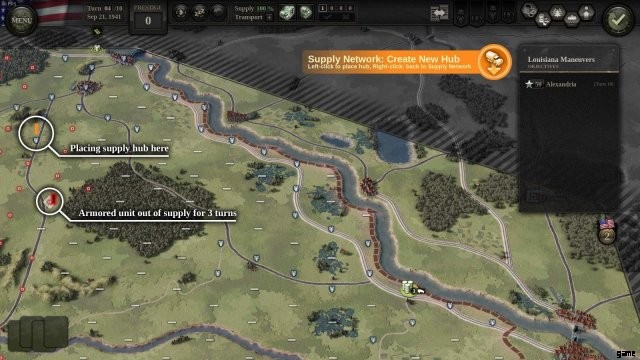
The roads however, don’t allow supply to spread without restriction like rail does. What you get instead is this:you are allowed to place a supply hub on any road hex within 5 MPs from rail (supplied rail).
This is how I’ll supply my armored unit, which is 3 turns out and sorely in need of supplies. I press Create New Hub again to see (screen #8) that I can place a supply hub on a road pretty close to the unit. I place the hub, and confirm with ENTER. There!
I could go on but I think you may be getting the point by now. My final supply situation is shown in screen #9 below. Between the 3-truck hub near Alexandria, and the new 1-truck road hub, my entire area of operations is neatly supplied.
Teasers
This post has grown long enough, but I hope it was a good read. I will leave you with some teasers:
- Supply Disruption: notice how some of the in-supply bars in screen #9 have a little red in them? Placing a supply hub on road (as opposed to rail) introduces some uncertainty as to whether your unit will actually receive supply when the turn starts. Other things introduce disruption too:mud, snow, ruined cities, stragglers, etc.

- Emergency Supply: if your units are out of supply, their HQ might be able to re-supply them. HQ supply is usually a bit more robust, so re-supplying units is possible, but it costs the HQ some of its CPs (command points). There are tradeoffs to be had.
- Capturing Enemy Supply Hubs: when you capture an enemy supply hub, all friendly units within 1-truck distance become instantly supplied. This can be pretty useful for a supply starved force.
- Removing Trucks: not shown in this explainer, but you can remove trucks from supply hubs too. When you do so, they become available on the following turn.