クリッカー ヒーローズ 2 – 完全なウィザード ガイド

このガイドは、魔法使いのニーズをすべてカバーしています。
ウィザードのガイド
はじめに
これを書いている現在、私は星系 14 を急いでいますが、まだ超越しておらず、アセンションを数回しか行っていないか、まったく行っていないと仮定して、ウィザードを始めた人にいくつかのヒントを与えることができると思いました.ただし、ベテラン プレイヤーにとっても役立ついくつかの戦略も含まれます。
始める前に:間違ったノードを選択したり、新しいウィザードを開始する必要があると考えたりする心配はありません。ウィザードはその点でシドよりもはるかに寛容であり、技術的には間違った要素がないため、失敗することはありません (本当にやりたいことを除いて)。アセンションごとに「間違い」を簡単に修正できます。しかし、それについては後で詳しく説明します。
ウィザード vs シド
ほとんどの人はおそらく以前にシドをプレイしたことがあり、ウィザードがどのように異なるのか疑問に思っています.彼らが共有する唯一のことは、機器を購入し、アップグレードし、ショップからアイテムを入手できることです.また、両方ともレベル グラフを持っており、各レベルの後にポイントを使って何かを学ぶことができます。
世界と星系を横断するコア ゲームプレイを除いて、他のすべてはかなり異なっています。ウィザードの場合、各スター システムには 50 のワールドがあり、シドには 30 のワールドがあります。
Cid は Automator を使用します。これは、レベル グラフを通じて学習および強化する必要があります。ウィザードには、実行したすべての入力を記録し、好みに合わせて再生する Runecorder があります。ルーンコーダーについては後で詳しく説明します。
全体として、ウィザードのアップグレードに費やす時間はほとんどないか、ほとんどありません (初期のゲームを除く)。彼のゴールドのほとんどは変換 (録音の再生中に有効になるパッシブ効果) によってダメージに変換されます。ダメージを増やすには新しい機器を購入する必要がありますが、それも自動化する必要があります。
ウィザードと彼の呪文は最初は威圧的かもしれませんが、ウィザードの機能のほとんどを説明して、できるだけ簡単に開始できるようにします.特定のトピックに興味がある場合は、右側のナビゲーションを使用してください。
略語
私の生活を少し楽にし、より理解しやすくするために、ここでは略語を使用し、最も一般的な用語について説明します。
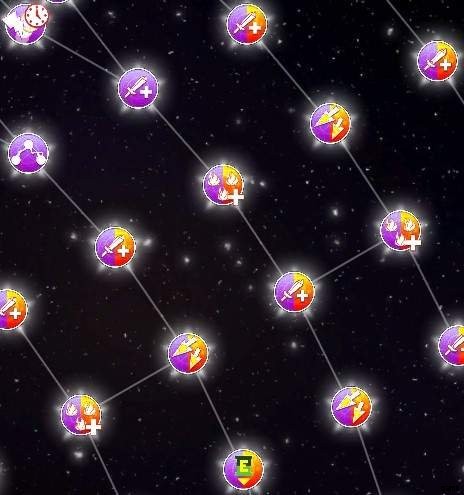
- ノード:レベル グラフでポイントを消費できるもの。例:ライトニング:魔法ランク 1。
- Combining-Node:習得すると 2 つの要素に利益をもたらすノードです。
- F、L &I:火、雷、氷。私は最初の文字を使用して、主に後でビルドを説明します。
- Tier 1-9:各エレメントにはメイン スペルのランク/ティアがあり、通常はそれを Tier と呼びます。したがって、最初のライトニング スペルは L1、ファイア ランク 3 は F3 などになります。
- 記録:キャストしてルーンコーダーに保存したルーン
- グループ録音:複数の録音を組み合わせて新しい録音を作成します。詳細については、以下の Runecorder を参照してください。
- セット:複数の録音/グループ録音のコレクションで、常に 3 つのセットが利用可能です。
- 1x:ローテーションの例を示すときはいつでも、たとえば 1x エネルゴン キューブを使用します。これは、繰り返しを 0 に保つ必要があることを意味します。これを混同する人もいるかもしれないので、これを明確にしたいと思います。
レベルグラフ
概要
ウィザードには、稲妻、火、氷の 3 つの要素があります。ここで見られるように、各要素はレベル グラフ上で方向を持っています:
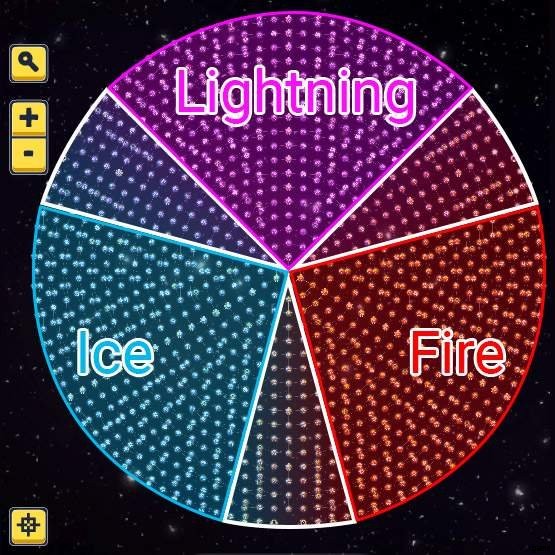
最初の中央には 4 つの基本的なノードがあり、一度だけロックを解除する必要があります。
- ルーンコーダー:ウィザードの自動化ツール。詳細は後述。
- カット アンド ペースト:呪文を記録し、必要に応じてほぼ瞬時に再度唱えることができます。欠点は、カットできる呪文は 1 つだけで、貼り付けるたびに 5 マナかかることです。しかし、ロング キャスティング スペルには確かに便利です。
- エネルゴン キューブ:呪文を使用すると、いわゆる疲労スタックが生成され、エネルギー消費が増加します。それに対抗するために、エネルゴンキューブが存在します。これは 18 秒間持続するバフで、2.5% のエネルギーを回復し、20% の確率で 3 秒ごとに疲労がスタックします。このバフは積み重ねることができ、回復されるエネルギーを増やし、疲労の積み重ねを取り除くチャンスを増やします。ウィザードにとって非常に重要なバフです。
- 闇の儀式:60 秒間、すべての DPS を 1.05 倍にし、最大 20 (合計 2.64 倍) までスタックできます。これは素晴らしいダメージ ブーストですが、1 分間のローテーションについていくのは非常に面倒で、毎回 10 マナもかかります。
- 交換:そのためのノードはありませんが、ニュートラル ノードをすべて取得すると、自動的に学習します。交換は、エネルギーもマナも消費しない呪文で、ランダムなカタログ アイテムを購入できます。
結合ノード
要素間の白い領域は結合ノードであり、接続している両方の要素の効果/統計をブーストします:
- 色は 1 色ではなく 2 色なので、簡単に見分けることができます。結合ノードは次の 2 つの目的を満たします:
- 1 つの価格で 2 つのノード値を取得できます。
- これまでになかった要素特性を追加できます。上のスクリーンショットでは、3 つの炎のアイコンが表示されています。これは通常、Fire エリアにあるノードです。火属性魔法の火傷ダメージが10%増加する。この結合ノードを学習すると、これがライトニング スペルにも追加されます。
ルーンコーダー
この機能は、アクティブであろうとアイドル状態であろうと、ゲームプレイを最適化するためのパンとバターです。
概要
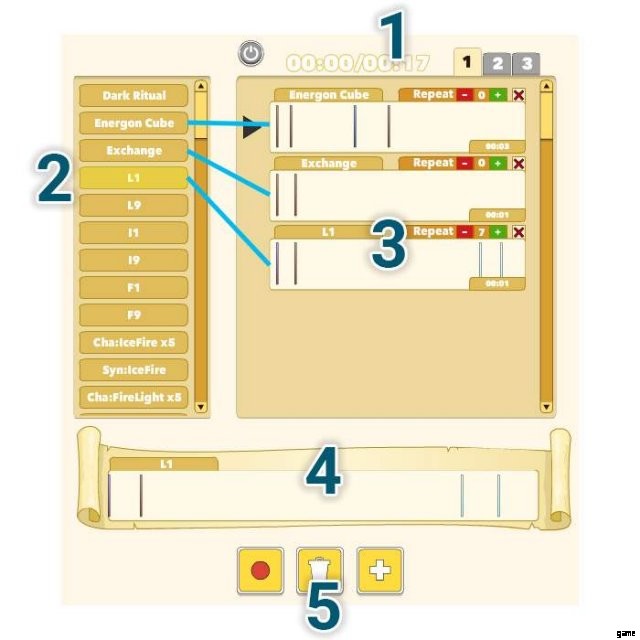
左から右へ:電源をオン/オフして Runecorder を実行し、ローテーションの現在および必要な時間、最後に切り替えることができる Runecorder セット。
各項目は記録であり、好きな名前を付けることができます。
記録をローテーションにドラッグすると、それらが互いに積み重ねられているのがわかります。それらはその順序で実行されます。次の呪文に進む前に、必要に応じて特定の呪文を数回繰り返すことができる小さな数字が表示されます。この例では、ローテーションは次のようになります:
- 1x エネルゴン キューブ> 1x エクスチェンジ> 8x ティア 1 ライトニング スペル
その後、最初から繰り返します。
新しい呪文を記録したり、作成済みの呪文を見たりすると、ここで記録の詳細を見ることができます。各ピンの色は使用したルーンを表し、水色のピンはクリック用です。はい、クリックも記録できます。ピンが右にあるほど、録音を停止するのに必要な時間が短くなり、効率的になります。上の写真では、交換のピンが左側にあり、右側に多くのスペースがあることがわかります。これは、ルーン文字を非常に速く押したためです。ただし、呪文にはまだ 1 秒のキャスト時間が必要です。そのため、ルーンを押した後は記録を停止せず、キャストが実際に完了するまで待ちます。
かなり自明ですが、ここで録音を削除、削除、または追加できます。既存の録音を再録音する場合は、それを選択して録音ボタンをもう一度押します。呪文が使用されるすべてのセットも更新されます。
録音のヒント
このゲームでは、この記録動作の一部がどのように機能するかについてはあまり説明されていません。そのため、いくつかのヒントを紹介しましょう:
- 何かを記録する前に:1 ~ 8 個のルーンを並べ替えることができます。シドが持っているスキルとは違うように見えるのでわかりませんが、これはまだホットバーです.並べ替えにより、呪文を唱えたり記録したりする際に指を骨折するリスクを最小限に抑えることができます。
- When you press record and do nothing, then after a while press a rune, the recorder will ignore any pause you did before that and places the rune at the beginning. So you don’t have to rush pressing your first button after hitting record. Pauses will only be recorded after your first press of a rune.
- Talking about pauses, the exception for the tip above is that you can start recording, do nothing and then stop recording. This will actually record the idle time, even tho you did nothing. You can use something like that as a delay between spells if you need one.
- Generally you should record every new Spell you unlock, but you can ignore tier 4-6 spells in every element. The reason is that only tier 1-3 or 7-9 trigger specific buffs or traits of their element, which makes 4-6 the least desireable spells you want to ever use.
- Recorderception:The best and most useful tip is that you can actually record rotations to a new recording. Yes it sounds confusing, but it is super simple.
- You create and start a new recording, run your rotation you want to save, stop the recording when it’s done and that’s it. This is also helpfull for getting the two clicks for the Zap-Bonus as close as possible to the casted spell. You essentially record for example any Lightning spell and then you record two single clicks as fast as you can. After that you put them together and you have a nearly perfect Lightning + 2 clicks combination. This Runecorderception is required for later on as you more likely hit the Set limit of 20 Recordings.
Elements
Each element has a basic signature:
- Ice:High critical chance and damage. Low energy cost. Good for dealing burst damage.
- Lightning:Chains towards further enemies. Medium energy cost. Good for cleaning up trash monsters.
- Fire:High damage and burn effect. High energy cost. Good for bosses with a lot health dealing constant damage through burning.
Nodes of each element
All elements have a Damage (+5% Ice/Lightning/Fire Spell damage) and Cost Reduction (-2.5% Ice/Lightning/Fire Spell cost) node. Everything else is unique to each element, except the Combining-Nodes which I mentioned above. Also does each Node stack be it time or value wise. Learning 3 “Chain (+10% chance)” Nodes will give you a bonus of +30%.
Talking about stacking, everything above 100% will get you additional tries which is often described in the Node. “Chain” for example will add more monsters to hit after every 100%.
Ice
Ice Traits:
- Crit Chance:+4% critical chance for Ice spells.
- Crit Damage:+8% critical damage for Ice spells.
General Buff (Triggered by a tier 1-3 Ice spell):
- Cool Criticals:Every element critical chance +8% for 10s.
- Chilly Cool Criticals:Additional critical chance +4%.
- Cold Cool Criticals:Additional buff duration +5s.
Ice Buff (Triggered by any Lightning or Fire spell):
- Cold Front:+10% spell damage for Ice spells for 10s.
- Frosty Cold Front:Additional +5% damage.
- Sustained Cold Front:Additonal buff duration +5s.
Special (Triggered by a tier 7-9 Ice spell):
- Shatter:+20% of Ice spell damage will be transfered to the next +3 enemies on death.
- (Learning Shatter several times will increase spell damage and number of targets, so next will be 40% damage to the next 6 enemies)
Combining-Node benefits:
- Lightning> Chain:+10% chance that Ice spells will hit an additonal monster.
- Fire> Corrosion:Monster receives +10% damage by all elements until it dies, applied when hit by any Ice spell.
Lightning
Lightning Traits:
- Zap:+5% damage and no energy cost for the next two clicks after any Lightning spell.
- Chain:+10% chance that Lightning spells will hit an additonal monster.
General Buff (Triggered by a tier 1-3 Lightning spell):
- Flash:The next +3 spells of any Element have a +10% chance to strike the same target again.
- Flashier Flash:Additonal +10% strike chance.
- Lingering Flash:Additonal duration +1 spell.
Lightning Buff (Triggered by any Ice or Fire spell):
- Thunderstorm:+10% spell damage for Lightning spells for 10s.
- Severe Thunderstorm:Additional +5% damage.
- Developing:Additonal buff duration +5s.
Special (Triggered by a tier 7-9 Lightning spell):
- Circuit:Strike the same target again with a chance by (Chain / 2)%, dealing +50% spell damage.
- (Learning Circuit several times increase the spell damage by +50%, the chance only increases with leveling Chain further)
Combining-Node benefits:
- Ice> Crit Chance:+4% critical chance for Lightning spells.
- Fire> Burn:Increase the damage over time effect (burning) by +10% for Lightning spells.
Fire
Fire Traits:
- Corrosion:Monster receives +10% damage by all elements until it dies, applied when hit by any Fire spell.
- Burn:Increase the damage over time effect (burning) by +10% for Fire spells.
General Buff (Triggered by a tier 1-3 Fire spell):
- Combustion:+20% chance that burn will be applied twice for 8s.
- Incendiary Combustion:Additonal +10% chance.
- Seething Combustion:Additonal buff duration +4s.
Fire Buff (Triggered by any Lightning or Ice spell):
- Heat Burst:+10% spell damage for Fire spells for 10s.
- Evaporating Heat Burst:Additional +5% damage.
- Persisting Heat Burst:Additonal buff duration +5s.
Special (Triggered by a tier 7-9 Fire spell):
- Explosion:+50% burn damage will be applied to the next monster after death (Learning Explosion several times increases the burn damage applied by +50%).
Combining-Node benefits:
- Ice> Crit Damage:+8% critical damage for Fire spells.
- Lightning> Zap:+5% damage and no energy cost for the next two clicks after any Fire spell.
Synergy
While learning Combining-Nodes you will notice Synergy spells or buffs which can be learned.
There are 3 types of Synergy nodes:
Synergy Buff (50 Mana, 5min cooldown)
- Combines the traits of two elements for 30s (60s when the 2nd node is learned) for each charge (5 max).
Damage Spell (100 Mana, 2min cooldown)
- A two elemental combined tier 9 spell which gets additionally +50% spell damage for each charge (5 max).
Special
- Lightning-Ice> Thundersnow (100 Mana, 10min cooldown):Strikes the same target with Ice or Lightning again with any spell cast. Affects two spells for each charge (10 max).
- Ice-Fire> Comet Shower (100 Mana, 15min cooldown):Damages the monster 3 times for each charge (10 max).
- Fire-Lightning> Solar Storm (100 Mana, 30min cooldown, Sets Energy to 0, 100 Stacks of Hyperthermia):All monsters lose 1% of their health for each charge (10 max).
Each of these need their own kind of charge, which is always noted in the spell info. To cast the Lightning-Fire Synergy Buff you need 5 of its charges. In this case is one charge a Lightning, Fire and then Lightning Spell in that order. You can shorten the charge gathering up, instead of:
- L> F> L #1
- L> F> L #2
- L> F> L #3
- L> F> L #4
- L> F> L #5
You can do:
- L> F> L #1
- F> L #2
- F> L #3
- F> L #4
- F> L #5
It only matters that they alternate between each other. Also while not being noted in the spell description, they do add additional Fatigue stacks when applied, so keep that in mind with your energy management.
Generally speaking are all Synergy damage spells wasted Mana, that includes especially the special types. The only real good stuff are the buffs, but more on that on strategies further below.
ウィップ