デッド エイジ 2 – 上級ガイド
あなたがする必要がないように、悪いゲームデザインに取り組みました。
DA2 上級ガイド
序文
ちょっと、そこ。このガイドでは、ゲームの 3 つの重要な側面である RPG (進行)、経済、戦闘について簡単に説明します。
つまり、ゲームプレイの基本を説明したり、プロットについて話したりすることはありません。このガイドは、ゲームの仕組みに関する基本的な知識があることを前提としています。そうでない場合は、このセクションにいくつかの優れたガイドと、カバーするフォーラムがあります。ゲームのチュートリアルはあちらこちらにあり、一部の情報やツールチップは完全に誤解を招くものであるため、それらに頼ることは恥ずべきことではありません.
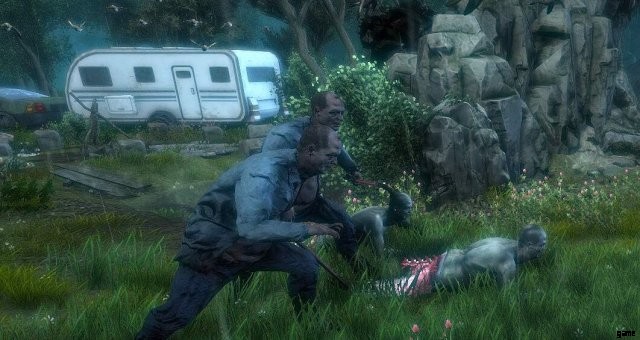
さらに、このガイドでは、ゲームの残忍で容赦のない性質について説明しています。カジュアルであっても極度の難易度、永久的な死、プレイヤーを罰してストレスを与えるだけの欠陥のあるゲーム メカニクスです。
これは、私が最適なオプションについてのみ話していることを意味し、何かが悪いと言った場合、それは代替案ほど実行可能ではないことを意味します.
I.プログレッション – 属性
キャラクターを強化する方法はいくつかあります:
- レベルアップによる統計の増加
- スキルのロック解除
- ギアの入手
現在、ステータスはレベルアップごとにランダムに増加します。これは、そのプロセスに影響を与えることができず、キャラクターが現在「なんでも屋」であることを意味します。ただし、開発者は、将来的にそれを制限的に制御できるようにすることを検討しています.
ゲームで最も重要な統計は、防御、抵抗、持久力です。防御は、ほとんどの近接/遠隔攻撃からのダメージ軽減です。耐性とは、特定のニッチな形のダメージ (火、毒など) の軽減です。持久力はあなたのHPを高めます。したがって、これらはあらゆる機会に強化したい統計です。
これは、アーマーとダメージ軽減がどのように機能するかによるものです。削減は、パーセント値ではなく、一律です。敵のダメージが 50 で、防御力が 10 の場合、40 のダメージを受けます。ただし、防御力が 50 の場合は、1 ダメージしか受けません。これは、この時点で、どのソースからもほとんどダメージを受けないため、すべての戦闘に勝つことを意味します. 「1 ダメージ」ということは開発者によって知られており、将来変更に直面する可能性がありますが、それが現在の仕組みです。
高い HP が必要な理由は自明です。このゲームでは、パーティ メンバーのいずれかが死亡すると、最初からやり直すことになります。
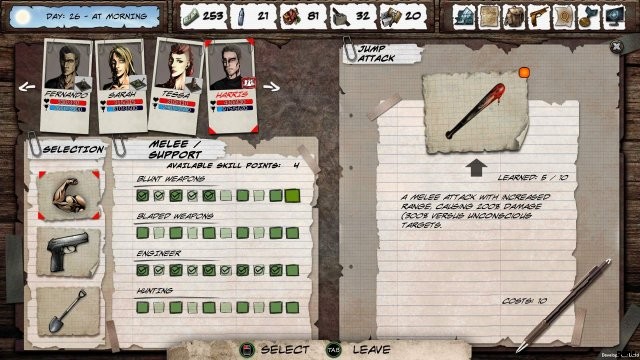
II.プログレッション – スキル
レベルごとに 10 のスキル ポイントを取得して、ピストルや生物学などのさまざまなツリーに割り当てることができます。戦闘でできることは、ブラント、ブレード、ピストル、ショットガン、ライフル、エンジニアリング、ハンティングによって異なります。他の木は、クラフト、リソースの収集、またはさまざまなゲームの出会いに取り組むのに役立ちます.
すべてのスキルの各レベルは、前のレベルよりも徐々に高くなります。レベルは 10 あるので、選択したブランチを最大にするには 55 ポイントが必要です。キャラクター レベル 10 以降、レベルアップに必要な xp 要件が大幅に増加するため、取得できるポイントの量がかなり制限されることに注意してください。参考までに、レベル 12 では、スキルを含めて合計 162 ポイントをスキルに投資していました。
これにより、どこにポイントを投資し、どこに投資しないかという問題が生じます。
一般に、すべての「武器」スキルは 1 ポイント (基本攻撃) 以上を投資する価値はありません。ただし、6 ポイントを投資してレベル 3 防御スキルをアンロックすると、戦闘での耐久性を高めることができるブラントとブレイドは例外です。
これは、最初のゲームとは異なり、武器のレベリングは現在、関連する属性ではなく、新しいスキルのみを付与するためです。したがって、スキル以外に武器をレベルアップするインセンティブはありません。そして、それらのスキルはほとんどの場合、価値がありません。状況に応じたものもあれば、完全に無駄なものもあります。
これがどのように機能するかを理解するための基本的な比較。基本的なピストル攻撃は、1 AP に対して 100% のダメージ x 1 です。ロックを解除するために必要なのは、1 ポイントの投資だけです。
ピストルのアルティメット スキルはアドレナリン ラッシュと呼ばれ、敵が特定のデバフの影響を受けている場合、3x 100% のダメージが 110% になります。ブラント、ショットガンなど、ほとんどすべての「究極」のスキルはそのように機能します。
AP 1 に対して 100% のダメージを 3 回与えることは、1 回 100% のダメージを 3 回与えることと同じですが、AP が 3 の場合とは文字通り同じです。デバフからのボーナスは価値がありません。デバフの適用は保証されていません。また、デバフを適用する代わりに、キャラクターがダメージを与えるだけである可能性があるため、結局多くを得ることができません.
したがって、ほとんどの場合、使用する予定の武器に 1 ポイントを投入するだけで十分です。
代わりに投資することをお勧めするスキルは、エンジニアリングか、それほどではありませんがハンティングです。
狩りをすると、早い段階で犬が得られ、後で虎が得られます。彼らは少しダメージを与えますが、ほとんどの場合、パーティーがスクイーズしている間はタンクになります。虎と犬は同時に召喚可能。 1回の戦闘で1回しか召喚できないので、無くなったら終わりです。ハンティング ツリーは、それ以外の点では目立たず、厳密に範囲を絞った構成には多少適しています。
さて、エンジニアリングツリーは本物です。ゲーム全体を通してメッキされた敵に対して頼りになるモロトフを提供します(バースト付きのショットガンのような他のブランチもアーマーを剥ぎ取ることができますが、ショットガンツリーにそこまで投資する価値はありません).
その後、エンジニアリングは小型タレットと、最大化された大型タレットを提供します。これらは特に優れています:
- 適切な DP を提供し、大型タレットは敵とその後ろの 1 体の両方にダメージを与えることができます
- 実際に発射するのではなく、召喚するためだけに弾薬を消費するため、弾薬に関しては非常に経済的です
- 後列に配置して、チームに追加の遠隔ダメージを与えるのに適しています
- 何度でも召喚できるので、倒されても大したことはありません
他のスキルとしては、アラートネスを持つ 1 人がキャンプを警備し、ハンディを持つ 1 人がギアを作成し、生物学を持つ 1 人が庭の世話をして医療キットを作成し、サバイバルを持つ 1 人が狩猟台を管理する必要があります。
キャラクターがあらかじめ装備しているスキルを強調することをお勧めします。 For example:Fernando – alertness, Sarah – biology/handy, Lance and Isa – engineering etc.
III. Progression – Gearing up
As the game rightly tells you, gear is very important. You can get it from factions and from crafting.
To craft gear you need to build a Forge and an Outfitter. Realistically, level 2 for each is enough, spare parts for level 3 are very rare to come by in the first half of the game. Then, you need someone with maxed out Handy skill to be able to craft really good gear. For crafting itself you need Materials, Scrap and Parts.
Every bit of gear has a level – the most important characteristic, influencing how much defense you’ll get from it. At level 4 with maxed out crafting every bit of gear gives you 4 defense, which is very nice.
Then, crafting your own gear, you can choose from a list of possible mods for us (assigned randomly):
- Agressive – strength or crit.
- Ranged – perception or power.
- Tactical – resistance or block.
- Defensive – resistance or endurance.
The amound of mods depends on quality of the gear itself. You’ll mostly be crafting tier 2 gear because of parts availability. The best pick here is Tactical + Defensive, because resistance and endurance, as we learned, are among the most important stats and even chance to block is pretty good to have.
As for armors, we are only able to craft cloth armor, better ones come from the factions.
The best armors by far are those of US Army’s – they provide the highest defense values. Then, Smugglers give you some melee stats and some endurance. Independents have the lowest defense on their armor, but give a bit of crit. chance along some perception.
Right now gear is most noticeable way you can influence your progression as once you get to 20-30ish defense/resistance, enemies will virtually stop damaging you in combat. So try getting yourself some gear with high defense values ASAP.
IV. Progression – Upgrades
The game has this weird design that you’re supposed to die a lot before you’re strong enough to enjoy. If your character dies you’ll get “medals” according to the achievements you unlocked for doing whatever from killing certain enemies to finishing certain quests in a certain way.
My advice is prioritize maxing out ranged upgrades, just concentrate on it and max it out first, including the US Army light armor and standing. It’s the best armor after all, and having US Army armor is a hard requirement for one of the game’s story quests , so you’ll save yourself a lot of hassle by unlocking it.
After you maxed out ranged, I suggest you throw some points into melee to unlock the endurance bonuses, those are always good. And then some to get additional starting medkits, those will help with your early struggles.
V. Economy – Resources
This is a survival game and one of the core ideas of survival is resource management.
The most important resources are food&water, materials&scrap.
Food and water gets consumed daily depending on your camp size, so with 6 people it’s gonna be 6 food and water every day. Then, if you want to assign someone to a job, it costs 1 food and 1 water to even do that. Then, when travelling the map the water gets consumed at regular intervals. Without food and water you can’t assign people to jobs, can’t craft, get debuffs that make your characters eventually die. Therefore, always watch out for your food and water, so you don’t fall into a loop where you don’t have food and water and can’t assign people to jobs to make more.
Materials and scrap are needed to get everything in your camp done – from buildings to weapons to armor to ammo to meds. These resources are needed to advance and you’ll want to advance as soon as possible.
You can get food and water from the garden and hunting stand in the camp. You can get by without those buildings early on, but eventually with more people joining you’ll need a stable supply.
Otherwise, for scavenging you should prioritize areas with food, water, materials and scrap and always make sure to have a heathy supply of those.
In addition, you are able to simply buy it from the factions. Food and water is something everyone has, and Independents have in larger stock than the others. Meanwhile Smugglers sell materials and Army sells scrap. Make sure to check their shops regularly (every 5 days) and buy all their stock.
VI. Economy – Ammo Trade
Another important resource you should scavenge for is ammo. Reason is, every bullet costs a minimal of 1$, 2$ for armor piercing ones. And 1$ is a lot in the game’s economy.
A viable and very strong option is to go full melee (full Blunt, specifically, which I’ll explain later on), throwing your firearms in the dumpster at the same time.
This means that you sell all your starting ammo and get yourself a great starting budget to buy food, water, materials and scrap and strongly boost your early economy. This also means paying 40$ for 10 standing with the Smugglers early on is not a big deal for you.
Your initial boost will be even higher if you did as I advised and invested into ranged upgrades – with those maxed out you get 140 ammo of your choice when you start, which means 140$.
From then on, each time you get 50 bullets from a gun shop or the like, you literally got 50$ for yourself.
Another way to abuse that is to start mass producing ammo at the Smith. While pistol and shotgun ammo come in batches of 50, rifle ammo comes in batches of 150, or 100 in case of armor piecing. So you’ll be earning 150-200 dollars per craft, always having enough money to buy resources, faction standing, heavy armor and the like.
This makes the game much easier as you don’t need to even get garden early on and can focus on getting your gear crafting set up ASAP. The game beginning at day 4, by day 12 I already had level 4 gear and made combat aspect trivial.
VII. Combat – Weapons
You can deal damage through firearms, through melee and some more through engineering&hunting (mostly through summons).
For firearms, pistols are strong, good single target attacks and low ammo consumption. Rifles are the weakest because of how damage reduction works – they deal close to no damage to armored enemies and also consume ammo rapidly in the bursts of 3-6 rounds per shot. Rifles’ skills are especially weak because of that, as most of them target random enemies so will certainly often hit targets with high defense, dealing little damage. And shotguns are somewhere in between, with decent damage and some nice control skills like Burst that strips plating, or Penetrating shot. Though pistols are still most all around best option.
All firearms suffer from a fundamental weakness in that they require ammo, while their damage output is not significantly better than melee, that requires none. In a survival game where every bullets means 1$ using firearms is simply suboptimal, therefore I almost don’t use it in my games.
Talking about melee, we have only two categories here, Blunt and Blades. There are cool-looking US Army brawler girls in the game, but unfortunately for us hand to hand isn’t an option.
Blades works much like rifles – two hits with little damage, useless against armored enemies, therefore not worth to use.
Blunts though will be your go-to – a single hit will provide consistent damage output no matter who you’re fighting against.
As I mentioned earlier, turrets from Engineering are really good, boosting your overall damage, being economical about ammo consumption and taking place in your back row at the same time.
Traps and grenades are more of an utility tool than damage, so outside of molotovs you can mostly ignore them.
The only weakness to going full blunt with turrets in the back is having your team in the front row, so all of them are constantly taking damage. That’s why boosting their defense values should be your priority.
VIII. Combat – How it Works
Right now there are only two stages of combat/progression – before you have high defense values, and after that.
Before that, you take quite a lot of damage, so you need to pick your fights and have a supply of medkits on hand. Try using defense skill once in a while to limit the damage the enemies will inflict on you.
Combat itself is very simple really. You move from the back row to the front, then you have one additional AP you could use for defense. If someone has plating then one of your characters throws molotov instead of moving.
My composition is Lance and Isa, who both have a headstart at Engineering, and I pick it for my character as well, so any of them can use molotovs.
After that, you simply focus fire on a single enemy, preferably the weakest one, trying to kill one enemy at a time with your basic attacks. Nothing fancy, no combinations, no debuff, just deal that damage and kill them one by one. The sooner fight ends, the more hp you’ll have afterwards.
If you optimise your economy you’ll arrive to the point where you have good gear quickly and enemies damage won’t be much of a problem anymore.
My late game is even more powerful. I start moving to the front row and going focus, saving 1 AP for the next turn. Next turn I summon large turrets to the back row, which together provide a strong damage output. This is especially useful when there’re a lot of enemies so row piercing works, and helpful in tougher, longer fights and against bosses. Though sometimes turrets are not needed as three attacks with a bat will simply achieve more damage in the short term.
Good thing though is that turrets scale with your level, damage and hp wise, so they stay viable through the game with no further investment needed towards them.
結論
The obvious question you might have by now is “Can I play differently?”. Absolutely, all options are somewhat viable, though some are much weaker than others, which makes a difference in a harsh reality of a survival game. Using guns means you’re basically shooting dollars instead of using them to buy resources and upgrade your base.
Eventually, the devs are planning to figure out how difficult Casual should actually be, so that rifles and knives become less frustrating to use and there are more interesting options and strategies.
But as it stands right now, there’s really few optimal options.
You may have noticed I said close to nothing about using traps, grenades, firearms skills and skill combinations, debuffs and the like, as well as the adrenaline mechanic.
It’s because that’s not relevant enough to talk about it. A basic attack is all you need. It’s reliable, it’s consistent, you’ll always deal some damage with it, it will carry you through the game. Setting up some combinations to trigger minimal bonuses like “+33% strength for one round” is simply too much hassle and too meaningless to bother.
This means that combat is kinda broken right now – it is deadly early on but gets trivial once you grasp the basics, and is more like a chore you’ll constantly encounter on your travels.
If the devs change the flat damage reduction to a percentage, it will mean you’ll be pretty vulnerable even with good gear. Same time, it would make rifles and melee more viable as not all of their damage would be negated, but just a tiny portion of.
So here, an advanced guide about basic attacks with a bat and ammo trade xD