Synthetik – 基本力学ガイド

基本的な仕組みのガイド
いきなり紹介
いくつかのゲームにロードした後、最初に気づいたことがいくつかあります:
- 弾丸は遅いので、ショットガン以外のほとんどの攻撃は、わずかなスペースがあればカバーを必要とせずにかわすことができます。敵は動きを追跡しないようです。そのため、一方向に機銃掃射するだけで、ショットガン以外のタイプに対するダメージを大幅に軽減できます。
- 移動すると精度が大幅に低下します。
- リロードは慣れていませんが、それほど難しくありません。武器によっては弾薬が非常に限られています。
- 健康再生は非常に重要です。最初のロードアウトでこれを広範囲に計画することをお勧めします。
- このゲームでは、弾薬がまったく出ません。さらに、私は後になってこれに気づきましたが、同じ種類の武器であっても、他の武器よりも多くの弾薬を獲得できます。紫色の武器の多くは、これに関して特に深刻な問題を抱えています.
- ほとんどの場合、ゆっくりできます。明らかな時間制限や時間に基づくスケーリングの難しさはありません (Risk of Rain とは異なります)。最終的には恐怖という形で難易度を上げていく必要がありますが、より長いレベルか何かでおやつを食べに行かない限り、特に時間の経過とともに変化することはありません。
その場合の基本的な考え方は、物陰に隠れていないときはできるだけ動き続け (ダッシュ、ダッシュ、ダッシュ!)、射程内で射撃するときは少し静止することです。ほとんどの場合、一度に少数の敵だけ、場合によっては 1 人か 2 人だけに直面するように手配できます。ヘッドハンターがあなたを追ってきて、退却するスペースがない場合は、より積極的になる必要があります。その場合、敵がすべてあなたを撃つことができないように、敵をまとめて、便利に撃つことができるようにしてください.多くのクラスには、そのような状況でも使用できる群集制御があります。それ以外 (そして、走って銃を撃たなければならない最初のボスの可能性の 1 つの場合) は、慎重かつ系統的に進み、カーソルをキャラクターのはるか前方に置いて先を見据え、何に関する情報をできるだけ多く得るかを調べます。可能な限り足を踏み入れることで、生存と戦利品獲得の両方の可能性が高まります。
忘れがちなコントロールや、完全に見落としがちなコントロールがいくつかあります:
- TAB:ミニマップを表示します。ミニマップは、行ったことがある場所と行っていない場所を示すのに最適です。これは、すべてのチェストとボルトを取得するために重要です。
- CTRL:マガジンが排出され、別の弾薬タイプがある場合に限り、アクティブな弾薬タイプを入れ替えます。
- L:現在の武器をドロップします。通常、これは行わず、「F」のみを使用して武器を交換します。
さらに、左矢印キーと右矢印キーは、オプションがある神社でオプションを切り替えることができます (また、選択肢を提供するテレポーターでも、少なくとも私はそれを理解することができました)。これは非常に重要で、私は最初の 10 時間のプレイでそれを見逃していました。はい、RMB にバインドされているアイテム以外のアイテムをアップグレードできます。
使用可能なアイテムを右マウスでドラッグ アンド ドロップすると、アイテムを並べ替えたり、リサイクルしたり、地面にドロップしたりできます。後者は奇妙で直感的ではありませんが、後で出くわす可能性のある明らかな状況では役に立ちます;)
ガイドの内容を説明する前に、最後に 1 つ簡単な注意事項があります。私はこのゲームがあまり得意ではないので、さまざまな意味で「初心者向けガイド」です。
ゲームプレイの仕組み
リロード中
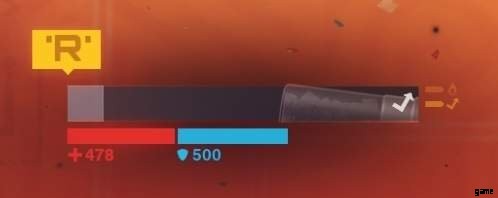
リロードしたいときは、まずクリップを「排出」する必要があります。クリップがイジェクトされると、「再ロード」が可能になります。完全なクリップを取り出しても弾薬は無駄になりませんが、部分的なクリップを取り出すと (1 ラウンドしかなくても)、そのクリップの残りの弾薬がすべて失われます。弾薬管理は非常に重要なゲーム メカニクスです。難易度設定でリロードをより自動化することは可能ですが、このリロード方法はゲームの中核であるため、お勧めしません。さらに、慣れると、このデフォルトのリロード方法ははるかに高速に実行できます。
これに加えて、リロード速度をさらに向上させることができる 3 つ目のオプションのキープレスがあります。リロード バーが完全に完了するのを待つのではなく、適切なタイミングで「アクティブ リロード」を実行できます。
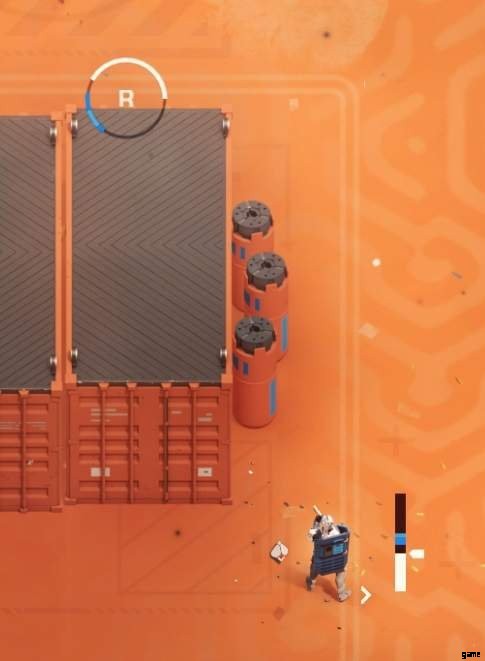
リロードを開始すると、カーソルに円形のプログレス バーが表示され、キャラクターの横にまっすぐなプログレス バーが表示されます。このプログレス バーの青い部分で「R」eload キーを押すと、アクティブ リロードが実行され、すぐにリロード プロセスが完了し、ダメージと発砲率にわずかなボーナスが与えられるだけでなく、次のクリップで生成される熱が減少します。
ヘイスト難易度モディファイアを有効にすると、常にアクティブ リロード ウィンドウの終わり近くにプログレス バーの水色のセクションがあり、そのセクションでリロードを完了すると「パーフェクト アクティブ リロード」が実行され、アクティブ リロード ボーナスが大幅に増加します。次のクリップのために。パーフェクト アクティブ リロードではないレイト アクティブ リロードを取得するのは非常に難しいため、パーフェクトを狙う場合はかなり遅い時間に狙う方が安全です。
ヘイスト難易度モディファイアが有効になっていない場合、特定の武器のクリップをリロードするたびに、アクティブ リロード ウィンドウは同じサイズで同じタイミングになります。一部の武器は、他の武器よりもアクティブ リロードがはるかに寛大です。
デフォルトでは、SPACE は Eject アクションと Reload アクションの両方にもバインドされています。これにより、移動中や照準中のリロードが容易になります。もちろん、このバインドはオプション メニューで変更できます。
ジャミング
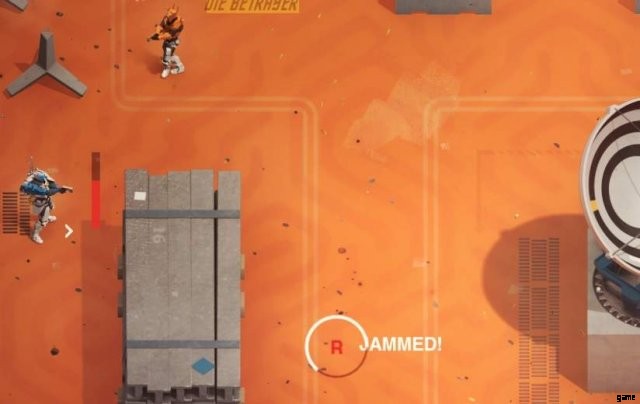
ときどき武器が動かなくなります。これが発生すると、弾薬を失うのではなく、無料でクリップを組み合わせているように見えます.各ジャムをクリアするには、リロード キーを約 5 ~ 6 回押す必要があり、再び完全なクリップが得られます。これはクリップの途中で発生する可能性があるため、効率的にクリアするにはある程度の注意が必要です。タイムリーにそうしないと、いくつかの…厄介な状況が発生する可能性があります.左側の画像を消去するには、さらに 2 回キーを押す必要があります。
ヘッドショット
ヘッドショットを獲得するには、ヒューマノイド ターゲットの頭を攻撃する必要があります (予想どおり)。ほとんどのシューティングゲームと同様に、自分がターゲットより上にいない場合は、頭の少し上を狙うと役立ちます.ヘッドショットは 200% のダメージを与えます (クリティカル ヒットよりわずかに大きい)。特に序盤のゲームでは、ヘッドショットによってダメージが大幅に増加し、火力の弱さを補ったり、1 つか 2 つのショットで敵を倒したりできます。
ヘッド ショットを取得するためにターゲットの頭を狙う必要はありません。モデルのその部分に接続するショットはすべて機能します。このため、ヒューマノイドの敵に直面していて、上または下から交戦するオプションがある場合は、より多くのダメージを与える可能性が高いため、上を選択してください。以前の更新では、シールドはヘッドショットを防ぐため、またはおそらくアーマーに対してボーナスを得るために使用されていましたが、私が収集したものから U24 についてはそうではありませんでした.
恐怖
恐怖は敵の数を決定し、敵の反応速度を高め、特別なイベントの可能性を高め、ボスの健康を高めます (24.2 パッチノートで確認済み)。ロードアウト画面で受け取ることを選択できるランダム モジュールを含むアイテムを拾うと (!)、恐怖を引き起こすチェストがあり、高警戒テレポーターの選択も恐怖を増加させます。レベルで非常に長い時間かかるか、しばらくじっと座っていると恐怖が増すと思いますが、それはまれです.キャラクター画面を初めて開いたときは、テラーが増えているように見えるが、それが何に影響されているのかはわからない。恐怖は、いくつかの明らかな方法 (狂気ボタンなど) によって非常に意図的に増加することもあります。恐怖の正確なメカニズムは、私自身やコミュニティ全体によって十分に文書化されていません.
高警戒テレポーターは検索するチェストが多い傾向にありますが、恐怖の増加は永続的です。 Low Alert テレポーターを選択すると、恐怖が永久に減少します (私が知っていることはこれだけです)。恐怖が 15 まで減少するのを見たことがあります。現在の恐怖は、「c」キーを使用してキャラクター画面で確認できます。 /P>
入ってくるヘッドハンターは、必ずしもテロまたはアラートの増加によって引き起こされるわけではなく、アラートの増加メッセージが常にテロの増加と一致するわけでもありません。実行のために注意深く追跡した後、恐怖を増加させるものがどれほど少ないかを確認した後、恐怖が影響を与えるもののパーセンテージ増加である可能性(ただし確実ではありません)(120の恐怖は+ 20%のボスの健康を意味する可能性があります) 、できるだけ長く生きたいのであれば、Low Alert テレポーターのみを選択することを強くお勧めします。
ヘッドハンターとその他のヒット部隊
ヘッドハンターやその他のヒット部隊 (レールガン部隊など) がスポーンすると通知されます。ヘッドハンターは常にあなたを探しに来ますが、他の人は代わりにうろつくエリアを選ぶかもしれません.これらのユニットは、通常のエリートよりも少し難しくなる傾向があります (ヘッドハンターは少し異なり、基本的には通常のエリートのようかもしれません)。
アラート増加警告の結果として、何らかのヒット部隊がほぼ常に生成されるため、高セキュリティ ゾーンにはそれらが存在する傾向があります。このような分隊は一見ランダムなイベントとして発生することもあります。ヘッドハンターは、クエストの結果としてスポーンすることもできます.
クロノ トルーパーが同様のメッセージを出すとき、この方法でスポーンされることはなく、代わりにアラーム ボットによって召喚されたことを示しています。
対シールド地雷とその他の環境ハザード
最近まで私の存在のターミネーターであった対シールド地雷に特別な注意を払いたいと思います (お察しのとおり、私は研究はできますが、このゲームは明らかに苦手です)。
ここでは、カーソルの左側に、気絶するだけでなく、シールドを完全に削除する地雷が直接表示されます。敵の攻撃が続いた場合、これは非常に致命的となる可能性があり、何度も影響を受けて初めて、何が起こっているのか、そしてそれらの小さなバグがどれほど厄介であるかを理解しました.ウィキによると、狙撃兵の近くに「現れる」と書かれていますが、元の狙撃兵がトリガーされた後、彼らが現れたり、再び設定されたりする可能性があると私は疑い始めています.狙撃兵と戦っているときに、彼らがあなたの隣に現れないように注意してください。
有刺鉄線とグラウンド スパイク自体は危険ではありませんが、危険な遭遇をより危険なものにする可能性があります (これらの危険を処理または回避することは、最初のボス戦の 1 つの重要な課題です)。そのような危険はすべて安全に乗り越えることができます。一部のハザードは敵によってトリガーされる可能性があり、プレイヤーがトリガーしたハザード (特に対シールド地雷) であっても、トリガーされたハザードによって敵にダメージを与えることがあります。
コアパーツとボルト
各レベルには、正確に 1 つのボルトと 1 つのコア パーツが含まれます。それらはマップオブジェクトの後ろに隠すことができますが、木箱に隠すことはできません.コア パーツをモジュール コアやその他の種類のコアと混同しないでください。
コア パーツを 4 つ拾うと、特定のアイテムであるハート コアが得られます。このアイテムは、使用してから 12 秒後に敵を倒すたびに最大体力を増加させ、ユーザーを完全に回復します。ただし、使用できるのは 1 回だけです。
一方、6 つのボルトの完全なセットを集めると、ランダムなアイテム (通常はよりレアなもの) が付与されます。
リサイクル
アイテムをリサイクルするには、マウスの右ボタンを使用してアイテムをアイテム スロットの右側にあるリサイクル シンボルにドラッグします。アイテム スロットの数が限られており、空きスロットがない限りアイテムを拾うことができないことがわかります。
アイテムをリサイクルすると、希少性とバリアントに基づいてクレジットが付与されます。これを定量化するための適切なリソースは見つかりませんが、通常のアイテムをリサイクルすると 200 ~ 300 クレジットを獲得できます。これがリサイクルの主な目的です。
ただし、リサイクルには「秘密の」部分があり (ネタバレではありませんが、研究メニューのリサイクル アイテムにカーソルを合わせると明らかです)、それは、一部のアイテムは、使用された後も (少なくとも部分的に) 機能し続けるということです。リサイクル。それについてのより多くの情報を見つけるには、代わりに研究ショップからそのデータを表示する機能を購入し、これを自分で調べてください!ただし、一般的なマイナーなものをここに書きます。Lighting Boots は、リサイクルしても速度ボーナスを保持します。また、リサイクルするのがやや面倒なアイテムが 1 つあります。これについては、発生時に何が起こっているのか分からない可能性があるため、ここでも言及します。「セットアップ」スーツケース セントリーです。ポーション。
運、清掃、通貨の統計
これらの統計は、ゲームが私に信じさせようとしているように見えるほど重要ではないように思えます.これらはそれぞれパーセンテージのように機能します。
- 運はあなたのクリティカル チャンスを 1 ポイント、1 パーセント増加させます。また、さまざまな種類の偶然に基づく要因にもわずかな影響を与えます。最も重要なのは、これには、チェストで高ティアの武器やアイテムを見つけたり、proc を取得したりすることが含まれます (Soft Point 弾薬からのスタンなど)。運は、ダメージを増加させるボディ ステータスです。
- 通貨は、獲得するクレジットを 1 ポイント、1 パーセント増やします。私の意見では、これは 3 つの中で最も価値がありません。
- スカベンジングは最も奇妙なもので、運のように機能するように見えますが、ドロップ (武器のチェストではなく、単にドロップするだけです) と通貨のように機能しますが、クレジット ドロップのみです。その最も重要な部分は、弾薬ドロップの増加です。また、見つけたチェストの種類にも影響しますが、中に何が入っているかには影響しません。他の 2 つと同様に、パーセンテージのようにスケーリングします。
「c」キーを使用して、現在の統計を表示できます。
立ち往生
移動できない場所にいることに気付いた場合は、ESC を押してオプションに移動し、スタック解除オプションのメニューを検索します。それをクリックして、あなたが自由になることを願っています!そうでない場合は、もう一度やり直してください。最終的には機能するはずなので、マップの外でかわしただけでランを失うことはありません。その後、あなたが本当のピクルスになるかどうかは別の問題です…
呪い、祠、宝箱
それに追加する主なものは、U26 の新機能、錬金術ショップです。錬金術ショップには、奇妙で相乗効果に重点を置いたアイテムの非常に限られたリストから、通常よりも安いアイテムが含まれています。見た目が違うだけで、通常のショップと同じように機能します。
武器統計 (ゲームプレイの仕組み)
武器の統計に関する普遍的なルールが 1 つあります。それは、ツールチップに役立つ情報がすべて含まれているということです。
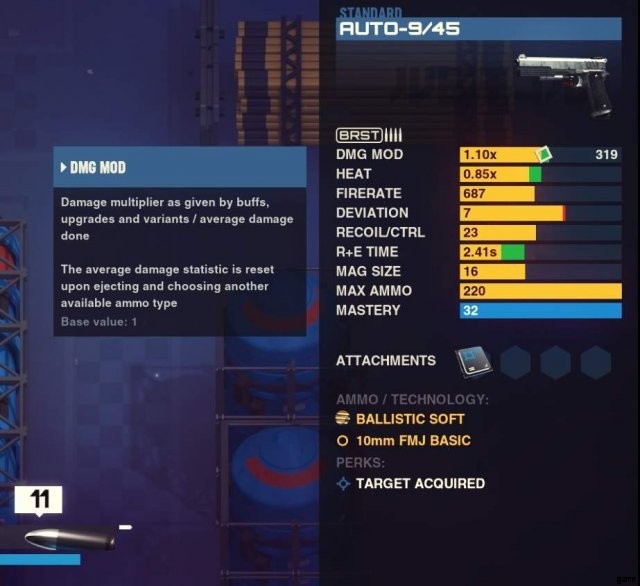
「x」を押すと、武器統計サイドバーが開きます。これを行うと、ヒート ベアの横にインジケーターが表示され、武器の弾薬の種類が 1 つしかないかどうかが示されます (複数ある場合は、既に表示されています)。武器名の上に武器のバリエーションが表示されます (これは初期武器であり、バリエーションはありませんでした)。統計バーの下には武器のアタッチメントがあり、その下には武器の特性があります。これらすべての指標にカーソルを合わせて、何が起こっているかを把握してください。
武器情報の統計バー
それでは、難しい部分に取り掛かる時が来ました。私が見つけた統計バーは、ほとんどの場合、役に立たないものですが、それにもかかわらず、それについて話すことは役に立ちます.
弾薬を理解していない限り、武器のダメージ モディファイアとそれに付随するバーはあまり意味がありません。実際、弾薬を理解していても、それは少し難解です。右側の数字は、はるかに優れた数字です。これは、あなたが発射したショットから武器が平均して与えることが知られているダメージの量です。その数字に従い、バーの長さを無視することが、正気を保つ方法です。ただし、武器のダメージ モディファイアを本当に調べたい場合は、参考として、wiki に一般的なデフォルトの弾薬タイプのダメージ数が示されています。
- レーザーセル:311
- バックショット:109×8
- FMJ ベーシックおよびその他のベーシック ピストル/SMG 弾薬:253
- 5.57mm 開田 SC:226 (アサルトライフルの弾薬)
- 8.8mm クルツ:270 (アサルトライフルの弾薬)
- 12.7mm アクセラレーター SC:450 (対物ライフルの弾薬)
ヒートモディファイアも同様にわかりにくく、あまり役に立ちません。それは明らかに熱増加に影響します。熱は 100% に達するとダメージを与えますが、Scorched 難易度モディファイアを使用しても、それを達成するには多少の作業が必要になる場合があります。明るい面では、バーの上にカーソルを合わせると、ショットごとにどれだけの熱が得られるかが正確にわかります.モディファイヤ バーがどれだけ満たされているかとはほとんど関係がないように見えますが、少なくとも理解できる数値が得られます。
発射速度は 1 分あたりの弾数であり、実際によく表現されています。
偏差は、照準レチクルから離れた開始最大可能発射角度 (度単位) です。
反動は、連射中に偏差が増加する速度ですが、ここの単位はわかりません。反動制御は、反動からの回復速度に影響します。関連するバーにカーソルを合わせると、適切な統計が表示されますが、これまでに表示された反動/制御の値は、私にはまったく意味がありません.
R+E タイムは簡単です。リロード+イジェクト タイムで、シンプルで簡単です。にカーソルを合わせると、2 つの間の内訳が表示されます。
Mag Size と Max Ammo は一目瞭然です。しかし、それほど明白ではないのは、Mag Size がアモプリンター タイプのアタッチメントから得られる弾薬を直接スケーリングすることです。マガジンのサイズは、ピックアップによる弾薬の増加にもある程度相関しています。 Max Ammo にカーソルを合わせると、最も重要な弾薬収集統計 (弾薬を拾ってどれだけの弾薬を獲得できるか) が分かりやすく表示されます。
熟達…実際には何もしません。武器をどれだけ使ったかです。実際、ジャミング (IMO のコア ゲーム メカニックのようなもの) でプレイすると、武器をどれだけジャミングしたかのようになります。
武器のバリエーション
武器は、バリアント バージョンとして異なるステータスで表示されることがあります。ボス部屋のバリアントは明らかにアルファのバリアントであり、弾薬の獲得量が少なく、与えるダメージが大きく、かなり複雑なバッグです.
Kaida-Elite、Modular、Printing、および Taiga Hunter (バフ後でも) は、場合によってはかなり悪いバリアントです。他のすべてのバリアントは、通常、良いフレーバーです。非常に望ましい Siege および Divine 修飾子のように、武器名にはいくつかのバリエーションが表示されます。
最も注意が必要なモディファイアは Cursed モディファイアです。呪われた武器は時々使用者にダメージを与えます。それほど悪くない武器の場合。他の人にとっては、それらは完全に使用できなくなります。これらを戦闘で使用する前に、自己ダメージを処理できるかどうかをテストしてください。どういうわけか健康を回復する手段がない場合、呪われた武器は完全に使用できなくなります。呪われたチェストは、常にある種の呪われた武器を提供します。呪われた武器は、弾薬の獲得量が大幅に減少しました (-33%) が、ダメージはさらに改善されました。すでに弾薬が不足している武器の呪われた変種も、単に価値がないかもしれません (ただし、一部のクラスには弾薬の問題をうまく解決できる能力があります)。
アーマー (ゲームプレイ メカニクス)
アーマー
アーマーは、アーマーの値に等しいパーセンテージ値で最大 75% までのダメージを減らし、アーマーの貫通を防ぎます。キャップは鎧貫通の前に適用されるように見えるため、75 の鎧貫通はすべての鎧を完全に無効にするはずです。ある程度の装甲貫通力はどこにでもあります。ショットガンを除くほぼすべての武器に少なくとも 10 の装甲貫通力があります。プラズマとイオンのエキゾチックなダメージ タイプは、アーマーを完全に完全に無視します。サイオニック武器についてはよくわかりません。
鎧と爆発物について私がなんとか読んだことは、鎧が爆発に対して非常に役立つことを示唆しています.
装甲貫通弾薬
この次のビットは少し理論的な話になりますが、興味がない場合は、「Armored Enemies」セクションにスキップして多くを見逃すことはありません。いずれにせよ、いくつかのより顕著なビットが繰り返されます。
最高のレーザー アーマー貫通力は 15 AP で、ほとんどのレーザー兵器が保持する品質です。ただし、Raptor Laser SG と Battle Hymn で使用される「Sprayer」リチウム セルには 5 AP しかありません (現在のパッチでは古くなっている可能性がある wiki 情報を使用)。ウィキでは、ショットガンのアーマー貫通は少しわかりにくいかもしれません。装甲貫通力がまったくない唯一の通常のショットガンの弾薬は、KSG 2000 によって利用可能になった 10 AP のトリプル スラグです。ただし、ほとんどのショットガンは、15 AP を持ち、おそらく非弾薬よりも優れている、加圧インペイラーのパワー ボルトを使用できます。 -トリプルスラッグ ショットガンの弾薬
装甲貫通力が 60 以上の唯一の弾薬 (前述のプラズマとイオン以外) は、次のような弾道反物質弾薬です:
- 12.7mm アクセラレーター ヴェノム (60 AP、酸)
- 12.7mm アクセラレータ サボ (60 AP、奇妙なことに、この AP バリアントは上記の酸タイプと同じ装甲貫通力を持っています)
- 12.7mm YL アンチ マテリアル (75 AP、ヨーコ ラガンのみ)
- All Nemesis prototype restricted ammo (90/100 AP)
- The Liandry Rail Gun restricted ammo (100 AP)
The following ammunitions have armor penetration 30 and above:
- 5.57mm Armor Piercing (40 AP, a surprisingly high AP that can even be used by 5.57mm assault rifles)
- 12.7mm Accelerator SC (30 AP, the default for anti-material rifles)
- 8.8mm Kurz (30 AP note:this is the default for 8.8mm assault rifles)
- 8.8mm Armor Piercing (40 AP)
- 8.8mm Acid Rounds (35 AP)
- 8.8mm Cataclysmic Hollow Point (35 AP)
- Shock Arrow Soft Point (30 AP, slightly better than the default Tungsten arrow)
- 4.73mm Caseless FMJ (35 AP)
- 4.73mm Unstable Core (35 AP)
Ammunition not in these lists tends to do 15 AP or 10 AP with only a few exceptions. The default ammo for most SMGs and pistols is 10 AP and the default for 5.57mm assault rifles is 15. That should give you an idea of what is normal for armor penetration in the game. Enemies, however, tend to have a lot of armor penetration compared to the player. Expect endgame enemies with projectile weapons to have at least 30-40 AP.
Armored Enemies
Enemies with ‘tank’ in the name or that have tank tracks as well as enemies that wield shields will have armor (the very first unit that you see with a riot shield has 45 armor). Additionally Stinger Gliders, Devastors, and Room Clearing Units all have some armor. Hyper Troopers have, shall we say, no shortage of armor. Many bosses have substantial armor. This is an important consideration in weapon type as well as taking the ‘Deflect’ difficulty modifier. Shotguns may do fine against your average shield-weilder due to sheer damage, but will suffer against bosses.
With the Deflect difficulty modifier, you will still experience damage resistance from armor on most enemies that have it unless you are using an anti-material rifle with special ammunition (Stinger Gliders and Devastators have less, so that may not be the case for those two), whereas without it you will mostly cease to notice armor when using an 8.8mm assault rifle. That said, even if you stick to more normal weapons, it is still just a +15% increase in the effective hitpoints of certain enemies (even if it does include bosses).
Ammunition (Gameplay Mechanics)
Generally each weapon starts with a basic type. 8.8mm Kurz (30 AP, 270 base damage per shot) and 5.57mm Kaida SC (15 AP, 226 base damage per shot) are the standards for assault rifles. FMJ Basic (10 AP, 253 base damage per shot) is the standard for SMGs and pistols, and buckshot (0 AP, 109×8 per shot) is the standard for Shotguns. Outside of the red weapons, the projectile weapons that do not conform to the standard largely are pretty bad (Brent Anti-Air being a major exception). Weapons that use 8.8mm ammo tend to be especially well regarded at the moment.
Alternate ammo types can be found in rare ammo chests, given by class features, or acquired by simply picking up the right weapon. For regular projectile weapons those ammo types generally come in Hollow Point (bleed), Soft Point (stun/slow), Acid, and Armor Piercing.
- Hollow Point does additional 5 additional armor penetration and has a 25% chance to inflict a pretty decent bleed effect for no sacrifice in damage.
- Soft Point has no substantial damage reduction for 5.57mm assault rifles, but a ~10% damage reduction for SMGs and pistols. It has a 25% chance to inflict a stun on hit, which is handy. 8.8mm assault rifles do not get Soft Point.
- Acid ammo can inflict a DoT every 5th shot at the cost of that shot doing 35% less damage. The 5.57mm version has a 50% chance to do so, the 8.8 version always does so and also has an additional 5 armor penetration. The wiki says that Acid does a very weak DoT, but as of U26, Acid ammo should deal a DoT similar in magnitude to Hollow Point.
- AP ammo has wildly differing increases in armor penetration depending on ammo size. The SMG/Pistol ammo has 25 AP compared to the default 10. The 5.57mm ammo has 40 AP compared to the default 15. And the 8.8mm AP ammo has an underwhelming 40 AP compared to the default 30. AP ammo also has bit of extra critical chance (I believe it was buffed to 10%, reading the U26 patch notes).
The analysis here appears to be that 5.57mm/SMG AP is the best, followed by any Hollow Point. After that AP is next most valuable. Whether you prefer Acid or Soft Point depends on how much you value the stun.
With that out of the way, lets get down to actually using the ammo. To switch ammo types you need to eject your clip (ejecting completely full or completely empty clips does not waste any ammo), and then press CTRL. But to do that you actually need an optional ammo type. When there is an optional ammo type available there will be a pair (or trio, etc) of little bullet symbols to the right of your weapon’s heat bar:
You can also see the bullet symbol even if there is no optional ammo type available by pressing ‘x’ to show weapon details. The alternate ammo that I can equip here is an incindiary shotgun ammo. That ammo is actually pretty bad because the DoT it applies doesn’t really synergize with the shotgun way of thinking very well. Actually, that’s true of all of the regular shotgun ammo as a whole with the exception of the Triple Slug made available by picking up the KSG 2000. Of the Pressurized Impaler ammo, the Power Bolt ammo seems better than the alternative unless I’m misreading. For the majority of shotguns that can use both Power Bolts and Triple Slugs, the latter does more damage on paper, but the former has enemy penetration and may be easier to handle in practice.
List of weapons that give ammo
- Spectre – Soft Point (Stun/Slow)
- Tactical Observer – Soft Point (Stun/Slow)
- R2000 ‘Sour’ DMR – Acid
- RPK-12 Tundra – Acid
- Damnation – Hollow Point (Bleed)
- AMD 65 – Hollow Point (Bleed)
- AEK Special Elite – Armor Piercing
- Sturmgewehr 44 – Armor Piercing
- R5000 ‘Sudden’ DMR – Armor Piercing
- Chaos Launcher – Unstable Core (High Crit – Limited to Chaos Launcher and Twin Mill)
- Pressurized Impaler – Power Bolt/Accelerated Coil X1
- KSG 2000 – Triple Slug
- ‘Eraser’ DMR – Lithium Cell (Burn)
- Human Model 9800K – Cold Fusion Charge (Slow/Pierce)
Weapons give that ammo type for all weapon types that can use it. So the AMD 65 gives Hollow Point for your pistol too. Moreover, you retain full use of that ammo type for the rest of the game, even after dropping the weapon.
Supply Hack Mechanics and Considerations
The wiki article is pretty succinct about the basics of this. Using occurrence up tokens you increase the liklihood of finding a weapon or item. Using occurrence down tokens you decrease the liklihood. You have four of each type of token to spend for weapons, and another set of four of each for items. Occurrence tokens cannot be used on red items or weapons, and there are a fair few items of the other rarities that also cannot receive occurrence tokens.
The wiki disagrees with the in-game tooltips concerning what power tokens do for weapons, however. The tooltip says that power tokens increase the ammo gain of a weapon whereas the wiki at the moment says that power tokens also increase weapon damage by 5%. I’m suspicious of that claim and suspect that is old info. The ammo gain is very significant 20%!, so it is well worth your time to place the power tokens well. For items, the wiki says that power tokens increase the item’s power by 20%, which is about one level worth of upgrade from an item upgrade shrine.
What the wiki does not mention (but the tooltip in the research menu does) is that one of a shop’s saleables will always be selected from one of your occurrence increase tokens. This means if you want a particular weapon, or one of a couple weapons, it may be worth only occurrence increasing one (or two) weapons so as to ensure the very maximum availability for that weapon. Because the player can hold more items than weapons, I recommend using at least three of the item occurrence up tokens. Shops are not rarity locked, meaning that it is unwise to use occurrence increase on light blue items and weapons unless you really want that as your endgame weapon (tactical observer, for instance). Weapons and items of higher rarity will cost more in a shop, so you may have to save up. I do not believe the old exploit of using a power token on a red weapon/item works anymore.
Being able to avoid weapons/items you don’t like, and also get more of weapons/items you like is so powerful, I recommend that this be one of your first research purchases.
Weapon Token Recommendations
Weapons to consider making more common for almost every class include:
- Bren Anti-Air (crazy good auto weapon).
- Super 90 / T 8-00-Gauge / KSG 2000 (a lot of which of the three you prefer may be down to taste).
- Tuned 14 EBR (Arena DLC) / R5000 DMR (gives AP ammo) / AS-VAL (this one has more significant ammo issues than most purple weapons).
- Kaida Medic ACR-X (helps with health problems) / AMD 65 (a little lifesteal and also gives Hollow Point ammo).
- Tactical Observer (is a growth weapon and gives Soft Point ammo) / AEK Special Elite (very solid auto rifle, gives AP ammo).
- Heavy Flak Cannon (wonderful explosive weapon) / HIG-S (more damage, similar effect, less ammo, and now it is an Ion weapon which was previously unavailable in non-red rarity).
- RPK-12 Tundra (Excellent LMG with passive scavenging to boot and gives Acid ammo, but not among the very top-of-the-list weapons, just the LMG category).
- UMP-10 Tornado (excellent for an SMG, but has ammo issues because of SMG things).
I’d also give the SCR Laser Socom (growth weapon), the Sturmghewehr (DLC-only, grants AP ammo, massive ammo supply and pickup) and MAG47 Heavy MG (massive ammo supply and pickup) as honorable mentions, but they are not preferred by people actually good at the game. Most of the listed weapons are dark blue rarity, with a good smattering of purple alternatives. However the Tactical Observer is light blue.
Many of the purple weapons have annoyingly low ammo pickup and pools (though the aforementioned purple heavy machine guns go the opposite route), so it is somewhat useful not to go all-purple unless you’ve planned ahead. Naturally Supply Hacking only lets you boost the drop rate of four weapons and four items, and due to shop randomness you may wish to limit that further to two or three, so choose wisely.
Difficulty Modifiers
One of the first things that may be useful to do in the game is to adjust the difficulty downward somewhat. The default difficulty has a few unnecessary complications. Here’s my run through of the difficulty modifiers. I am, however, not very good at the game. So I’ll be relying on the same sources I used for the prior recommendations.
Base difficulty
10% more enemies forces, 10% faster enemy reactions, 25% more incoming damage on floor 1 (that is, the levels before the first boss fight), 15% more incoming damage on floor 2, 5% more incoming damage on floors 3+. Grants better loot.
This is worth 30% difficulty for a reason. In a game where most of your character loadout decisions are designed to reduce incoming damage this is the last thing you need when starting out. Especially considering you don’t have enough modules to avoid the terror increase that a random module will give you. 10% faster more enemy reactions also makes playing certain classes a tad harder. To make matters worse, no one knows what “Grants better loot” even means. If it means rarity, the section on weapon Supply Hacking should hopefully convince you that it is completely unnecessary.
Manual Ejection
The active reload mechanic. Ejecting and reloading is much slower with this turned off.
Core mechanic, and the bonus for keeping it on is substantial enough that eventually it makes the game easier.
Jamming
Weapons have a realistic chance to jam and require unjamming. Unjamming grants high weapon mastery.
Since weapon mastery doesn’t do anything, the first thought is that this is unncessary. Jamming doesn’t usually kill you, but it can result in some awkward moments. However, jamming is a really fun and kinda core mechanic, so I leave it on, YMMV. Occasional jamming is rare but will still occur even with this difficulty modifier turned off.
Flinch
Taking health damage briefly decreases accuracy and movement speed. Move slightly faster.
As the google doc strategy guide says, the movement speed increase is substantial, but the downside is killer. Though it may not look it at first, this is likely the nastiest +10% difficulty modifier.
Scorching
Weapons cool down 20% slower and overheating causes double damage. Weapons fire slightly faster.
If you aren’t playing heavy gunner, when are you overheating in single player? I am not sure at all how much of a fire rate increase is granted, mind, but with a downside this small, it has to be worth it. Moreover there are several modules and attachments that gain bonuses based on heat. Unless you intend to make plenty of use of the SS58 Plasma Charger that automatically overheats on reload, this modifier makes the game easier, so turn it on.
Haste
All projectiles fly faster. Active Reloads are randomized. Active Reloading gains a smaller Perfect portion of the bar which grants increased damage, rate of fire, and jamming immunity to the next magazine.
Lots to unpack here. Firstly projectiles are about 50% faster, which isn’t crazy because of how slow projectiles in this game are by default. The tracking ability of enemy weapons isn’t improved to compensate. This makes dodging missiles much, much, much easier. Tracking weapons are not uncommon in boss fights, so some boss fights are also made easier by this. However, walking through small arms fire is much harder, which makes the average combat quite substantially more deadly, especially if you end up having to face more than five enemies at once (which you should try as much as possible to avoid, but sometimes it happens). This is quite reasonably a dangerous modifier for this reason alone.
On the other side of the modifier, the perfect reload bonus is quite nice indeed, certainly in excess of 5%. Moreover, many weapons can usually be reloaded faster with the randomized active reload than they can by default. On the other hand, muscle memory can’t be used to reload, which makes using the T-8-00-Gauge a pain in the ass and can really kill player’s rhythm on their usual weapons. Unless you’re making use of a lot of shotguns and RPGs however, this part of the modifier seems very desirable to me.
Deflect
Armored enemies gain 15 additional armor. Gain +4% dodge chance.
15% damage reduction on a small subset of enemies? Doesn’t kill my survivability but instead enhances it? I’m not rushing to turn this on right away, but this sounds like a pretty easy +10% to difficulty. The nasty part here is that you will likely very much notice the extra 15% effective hitpoints on bosses, especially the later ones.
Hard Core 1
Taking damage can cause bleeding. Using substances can poison. Explosives cause shell shock. Active Reloads are less forgiving. Stat upgrades grant more stats.
Probably the easiest +15% there is. The downside is very class dependant, however. The commando classes initially rely on imbibing for out of combat healing, and this makes doing so hard to cope with. For classes that don’t do that, the main noticeable part is the bleeding effect, which makes taking what would have been small amounts of health damage much nastier. With that being what it is, and the stat upgrade increase being of only moderate value, so this is firmly one of the last things to take in order to reach 140% difficulty for the class challenges.
Critical
Enemies have a 10% chance to crit for 150% damage. +4% Increased crit chance
Sounds nastier than it is, apparently. However, one day some enemy with a sniper rifle or ion weapon will ruin your ruin your day solely because of this. For faster firing enemy weapons you can think of this as being a 15% reduction to your survivability, which you may or may not consider to be worse than the Base difficulty modifier.
Fragile
Taking health damage reduces maximum health by 5%. Medical crates add back 50 lost health, and a boss kill adds back 75. +5% damage
If you’re good, you can end up very positive on maximum health after the first boss. For the rest of us plebians, this is the single nastiest modifier one could think of.
Lightning Start
More difficult floor 1 (first 4 levels). Headshots deal 15% more damage.
Once you reliably get through the second stage, this makes the game easier and becomes a no-brainer. Snipers want to turn this on pretty darn quickly.
Achieving 140%
There are basically two schools of thought regarding achieving the requirement for the class challenges with minimal modifiers:
- Lightning Start + Manual Ejection + Jamming + Scorching + { (Deflect/Haste + Hardcore =140%) / (Deflect + Haste + Flinch =145%) }
- Base + Lightning Start + Manual Ejection + Jamming + Scorching =145%
The increase in both enemy count and damage taken from Base is just severe enough to consider taking the bleed effect from Hardcore. However, the other school of thought is that whatever increased loot quality from Base that exists ought to be important enough that the increased difficulty is more or less worth it.
その他
You can change which pistol you start with in the loadout screen. This is pretty important, because the default pistol does an annoyingly pitiful amount of damage.
- That and other useful tips I found in a very useful FAQ here. That link also has a promo code for one of the better pistols in the game (saves nothing more than a tiny bit of grinding). Having a better pistol means being able and willing to use it even very late in the game, though it won’t outshine your better weapons.
- The above doesn’t apply as much to the Riot Guard because the class passive uniquely permits dropping the starting pistol for advanced weaponry. For this and other reasons (health regen!) the Riot Guard is widely considered one of the beginner-friendly classes. I will say that I got further with my very first game of the Riot Guard than I had ever been, despite being level 10 in another class.
- Prioritize survivability with the modules in your loadout. If you’re going to progress through the game, you need to live through it first. Generally I think the community has arrived at a consensus on which modules go best with which playstyle. It may be good to look through your class’ section in the google doc strategy guide or ask around if you’re looking for an edge.
- There is a lot of old material talking about “Guardian Stacks”. However, only the Riot Guard cares about stacks in the current update. The Breacher does gain some stacks when dashing into enemies, but those are maintained extremely briefly and never really get far beyond 5. The Shield Burst and Stun Grenade do apply two stacks for the Breacher, but the effect is almost negligible due to the stack duration (tooltip says it would give five stacks, but that’s only for the Riot Guard). Similarly, while the Shielded module is still good, it is also much less necessary than it used to be because it was nerfed in U26, rendering that advice old material as well.
- If you’re using the AS-VAL, you can switch it to the default Kurz ammo for armored bosses — doing so should be a ~10% damage increase against enemies with at least 30 armor).
- Effects that active upon killing with a weapon take effect upon killing with the weapon currently equipped, there’s no need to actually score the finishing blow with the weapon.
- A tip from the google doc strategy guide:if you find and item in a chest and a shop on the same floor you can obtain two of the same item, which is not normally possible. A lot of times this is very powerful.