Genshin Impact 上級ガイド:進歩を後押しするその他のヒントと戦略
Genshin Impact は、熱心な RPG 愛好家、特に息をのむような光景や景色を提供し、発見されるのを待っているコンテンツや秘密に満ちたオープン ワールドでの探索を楽しむ人に提供できるものがたくさんあります。 Genshin Impact の世界での冒険に費やすことができる時間に制限はほとんどありませんが、それでも、Tevyat にすばやく没頭すると、隅々まで完全に探索するのにどれだけの時間を費やす必要があるかがわかります.
Genshin Impactで考慮すべき要素の1つは、多くの機能とメカニズムが含まれている一方で、このジャンルの初心者が比較的簡単に手に取ってプレイできることです.ただし、ダウンロードしてプレイすることに決めたばかりの場合は、最初に Genshin Impact 初心者向けガイドを読むことを強くお勧めします。このガイドには、冒険を始めるために必要なすべての基本的なヒントと戦略が記載されています。
このガイドでは、原神インパクトの基本的な機能と仕組みにもう少し精通する必要がある高度な戦略に焦点を当てます.ここで説明する概念を簡単に適用できますが、最初のガイドで提供したより単純な戦略に固執することをお勧めします。
1.さまざまなチームを結成
Genshin Impact は 1 人のキャラクターのゲームと非常によく似ていますが、4 人のキャラクターからなる完全なチームで冒険を楽しむことができます。パーティ内の他の3人のキャラクター、または特定のミッションのゲストキャラクターの場合は4人のキャラクターにほぼ瞬時に切り替えることができるコア機能を使用して、パーティー内のヒーローの要素の組み合わせに基づいてさまざまな戦闘戦略を立てることができます.
要素の組み合わせを超えて、各チームは、チームで表される要素に基づいてアクティブ化される要素の共鳴からさまざまなバフを獲得することもできます。ゲームの一部の領域では、パーティーのメンバーを簡単に変更することはできませんが、非常に自由です。世界地図でそうする
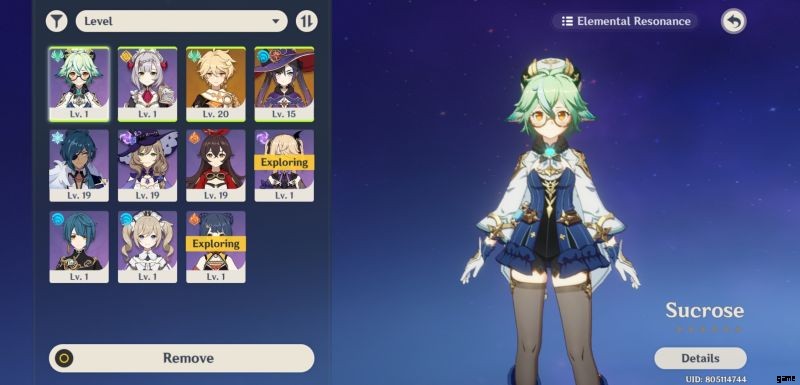
チームメニューでパーティーメンバーをすばやく切り替えることができるだけでなく、Genshin Impactでは、4つの異なるチームを用意して遊ぶこともできます.オープン ワールドの特定のパズルやシナリオでは、利用可能な 7 つの要素のそれぞれを使用する必要があることを考えると、4 人以上のキャラクターを利用するより効率的な方法は、別のチーム名簿を用意することです。
ビギナーズ ガイドでは、ヒーローとその装備をアップグレードおよび強化するにはさまざまなリソースが必要であるため、4 人のメイン キャラクターに焦点を当てる必要があると述べました。ただし、他のヒーロー、特にメインパーティに存在しない要素を持つヒーローを利用することを妨げるべきではありません.一部のクエストでは、チーム内で特定の要素を表現する必要があり、ほとんどの場合は最後までやり遂げることができますが、推奨される要素から外れるのははるかに困難になります.
複数のパーティーのセットアップを作成することを利用するもう 1 つの実用的なアプリケーションは、戦闘外で適用されるいくつかのエレメンタル レゾナンス バフの効果です。例えば、アネモ(風)属性のキャラクターが2人いると、パーティーのスタミナ消費が15%減少し、移動速度が10%増加し、スキルのクールダウンが5%減少します。これらの特典は、戦闘中のパーティーにも大いに役立つ可能性がありますが、土地を探索するときに持っているのに最適な組み合わせです.この意味で、タフな戦いのためにパーティーを簡単に切り替えることができるため、探索用に構築されたチーム設定に多額の投資をする必要さえありません.
2.マスターエレメンタルリアクション
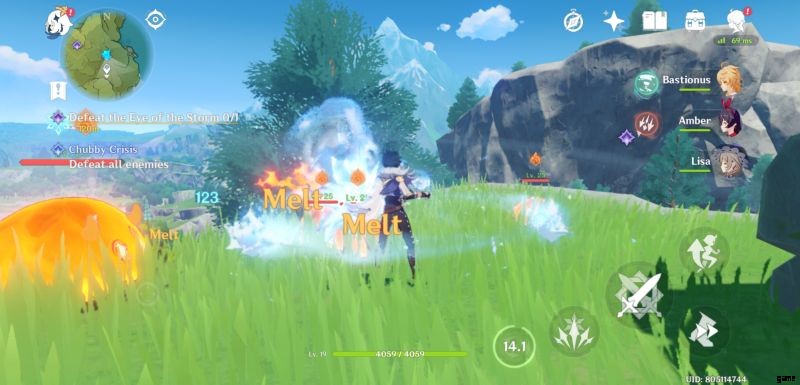
要素の組み合わせと反応は、原神インパクトの戦闘システムの中核です。各要素が他のすべての要素に対してどのように機能するか、および各要素への露出から生じる対応する組み合わせについての知識がなくても、多くの場合、ダメージを与えることができます.ただし、各要素の反応を開始して戦闘で利用する方法を知ることで、各戦闘でのパフォーマンスを大幅に向上させることができます.
まず、一部の要素には、ターゲットに影響を与えるとすぐにトリガーされる効果が既にあります。クライオは、敵の動きを遅くします。パイロはターゲットに火傷の DoT 効果を引き起こし、敵の木製の盾を含む木製のオブジェクトを焼き尽くすことができます。ハイドロはウェット ステータスを課します。これは、それ自体では何もしませんが、さまざまな要素効果の準備ステータスです。
Pyro の Burn DoT 効果は、dendro (ライフ) でさらに強化できます。火傷状態に苦しむターゲットは、クライオに苦しむターゲットになり、その逆も同様です。クライオがトリガー要素である場合、各クライオ攻撃は 1.5 倍のダメージを与え、パイロ攻撃で攻撃された凍結ターゲットは 2 倍のダメージを受けます。パイロは、気化状態のハイドロと組み合わせてほぼ同じように機能します。パイロとエレクトロの組み合わせは AoE パイロ ダメージを引き起こし、敵の近くで爆発バレルをトリガーしたり、敵全体に火傷効果をさらに広げたりするのに最適です。
水力効果と電気効果を組み合わせると、電気帯電状態になります。これは、燃焼のように機能する雷タイプの DoT です。ハイドロとクライオのより一般的な組み合わせは、クライオによる減速効果に加えて、ターゲットを一時的にフリーズします。クライオとエレクトロを混合すると超伝導が発生し、AoE クライオ ダメージを与え、ターゲットの防御力も低下させます。
Geo と Anemo の元素反応は、どちらも本質的にクライオ、エレクトロ、ハイドロ、パイロに同じように影響を与えるため、マスターするのがはるかに簡単です。前述の要素のいずれかと組み合わされたジオは、結晶化をもたらします。 Crystalize はターゲットのエレメンタル エネルギーを抽出し、キャラクターがエレメンタル シールドを獲得するために使用できるクリスタルを生成します。これらのシールドはユーザーを保護し、エレメンタル攻撃によるダメージを軽減します。
当然のことながら、属性シールドタイプは、同じ属性に対してより効果的なダメージ軽減を行います.アネモは、与えられた要素と連携して渦を巻きます。渦巻き効果は元素効果を高めるだけでなく、その効果がさらに広がります。
要素をマスターすることは、それぞれの完全な効果と組み合わせ反応に十分なレベルの親しみを持っていることを超えています.戦闘での習熟度をさらに高めるには、各キャラクター、スキル、およびそれぞれの要素の親和性に慣れてください。戦闘で適切な要素に切り替えることは、ゲームでのパフォーマンスの重要な側面となります。
3.毎日すべてのコミッションを達成
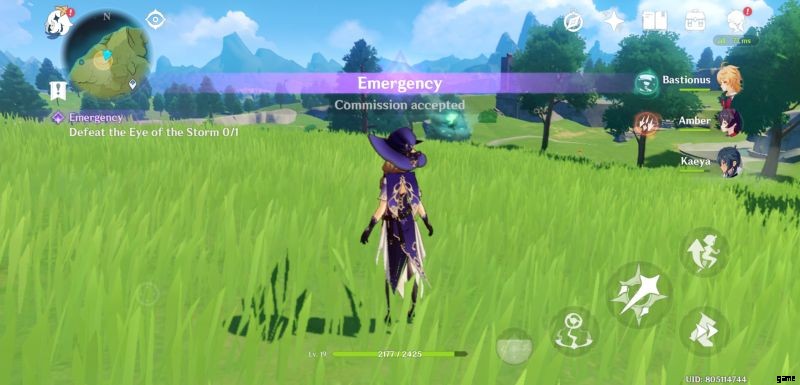
巨大なオープン ワールドの探索に加えて、Genshin Impact のストーリーとアルコン クエストを進めることで、各プレイヤーの毎日の冒険を確実に満たすことができます。ただし、冒険ランク 12 に到達すると、冒険者ギルドからの依頼のロックが解除されます。プレイヤーは毎日ランダムに 4 つのコミッションを受け取ります。これは、プレイヤーがロックを解除したマップのさまざまなエリアで達成可能なクエストです。
各コミッションを達成すると一連の報酬が付与され、4 つすべてを完了すると追加の報酬を獲得できます。一部のコミッションは繰り返し使用できますが、他のコミッションはプレイヤーのゲーム進行状況に基づいて 1 回しか経験できません。簡単な用事を伴うクエストもあれば、さまざまな戦いに没頭したり、さまざまなパズルを解いたり、またはその両方を行うクエストもあります。
コミッションを受け取ることは、そこから得られるさまざまな報酬のためだけに重要ではありません。これらのミッションはマップ上のさまざまな場所に配置されるため、ほとんどまたはまったく知らない原神インパクトのさまざまな機能についても紹介します.また、7 人の彫像をアップグレードするために必要なユニークなリソースやアメノクリを収集するのに役立つ、より多くの探索への道も提供します。
コミッションのロックを解除したら、報酬として得られるプリモジェムと、より多くのクエストやゲーム モードのロックを解除するために必要なアドベンチャー ランク XP が常に必要になるため、それぞれのコミッションを達成するように努力してください。
4.マップ内の重要なスポットでマーカーを使用する
Genshin Impact の世界を探索し続けると、発見が今のところ解決できないパズルを提供する多くの状況に確実に遭遇します。それはおそらく、あなたがまだ挑戦する能力を欠いているか、完全に追求したいクエストに取り組んでいるために時間が足りないためです.このような場合は、これらの場所をメモするのが最善です。頭の中でメモするだけでなく、これらのスポットがどこにあるかを正確に示すマーカーを付けてください。
画面の左上にあるミニマップ アイコンからマップを開き、7 人の彫像、テレポートのウェイポイント、およびその他の重要なアイコン以外の領域をタップすると、ピンを追加できます。それ。あなたの裁量に基づいて使用できる 6 つのユニークなピンがあり、合計 90 の異なるスポットをマークできます。
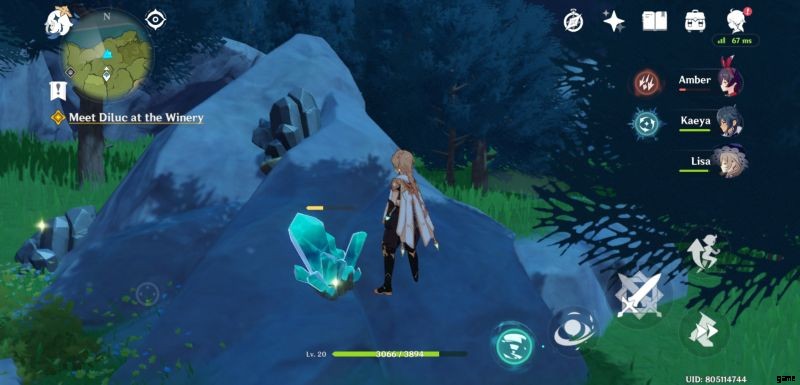
アメノクリの場所は、地図上にマークするスポットの完璧な例です。探索中に星に十分近づくと、ミニマップに星として表示されることがあります。ただし、高台に移動してグライドしない限り到達できない場所にあることもあります。そのため、現時点でそれらを取得できない場合は、マップ上にマークするオプションがあります.
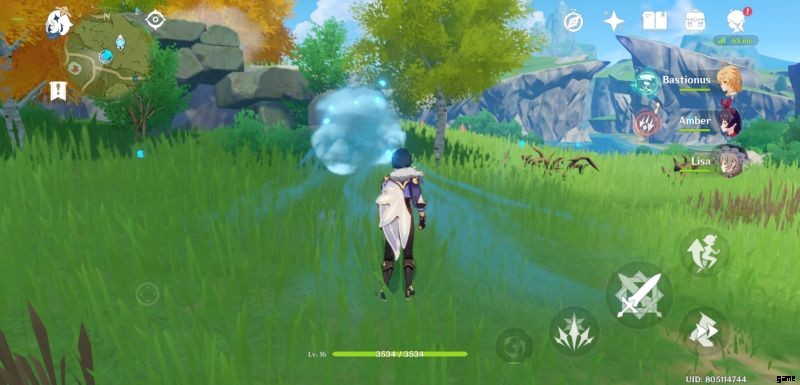
あなたがすぐに取ることができないかもしれない世界地図の別の一般的な例は、神秘的なシーリーまたは潜んでいる青い精霊です.彼らを目的地に導く必要があり、多くの場合、これにより宝物がアンロックされます。ただし、場合によっては、待っている報酬のロックを解除するために複数の青い精霊が必要になることがあります。すべてのブルースピリットを簡単に見つけることができるわけではなく、巨大な岩の塊の後ろにいるものもあります。いくつかの宝箱と同じようにエレメンタル バリアの内側に閉じ込められているように見えるものもあり、それらを解放するにはその中心を滑り降りる必要があります。
マップ上でマークできる場所は、後で再訪する未解決のパズルに限定されるべきではありません。場合によっては、資源を集めることができるため、再訪する価値のある地域があります。資源が豊富な地域に出くわした場合は、どこにも簡単には見つからないかもしれません.
5.元のレジンをレイ ラインの露頭に消費
Genshin Impact の世界でマップを表示しているときに、月のアイコンで表された右上隅の数字に気付く場合があります。これらは、他の RPG のゲーム内スタミナと同じように機能するオリジナルの樹脂ですが、レイ ライン アウトクロップにのみ適用されます。スタックできるオリジナルレジンの量には制限があり、消費すると時間の経過とともに補充されます。 Ley Line Outcrops を開くと元の樹脂が消費されますが、他の貴重な報酬に加えて冒険ランク EXP が付与されるため、定期的にできるだけ多く消費することをお勧めします。
世界地図で見ることができるレイ ライン露頭は 2 種類あります。 The Blossom of Revelation, indicated by a blue sphere appears once you reach adventurer rank 3 while the Blossom of Wealth, symbolized by a yellow sphere on the map, appears once you reach adventurer rank 12. Both outcrops offer the same level of challenge based on your adventurer rank. Blossoms of Revelation reward you with adventure EXP, Companionship EXP, adventurer’s experience, and wanderer’s advice. Blossoms of wealth, on the other hand, earn you adventure EXP, companionship EXP, and mora.
Once you approach and interact with the spheres on the world map, a mob of enemies will be summoned and you will need to defeat all of them to reveal the Ley Line Blossom. After expending original resin on the Ley Line Blossom, you will earn the rewards. Note that there will always be a Blossom of Revelation and a Blossom of Wealth on the world map. As soon as you activate and beat one, another will spawn in a random location.
As you will occasionally be prevented from continuing on some quests due to the minimum adventure level requirements, engaging in Ley Line Outcrops is among the best ways to rack up some adventure EXP. Traveling to different areas on the map, even with teleport waypoints and other landmarks you can instantly move to, will still help you explore zones better. Consider it as an added incentive to activate teleport waypoints you may have missed before or revisit some marked areas that you can now pursue.
6. Spend Time To Explore Each Shop’s Offerings
Genshin Impact makes it so that venturing outside of Mondstadt can become a little too exciting in that you hardly spend time within the town unless your current quest requires you to do so. Although you may visit the shops and other establishments within Mondstadt in passing as required by some quests, your eagerness to accomplish quests outside the city as well as venture out to explore may prevent you from taking time to check each of the shops out, particularly what they have to offer. Before you go on your next adventure, take time to look into each shop as they may provide you with something to make the next quest easier.
There is a shop that is unique in Genshin Impact as it can be accessed from the main menu rather than be physically seen on the map. Initially, some items for sale require real world cash or genesis crystals that can only be obtained through spending real money as well. Beyond all that, your attention should be directed towards Paimon’s Bargains, which is the third tab of the shop.
There are Intertwined Fates amd Acquaint Fates that can be purchased using primogems although you can buy them directly at the wish feature if you lack fates for summoning from the gacha. What you might need to explore further are the starglitter exchange and stardust exchange within Paimon’s Bargains. You can earn masterless stardust with every wish you make, regardless of the pull’s outcome. Masterless starglitter, on the other hand, can only be earned if you pulled a hero that you already have. Both these resources serve as extra incentives from wishes, given that you luck with every subsequent pull grows if you fail to secure the best possible rewards.
Masterless starglitter can be exchanged for intertwined fates, acquaint fates, heroes, weapons, and various other items. Masterless stardust can likewise be exchanged for intertwined fates, masterless fates, and a plethora of other resources.
The Good Hunter shop in Mondstadt is one of the basic shops you need to visit. You can purchase ready-to-eat food items from the shop, as well as ingredients and recipes for your own cooking. As items for sale here only consume mora, you would want to stock up on some food regularly as you would rather have an excess amount of food in your bag than run out of it during critical battles.
There is even a cooking area beside this shop where you can prepare some extra meals from the ingredients you have gathered. Note that some recipes will unlock based on your adventure level but you only need to purchase each new ingredient once.
With Winds Come Glory is a souvenir shop that holds various character ascension materials as well as weapon ascension materials, weapon crafting materials, and even Memory of Roving Gales needed to unlock constellation nodes. You need Anemo Sigils to purchase any item and this rare currency can be obtained from expeditions.
Another shop where you can spend mora is the general goods shop, which holds various food ingredients. As each one is fairly cheap, you may want to stock up on some items that you cannot gather from the field. Note that there will be some commissions that may require using some of these basic ingredients as well.
Timaerus’ crafting bench is not a shop at all but provides you with the means of crafting potions and other items from the materials you gather in your adventure. Before you start engaging in the activity, be sure to read through the description of the item you want to craft. More items will become available for crafting as you increase your adventure level but due to limitations on some of the raw materials needed, it is best to know exactly what you want to produce beforehand.
An important establishment to familiarize yourself with is the forge. The blacksmith offers some basic weapons for mora but the more important aspect of the forge comes with creating items. Iron and crystal chunks that you gather from across the land can be used to create enhancement ores. These enhancement ores are needed to upgrade the level of your weapons. Beyond that, the forge can also be utilized to craft 4-star weapons for your heroes.
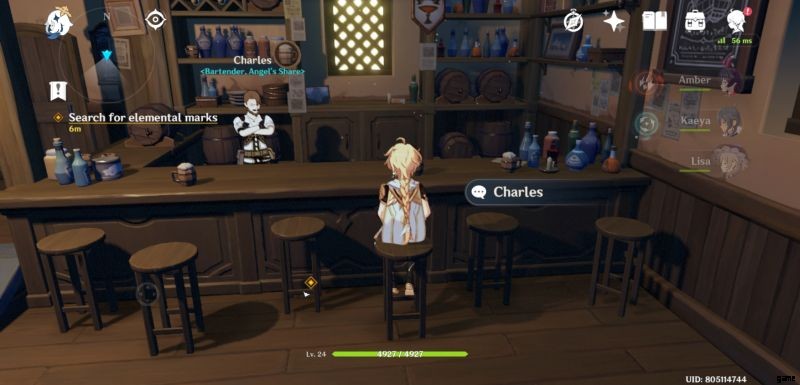
Angel’s Share, the bar inside Mondstadt that you will be visiting early on as part of your quest. You might not have guessed it but the bar actually sells different drinks that you can consume in battle to temporarily grant your party different buffs.
There are numerous other shops available in the game that will provide you even more items to spend your currencies on. As the city of Mondstadt is only the starting region, making it a habit to know what each shop can offer can go a long way relative to your adventures. As such, do not shy away from visiting each one and checking out the products they offer.
Genshin Impact still holds a lot of content and secrets awaiting discovery. For now, though, this is where we will end our Genshin Impact advanced guide. Although there are more game modes that we have yet to cover, we are confident that the tips and strategies we shared here, along with the ones we discussed in our beginner’s guide will suffice to take you through every challenge that comes your way. If you have spent hours in the world of Genshin Impact and have chanced upon a unique trick or strategy that slipped us, we very much appreciate hearing from you about it so do not hesitate to tell us about it and drop us one in the comments down below!