BlitZ:Rise of Heroes ティア リスト:全 41 人のヒーローの完全なランキング
こんにちは、アステリアの英雄です! BlitZ:Rise of Heroes でチームを微調整するためのガイダンスを得るためにここにいるようです .おそらく、あなたのローテーションの現在のヒーローは、以前ほどの成功を収めていません。私たちはその気持ちを知っています。アリーナやシングル プレイヤー バトルの初期段階で敵を強力に破壊した、かつては手ごわいチームでした。または、単純に、あなたはスカウトし、昇格とレベルアップのためにどのヒーローを優先すべきかを学ぶ使命を負っています.

ご心配なく。BlitZ:Rise of Heroes のすべてのキャラクターは、戦闘でのダメージ、維持、およびフィールドで与えられる全体的なメリットに応じて、ティアに配置されています。条件付きスキルを持つヒーローはそれほど評価されませんでしたが、十分に考慮されました。
各ヒーローを何十回も (時には何百回も) 使用するために時間を注ぎ込んだことを信頼してください。結局のところ、純粋に理論から外れているものを提供したくはありません。表示されるティアの分類は、戦闘の流れの現実を十分に考慮して、各ヒーローがどのように戦っていくかについての経験と技術的な理解に基づいています。
ダイブする前に調整するために、以下のラベルを使用してヒーローのスキルを交換可能に参照します:

スキルスロット 1 は、ゲーム用語で「アクティブスキル」または「スペシャルスキル」と呼ばれます。このガイドでは、スキル 1 または最初のスキルとして扱います。これは、レベル 1 からすぐにアンロックまたは使用できるスキルです。
スキル スロット 2 は、ゲーム内で「アルティメット」と呼ばれ、私たちもそのように呼んでいます。すべてのヒーローは、レアリティのレベルに関係なく、アクティブ スキルとアルティメットを持っています。
スキル スロット 3 と 4 は、UI でオーラとしてラベル付けされています。これらのスキルはパッシブにアクティブ化または効果を発揮するため、パッシブ スキル、オーラ 1 (スロット 3)、またはオーラ 2 (スロット 4) と呼びます。レジェンダリーとエピックのヒーローだけがオーラを持っていることに注意してください。
さらに、物事を簡潔かつ鮮明に保つように努めました。ヒーローごとに、2 つの段落を作成しました。 2 つ目は、ヒーローの有効性 (またはその欠如) の内訳と、その設計に従ってヒーローを「機能させる」方法を説明する、私たちの分析です。
リアリズムのために、同じレベルの視点を適用して各ヒーローを調べました。つまり、アップグレードされた同じレベルのヒーローに対するキットの有効性を示しています。当然、レベル 100 のシグルド (エピック) はレベル 80 のヒデオン (レジェンダリー) を飲み込みます。両方ともレベル 100 である場合、状況は同じではありません。それはさておき、包括的な BlitZ:Rise of Heroes ティア リストを紹介しましょう。 !
では、ラーネスのすべてのヒーローのランク表は次のとおりです。

ヒーローの名前は派閥を反映するように色付けされていることに注意してください。
S ティア
これらは決して間違いのない優れたヒーローです。彼らのスーツのスキルは、どのラインナップにも紛れもないアドバンテージをもたらします。彼らが別の派閥から来ていて、チーム構成の分隊ボーナスを壊したり下げたりするのにコストがかかっても、まったく問題ありません.彼らが貢献できることは、ボーナスの損失を上回ります。アリーナの上位 10 人のプレイヤーは、メイン ラインナップにこれら 5 人のすべてまたはほとんどを持っています。彼らのスキルは非常に強力で、多くのヒーローと相乗効果を発揮するため、戦闘の流れに大きな影響を与えることができます.

アイラー – レア度:レジェンダリー |派閥:神 |攻撃:遠距離 |クラス:ローグ |役割:ダメージ
Ilar は、破壊を引き起こすことに傾倒している神聖なヒーローであり、彼女のスキルはそれをよく反映しています。彼女のスキルに考慮された攻撃のパーセンテージは多くないかもしれませんが、彼女は戦闘全体を通して優れた一定のダメージを提供するため、彼女は理想的なバックライナーになっています.彼女の最初のスキルである敗北は、複数の敵に優れたインスタントティックと継続ダメージ (DoT) を与えます。
それとは別に、彼女の究極のスキルであるブルームは、敵チームの最強のヒーローを柔らかくし、優先順位を付け、その過程で残りのヒーローを傷つけるのに役立ちます.彼女のオーラ 1 である Divine Resilience は、2 つのダメージ タイプ (物理的および自然) に対する耐性を高め、オーラ 2 である Sweet Retribution は、10 秒ごとに彼女に最も近い敵にダメージ ティックを送信します。
Ilar は攻撃志向であるため、他のすべての派閥に対して 20% のダメージ ボーナスを最大限に活用できる神聖なヒーローです。彼女はどんなダメージ集中型のラインナップにもうまくフィットし、より安定した複数ターゲットへのダメージのためにエネルギー獲得をブーストするヒーローとグループ化すると、より輝く可能性があります.
彼女の生存性と有効性を最大化するには、彼女を後衛に座らせて、AoE スキルを持つ戦士を前線に配置するのが最善です。そうすれば、一度に 1 つのターゲットを攻撃するのではなく、複数のヒーローを罰することができる攻撃を仕掛けることができます。この役割でうまくスライドするのは、Grodan と Sigurd でしょう。

うみだ – レア度:レジェンダリー |派閥:キーパーズ |攻撃:近接 |クラス:ローグ |役割:攻撃サポート
ウミダは、他のヒーローとは異なり、確固たる戦術的アドバンテージを提供します。スキルキャストの弾幕とマルチターゲット無効化を呼び出すことができるオーラを装備しており、彼女はあなたの収穫のために戦闘の進行をより速く成熟させることができます.彼女の最初のスキルである Shrill Scream は、最大スキル レベルで最大 4.5 秒持続する、ゲームで最も長い無効化です。それが続く間、チーム全体の攻撃が少し速くなり、本質的にそれ自体を利用するスキルになります.
彼女の究極の Claw Marks は、わずか 1 つのターゲットに命中し、マイナー インスタント ティックと追加の DoT を発生させます。おそらく、このスキルの明白さが彼女のバランスをとっています。彼女のオーラ 1、Dance of the Wings は、彼女が BlitZ:Rise of Heroes の障害者の女王であるという事実を甘くします。これは、制御効果に対して非常に抵抗力があるためです.
彼女を真に特別なものにしているのは、彼女のオーラ 2 であるライトウェイト フェザーです。これは、スキルを使用したばかりの味方のエネルギー獲得を加速します。これにより、チェーン スキル キャストの雪崩が設定されます。あなたのチームが強力な後衛核兵器を持っている場合、彼らの核兵器が立て続けに発射されることを想像してみてください。
ウミダには壊滅的な核兵器がありませんが、ライトウェイト フェザーは、エネルギー バーがいっぱいになると、スキル 1 とアルティメットを 2 回キャストできることを保証します。彼女はあらゆる分隊の効力を高めることができ、Rodkhan や Yagolor のような生き残るためにスキルをキャストする必要があるタンクや、Melgor、Ashmira、Hideon、Dormin などのダメージを与えるモンスターとグループ化すると、彼女の存在はより高く評価されます。

ヒデオン – レア度:レジェンダリー |派閥:同盟 |攻撃:近接 |クラス:ウォリアー |役割:損害者
彼のアルティメットであるグリフィンのグリップは、位置に関係なく、床にいる最強の敵に飛び込みます。大きなダメージを与えるだけでなく、ターゲットは挑発されて攻撃されます。これにより、最大の脅威を排除するためのダメージの「余裕」が生まれる可能性があります。
彼のオーラ 1 であるブラインド オーラは、受動的に敵のクリティカル レーティングを低下させ、間接的にチームの生存率を向上させます。彼のオーラ 2 であるカウンシル ディフェンスは、彼のヘルスが 10% まで低下すると、すべての敵を揺るがします。これは、彼が十分に回復し、戦闘が進行するにつれてヘルスが再び低下する場合に複数回発生する可能性があります。
Griffin's Grip は両刃の剣として機能する場合があります。最強の敵 (最大のパワー レートと現在の HP を持つもの) が後衛に座っていて、攻撃に耐えるのに十分な体力を持っている場合、Hideon は妥協した位置に着陸し、2 ~ 3 の敵対船の攻撃を引き寄せる可能性があります。このスキルの高リスク、高報酬の性質により、彼を維持するのに役立つヒーラーまたはサモナーとチームを組んで、彼が「悪い」ダイビングから落ちた場合に彼が空けるスロットをすばやく埋めることができるようにすることをお勧めします.

ロドカン – レア度:レジェンダリー |派閥:キーパーズ |攻撃:近接 |クラス:ウォリアー |役割:タンク
Rodkhan は、BlitZ:Rise of Heroes で最高の戦車としての称号を保持しています。気の利いた攻撃と相まってダメージを無効化および回避できるスキルを備えた彼の永続的な存在は、多くの場合、敵を長持ちさせるための鍵として機能します.レースでは、「セカンド ウィンド」とは、すでに疲労と疲労を感じているときにエネルギーとモチベーションが爆発することを指し、希望と強さが突然押し寄せます。 Rodkhan はまさにその典型です。
彼の最初のスキル、Tiger's Fury は、彼が受けるすべてのダメージを 7 秒間 0 に設定し、同じ時間の間全員のダメージもブーストします。味方を回復したり防御バフを与えたりできるヒーローがいる場合、そのような性質のほとんどのスキルは HP の低いチームメイトを優先するため、Rodkhan が受け手になることはほぼ確実です。
攻撃のために、彼は彼の究極のハンマーオブジャスティスを持っています。これは、衝撃内の敵にダメージを与え、ノックバックし、精度を損ないます。それに加えて、彼のオーラ 1、異邦人嫌いは、最も弱い敵に定期的にダメージを与えます。彼のオーラ 2、Impressive Agility は、チーム全体の回避率を高めます。これは、自動攻撃に対する防御です。
Rodkhan と Yagolor のみが絶対無敵スキルを持っています。ただし、彼はより速くアクセスできるため、後者に有利です。ロドカンの唯一の問題は、自動攻撃のダメージが低いことを除けば、アライアンスのヒーローによってフォーカス発射された場合です.これにより、エネルギーバーがいっぱいになる前に彼を消す可能性があります.
したがって、選択肢は次のようになります。 1) 彼を前中央のスロットに配置しないでください。 2) 同盟のウォリアー/ローグの反対側ではないスロットに彼を割り当てます。または 3) タンキーで挑発可能な仲間のフロントライナー (つまり、ソレイまたはダリア) を持っている。あなたの鍵は、彼がスキル 1 を少なくとも 1 回利用するようにすることです。これは、多くの場合、バックラインがスキルを解き放ち、引き継ぐためにエネルギーバーをいっぱいにするのに十分な時間を稼ぐのに十分であるためです。
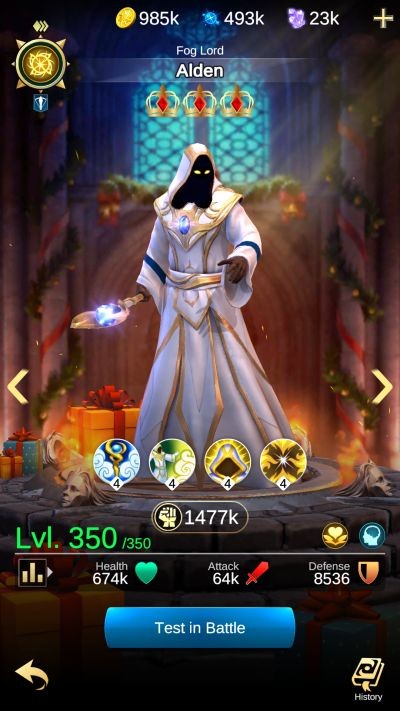
オールデン – レア度:レジェンダリー | Faction:Divine | Attack:Ranged | Class:Mage | Role:Support-Healer
Alden may not have a single damaging skill, but this Divine hero deserves his seat at S Tier. His health restoration capabilities are coupled with a buff or debuff and the frequency of his heals almost makes it seem that he can do the work of two healers. The effect of his first skill, Living Fog, lays a protective cover to teammates; enemies in its area suffer a loss in accuracy and Alden’s allies gain health while it’s up.
His ultimate, Protective Veil, drops a burst heal to the most-damaged teammate and blesses it with a temporary ATK stat increase. Upon casting his ultimate, his aura 1, Unearthly, kicks in and this renders him immune to control effects for 10-25 seconds, depending on skill level. The main kicker is his aptly-named aura 2, Immortality, which heals a teammate each time they use their ultimate.
With three heals in his kit, Alden’s sheer presence increases his team’s chances of outlasting the enemy. The sustain he provides will let you see miles and miles of success not just in the Arena, but also in the Treasure Maze because he can nullify or at least buffer the health attrition. He does not have a direct weakness, except for heroes with skills that can access or prioritize the backline (Zera’s skill 1 and aura 1, Larana’s skill 1, Hideon’s ultimate, Delayra’s ultimate, and Dormin’s skill 1).
A Tier
Some heroes in this tier can be considered in S Tier. However, the conditional nature of some of their skills makes them not as effective as the ones mentioned above right from the onset of combat. If the RNG gods only awarded you with the heroes from this tier, you don’t need to worry much because they can still fight as effective as their superior counterparts. It is all up to you to figure their strengths and tendencies when it comes to formation, target prioritization, and their relative longevity/survivability. Check below if your favorite hero is listed in this tier.

Tezeus – Rarity:Legendary | Faction:Undead | Attack:Ranged | Class:Mage | Role:Support-Healer
Tezeus could easily belong to S Tier, however, his strong healing and protection capability is balanced by his conditional passive skills. Still, he brings to the table a combination of healing, protection, buff removal, and summoning, practically, a jack of all trades.
His first skill, Blood Transfusion, is a burst heal that seeks out the most injured teammate while pulsing a good damage tick to all enemies. Complementing well is his ultimate, Nectrotic Hideout, which envelopes the most injured teammate with a damage-mitigating spell for 7 to 10 seconds, depending on skill level.
His aura 1, Book of Damned, will check for any supportive spells that were affecting a recently-slain enemy and proceed to cancel up to 9 buffs and heals on its surviving teammates—super conditional, but may come in handy. His aura 2, Necromancer’s Elixir, conjures a tanky version of Niss upon his death. This acts as a life extension rather than a usual, force-augmenting summon.
Blood Transfusion is the strongest, single-target heal in the game, but due to his nature as a backliner, Tezeus might not be able to pop it on time to save a dying frontline ally. As such, it will be ideal to group him with Miara and Umida who can greatly help with energy gain. The burst heal will still be an asset. If you are looking to add just one healer in your line-up, the best picks can only either be Alden or Tezeus.

Ashmira – Rarity:Legendary | Faction:Keepers | Attack:Melee | Class:Warrior | Role:Damager
Ashmira is the most promising area of effect (AoE) nuker in the game. When it comes to dealing torrential damage, few could be at par with her. In fact, she could easily be a classified as an S-Tier hero if she only has a sustain/supportive skill. The hellacious damage storm she can bring begins with her first skill, Call of the Deep, which can devastate multiple enemies.
Her ultimate, Serpentine Power, can hit multiple targets as well. Her aura 1, Immersion, periodically hits the enemy with the lowest remaining HP. The cherry on top is her aura 2, Drowned One’s Gift, which boosts her damage for 8 seconds should she kill (last hit) at least one enemy.
Designed with a damage-intensive kit, Ashmira is a must-have if you seek to build a damage snowballing team. Her weakness however is her range. As a melee hero, she’ll naturally walk into the frontline rendering her susceptible to early damage and this, at times, could mean that she might be dead before she can unload her arsenal.
Taking that into account, she is best deployed with taunting heroes (Solei or Dalia) or defense buffers (Tezeus, Aarox, Ingrid, Drumbor, or Karn). If you’re gunning for a pure offense team, she can excellently synergize with fellow monsters like Hideon, Ilar, and Zera.

Melgor – Rarity:Legendary | Faction:Alliance | Attack:Ranged | Class:Mage | Role:Damager
Melgor is the representation of a traditional wizard both in appearance and ability. Armed with devastating nukes and self-sustaining passives, he has the power to end battles with his raging magic. His first skill, Meteorite, is about the most intimidating skill in BlitZ:Rise of Heroes. The huge meteor he calls down will deal a great damage and weaken the defense of all enemies for 10 seconds.
His ultimate, Rocky Rain, will prioritize the enemy with the lowest HP pouring immense damage to it and its nearby allies. His aura 1, Help of the Earth, boosts his own energy gain—this he greatly needs to make up for his slow attack and backline-dwelling nature. His aura 2, Seasoned in Battle, toughens him up against magic damage types; necrotic damage in particular. This preps him as a likely part of your squad’s last stand.
As a self-sufficient mage, all that Melgor needs are steady frontline teammates—the goal is to keep attackers off him. He is then best grouped with the likes of Rodkhan and Dalia (for their sheer beefiness) or Aurelia and Vilante, so undead minions may stand between Melgor and the enemy should the melee-types be overwhelmed.
From an offensive standpoint, Melgor’s defense-reduction capability fully stacks with Zera’s aura 2. Alternatively, having Miara or Umida will offer better energy regeneration rates for more frequent Meteorites and Rocky Rains.

Aarox – Rarity:Legendary | Faction:Ashen | Attack:Ranged | Class:Mage | Role:Overall Support
Aarox can prove an asset for a team that relies on risks and comebacks. The healing, protection, and damage boost he offers amazingly works to fill in offense and defense gaps. His first skill, Zackraf’s Will, blinds enemies for 3 seconds. Blinded heroes cannot land normal attacks while the debuff is active. The skill also deals a good amount of damage to enemies and heal allies.
His ultimate, Fiery Mark, puts a protective spell on his most injured teammate which will reduce all incoming damage for 7 seconds. His aura 1, The Last Spark, makes him a viable, sacrificial hero because his death will give a generous, burst heal to his teammates.
Meanwhile, his aura 2, Last Frontier, is a team buff that will last all throughout the battle; it will activate soon as a teammate reaches low health. Everyone in the squad will receive an attack power boost, and what makes it sweet is the fact that it cannot be dispelled.
Due to the conditional nature of The Last Spark, it is relatively “okay” to deploy Aarox on the frontline. In that way, he can charge his energy sooner to allow Zackcraf’s Will and/or Fiery Mark to happen; should he die, everyone is healed and in the process, Last Frontier gets activated.
Although his skills aren’t designed to be flashy, that does not discount his potential to be a “glue guy” or the one who ensures that the team succeeds even at his own expense. He synergizes in many ways with Alzekir, Hideon or melees that can greatly appreciate his support to last longer as they deal damage.

Yagolor – Rarity:Legendary | Faction:Undead | Attack:Melee | Class:Warrior | Role:Tank
Yagolor stands as a team-oriented tank capable of sustaining not just himself, but his allies as well. Everything in his arsenal has both offensive and defensive implications. His skill 1, Stealing Life, zaps a good percentage of health from all enemies and transfers it to his teammates. His ultimate, Phantom Form, renders him invincible for 8 seconds and while active, he’s able to deal more damage.
His aura 1, Deadly Trap, disables an enemy casting an active skill for 4 seconds, damaging it at the end of the duration. This has a strong deterrent potential, especially against heroes that need to clutch their skills for survival. His aura 2, Vampire’s Grin, periodically steals life from the enemy with the highest remaining HP to heal his most injured teammate.
The penalizing effect of Deadly Trap can be felt much more when there are fewer enemies on the field. As such, it may be helpful to make Yagolor occupy a backline slot. Since he is a melee hero, he is going to march forward anyway, so this will do no harm to your formation; he will still act as a shock absorber to cover ranged allies.
Either way, assigning him as a frontliner remains as the foremost option, but try to not put him directly across a Keeper warrior or melee rogue—this is to help ensure that he can assume his Phantom Form and do what vampires are expected to do:outlast everyone and suck the life out of their pitiful preys. Also, like Rodkhan, it will always be better if you team him up with a healer like Tezeus or Alden.

Larana – Rarity:Legendary | Faction:Undead | Attack:Melee | Class:Rogue | Role:Defense Support
Larana helps her allies stay in combat and in case they fall, she could still tilt the battle in their favor. Although only one of her skills is exclusive to her, only a few can do what she can altogether and this makes her essentially, tactically “unique.” Her skill 1, World of Nightmares, disregards distance and positioning to drop massive damage to the farthest enemy; she also restores a good percentage of her health in this single-target nuke.
Her ultimate, Fearlessness, does take some fear away from her allies because once it activates, everyone becomes insusceptible to control effects for 5 to 6.5 seconds, depending on skill level. Very few heroes offer control immunity and the decent duration of this skill makes Larana valuable.
Although conditional, her aura 1, Last Will, brings forth a promise of vengeance, as each fallen ally will give surviving teammates a huge boost in evasion rate; just at skill level 1, 3 dead allies will already more than double the stat. Her aura 2, Plague Bearer, ups her normal attack damage output by means of a Necrotic DoT that lasts for 6 seconds and will tick 3 times.
When the tide of battle usually becomes less ideal, it actually gets more optimal for a squad with a Larana, thanks to her Last Will. She is then best deployed with heroes that can poise a comeback like Aarox, Yagolor, and Alzekir. Alternatively, if you happened to have a leveled up Delayra and Dormin, you can brew a backline-breaking team by adding Larana in.

Solei – Rarity:Legendary | Faction:Divine | Attack:Melee | Class:Warrior | Role:Support
Solei dedicates her Divine presence to safeguard those who she fights alongside. It is in her nature to charge ahead providing cover, protection, and healing to fortify the frontline. Her first skill, Sunshine, puts a temporary, minor damage reduction buff; it has a small AoE, but will almost always be casted on frontline heroes.
Her ultimate, Blinding Beam, is her coveted taunt skill; those near her will be blinded and forced to attack her for 6 seconds. During which, she will receive 3 ticks of minor heal based on her max HP. Her aura 1, Deceived Death, saves a dying ally, keeping it alive with a portion of its HP healed. Her aura 2, Grace of the Sun, is a minor, max HP-based self-heal.
In the multiple permutations or times we used Solei (across multiple accounts and battle modes), we observed that she and Fterag has something in common:regardless if you deploy them on the backline, by the moment they march forward, the enemies will be drawn to attack them (even without the taunting skill’s effect). We’re not exactly sure if this is a bug or an intended behavior. Due to this, Solei has a high likelihood of dying first or very early in battle.
As such, despite her decent kit, it is hard to “maximize” her potentials. With zero damage skills, she cannot entirely capitalize on the faction advantage as a Divine hero and this is what stops her from joining the two other gods in S Tier. Prioritizing her could only be probably justified if you have the luck of getting her multiple times (thus, promoting her via the Altar of Ascenscion) or if you are willing to make her your most upgraded hero in terms of equipment and level.

Grodan – Rarity:Legendary | Faction:Ashen | Attack:Melee | Class:Warrior | Role:Damager
Grodan thrives in putting pressure on his foes with relentless aggression. Possessing three skills meant to damage and a passive that toughens him up against control effects, this warrior is a great option for offense-centric teams. His first skill, Incineration, is a linear AoE nuke that knocks down affected units right before the flame jet ends.
His second skill, Steel Whirlwind, is a multi-target damaging maneuver meant to swath the enemies near him—this beautifully synergizes with Incineration because they will both land on the same 1 to 3 enemies. His aura 1, Combustion of Soul, is akin to Yagolor’s Deadly Trap, except that it only deals damage. His aura 2, Steadfasness, grants him resistance against disables; at max skill level, he will have 100% immunity.
The combination of his skills makes Grodan the melee counterpart of Ilar. He is then best grouped with her and Supports that can help with energy gain, to give your team a constant, multi-target damage output that can soften up your enemies for the eventual kills.
Quite interestingly, if you make this melee damager take a backline slot, the knockdown from Incineration may come at a “golden” timing—usually kicking in right in time to disrupt the enemy backline from using their skills or at least delay them. As such, Grodan can perform in a 3 melee + 3 ranged or a 4 melee + 2 ranged line-up.

Zera – Rarity:Legendary | Faction:Ashen | Attack:Melee | Class:Rogue | Role:Damager
Zera possesses contagious ferocity and is a threat to enemies near and far. Half of her kit is designed to attack the heroes farthest from her and this can pave a way to “tame” backline-hugging mages and ranged rogues. Her skill 1, Flaming Stars, will shoot the two farthest enemies and deal a decent amount of damage. For the next 6 seconds, everyone in her team will get a boost in ATK.
Her ultimate, Sizzling Dance, shares the same target preference as Grodan’s Steel Whirlwind; it deals lesser damage, but has a bit shorter cooldown. Her aura 1, Wandering Flames, is what promotes her as an executioner of ranged heroes; each time an ally casts an ultimate, she blasts the two most distant foes with a damage pulse.
Additionally, her allies will also receive a critical strike chance increase for the next 5 seconds. Her aura 2, Burning Armor, primes her immediate opponent for execution because her normal attack will reduce its defense for 7 seconds; the duration will essentially refresh as she keep on landing hits.
Not a lot of heroes can breach the backline like Zera. She can particularly be useful in campaign mode where a stack of identical mages present problems. If you then want a line-up capable of poking or softening those that seek protection behind melees, it is best to deploy Zera with Larana (for her skill 1), or Delayra (for her ultimate) as they have skills meant to reach the farthest enemies with no conditions required. Just be wise to not sacrifice squad composition bonus because grouping all three might make your squad too faction-diverse.
As previously mentioned, the defense reduction from Melgor’s Meteorite stacks with Zera’s passive; you may go for this synergy too. Another offensive arrangement option is to pair Zera with Umida to enable your entire squad to cast ultimates more frequently so Wandering Flames can contribute more to the wreckage of your adversary.

Miara – Rarity:Legendary | Faction:Keepers | Attack:Ranged | Class:Mage | Role:Support
Miara, the feline wizard, fulfills what is expected of a cat and a mage. She can keep her friends’ morale up (with her health and energy gain skills) and use her irresistible charm to tame even the toughest foes. Her skill 1, Flower Meadow, creates a visible aura around her that heals and speeds up the energy gain of her allies.
Her ultimate, Catlike Charm, trances the enemy with the greatest normal attack potential making it a temporary teammate. This is an incredible skill; if the controlling effect coincides with an enemy skill cast, the skill will be used to harm the enemy’s own teammates. It is also the longest, single-target “true” disable in the game.
Her aura 1, Beam of Hope, provides a trickle heal for the most injured ally each time she attacks. Her aura 2, Vicious Hiss, roots in place whoever she is attacking whenever an enemy uses an ultimate. The lockdown lasts for at least two seconds.
If BlitZ:Rise of Heroes is a MOBA, a hero with a kit like Miara’s would be a permanent meta because she can offer continuous sustain. Add to that, the effects and total duration of her disables are useful to secure a kill. Fortunately, her design works equally well in an idle battler. Although it requires lucky timing, Catlike Charm can turn the tide of battle for your team. If the charmed enemy has no more teammates to attack, it would simply act as a long stun. We’ve honestly lost count how many times this skill has saved the day for us in the hundreds of matches we played to master the game to create our beginner’s guide and this tier list.
As a support, she is not the type that requires certain heroes to be teamed with her; other heroes need her instead. Her power can, however, be felt much more when teamed with other heavy disablers (like Umida and Gvin) or if partnered with another healer.

Istra – Rarity:Legendary | Faction:Ashen | Attack:Ranged | Class:Mage | Role:Damager
Istra is the embodiment of a raging fire that consumes everything in its wake. The abilities at her disposal are bent to end the fight quick even if it means breaking her own life force. Her skill 1, Sphere of Defeat, is the most powerful, DoT in BlitZ:Rise of heroes. It seeks out the enemy with the lowest current HP and deal damage per second that is around Istra’s ATK stat value for 7 seconds.
Meanwhile, her ultimate, Greedy Flame, deals heavy fire damage to the enemy with the highest attack rate. As she taps into her own fiery essence to do this, she takes damage equivalent to 100% of her ATK.
Her aura 1, Battle Ignition, jumpstarts her team’s charge as it provides a minor damage buff to all allies on the onset of combat for 10 to 25 seconds, depending on skill level. Her aura 2, Will to Live, is a periodic self-heal; this occurs every 10 seconds and can more than offset what she loses from her sacrificial ultimate.
With her solid, single-target skills, Istra can be a decent backline damager especially that she can hasten the elimination of a “tenderized” enemy through Sphere of Defeat. Such quick eliminations will be more probable if teamed with heroes that have high ATK factoring in their single-target skills like Hideon, Dormin, Rog-Drog, Gok, Mireyn, Gal-Dzuk, Larana, Mom-Ghor, and Vilante.

Alzekir – Rarity:Legendary | Faction:Ashen | Attack:Melee | Class:Rogue | Role:Supportive Damager
Alzekir may have no outright strength, but she is capable of mounting a late-battle comeback. She’s built like a tiger, able to fight better when wounded (sorry, tiger-man Rodkhan). Her skill 1, Flame Claws, swipes through multiple enemies and heals her for a good portion of the total damage dealt. This allows her to sustain herself which she greatly needs as a melee rogue. Just to note, of all the Ashen Legendaries, she has the lowest base HP.
Her ultimate, Burning Magic, helps her and her allies deal with curses. Upon casting, it will clear up to 4 to 7 debuffs, depending on skill level. Her aura 1, Taking Pleasure in Pain, bolsters her critical attack chance when her health gets down to 30%. Her aura 2, Sharing Time, is her comeback ace; for each dead ally, she gains a decent percentage increase in ATK.
Flame Claws’s huge AoE hits a wide area and can reach the backline; since the damage it does is the basis of its heal, it can work as a burst regen almost as good as Tezeus’ skill 1. While she has a sustain skill of her own, Alzekir still needs the assistance of healers to keep herself alive.
As such, having two healers to fight alongside wound be befitting—ideally one with a burst regen and one with a heal over time. You could then go for an Alden/Tezeus + Miara/Meya combo. Of all supports, however, fellow Ashen, Aarox, offers the most synergy because he can exceptionally nurse Alzekir with his healing, protection, and comeback-dependent skills.

Meya – Rarity:Legendary | Faction:Keepers | Attack:Ranged | Class:Mage | Role:Healer
Meya helps ensure her allies’ survival with her heal and just her sheer supportive presence. Blessed with passives that make her teammates harder to disable and more receptive to heals, her nuke and actual healing skills are simply just icing on the cake. Her skill 1, Nature’s Blessing, places a visible, healing aura around her most injured teammate. This lasts for 8 seconds and will tick 4 times.
Her ultimate, Nature’s Wrath, gives her some offensive capability. It is a small, AoE nuke that can hit multiple enemies wherein the main target is meant to take more damage. Her aura 1, Born Mentor, increases the effect of heals for her team by a good percentage.
Note that this affects every means of life gain/regeneration including life steals and similar skill effects; simply put, it will amplify your team’s overall survivability. Her aura 2, Maneuverability, increases her team’s resistance to control effects. Since control evasion and resistance works in the same way and follows just a “direct” equation, heroes with natural control defense skills can achieve 100% immunity against disables with the help of this passive.
Like Miara, Meya does not prefer particular allies to help her perform better, instead she acts as the reinforcing block to most team builds. She has a lot of synergy applications. Since her skills revolve around improving the sustain and survivability potential of a squad, melees with life steal and regen can benefit greatly from her—think of Yagolor, Larana, and Alzekir.
Of course, Meya synergizes the most with other support healers and even with heroes that have conditional, burst HP regen like Solei, Karn, Dalia, and Tromgar. Nature’s Blessing will be chiefly beneficial to shock-absorbers with no regen of their own; from Rodhkan down to skeletal minions—yes, they are eligible targets of the skill too!

Gvin – Rarity:Legendary | Faction:Alliance | Attack:Ranged | Class:Mage | Role:Damager
Gvin is the scariest disabler in the game and is a constant late-battle nightmare. The ice abilities in her command can freeze multiple threats only to greet them with a deadly blast when they get thawed. Her skill 1, Winds of Niflheim, will disable all enemies for 2.7 to 3.5 seconds, depending on skill level. This disable does not only pause enemy auto-attacks, it can also cancel skill casts if it occurs at the right time. Her ultimate, Ice Hit, deals massive damage to the entire enemy team and reduces their evasion rates by 90% for 8 seconds—this is the highest anti-evasion debuff in the game. Her aura 1, Fireproof Ice, makes her resistant to fire damage.
This, essentially, cancels out the factional advantage of Ashen heroes over her, enabling her to withstand the strategic, backline-reaching skills of Zera and Azran. Her aura 2, Frosty Aura, further increases her potency in culling the evasion rates of enemies; just at skill level 1, it takes away 47% evasion chance. Beyond that, it also gives a minor accuracy increase to allies.
Usually, when Gvin starts casting her skills, it becomes impossible for the enemy to pull off a comeback because of the painful disable + damage combo she can invoke. Add to that the fact that her anti-evasion properties neutralize the ability of most rogues to survive and make it to the late-battle phase.
To make Gvin more effective, it will be smart to team her up with Keeper supports, Umida and Miara, for quicker energy refills. Naturally, a steady frontline is ideal too to prime things up; basically, any tank or supportive melees will do, but Roderick deserves a special mention because all of his skills complement Gvin’s (do check him in B Tier later).

Aurelia – Rarity:Epic | Faction:Undead | Attack:Melee | Class:Rogue | Role:Damager, Summoner
Aurelia augments her team’s charge with her attacks and her undead reinforcements. Gifted with high-damage skills that has nasty side effects and the ability to summon skeleton warriors, she is a worthy addition to any squad. Her skill 1, Multiple Piercings, is a single-target nuke with a great ATK stat factoring. It starts by dropping a great burst damage and proceeds to injure the target with a trickle DoT that will tick every 2 seconds.
Aside from that, it will also take away some of the enemy’s evasion and it can last from 7 to 10 seconds, depending on skill level. Her ultimate, Piercing Blow, is another single-target skill with a good ATK stat factoring. The damaged opponent will be less susceptible to health regen effects for 10 seconds.
Her aura, Endless Battle, is what sets her as a true asset; if any teammate falls, Aurelia will summon a skeleton warrior (a Yorton) to take its place. The summon will only last for 25 seconds, but will basically be “resurrected” once its lifetime expires, thus living up to its name.
Most BlitZ:Rise of Heroes tier list you will see have a unanimous opinion on Aurelia about being an outstanding addition to any squad and ranked better than some Legendaries. With her outright damage output dedicated to eliminate one target a time, she is a great help in breaking the enemy frontline. Her 100 base evasion stat also helps her weather through attacks and make it to the late-battle phase where she and her minions usually shines.
Aurelia is one of the heroes you’d be “happy” to see surviving the early-battle onslaught simply because, as long as she’s alive, there will be a supply of warm bodies (okay, maybe cold) that will get in between the enemy and your usually fragile backliners.
The Yortons she can call to battle are also relatively tanky (they can have up to 1000% of Aurelia’s HP at max skill level) PLUS they have their own implicit energy bars and skills to use, making them an offensive threat as well. Vilante may have a similar summoning skill, but Aurelia can call reinforcements easier because hers requires no energy—a vacated hero slot will do it. She simply runs circles around her Undead comrade.

Karn – Rarity:Legendary | Faction:Keepers | Attack:Ranged | Class:Mage | Role:Overall Support
Karn assists his allies to regenerate their health and deny the enemies the very benefits of restoration. The power of nature in his command allows him to attack, protect, and heal which makes him a multi-dimensional support. His skill 1, Poisonous Cloud, will leave a DoT with an 8-second duration to all enemies.This will deal a tick of minor damage 4 times and reduce the effectiveness of all health regeneration for the same period.
His ultimate, Strengthening Recovery, is a burst heal meant to be placed on the most damaged ally. It also gives a huge boost in defense (140% to 200% depending on skill level) for 6 seconds. His aura 1, Unity with Nature, helps with his survivability as it increases his resistance against natural damage. His aura 2, Natural Healing, is a minor heal to all teammates whenever one of them falls.
Only Karn and Aurelia have anti-regen abilities and their combination could work well against teams that are clearly dependent on healers. Since both of them are likely survivors of the early-battle chaos, the two could beautifully blend a comeback or at least make for a solid late-battle stand.
Strengthening Recovery also makes it possible for an injured teammate to stay alive until another heal kicks in. As such, Karn will solidify a regen-based team and, in the same way, can somewhat nullify enemies that uses the same composition format.
B Tier
Heroes in this tier are relatively decent. They can still hold good against a team composed by heroes in tiers S and A, but will simply fade since they will have lesser passives/auras and most of them are too one-dimensional. Most of them have offensive skills that can intensify your team’s damage stream.

Gal-Dzuk – Rarity:Epic | Faction:Keepers | Attack:Melee | Class:Warrior | Role:Damager
Gal-Dzuk’s presence and fierceness are meant to bring peril to those that wield magic. He marches with an aura that makes enemy mages fragile and heavy damaging skills that help break those that protect them. His skill 1, Mighty Hit, deals a high, burst damage to a single target and makes it bleed for a trickle DoT that will occur 5 times in 10 seconds. It will also knockback the affected enemy causing it to briefly fall off formation. His ultimate, Severe Magic, is a nuke with a great ATK factoring and will hit all enemies. His aura, Hatred of Magicians, makes all opposing mages take more damage.
There is a vast selection of possible frontliners from this point of the guide onwards; most of which have kits that heavily inclines to either offense or defense. What sets Gal-Dzuk ahead of the pack (or be listed early in B Tier) is the effect of Hatred of Magicians.
Since a lot of heroes have skills that seeks multiple targets, AoE, or a possible access to the backline, it offers a way to make it easier to drop substantial damage to mages early in the battle and potentially cull their late-battle potency.

Sigurd – Rarity:Epic | Faction:Alliance | Attack:Melee | Class:Warrior | Role:Damager
Sigurd is BlitZ:Rise of Heroes’ poster boy for a reason—he has powerful, flashy attacks and his will to vanquish his foes will be felt even if he is taken out of the battle. His skill 1, Blade Storm, is an ostentatious nuke with a cone-shaped AoE that has a good ATK stat factoring. His skill 2, Tactical Advantage, is yet another AoE skill.
It only deals minor damage, but induces a mini-stun lasting 0.5 seconds. It also helps him regain energy a bit faster for the next 4 seconds. His aura, Guardian’s Loyalty, is an undispellable team buff that will kick in when he dies. It will give a 5 to 9% increase in attack power depending on the skill’s level.
Since the goal in each battle is to eliminate all enemies, the ATK buff from Guardian’s Loyalty is a welcomed boost, especially that it will persist through dispel skills. It may cement a lead or help mount a comeback. Blade Storm’s high damage and wide area is a delight to connect against Keeper heroes; its length can extend to the backline.
If Sigurd is situated in slot 1, it can even land on all 6 enemies. Sigurd is listed high in B Tier because, like Gal-Dzuk, it requires little luck to summon multiple copies of him, opening the possibility for easier ascension.

Dormin – Rarity:Epic | Faction:Alliance | Attack:Ranged | Class:Rogue | Role:Damager
Dormin has a notorious reputation for erasing enemies with ease. The massive damage from his skills and a passive that makes disabled enemies more vulnerable primes him as the best ranged rogue in BlitZ:Rise of Heroes. His first skill, Arrow of Oblivion, is a dreadful, single-target skill meant to hit the enemy with the most filled up energy bar. It will also prevent the victim from using its ultimate for 12 seconds—the longest disable type skill in the game (albeit being just a “pseudo” control).
His ultimate, Little Trick, is yet another high-damage, single-target skill. Once it hits, Dormin will receive a damage increase buff that will last for 7 seconds. His perfectly-named passive skill, No Mercy, is a passive damage multiplier for his allies when landing hits or skills on disabled enemies.
From his skills alone, it’s plain to see why Dormin is the highest-listed ranged rogue in the game. The sheer damage of Arrow of Oblivion is enough to consider him as a backline-sitting damager; its effect further increases his deadliness.
At late-battle, it means that the affected enemy can only use its skill 1, creating a severe mismatch if it all goes down to a 1v1 or 2v2. He is simply a pain to take on if not killed earlier. Since Arrow of Oblivion is treated as a disable, the unfortunate recipient will also take extra damage, thanks to No Mercy. Dormin will undoubtedly shine if grouped with other disablers like Gvin, Umida, and Miara so your team can reap better “harvest” from his passive.
It is also noteworthy to say that Dormin is the “pound for pound” king when it comes to attack power. By pound for pound we mean that, if all heroes are at the same level and base star ascension, he takes the cake as the best one with the highest damage.

Gok – Rarity:Epic | Faction:Fireborn | Attack:Melee | Class:Warrior | Role:Damager
Gok is a finisher with a persisting desire to crush his opposition. Charging in with his savage presence, he can weaken the enemies’ defenses and even persevere through control spells; he is also talented in hunting down the most injured foe. His skill 1, Flight of Gok, allows him to dive and knock down the enemy with the lowest health dealing an immense amount of damage.
His ultimate, Battle Roar, greatly reduces the defense of all enemies for 8 to 10 seconds, depending on skill level. His aura, Lucky Amulet, gives 100% resistance against any control effect that has previously affected him in the battle. This immunity, even just at skill level 1, will last for 20 seconds.
Due to the effects and conditions of his skills, there are multiple synergy opportunities for Gok. Battle Roar blends well with other defense reduction skills (Zera’s aura 2 and Melgor’s ultimate); Flight of Gok may help get a confirmed kill if it activates in conjunction with other strong single-target skills from Hideon, Dormin, Rog-Drog, Mireyn, Gal-Dzuk, Larana, Mom-Ghor, and Vilante.
The problem with Gok is that his passive requires him to be a victim first and because he isn’t exactly tanky, he may not get to fully “enjoy” the benefits of Lucky Amulet, especially if he gets out of position due to his skill 1.

Dalia – Rarity:Epic | Faction:Keepers | Attack:Melee | Class:Warrior | Role:Tank
Dalia is a formidable tank that can provide cover and healing. True to her character as a tree, she is inherently tough and can extend this toughness to her allies. Her skill 1, Barbed Barrier, will draw the aggression of the two nearest enemies and return 30% of all the damage they deal on Dalia. For the next 6 to 12 seconds (depending on skill level), she will also receive a huge increase in defense.
Her ultimate, Nature’s Mercy, is a protective buff that will be placed on the most wounded team member. It will reduce all incoming damage and heal a great portion of its health. Her aura, Steady Tree, increases her health pool by a substantial percentage. This, even just at skill level 1, makes her the tankiest Epic hero just by HP count alone.
Barbed Barrier is one of the three taunt skills in the game and this makes Dalia a precious frontliner. The hits she can divert to herself can allow the likes of Rodkhan, Yagolor, and Larana to cast their self-preserving skills before depleting their HP in their tanking duties.
Oddly enough, she can bring more impact than Solei (a Divine hero) because apart from her damage distribution potential, she can offer a higher heal percentage and does have better overall stats (provided they have the same level and ascension star number). Dalia is a great enforcer for a Keeper-heavy line-up and will be able to hold well against anyone except Alliance melee damagers.

Elentine – Rarity:Legendary | Faction:Alliance | Attack:Ranged | Class:Rogue | Role:Damager
Elentine excels at sniping enemies with strategic purpose. Talented in hitting single or multiple marks, she can be a decent supporting fire option. Her skill 1, Massive Strike, will deal a good amount of damage to all enemies.Her ultimate, Heart Shot, is an amplified version of her auto-attack, but will seek the enemy with the lowest energy, causing it to gain energy at a slower rate for 6 seconds. Her aura 1, Intoxicated Arrow, is a special shot she can do every 11 seconds which briefly stuns her target. Her aura 2, Bullseye, is a passive self-buff that grants her a minor damage increase.
It might appear outrageous for a Legendary like Elentine to be listed in B Tier, but there are multiple reasons for this. In terms of functionality, she is just similar to Dormin. As a Legendary, one would need extreme luck to summon multiple copies of her. Therefore, trying to ascend Elentine to the the next star level is essentially more expensive and less feasible. You’d be better of leveling up a Dormin instead if you really want a ranged rogue.
Also, the attack factoring of her skills aren’t too pleasing and her low overall stats in terms of attack, defense, and health points makes her a weak option. If we must add, the effect of Bullseye gives too little and is exclusive to herself, plus the duration of Intoxicated Arrow is too short to open a window of opportunity. Verdict:she does not live up with her level of rarity; go for any of the 3 other ranged rogues instead.

Roderick – Rarity:Epic | Faction:Undead | Attack:Melee | Class:Warrior | Role:Support, Damager
Roderick aids his comrades to victory with his offense-strengthening ways. Capable of passively boosting his allies’ damage and delivering attacks that can hamper the enemy in two ways, he has his own niche as an enforcer. His skill 1, Accumulate Rage, pilfers a good portion of energy from the enemy with the most filled bar then transfers it to his ally with the least current energy. It will also place a 6-second DoT that will reach a decent overall damage output on its own.
His ultimate, Necrotic Blade, is a linear AoE nuke that deals damage and petrifies those that it harms. His aura, Deadly Inspiration, will increase the attack power of his allies with no condition required.
Since Roderick’s melee nature will make him advance on the frontline regardless of positioning, there is a high chance that he will be able to use Accumulate Rage; the likely recipient of this would be another frontliner that has just used a skill. If the energy is awarded to a single-target damage monster (think of Rog-Drog, Hideon, or Larana) it can almost always result to an instant kill.
Quite unfortunately, Roderick may not be tanky enough to survive and be able to use his Necrotic Blade. But, if and when he is able to use it, the lockdown it offers may be the last lockdown you will need to clinch the battle.
Deadly Inspiration simply shames what Elentine’s self-serving Bullseye does and it has a better end game (or max skill level) effect as it gives an 11% attack power increase. It also stacks with Istra’s aura 1; you may opt to field them together to give your team a decent, no-conditions damage boost.

Mireyn – Rarity:Epic | Faction:Alliance | Attack:Melee | Class:Warrior | Role:Damager
Mireyn can positively influence her squad’s stand with her pinpoint attacks and enduring leadership. She is essentially the female counterpart of Sigurd, except that she’s geared to eliminate one target at a time. Her skill 1, Impaling, is a powerful, single-target nuke that will also greatly lessen the victim’s defenses for 8 seconds.
A suitable follow up is offered by her ultimate, Poisoned Darts, as it will seek the enemy with the least health remaining to put a DoT worth 140% to 180% of her ATK stat (depends on skill level). It lasts for 6 seconds and will tick 3 times. Her aura, Inspirational Example, passively increases her allies’ health pool.
The damage skills of Mireyn undoubtedly synergizes with the multiple other single-target killers in the game. The problem with her is that, she is rather flimsy. The additional health from Inspirational Example does help, but it simply makes her 1 to 2 hits “harder” to kill, and it doesn’t take much to kill her.
She has the lowest base health pool among all Epic heroes. If you use her as a frontliner against a squad with a higher power rating (which is the “common” picture in campaign mode by chapter 8), you’d be lucky to see her use both active skills. Her viability then is to use her in a 4-melee-squad and make her take a backline slot.

Niss – Rarity:Legendary | Faction:Undead | Attack:Ranged | Class:Mage | Role:Damager-Debuffer
Niss slings weakening curses that can clip an enemy’s combat prowess. Designed as a debuffer with a decent damage output, she can subjugate auto-attack types with her deathly chants while offering supportive fire. Her skill 1, Plague Ray, is a linear AoE nuke.
Her ultimate, Piercing of the Soul, will damage one enemy and disrupt its critical hit chance and accuracy for 7 seconds. Her aura 1, Fear of Death, will decrease the ATK stat of the most powerful enemy. Her aura 2, Dead Man’s Flesh, gives her some survivability, for it will increase her resistance against physical and necrotic damage up to 30% at max skill level.
Although the damage factoring in her nukes are quite impressive, her overall kit is problematic. This explains why, despite being a Legendary hero, she is just in Tier B. As a natural backliner, she usually makes it to the late-battle phase where what counts the most are skill damage and effects. While she does have checks in both departments, Piercing of the Soul and Fear of Death mainly impairs auto-attacks. She is hardly a threat.
As her passives can’t help with energy gain, disable, or heal, Niss cannot facilitate a comeback and can hardly thrive in a 2v2, let alone, a 1v1 against another damager-mage or ranged rogue. The only niche of Niss then is to provide additional firepower while seating at the backline, whilst praying hard enough that the frontline would hold better than their enemy counterparts.

Rog-Drog – Rarity:Rare | Faction:Keepers | Attack:Melee | Class:Rogue | Role:Damager
Rog-Drog hits like truck; plain and simple. If only Rog-Drog is not limited to have a maximum level of 80, this big guy can shame a lot of damagers that have more skills in their suit. Only a few can survive the swing of his club and those that are lucky to will endure a lasting injury.
His skill 1, Concussion, deals an enormous amount of damage to a target. The victim also suffers a huge loss of accuracy for 10 seconds. His equally-notorious ultimate, Toothy Club, also drops a ton of pain; should the receiver survive, it will be stripped off a great portion of its defense.
This ogre may just be a Rare, but his appearance in Tier B can be explained by his almost sure-kill skill 1. If you have played campaign long enough, you surely know of his reputation already. Pound-for-pound (or level for level), Rog-Drog has a neat chance to kill whoever you set in front of him.
The ATK multiplier fitted to Concussion and Toothy Club is too much for Rogues and Mages to take. Both of his skills could also execute pre-injured warriors. He can be an excellent early game damager for any lineup, as the naked values of his nukes requires no squad composition or teammate preference to be effective.

Tromgar – Rarity:Epic | Faction:Ashborn | Attack:Melee | Class:Warrior | Role:Damager
Tromgar is a straightforward warrior able to dish out and endure damage. Equipped with a self-preserving passive skill, he is one of the few melees that requires no assistance to at least cast a skill before expiring. His first skill, Inferno, is an AoE nuke that will damage and knockdown enemies around him.
His ultimate, Fiery Spikes, is another AoE nuke that shares the same radius with Inferno. Both active skills have no side effects; the ultimate has a slightly higher ATK factoring, though. His passive, Ashen Phoenix, instantly replenishes a good portion of his health once his HP drops to 10%.
The only special thing about Tromgar is Ashen Phoenix because it essentially sets him tankier than some warriors. It has a catch though; should he sustain a burst damage when his HP is far from reaching the 10% threshold, it will NOT kick in.
Absent of any true asset, Tromgar, could work as a reserve warrior whenever you need to cycle your picks when taking on a team with an Alliance frontline. In single player modes, though, do not set him across a Rog-Drog or other single-target killers because it will completely negate his ability to “buy time” for your backline.

Azran – Rarity:Epic | Faction:Ashborn | Attack:Melee | Class:Rogue | Role:Damager
Azran aims to level the entire opposition with his constant stream of fire damage. Packed with skills that can hit most, if not all, enemies, his silent contribution from the get-go can lead to a caustic finale. His skill 1, Explosive Arrow, deals at least twice his attack damage to all enemies.
His ultimate, Burning Target, sets ablaze the enemy with the highest health making it take damage for 3 ticks in 6 seconds. After which, it explodes dealing damage to its allies. His passive skill, Flaming Brotherhood, enables Azran to deal minor damage to all enemies whenever one of them uses an active skill.
The ATK factoring on Azran’s skills may be low, but it can get dangerous when it all accumulates. Appointing a sturdy a frontline will make it possible for him to register enough damage so he can dominate when the board gets down to 3v3. Any tank or defensive hero could serve that purpose well, but special mention goes to Tromgar and Solei who both have means of extending their presence if they get overwhelmed.
However, we have to state that Azran can better operate in an offense-oriented team that is capable of dishing out numerous AoE and multi-target skills—excellent choices for such would be Istra, Grodan, Zera, Ashmira, and Ilar.

Mom-Ghor – Rarity:Epic | Faction:Keepers | Attack:Melee | Class:Rogue | Role:Damager
Mom-Ghor has harmful skills that work to prepare for his team a sweet dish of victory. This lumbering frontliner can cause problems for his skills are fortified with control effects—speaking of which, he is simply one fortified big guy. His skill 1, Hot Spices, spews a good damage to a wide area in front of him which blinds all affected units for 2.2 to 3.4 seconds, depending on skill level.
His ultimate, Pork Chop, is a heavy, single-target nuke that knocks its victim down. His passive, Well-fed and Happy, passively increases his health pool. This further reinforces his status as the toughest Epic rogue in Blitz:Rise of Heroes.
Since Mom-Ghor is pretty easy to acquire (being an Epic hero), you can groom a damage team early game with him in it. His Hot Spices cover the same wide area as Sigurd’s skill 1; if they are both well-leveled and equipped, their first skills alone may secure the win for you or at least create a sizeable damage advantage.
The blind status from Hot Spices means that for a period, most of the enemies will offer no auto-attack threat—a much-welcomed scenario. By default, he has the most HP among all Epic heroes and with Pork Chop it only gets better; you can almost forget that he is just a rogue, not a tank (not that the class difference really spells anything big).
Since it is pretty cheap to level up an Epic, he can be a good, spare frontliner that you can tap whenever you are not fighting a team with Alliance damagers because he can pretty much survive long enough to cast a skill or two.

Delayra – Rarity:Epic | Faction:Keepers | Attack:Ranged | Class:Rogue | Role:Damager
Delayra reciprocates the safety offered by the frontliners by “ensuring” they will not be outgunned. Armed with a unique passive that starts out strong, she can thrive in a well-kept team sniping multiple threats all at once. Her skill 1, Shocking Blow, damages all enemies every second for 3 seconds. Meanwhile, she can focus her firepower to the enemy backline with her ultimate, Triple Shot.
This skill will home unto the 3 farthest enemies. Her passive, Allied Support, increases her critical chance per each allied hero alive. Just at skill level 1, it gives her a 20% increase. This means that at the start of battle, her chance to land a crit is doubled—the highest, default crit rate in the game.
The strength of her passive is also its weakness; it doesn’t go along well with the attrition reality of battles. Then again, the scenario it begs is the most ideal situation to be at:have more alive squad members than the enemy team. Due to this, she’s golden in a healing-based team. She is, however, relatively flimsy and would not survive a stream of skills against a team with multiple AoEs.
Perhaps, it supports why she is just an epic hero. It is only rational to use her if you are running a Keeper-heavy team and you want a backline damage-dealer. Note that all damagers in her faction are all melees.
C Tier
The heroes in this tier are far from ideal to depend on if you want to thrive further in the Arena or single player battles. Still, they have interesting skills that can fill in some tactical gaps and you may find a good situational use for them.

Ingrid – Rarity:Epic | Faction:Undead | Attack:Melee | Class:Warrior | Role:Tank
Ingrid is an attacker and defender rolled in one. She has the ability to toughen herself and her teammates and then help pummel enemies. Her skill 1, Thunderous Shield, gives a huge defense rating increase to everyone in her team for 10 seconds.
A good portion of the damage taken during this period will be reflected back to those who dealt it. Her ultimate, Electric Shock, dishes a decent amount of damage to one enemy and ripples some to those that surround it. Her passive, Energy Barrier, makes her more resilient against physical and natural damage.
As the fifth beefiest Epic hero in the game, Ingrid has a good chance in surviving the early-battle onslaught—thanks to Energy Barrier. This means that she may be able to at least cast Thunderous Shield and leave a good defensive buff if ever she gets taken out right after casting it. If she lives long enough to use Electric Shock; all the better.
The tempo of Thunderous Shock may come at a perfect moment, and if it does, you would see the squishier heroes from the other team “feel” it when they unload offensive skills. Her ability to contribute is very conditional, but will still make for a good shock-absorber when you have no better options.

Vilante – Rarity:Epic | Faction:Undead | Attack:Ranged | Class:Mage | Role:Damager
Vilante seeks to subdue enemies with her magic or the sword of the undead soldiers she can call. She can bring the pain either by her skill or her minions, and should she successfully slay an enemy, the deadly cycle practically restarts. Her skill 1, Awakening, summons a Yorton that can fight for 20 to 35 seconds, depending on skill level.
One will only be spawned if there is a vacant slot. If all of your heroes are still alive, Vilante will enchant the enemy she is attacking, appointing it as the target to where the minion would spawn. Her skill 2, Necrotic Touch, is a hard-hitting, single-target spell that deals an immense amount of damage and knocks the receiver down. Her passive skill, Power of the Dead, absorbs most of the energy of any enemy that she or her minions kill.
Technically, Vilante fades in comparison to Aurelia. Yes, they may have the same skeleton warrior-summoning skill, but she gravely lacks contribution to the damage department. While it’s true that Necrotic Touch has a handsome damage factoring (up to 1000% ATK at max skill level), it can only damage and floor one target and that’s basically it.
Additionally, Power of the Dead, benefits just herself and requires two conditions to be of use:1) she or her minions need to get the last hit and 2) how much energy the slain enemy had. You’re better off using another backliner, preferably a team-oriented one.
The only good reason to use Vilante is if you’re aiming for a two-summoner lineup (Aurelia+Vilante), which may shine in rare occasions, or if you simply have the luck (or lack thereof) of summoning more Vilantes than Aurelias.

Drumbor – Rarity:Epic | Faction:Alliance | Attack:Melee | Class:Rogue | Role:Support
Drumbor takes courage to charge upfront and bolster his allies’ will to fight. Although he’s not equipped with any damage skills, he has the toughness for frontline duty and has the ability to toughen a friend and increase his team’s attack potentials.
His skill 1, Retraining, drastically increases the critical chance of all allies for 6 seconds. His ultimate, Strong Shield, will give the most wounded teammate a damage-mitigation buff that lasts for 8 seconds. His passive, Stronger Than Steel, augments his health pool by a good percentage.
The critical chance increase from Retraining looks good on paper; it can get up to 110% at max skill level. However, you cannot really expect for this buff to do wonders, since it can only improve auto-attacks.
Due to the absence of any offensive skill and having the lowest damage among Alliance Epics, Drumbor cannot “threaten” the enemy frontliner he gets assigned to, even if it’s a Keeper. He is a lackluster addition to a squad and should be passed up for another melee when there is anyone else available.

Fterag – Rarity:Epic | Faction:Ashen | Attack:Melee | Class:Warrior | Role:Damager
Fterag’s burning desire to turn his enemies to ashes registers in multiple ways. With the fiery skills at his disposal, he can hurt foes near and far. His first skill, Ashen Sun, deals a good amount of damage to all enemies. He can damage enemies in front of him with his ultimate, Scorching Cut. He also poses some threat to the enemy backline because his passive, Heat of Terror, deals a decent amount of damage to the enemy farthest to him every 10 seconds.
Among all Epics, Fterag has the second most health points by default. However, as we’ve mentioned earlier when we discussed Solei, Fterag shares the same apparent targeting prioritization, no matter if you make him take a backline slot, somewhere somehow, he gets focus-fired soon as he marches forward.His sheer beefiness is often not enough and you’d likely see him fall right after he casts Ashen Sun (if he’d be lucky to fill his energy, that is). His viability is very limited and using him can only be rational if you are running an Ashen-heavy team. Then again, you’d be better off using Tromgar, a fellow Epic hero, if you have developed a liking to the Ashen faction.
D Tier
Needless to say, the two heroes that we have not yet mentioned are bottom-of-the food chain quality. As Rares, they are limited to only get a max level of 80 and their low base health points means they are in danger of getting evaporated once multi-target skills and AoEs come pouring in. But of course, we’re still presenting what they can bring to the table.

Siana – Rarity:Rare | Faction:Alliance | Attack:Ranged | Class:Mage | Role:Support
Siana takes joy in strengthening hear teammates and healing the wounded. She can sharpen her allies’ deadliness and help a friend stay in the battle. Her first skill, Star Map, creates a buffing zone around the teammate with the highest ATK stat, substantially improving the damage and accuracy of those within. The effect will last for 8 seconds.
Meanwhile her ultimate, Star Protector, looks out for the weakest ally—the one closest to death, in hopes to rejuvenate it. For the next 8 seconds, it will get 4 ticks of heal each amounting to 200% to 300% of Siana’s ATK power (depending on skill level). The treated hero will also experience an increase in energy gain speed for the duration.
As it’s relatively cheap to level Siana up, she can be a good support option at the very early stages of the game. The damage boost from Star Map can shorten battles in your favor and the healing from Star Protector does help if the frontliners you have access to as of yet aren’t really tanky.

Yorton – Rarity:Rare | Faction:Undead | Attack:Melee | Class:Warrior | Role:Damager
Yorton, straight up, is a damage-dealing pawn. If he can survive the long enough to cast his skills, he can play as a decent offensive threat. His first skill, Flood of Attacks, focuses three attacks on one enemy dealing up to 1400% to 1900% of his attack damage, depending on skill level. His ultimate, Liquid Plague, is a per second DoT that will be placed on the most wounded enemy; it stays for 5 seconds.
If out of curiosity or “taste” you want to field Yorton, you’d see that it only takes 5-10 attacks to take him out. He is essentially a bad frontliner. There is basically no reason to actively choose an actual Yorton over picking a summoner that can conjure a “free” version of him.
そこにあります! All the 41 Heroes of Larnes arranged in tiers and listed in order. We hope that this Blitz:Rise of Heroes Tier Guide will be helpful to you. Knowing all these now, it is only proper to focus or repurpose your resources to level up the ones at higher tiers.
If those that you have leveled up belongs to lower tiers, it’s time to use those gems in the Oblivion Valley (so you can regain the resources you have used on them) or shuffle the trainees at the Training Camp.
Don’t feel bad if your favorite hero is ranked low, at least you have learned now how to make him/her more effective for we mentioned which heroes can complement each other well. That comes with our hopes that it isn’t Fterag, Drumbor, Siana, or Yorton (pretty please)!
We hope that you appreciate this article as much as we get to better appreciate BlitZ:Rise of Heroes and all its complexities. If you feel that we have listed a hero too or too low, feel free to tell us why in the comment section below. We would love to hear your inputs. As no to journeys are alike, we may learn something from you as well.
That’s it, as far as our BlitZ:Rise of Heroes tier list is concerned. Thanks for your time. See you in Asteria and we hope that this list will make it possible for you to make it into the top 20 of the Arena leaderboard and keep conquering campaign battles.