パズル アドベンチャー ビギナーズ ガイド:すべてのミステリーを解決するためのヒント、コツ、戦略
18 歳の誕生日は、幸せな行事のはずです…ブルーミング ハーツ孤児院の名前のない孤児であるあなたを除いて。重い心を持って、あなたは自分のバッグを背負って、自分で世界に出発する準備をします...
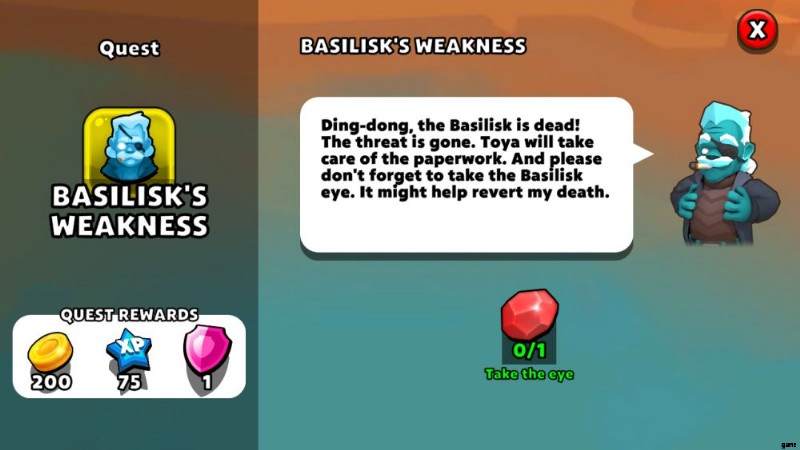
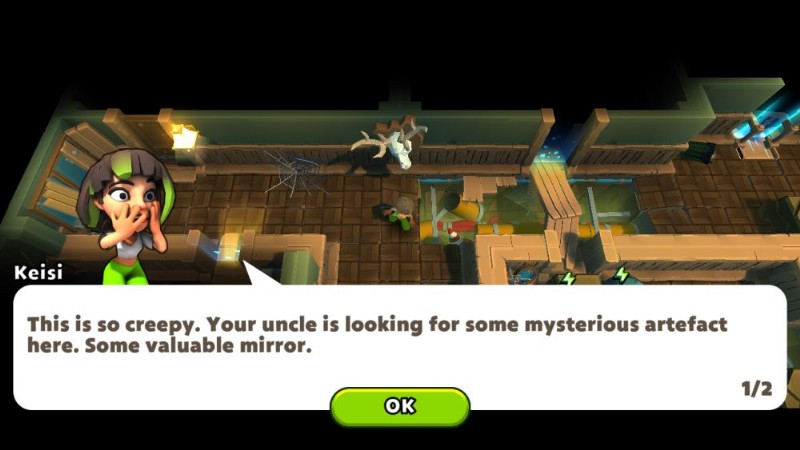
ちょっと待って!これは何ですか?アンクル モートが誰かをブルーミング ハーツの孤児院に送り込み、彼の調査を手伝ってほしいと頼んでいますか?

もちろん?起こりうる最悪の事態は何ですか?
Pixel Federation Games の新しいモバイル タイトル パズル アドベンチャー ミステリー ゲームの古典的なポイント アンド クリック ゲームプレイと、巧妙なパズルと直感的な探索ゲームプレイを組み合わせています。新しいアンクル モートの無名の相棒として、超自然的な犯罪を解決し、神秘的な宝物を掘り起こしながら、超自然探偵社で名声を築きましょう。
前述のように、ゲームプレイは非常に直感的ですが、行き詰まっていると感じた場合は、新しいプレイヤーがパズル アドベンチャーの世界を分析するのに役立つ包括的な初心者向けガイドと、可能であればいくつかのヒントとコツをまとめました。進歩する方法が見つからないようです。
調査の基本
アンクル モートの新しい雇い主として、あなたはアンクル モートと彼のアシスタントのケイシと共に超自然的なミステリーを解決します。このミステリーは主に警察から逃げ出し、真実を探るという順序で行われます。

調査はゲームの要であり、非常に直感的ですが、調査に期待すべきことの概要を以下に示します。
目的
各段階の基本的な目的は、通常、対話または説明を通じて与えられます。レベルを完了するために達成する必要がある唯一の目標ですが、目標を達成して宝物を獲得するには、多くのパズルを解く必要があります。単純なものから複雑なものまであります。
画面の下部に目的の詳細が表示されます 現在のステージ用。技術的に言えば、レベルを完了するために必要なのは目的を達成することだけですが、それのどこが楽しいのでしょうか?
目的を達成するために何をする必要があるかをより詳細に確認したい場合は、画面下部のアイコンをタップできます。
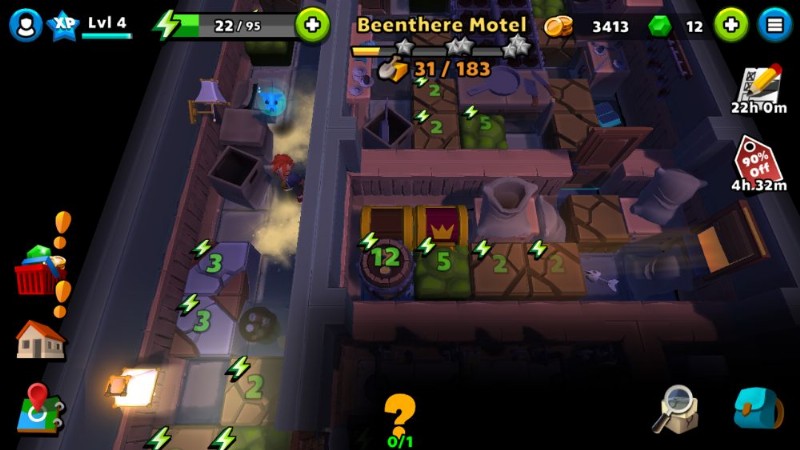
ブロック
ブロック 超常現象の調査中に見つかる最も一般的な障害です。ブロックをタップするだけで破壊できます。ブロックを破壊するにはエネルギーが必要です。一般に、ブロックが固いほど (たとえば、石と草)、破壊するのにより多くのエネルギーが必要です。
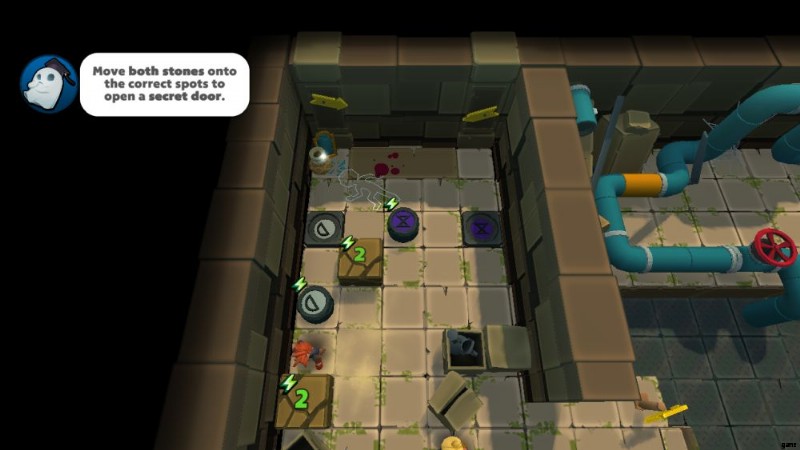
ボタン
ボタン ステージの主要なメカニズムの 1 つです。ボタンは、回転するパイプ、プラットフォーム、または別の種類のスイッチなど、常に別の部品にリンクされています。ボタンを押すとスタミナが消費されますが、正確に何に影響するかを確認するために、ボタンを複数回押す必要があります。たとえば、プラットフォームを予期しない方向に動かすことができることに気付くかもしれません.
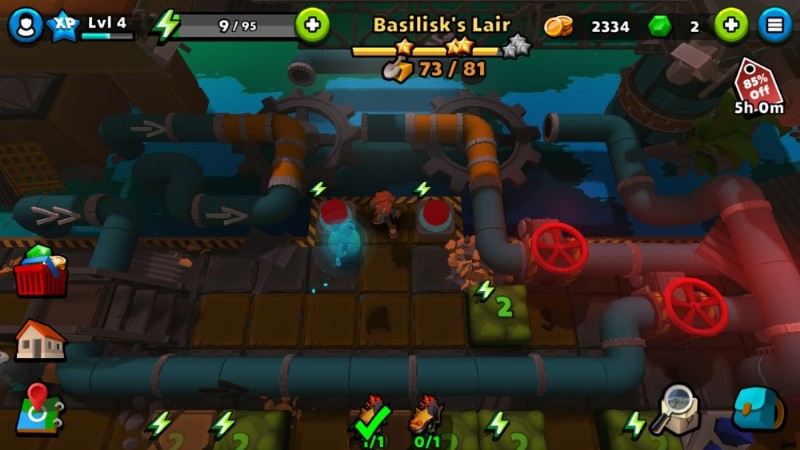
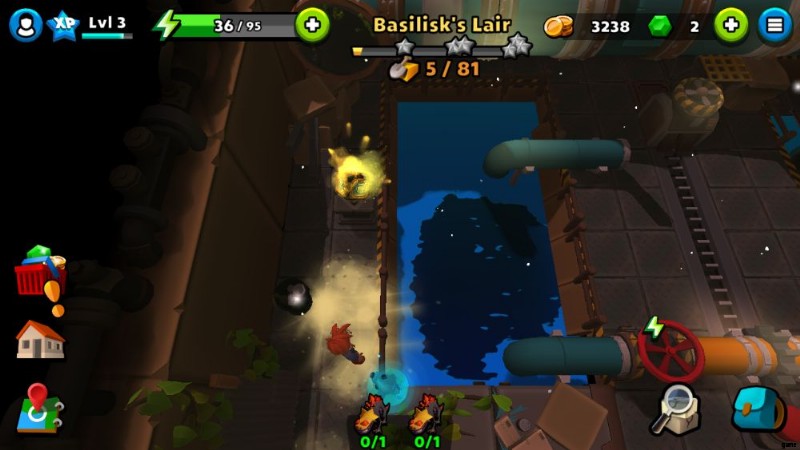
たとえば、バジリスクの隠れ家の最後の部屋では、ボタンを押すと、取水パイプがパイプ ネットワーク 1、2、または 3 のいずれかに移動します。ボタンをタップすると、パイプが 1-2-3-2 の順に移動します。 -1 など。特に、ボタンが移動するオブジェクトに複数の方向がある場合は、実験が重要です。
レバー
レバー 接続先のトリガーのオン/オフを切り替えるスイッチです。 すべてではないにしても、ほとんどのレバーにはワイヤーが通っており、レバーがトリガーするものすべてにつながっています – これは通常、レバーを引くと何が起こるかを正確に把握するのに十分な手がかりになります.
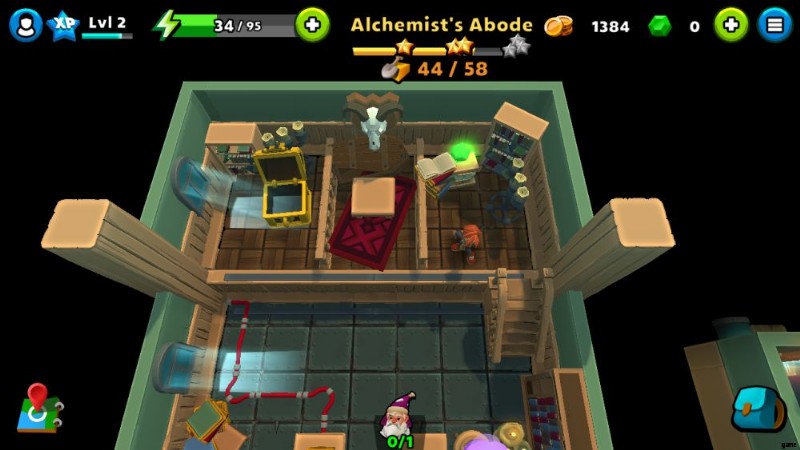
オブジェクトのプッシュとプル
可動オブジェクトは、調査で直面する障害の 1 つです。
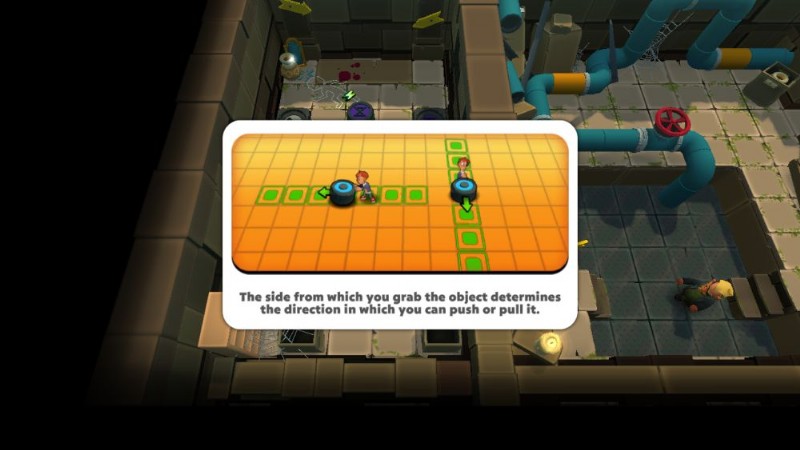
これらのオブジェクトは前方に押し出すことができます または後ろに引っ張る .ブロックを押したり引いたりできる場所は、自分の配置場所によって異なります。ブロックをつかむときは、向いている方向に押したり、後ろに引いたりできます。多くの場合、パズルを解くために何度か再編成する必要があります。探索して創造力を発揮してください!
移動の経済
パズル アドベンチャーではすべてのアクションがエネルギーを消費するため、最小化することが最善の方法です。 あなたが実際に行う動きの量。
スタミナを消費するのは、ブロックを壊したり草を刈ったりするだけではありません。 バルブをフリックしたり、ボタンを押したり、スイッチをフリックしたりするだけでもエネルギーを消費します 、そのため、部屋にエネルギーを注ぐ前に、部屋のパズルを注意深く分析することは良いアプローチです. This also serves as a visual clue of what to do next; for example, water valves that have water running through them will have an energy icon above them to indicate energy consumption – which means something has changed.
Pathing
If you’re not sure if you can path to a particular tile, you can try tapping on it anyway – if there’s a route, the game will allow you to move there anyway . This is great for puzzles that have multiple vertical levels where it’s easy to lose track of ladders and stairs. However, if the tile flashes red, there’s no possible path to it. Try exploring and experimenting in the room some more.
Room Layout
And while we’re at it, pay careful attention to the room’s layout , particularly the height of objects as they can obscure elements that are needed to solve puzzles. Some areas can be difficult to analyze due to the amount of stuff on the screen. The very large UI on top of the screen doesn’t help, either, and neither can you rotate the camera to get a better view of your surroundings.
With all that in mind, the best way to get a feel for each room is to move the camera around and study the room from different areas .
Pets
If you’re really stuck, you’ll be able to summon a friendly, otherworldly companion (not you, Uncle Mort) to guide you towards suspicious objects.
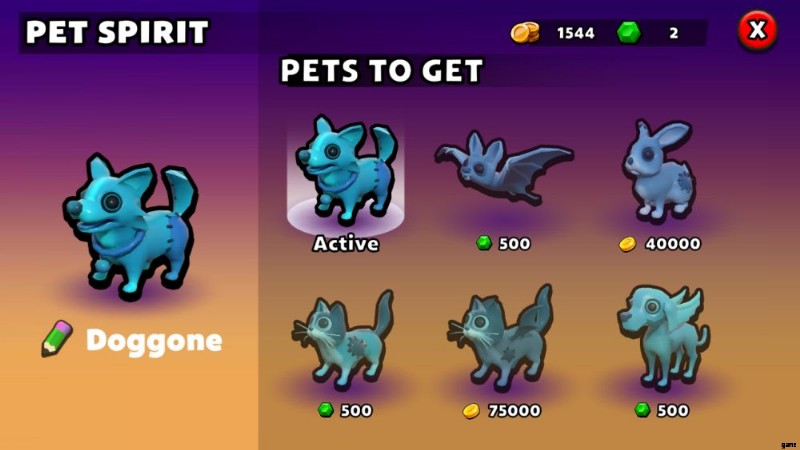
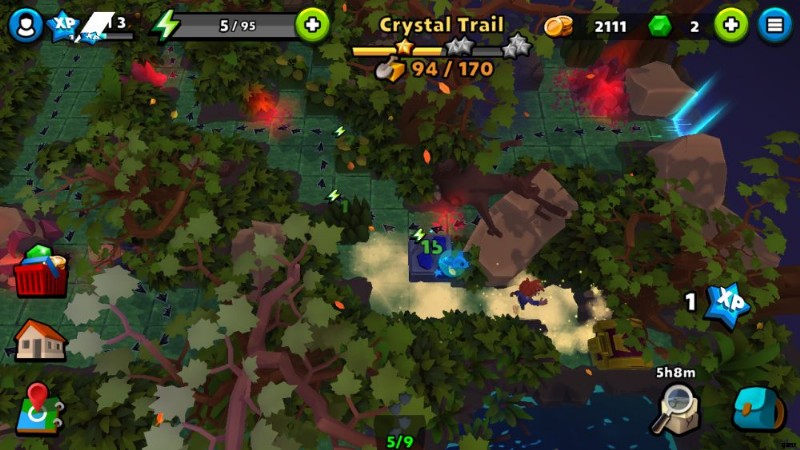
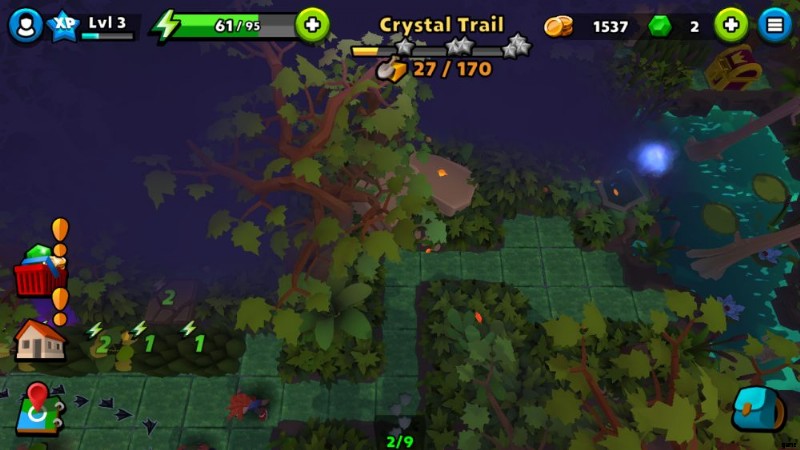
You’ll gain access to the ghost dog in the third level, the Crystal Trail . This helpful spirit lets you suss out suspicious spots by flying to the location of hidden blocks and items that you might have missed. This doesn’t come cheap though; you can only send your ghostly familiar out once every 6 hours unless you skirt the cooldown by paying Gems .
Cat people (like me) might want to change their pet skin. You can do this by tapping the upper right button beside your experience bar. In this menu, you’ll be able to change the skin of your pet for a rather hefty sum of either coins or Gems. This is purely aesthetic, and won’t impact how your spectral friend behaves.
Stages and Stars
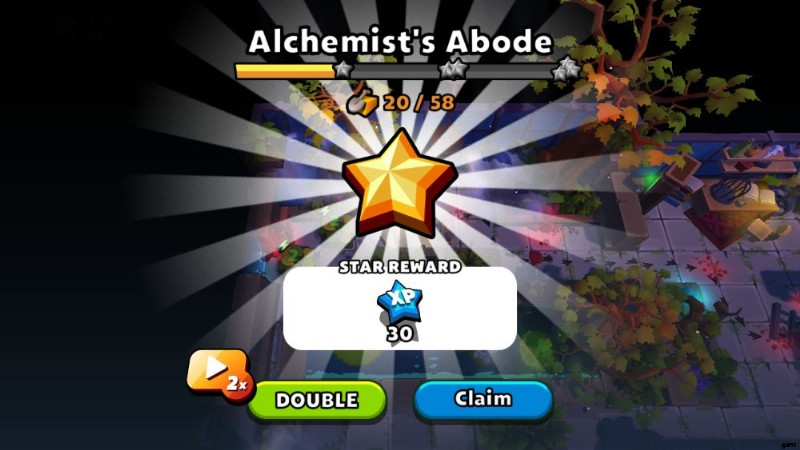
While I advise against needlessly spending energy, doing this does net you with stars. These stars are a rough representation of the progress you’ve achieved in each level.
Each stage has a maximum amount of stars (represented as a fraction). However, you still receive rewards just for filling the bar up.
If you have nothing better to do with your energy, it’s well worth going back to stages you’ve already completed and go for the maximum star rating as this nets you invaluable blue shards. Your progress is retained when you return to a previously-completed stage, so you don’t have to do it all from the beginning. And since these prizes are a one-time thing , I strongly urge doubling your prizes by watching the ads.
Note that you can switch stages at any time – your progress is tracked separately per stage. Just tap on the map icon in the lower left if you’d rather tackle a different investigation than the one you’re currently in.
Fame
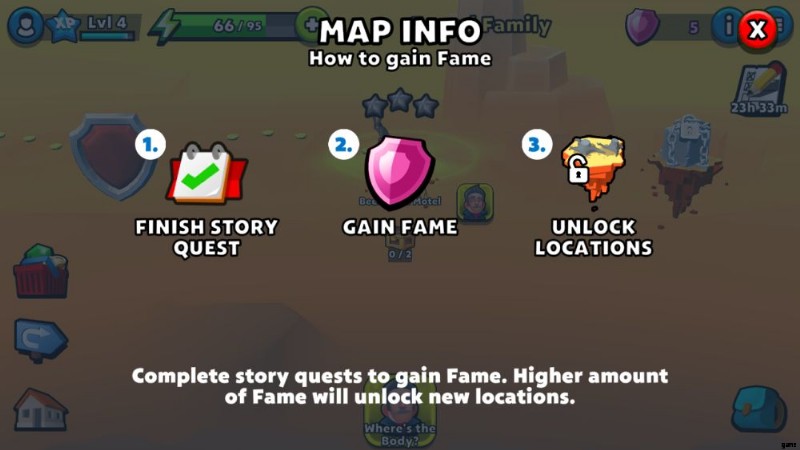
Fame is indicated as a pink shield icon, and serves as a representation of your investigative prowess to the Supernatural Detective Agency. By amassing fame, you’ll unlock new stages and be able to progress further in the story.
You gain fame from completing story quests. While I haven’t encountered any branching paths while playing Puzzle Adventure, keep in mind that you really should push forward with the story at all times.
Energy Sources
If you’ve played the game for a while, you’ll notice how quickly you can burn through your energy bar. As the ghost points out during the tutorial, there’s lots of ways to gain energy so that you can keep playing.
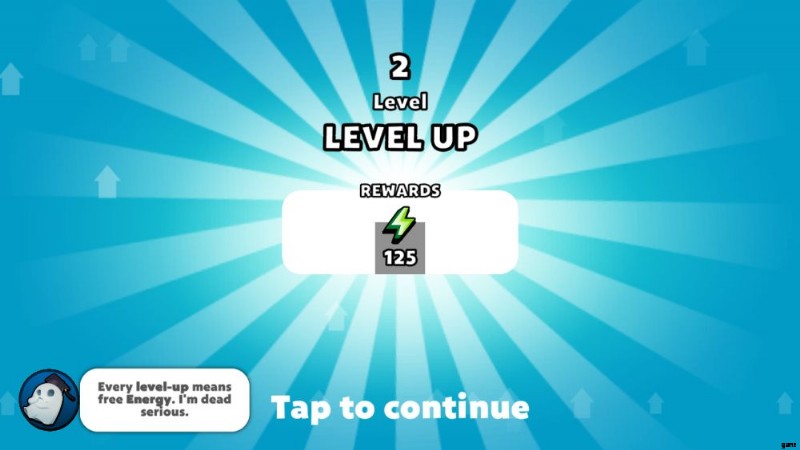
Any time you level up, you get a large lump of sum of energy. Don’t worry about overflow either, as any extra energy gained this way will be added on top of whatever energy you have, surpassing the cap . The downside here is that you’ll no longer be regenerating energy passively, so be sure to drain your energy down to standard levels before closing the game.
Performing actions in a stage gives you experience, whether that’s breaking blocks or pursuing the objective. As a general rule of thumb, breaking blocks nets you an amount of experience equal to the amount of energy an action takes.
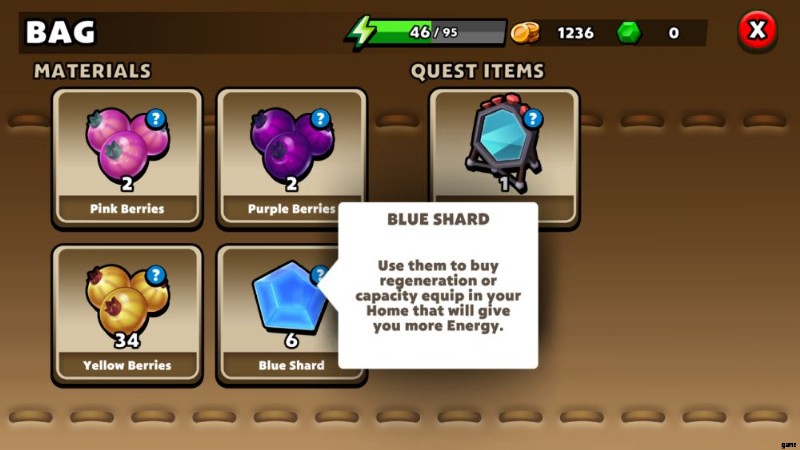
Be on the lookout for blue shard blocks – while they may not look like a good investment at a whopping 10 energy to break, they always drop blue shards . Blue shards are very valuable items that allow you to purchase and upgrade items that either increase your maximum energy capacity or its regeneration rate!
The materials you gather from breaking blocks and opening chests can be experimented with in the laboratory in your home menu – more on that later. You can also choose to watch an ad for quick burst of 50 energy. You can only do this once every 8 hours , and only when you don’t have energy to perform an action.
Finally – though I don’t recommend it – you can just buy energy with Gems.
Familiarize Yourself With Your Home
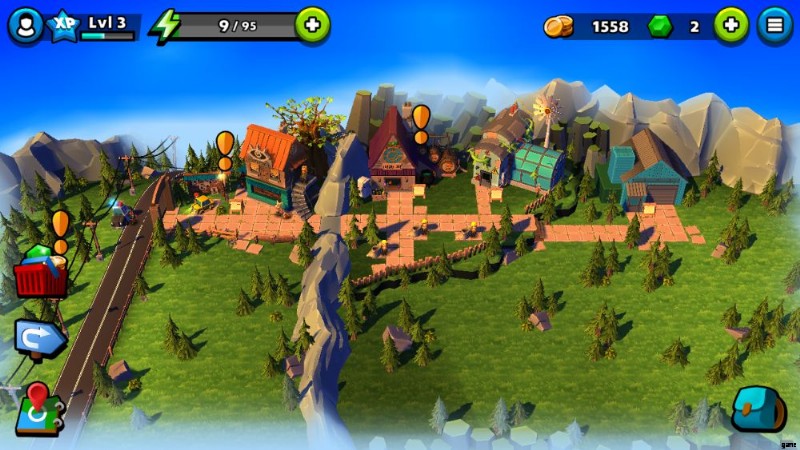
The home menu becomes available after completing the second level. As you might have guessed, the home serves as your base of operations and contains multiple facilities that you can visit even in the middle of an investigation to help you get a leg up on your detective work!
The Laboratory
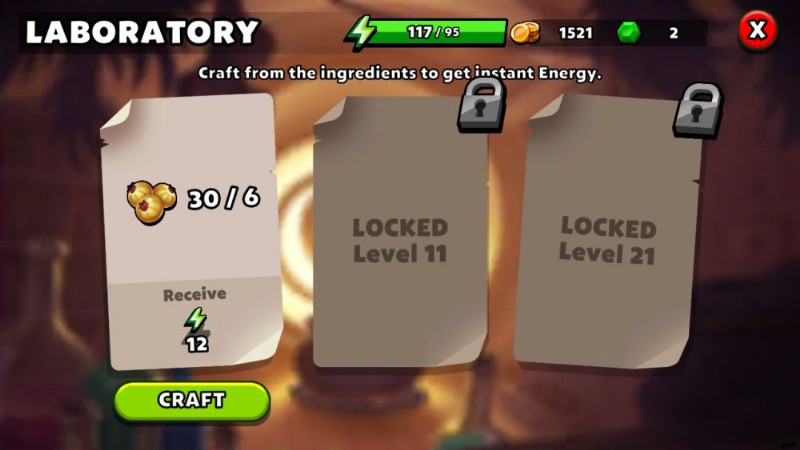
The laboratory is where you can synthesize those random items you find while snooping around other people’s houses. Upon entering the laboratory, you’ll be presented with up to 3 recipes that you can mix from whatever you have at hand, with each recipe providing a different amount of energy. If you don’t have enough ingredients, you can also choose to buy what you’re missing with gems, though I don’t recommend doing that.
Although there’s no limit to the number of recipes you can make per day (barring the amount of ingredients you have), each time you complete a recipe, that recipe slot goes into cooldown for a little while.
Do note that you’ll need to reach certain levels to unlock new recipe slots. The second slot becomes available at level 11, while the third and final slot requires you to hit level 21.
Your Ghostly Greenhouse
The greenhouse is a very important building as itserves as your energy regeneration hub .
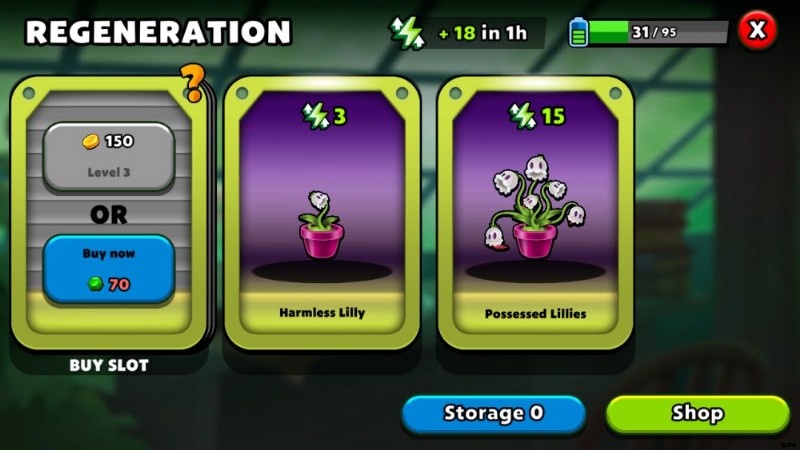
It’s here that you can spend your hard-earned coins and blue shards to purchase new plants that will boost your passive enery regeneration rate. However, before you tap those buttons like mad, there’s some things you should be aware of.
All players start with the Possessed Lillies , which gives a generous 15 energy per hour. But upon your first visit to the greenhouse, you’ll find that your other options in the plant shop aren’t quite as good. On top of that, you only have one extra slot for another plant.
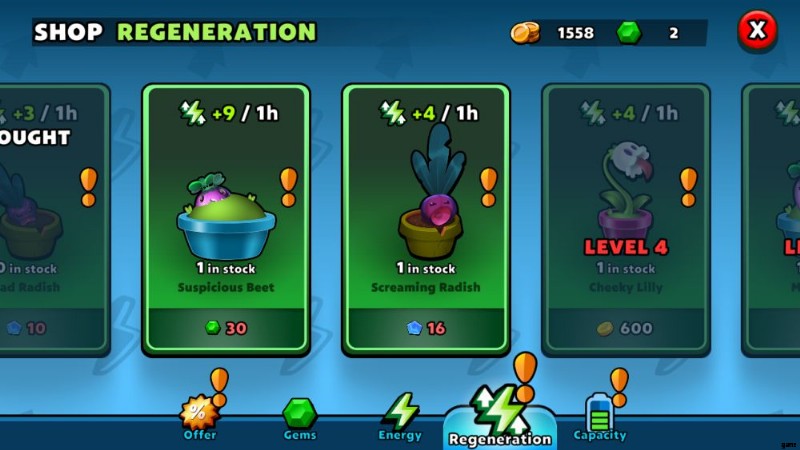
Both the selection for your ghastly garden, as well as the number of slots, improves as you play the game and gain levels. Whenever you gain a new level, visit the greenhouse to see if you’ve unlocked a new purchaseable slot. If there is, you can shell out some coins to permanently unlock that slot for another plant. If you’re feeling rich, you can also spend Gems to skirt the level requirement for a new slot.
You can’t spam the same plant over and over, either. There’s a limited stock of each plant, so diversity is key. By buying plants that cost different resources (gold, blue shards, and Gems), you can massively increase your passive energy output.
The Garage
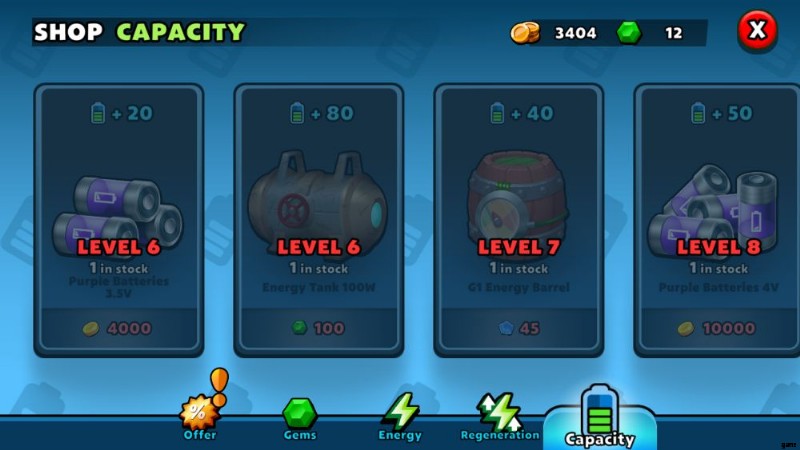
The garage is the rightmost building in the home screen, and serves as a counterpart to the greenhouse. Where the greenhouse increases your passive energy regeneration rate, the garage provides boosts to your maximum energy capacity. Just like greenhouse plants, diversity is key – so be sure to buy anything and everything that’s available to increase your energy cap.
Free Blue Shards
While we’re on the topic of blue shards and boosting your energy, there’s a quick and easy way to net some extra blue shards, and if you’re thinking “it’s going to be ads”, then you’re right on the money.
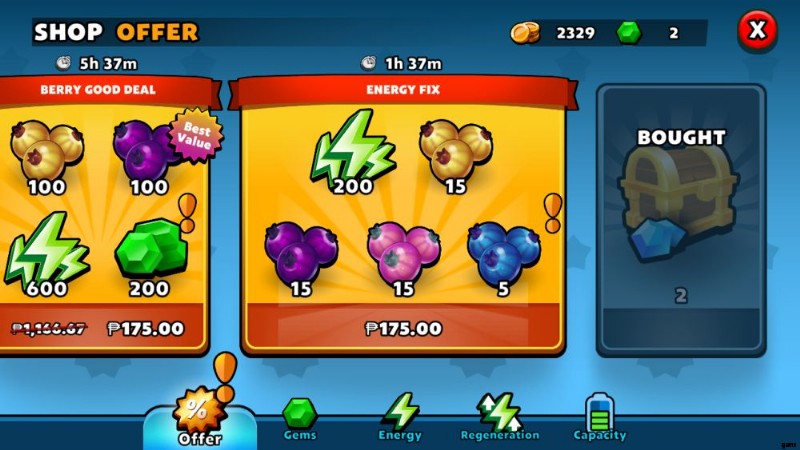
Go to the shop and tap the Offer ボタン。 This will guide you to a menu where you can opt to watch a 30 second ad for some blue shards. This is only available once a day, so be sure to do this whenever you log in.
The Museum
The museum is where you can view your artefacts – completed or not. Coincidentally, it’s also where you can redeem rewards for completing artefacts.

The museum also offers off-hand hints as to where you can find artefacts. In the image above, you’ll notice the text “Found Family” at the bottom – meaning that these artefacts can be found in stages that belong to the Found Family chapter. If you’d prefer more direct clues, you can tap on the silhouettes of artefacts you haven’t completed and the game will helpfully point you towards what stages those pieces are located in.
The Rewards Board
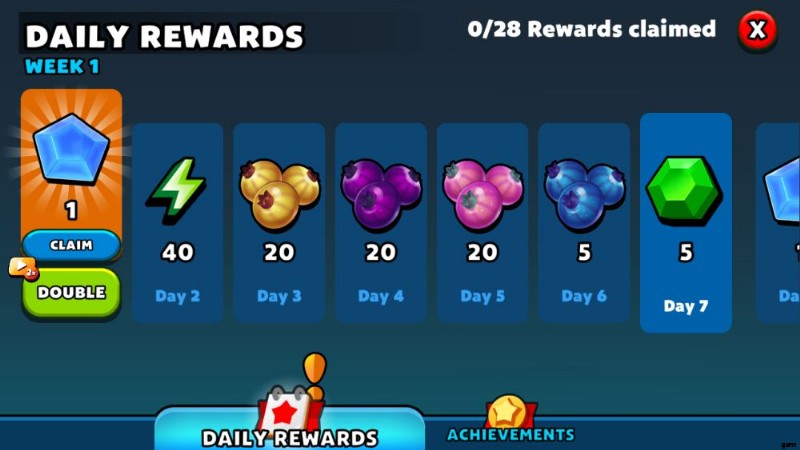
The rewards board is at the leftmost of your home menu, near the police car.
This board is where you claim your daily login reward, which I highly suggest you pay close attention to as the rewards get better with each login , culminating in 10 Gems at 28 days.
The rewards board also details achievements that you can complete for a burst of resources, ranging from coins to Gems. Each achievement has multiple levels denoted by the stars on top of each progress bar, and the rewards (and requirements) increase each time you complete the achievement.
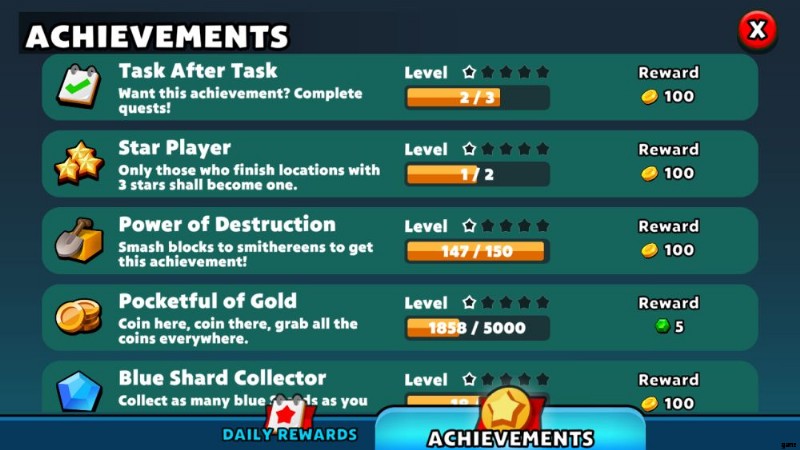
Once an achievement has been completed, you have to return to the rewards board to claim it…or, if you’re so inclined, you can watch an ad to double your gains.
Search For Hidden Treasure
What kind of puzzle and exploration game would be bereft of treasure? Puzzle Adventure has a lot of hidden goodies stashed away in each level, and it takes a curious mind and a persistent attitude to sniff them out.
Chests
Levels in Puzzle Adventure can also contain chests laden with goodies to help you in your investigation. In general, there are two kinds of chests – red ones that give a smaller payout, and blue ones where you can double your gains by watching an ad.
As your playtime is limited by your energy, it’s worthwhile to watch these ads. Not only will you be able to get more coins for your trouble, but you’ll also earn much more blue shards.
Goodies
If you thought that there might be hidden goodies in this game, you’d be right.
While exploring in stages, be on the lookout for things with a blue glow. A scanner-like glow indicates items that can be interacted with – and will also highlight items that can be picked up for bonus resources . All switches and items for quests will be glowing this way, but it’s worth your while to prolong your investigation – particularly in suspicious rooms – as you can find coins, items, chests, and most importantly, Gems lying around.
You can find bonuses even if you’re just pushing the objective. Some puzzle rooms can have alternative solutions which can uncover unexpected treasures. Still other bonuses are hiding in plain sight, and will require attention and an observant eye to unearth. Once you’ve found your goodies, I’d highly suggest watching the ads, especially when opening blue chests – those are one-time things, after all.
Artefacts
Artefact pieces can be found in stages – some are hidden in plain sight, others require a dedicated sussing out. As I mentioned in the museum section, you can get a clue in which chapters the artefact pieces are located. These mystical treasures are very much worth seeking out as they give a very hefty payout of resources, but only when completed.
To help you assemble get started with assembling your first artefact, the Necronomicon Page, I’ll list the locations of the 2 pieces.
The first piece of the Necronomicon Page is found in the Crystal Trail. You’ll need to cut grass and blocks to find a side path, where the artefact piece will be resting on a pedestal.
The second half is found in the Basilisk’s Lair, hidden in plain sight on the left part of the first room.
Ads and Doubling
At the risk of sounding like a broken record, I’m going to repeat this line one more time:double your rewards via ads whenever you can. Most of the rewards that you can double are one-time payoffs, so seize the opportunity to double them as you won’t get the chance to do so again.
Enjoy The Journey
In games like Puzzle Adventure, every step of your investigations is a treat, and you need to savor the journey, rather than the destination.
With that, our Puzzle Adventure beginner’s guide comes to an end. We hope you learned something from our guide to help you get past those oh-so-tricky levels. If you have anything you’d like to add, or if we missed something, let us know in the comment area below!