Days Gone – 100% 達成ガイド

このガイドでは、基本ゲームのすべての実績について詳しく説明します。
全実績の入手方法
重要な情報
このゲームには見逃せない実績がないことに注意してください。ストーリーが完了すると、未完成のコンテンツやその他の実績を取得できます。そうは言っても、ゲーム中の特定のポイント (「これはナイフです」、「Go Kick Rocks」) でより簡単に達成できる実績もあります。
また、ストーリーの特定のポイントで、マップの一部がロックされることに注意してください。前述のように、ストーリーの完了後に完全なマップが利用可能になるため、これによってその地域のコンテンツを完了することが妨げられることはありません。
ストーリー
このセクションでは、特定のミッションを完了することによって得られる実績だけでなく、そのミッションの完了中にロックが解除される実績についても説明します。ここにリストされているパーツの前に、これらの追加の成果の一部を解除できる可能性がありますが、そうでない場合は、これが確実に取得できる方法です。
このセクションには、非常に軽度のスポイラーも含まれています。このセクションのすべての実績は、ゲームのメイン ストーリーを完了するだけで得られるため、完全にネタバレのない体験をしたい場合は、このセクションを避けてください。
ただの生傷
- クレイジーウィリーズから出て行け
ミッションを完了すると獲得できます:「彼は私の兄弟です」ストーリーラインの「死の願いを手に入れました」。
化学を通じてより良い生活
- 体力、スタミナ、集中力のいずれかを初めてアップグレードする
NERO インジェクターを使用すると、健康、スタミナ、または集中力をアップグレードできます。これらはマップ全体のNEROチェックポイントまたは研究サイトで見つけることができますが、「彼は私の兄弟です」ストーリーラインで最初に見つけることができます.
目的と手段
- NERO に何が起こったのかを知る
ミッションを完了すると獲得できます:「ネロを見つける」ストーリーラインの「彼らは眠っていません」。
速達
- タッカーまたはコープランドに配達する
どちらを選択しても、「チェイシング レオン」のストーリーラインを完了すると獲得できます。
遺失物
- ブーザーと一緒に南へドライブ
ミッションを完了すると獲得できます:「彼は私の兄弟です」ストーリーラインの「誰もそれが来るのを見なかった」。
腕の兄弟
- ブーザーをチェック
ミッションを完了すると獲得できます:「He's My Brother」ストーリーラインの「I Could Use a Hand」。
ワンダウン
- 最初の大群を倒す
Days Gone で直面する最も困難な障害は、おそらく大群でしょう。特に初期のゲームでは、殺すための計画と準備が必要です。プレイスルーを通じてロックを解除し、それらを簡単に倒すことができる多くのツールがありますが、ほとんどの場合、取得するにはサイド ミッションをかなり進める必要があります。
技術的にはいつでもこの実績を取得できますが、ウィザード レイク キャンプからの「あなただけが見た」ミッションの後にこのタスクを完了する必要があります。
このミッションを待つことは、この実績のロックを解除するための特に簡単な方法です.何度も死ぬかのように、ゲームはこのセクションをすべてスキップするオプションを提供し、とにかく実績のロックを解除します.
大群を早期に倒したり、ミッションを合法的に実行したりすることを主張する場合は、考慮すべきいくつかのヒントがあります.最初に大群と戦おうとする前に、どのような装備を持っているかを予測するのは難しいので、最も役立つと思われるいくつかの基本的な戦略を提示しようと思います.
- できるだけ多くの弾薬/爆発物とヘルス/スタミナの回復を確保してください。
- スタミナの再生は非常に重要です。群れは速く、先を行くのはスタミナだけです。
- 大群は日中は活動していません。これを使用してトラップを設定し、圧倒された場合に備えて脱出ルートを計画し、アクティブになって追跡を開始する前にかなりの数を殺します。
- 設置したトラップに加えて、手榴弾やモロトフのような爆発物は、大群を薄くするのに最適です。大群がアイドル状態のとき、または廊下、路地、トンネル、トラックの間などの狭いスペースにそれらを集中させることができる場合は、これらを使用するのが最善です.
- 屋上は友達です。大群はあなたに到達するために建物を登ることができますが、登る必要があるほど、あなたに向かって走ることは少なくなります。自分を閉じ込めないように注意してください。
上で述べたように、大群はおそらくゲームの最も難しい部分です。それらに対処しやすい場所もあれば、対処しにくい場所もあります。死に続ける場合は、当面はそれらを回避し、メイン/サイド ミッションにさらに進んでください。後で大群を支援するためのより多くの機器のロックを解除できます。
あなたの名前を取り戻す
- 恩返し
ミッションを完了すると獲得できます:「Ripped Apart」ストーリーラインの「それが来るのを見るべきだった」
ノマドに乗る
- 一人で旅に出る
「私たちはすべてやり遂げました」ストーリーラインのミッション「再びノマドに乗る」を完了すると獲得できます。
ちょっと待って
- 懐かしい顔を見る
ミッション「I Remember」ストーリーラインの「A War We Can Win」を完了すると獲得できます。
外は寒くなってきました
- 失ったものと再びつながる
Earned for completing the mission:“We Couldn’t Take the Risk” in the “I’m Never Giving Up” storyline.
Morior Invictus
- Ride out to take back what’s yours
Earned for completing the mission:“Ascending from the Underworld” in the “Race Against Time” storyline.
I’ve Been Waiting for This
- Take revenge, once and for all
Earned for completing the final mission:“For An Outlaw Biker”.
Days Done
- Complete the story of Days Gone
Earned for completing the final mission:“For An Outlaw Biker”.
Map Completion
Welcome to the Party, Pal
- Clear all Ambush Camps, Infestations, and NERO Checkpoints in a single region
For more details, see the other achievements in this section.
World’s End
- Complete the World’s End storyline
The “World’s End” storyline requires you to find 12 NERO Checkpoints and 18 NERO Research Sites located around the map. Both location types have NERO Injectors, a stat upgrade needed for the “Performance Enhanced” achievement.
NERO Checkpoints are abandoned outposts that are without power. To restore power you need to collect fuel cannisters scattered around the area and bring them to the generator. You may also need replace a broken fuse on a mobile unit. There are also often loud speakers that will attract nearby enemies once power is restored. You can prevent this by cutting the wires leading to the speaker.
With the power on you can access the interior of the outpost where you will find a NERO Injector, a bed and an audio log. The checkpoint also becomes a fast travel point.
NERO Research Sites are often in hard to reach location like perched on a cliff or hidden in caves or forests. Some will even require you to use your bike to clear a jump to reach. However that is where the difficulty ends as they have no need for refueling generators and you can simply grab the NERO Injector without issue.
Ambush Camp Hunter
- Complete the Ambush Camp Hunter storyline
The “Ambush Camp Hunter” storyline involves killing all enemies at 14 different sites across the map. Each site also houses an underground bunker whose entrance must be located. Inside this bunker you will find a map that clears nearby fog and reveals nearby Historical Markers on your map. Clearing these camps also awards crafting recipes and unlocks a fast travel point for future use, so it’s quite useful to complete these objectives when able as you play through the game.
These camps are marked on the map as a red icon very similar in appearance to the achievement icon. Unlike Marauder Camps, there are no missions/jobs that lead you to these camps, only exploration.
You can check your progress by pausing> select Storylines> Progress> Ambush Camp Hunter.
Below are the locations of each camp. Click or tap to enlarge image.
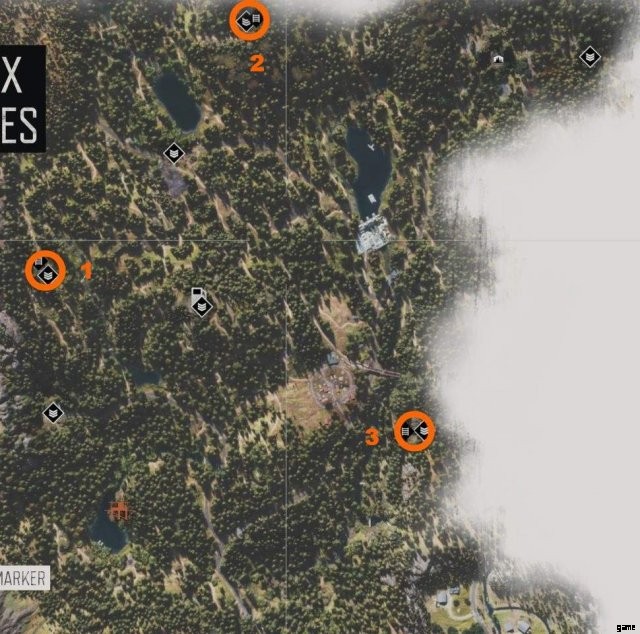
Cascade Region
- 1:Cascade Radio Tower
- 2:Jefferson Rail Tunnel
- 3:Horse Creek
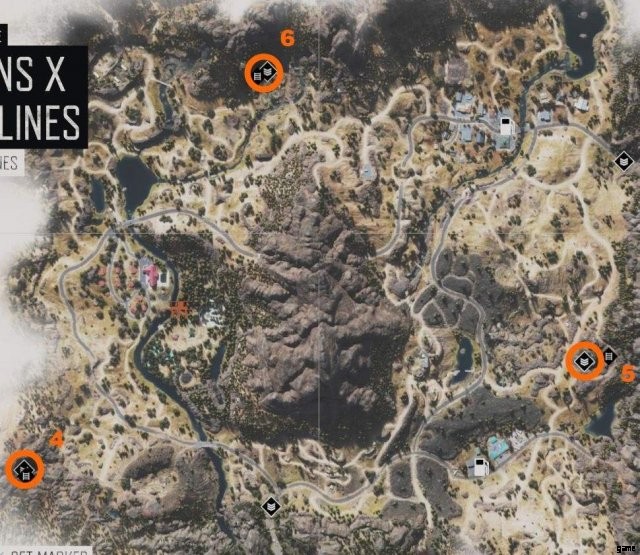
Belknap Region
- 4:Black Crater
- 5:Belknap Caves
- 6:Bear Creek Hot Springs
Lost Lake Region
- 7:Deerborn
- 8:Berley Lake

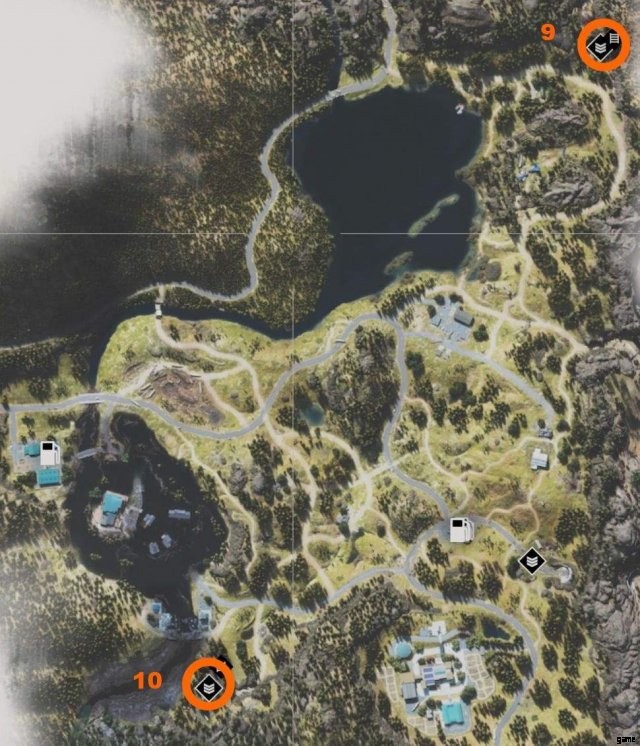
Iron Butte Region
- 9:Wagon Road
- 10:Redwood RV Park
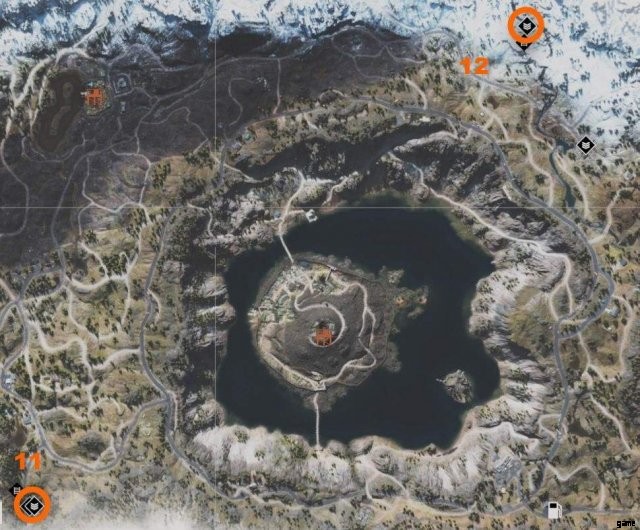
Crater Lake Region
- 11:Spruce Lake
- 12:Cascade Lakes Railway
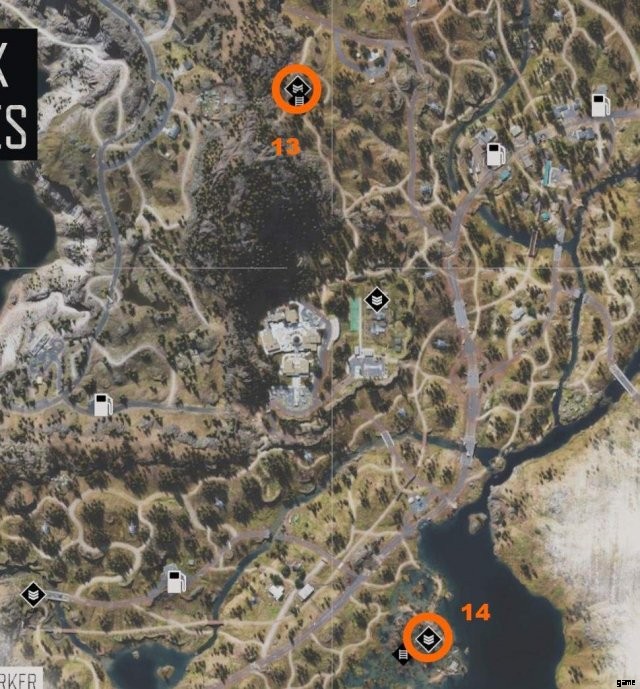
Highway 97 Region
- 13:Aspen Butte
- 14:Bare Bay
Infestation Exterminator
- Complete the Infestation Exterminator storyline
The “Infestation Exterminator” storyline involves clearing out 12 (technically 13, read further) infected areas around the map. These areas are marked by a large red circle that changes into an icon showing the precise location when the player is close enough. Each infected area contains anywhere from 3-6 separate nests that must be destroyed with fire, so ensure you have sufficient incendiary supply before taking them on.
The northern region of the map only contains Freaker nests, these can be found in cars, buildings or caves.
The southern region contains not only Freaker nests but also includes Crier (infected crow) nests. These nests are often high up in trees or on electric poles so Molotov’s or Incendiary Crossbow Bolts will be required as opposed to fuel cannisters.
In the case of both nests, once you damage them several enemies will spawn from within and attack you.
The 13th infected “area” is actually 18 separate Crier nests spread out over the Crater Lake and Highway 97 regions. These will need to be discovered either by thorough exploration or by watching the video guide below.
Depending on the location of the nest, causing too much noise can sometimes attract a nearby horde, complicating the situation quite a bit. It may be wise to avoid such locations until you have better gear to take on the combined threat.
You can check your progress by pausing> select Storylines> Progress> Infestation Exterminator.
List of Infestation Areas/Locations
<オール>Marauder Camp Hunter
- Complete the Marauder Camp Hunter storyline
The “Marauder Camp Hunter” storyline requires you to simply kill all enemies at 10 different camps across the map. However unlike the other two Storyline quests above, these camps can only be completed during specific missions/side mission.
The first 2 camps are cleared during 2 story missions, the following 7 from different Encampment Jobs and the final 10th camp after all others camps are cleared. Just complete any Encampment Jobs (you need to anyway for other achievements) and you’ll naturally complete these.
You can check your progress by pausing> select Storylines> Progress> Marauder Camp Hunter.
List of Marauder Camp Missions
<オール>
Collectibles
You’ve Got Red on You
- Collect 541 Items from corpses
This achievement is listed in both the Collectible and Combat sections as it technically both.
I highly recommend you start making progress on this achievements from the beginning of the game. This can be a serious grind if you aren’t making an effort to progress this as you play normally. You can only make progress on this achievement by looting human corpses, Freakers do not count (they have their own achievement).
You must also always be aware that you have limited inventory space for crafting supplies (what you will be looting the most). You can clearly see your inventory is full when you try to loot and a red icon appears over the body. Items must be successfully looted for them to count towards the achievement.
You can check your progress by pausing> select Storylines> Achievements> You’ve Got Red on You.
Lend Me Your Ears
- Collect 989 Freaker Ears
This achievement is listed in both the Collectible and Combat sections as it technically both.
This is much easier than the “You’ve Got Red On You” achievement as not only are Freakers far more common than humans, you will automatically pick up Freaker Ears by simply walking over their bodies. You can even pick them up on your bike.
If you haven’t gotten this while completing all Mission/Side content, clearing out the last few hordes should easily award this to you. Just be sure you are picking them up.
You can check your progress by pausing> select Storylines> Achievements> Lend Me Your Ears.
Go Kick Rocks
- Knock down 12 Anarchist Cairns
Cairns are stacked piles of rocks left by the Anarchist faction. While there are over 40 scattered around the map, you can find 10 Cairns during the mission “Just Doing My Job”.
You can check your progress by pausing> select Storylines> Achievements> Go Kick Rocks.
Performance Enhanced
- Max out either your Health, Stamina, or Focus
In order to upgrade your Health, Stamina and Focus you will need to find NERO Injectors. These are located at NERO Checkpoints and NERO Research Stations around the map.
There are enough NERO Injectors to Max all three stats, however for this achievement you only need to max one.
Finders Keepers
- Unlock your first collectible
See “The Broken Roadshow” below.
Wannabe Fortune Hunter
- Unlock over 50% of the collectibles
See “The Broken Roadshow” below.
The Broken Roadshow
- Unlock over 75% of collectibles
For this achievement there are 240 relevant collectables of 10 different types. You will need to collect 181 to reach the 75% needed.
As there are a substantial number of collectibles I recommend making it easy on yourself and simply waiting until after the main story is complete. The map will open back up and you can follow any of the video guides below to easily collect anything you were missing.
Collectible List
- 6 Sarah’s Lab Notes – All of these are unlocked upon completing Story Missions.
- 20 Radio Free Oregon – All of these are unlock as you progress through the story and will play on their own.
- 6 Colonel Garret Speeches – These start to become available after the mission “I Know the Look” after Kouri calls you and tells you about the Colonel’s speeches. Every morning at the Wizard Island Encampment the you can find the Colonel at the gallows (represented by a mission marker on the map) giving one such speech. As you progress the game he will continue to give new speeches so it’s worth checking your map every so often to see if there is a new icon. Though this needn’t be a priority as any missed speeches can be accessed as audio recording in the Colonels tent after completing the main story.
- 52 Nero Intel – These are mainly acquired during the main story or found at various NERO sites throughout the map, see “World’s End” in the Map Completion section for more information on these sites.
There are also a handful of recordings left behind by Nero Soldiers at places where you see them during the story. These aren’t terrible hard to find, but missing a few isn’t a big deal. - 43 Historical Markers – These will be revealed on the map as you clear Ambush Camps, see “Ambush Camp Hunter” in the Map Completion section for more information.
- 33 Character Collectibles
- 13 R.I.P. Sermons
- 28 Tourism Collectibles
- 33 Herbology Plants
- 6 Camp Guitarists
Encampments
As you progress through the main story you will encounter multiple Encampment sites. These are essentially small survivor settlements that act as safe areas, trading posts as well as a location to get side quests. Completing encampment Jobs, quests, bounties, and selling supplies rewards you with Trust Points. Each Trust Level you advance unlocks better weapons and bike upgrades you can purchase.
There are 5 Encampments around the map. Three in the northern region:
- Copeland’s Camp
- Hot Springs
- Iron Mike’s Camp
And 2 in the southern region:
- Diamond Lake
- Wizard Island
I recommend you complete Encampment Jobs as they become available, as not only is completing many of them required for several other achievements. The new weapons you unlock make several other tasks much easier, namely killing hordes.
Burnout Apocalypse
- Use nitro and drift at the same time on your bike for at least 5 seconds
This achievement is listed in both the Encampment and Bike sections as it technically both.
While the achievement action itself doesn’t involve Encampments like the others here, the Nitro 3 upgrade required is only available once you reach Trust Level 3 with the Diamond Lake Encampment.
This achievement is best attempted in a flat, open area and may take some practice to preform.
On Xbox Controller:
- Hold RT + B + A
On Playstation Controller:
- Hold R2 + Circle + X
While holding the above buttons, lightly accelerate and drive in a circle for at least 5 seconds.
Best Friends Forever
- Receive the Allied Trust status with an Encampment
Best Friends Forever (For Life)
- Gain the Allied Trust status with three different Encampments
The 3 Encampments I recommend you reach Allied Status (level 3) with are Iron Mike’s, Wizard Island and the Diamond Lake Encampments. Iron Mike’s and Wizard Island will receive a good amount of progress naturally as they are who you spend a large portion of the main story with and Level 3 Trust with the Diamond Lake Encampment is required for the “Burnout Apocalypse” achievement.
If you have completed the Main Story and a large portion of side content and find you are still level 2 with an Encampment, the best way to increase trust is the kill hordes in that camps region. To ensure you are helping your desired camp, hover your cursor over a horde and it will tell you which camp receives Trust Points.
Surviving isn’t Living
- Rescue 10 survivors
As you play you will encounter survivors stuck in precarious situations, either as hostages or surrounded by Freakers. Speaking to a survivor after rescuing them gives you the option to send them to an Encampment of your choice, gaining you trust with that camp.
While playing through the main Story you will rescue 7 or so survivors, so this achievement will be easily gotten.
Kitchen Courier
- Sell Animal Meat or Plants to any Encampment
As you explore you can harvest a variety of different plants as well as meat from different animals you hunt. Once in an encampment, locate the “Kitchen” (a boiling pot) and activate it to initiate trade. Simply sell anything and the achievement should unlock.
Make it Rain
- Spend 20,000 credits at one Encampment
Each encampment has it’s own currency, and you earn that camps currency from doing most content related to it (Main story, camp jobs, clearing hordes, selling items, etc…). You should earn more then enough as you max out your Trust Level with a specific camp. If not, clear any hordes you may have missed and keep an eye out for survivors as you explore.
スキル
As you play you will earn experience and gain skills. There are 3 skill trees with 15 skills each:Ranged, Melee and Survival. Story missions, side missions, activities and hordes are all good sources of experience. Depending on how much of these things you do during your play through, you may be short a few skill from the 45 needed for the final achievement.
As you will need to do most side missions (Storylines, Encampment Jobs, Map Completion) for the other achievements anyway, it’s best to focus on these before taking on extra hordes. While there is more then enough experience for all skills if you have done absolutely everything, unless you enjoy killing hordes it’s best to leave that for the final bit of experience you need. Northern region hordes award 3,000 XP and southern region award 4,000 XP. All hordes are marked on your map after you complete the main story.
Don’t Stop Me Now
- Unlock your first skill
I’m Out of Control
- Unlock 15 Skills
There’s No Stopping Me
- Unlock 30 skills
さんFahrenheit
- Unlock 45 skills
戦闘
You’ve Got Red on You
- Collect 541 Items from corpses
This achievement is listed in both the Collectible and Combat sections as it technically both.
I highly recommend you start making progress on this achievements from the beginning of the game. This can be a serious grind if you aren’t making an effort to progress this as you play normally. You can only make progress on this achievement by looting human corpses, Freakers do not count (they have their own achievement).
You must also always be aware that you have limited inventory space for crafting supplies (what you will be looting the most). You can clearly see your inventory is full when you try to loot and a red icon appears over the body. Items must be successfully looted for them to count towards the achievement.
You can check your progress by pausing> select Storylines> Achievements> You’ve Got Red on You.
Lend Me Your Ears
- Collect 989 Freaker Ears
This achievement is listed in both the Collectible and Combat sections as it technically both.
This is much easier than the “You’ve Got Red On You” achievement as not only are Freakers far more common than humans, you will automatically pick up Freaker Ears by simply walking over their bodies. You can even pick them up on your bike.
If you haven’t gotten this while completing all Mission/Side content, clearing out the last few hordes should easily award this to you. Just be sure you are picking them up.
You can check your progress by pausing> select Storylines> Achievements> Lend Me Your Ears.
This is a Knife
- Kill a Breaker, Reacher, or Rager with a knife
Each of these enemies are encountered through story progression and after defeating them the first time can be found throughout the map. Each enemy is unique and provides their own challenge in killing, especially with a knife.
By far the easiest way is on Playing All Night mission where you fight a Breaker. As this is a pseudo boss fight, the breakers health bar is displayed on the screen. This allows you to easily use other more powerful weapons to bring it to the brink of death and finish it off with your knife.
If you missed this opportunity, it’s not the end of the world. As I mentioned all three spawn in the world naturally and provide plenty of opportunity to try again. In the Melee skill tree, the executioner skill allows you to use stealth takedowns on Breakers. Combine this with a smoke grenade and you can easily kill one without much trouble.
Additionally, tagging a Breaker with binoculars apparently (I haven’t done this myself) causes the health bar to display on screen, allowing you to use the first method outside of the required mission.
Ghost of Farewell
- Get 100 stealth kills
Enemy awareness in this rivals that of a Bethesda game. That is to say enemies will rarely detect you regardless of what you do. Simply walk up behind an enemy and perform a stealth take-down 100 times.
Old Reliable
- Kill 200 Enemies with a Crafted Weapon
This one is also fairly simple, but there are a few thing you can do to make it even easier.
By completing Ambush Camps you unlock crafting recipes. Some of these recipes allow you to create more powerful melee weapons such as Nail Bats or a Buzzsaw. Combine that with the Field Repairs skill and you can repair your melee weapons with scrap, an abundant resource. With this you’ll almost never need to craft new weapons.
Most enemies don’t take many hits to bring down, but Freaker “Newts” are by far the best target for achievement progress as they only take 1 hit to kill.
Variety is the Spice of Life
Kill an enemy with every type of crossbow bolt
There are 5 different types of bolts:
- Crossbow Bolt:Unlocked from the start.
- Residue Bolt:Unlocked by completing the “They’re Not Sleeping” mission.
- Poison Bolt:Unlocked by completing the “I’ve Got a Plan” mission.
- Incendiary Bolt:Unlocked by clearing 8 Ambush Camps.
- Explosive Bolt:Unlocked by clearing 12 Ambush Camps.
Bike
Burnout Apocalypse
- Use nitro and drift at the same time on your bike for at least 5 seconds
This achievement is listed in both the Encampment and Bike sections as it technically both.
While the achievement action itself doesn’t involve Encampments, the Nitro 3 upgrade required is only available once you reach Trust Level 3 with the Diamond Lake Encampment.
See the Encampment section of the guide for more information.
This achievement is best attempted in a flat, open area and may take some practice to preform.
On Xbox Controller:
- Hold RT + B + A
On Playstation Controller:
- Hold R2 + Circle + X
While holding the above buttons, lightly accelerate and drive in a circle for at least 5 seconds.
Farewell Drift
- Accumulate 10 minutes of drifting while on your bike
Fairly simple, just a bit grindy.
To drift hold:
- B on Xbox Controller
- Circle on Playstation Controller
And move the directional keys or analog stick in any direction.
You can check your progress by pausing> select Storylines> Achievements> Farewell Drift.
First Time Buyer
- Upgrade your bike for the first time
Each camp has a mechanic that can upgrade your bike. Just buy any upgrade.
Farewell Original
- Purchase an upgrade under the Performance, Visual, and Paint Categories for your bike
Simply buy one of each the three different category’s and the achievement will pop.
The Art of Bike Repair
- Apply 100 scrap to your bike
When you crash or are hit by enemies you bike will take damage. If you have scrap you can use it to repair any damage.
You can check your progress by pausing> select Storylines> Achievements> The Art of Bike Repair.
その他
D.I.Y. Oregonian
- Craft 50 items
You will likely craft much, much more than is required during your playthrough.
One Percenter
- Go above and beyond, unlocking every achievement in Days Gone
This should only require the base game achievements, not Challenge Mode, Survival Mode or NewGame+ achievements.
ウィップ