Havsala:Into the Soul Palace – 100% フル ウォークスルー &アチーブメント ガイド
チュートリアルを完了するためのガイド
はじめに
すべての実績を取得するには、2 つのプレイスルーを実行する必要があり、それぞれが 2 つの相互に排他的な実績を授与します。
これらのプレイスルーの 1 つはヒントなしである必要があり、もう 1 つは少なくとも 5 つのヒントを使用する必要があります。
これらのプレイスルーの 1 つは、すべてのクイズの質問に正しく答える必要があり、もう 1 つはすべてに失敗する必要があります。
これらのプレイスルーの 1 つを一度に行う必要があります。
このガイドの目的は、最初のプレイスルーで可能なすべての実績 (ヒントなしでプレイし、すべてのクイズの質問に正解することを含む) を取得し、2 回目のプレイスルーを不足している成果の「クリーンアップ」実行として使用することです。
第 1 章:フリュネ
部屋の正面 -> デスク
- 左下の引き出し:カラスの賄賂を受け取ります。
- 机の左脚には、開くことができる小さなコンパートメントがあります。中のメモを取ってください。
部屋の正面 -> 左の絵
- 絵の後ろにあるメモを取ります。
部屋の前側 -> 左の本棚
- すべての本を読みます。ハイライト表示されたページをクリックして、日記にメモを追加してください。
- ぶら下がっている植物をクリックして、14 面体の形をした立方体を表示し、ドア 4 をクリックして釘をつかみます。
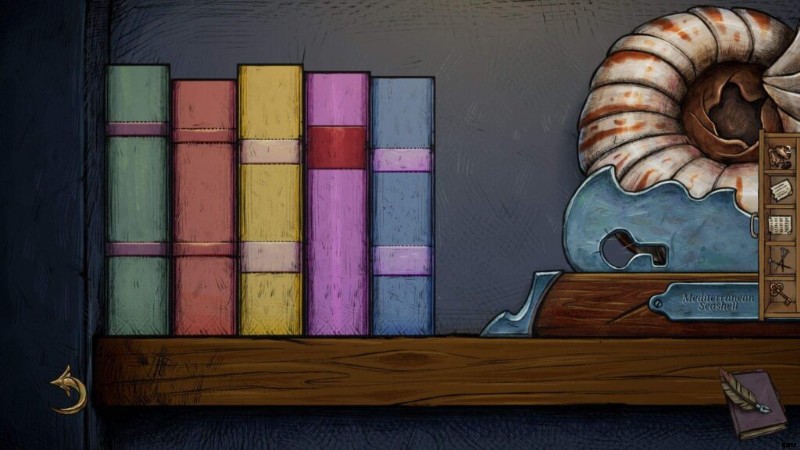
- 右上の棚:次の順序で本を置きます。緑、オレンジ、黄色、ピンク、青 (前の絵からヒントを得ました)。この本棚の下にあるガラスのショーケースの鍵を手に入れてください。
- 右下の棚:カラスの賄賂を受け取ります。
- 鍵を使ってガラスのショーケースのロックを解除してください。
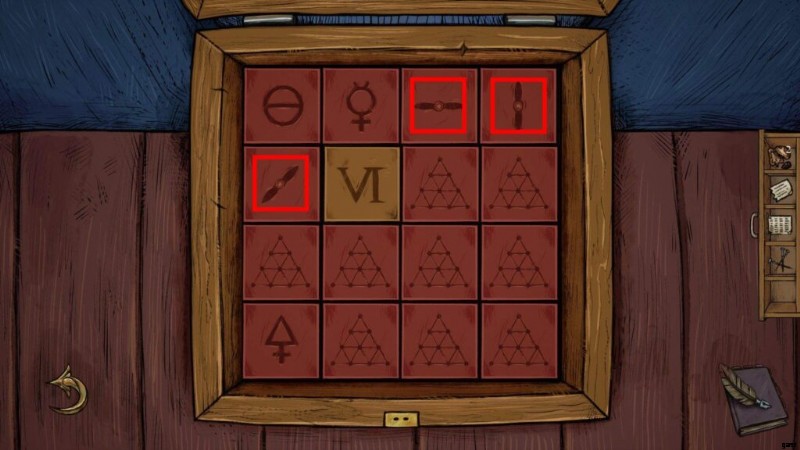
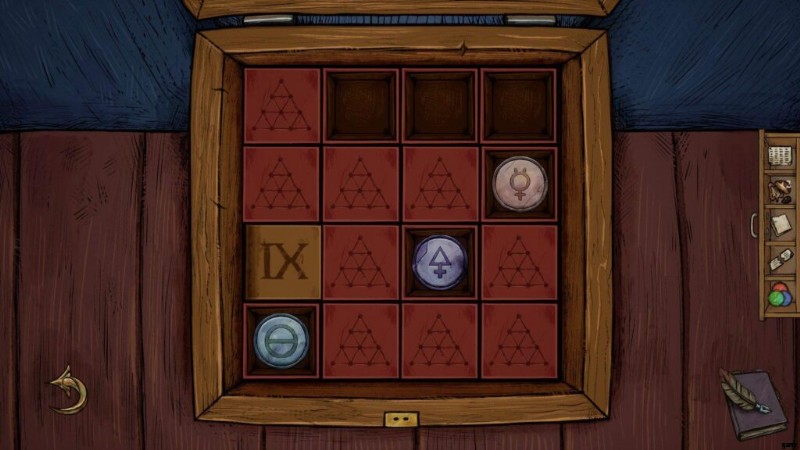
- ガラスのショーケースのパズルを解く:無限大記号の付いたタイルを次の位置に移動します:
- 3 =水平方向の無限記号、4 =垂直方向の無限記号、および 5 =斜めの無限記号 (上の棚にあるピタゴラスの本の 10 ページに、無限記号と重なる正方形の数を数えることでヒントが見つかります) ); 3 つの花の形をした円盤を手に取ります
- 一番下までスクロール:アンフォラの破片を手に取ります。
部屋の正面 -> アンフォラ ニッチ
- アンフォラのピースを使ってアンフォラを固定します。
- カラスのために賄賂を受け取る
部屋の裏側 -> 左の棚
- 安全:カラスのために賄賂を受け取ってください。
- 石油ランプを手に取ってください。
- 蝶々のいる棚:カラスの賄賂を受け取ってください。
部屋の裏側 -> 右側の壁龕
- 3 つの花の形をしたディスクを、右下隅から絵を複製するようにパズル エリアに配置します。ディスクが中央のパズル エリアの外にある場合は、ディスクをクリックして回転させることができます。
- 画像ソリューションでの重なり方に注意してください:
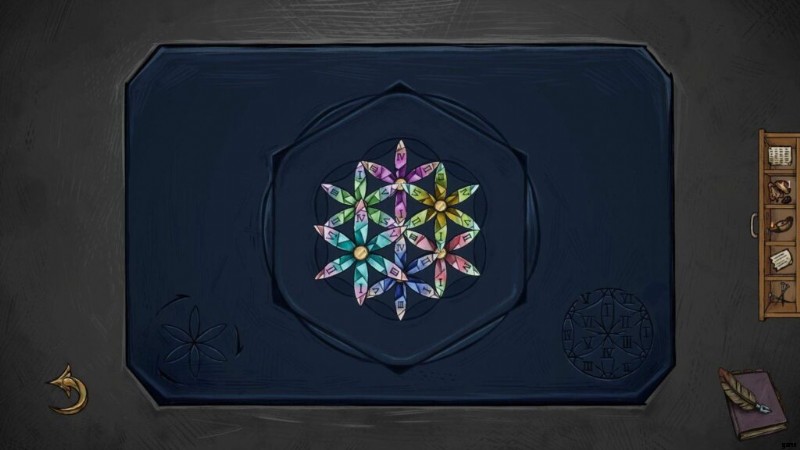
パズルを解いた後、カラスへの賄賂と金属製の紐を手に入れてください。
部屋の正面 -> ライラ
- 金属製のひもを配置します。
- 次の順序で文字列をクリックします。
- 134751 (1 が一番左、8 が一番右)。
このパズルを最初から間違いなく解決すると、次の実績を獲得できます:
- 絶対音感
この画面で 5 分間アイドリングすると、次の実績がトリガーされます:
- オルフェウスを嫉妬させた
部屋の裏側 -> 木
- リンゴを手に取り、フラワー ディスク パズルがあった場所にある彫像の手の中に置きます。これにより、部屋の反対側にあるマップ パズルのロックが解除されます。
部屋の正面 -> 地図
- 上部と右側のハンドルをドラッグして座標を「クロトン」(ヒント:ノートのフリュネのテキスト) に設定し、「-」を前に付けて「345」年に変更します (年表の 2 ページからのヒント)ブック)、次にボタンを押します。
タロットカード #1
隠しコンパートメントを開けるのに何枚のフラワーディスクを使いましたか?
正解:6 (2 回目のプレイスルーで、他の間違った答えを選択してください)。
- さようなら、Phyrne
第 2 章:フラビア
部屋の正面 -> デスク
- 日記を読む。鍵を取ってください。
- 机の左上の引き出しにある鍵を使用してください。女神の名前が書かれた宝石を手に入れましょう。
前の章の日記は、机の左上隅にあるボックスに配置されています。 1 つを読んで実績を獲得してください (第 2 章からいつでも取得できます)
- 振り返って先を見る
部屋の前側 -> 左の本棚
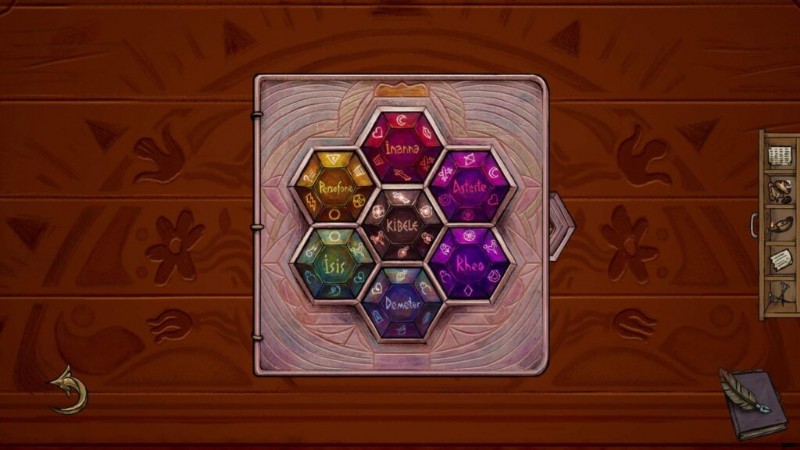
- Cybele ボックスを中心に生まれた 4 冊の新しい本を読みましょう。
- 女神の名前が書かれた宝石を、Cybele ボックスに配置します (正しい位置にあると、中央の六角形にアイコンが点灯します)。クリックすると、本のページが表示されます。
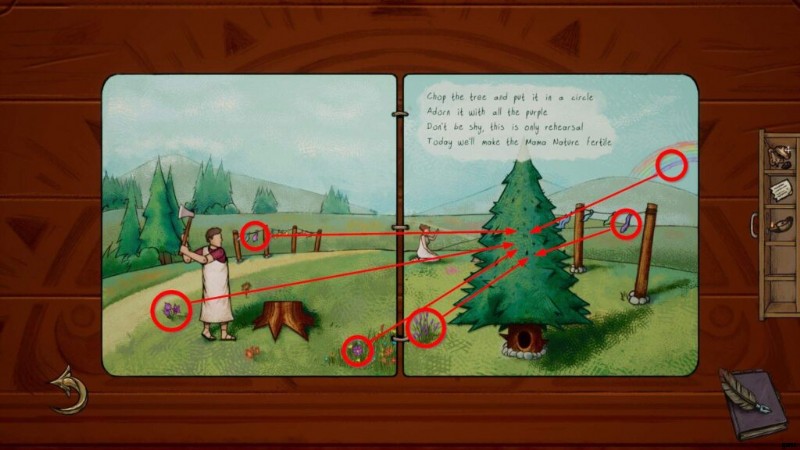
部屋の正面 -> 左の本棚 -> キュベレのパズル (前編)
- 右側のページ (座っている女性の前) から斧を取り、左側の男性に渡します。
- ツリーをストーン サークルの右側に移動します。
- すべての紫色のアイテム (花、吊り下げリボン、虹) をその上にドラッグします。
- 最後に右矢印を押して次のページに進みます。
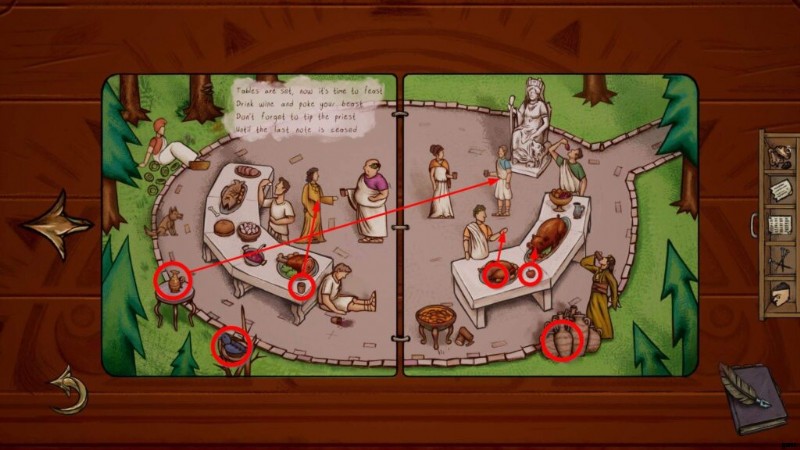
部屋の正面 -> 左の本棚 -> キュベレパズル (後編)
ここでの目的は、コインを 6 枚集めることです。
まず、達成のために骨を犬に渡します:
- コインはもらえません
- 青い鳥を 2 回クリックします (左ページ)。
- 小さな円卓 (左ページ) の水差しを、右側にいる水色のシャツを着た男性に渡します。
- テーブルの隅にあるマグカップを、オレンジ色のトーガを着ている人に渡します (どちらも左ページにあります)。
- りんごを豚の口に入れます (どちらも右ページの表にあります)。
- その前に立っているオレンジ色のシャツを着た男性に鶏もも肉を渡します (どちらも右側のページにあります)。
- コインが現れるまで、右側のワイン アンフォラを複数回クリックします。
部屋の正面 -> 左の本棚 -> キュベレのパズル (その 3)
- 岩の上に座っている女性の手で太陽を動かす
- フルートの音が終わるのを待ってから、彼女のドラムのビートと 3 人のミュージシャンの音に注意してください。
- 彼女がビートを出すのを待ってから、正しいミュージシャンをクリックします。あなたが失敗すると、彼女は手のひらのようなアニメーションを行い、フルート + デモンストレーション ビートのシーケンスが再び再生されます
- プレイスルーごとにサウンドの順序がランダムになる可能性があります (100% 確実ではありません)。
部屋の裏側 -> 左の棚
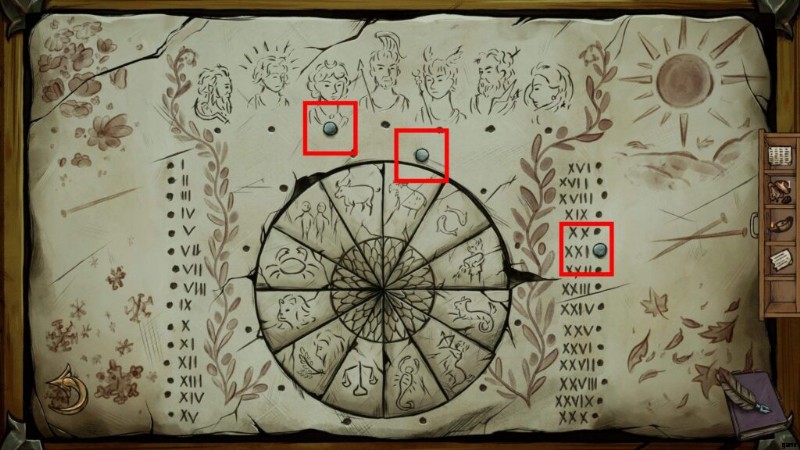
- カレンダー パズル:釘を次の位置に置きます (キュベレ パズルの最後のメモからのヒント)。次に、月の女神の石を拾います:
部屋の裏側 -> 木
- 上部にハイライト表示されているツリー スロットに月の女神の石を配置します。
- 木の内部:石油ランプを使用して光を当て、射手を動かして、アンフォラに描かれている 4 匹の動物すべてに矢が当たるようにします。次に、一番左の射手 (動かせないのは 1 つだけ) を押します。射手の正しい構成を以下に示します:
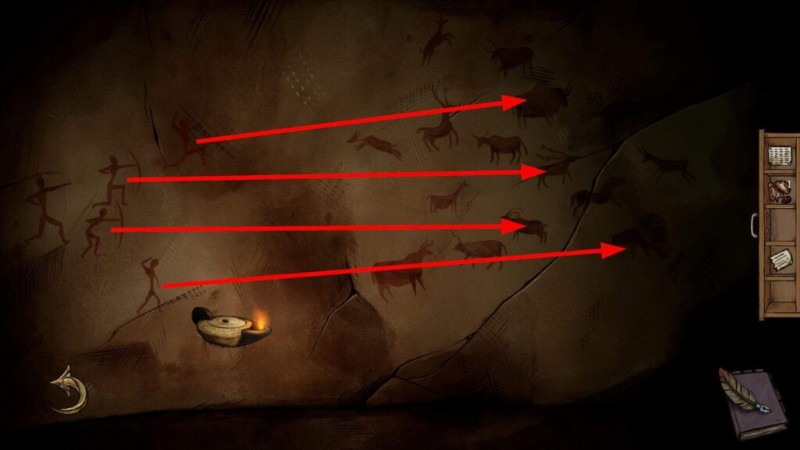
パズルを解いた後、隕石のピース (画面右下) を拾います。
1 画面分部屋に戻り、ツリーの右側のニッチに配置します。
部屋の正面 -> 地図
- 座標をローマ、「-」、160 に設定します (ヒント:ノートブックのキュベレ本のページ)
タロット カード #2
マグナ・マーテル祭の本に出てくるお金を集める司祭の帽子は何色でしたか?
正解:オレンジ (2 回目のプレイスルーで、他の間違った答えを選択してください)。
- さようなら、フラビア
第 3 章:イシオン
部屋の正面 -> デスク
- 日記を読む。鍵を取ってください。
- 机の右上の引き出しにある鍵を使用してください。カラスのために地球のシンボルと 3 つの賄賂を受け取ります。
部屋の前側 -> 左の本棚
- 右下の 2 つの棚にある 7 冊の新しい本を読みます。 「星座」の本には、拾うことができるメモが含まれています。
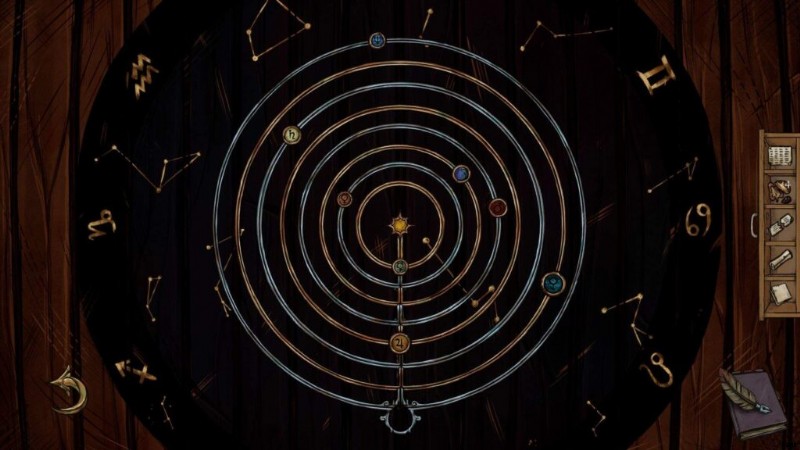
部屋の裏側 -> 天井
- 地球のシンボルを中央に配置し、リングを回転させて、それらの間の仕切りが中央の下の垂直スペースに収まるようにします.
- 月のピースを下に動かしてパズルから外します。
部屋の正面 -> バルコニー
- 月の箱をシーンのどこかにドロップして開きます。鍵をつかみます。
部屋の正面 -> デスク
- ダイアリーの上で、新しく取得したキーを左側のキー スロットに挿入します。ノートを手に取り、「何か」
部屋の正面 -> 地図
- 地図の下部、年カウンターの右側に「何か」を添付します。
- 新しく形成されたデバイス (時間モジュール) をクリックしてピックアップし、地図の下の小さなコンパートメントをクリックして、不完全なメモの欠落部分を明らかにします。インベントリ内の 2 つのパーツのいずれかをクリックし、画面に表示される回転ボタンをクリックすると、それらがマージされます
部屋の裏側 -> 左の棚
- セーフ:タイム モジュールを取り付けて、年を 1932 に設定します (ヒント:先ほどデスクから取り出した M のメモに記載されている年)。望遠鏡の部品を手に入れてください。
部屋の裏側 -> 木
- 強調表示されたスロットにムーン ボックスを配置します。
部屋の正面 -> バルコニー
- 見つからない 2 つの惑星を取得するために必要な手順は、インベントリのメモに記載されています。ただし、メモの左側からのみ指示に従うと、実績が授与されます。
- 達成するには、次の手順に従ってください:
- 望遠鏡を設置する
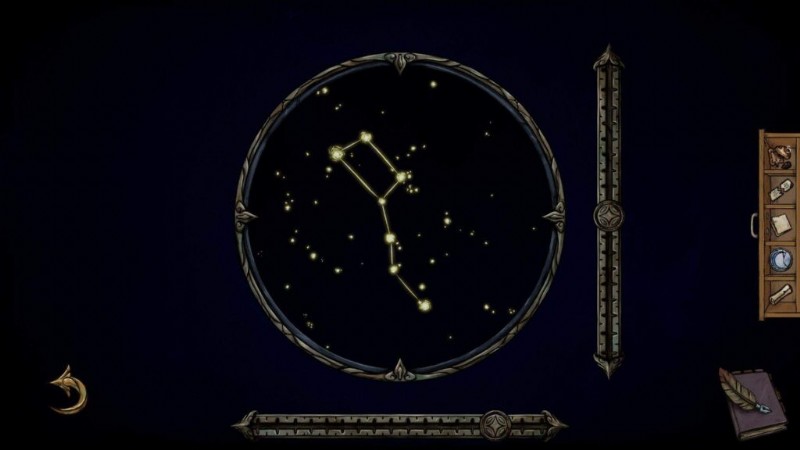
- 望遠鏡をクリックし、おおぐま座が見つかるまでレバーを動かします (正しい位置は下の画像で確認できます):
- 1 画面出て、ヘッドピースを天王星のシンボル (茶色) に向けます。
- 1 番目、3 番目、4 番目、6 番目のレンズをクリックして下に移動し、2 番目と 5 番目のレンズは上に残します。
- 望遠鏡をクリックして実績を取得してください。
- だまされた!彼は…
正しい手順は次のとおりです:
- 手順に従って前の実績を取得した場合は、レンズのすぐ下にあるボタンを押してレンズをリセットしてください。
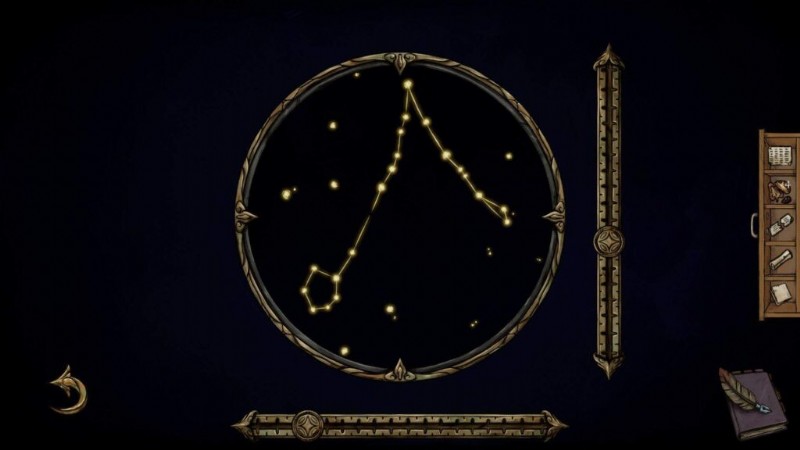
- 望遠鏡をクリックし、うお座の星座が見つかるまでレバーを動かします (正しい位置は下の画像で確認できます):
- 1 つの画面に移動し、ヘッドピースを天王星のシンボル (茶色) に向けます。手順に従って前の実績を取得した場合は、既にこれに設定されているはずです。
- 1 番目、2 番目、5 番目、6 番目のレンズをクリックして下に移動し、中央の 2 つのレンズは上に残します。
- 望遠鏡をクリックして、天王星のタイルを拾ってください。
- 1 画面出て、ボタンを押してレンズをリセットします (レンズのすぐ下)。
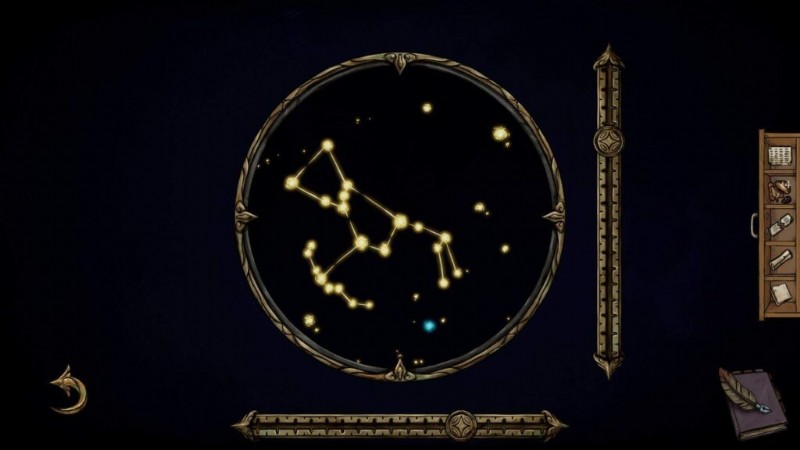
- 望遠鏡をクリックし、オリオン座が見つかるまでレバーを動かします (正しい位置は下の画像で確認できます):
- Go out one screen, turn the headpiece to the Neptune symbol (dark purple).
- Click on the 2nd and 5th lenses to move them down.
- Click on the telescope and pick up the Neptune tile.
This achievement can be obtained any time, but since we’re here, click on the raven 20 times…
- Leave the bird alone
Back side of the room -> Ceiling
- Place the two missing planets on the puzzle board by inserting them through the bottom circle.
- Arrange them as follows, then pick up the sun disc:
Back side of the room -> Tree
- Place the newly acquired sun disc; pick up the emerald tablet and place it in the niche on the right of the tree.
Having placed all 3 sacred objects will trigger the following achievement:
- Holy Trilogy
Back side of the room -> Left shelves
- Pick up the time module from the safe.
Front side of the room -> Map
- Place the time module, set the coordinates to “Alexandria”, “+”, 415 (hint:time and death of Hypatia).
Tarot Card #3
In the first version of the cosmos model on the ceiling, which planet around the earth did the sun appear as?
Correct answer:4 (During your second playthrough, pick any of the other wrong answers).
If you answered all 3 questions correctly, you should now receive:
- Vigilant Engrams
- Good bye, Ision
Chapter 4:M.
Front side of the room -> Desk
- (skippable in the second playthrough) Read the diary; pick up the key.
- (skippable in the second playthrough) Use the key on the bottom right drawer of the desk; pick up the colored discs.
Front side of the room -> Left bookcase
- (skippable in the second playthrough) Read the new books that spawned, don’t forget the two new ones on the left of the Cybele puzzle.
If you clicked through all the books, you should now receive:
- Literature is the most agreeable way of ignoring life
Back side of the room -> Left shelves
- (skippable in the second playthrough) Place the colored discs on the wooden box puzzle from the top shelf (green on top, blue in the bottom left, red in the bottom right slot) to see their corresponding symbols, then pick them up again.
- (skippable in the second playthrough) Place the time module (from below the map on the other side of the room) into the safe and set the year to +1471 (hint:Corpus Hermeticum book translated by Salvino); pick up Salvino’s diary and the tarot card inside (Tarot Card #4); read the diary until the end.
- (skippable in the second playthrough) Close the safe, set the year to +1525; pick up Ynes’s diary and the tarot card inside (Tarot Card #5); read the diary until the end.
- Your dedication has not gone unnoticed
- Hungry for more stories
- (skippable in the second playthrough) One shelf below the safe, click on the tarot card book and go to the end, where you see a page with one button:“Spread”; this will start a tarot reading and grant you one achievement:
- Do you believe in fortune-telling?
- (skippable in the second playthrough) Repeat the tarot reading 4 more times.
- I will not accept my fate!
Front side of the room -> Animals painting
- (skippable in the second playthrough) Place the colored discs like so:
- Red on the lion, green on the swan, blue on the wolf.
- You can then see the following numbers:
- 13 =blue wolf (=Salt), 11 =green swan (=Sulphur), 8 =red lion (=Mercury).
Front side of the room -> Left bookshelf
- Place the three symbols based on the previously discovered number links and then pick up the 3 pieces:
Back side of the room -> Tree
- Place the Salt, Mercury, Sulphur symbols (ion this order from left to right) on the highlighted slots of the tree and pick up the diamond pieces.
Back side of the room -> Left shelves
- Wooden box:insert the diamond-shaped tiles and the colored discs; order the diamonds like from top to bottom like so:
Green – silver – purple – yellow (hint given by the number of knots and the colors of the threads on the right side of the balcony).
- Open the inner slots of the newly revealed puzzle, then fill in the missing pieces located at the edges; pick up the brush and the paint.
Back side of the room -> Floor
- Place the paint, use the brush to draw the full pattern in one go, without releasing the mouse; pick up the stones for the 4 elements.
Back side of the room -> Tree
- Place the stones for the 4 elements in the highlighted slots.
- Fellow Soul
- One night stand
If you didn’t use any hints, you should also unlock:
- Do we need this achievement? No one can finish without a hint, right?
Second Playthrough
The second playthrough requires replaying only the first 3 chapters.
Make sure to:
- Pick wrong answers to the quiz questions.
- Use the hint 5 times (collect the bribes for the bird, as indicated in the guide and feed them to the raven on the balcony).
This playthrough should award you the following two achievements:
- Need b12?
- Someone should feed the bird.