エデンからの一歩 - 完全な実績ガイド
One Step From Eden で実績を取得するための一般的なガイド。
全実績の入手方法
概要
One Step From Eden の実績のほとんどは非常に簡単ですが、取得に問題がある場合は、このガイドで洞察を得ることができます。
実績は、この記事の執筆時点で実績を持っているすべてのプレーヤーの割合で並べ替えるという意味で、「最も簡単」から「最も難しい」の順にリストされます。
アチーブメントを取得するために技術的にランに勝つ必要はないことに注意してください (明示的に必要な場合を除きます)。つまり、実績だけのために実行を調整し、続行したくない場合はそれを取得したら終了できます。
免責事項:私は決してゲームの専門家であるとは主張しませんが (個人的にはまだすべての実績を持っているわけではないため)、それらを取得するための最良のルートについて知識に基づいた推測を行うことができます.成功するには、ゲームの仕組みに十分に慣れる必要があります。
1.冒涜
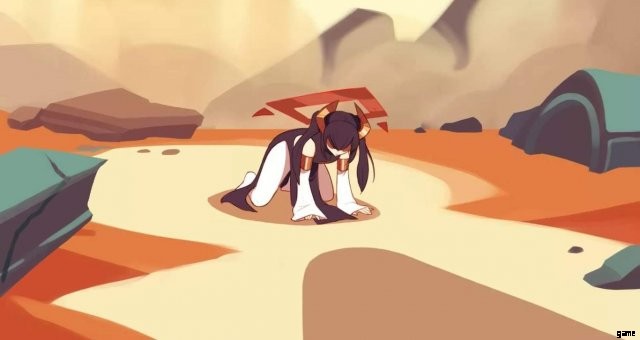
- 説明:セルフ ディフェンス ハザードを破壊します。
- 達成しやすいキャラクター:任意
- ヒント:セルフ ディフェンス タレットに遭遇する可能性を高めるために、ハザードまたはミニボス エリアを目指します。彼らの HP は 999 で、ダメージを与えたユニットに対して迅速に報復射撃を行います。できるだけ安全に破壊するには、通常、発射されるショットの量を最小限に抑えるために、高いダメージ インスタンス能力で攻撃しながら素早く動き回ることをお勧めします。
HP が 100 しかない自衛タレットを呪文で出現させることもできます。
これを破壊しても達成できるかもしれませんが、テストはしていません。
これはフィールドでのセルフ ディフェンス タレットの外観です:
2.仮装トースト
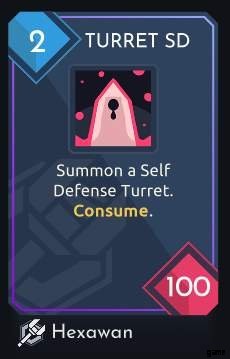
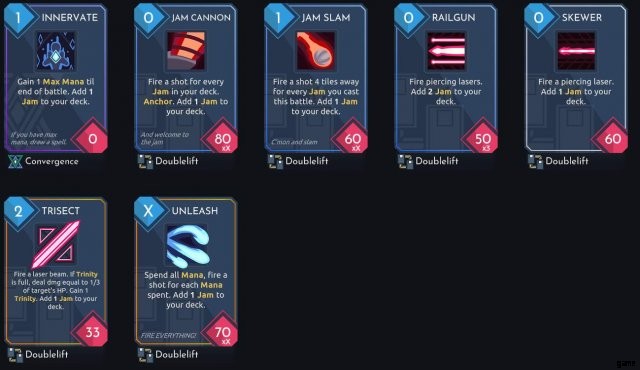
- 説明:1 回の戦闘でジャムを 10 回キャストする。
- 最も達成しやすいキャラクター:ガンナー (マナファイア)
- ヒント:ガンナーは、ジャム ジェネレーターである Innervate から始めますが、これは、Doublelift に焦点を合わせてジャム ジェネレーターを拾い、(自然または手動のいずれかで) 十分に長引く戦闘を見つけるだけで、どのキャラクターでも簡単に実行できます。十分なジャムをキャストしてください。
ジャム ジェネレーター カードの例を次に示します。
3./5./6./8./9./12./13./15.標準ティア 4 ボス
- 3.これを弱体化
- 5.リバース エンジニアリング
- 6.アンブレイカブル
- 8.銃規制
- 9.沈黙は金なり
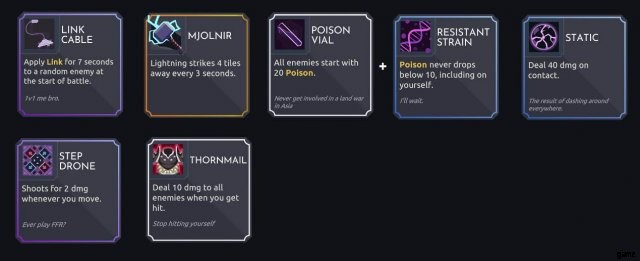
- 12.シャーロット
- 13.ホワイトナイト
- 15.コールド、デッドハンド
- 説明:ティア 4 ガンナー/ヘーゼル/テラ/シソ/ヴィオレット/サフラン/レヴァ/セリシーを倒せ。
- 達成しやすいキャラクター:任意
- ヒント:Tier 4 ボスはステージ 6-6 と 7-6 で見つかります。特定のボスの実績を目指している場合は、特定のエリアを最後に残すことを忘れないでください:
- 北極:セリシーとヴィオレット
- 火:ガンナーとサフラン
- 森:ハシバミと紫蘇
- 廃墟:レヴァとテラ
特定のボスに問題がある場合は、ビデオを見て、攻撃パターンに慣れるまで下位レベルのバージョンで練習することをお勧めします。ビジュアルを通じてより良い体験を提供するビデオが多数あるため、これはボスを倒す方法のガイドではありません.
4.大賢者
- 説明:デッキにあるすべてのフォーカスの呪文を 1 つ持つ。
- 達成しやすいキャラクター:任意
- ヒント:全部で 10 個のフォーカスがあります。髪を分けたい場合、サフラン (クロノ)、ヴィオレット (ダブルタイム)、ショップキーパーなどのキャラクターは、すでに 4 つの異なる焦点から始めているため、これで少し楽になりますが、快適なものをプレイして、まだ見落としていることに注意してください。
7.災害
- 説明:カラミティ スペルを取得します。
- 達成しやすいキャラクター:任意
- ヒント:カラミティの呪文には虹の境界線があります (高いレアリティを象徴しています)。これらのロックを解除する前に、おそらく数回プレイする必要がありますが、一度プレイすると実績を取得するのは非常に簡単です。
カラミティ呪文の例をいくつか示します:

10.エデンから一歩
- 説明:門にたどり着く。
- 達成しやすいキャラクター:任意
- ヒント:ゲートはニュートラル エンディングのボスで、少なくとも 1 つのボスを回避し、少なくとも 1 つのボスを実行することで到達できます。この実績を得るために門を破る必要はありません。
11.赤ちゃんにさえ近づかない
- 説明:1 HP でボス戦に勝利する。
- 最も達成しやすいキャラクター:レヴァ以外の誰でも
- ヒント:早い段階でレバと戦って助けてから、レバの復活を使わずに別のボスに行き、レバを殺さずに HP をできるだけ低くします。蘇生を使い切り (ボスに「殺される」ようにすることで)、レヴァがドロップするヘルスをまだ拾わないで、ボスを倒してこの実績を獲得してください。
ボスがあなたを処刑している最中に(火や毒などで)、またはM.A.D.でボスを倒した場合にも、この実績を得ることができます。ソウルリンク経由で、しかしそれらの方法は少し信頼性がないようです.
14.末永くお幸せに
- 説明:予備のテラブル。
- 達成しやすいキャラクター:任意
- ヒント:Terraable は Pacifist エンディングのボスです (ボスを実行しないでください)。この実績を得るには、彼女を倒し、処刑せずに続行してください。
16.ナイフで銃撃戦
- 説明:スラッシュフィク スペルでガンナーまたはシソを倒します。
- 達成しやすいキャラクター:任意
- ヒント:Slashfik に焦点を合わせ、その焦点から少なくとも 1 つの呪文を取得し、何らかの方法で Gunner または Shiso の HP を 1 にしてから、Slashfik 呪文でそれらを実行します。明らかに下位層の方が簡単です。
17.もっともらしい否認
- 説明:呪文や武器を使わずに戦闘に勝利する
- 最も達成しやすいキャラクター:レヴァ (ビート)
- ヒント:レヴァ (ビート) は、攻撃を受けるたびに 20 ダメージのショットを発射するフラック ジャケット アーティファクトから始めます。単一の敵に直面し (大量の防御なしで)、すべての攻撃をタンクに入れると、最初の戦闘でこの実績を取得できます。

これに加えて、仕事を成し遂げることができる成果物がいくつかありますが、効果の度合いは大きく異なります:
私は、人質が爆発する破片の前にいる遭難エリアに入り、味方のサフランにラグナロクで一発撃ち込ませたときに、この実績を達成する人々に関するいくつかの議論を見てきました.個人的には、これは私に成果をもたらしませんでした.
18.ひどい
- 説明:Terraable を実行します。
- 達成しやすいキャラクター:任意
- ヒント:Terraable は Pacifist エンディングのボスです (ボスを実行しないでください)。彼女を倒し、処刑してこの実績を手に入れましょう。
19.ソロ
- 説明:デッキに呪文を 1 つ入れます。
- 最も達成しやすいキャラクター:ガンナー (Bullethell)。
- ヒント:Gunner (Bullethell) をアンロックしている (Gunner (Manafire) としてニュートラルまたはジェノサイドの実行を完了する) 場合、彼は 1 つの呪文で開始するため、彼との実行を開始するとすぐに実績を取得できます。

サフラン(ソロ)でもこれを行うことができますが、アンロックするのが難しく、完全なジェノサイドの実行を完了する必要があります.何らかの理由でこれらのいずれも行いたくない場合は、典型的な 4 つの呪文のキャラクターを選択する標準的な方法を実行できます。追加の削除が 2 つ蓄積されるまで (ショップまたはボスの実行報酬を通じて)、呪文を拾うことはありません。 )、その後 3 つの呪文を取り除きます。
20.テラフォーム
- 説明:同時に 16 個以上の壊れたタイルを持っている
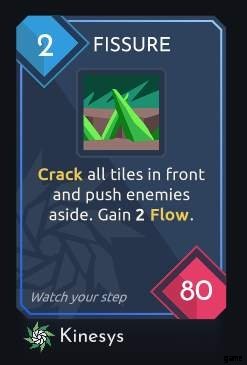
- 最も達成しやすいキャラクター:セリシー (侵略)
- ヒント:Kinesys にフォーカスして、Fissure を探します。
私の記憶が正しければ、ミドルバックからキャストした場合、21 個のタイル (自分側で 9 個、敵側で 12 個) をクラックする必要があります。そこから、曲がりくねった動きで素早く前進し、自分の側のひびの入ったタイルをすべて壊してから、Fairfrozen (セリシーの基本攻撃) を使用して敵側に移動し、敵のタイルを壊し始めます。 2、3 回再配置する必要があるかもしれないので、既に壊れているタイルにテレポートして行き詰まることはありませんが、少しルーティングを行うことで、最終的にはこれを管理できるはずです.
21.過去に戻る
- 説明:セリフを打ち負かして送り返してください。
- 達成しやすいキャラクター:任意
- ヒント:Serif はジェノサイド エンディングのボスです (ショップキーパーを除くすべてのボスを実行します)。彼女を倒したら、送り返されて別のループを開始し、この実績を取得する必要があります。
22.ブザービーター
- 説明:フェードアウェイ スペルで最後の敵を倒す
- 達成しやすいキャラクター:任意
- ヒント:参考までに、これは Fadeaway です:

「逆タイル」の意味がわからない方のために、簡単な例を示します:

フェデアウェイ スペルを持っているとしたら、それでオーバーマーを倒したい場合は、キャラクターが現在立っている場所にキャストします。そこから、彼女は反対側のコーナーにテレポートし、4 タイル先にショットを発射します。なんらかの理由で岩を殺したい場合は、赤い「R」の位置に立ってからキャストします。
23.人食い
- 説明:むさぼりの呪文で人質を殺す
- 達成しやすいキャラクター:任意
- ヒント:参考までに、これは Devour です:
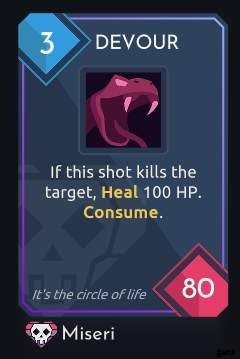
呪文を取得したら、かなり簡単です(明示的に探している場合は、ミセリに焦点を当てます).キャスト後に消費されるため、人質の HP が実際にむさぼりによって殺されるのに十分なほど低いことを確認してください。
24.かごに入った卵
- 説明:同じ呪文を 4 回アップグレードします。
- 最も達成しやすいキャラクター:シソ (処刑) / 店主
- ヒント:呪文をアップグレードするたびに、以前のアップグレードに加えて追加のアップグレードが必要になることに注意してください。したがって、呪文を最初から 4 回アップグレードしたい場合、1+2+3+4 =10 回のアップグレードの費用がかかります。ショップで購入したアップグレーダーだけを使用してゼロからカードをアップグレードしてこれを取得しようとすると、1,050 の費用がかかります。その場合、Shiso (実行) と Shopkeeper は、戦闘ごとに追加のお金を生成できるため、最良のオプションになります。慎重なプレー。ただし、これを任意のキャラクターで実行可能にする方法があります:
- ショップキーパーの協定に注意してください。アップグレーダーが提供される場合があります。必要なすべてのアップグレーダーをまだ持っていない場合、実行を終了する可能性のある協定に注意してください。
- アップグレード者を提供する可能性があるため、実行しても問題のないボスを処刑してください。
- アップグレード前の呪文を探します。まれに、すでに 2 つ (または 3 つ!) のアップグレードが含まれている戦闘報酬の呪文を見つけることができます。これにより、自分で提供する必要があるアップグレードの量が大幅に削減されます。
- アップグレーダーを最小限に抑えたい場合は、ジェノサイド ループもリソースを集め続けるためのオプションです。
25.サンセリフ
- 説明:セリフを実行します。
- 達成しやすいキャラクター:任意
- ヒント:Serif は真のジェノサイド エンディングのボスです (ショップキーパーを含むすべてのボスを実行します)。彼女を倒したら、店主のヤミの呪文で彼女を処刑できるはずです (ただし、使用しないことを選択した場合でもエンディングが発生するようです)。
26.最高の防御
- 説明:9,999 以上のシールドを持っています。
- 達成しやすいキャラクター:任意
- Tips:There are a multitude of ways to achieve this (some more…boring than others), but remember that you lose 40% of your shield after every shuffle (unless you have the Duct Tape artifact, which reduces the shield loss to 25%). While you could do this with Reva (Shield) on the first battle, and just move around with her Eschaton artifact 9900 times or so (you get a little bit of leeway with Shield Catch and Shield Beam…), there are some marginally better alternatives. Note that you need to be in an active battle to gain shield, so your best option would be to find a distress area with a turret/turrets and camp in a corner.
Here are some spells that will get you this achievement by themselves, AFKing recommended (spells or artifacts that grant large amounts of shield will not be mentioned as they cannot get you to 9,999 shield by themselves, but they can shave off a little bit of time):
Note that if you use Blood Shield, you are probably going to die after you deactivate it unless you can finish the battle within the next two seconds or have Detox.
27. Eat the Rich
- Description:Defeat tier 4 Shopkeeper.
- Easiest Character to Achieve:Whatever you’re comfortable with.
- Tips:You will have to attack and defeat the Shopkeeper in Stage 6, 7, or 8 (Genocide route) to get this achievement. I would recommend looking at some Shopkeeper fight guides to ease the time you’ll have with this, as even with Soul Link, you may still have to learn many of her attack patterns (or get a strong enough build to face-tank everything). Usually the earlier you fight her, the better, as her health goes up every stage. Most people would recommend Saffron (Chrono) so you can more easily read the Shopkeeper’s attack patterns, or Reva (Shield) with high amounts of mana regen so you can reflect the bigger attacks.
I will go over Soul Link in more detail in a later achievement.
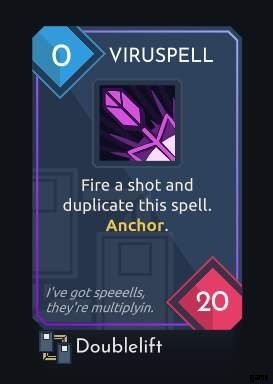
28. Hoarder
- Description:Have over 200 cardtridges in your deck.
- Easiest Character to Achieve:Any.
- Tips:Focus Doublelift and look for Viruspell:
Once you get this, just find a prolonged battle (naturally or manually) where you can spam the ever living hell out of this. You will probably get the achievement between your 7th and 8th shuffle as long as you don’t consume the card or give it an unmanageable mana cost (aka. more than 0).
29. Absolute Zero
- Description:Have 0 Max Mana.
- Easiest Character to Achieve:Gunner (Bullethell)/Shiso (Kunai).
- Tips:Don’t pick up any max mana artifacts, and make a beeline for the Shopkeeper to see if she has a pact that reduces your max mana by two. Because Gunner (Bullethell) and Shiso (Kunai) start with 2 max mana, picking up this pact will grant you the achievement.
Alternatively, you can focus Convergence and look for Limit Break:
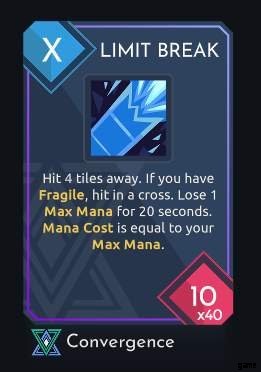
You should also be able to get the achievement if you can cast this enough times to remove all your mana within 20 seconds.
30. Soulless
- Description:Have 8 pacts at the same time.
- Easiest Character to Achieve:Shopkeeper.
- Tips:This might only be achievable by the Shopkeeper. If you amass 450 money, you can refresh the shop three times consecutively (140+150+160), so just make sure to pick up the two pacts four times to get the achievement. Note that this may absolutely ruin your run, so don’t do this unless you are willing to abandon the run, or are very confident in your abilities.
31. All For One
- Description:Beat the game with every character.
- Easiest Character to Achieve:N/A.
- Tips:You can complete any of the routes (Pacifist/Neutral/Genocide) to count as beating the game, so go for whatever boss you have the easiest time with. I would recommend the Gate, as you can get spells that hit multiple tiles and deal massive amounts of damage without worrying about missing, although some people may also have an easier time with Terrable (or even Serif).
Note that every character includes the Shopkeeper, so if you haven’t gotten the Eat the Rich achievement (and don’t think you’ll be able to), you can still unlock her by beating her Tier 1 version. If you want this to be as painless as possible (as in you just want to unlock her and don’t care about anything else), either focus Glimmer and look for Soul Link, or unlock Reva (Beat) who starts with this spell by default:

If you use this spell on the Shopkeeper as she sets up her “ice column” attack, the resulting explosion will do around 4,500-6,000 damage to her, effectively one-shotting her earlier tiers. I put some screencaps of what the attack pattern looks like, but it’s best to just watch a video of it (and the whole fight) to get a better idea of things.


32. Bravely Default
- Description:Beat the game without taking any spells.
- Easiest Character to Achieve:Whoever you’re comfortable with.
- Tips:You are allowed to upgrade your existing spells, but cannot add any new ones (this includes artifacts that give you kunais or jams). You should get a good feel for the game and at least one of the characters before you tackle this, but it should be doable by any character. Personally, I got this achievement by beating Terrable with Selicy (Invade).
33. Watch the World Burn
- Description:Cover the entire field in flames.
- Easiest Character to Achieve:Any.
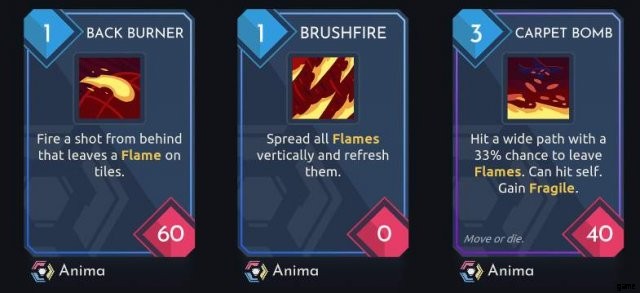
- Tips:Focus on Anima and look for Back Burner and Brushfire (Carpet Bomb is also an option, but doesn’t seem as reliable):
If you are able to upgrade one of these spells to doublecast, you should be able to get the achievement by casting Back Burner in a middle row, followed by Brushfire. If you cannot get a doublecast upgrade (I am unsure if they are blacklisted or not), then you may also have to focus Doublelift and look for Echo, which can serve as a makeshift doublecast for either of the two spells:

34. Ascetic
- Description:Beat the game without collecting any Artifacts
- Easiest Character to Achieve:Whoever you’re comfortable with
- Tips:Similar to the Bravely Default achievement, you should get a good feel for the game and at least one of the characters before you tackle this, but it should be doable by any character. You will probably have just as hard of a time making sure not to accidentally take any artifacts while attempting this as you are with completing the run itself.
35. One Shot
- Description:Beat Hell Mode 14
- Easiest Character to Achieve:Whoever you’re extremely comfortable with
- Tips:After selecting a character and playstyle, you can select a Hell Mode level, which is a challenge/restriction tacked onto your run. Beating the game with a Hell Mode level unlocks the next one, and all of the previous Hell Modes stack on top of the currently selected level, leading to extremely difficult runs. You will only get this achievement once you complete all 14 Hell Modes.
