Idle Guardians:Never Die 初心者向けガイド:敵を支配するためのヒント、チート、戦略
Idle Guardians:Never Die は、Evil Hunter Tycoon や Lucid Adventure などのモバイル タイトルを開発した SuperPlanet の新しいアイドル RPG です。この iOS および Android ゲームでは、何十もの異なるガーディアンを募集し、何百ものステージを通過しながら自分のパーティーを編成し、マイナーが大量のゴールド コインを獲得するにつれて、より多くの敵を倒すことができます。ガーディアンとマイナーがあなたに代わってすべてを行います。あなたが座ってリラックスし、「かわいい」ドット グラフィックとレトロ感を楽しんでいる間、あなたの関与を制限します。そして約束通り、これはあなたのヒーローが決して死ぬことのないゲームであり、理論的には際限なく生まれ変わる可能性があります.
Idle Guardians:Never Die を説明する最良の方法は、ネクソンのタイトルを連想させるということです — グラフィックの観点からだけでなく (このタイトルの美学は間違いなくレトロですが)、ゲームが付属しているという事実の観点からもです。根底にあるバックストーリーであり、アイドル クリッカーとしては非常に多くの機能が詰め込まれています。
物事を理解した後、ゲームをプレイするのは非常に簡単だと思うかもしれませんが、ゲームのより基本的な機能をナビゲートし、広範なチュートリアルのカットシーンで提供されるものを超えていく方法を示しているので、読み進める方が良いかもしれません.そうは言っても、私たちの Idle Guardians:Never Die 初心者向けガイドは、まだ最初の 2 つまたは 3 つのヒーロー レベルにいる間に、ゲームについて知っておく必要があるすべてをカバーしていると信じています.
1. Idle Guardians の基本:Never Die – チュートリアルに細心の注意を払う
Idle Guardians:Never Die は確かにアイドル クリッカーですが、バックストーリーがあるという事実と、このジャンルの平均的なタイトルと比較して非常に多くの機能があるという事実に、最初は少し圧倒されるかもしれません。ただし、それがチュートリアル ステージに注意を払う必要がある理由でもあります。チュートリアル ステージには多くのものがあります。紹介する新機能がある限り、ゲームの 2 人のキャラクターがカットシーンで会話し、そこで機能について話し合うのを見ることができます。バックストーリーのコンテキスト。
チュートリアルをざっと読みながらゲームの基本を学ぶことは可能ですが、ゲームをアンインストールして再インストールしない限り、カットシーンを繰り返すことはできないため、注意を払うことをお勧めします.
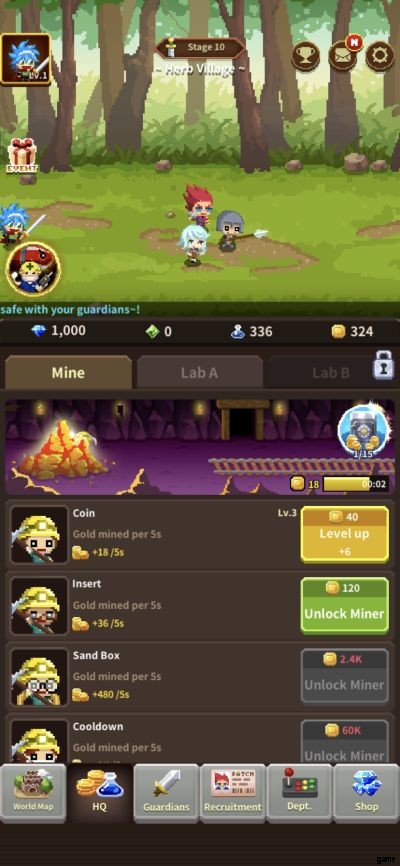
初期段階では、画面の下部に 2 つのタブがあり、他のタブよりも注意を払う必要があります。 HQ タブ (左から 2 番目) は、マイナーを見つける場所です。各マイナーの名前は、ハードウェアおよび/またはソフトウェアの機能に関連するランダムな単語のように見えるため、無視することをお勧めします。覚えておく必要があるのは、各マイナーの順序です。コインと呼ばれる最上位のマイナーは、最初に利用可能なマイナーであり、5 秒あたりのゴールドのマイニングが最も少ないマイナーです。
後続の各マイナーは、5 秒あたりにより多くのゴールドをマイニングできますが、レベルアップするために次第により多くのコインが必要になります。ここには 2 つのオプションしかありません。各マイナーを 1 つずつレベルアップするか、金が許す限りレベルアップするかです。他のアイドル クリッカーのように 5、10、または 50 ずつレベルアップする方法はないようです。そのため、利用可能なより高価なマイナーを扱っている場合を除き、1 つレベルアップすることをお勧めします.
左から 3 番目にある [ガーディアン] タブには、ゲームの有名なガーディアンが表示されます。ガーディアンは、ヒーロー キャラクターを自動的にエスコートし、あるレベルから別のレベルに移動するときに敵を倒します。 Student Publi と Assistant Patch (ほとんどのチュートリアル カットシーンをガイドする 2 人のキャラクター) は 3 つのデフォルト キャラクターの 1 つで、どちらも 3 つ星のレアリティから始まります。
3 番目のキャラクターであるガードは、レア度が 1 つしかない一般的なガーディアンです。それらを1レベル上げるか、30または40(通常)レベルアップすることができます.1レベル上げた後に後者のオプションが表示されます.マイナーをアップグレードするよりも安価です。各ガーディアンはレベルが上がるにつれてより多くのスキルを習得することに気付くでしょう。マイナーをアップグレードして 5 秒あたりのゴールド生産量を増やすのと同じように、できる限りレベルを上げてください。
ガーディアンをアップグレードすることの重要性を再度強調する必要があります。なぜなら、ガーディアンが全員死ぬと結果が生じるからです。ゲームのサブタイトルでは、結局のところ、ガーディアンが「死なない」とは明記されていません。すべてのガーディアンが殺されると、あなたのヒーローは彼の孤独に取り残され、鳥が画面上を飛んで 2 ステージ戻り、既存のすべてのガーディアンが 100% に戻ります。
ステージが 2 つ後退すると、進行状況が損なわれ、収益に影響します。弱いガーディアンであってもレベルアップして、これを回避できるようにしてください。いずれにせよ、それらを交換できるようになるまでにそれほど時間はかかりません。その方法については、次のヒントで説明します。
2.募集機能を使って守護者を増やしましょう
最終的には、1 つ星のガーディアンがマスターを切らなくなるポイントに到達します。または、ハーブ村のステージを進めていくと、3 人のガーディアンでは敵を食い止めるのに十分ではないことに気付くかもしれません。そこで役立つのが募集タブです — これは一番下の 4 番目のタブです。このタブをタップすると、募集できる 2 人のガーディアンが表示され、3 回無料で募集できるチャンスがあり、最低でも支払うオプションがあります。特別採用のための 50 ダイヤモンド (プレミアム通貨) — これにより、ガーディアンのリストに追加するための保証されたショットが得られます。これを利用するためのダイヤモンドのコストは、ガーディアンの星のレア度が上がるにつれて上昇します.
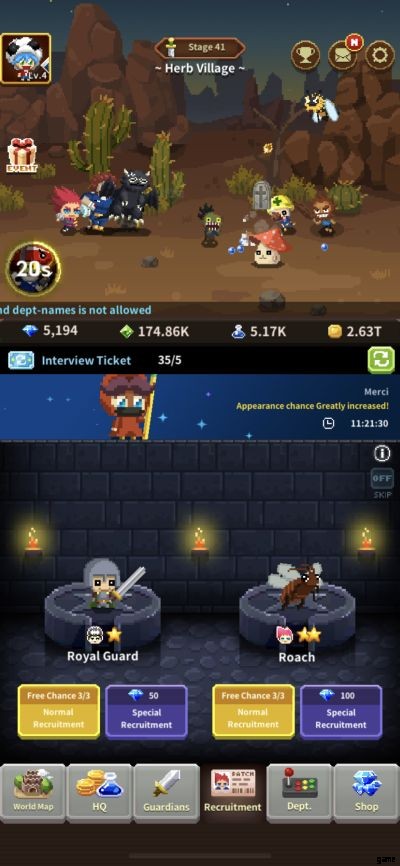
あなたが初期段階にいる場合は、おそらく 1 つ星または 2 つ星のガーディアンで十分にやっていけ、無料の募集オプションを使用できます。または2つ星の範囲。 However, once you’re close to completing Herb Village, you can start using your Diamonds for Special Recruitment when it comes to three-star or better Guardians. Using the free option for these more powerful characters gives you a low chance of recruiting them, but you can also try recruiting them for free, then paying Diamonds once your free chances are up.
What happens after you recruit a new Guardian? Don’t expect to see them appear immediately in the Party tab under Guardians. You’ll need to go instead to the Stand By tab, where you will have to tap on Join Party, upon which you can add them to your party, or have them replace someone who is already on your party. You will also notice that you have three Party configurations to choose from, as designated by the 1, 2, and 3 tabs — feel free to mix and match Guardians so you can experiment with various configurations and see which one works for you the best!
In order to refresh the list of Guardians that you can recruit, you’ll need Interview Tickets, and we’ll tell you later how you can get more of these. New Guardians will show up at random, and there’s no guarantee that you’ll be getting a three-star or better Guardian available to recruit. It’s purely based on luck here, but trust us when we say you’ll have more than enough Interview Tickets to allow you to refresh the Guardians options to your liking and find someone worth adding to your Party.
3. Check Your Mail Rewards And Dailies And Redeem Them
On the upper right side of your screen, you’ll see an envelope icon with a red letter “N” above it — tapping on that will take you to the Mail menu, and as a new player, you will get several messages that contain various rewards, including, but not limited to your common (Gold) and premium (Diamond) currencies. Even after you redeem these rewards, we suggest coming back to the Mail menu at least once a day, as long as there’s an “N” designating new messages — at the very least, you’ll have a chance to watch an ad video, but if you received new Recruitment Tickets through the events, as we will be discussing below, your can use them in the Mail menu by either tapping on the yellow “Reward” button for the individual reward, or by tapping on the green Receive All button at the bottom.
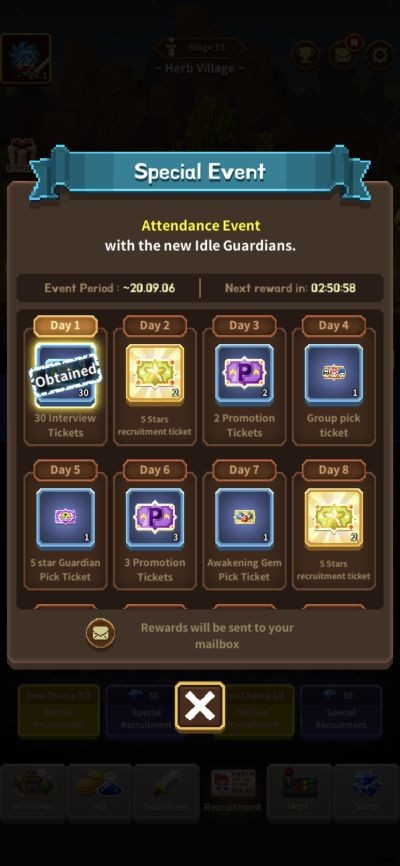
It appears that Idle Guardians, like your average role-playing game, idle or not, is packed with special events that allow you to get tons of freebies that could help you in your overall quest to keep improving your Hero, Guardians, and Miners and complete more stages! These events come with daily login rewards, and it just so happens that your initial reward for logging on in the first day is 30 Interview Tickets.
Just as we promised you in the last tip, these will be very valuable in your first few days of playing the game, as this gives you a chance to refresh Guardians in the Recruitment screen if you aren’t satisfied with the one- and two-star options or have recruited both Guardians from the current batch. However, that’s not the only reward you can get for your daily logins in this event — these include 5 Star Recruitment Tickets, Promotion Tickets, and tons more goodies that will also be useful in helping you improve your roster of Guardians!
4. Empty Your Vaults Once They Fill Up Completely
Just like any other idle clicker worth its salt, Idle Guardians comes with a feature that allows you to earn currency while offline. While leaving the game open will allow you to earn a ton of money in the blink of an eye, you can earn up to 60 times the current gold production every 10 minutes or so.
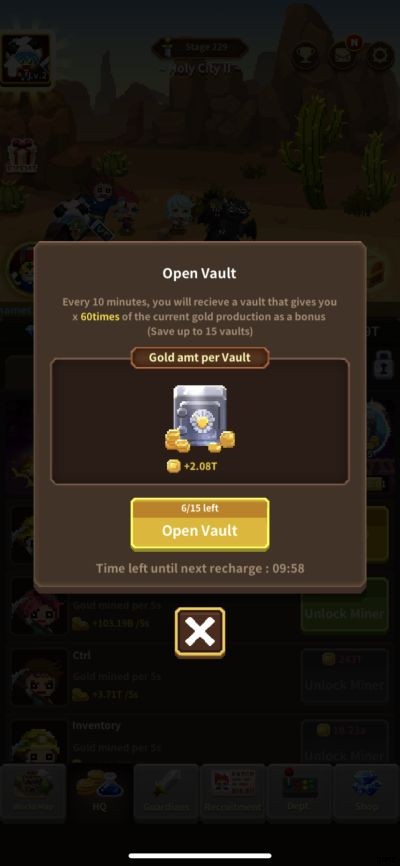
Essentially, that eliminates the ability of loading up on in-game currency during the six to eight hours (or more, or less) of sleep you get each day, but by default, you get up to 15 Vaults, and since it takes 10 minutes for each Vault to charge up, that means you’ll want to check back every 150 minutes (2 hours and 30 minutes) if you prefer to open all your Vaults in one go and quickly add to your Gold total. Once you’re offline, also keep in mind that you will remain at the same stage you were when you were last online — this isn’t one of those clickers where your characters keep working through stages even when you’re not actively playing.
The only drawback here is that you’ll need to manually tap on Open Vault in order to open each one individually — sadly, there’s no option to open all available Vaults at the same time. However, it’s just a minor inconvenience if you’re trying to take full advantage of the game’s offline earning capabilities and earning more Coins to level up your Miners and Guardians alike!
5. About Rebirth – How It’s Different From Your Usual ‘Prestiging’
You may be wondering why we’re talking so early about Idle Guardians’ equivalent of “prestiging,” which, for those who are unfamiliar with the term, is the process of starting everything else from square one but enjoying some of the perks that may have been acquired during the previous playthrough, thus allowing for the new playthrough to move considerably faster. But the game will prompt you quite soon to tap on your Hero’s avatar on the upper left corner of the screen and Rebirth him, which will allow you to earn Dragon Stones. This is a resource that you can then use to power up your Guardians, making them stronger and more effective against enemies as you go from one stage to the next.

Given how idle clickers work, you may be wondering if you will be losing the Guardians you unlocked during your previous playthrough. As Patch and Publi will explain during the Rebirth tutorial cutscene, you will retain all Guardians once you Rebirth your Hero. All promotions that have been performed, all items that have been equipped or acquired, and any progress you may have had in Research (more on that later) will also be retained. What will be reset, however, is your progress in the map, as well as the levels of each of your Miners and Guardians.
However, the obvious tradeoff here is that you will progress faster in the next playthrough, thus making leveling up and earning Gold much easier! And let’s not forget those Dragon Stones, which you can double by paying a few hundred Diamonds for a “Special” Rebirth. All in all, Rebirth is designed to level up your Hero, and as your Hero level increases, you will unlock more features.
Before Rebirthing, it is highly advisable that you spend all of the Dragon Stones you had previously acquired by powering up your better Guardians — if they’re at two stars and below (or three stars as you progress), you wouldn’t want to focus on those characters too much.
6. Research – What’s In It For You If You Study More Technologies?
Aside from Gold, one other resource you can earn while completing more Stages and killing more enemies is Flasks — these appear as containers of blue liquid right in between your Dragon Stone and Gold counters. What’s the purpose of these Flasks and how can they help you in Idle Guardians?
When we were talking about the HQ tab earlier, we specifically focused on the Miners because we wanted to bear down on the basics. However, there are two other tabs next to the Mine tab in the HQ menu — these are Lab A and Lab B. Lab A will be the one that’s available immediately, and in here (as well as in Lab B when it gets unlocked), you can research new technologies that could help your cause, especially as you go through more stages, level up your Hero through Rebirth, and destroy more enemies.
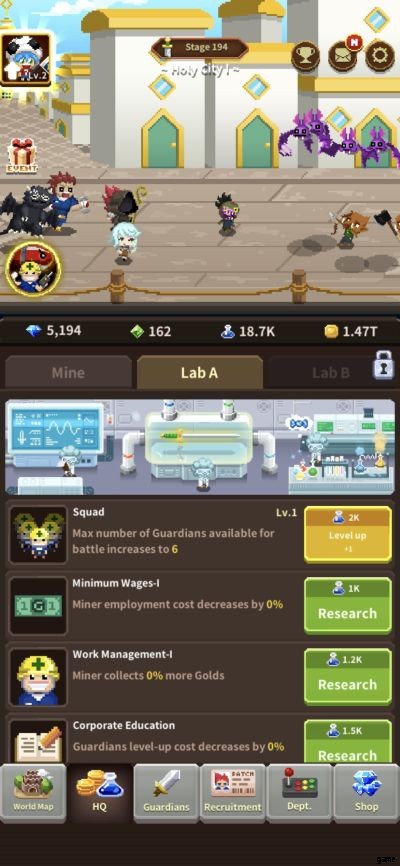
When it comes to the technologies you should prioritize, we would warn you against making the same mistake we did, which was to prioritize Squad, which increases the number of Guardians you can include in your Party. In the first few hundred stages, you should get by well enough with six Guardians, so there’s really no need to get this up to 7 or 8. Instead, you should prioritize Minimum Wages, as this decreases the cost of hiring and upgrading Miners by a certain percentage — at level 2, you can save 40 percent on all Miner expenses.
Work Management is also important, as this allows your Miners to collect more Gold — at level 2, this increases by 40 percent. Corporate Education, meanwhile, shouldn’t be too important as compared to the Miner-related technologies, as it’s fairly affordable to level up your Guardians anyway. Still, it’s arguably more important than the Squad technology when talking about the hierarchy of the first available technologies.
As you increase your Hero level, more technologies will become available, but we won’t discuss them just yet, as this is merely a beginner’s guide for anyone in their first few days of playing Idle Guardians.
7. Crawl Through The Dungeons To Earn Resources For Your Equipment
As you’ll see in your Hero screen, you will have the option to equip various items — a Helm, Armor, Boots, Weapon, and two Accessories. Given that your Hero doesn’t do as much as the Guardians do, they won’t directly impact your Hero — instead, they serve as buffs that could improve certain stats for all Guardians you may have unlocked.
For example, a level 1 Hero’s Wooden Club would increase damage by 20 percent for all Guardians, and if you upgrade it all the way to level 6, for instance, that figure will increase to 49 percent. But how do you buy new Equipment anyway, and how do you upgrade the existing items that you have?
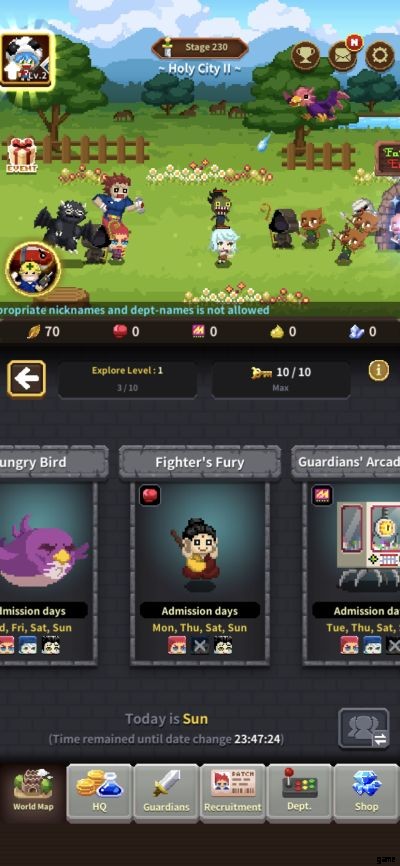
The answer to this question is the Dungeon, which is unlocked once you Rebirth your Hero to the first time and level them up to level 2. There are various Dungeons to choose from in the menu of the same name, which can be found in the World Map (first tab at the bottom), and these allow you to earn various resources that can be used to buy new Equipment at the Equipment Shop (also on World Map). Different Dungeons are available on various days of the week, and you’ll be limited to using certain Guardians, with all their skills fixed at level 1.
That’s where the challenge generally lies, though you can always crawl through Dungeons repeatedly, just as long as you have enough keys, which automatically refill. As for the Dungeon schedule, keep in mind that the game follows Japanese time — Hungry Bird is available on Wednesdays, Fridays, Saturdays, and Sundays, for instance, and this is the easiest series of Dungeons you can crawl through.
It’s best to crawl through as many types of Dungeons as possible per day, as there are five different resources that can be used for different types of Equipment. For example, you cannot use the resource designated for weapons to buy armor, or vice versa!
そこにあります! These would be all the tips and strategies we have for Idle Guardians:Never Die. If you happen to know more tips for the game, then be sure to drop us a line in the comments!