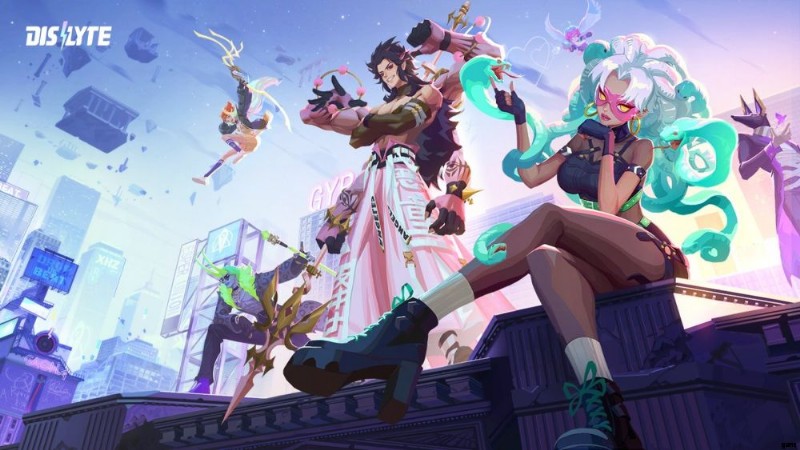
Dislyte ビギナーズ ガイド:敵を支配するためのヒント、コツ、戦略
ファンキーなビート、エキサイティングなバトル システム、神話に基づく優れたキャラクター デザイン、興味深いストーリー展開、Dislyte は、Lilith Games が発行する都市神話ポップ ファンタジー RPG です。 iOS および Android プラットフォームで。
AFK Arena などの人気タイトルと同じクリエイターの出身 ライズ オブ キングダムズ Dragon Tamer などのモバイル ゲームと同様に、ターン制、ガチャ、およびオプションのオート バトラー システムを採用しています。 そしてナイトフッド。 Dislyte をほとんどのモバイル タイトルと一線を画しているのは、ビートに合わせてうなずき続けるダイナミックなサウンドトラック、キャラクターとその世界の背後にある興味深い伝承、ターン制 RPG の通常は複雑で退屈な体験を簡素化するユニークなバトル システムです。
この組み合わせは、現在プレイステーション 3 と 4 でリリースされているターンベースの RPG であるペルソナ 5 が、通常は退屈なゲーム ジャンルの 1 つを誇張し、より新鮮で魅力的なものにする方法を非常に連想させます。ストーリー モードのチャプターを完了することで収集できる多数のエスパーと相まって、ショップで購入したり、バウンティやトライアルの報酬として受け取ったりできるエコーでゴールド レコードを回転させることで、グルーヴィーでアクション満載のゲームの準備が整います。時間!
Dislyte は 2027 年に設定され、古代古代の遺跡、謎のエイリアンのようなオベリスクが地面から芽を出し、特定の人々をエスパーに変えた神の波を放出します。選ばれし者と見なされるエスパーは、北欧神話、ギリシャ神話、中国神話、エジプト神話の 4 つの異なる神話の神々の影響を受けた魔法に近い力を与えられます。しかし、この「贈り物」には、神秘的な実体を守るミラモンとセンチネルと呼ばれる攻撃的で危険なモンスターが付属しています.
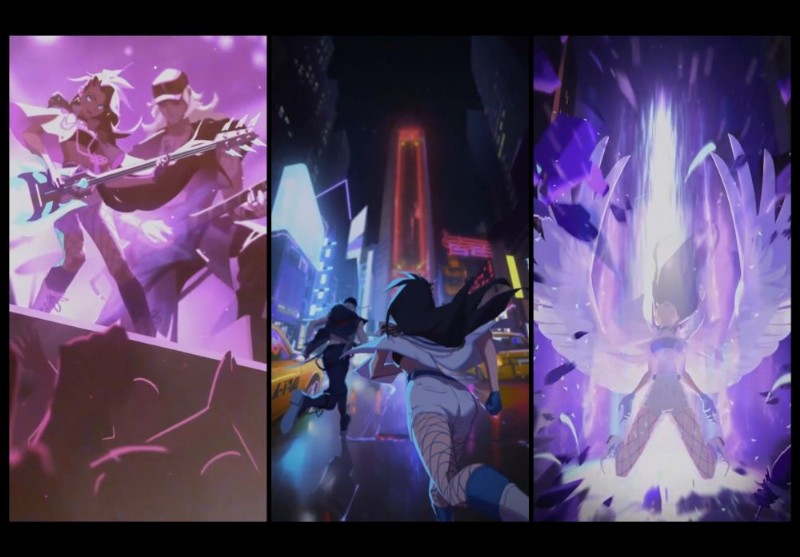
物語は、パンク ロッカーのブリンが、混雑したアリーナの前でパートナーのジークと一緒にライブを行い、音楽ビジネスのためにジャイレートに留まる意向を発表するところから始まります。パフォーマンスが終わると、ミラモンが攻撃を開始し、無事に逃げ出します。ミラモンの攻撃はその後、ブリン自身のエスパー変身を引き起こし、背中から生えた一対の翼と説明のつかない力の急増を彼女に与えます.
しかし、新たにエスパーになったブリンは、ウルフマンと狙撃兵という 2 人の影のような人物がジークを連れ去り、彼女を無意識にノックアウトするのを止める力がありませんでした。エスパー ユニオンによって救出された彼女は、アヌビスの力を持つ元執事のドリューと、キューピッドの力を持つビデオブロガーの Q という 2 人のエスパーと合流して、ジークを見つけ、シャドウ デクリーの陰湿な計画を明らかにします。ブリンはシャドウ デクリーからパートナーを救うことができるでしょうか?そして、謎めいた組織でのジークの過去とは?

ストーリーに没頭していて、より簡単に進行したい場合、または単に戦いの波を効果的に戦い、気が遠くなるほど難しいボスを倒す方法を学びたい場合は、詳細な Dislyte 初心者向けガイドをご覧ください!
ゲームの内外を学ぶために知っておく必要があるすべての基本を説明します。ジークと再会し、戦闘のマスター戦略家になるための英雄的な探求の開始時に役立つ、考えられる限り多くのヒントとコツを書き留めました。
1.自分の長所と短所を知る
エレメンタル クラス
Dislyte には 4 つの主要なエレメンタル クラスがありますが、ほとんどのゲームとは異なり、通常は地球、風、水、火の同じ構造を使用しますが、このゲームにはシマー、ウィンド、フロー、インフェルノがあります。
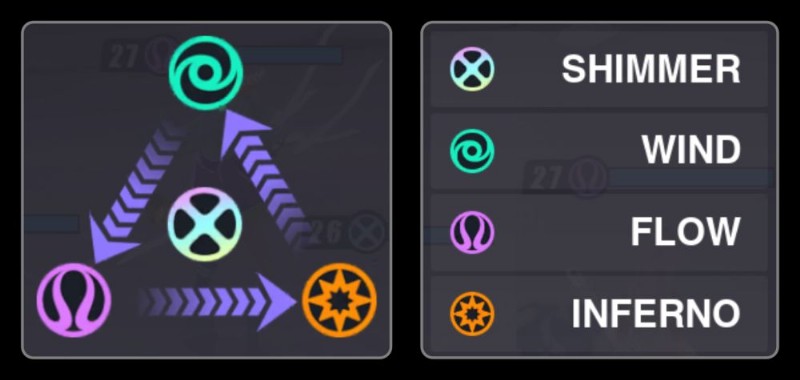
• シマー – 基本的な利点も欠点もありません。カラフルなグラデーションの円の中の X 記号で表されます。
• 風 フローに強く、インフェルノに弱い。これは、円の内側の曲線で囲まれた緑色の小さな円で表されます。
• フロー ・インフェルノに強く、風に弱い。これは、円の内側の一対の曲線と紫色で表されます。
• インフェルノ ・風に強く、流れに弱い。これは、円の中にオレンジ色の 8 芒星で表されます。
また、それらは通常、他の RPG と同じように機能しないため、最初はどちらの要素が他の要素よりも強いかを覚えておくと混乱する可能性があります.しかし、開発者はすでにこれを予測しており、戦闘中にどちらがどちらであるかを判断するのに役立ついくつかのインジケーターを配置しているため、心配する必要はありません.
関連: Dislyte レア エスパー ガイド:各レア エスパーの完全な説明
長所と短所の指標
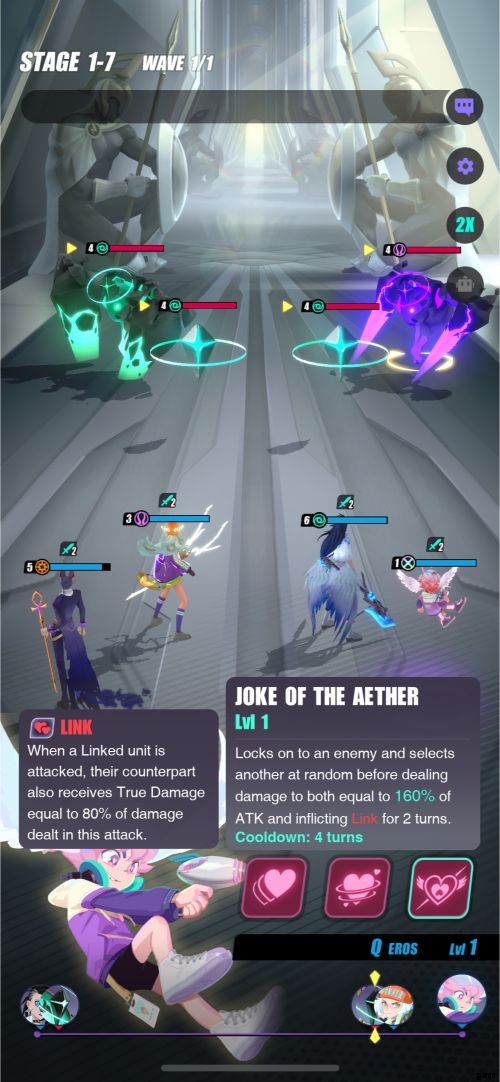
ターン中、敵の HP バーの左側に矢印が表示され、選択した敵の下に円が表示され、選択した敵がいる AP バーを指す 2 つの矢印が表示される場合があります。これらはすべて、現在選択されている味方の敵に対する有利または不利に応じて、色が赤、黄、または緑に変化するインジケーターです。
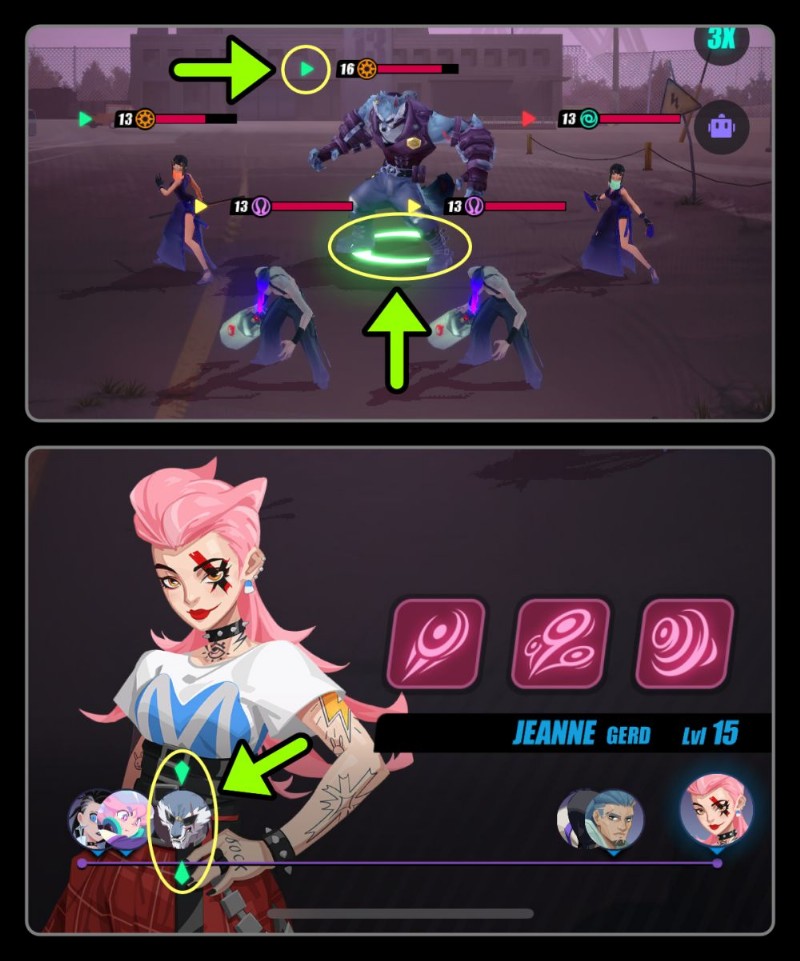
• 赤 ・選択した味方の属性が敵の属性より不利。この敵への攻撃は、+50% の確率でミスを引き起こします。
• 黄色 ・選択した味方の属性は、敵の属性に対して有利不利を持たない。これは、味方と敵の両方が同じ要素を持っている場合、またはシマー要素を持つ誰かを使用またはターゲットにしている場合に発生します.この敵への攻撃は通常のダメージを与えます。
• 緑 - 選択した味方のエレメントは、敵のエレメントよりも有利です。この敵への攻撃は +15% の確率でクリティカルをトリガーし、+50% の確率でエレメンタル ブーンをトリガーします。
攻撃結果
戦闘中、攻撃中に特定の攻撃結果をトリガーする機会があり、さまざまな要因に依存します。これらの攻撃の結果は、攻撃中にどれだけのダメージが与えられるかに影響します。

• ミス – 与えるダメージが 25% 減少し、エレメンタル アドバンテージを持つ攻撃者によってトリガーされます。
• クリティカル – 攻撃者の C. DMG (クリティカル ダメージ) に応じて増減する追加のボーナス ダメージを与え、要素の長所または短所に関係なくトリガーできます。このトリガーの確率は、攻撃者の C.RATE (クリティカル率) に基づいています。
• エレメンタル ブーン – ダメージが 30% 増加し、エレメンタル アドバンテージを持つ攻撃者によってトリガーされます。
攻撃結果はミス→クリティカル→エレメンタルブーンの順で判定されます。これらの結果の 1 つだけを取得することも、クリティカルとミスまたはエレメンタル ブーンを組み合わせて取得することもできます。 Miss + Elemental Boon の結果は得られません。
関連:Dislyte エピック エスパー ガイド:各エピック エスパーの完全な説明
ステータス効果
HP バーの上にシンボルが表示されることがあります。これらは、現在キャラクターに影響を与えているバフとデバフを表しています。バフとデバフは、キャラクターにプラスまたはマイナスの影響を与えるステータス効果です。これらの範囲は、特定のステータスの増減、キャラクターへのダメージの追加または HP の回復、キャラクターの移動の防止などに及びます。
付いている数字は、状態が続くターン数を示します。各バフまたはデバフには、それを表す固有のシンボルがありますが、それらはすべて、それらが何であるかを示す特定の色またはフレームを共有しています.

• 緑のシンボル – ポジティブなステータス効果であるバフを表します。
• 赤いシンボル – 負のステータス効果であるデバフを表します。
• シルバー フレーム – ACC と RESIST を無視するステータス効果を表し、ミスすることはできず、トリガーする必要があります。特定のエスパーまたは敵に固有のバフまたはデバフに表示されます。これまでのところ、このフレームを持たない唯一のユニークなデバフは、セリーヌ (サイレン) のスリープです。
• ゴールド フレーム – 解除不可/解除不可のステータス効果を表します。特定のエスパーまたは敵に固有のバフまたはデバフに表示されます。
関連: Dislyte 伝説のエスパー ガイド:各伝説のエスパーの完全な説明
ほとんどのボスまたはセンチネルは多くのデバフに耐性があるため、それらのデバフを周囲の他の敵に与える方がよい場合が多いことに注意してください.
2.強力な部隊を編成しましょう!
ゲームの主な目的は、敵の HP をゼロにし、ステージ内のすべてのウェーブをクリアして、敵を排除することです。各ステージにはそれぞれ 1 ~ 3 のウェーブがあり、最後のウェーブには最強の敵と、時にはボスが含まれます。これらの波を乗り切り、戦いに勝つためには、強力なチームを編成する必要があります。戦闘には最大 5 体のエスパー (場合によっては、後で説明するスタリモンのような精霊) を配置できます。
エスパーの能力と強さに基づいてチームを編成することは重要ですが、編成の実際の順序は、キャプテンとして機能する最初のキャラクターを除いては重要ではありません.
関連: Dislyte ティア リスト:すべてのエスパーの完全なランキング
船長の選択
どんなエスパーも船長になることができますが、すべての船長が船長能力を持っているわけではありません。キャプテンアビリティは、一部のエスパーが持っているユニークなアビリティで、チーム全体の特定のステータスを増加させます。キャプテンの能力を持つエスパーをキャプテンのスロットに配置すると、能力の説明がチームのすぐ下に表示されます。
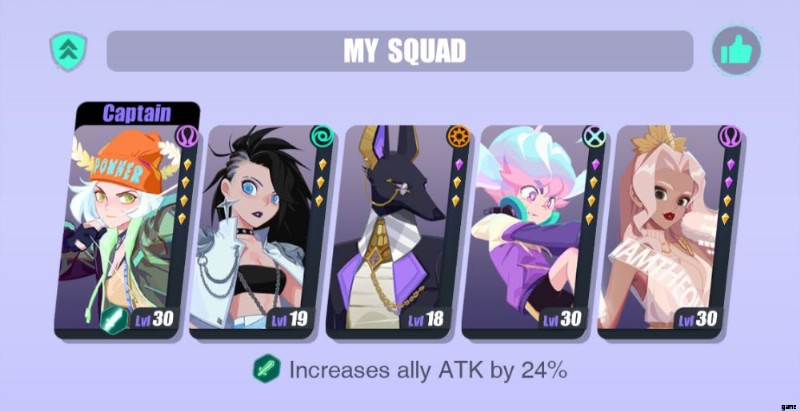
戦闘前にチームを編成するとき、または戦闘外でエスパータブを確認するときにエスパーの選択をスクロールすると、レベルの横にあるシンボルに基づいて、どのエスパーがキャプテンの能力を持っているかを簡単に判断できます.エスパーを選択し、統計ページに表示されるキャプテン アビリティ アイコンをクリックすると、そのアビリティが何をするのかが表示されます。
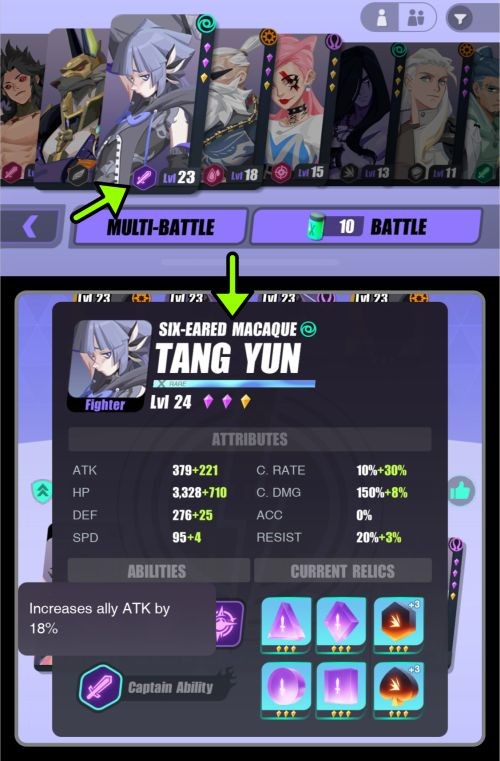
選択したエスパーをスクロールすると、一部のアイコンがグレー表示されていることに気付く場合があります。これは、すべてのキャプテン アビリティがすべてのモードで機能するわけではないためです。一部のキャプテン アビリティは、トライアルやポイント ウォーの儀式やソニック ミラクルなどの特定のモードでのみ機能します。以下は船長の能力を持つエスパーのリストです:
どのモードでも
レジェンダリー
| 味方のHPを30%増加 | ジン ユヤオ (女王母)、ガブリエル (ニヨルド)、アーメド (ゲブ) |
| 味方の攻撃力を30%アップ | 孫悟空 (タン スアン)、レイヴン (オーディン)、リー リン (ネザ) |
| 味方のDEFを30%増加 | ドナー (トール) |
| 味方のSPDを25%増加 | Tiye (ナッツ)、Ollie (オシリス) |
| 味方のC.RATEを25%増加 | ルイス (アレス) |
| 味方のACCを40%増加 | トリキ (ロキ)、ルーカス (アポロ) |
| 味方の耐性を40%増加 | サリー(シフ)、シエナ(ガイア) |
エピック
| 味方のHPを24%増加 | 恒悦(嫦娥) |
| 味方の攻撃力を24%増加 | モナ (アルテミス)、エイラ (フレイヤ)、スチュワート (ディオニュソス) |
| 味方のDEFが24%増加 | Ren Si (黒亀) |
| 味方のSPDを20%増加 | ロン ミアン (アオ ビン) |
| 味方のC.RATEを20%増加 | ファルケン(ホルス)、ケイリー(アヌケット) |
| 味方のACCを30%増加 | セリーヌ (サイレン)、クロエ (メデア) |
| 味方の耐性を30%増加 | Fabrice (フレイ) |
レア
| 味方のHPを18%増加 | Unky Chai (Yue Lao) |
| 味方の攻撃力を18%増加 | タン ユン (6 つ耳のサル)、チャーマーズ (イドゥン) |
| 味方のDEFを18%増加 | ローレン (ヘケット) |
| 味方のSPDを15%増加 | メラニー (メデューサ) |
| 味方のC.RATEを15%増加 | レオン (ヴァリ) |
| 味方のACCを20%増加 | ジャンヌ (ゲルト) |
| 味方の耐性が20%増加 | ベレニス (バステト) |
ポイント戦争専用
レジェンダリー
| ポイント戦争で味方のHPを40%増加 | セシリア (イシス) |
| ポイント戦争で味方の攻撃力を40%増加 | ナーメル (ラー)、ビオンディナ (ポセイドン) |
| ポイント戦争で味方のDEFを40%増加 | クララ (ヘラ) |
| ポイント戦争で味方の耐性を 50% 増加 | ハイド (ハデス) |
エピック
| ポイント戦争で味方のHPを30%増加 | アレクサ (アフロディーテ)、ダリア (カリプソ)、ニコール (ネフティス) |
| ポイント戦で味方の攻撃力を30%アップ | アルカナ(エルメス)、ボニー(エリス) |
| ポイント戦争で味方のDEFを30%増加 | ローラ(ネイト) |
| ポイント戦争で味方のACCを40%増加 | アネシドラ (パンドラ) |
| ポイント戦争で味方の耐性を 40% 増加 | ルオ ヤン (ヤンルオ ワン) |
レア
| ポイント戦争で味方のDEFを24%増加 | バードン (バルドル) |
| ポイント戦争で味方のSPDを20%増加 | リー・アオ (タオ・タイ) |
儀式と音の奇跡のみ
エピック
| Ritual と Sonic Miracle で味方の HP を 30% 増加 | ヤコブ (ヨルムンガンド)、メレディス (スキュラ) |
| Ritual と Sonic Miracles で味方の攻撃力を 30% 増加 | Lu Yi (Dayi)、Hathor (Lynn)、Xie Chuyi (Death Guard Hei) |
| Ritual と Sonic Miracles で味方の DEF を 30% 増加 | アセナート(ネフェルテム) |
| Ritual と Sonic Miracles で味方の SPD を 25% 増加 | サンダー (セット) |
| Ritual と Sonic Miracles で味方の ACC を 40% 増加 | Kara (Serket)、Xie Yuzhi (Death Guard Bai) |
レア
| Ritual と Sonic Miracle で味方の C.RATE を 20% 増加 | ホール (Hodur) |
常にヒーラーを持っている
ほとんどの RPG とは異なり、Dislyte では、戦闘中に開くことができるインベントリも、使用できるポーションも提供されません。味方が戦闘で死亡した場合、アイテムを使用して味方を復活させることもできません。幸いなことに、チームのメンバーが死亡した場合でも、戦闘に勝った場合でも、経験値を得ることができます.
関連: Dislyte Squad フォーメーション ガイド:推奨されるチーム フォーメーション
時間のないカジュアルゲーマーにとって、これは戦闘の長さを短く保つのに最適ですが、タフな対戦相手との戦いで生き残ることも難しくなります.ポーションを買いだめする代わりに、HP 統計を増やすか、ヒーリングまたは復活スキルまたはバフを持つエスパーを追加して、チームを存続させなければなりません。

あなたが受け取る最初のヒーラーはヘレナ(ヘレン)で、最初の章を終えるとすぐに彼女をあなたの名簿に連れて行くことができます.彼女の最初の 2 つのスキルは特に強力ではありませんが、敵からのバフを無効にし、ターゲットの AP を減らすことができる効果があります。しかし、彼女が持っている最も重要なスキルは 3 番目のスキル、ささやきの祝福です。
それが本質的に行うことは、対象のチームメイトの HP の割合 (レベル 1 で 20%) を回復するだけでなく、他のすべての味方をより少ない割合 (レベル 1 で 10%) で回復することです。彼女をチームに入れると、チームの生存率が即座に向上します。ゲームをプレイし続け、さまざまなエスパーに移行するにつれて、ヒーラーの他のオプションを検討したいと思うでしょう.以下は、私たちがあなたのためにまとめたリストです:
ゲーム内のすべてのヒーラー
| レジェンダリー | エピック | レア |
| クララ (ヘラ) | アレクサ(アフロディーテ) | ベレニス (バステト) |
| セシリア (イシス) | アセナート(ネフェルテム) | チャン・プ(ヤオ・ジ) |
| ジン ユヤオ (女王母) | Fabrice (フレイ) | ヘレナ (ヘレン) |
| サリー(シフ) | 恒悦(嫦娥) | ローレン (ヘケット) |
| ルオ ヤン (ヤンルオ ワン) | Ye Suhua (Shao Siming) |

復活に関して言えば、現時点で味方を復活させることができる唯一のエスパーは、ヒーラーでもあるルオ ヤン (ヤンルオ ワン) です。
ヒーラーの代替手段
または、どのヒーラーも使用せず、別のチームの組み合わせが必要な場合は、代わりにこれらのエスパーをチームに含めることができます:

キャサリン(ヘラ)の3つ目のスキル「アンダーワールドプレゼンス」は、味方エスパー全員にスタンドオフバフを1ターン付与する。このバフが行うことは、エスパーが何回攻撃されても、次のターンまで少なくとも 1 HP で生き続けることです。

Gabrielle (Njord) の 3 番目のスキルである Rush は、すべての味方に免疫 (デバフを受けるのを防ぐ) と 2 ターンの DEF アップを祝福します。

セリーヌ (サイレン) の 2 番目のスキル、自然の音は、2 ターンの間 SPD アップと 1 ターンの間 DEF アップを付与します。

Bardon (Baldr) の 3 つ目のスキル、Rise to Honor は、2 ターンの間、味方のすべてのエスパーに DEF Up を付与します。
マルチターゲット スキルは必須
通常、1回の戦闘で5体の敵がいて、最大3ウェーブまで戦う可能性があるため、一度に複数の敵を攻撃できるエスパーをチームに配置する必要があります.これにより、時間を節約できるだけでなく、敵に殺される前に敵を倒すことができます。特にそれらのスキルにデバフがある場合、複数のターゲットスキルで敵を弱体化させると、他の味方が仕事を終えるにつれて戦闘の流れが大きく変わります.
複数の敵を攻撃するエスパー
| レジェンダリー | エピック | レア |
| Tiye (ナッツ) | セリーヌ (サイレン) | Q (キューピッド) |
| 唐玄(孫悟空) | カーラ (セルケット) | メラニー (メデューサ) |
| レイヴン (オーディン) | エイラ (フレイヤ) | レイラ(メジェド) |
| ナーマー (Ra) | ファルケン (ホルス) | ジャンヌ (ゲルト)** |
| Li Ling (Nezha) | Lu Yi (Dayi)* | バイ リウリ (ホワイト スネーク)* |
| トリキ (ロキ) | アルカナ (ヘルメス) | |
| ハイド (ハデス) | ルオ ヤン (ヤンルオ ワン) | |
| ビオンディナ (ポセイドン) | クロエ (メデア)* | |
| ガブリエル (ニヨルド) | キャサリン (ヘラ) | |
| ウナス (シュウ) | プリツカー (ミミール) | |
| ルーカス (アポロ) | ヤコブ (ヨルムンガンド) | |
| シエナ (ガイア) | Ren Si (黒亀) | |
| リン シャオ (ホワイト タイガー) | ||
| ロン ミアン (アオ ビン) | ||
| アネシドラ (パンドラ) | ||
| ボニー(エリス) | ||
| Xie Chuyi (Death Guard Hei) | ||
| Xie Yuzhi (デス ガード バイ) | ||
| ケイリー(アヌケット) |
*ランダムな敵を攻撃しますが、すべてを攻撃することはできません。
**複数の敵を攻撃しますが、すべてではありません。
チームにこれらの 3 種類のエスパーがいる限り (または、1 つか 2 つのエスパーでこれらの特性の組み合わせさえあれば)、強固な基盤があり、あらゆる種類の敵と自信を持って戦うことができます。
エレメントをバランスよく選ぶ
各戦闘の前に、戦闘に使用するエスパーを選択できるフォーメーション画面に移動します。前述の 3 種類のエスパーとは別に、チームにどのエレメンタル タイプを選択するかを検討することも重要です。エレメントは4体、エスパーは5体なので、最低でも1体は重複する。戦闘で成功するためにすべての要素が存在する必要はありませんが、直面する敵が不明な場合、特にステージまたはレベルに初めて遭遇する場合は、最も安全な選択であることがよくあります. /P> 
上記の例では、表示されている潜在的な敵には、風属性のボス敵が 1 体、流れ属性の通常の敵が 3 体含まれています。それだけでフォーメーションを組むなら、炎属性(風に強い)を1~2枚、風属性(流れに強い)を3~4枚までと考えるといいかもしれません。ただし、潜在的な敵に表示されるものが、このステージで実際に直面するすべての敵を常に表しているとは限りません。
2番目の写真では、最初の波に、インフェルノ要素を持つ敵がいることがわかります.前に言ったフォーメーションを組んでいれば、最後の波に到達する前に、風属性に強い敵がほとんどのエスパーを倒していたでしょう。
フォーメーション画面に出現する可能性のある敵は、このステージの最終ウェーブの敵のみを表示し、最初のウェーブの敵を表示しないように見えました。したがって、一般的には、チーム内のすべての要素をバランスよく配置し、すでにステージを終了して敵の攻撃方法を把握している場合は、特定の要素にのみ集中することが最善です。
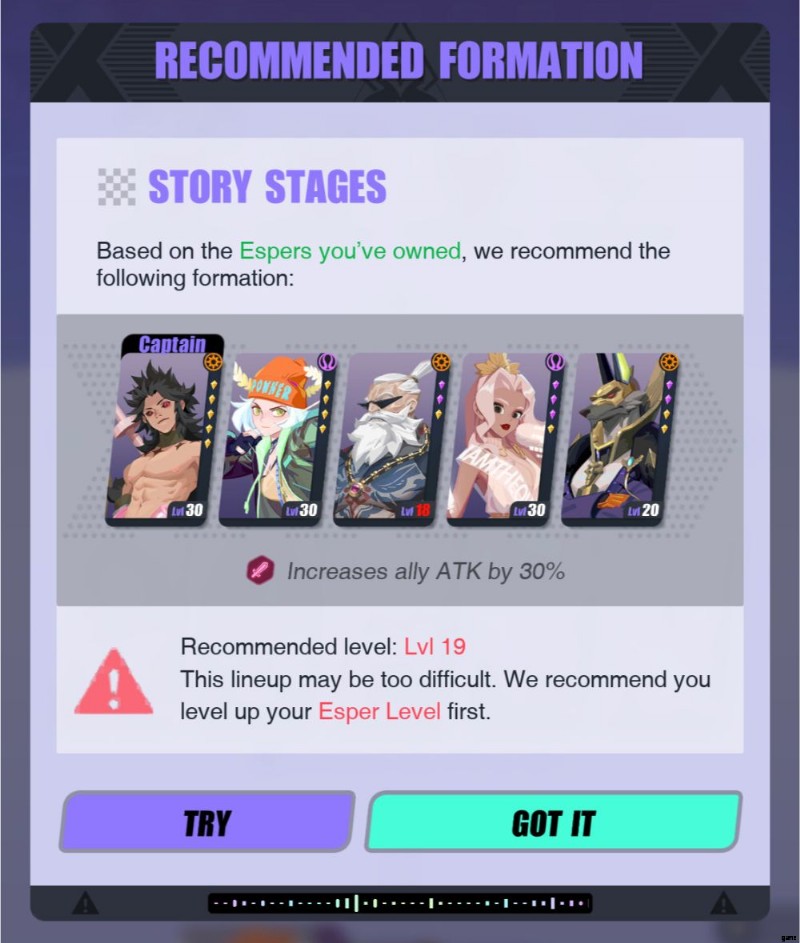
フォーメーション画面では、マイ スクワッドの横に親指のサインが表示される場合があります。それをクリックすると、ゲームは使用するフォーメーションを提案します。良い提案がある場合もありますが、常にこの関数に依存することはお勧めしません。それらの提案は、あなたが直面している要素を実際には考慮していないからです.この段階で彼らの提案に従っていれば、フロー要素を持つ 4 人の敵は、私が持っていた 3 つのインフェルノ エスパーを簡単に殺したでしょう。
3.スピードが鍵
覚えておく必要があることの 1 つは、チーム内のエスパーの順序が実際に攻撃する順序に影響しないということです。それは SPD と AP にのみ依存します。クールダウン、SPD、およびアクション ポイント バーを乱用または利用する方法についてのヒントを提供する前に、それらが何であるか、およびそれらが最初に何をするかを説明しましょう。
スキルとクールダウン
使用したばかりの特定のスキルについては、次のターンでそのキャラクターを使用すると、下の図の 3 番目のスキルのように番号が上に表示されます。これはクールダウン番号です。クールダウンは、プレイヤーが圧倒されて非常に強力なスキルを連発するのを防ぐためのゲームの方法です。その上に表示される数字は、再び使用できるようになるまでに経過しなければならないターン数です。
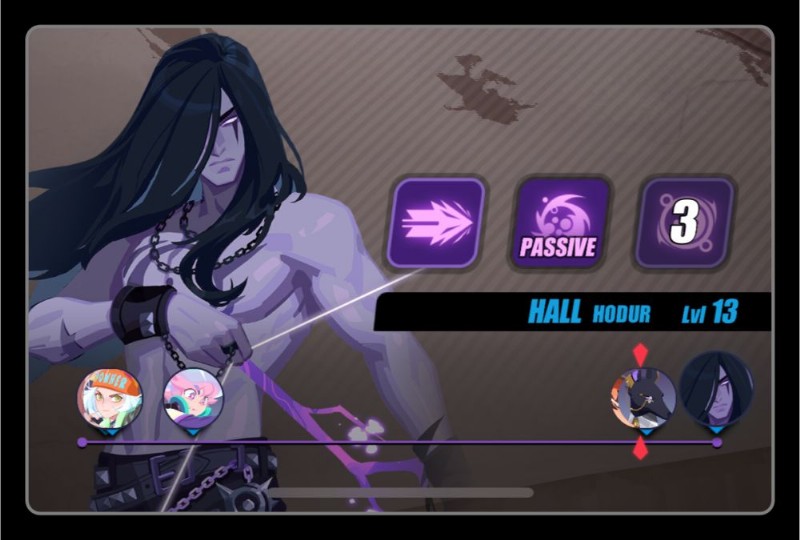
エスパーの最初のスキルは、クールダウンのない基本的なスキルであり、行動を起こすことが不可能になるデバフを受けていない限り、いつでも使用できます。
2 番目のスキルは、クールダウンのある強力なアクティブ スキルまたはパッシブ スキルです。パッシブ スキルはそれ自体でアクティブになり、多くの場合、アクティブになるためのトリガーまたは条件があります。この例では、Hall (Hodur) のパッシブは、味方が個々のターゲットを攻撃したときにのみアクティブになります。彼らがそうするとき、Hall (Hodur) は彼の弓の追加攻撃でそれに続いて攻撃力の 40% に等しいダメージを与え、1 ターンの間敵に毒を与えます.
3 番目のスキルはキャラクターの最も強力なスキルであり、通常はクールダウンが最も長くなります。
AP、SPD、およびアクション ポイント バー
アクション ポイント バーは、エスパーと敵の矢印とアイコンが付いた細い紫色のバーです。戦闘中の各キャラクターには、時間の経過とともにいっぱいになる独自の AP またはアクション ポイントがあります。敵または味方を数秒間押してキャラクターの統計を表示するか、戦闘画面の右側にある歯車アイコンを押して確認できます。 100% まで満たされると、そのキャラクターは次のターンに移動します。
100% AP に早く到達するほど、次のターンが早くなり、クールダウンが速く通過します。ただし、すべてのキャラクターの AP が同じペースでいっぱいになるわけではありません。これが、敵が味方をはるかに遅れていたにもかかわらず、敵が味方を突然追い越していることに気付く場合がある理由です。また、その逆も同様です。

AP がいっぱいになる速度は、SPD によって異なります。残念ながら、戦闘中に味方の SPD と敵の SPD を決定または比較する方法はなく、AP % のみです。敵が味方よりもはるかに速く動いているかどうかに気付くには、自分の観察力に頼る必要があります。これは、優れたビジュアルを提供するアクション ポイント バーが役立つ場所です。
AP とクールダウンを効率的に使用して戦闘の流れを変える方法はいくつかあります。
SPDを操作
速度は、キャラクターが AP をいっぱいにして次のターンを取る速度に影響します。 SPD ボーナスを持つレリックを装備し、アセンションを通じてエスパーを強化し、SPD アップバフを持つエスパー アビリティを使用し、SPD キャプテン アビリティが増加したエスパーをチームに割り当てることで、それを増やすことができます。
これは、味方が敵よりも遅い場合、または特定のバフ、デバフ、およびスキルを有利に機能させるために追加のスピードアップが必要な場合に非常に役立ちます.また、素早さが高いことで先制され、戦闘開始時に先制することができます。率先して行動することで、攻撃する前に敵に弱体化されたり殺されたりすることがなくなります。
または、SPD デバフを持つエスパーをチームに配置し、最も速く動く敵、最も激しく攻撃する敵、または回復できる敵のいずれかをターゲットにすることに集中することもできます。これらの 3 種類の敵は、倒すのが最も難しいことが判明する可能性があるため、最初にそれらをターゲットにすることが重要です。以下に、SPD または AP を変更するバフとデバフ、およびそれを持つエスパーのリストと、SPD バフ能力を持つキャプテンのリストをまとめました。
SPDとAPバフ
 | SPDアップ | SPD が 30% 増加します。 | シエナ (ガイア)、セリーヌ (サイレン)、エイラ (フレイヤ)、サンダー (セット)、アネシドラ (パンドラ)、シェ ユジ (デス ガード バイ)、メレディス (スキュラ) |
 | ブリシンガメンズ ウォッチ | 各チームメイトのターン終了時に 15% のボーナス AP を付与。 このデバフは ACC と RESIST を無視し、ミスすることはできず、トリガーする必要があります。 | エイラ (フレイヤ) |
 | ヘイスト | (解除不能) ヘイストごとに 30 SPD を付与します (最大 3 スタック)。攻撃を開始した後に解除されます。 | ウナス (シュウ) |
SPD &AP デバフ
 | SPDダウン | SPD を 30% 減らします。 | Tiye (Nut)、Kara (Serket)、Eira (Freya)、Sander (Set)、Lin Xiao (White Tiger)、Long Mian (Ao Bing)、Dhalia (Calypso)、Xie Chuyi (Death Guard Hei)、Kaylee (Anuket)、Brynn (Valkyrie)、Melanie (Medusa)、Lauren (Heket) |
SPDバフのある船長の能力
| 味方のSPDを25%増加 | Tiye (ナッツ)、Ollie (オシリス) | レジェンダリー |
| 味方のSPDを20%増加 | ロング ミアン (アオ ビン) | エピック |
| 味方のSPDを15%増加 | メラニー (メデューサ) | レア |
| ポイント戦争で味方のSPDを20%増加 | Li Ao (Tao Tie) | レア |
| Ritual と Sonic Miracles で味方の SPD を 25% 増加 | サンダー (セット) | エピック |
| ホロバトルで味方のSPDを35%増加 | ウナス (シュウ) | レジェンダリー |
| ホロバトルで味方のSPDを25%増加 | プリツカー (ミミール) | エピック |
それらを完全に停止
SPD の高い敵や、攻撃力の高い敵や回復中の敵に対処するもう 1 つの方法は、敵の移動や行動を止めることです。この方法は、アクション ポイント バーの右端に最も近い敵が攻撃または回復するのを防ぎ、ターンをスキップするのにも役立ちます。以下は、それを達成するのに役立つデバフのリストです。
行動を止めるデバフ
 | むさぼり食う | ターゲットの行動、選択、攻撃、バフ/デバフを防ぎます。 | Li Ao (タオ タイ) |
 | フリーズ | アクションを実行できません。 | ロング ミアン (アオ ビン)、ダリア (カリプソ)、ケイリー (アヌケット)、ブリン (ヴァルキリー) |
 | 石化 | アクションを実行したり、能力のクールダウンを短縮したりできません。 | トリキ (ロキ)、ジェイコブ (ヨルムンガンド)、メラニー (メデューサ) |
 | 睡眠 | ダメージを受けるまで行動できない | セリーヌ (サイレン)、スチュワート (ディオニュソス) |
 | 気絶 | アクションを実行できません。 | Jin Yuyao (Queen Mother), Tiye (Nut), Triki (Loki), Lucas (Apollo), Sienna (Gaia), Arcana (Hermes), Sander (Set), Pritzker (Mimir), Anesidora (Pandora), Bonnie (Eris), Dhalia (Calypso), Xie Yuzhi (Death Guard Bai), Bardon (Baldr), Tang Yun (Six-Eared Macaque), David (Jason), Layla (Medjed), Jeanne (Gerd) |
Alternatively, you can choose to force your enemies to use their weakest attack, which is their basic attack, so they won’t be able to use any of their stronger hard-hitting or healing skills.
Action-Limiting Debuffs
 | Silence | Cast only basic ability. | Jiang Man (Meng Po), Bai Liuli (White Snake), Ollie (Osiris), Laura (Neith) |
 | Taunt | Forced to attack the debuff caster with basic ability at the start of turn. | Djoser (Atum), Falken (Horus), Ren Si (Black Tortoise), Bardon (Baldr), Li Ao (Tao Tie), David (Jason), Ollie (Osiris) |
Use the enemies’ high SPD to your advantage
Sometimes, when you can’t control something, the best thing to do is to embrace it. Since their turns come by so quickly, there are certain debuffs that you can use against your high SPD enemies that will trigger a negative effect at the start of every turn.
Debuffs best used on High SPD Enemies
 | Bleed | Receives True Damage equal to 50% of the debuff caster’s ATK at the start of the turn. | Lu Yi (Dayi), Lin Xiao (White Tiger), Zelmer (Sekhmet) |
 | Pandora’s Box | Takes effect at the start of the target’s 2nd turn. Removes a certain percentage of current HP and inflicts Stun for 1 turn. | Anesidora (Pandora) |
 | Poison | Loses 4% of max HP at the start of the turn. | Jiang Man (Meng Po), Kara (Serket), Jacob (Jormungand), Hall (Hodur), Layla (Medjed), Meredith (Scylla) |
Making the most out of your high SPD
Alternatively, if your Espers are the ones with high SPD, there are some buffs that will complement this stat very well that also trigger at the start of each turn:
Buffs best paired with High SPD
 | Recovery | Recovers 15% max HP at the start of the turn. | Asenath (Nefertem), Fabrice (Freyr), Heng Yue (Chang’e), Luo Yan (Yanluo Wang), Berenice (Bastet), Ye Suhua (Shao Siming), Ollie (Osiris), Nicole (Nephthys) |
 | Conductor | Deals damage to all enemies based on DEF at the beginning of each turn. Removed upon receiving disables. | Donnar (Thor) |
 | Neko-Sense | Each stack increases Tevor’s damage taken by 15%. When stacks are maxed, resets all ability cooldowns and attacks a target twice the next turn, then removes all existing stacks. Max 2 stacks. | Tevor (Sphinx) |
4. Know When to Use Your Skills
Each Esper has their own unique set of skills. How you use those skills will dictate how you do in battle. Basic skills, the first skill on your set, have no cooldowns and can be used anytime. On the other hand, your higher damage skills, healing skills or buff and debuff skills (which are usually the second or third skill) have cooldowns of their own unless they’re a passive skill. Because of this, you won’t always have the option to use them so you have to be wise when it comes to timing.
When to use Basic Skills
Since this is usually the least powerful skill you usually use this when your two other powerful skills are on cooldown. Aside from that though, it may benefit you to use them if you are saving your stronger skills for the next wave and the enemies that are left are close to death. The first skill is also typically a one-target skill, and depending on the Espers on your team, using this skill can be the best choice in a situation.
An example of this is Mona (Artemis)’s first skill, Moonshot, where she gains an additional turn if she kills an enemy with this attack. Another example is Hall (Hodur)’s Passive 2nd skill where each time an ally attacks individual targets, he deals an attack of his own on the same target.
When to use your High Damage Skills
This depends greatly on the kind of enemies you have. If you have 1 wave of enemies, use them as soon as you can to finish the battle. If you have 2-3 waves of enemies, it’s best to use just a couple of them at a time so that when you reach the next wave, there are still some strong skills that are not on cooldown that you can use on the fresh batch of enemies.
Avoid using your high damage skills on enemies that are already near death unless it is the last enemy. You would not want to waste a skill that could be used to attack a healthier enemy. Aside from this, prioritize using multiple-target skills at the start so that you could weaken the enemy and it would be easy to pick them off with your one-target skills.
When to use your Healing Skills
The best time to use them is when your ally’s life is less than 50% unless you are fighting an enemy or boss that could launch a fairly strong attack like Kronos from Ritual Miracle. In those cases, you’d want to make sure to keep your HP as full as possible before Kronos attacks as he launches a second attack as a bonus turn if he successfully kills at least one ally with it. There are also a couple of Espers with that type of skill that could wipe out your team blow after blow so be careful.
When it comes to fighting in multiple waves, I highly suggest that you hold off on using your healing skills when the wave you are currently in is about to finish and you still have a next wave waiting for you. This is because the game heals you in between waves. If you have 50% or more HP left in you before the wave ends, save your heals for later.
When to use your Buff and Debuff Skills
Buffs and debuffs are always best used at the start of a battle so that each attack would be at its best potential. Just make sure that your first turns are not all buff and debuff skills and balance them out with some damage attacks (unless of course your buff and debuff skills deal damage as well). However if you would like to know each specific buff and debuff’s best use, read on to the next section below.
5. Strategize with Buffs and Debuffs
There are many different buffs and debuffs in the game and a few of them are unique to certain Espers. You don’t need to learn all the buffs and debuffs by heart to play the game and win your battles, but when you find yourself stuck on a level or stage, it has its advantages.
Learning what they do and how to use it can greatly help you in battle and even help you form your squad. Below is a list of buffs and debuffs and which Espers possess them as well as our notes on their recommended use. Take note that this list does not involve buffs and debuffs of Miramon, Sentinels and other enemies.
How to utilize Buffs
Buffs are status effects that positively affect a character.
Regular Buffs
These are buffs that are usually shared by many different Espers and can be disabled.
 | ATK Up | Increases ATK by 40%. | Narmer (Ra), Sally (Sif), Sienna (Gaia), Fabrice (Freyr), Luo Yan (Yanluo Wang), Dhalia (Calypso), Taylor (Hercules), Brynn (Valkyrie), Freddy (Fenrir), Ye Suhua (Shao Siming), Unky Chai (Yue Lao) |
Useful against enemies with high HP or DEF. Low ATK allies will greatly benefit from this.
 | C.RATE Up | Increases C.RATE by 30%. | Lewis (Ares), Dhalia (Calypso), Taylor (Hercules), Xie Chuyi (Death Guard Hei), Kaylee (Anuket), Helena (Helen), Unky Chai (Yue Lao) |
Use with allies that have high C.DMG to fully utilize this buff.
 | CRIT RESIST | +30% CRIT RESIST | Laura (Neith), Meredith (Scylla) |
Best used on low HP or DEF allies or when against enemies with high C. RATE or C. DMG.
 | DEF Up | Increases DEF by 60%. | Donnar (Thor), Gabrielle (Njord), Celine (Siren), Bardon (Baldr), Ye Suhua (Shao Siming), Nicole (Nephthys), Meredith (Scylla) |
Useful against enemies with high ATK. Low DEF allies will greatly benefit from this. May not be so useful against enemies with True Damage.
| | Immunity | Cannot be debuffed. | Donnar (Thor), Gabrielle (Njord), Sally (Sif), Unas (Shu), Clara (Hera), Cecilia (Isis), Fabrice (Freyr), Lynn (Hathor), Chang Pu (Yao Ji) |
Useful against enemies with many debuff skills.
 | Invincibility | Immune to all damage. | Fabrice (Freyr), Ye Suhua (Shao Siming), Ollie (Osiris) Nicole (Nephthys) |
Useful for when you are up against enemies that you have an elemental disadvantage with. Also useful for when you have an ally that is near death and cannot be healed immediately or at all.
 | Recovery | Recovers 15% max HP at the start of the turn. | Asenath (Nefertem), Fabrice (Freyr), Heng Yue (Chang’e), Luo Yan (Yanluo Wang), Berenice (Bastet), Ye Suhua (Shao Siming), Ollie (Osiris), Nicole (Nephthys) |
Useful for all situations but best used during battles that you have a hard time surviving. Good to pair with an Esper with a SPD buff so heals would be frequent.
 | Shield | Absorbs damage equal to shield strength. | Tang Xuan (Sun Wukong), Berenice (Bastet), Lynn (Hathor), Cecilia (Isis), Clara (Hera), Lynn (Hathor), Berenice (Bastet), Laura (Neith) |
Shield Strength is not a base stat and usually depends on many factors like the caster’s HP, the HP of the ally it is casted on or overflow healing. To maximize its use, focus on increasing the HP of the Esper that has this buff or use on high HP allies depending on how the Esper’s skill that has this buff works.
 | SPD Up | Increases SPD by 30%. | Sienna (Gaia), Celine (Siren), Eira (Freya), Sander (Set), Anesidora (Pandora), Xie Yuzhi (Death Guard Bai), Meredith (Scylla) |
Useful against enemies with high SPD. Low SPD allies will greatly benefit from this.
 | Standoff | Retains at least 1 HP. (In this state, Esper is Immune to AP Down.) | Catherine (Hela), Freddy (Fenrir), Nicole (Nephthys) |
Best used when fighting through multiple waves and boss fights or Sentinels. Useful to use just before a strong enemy attacks or when an ally is in danger of dying. Do not use it when your allies are at full health or are not in danger of dying yet.
 | Soul Guard | 30% of the damage taken by the carrier is redistributed to the caster. The carrier, when dies, revives immediately and restores 10% of their max HP. This buff expires on the caster’s death. | Nicole (Nephthys) |
Best used on low HP or DEF Espers on your team.
Silver-Framed Buffs
These are buffs that are unique to their Espers and ignore ACC and RESIST, cannot Miss and must be triggered.
| | Brisingamen’s Watch | Grants 15% bonus AP at the end of each teammate’s turn. | Eira (Freya) |
Best used on allies with low SPD. May also be beneficial to use it along with allies that can stun or silence or increase other allies’ speed, letting your team attack more often than your enemies.
 | Death Tome | Marks the current HP% of a teammate. After 2 turns, if the teammate has lost some HP, then restores to the marked HP%; if the teammate has died, then resurrects them. | Luo Yan (Yanluo Wang) |
Allies with low maximum HP would benefit greatly from this buff. It is also helpful for dealing with multiple waves of enemies and fighting boss battles or Sentinels.
 | Fangs | Can’t be Poisoned. May retaliate to an attack with Poison for 1 turn. | Jacob (Jormungand) |
A good counter against enemies with Poison debuff.
 | Kiss of the Nightingale | Blesses an allied Esper, returning 60% of damage received as True Damage to the attacker. (Alexa (Aphrodite)’s third skill returns 75% of damage instead). | Alexa (Aphrodite) |
A good counter against enemies with high ATK. Best used with high HP allies so that they could take in a lot of damage and return a lot of them back to the enemy.
 | Lotus Mark | Reduces damage taken by 50%. Disappears when attacked. | Asenath (Nefertem) |
Best used before a strong enemy would attack, especially enemies that have skills that damage more than one enemy. Very useful against Sentinels or boss battles.
 | Tiger Roar | C.RATE increases 100% during the next attack. | Lin Xiao (White Tiger) |
Best paired with allies that have high C.DAMAGE.
Gold-Framed Buffs
These are buffs that are unique to their Espers and are undispellable or not removable.
 | Breath of the Deep | (Undispellable) Grants +5% ATK per stack, and +3% damage reduction per 10 stacks; up to 50 stacks. | Hyde (Hades) |
To fully utilize this, use against enemies with debuffs and / or allies with buffs as each buff or debuff on Hyde (Hades) will grant a stack of this buff.
 | Bull Rage | +10% DEF and +5% RESIST per stack. Max 10 stacks. | Djoser (Atum) |
Useful against most enemies, especially those that have debuff skills.
 | Burning Sun | Amplifies the power of Emblazoned Strike. | Narmer (Ra) |
To fully utilize this buff, increase Narmer (Ra)’s ATK stat through buffs during battle or advancements, resonance or ascension outside of battle.
| | Conductor | Deals damage to all enemies based on DEF at the beginning of each turn. Removed upon receiving disables. | Donnar (Thor) |
Avoid using against enemies with disabling debuffs. To fully utilize this buff, increase Donnar (Thor)’s DEF stat through buffs during battle or advancements, resonance or ascension outside of battle.
 | Death | (Undispellable) Inflicts additional damage equal to 5% of the target’s max HP (under 50% of ATK) upon dealing damage. | Tang Xuan (Sun Wukong) |
Useful against enemies with high HP. Even more useful when paired with an ally that does multiple attacks per turn that would trigger the additional damage for each time.
| | Haste | (Undispellable) Grants 30 SPD per Haste (max 3 stacks). Dispelled after launching an attack. | Unas (Shu) |
Best used against enemies that have high SPD or when your team has low SPD.
| | Neko-Sense | Each stack increases Tevor’s damage taken by 15%. When stacks are maxed, resets all ability cooldowns and attacks a target twice the next turn, then removes all existing stacks. Max 2 stacks. | Tevor (Sphinx) |
Best used with an ally that can heal Tevor (Sphinx) as he takes additional damage from the buff before he can use it against enemies.
 | Scorch | (Undispellable) Inflicts Diseased for 2 turns upon damaging the target. | Tang Xuan (Sun Wukong) |
Useful against enemies with healing abilities. Even more useful when paired with an ally that has a poison debuff.
 | Shackle | (Undispellable) Has a 40% chance to inflict DEF Down for 2 turns upon damaging the target. | Tang Xuan (Sun Wukong) |
Useful against enemies with high DEF. Even more useful when paired with an ally that does multiple attacks per turn for a higher chance to trigger DEF Down.
 | Supporting Song | (Undispellable) Grants +2% base ATK per stack (max 25 stacks). | Ahmed (Geb) |
Best used on high damage-dealing Fighters or Espers that may need a little ATK boost.
 | Sweet Harvest | Can’t Move. All Allied Espers take 25% less damage. Each time before an ally moves, dispels a debuff on them and heals them for some HP. | Sally (Sif) |
Best used against enemies that have skills that cause debuffs. Also very useful against Sentinels or boss battles.
 | Thunder Blessing | Increases DEF by 20% upon receiving damage (stacks up to 5 times). | Donnar (Thor) |
Best used against enemies that deal multiple attacks per turn.
How to utilize Debuffs
Debuffs are status effects that negatively affect a character.
Regular Debuffs
These are debuffs that are usually shared by many different Espers and can be disabled.
 | ATK Down | Reduces ATK by 40%. | Donnar (Thor), Gabrielle (Njord), Falken (Horus), Lynn (Hathor), Anesidora (Pandora), Q (Cupid), Hall (Hodur), David (Jason), Ye Suhua (Shao Siming) |
Useful against enemies with high ATK. Low DEF Esper allies have a higher chance of surviving when this is used.
| | Bleed | Receives True Damage equal to 50% of the debuff caster’s ATK at the start of the turn. | Lu Yi (Dayi), Lin Xiao (White Tiger), Zelmer (Sekhmet) |
Useful against enemies with high DEF since True Damage ignores it. To fully utilize this buff, increase your Esper’s ATK stat through buffs during battle or advancements, resonance or ascension outside of battle.
| | Buff Blocker | Cannot be buffed. | Raven (Odin), Biondina (Poseidon), Chloe (Medea), Chalmers (Idun) |
Useful against enemies with buffing skills.
 | DEF Down | Reduces DEF by 60%. | Tang Xuan (Sun Wukong), Raven (Odin), Gabrielle (Njord), Unas (Shu), Djoser (Atum), Ren Si (Black Tortoise), Lin Xiao (White Tiger), Xie Chuyi (Death Guard Hei), Brynn (Valkyrie), Drew (Anubis), Q (Cupid), Zelmer (Sekhmet), Hall (Hodur), Berenice (Bastet), Ollie (Osiris) |
Useful against enemies with high DEF. High ATK Esper allies will have the best advantage over this.
 | Diseased | Cannot be healed. | Tang Xuan (Sun Wukong), Kara (Serket), Lin Xiao (White Tiger), Luo Yan (Yanluo Wang), Chalmers (Idun), Layla (Medjed), Leon (Vali) |
Useful against enemies with healing abilities. Even more useful when paired with an ally that has a poison debuff.
| | Freeze | Cannot take actions. | Long Mian (Ao Bing), Dhalia (Calypso), Kaylee (Anuket), Brynn (Valkyrie) |
Target enemies closest to your current character in the Action Point Bar to make them skip a turn or enemies with the highest AP percentage. Can be used to prevent high damage-dealing enemies or enemies with strong abilities from attacking.
 | Miss Rate Up | Increases Miss Rate by 50%. | Triki (Loki), Arcana (Hermes), Alexa (Aphrodite), Catherine (Hela) |
Choose a team of Espers that have an elemental advantage over your enemies to efficiently utilize this buff.
| | Poison | Loses 4% of max HP at the start of the turn. | Jiang Man (Meng Po), Kara (Serket), Jacob (Jormungand), Hall (Hodur), Layla (Medjed), Meredith (Scylla) |
Very useful against enemies that have high HP. May also be useful against enemies that have high SPD since their turns come by so quickly and they get damaged at the start of each turn.
| | Petrification | Cannot take actions or reduce ability cooldown. | Triki (Loki), Jacob (Jormungand), Melanie (Medusa) |
Target enemies closest to your current character in the Action Point Bar to make them skip a turn or enemies with the highest AP percentage.
 | Sear | Increases damage received by 25%. | Raven (Odin), Tevor (Sphinx), Xie Chuyi (Death Guard Hei), Leon (Vali), Bai Liuli (White Snake), Nicole (Nephthys) |
Useful against enemies with high DEF. High ATK Esper allies will have the best advantage over this. Espers with skills with True Damage would be even more effective.
| | Silence | Cast only basic ability. | Jiang Man (Meng Po), Bai Liuli (White Snake), Ollie (Osiris), Laura (Neith) |
Very useful against enemies that have strong 2nd and / or 3rd skills but weak basic abilities. Can prevent some healer enemies from healing their team.
| | Sleep | Cannot take actions until damaged. | Celine (Siren), Stewart (Dionysus) |
Target enemies closest to your current character in the Action Point Bar to make them skip a turn or enemies with the highest AP percentage. Can be used to prevent high damage-dealing enemies or enemies with strong abilities from attacking or from healers to heal their team.
| | SPD Down | Reduces SPD by 30%. | Tiye (Nut), Kara (Serket), Eira (Freya), Sander (Set), Lin Xiao (White Tiger), Long Mian (Ao Bing), Dhalia (Calypso), Xie Chuyi (Death Guard Hei), Kaylee (Anuket), Brynn (Valkyrie), Melanie (Medusa), Lauren (Heket) |
Useful against enemies with high SPD or when allied Espers have low SPD.
 | Stun | Cannot take actions. | Jin Yuyao (Queen Mother), Tiye (Nut), Triki (Loki), Lucas (Apollo), Sienna (Gaia), Arcana (Hermes), Sander (Set), Pritzker (Mimir), Anesidora (Pandora), Bonnie (Eris), Dhalia (Calypso), Xie Yuzhi (Death Guard Bai), Bardon (Baldr), Tang Yun (Six-Eared Macaque), David (Jason), Layla (Medjed), Jeanne (Gerd) |
Target enemies closest to your current character in the Action Point Bar to make them skip a turn or enemies with the highest AP percentage. Can be used to prevent high damage-dealing enemies or enemies with strong abilities from attacking or from healers to heal their team.
| | Taunt | Forced to attack the debuff caster with basic ability at the start of turn. | Djoser (Atum), Falken (Horus), Ren Si (Black Tortoise), Bardon (Baldr), Li Ao (Tao Tie), David (Jason), Ollie (Osiris) |
Very useful against enemies that have strong 2nd and / or 3rd skills but weak basic abilities. Can prevent some healer enemies from healing their team. Can be used to prevent high damage-dealing enemies or enemies with strong abilities from attacking or from healers to heal their team.
Silver-Framed Debuffs
These are debuffs that are unique to their Espers and ignore ACC and RESIST, cannot Miss and must be triggered.
| | Devour | Prevents the target from taking actions, being selected, being attacked and being buffed/debuffed. | Li Ao (Tao Tie) |
Target enemies closest to your current character in the Action Point Bar to make them skip a turn or enemies with the highest AP percentage. Can be used to prevent high damage-dealing enemies or enemies with strong abilities from attacking or from healers to heal their team.
 | Eye of Horus | When this debuff expires, the carrier receives True Damage equal to 20% of total damage they received during this debuff. | Falken (Horus) |
Useful against enemies with high DEF since True Damage ignores it. Best paired with allies that have a buff that increases ATK.
 | Link | When a Linked unit is attacked, their counterpart also receives True Damage equal to 80% of damage dealt in this attack. | Q (Cupid) |
Useful against enemies that are in stealth and enemies that your team has an elemental disadvantage against. The skill will link your selected enemy randomly, but if you happen to link an enemy you have an elemental disadvantage against and an enemy you have an elemental advantage against, attacking the latter will make it easier to kill the former. Linking two enemies then using an area attack or any attack that affects more than one enemy will make each Linked enemy experience almost twice the damage.
 | Netherbloom | Enemies marked with Netherbloom will suffer a Netherbloom blast after taking 5 attacks, receiving damage equal to 85% of Meng Po’s ATK. This blast also deals damage of the same amount to 2 other random enemies. Has a 50% chance of Silencing the affected targets for 2 turns. | Jiang Man (Meng Po) |
Best used with an ally that does multiple attacks so that you can trigger a Netherbloom blast more quickly. Allies with high SPD or those that have buffs that increase speed may also be beneficial paired with this debuff.
 | Neko-Curse | This debuff is removed upon the carrier’s death, dealing 40% of Tevor’s ATK as True Damage to all enemies. Each Stack increases the multiplier by 40%, max 5 stacks. | Tevor (Sphinx) |
To fully utilize this debuff, increase Tevor (Sphinx)’s ATK stat through buffs during battle or advancements, resonance or ascension outside of battle. Helpful when fighting against high HP enemies or enemies that heal often.
| | Pandora’s Box | Takes effect at the start of the target’s 2nd turn. Removes a certain percentage of current HP and inflicts Stun for 1 turn. | Anesidora (Pandora) |
Very useful against enemies that have high SPD as they will reach their 2nd turn before most characters in battle.
6. Enhance your Espers
At some point you will find that no matter how many times you redo a level and no matter how many different combinations of teams and strategies you’ve tried, you still can’t pass a certain stage. When that time comes, it means it’s time to enhance your Espers through the Espers tab.
Equip them with Relics
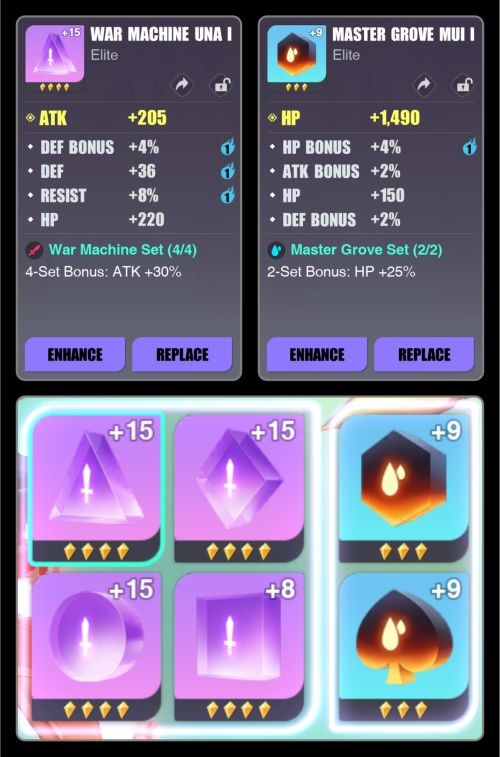
Relics are the equivalent of equipment in most RPGs. It is one of the easiest improvements to implement as you can freely equip and unequip them to any Esper you have. Relics increase certain stats of your Esper, and if you manage to equip them with a set of four (Triangle, Diamond, Circle and Square) or a set of two (Hexagon and Club) you get a set bonus. You can easily identify which are sets because they have the same names.
Relics have a main attribute and can have up to 4 secondary attributes. Each Relic slot has a different main attribute:
• Triangle – ATK
• Diamond – DEF
• Hexagon – HP
• Circle – ATK / ATK% / DEF / DEF% / HP / HP% / C.RATE / C.DMG
• Square – ATK / ATK% / DEF / DEF% / HP / HP% / ACC / RESIST
• Club – ATK / ATK% / DEF / DEF% / HP / HP% / SPD
Secondary Attributes on the other hand may vary.
The stars on the Relic determine how high are the stats you can get from it. The number of stars on a Relic can go as low as 2 or as high as 6. The higher the number of stars, the more gold it costs to enhance. However, the number of stars does not determine the quality of the Relic.
Relic Quality determines how many secondary attributes they can have at level 0 and how many attributes they can have when fully enhanced at lvl 15. You can find out what quality your Relic is by clicking on the Relic and checking underneath the name of the relic.
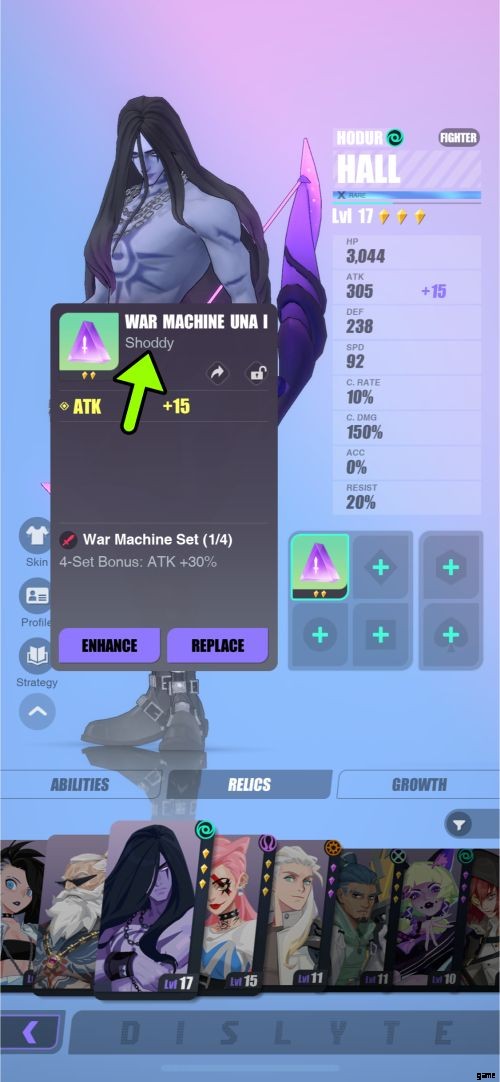
Below, we have listed the different Relic Qualities, their number of secondary attributes at Lvl 0 and how many boosted secondary attributes you can get at Lvl 15.
| Quality | Number of Secondary Attributes at Lvl 0 | Boosted Secondary Attributes at Lvl 15 |
| Shoddy | 0 | 1 |
| Good | 1 | 2 |
| Elite | 2 | 3 |
| Superior | 3 | 4 |
| Flawless | 4 | 5 |
When you enhance a relic, the main attribute is improved. For every three enhancements, a secondary attribute is unlocked. Once it is, the next enhancements at three intervals will boost a random secondary attribute.
We highly suggest not investing too much in Shoddy or Good Quality Relics. Elite Relics may be fine for a while when you are just starting, but Superior and Flawless Relics are the ones that are worth investing in for the long run.
However, they cost a lot more to enhance, especially since the Success Rate of the enhancement lowers and the price increases for each level up. If you fail an enhancement, you can try again until you reach the limit of failures. Once you reach that limit, your Relic will be guaranteed to enhance. The number of tries until guaranteed enhancement only appears when you auto enhance.

Auto Enhance will let the Relic enhance automatically until a certain level. Keep in mind that if you do, the game will keep enhancing it, even after failing, until you succeed or until you run out of funds.
You can obtain Relics by playing through Story Mode or Ritual Miracle and Cube Miracle in Trials or buying them in Shops. When you reach account level 7, you also have the option of making your own 6-Star Relics but they are very expensive to make and you need to gather Relic Dust, Relic Crystals or Relic Essences from Cube Miracle for it. However, if you want a specific type of Relic sometimes this is the only way to obtain it.
Experimons, Abilimons and Starimons
In Advancement, you can enhance your Esper with the use of special entities called Experimons, Abilimons and Starimons. You can buy these in Shops or earn them as rewards in the Infinite Miracle under Trials, Bounties, Achievement Rewards, Course Rewards, and Daily Login Gift. You may also check under Events to see if there are any quests or freebies that give those out.
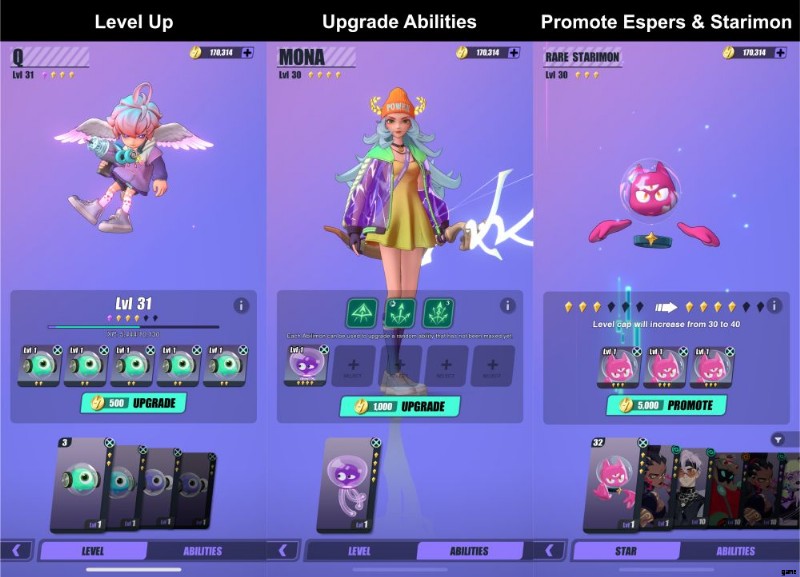
Use Experimons to increase your levels
There are four different types of Experimons that you can use to increase your level:Basic, Advanced, Elite and Special. To give you an idea of their differences, we made a table comparing how much XP or experience points you can get and how much a level 1 Esper can level up if an Experimon of a certain type is used for Level Advancement. You can also use Experimons on Starimons to level them up. You can use up to 5 Experimons at a time to level up.
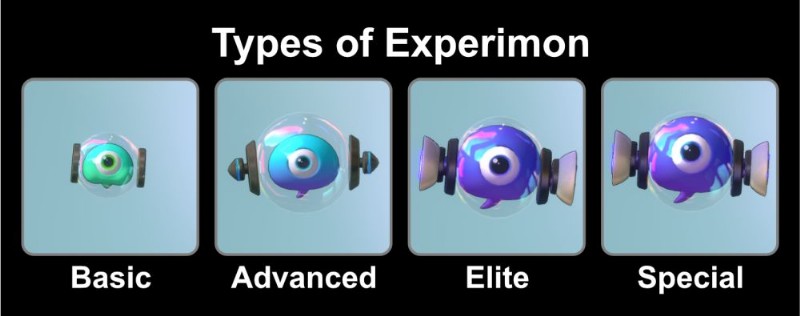
| Experimon | XP | Leveling up a Lvl 1 Esper |
| Basic | 1,000 | Lvl 4 |
| Advanced | 4,000 | Lvl 10 |
| Elite | 20,000 | Lvl 20 |
| Special | 75,000 | Lvl 30 |
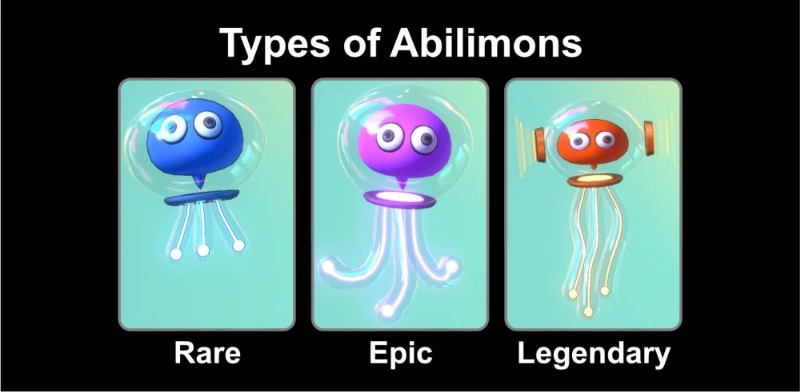
Use Abilimons to enhance your abilities
Abilimons come in three types of rarities that you can use to enhance your abilities:Rare, Epic and Legendary. Unlike Experimons that you can use on any Esper, Abilimons have to match the same rarity as the Esper you are enhancing. You can also use up to 5 Abilimons at a time to enhance your abilities.
These upgrades can potentially increase your abilities’ damage, decrease cooldowns, increase trigger chance and so on. Unfortunately, you cannot use which ability to upgrade as it chooses a random ability that has not been maxed yet.
Use Starimons to promote your Esper
A Esper’s level cap depends on their rarity. In order to increase their level cap, you must promote them, adding a star next to their level. Each star increases the level cap by 10. A Rare Esper can be promoted 3 times, an Epic 2 times and a Legendary 1 time. However, you can only promote them when your Esper has reached its maximum level.
| Esper Rarity | Level Cap |
| Rare | Lvl 30 |
| Epic | Lvl 40 |
| Legendary | Lvl 50 |
Starimons, like Abilimons, also come in three types of rarities that you can use to promote your Esper:Rare, Epic and Legendary. Similar to Abilimon, you also need to match the Starimon you will use to the Esper of the same rarity. You may also promote your Starimon the same way so that you can have Starimons of higher rarity as it is a lot harder to get.

There is also an option to use other Espers to promote your Starimon or other Espers but it is not advisable as duplicate Espers are best used for Resonance. On the other hand, if you’ve already maxed out your Esper through Resonance, this would be the best way to dispose of your extras.
Merging your duplicate Espers
Since you can only get Espers through Echo, which is a Gacha system where everything is random, you will sometimes get duplicates of your Espers. Duplicates may seem like a waste at first glance but you can actually increase your ATK, HP and DEF when you resonate them with the same Esper. Rare Espers get 4 Energy when resonating, 5 for Epic Espers and 6 for Legendary Espers.
All of them will get a Lvl 1 Starimon of the same Star Rating afterwards. There doesn’t seem to be a benefit from leveling up a duplicate before Resonating them. If you try to Resonate a higher leveled or upgraded Esper to a new, Unresonated Esper, you will still get the same result.
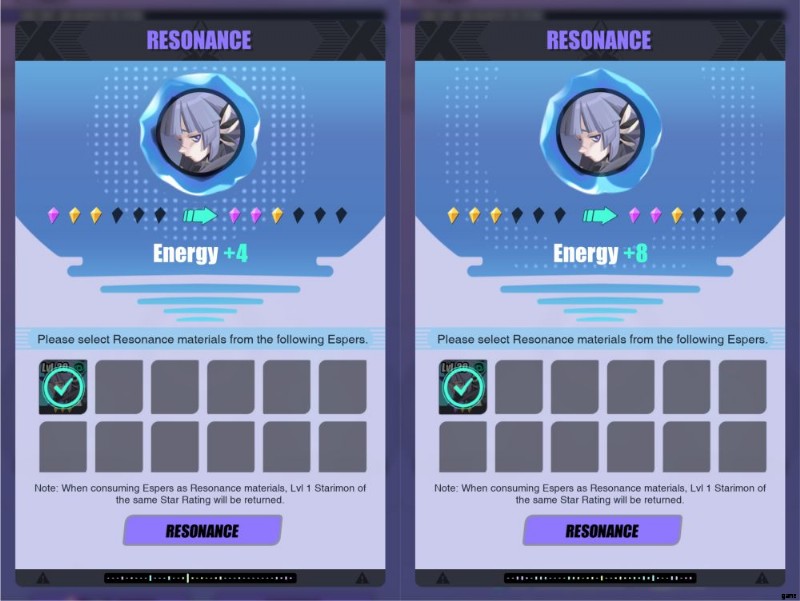
In the example below, the image at the left includes an Esper that was Resonated once (already received +4 Energy) and is being combined with an Unresonated Esper. From this, they will get another +4 Energy. All in all, they have a total of +8 Energy received from the two Resonance which is the same result as the right where an Unresonated Esper is combined to an Esper that was Resonated once.
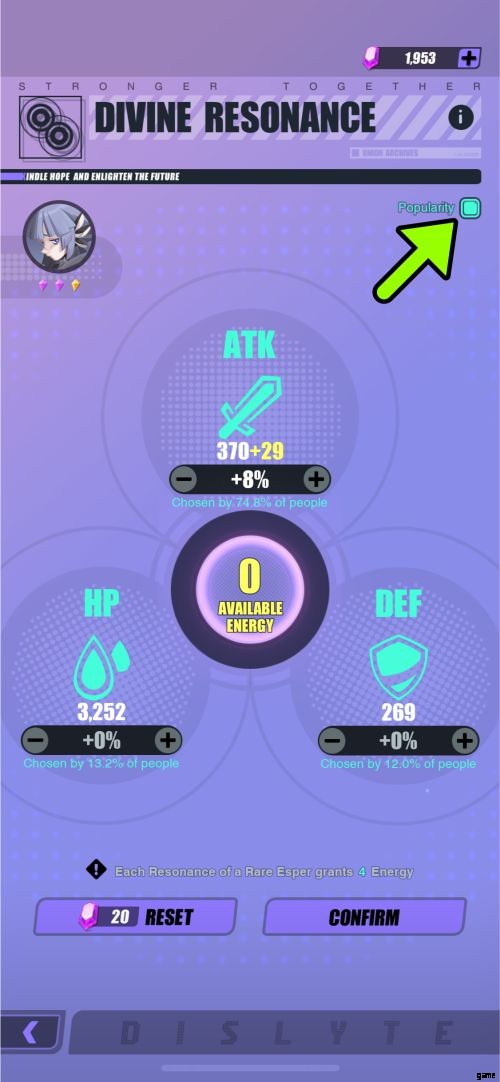
Since each Esper is unique, you need to take a couple of minutes to read what each of their skills do in order to fully use them to your advantage. You might think that adding more ATK to your character would be the best way to increase their damage in battle, but some skills may depend more on HP or DEF. If you’re unsure, there’s a popularity tab at the upper right side that can tell you which stat most people choose to apply to the Esper.
Alternatively, you could also save your duplicates and use them in Esper Fusion to unlock new Espers. However, you can only unlock this at account level 25.
Unlocking more Upgrades
Ascension is unlocked at Account Level 15. Here, each Esper gets 6 Phases of Bonuses that they can get at Lvl 1, 10, 20, 30, 40 and 50. Each Phase costs Waves that match the Esper’s element. Each bonus ranges from Stat increases to Ability Upgrades. You can get Waves from Sonic Miracle in Trials.

You can also use the S-Remixer to turn Basic Waves into Advanced Waves and then into Elite Waves which are required to unlock later Phases.
7. Farm with Multi-Battles
When you’re in the Formation Screen, you might have noticed the option at the lower left that says “Multi-Battle”. Multi-Battles are a great way to farm for relics and materials while easily leveling up your Espers or Starimon if you have enough Stamina to use.
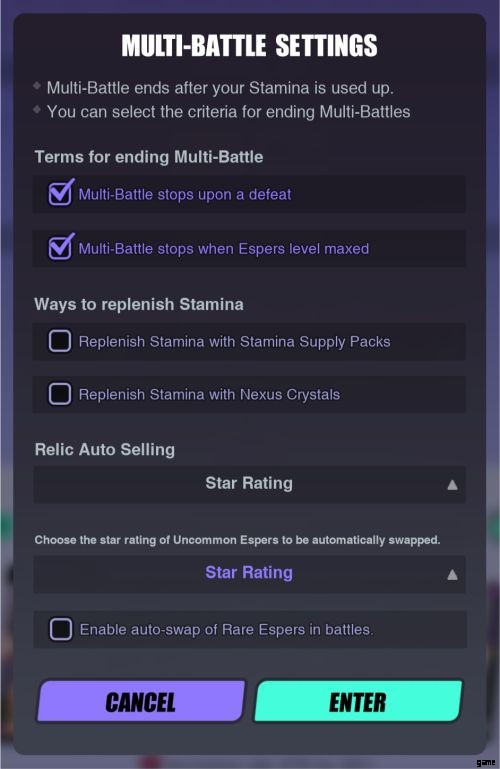
Before it proceeds, the game will allow you to set the terms for ending a Multi-Battle, ways to replenish Stamina and Relic Auto Selling. Even without setting any terms, Multi-Battles always end at the 10th round. We recommend keeping the terms “stops upon defeat” and “stops when Espers level maxed” to minimize the amount of stamina and experience points wasted.
We also recommend Auto Selling Relics that are 1-2 stars. If your level is even higher and you’re Multi-battling against stronger enemies, you may even set it to 1-3 or 4 stars. As for replenishing stamina, that is up to you. But take note that the settings you chose in a Multi-Battle will be retained on the next one.

Once the Multi-Battle starts, a different set of buttons will appear where your abilities usually are. Clicking the cogwheel icon will allow you to change the settings at any time during the Multi-Battle. The bag icon contains all the Relics, Experimons and other resources you gathered during the Multi-Battles. The red stop icon will stop the Multi-Battles after the current battle has finished. The second button allows you to minimize the current Multi-Battle and play on another game mode which is great because you get to farm in two different modes at the same time.
However, you cannot do a Multi-Battle on one mode then play on the same mode. You also cannot do more than one Multi-Battle at the same time. Aside from this, you have to clear the stage at least once before you can Multi-Battle it. Currently the only modes where Multi-Battles are possible are Story Mode, Ritual Miracle and Sonic Miracle.
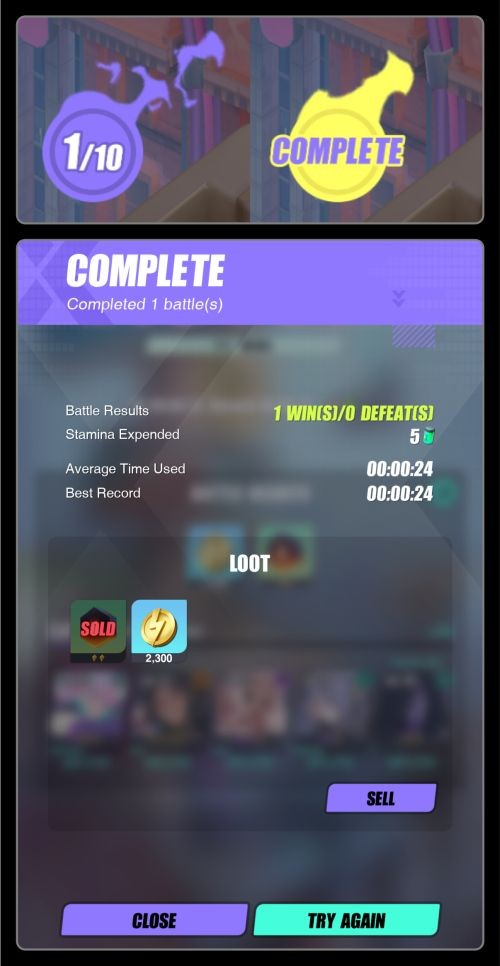
Once you’ve minimized your Multi-Battle, you will see a purple flame with numbers on it on the lower left part of your screen. This will track your Multi-Battle’s progress. Once this turns yellow, the Multi-Battle is complete and you can click on it to collect your XP and loot.
8. Collect Freebies and Rewards
There are a lot of Freebies and Rewards you can get in the game if you know where to look. They range from daily rewards to tasks that may not be easily noticed.
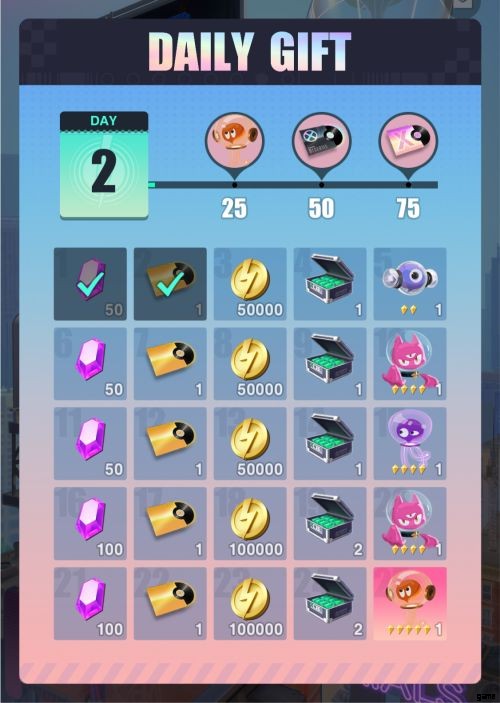
Getting Daily Gifts
These Daily Gifts greet you as soon as you open the game for the first time in the day so it would be very hard to miss. You don’t even have to worry about missing a day as the game just picks up where you left off!
Plaza’s Daily Pack
While Plaza is the place to go to buy resources with real money, they do provide a daily pack for free so be sure to check once a day.

Friendship Matters
In the Friends Tab, you can add your friends or recommended players to be your friend. Having friends in the game has many benefits. By just having friends and an Esper on your Friend Assist slot, you can earn 100 Friendship Points daily. You can also give and claim friendship points from them which you can exchange at the shop for Stamina, Random Wish Stickers and Starimon among others.

Aside from this, you can assign one of your strongest Espers for Friend Assists, letting your friends add your Esper to their team in Ritual Miracle and Sonic Miracle. In turn, you can also use theirs up to 50 times a day. This is very handy when you’re stuck on a stage or you just want some help leveling up.
Limited-Time Events
This changes all the time and has a time limit so be sure to check often which missions are available to gain more rewards. These usually offer the same items as the ones in Missions, but sometimes they will offer Espers that are difficult to obtain.
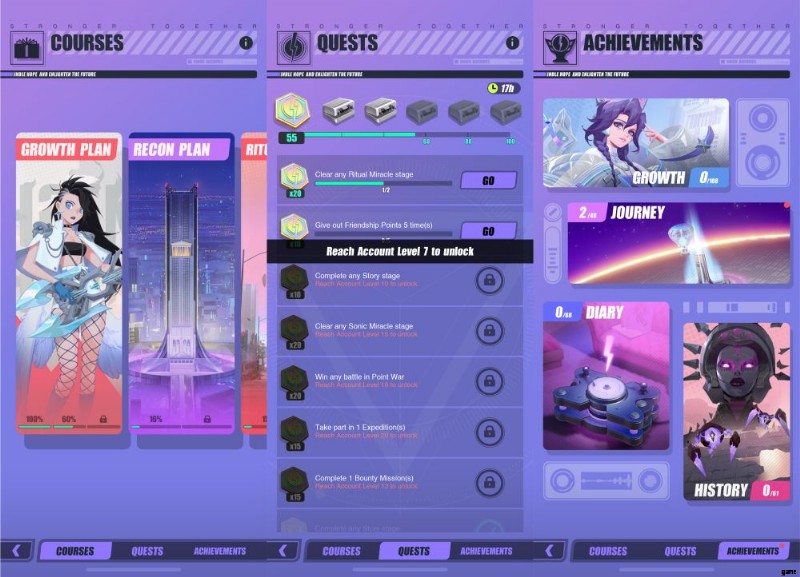
Passive Missions
Just by playing the game normally, you can accomplish rewardable tasks from Courses, Quests and Achievements under the Missions Tab so be sure to check often! Rewards range from Experimon, Abilimon, Starimon, Relics, Relic Sets, Gold Records, Nexus Crystals, Gold, Relic Dust, Waves, Supply Vouchers, Friendship Points, Admission Certificates and more.
Passing the Tactics Exam
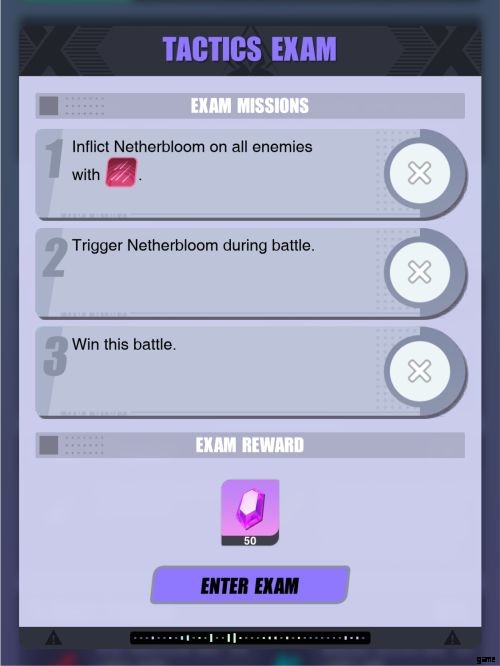
When you first get your Epic and Legendary Espers, you can take the Tactics Exam by going to the Espers Menu, selecting your Esper and clicking Strategy. Passing a Tactics Exam will reward you with Nexus Crystals. All you need to do is to accomplish the three exam missions to pass it which can be done in less than 5 minutes.
Unlocking Espers’ stories in Careers &Diary
When you go to an Esper’s Profile and check Careers you can find the conditions to unlock each segment which is to reach Level 20 and 30 and sometimes there is a fourth segment that you can unlock when you reach Esper Ascension Phase 4.
Unlocking these segments will not only tell you an Esper’s back story, but also reward you some Nexus Crystals. Diary does the same thing except you have to complete a Friendship Commission Bounty to unlock it. Friendship Commission Bounties usually just require you to watch a cutscene about the Esper. The reward for this is Gold.

Become a Bounty Hunter
Another way to earn more rewards is by fulfilling Bounties. Five Bounties are displayed at a time and the tasks vary from acquiring certain items, defeating specific enemies and even watching cutscenes of an Esper’s story.
To accept a bounty, you have to exchange a Mission Letter. 3 Mission Letters are given to you at 00:00 UTC everyday and you can have a maximum of 6 Letters. Rewards vary from Gold, Gold Records, Stamina and Nexus Crystals. We recommend checking the Bounties before playing in different game modes since certain Bounties may be easily completed as you play.
9. Other Hints and Easter Eggs
These are hints that don’t necessarily make you better at the game but can improve your gaming experience.
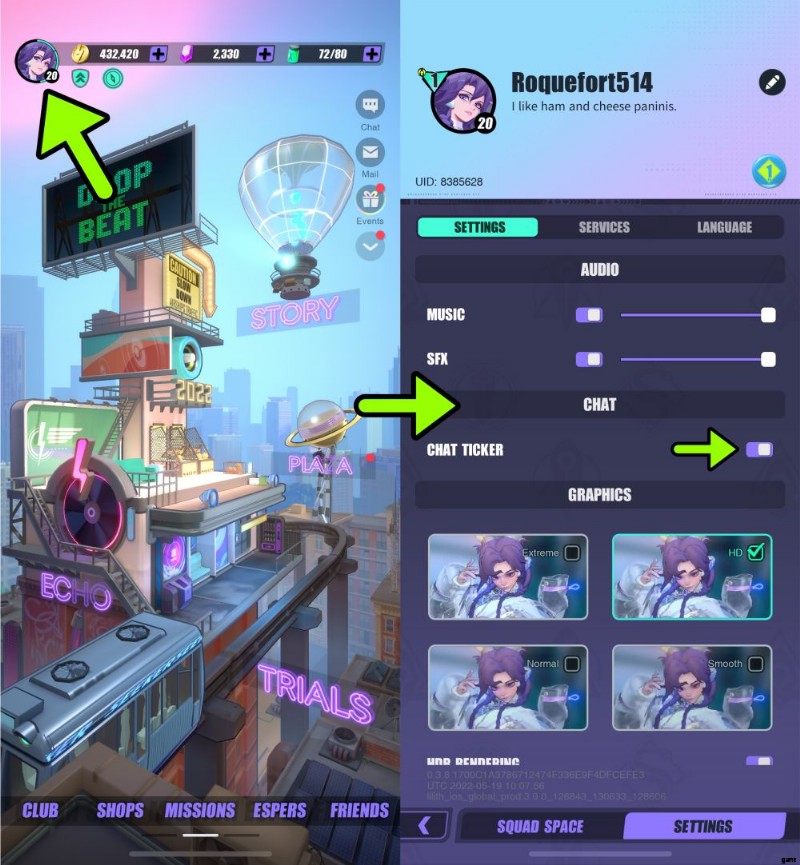
Get rid of distractions!
By default, world chat pops up on the screen just below the bar that displays your currencies. While this may not be a big deal for some people, it can prove to be distracting, especially if you are trying to immerse yourself in the game and there are system announcements about the Ripple Dimension or someone is debating about whether pineapple deserves to be on pizza.
If this is something you want to hide, you can easily stop the chat from appearing by clicking on your profile picture at the upper left side of the screen, going to the settings tab and turning off the Chat Ticker.
Play Music at the Bar!
This was more of an easter egg but since one of the Path to Mastery Quests was to Play “We Could Have a Good Time” at the bar, it is helpful to know where it is as it is an easy quest to accomplish. Aside from this, If you just genuinely want to know which artists are responsible for the sick, funky beats that’s invading your earbuds, read on!
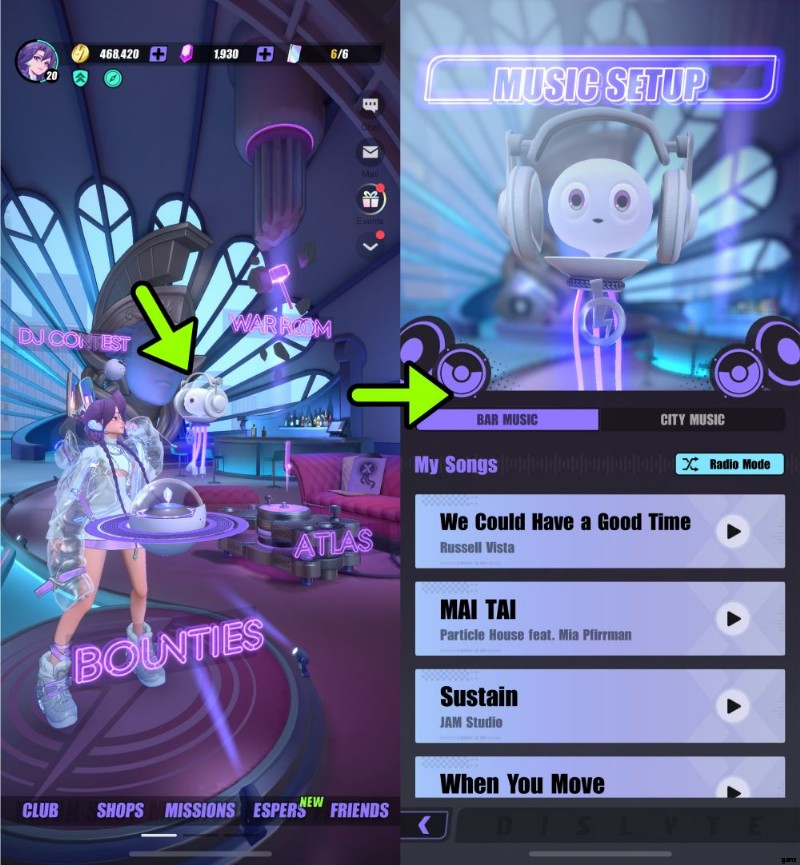
Swipe left to go to the bar. There you will find Discoboom with her pet, BoomBoom. If you click it, it will come up to you and show you the list of music the game has and play it for you!
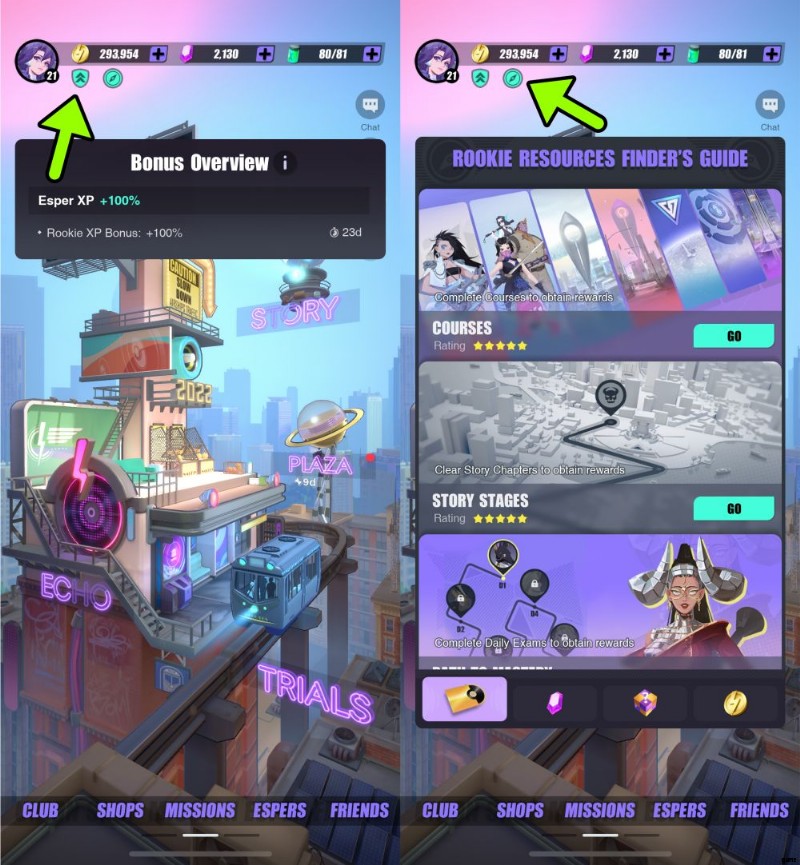
Check Bonuses &Resource Finder!
Sometimes, Dislyte gives away bonuses when they have special events like +100% Esper EXP they had on their global launch. To check, you can click on the badge icon with two up arrows just below the coin currency to see.
The button right next to it on the other hand leads you to the Rookie Resource Finder’s Guide. It’s very handy as it tells you exactly where to go to get more Gold Records, Crystals, Relics and Coins.
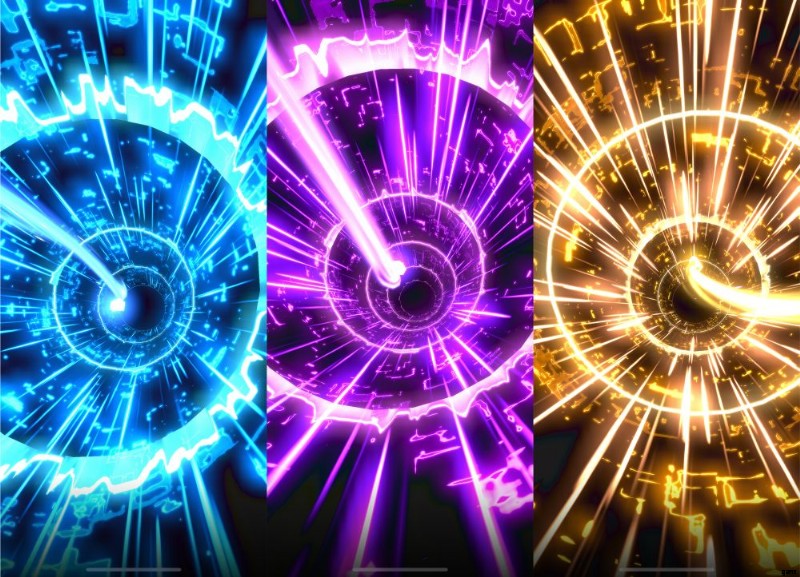
Know what tier of Esper you’ll get before it appears!
Knowing this will not in any way help you change the result, but it does make things exciting and is something that other people don’t notice straight away. When you spin a Gold Record in Echo, there is a chance to get a Rare, Epic and Legendary Esper. The animation sequence before the reveal shows a light traveling through a portal. The light color changes depending on what Esper you will get. It turns blue for Rare, Purple for Epic and Gold for Legendary.
And this marks the end of our beginner’s guide to Dislyte. As long as this was, it barely scratched the surface of what the game has to offer. Since this game just had its official global recently, there are many features that have yet to be introduced and many more adventures waiting to be unveiled.
We hope that you find our tips helpful as you play to the beat of this funky fresh game. If you have any tips and tricks that were not mentioned in this guide, feel free to share them in the comment section below!