Rivengard 初心者向けガイド:敵の裏をかくためのヒント、コツ、戦略
Rivengard は、Snowprint Studios によって開発されたエキサイティングなターンベースの戦略ゲームで、キャンペーンまたは PvP マッチを通じて、ライバル勢力に対して最大 5 人のヒーローを指揮します。収集するさまざまなヒーロー、装備するギア、考慮すべき要素の親和性を備えたRivengardは、表面に見えるよりもはるかに詳細です.好奇心や在庫のニーズを満たすために、さまざまなチャレンジも用意されています。
これらすべては、最初はかなり圧倒されるように思えるかもしれません。ゲームにはチュートリアルがありますが、Rivengard の包括的な初心者向けガイドでは、見逃しがちな詳細とメカニズムについて説明しています。単純なミッション ホッピングでも、他のプレイヤーとの対決でも、私たちはあなたが始めるのを手助けするためにここにいます。 Rivengard が何を準備しているか、しばらくお待ちください!
1.移動、マップ、モンスター
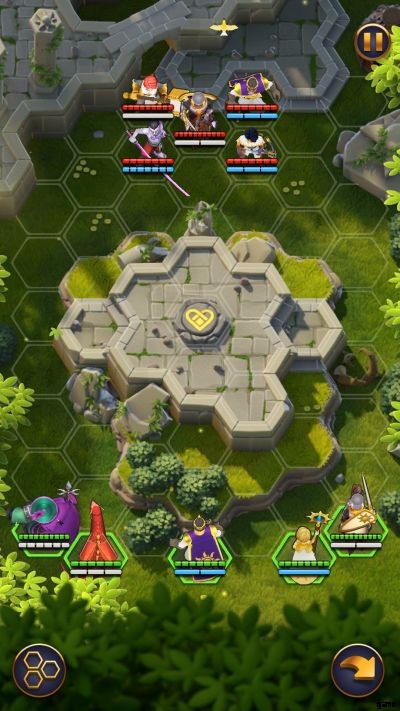
チュートリアル ミッションを除いて、Rivengard の特定の試合は、通常 3 から 5 スロットの範囲で、フィールドに配置したいヒーローを選択することから始まります。すべてのヒーローには、移動と攻撃範囲を決定する 2 つの統計がありますが、後者は遠距離ヒーローに実際に作用し、一度移動または攻撃すると、そのターンには使用できなくなります。
ヒーローには、アクティブ アビリティとパッシブ アビリティもあります。アクティブな能力は最初から利用可能であり、適切に使用すれば簡単に流れを変えることができます.ただし、アクティブなアビリティは戦闘ごとに 1 回しか使用できず、そのターンでヒーローが早まって使用できなくなることに注意してください。パッシブ アビリティはロックを解除する必要がありますが、ヒーローがその要件を満たしている限り、常に有効になります。
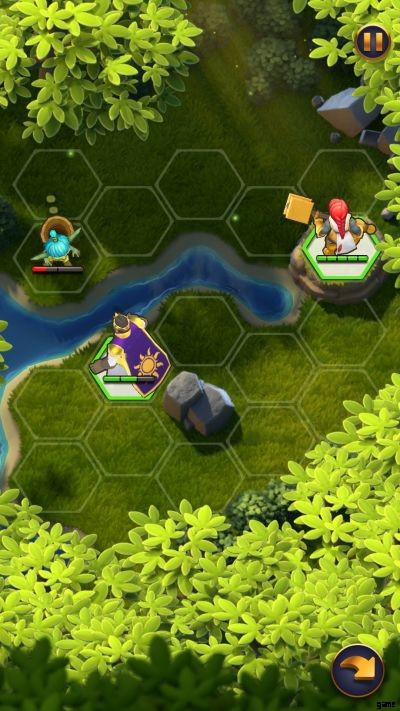
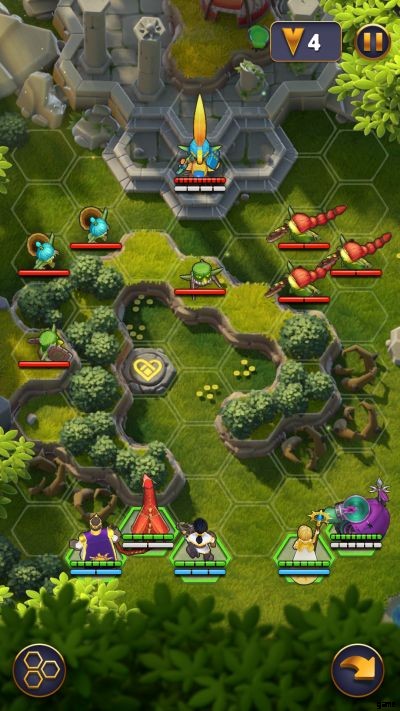
マップは、誰かが上に立つと移動を制限したり、さまざまな効果を与えることができるタイルを備えた六角形のグリッドです。これらの特別なタイルには次のものがあります:
• とげ: 踏んでいる人を遅くし、追加のダメージを与えます
• 茂み: 受けるダメージを軽減し、動きを制限しません
• ヒーリング タイル: まさにそれが言っていること–ターンの開始時に現在それを使用しているすべての人をヒールします
• 燃焼: ユニットが明示的に耐性を持たない限り、タイルが燃えているターンごとにダメージを受けます
これに加えて、一部のタイルは高さが異なるため、近くの崖を使用して登る必要があります。これは、ユニットがどのタイルを横切ることができるかについて少し誤解を招く可能性があります.より高いタイルにいるユニットは、敵が近接志向であっても、敵により多くのダメージを与えますが、より高い崖にいる敵を攻撃できるのは遠距離ユニットのみです。一部のユニットはこれらの制限を回避する手段を持っていますが、他のユニットは特にそれらの影響を受けます.
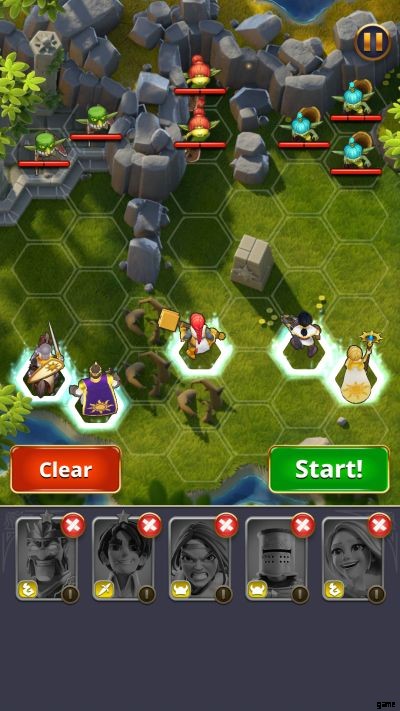
キャンペーン専用またはヒーロー固有の能力を通じて、数に依存してチームを圧倒したり、敵のヒーローの気を散らしたりする一般的なモンスターです。彼らには何の能力もありませんが、他の人と同じルールが適用されます。ヒーローの能力によって召喚されたモンスターは完全に独立しており、プレイヤーの入力なしで移動および攻撃します。
2.ヒーローを知り、管理する
Rivengard のチュートリアルを完了すると、最初に 5 人のヒーローのロックが解除されますが、ショップから入手できるサモニング ポータルからさらに召喚することができます。特定のヒーロー (特にキャンペーンのボスとして遭遇したもの) は、十分な数の召喚シャードを見つけることでロックが解除され、十分なシャードが収集されるとヒーローに自動的に報酬が与えられます。どちらの場合も、サモニング ポータルを使用すると、ゲームのプレミアム通貨であるジェム、またはチェストから授与されるサモニング トークンが使用されます。
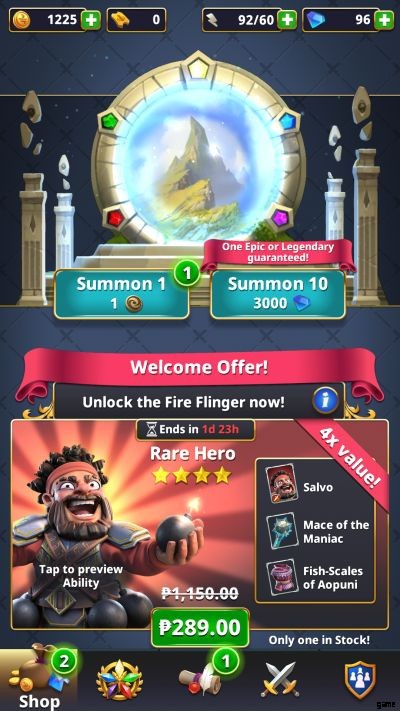
ポータルは 1 回または 10 回使用できます。後者を選択すると、少なくとも 1 つのエピックまたはレジェンダリー ティアの報酬が保証されます。さらに、機器とリソースもポータルから入手できます。ヒーローは、ウォリアー、ローグ、メイジの 3 つのカテゴリに分類されます。ウォリアーはローグにより多くのダメージを与えます。ローグはメイジにより多くのダメージを与えます。魔法使いは戦士により多くのダメージを与えます。
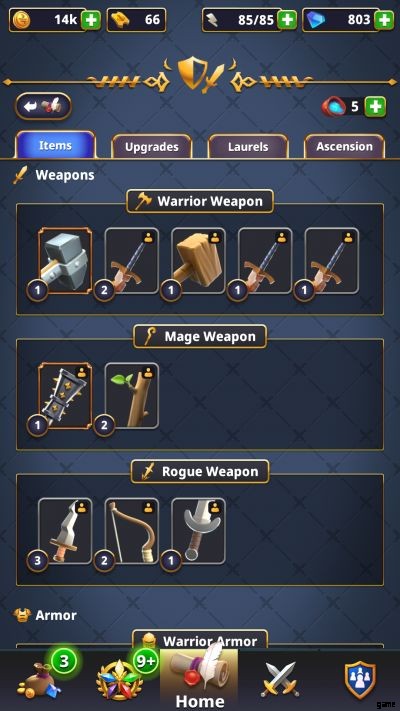
画面の下部にある [ヒーロー] タブから、収集したヒーローと将来のヒーローをすべて表示できます。未取得のヒーローのアイコンはグレー表示されます。個々のヒーローは、たとえ殺されても試合に勝つことによって、またはチェストから授与されたパンフレットを使用することによって経験を積む.ヒーローには 2 つのインベントリがあります。1 つは武器とアーマー用、もう 1 つはステータス アップグレード用です。これらは両方とも、デイリー クエストの完了、チェスト ドロップ、および前述のサモニング ポータルで、ミッションの報酬として見つけることができます。ヒーロー、武器、防具に関する注意事項:
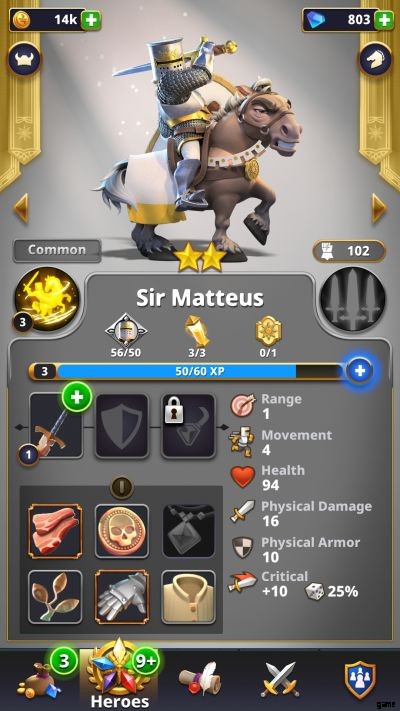
• ヒーロー ゴールドを消費して消費する前に、最大 6 つの統計アップグレードしか受け入れることができず、新しいアップグレードのセットを見つけてローリングします。
• 武器 ヒーローにクリティカル ヒットを与えるチャンスを与えます。これにより、武器自体にも記載されている追加のダメージが追加されます。
• 防具 特定のヒーローの健康と鎧の値を増加させるか、通常のヒーローに影響を与える過剰なダメージで、設定された量のダメージを完全にブロックする機会を与えることができます。アーマー値は、ウォリアーやローグからの攻撃を吸収する物理アーマーと、メイジからの攻撃を吸収し、枯渇するまで持続する魔法アーマーの 2 種類に分けられます。ローグは、個々のヒーローに応じて魔法的または物理的なダメージを受けることができるという点で独特です.
• 武器と防具 ゴールドとアイテムダストを必要とするステータスを改善するために鍛造することができます.アイテムダストは、主に未使用の武器や防具を溶かすことで入手でき、アップグレードに使用したゴールドも返金されます。一部の装備では、ヒーローが特定の希少性である必要があります。これは、Summoning Shards と同じ場所にある Laurels を使用して行うことができます。これには、統計を強化するという追加の利点もあります。
ヒーローのレア度をアップグレードすることは、パッシブ アビリティをアンロックする唯一の方法でもあります。一部のヒーローはより高いレアリティで開始し、最初からパッシブ アビリティをアンロックします。すでに持っているヒーローにサモニング シャードを転がすと、それらは自動的に月桂樹に変換されます。
すべてのヒーローは派閥にグループ化され、それぞれが指定された色 (ライト、グリーン、レッド、ダーク、ブルー) に専念しています (一部の人には馴染みのあるラインナップです)。各色は、他の 2 つの色により多くのダメージを与えます:
• 光属性 ユニットは赤ユニットと闇ユニットにより多くのダメージを与えます:
• 緑寄り ユニットはダークユニットとブルーユニットにより多くのダメージを与えます:
• 赤列 ユニットは青と光のユニットにより多くのダメージを与えます:
• 闇属性 ユニットはライトユニットとグリーンユニットにより多くのダメージを与えます。と
• 青属性 ユニットは緑と赤のユニットにより多くのダメージを与えます。
チュートリアルを進めると、以下にリストされている光属性のラディアント オーダーの 5 人のヒーローすべてのロックが解除されます。
• シグリッド: 最初のヒーロー、信頼できるハンマーで武装した戦士。彼女のアクティブ アビリティにはスピンがあり、隣接するすべての敵にダメージを与えます。一方、パッシブ アビリティは、近くにユニットが 3 体以上いる場合、近くのユニットにダメージを与えます。
• アレウス: 雷を操る魔法使い。彼のアクティブ アビリティは最大 4 人の敵に跳ね返る落雷を投げ、パッシブ アビリティは彼を攻撃した最初の近接敵にダメージを与えます。
• マテウス卿: 茨の中を一ターンも無駄にせずに通り抜ける気高さを誇る寡黙な騎士であり、戦士として数えられる。彼のアクティブな能力は、マテウス卿が能力の使用を控えるほどステータスが増加する一対のスペクトラル ナイトを召喚します。彼の受動的能力は、あなたのターンの開始時に彼がスペクターの 1 人の隣にいる場合、彼を少量回復します。
• モンティ: 自分自身を証明することをいとわない若いアーバレストで、ローグに分類されます。彼のアクティブな能力は、クロスボウからアーマーを無視する強力なボルトを発射し、選択したターゲットのヘルスの最大半分を処理し、ノックバックします。彼のパッシブ アビリティは、移動していなければダメージを増加させます。
• ハンナ: 専用のヒーラーとして機能する別のメイジ。彼女は、敵と同じように味方を選択することで味方を癒すことができます。彼女のアクティブ アビリティは、彼女に隣接するすべての味方をより多く回復し、パッシブ アビリティは誰かを回復するたびに隣接する味方を回復します。
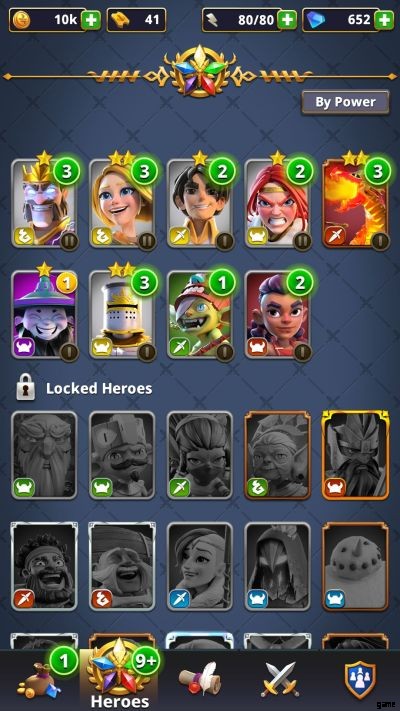
最初の5人に加えて、以下にリストされている追加のヒーローのロックを解除しました.これらはプレイスルーと運によって異なる場合があります:
• 太郎: 闇属性の衰退月出身の格好良い槍兵戦士である彼のポールアームは、マテウス卿のような騎乗したユニットにより多くのダメージを与えます。彼のアクティブな能力は、近くの敵を挑発して彼を攻撃させ、物理攻撃と魔法攻撃の両方から防御する特別なフォース シールドを彼に与えます。彼の受動的能力は、彼がターン終了時に動かなければアーマーを回復します.
• ギボとゴボ: ローグとして数えられる、緑に列するリンジ王朝のゴブリンの槍兵のペア。彼らの槍はまた、騎乗したユニットから追加のダメージを与えます。彼らのアクティブな能力は、敵から2タイル離れた敵をターゲットにし、最も近い空いているタイルに引き寄せ、ダメージを与えます。彼らのパッシブ アビリティは、ターゲットの真後ろにいるすべての人にダメージを与えます。
• サンシャイン: 奇妙なことにローグとして数えられ、他のヒーローとはまったく異なる振る舞いをする、赤属性のブレイジング ブリューの機械式ドラゴン。機械であるということは、彼女は癒される代わりに修理することしかできないことを意味しますが、修理すると鎧も復元されます.彼女はまた、あなたのターンの開始時にアーマーを回復し、翼によって地形の制限や障害物を無視できるため、素早く位置を変えることができます.

彼女のアクティブな能力は、最大 3 つのタイルをターゲットにすることができ、ターゲットが立っているタイルに点火しながらターゲットに大きなダメージを与え、近くの敵にスプラッシュ ダメージを与えることができます。残念ながら、彼女はすぐ隣の敵には使用できません。 Her passive ability, which is unlocked at the beginning due to her higher rarity, causes her to explode on death, damaging friend and foe alike.
• Cinder: A Warrior-Engineer also from the Blazing Brew, she deals and receives extra damage on the start of your turn and can repair mechanical units like Sunshine above. Her active ability allows her to deploy a turret next to her provided she does not move and it automatically fires on any enemy up to two tiles away. Her passive ability restores the physical armor of any allies near her.
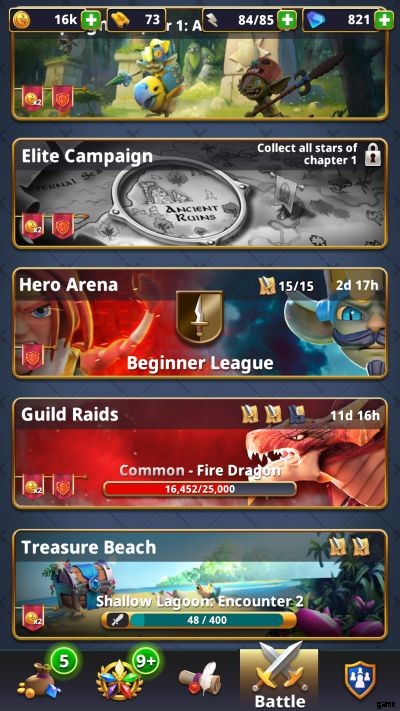
3. Missions And Matches And Marauding, Oh My!
Rivengard has multiple missions you can unlock as you play which are all available via the Battle Tab. The first set of missions you have is the opening campaign where you butt heads with the Rinji Dynasty. Campaign mission performance is ranked with stars, with three stars achieved if all your heroes survive; two stars achieved if at least only one of your heroes is defeated; and one star awarded if only one of heroes is left standing. Each star awards a one-time bonus when you reach it for the first time. Completing a campaign mission in a set number of turns also awards a Lightning Victory bonus.
Should you get all three stars in a given mission, you can run the mission with raid tickets instead, automatically getting the rewards in exchange. However, all campaign missions can only be completed a set number of times and are refreshed at roughly 12:00 AM UTC. Campaign missions also consume stamina, which is refreshed at a quicker pace:one unit of stamina every five minutes.
However, this still limits your daily campaign progression. The campaign will be your primary source of coins, equipment, and Summoning Shards/Laurels. Later on you can unlock the Elite Campaign, which is naturally much harder but offers more lucrative rewards.
If you want to test your heroes’ mettle, you can fight in the Hero Arena, where you select your heroes to take on another player’s collection. The overall power of your heroes is listed by the Power Score value towards the right of the screen, so it is in your best interests to choose an opponent whose Power Score is close to yours.
Unfortunately, the game’s Power Score filtering is not perfect, and you may encounter players with a much higher Power Score than yours. In that case, you can spend a gem to reroll your opponents until you get someone you think you can take on. Winning a set number of fights will reward chests.
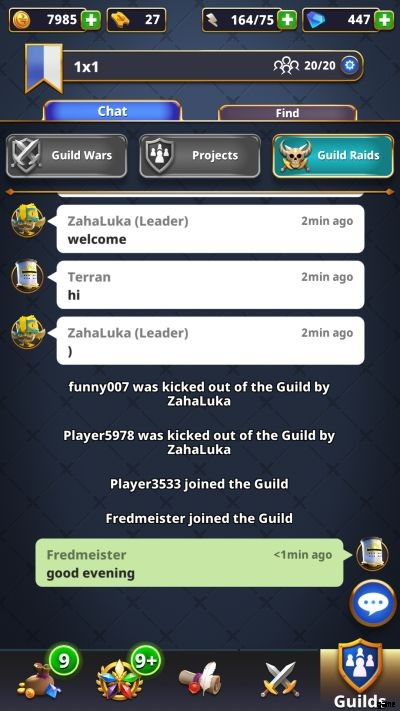
You can also unlock access to guilds, which can hold up to twenty people. These can be filtered by country or by joining an international guild. Guild members have periodic access to a raid (not to be confused with the raid tickets mentioned above) where the guild has to take on dragons of increasing health. Each dragon occupies up to three slots on the map, and pushes away any unit that happens to be beneath their landing site.
Players have a limited number of turns to deal as much damage as possible before the dragon flies off, and players can only engage the raid up to three times a day. Upon the dragon’s defeat, all current guild members are awarded a chest and go on to fight the next dragon.
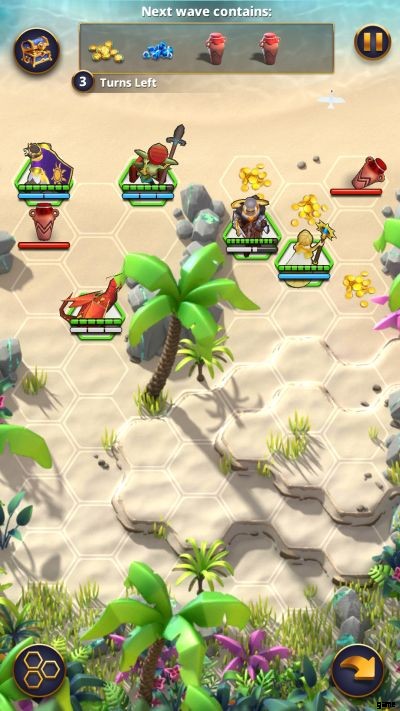
Lastly, you have Treasure Beach, where you command your heroes in gathering riches off the coast, dealing with the occasional enemy that washes ashore. Like raids, you only have a limited number of turns to collect whatever goodies come in and you can only visit the beach twice a day.
In all cases, completing missions, winning matches, and doing general tasks will add up to your Quests and these offer some nice bonuses for completing their requirements. The chests they award are the main source of Summoning Tokens as well.
4. Rules (And Tips) Of War
This section of our Rivengard beginner’s guide is split into two parts:a section for general tips and a section dedicated for beating the first set of bosses in the campaign.

• In all cases, always take a look on what your enemies are composed of , and build your party accordingly. If the enemy team is mostly warriors for instance, build your team towards mages to bypass their physical armor and lay off on rogues unless you have some way of drawing fire away from them.
• Although not much, elemental interactions can tip the scales in your favor ever so slightly , and it really comes into play in guild raids and treasure beach. Some enemies encountered there have the Elemental Affinity passive, which causes them to take double damage against opposing elements.
• Know the terrain of a given map , as it may have things like healing tiles in key areas or chokepoints to place your dedicated tanking heroes in while your ranged heroes can fire away.
• When it comes to summons, save up on Summoning Tokens as they are much easier to come by compared to gems. Go for ten summons each time :you will get more opportunities for rolling either a new hero, or Laurels to increase the rarity of preexisting ones.
Now we will discuss how to beat the esteemed members of the Rinji Dynasty:
• Your first boss is Boulder , a moss-covered golem who can opt to hunker down instead of moving, doubling his health at the expense of reducing his damage and hurting any enemies near him. Thankfully, his lumbering size means that he stops moving once he moves to higher elevations, so it is only a matter of having Areus (as you have yet to unlock Hanna at this point) and Monty focusing on him while Sigrid and Sir Matteus deal with Boulder’s reinforcements.
• Your second set of bosses are Gibbo and Gobbo (yup, the same goblin pair we mentioned earlier in this guide!), who have access to both their active and passive abilities. Be very careful with how you position your forces or else the duo can end up damaging your more fragile units, and they can pull someone out of formation with their active ability. They start off with magical armor, so have your warriors and rogues take them on.
• Your third boss is Sir Florianus , whose avian mount allows him to ignore the thorns that dot his arena., The real danger lies in his passive ability, where he counters the first melee attack he receives in a turn with a full 360 degree sweep.
This means surrounding him becomes quite the gamble, and it makes his active ability, where he damages his target and pushes them one tile back, rather pale by comparison. This can make getting all three stars in his fight quite a pain.
• Your fourth boss is Pari , who can launch a spider’s web that deals damage to any enemy up to two tiles away and damages up to two to three tiles behind her target. The webs are bad enough in that they act like weakened Thorns that dissipate after you cross them. Pari’s passive ability increases the damage she deals to anybody caught in her webs, and allows her to generate webs on any tile she travels to or attacks.
This makes it easy for her to kill one of your heroes on her first turn. Try to lure her closer by staying out of her active ability’s range and use bushes to reduce the damage of her active ability.
• The fifth and last boss of the Rinji Dynasty is Tawa Rinji , who comes with the ability to heal her allies. Her active ability is particularly mean, as she launches twelve to sixteen projectiles that deal low damage to random enemies within three tiles of her.
This is made worse by her passive, which causes any damage from her to bounce to any enemies next to her target, and allows her healing to bounce towards adjacent allies as well. Her active ability does prioritize summoned units however, so the likes of Sir Matteus can be used to bait out her most powerful attack and leave her vulnerable.
In all cases, defeating campaign bosses allows you to acquire their Summoning Shards, unlocking them for your own use. That being said, the Rinji Dynasty’s finest warriors can lend their strengths to you with enough time, as will later bosses you will run into during the campaign.
And that wraps up our beginner’s guide for Rivengard. We hope that our overview of the game, as well as the tips and strategies will come in handy when you decide to try this game out yourself. If you have any tips we might have forgotten or missed, please let us know in the comment area! Good luck and game on!