Dislyte レア エスパー ガイド:各レア エスパーの完全な説明
Dislyte のさまざまなエスパーを分析した後、3 つのエスパー ガイドの最初の部分を紹介します。 77 人のエスパー (および増加中) を使用して、エスパーの希少性に基づいてガイドを分割することにしました。このガイドでは、ゲーム内で入手して遭遇できる 22 種類のレア エスパーの長所と短所について説明します。
このガイドは、あなたがしばらくの間 Dislyte をプレイしており、いくつかの用語に精通していることを前提としています。ただし、ゲームに慣れていない場合は、Dislyte ビギナーズ ガイドをご覧ください。エピックとレジェンダリーのエスパー ガイドもチェックすることをお勧めします!
レア エスパーの個々のガイドに飛び込む前に、彼らの役割と属性について簡単に説明しましょう。
エスパーの役割
エスパーはそれぞれ戦闘で異なる役割を果たします。主な役割は次の 4 つです。
ファイター – 大量のダメージを与えることに集中
サポート – 回復、バフ、デバフでサポート
ディフェンダー – まともなDEFまたはHPを持ち、主な役割は敵の攻撃の鈍器を取ることであるため、通常、敵を彼らに向けるスキルを持っています
コントローラー – 彼らの主な役割は、敵の動きを遅くし、移動や攻撃を防ぐことです
ゲームではエスパーをそのようにラベル付けしていますが、このガイドでは、彼らの能力が何であるかをより正確に説明するために、サブロールでラベル付けしています:
チェーンストライカー – 1ターンに複数回攻撃できるスキルを持つ
範囲 – すべての敵を対象とする攻撃的でダメージを与えるスキルを持っています
ヌーカー – 1 人のターゲットに 1 回の攻撃で大きなダメージを与えるスキルを持つ
関連: Dislyte ティア リスト:すべてのエスパーの完全なランキング
障害者 – AP と SPD を減少させ、敵が使用できるスキルに影響を与え、バフ (フリーズ、バフ ブロッカー、病気、ミス率アップ、石化、沈黙、睡眠、SPD ダウン、スタン、挑発) を削除、取得、転送、ブロックできるスキルを持っています。 、むさぼり食う、パンドラの箱)
衰弱者 – 敵を弱めたりダメージを与えたり、攻撃をより効果的にするデバフを付与するスキルを持っています (ATK ダウン、流血、DEF ダウン、毒、灼熱、ホルスの目、リンク、ネザーブルーム、猫の呪い、パンドラの箱)
バッファ – バフを付与し、AP を増加させ、自分自身または味方を強化できるその他のボーナスを得るスキルを持っている
ヒーラー – ヒーリングスキルを持っています
リバイバー – 復活できます
ディスペラー – デバフを削除、取得、転送できます
このガイドの目的のために、すべてのレアリティのすべてのエスパーの最高および最低の開始レベル統計に基づいて、属性の高低を測定する基本属性範囲の表も作成しました。
開始レベルに基づく基本属性範囲
| 攻撃力 | HP | DEF | SPD | |
| 敬虔 | 325 - 366 | 4,115 - 4,583 | 308 - 341 | 105-107 |
| 素晴らしい | 288 - 324 | 3,649 - 4,114 | 273 - 307 | 102-104 |
| 高 | 251 - 287 | 3,183 - 3,648 | 238 - 272 | 99-101 |
| 良い | 214 - 250 | 2,717 - 3,182 | 203 - 237 | 96-98 |
| 平均 | 177 - 213 | 2,251 - 2,716 | 168 - 202 | 93-95 |
| 低 | 140 - 176 | 1,785 - 2,250 | 133 - 167 | 90-92 |
比較のために、すべてのレア エスパーの基本開始レベル属性と最大レベル属性をリストした表も作成しました。現時点では、C.RATE(10%)、C.DMG(150%)、ACC(0%)、RESIST(20%)の開始レベルと最大レベルのパーセンテージは、すべてのエスパーと SPD 統計で同じようです。レベルアップしても変化しません。
関連: Dislyte Squad フォーメーション ガイド:推奨されるチーム フォーメーション
エスパーレア属性
| ESPER | 攻撃力 (lvl1) | 攻撃力 (Lv60) | HP (レベル 1) | HP (レベル 60) | 防御 (レベル 1) | 防御 (レベル 60) | SPD |
| バードン (バルドル) | 152 | 829 | 2,051 | 11,035 | 200 | 1,082 | 95 |
| Chang Pu (Yao Ji) | 180 | 963 | 2,247 | 12,081 | 157 | 850 | 94 |
| ブリン (ヴァルキリー) | 224 | 1,203 | 1,888 | 10,159 | 140 | 753 | 105 |
| ドリュー (アヌビス) | 221 | 1,144 | 1,924 | 10,343 | 150 | 810 | 91 |
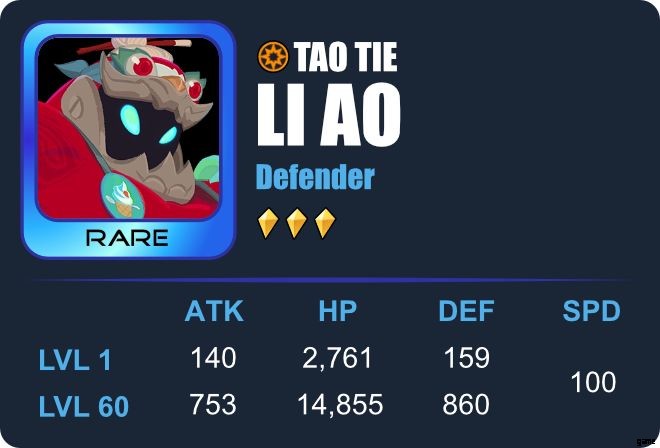
| Li Ao (タオ タイ) | 140 | 753 | 2,761 | 14,855 | 159 | 860 | 100 |
| Q (エロス) | 207 | 1,123 | 2,004 | 10,784 | 148 | 796 | 104 |
| メラニー (メデューサ) | 166 | 886 | 2,247 | 12,081 | 170 | 912 | 102 |
| ゼルマー (セクメト) | 207 | 1,123 | 2,004 | 10,784 | 148 | 796 | 90 |
| ホール (ホドゥール) | 200 | 1,082 | 2,000 | 10,771 | 156 | 849 | 92 |
| Tang Yun (六つ耳のサル) | 211 | 1,144 | 1,860 | 10,002 | 154 | 831 | 95 |
| フレディ (フェンリル) | 224 | 1,203 | 1,974 | 10,629 | 133 | 722 | 91 |
| デビッド (ジェイソン) | 160 | 861 | 2,177 | 11,708 | 182 | 991 | 92 |
| ローレン (ヘケット) | 143 | 780 | 2,566 | 13,798 | 171 | 925 | 92 |
| チャーマーズ (イドゥン) | 207 | 1,123 | 2,004 | 10,784 | 148 | 796 | 95 |
| ベレニス (バステト) | 159 | 860 | 2,381 | 12,810 | 168 | 910 | 97 |
| レイラ (メジェド) | 151 | 811 | 2,653 | 14,269 | 156 | 850 | 94 |
| レオン (ヴァリ) | 217 | 1,173 | 1,785 | 9,608 | 154 | 831 | 92 |
| ヘレナ (ヘレン) | 163 | 874 | 2,631 | 14,152 | 146 | 794 | 94 |
| Ye Suhua (Shao Siming) | 159 | 859 | 2,086 | 11,217 | 191 | 1,031 | 101 |
| Unky Chai (Yue Lao) | 140 | 753 | 2,730 | 14,687 | 162 | 874 | 101 |
| ジャンヌ (ゲルト) | 147 | 795 | 2,710 | 14,577 | 156 | 850 | 102 |
| バイ リウリ (白蛇) | 204 | 1,097 | 2,022 | 10,877 | 150 | 810 | 99 |
凡例:
| レアエスパーの中で最高 | 全エスパーの中で最低 |
それが終わったので、レア エスパーを見てみましょう。
レアエスパー
レアなエスパーは、エコーでレコードを回すときに最も頻繁に表示されます。多くの場合、Low と Average のステータスを持ち、Good と High のステータスを持つこともあり、Excellent と Godly のステータスを持つことはめったにありません。レア エスパーの利点の 1 つは、レア エスパーを強化するためにレゾナンスで使用できる、それらの複製を取得する可能性が高いという事実です。

バードン (バルドル)
役割: ディフェンダー
サブロール: バッファ、無効化
バフ: 防御アップ
デバフ: 気絶、挑発
その他の能力: —
船長の能力: ポイント戦で味方のDEFを24%増加
属性:
平均 SPD &DEF (すべてのレア エスパーの中で最高)
低攻撃力と低HP
スキル:
| ライトシールド | 優等生(パッシブ) | 名誉への上昇 | |
| ターゲット | 敵1体 | 味方のアタッカー | 敵1体 |
| ダメージ/回復 | ダメージ:攻撃力の 100% (最大レベル) | ダメージ:攻撃力の 20% + 防御力の 80% (最大レベル) | ダメージ:攻撃力の 250% (最大レベル) |
| 効果 | 50% (最大レベル) の確率で気絶、1 ターン | — | 防御アップ、2ターン すべての同盟国へ |
| トリガー / クールダウン | — | HPが50%未満の味方が攻撃されると、1ターンに1回発動 | 3 ターン (最大レベル) |
| アセンション アップグレード | — | 60% の確率でターゲットを挑発、2 ターン | — |
推奨 x4 レリック セット:
ウォーマシン、ハデス
推奨 x2 レリック セット:
石脈、剣アバター
Bardon の DEF は、特にすべての味方にも影響を与える Rise to Honor スキルの DEF Up バフを使用する場合に、強力な敵の攻撃を処理することを可能にします。彼の Light Shield の気絶のチャンスと Honorbound の Taunt のチャンス (Ascension でアップグレードすると) は、敵を無力化するのに役立つ可能性があります。
HP が 50% 未満の味方を攻撃する敵を攻撃する彼のパッシブは興味深いスキルかもしれませんが、キャラクターのヘルスを 50% 未満にする必要があるため、必ずしも実用的ではありません。ただし、フレディやキャサリンのようなエスパーは、死にかけているエスパーに対してスタンドオフ (ヘルスを少なくとも 1 HP に保つ) を使用すると、エスパーが死ぬ危険なしにパッシブをより多くトリガーできるため、彼の恩恵を受ける可能性があります。
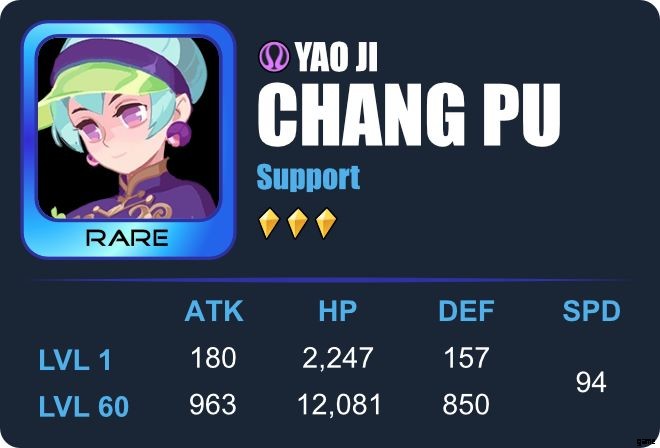
チャン・プ(ヤオ・ジ)
役割: サポート
サブロール: ヒーラー、バッファー、ディスエイブラー
バフ: 免疫
デバフ: —
その他の能力: AP減少、単体回復、味方全員回復
船長の能力: —
属性:
平均攻撃力と速さ
HPとDEFが低い
スキル:
| ヴァクサーのオーブ | 復元 | 更新の祈り | |
| ターゲット | 敵1体 | 味方1人 | すべての味方 |
| ダメージ/回復 | ダメージ:攻撃力の 120% (最大レベル) | 回復:ターゲットの最大 HP の 15% + Chang Pu の攻撃力の 160% (最大レベル) 最大 HP の 10% が失われるたびに付与 + 10% の回復 | 回復:ターゲットの最大 HP の 15% + Chang Pu の ATK の 85% (最大レベル) |
| 効果 | 100% (最大レベル) の確率で AP を 15% 削減 | — | — |
| トリガー / クールダウン | — | 2ターン(最大レベル) | 4 ターン (最大レベル) |
| アセンション アップグレード | — | — | 免疫、2ターン |
推奨 x4 レリック セット:
永遠の万能薬、ウォーマシン
推奨 x2 レリック セット:
Adamantine、Master Grove、Stoneveins
Chang Pu の強みは、彼女のヒーリング スキルにあります。回復 (味方 1 人を回復) と再生の祈り (味方全員を回復) は、味方 / 味方の最大 HP とチェンジ プゥの ATK に依存します。彼女の最後のスキルは、アセンションでアップグレードすると免疫を付与し、味方をデバフから守ります。彼女はまた、敵の AP を減らすこともできる、Vaxar のオーブ スキルでかなりの量のダメージを与えることができます。
多くのプレイヤーは、彼女の回復効果を高めるために常備万能薬セットを装備することを好むかもしれませんが、彼女の攻撃力は回復スキルに直接関係しているため、ウォー マシン セットを装備することも実行可能です。 HP と DEF が低いため、彼女に少しの DEF を与えるか、死ぬのを防ぐことができるエスパーとペアにする必要があるかもしれません。 Abiding Panacea セットを使用してダメージよりもサポートに重点を置く場合は、Fighter Espers と組み合わせるのが最適です。
ブリン(ヴァルキリー)
役割: サポート (ファイター候補)
サブロール: チェーンストライカー、ヌーカー、ディスエイブラー、バッファー、デビリテーター
バフ: 攻撃力アップ
デバフ: SPDダウン、フリーズ、DEFダウン
その他の能力: —
船長の能力: —
属性:
Godly SPD (すべてのレア エスパーの中で最高の SPD)
攻撃力が高い(エスパーの中で最も攻撃力が高く、フレディと並んでいる)
HPとDEFが低い
スキル:
| コールド エッジ | ロックンロール | 女神降臨 | |
| ターゲット | 敵1体 | すべての味方 | 敵1体 |
| ダメージ/回復 | ダメージ:2 ヒット、それぞれ攻撃力の 60% (最大レベル) | — | ダメージ:攻撃力の 300% (最大レベル) |
| 効果 | 50% (最大レベル) の確率で SPD ダウン、2 ターン | 攻撃力アップ、2ターン | 凍結、1ターン |
| トリガー / クールダウン | — | 4 ターン (最大レベル) | 3 ターン (最大レベル) |
| アセンション アップグレード | — | — | DEFダウン、2ターン |
推奨 x4 レリック セット:
ウォーマシン、ウィンドウォーカー、
推奨 x2 レリック セット:
マスターグローブ、燃えるような白熱、ソードアヴァタラ
ブリンはゲーム内でサポートとしてラベル付けされる場合がありますが、このエスパーは間違いなくファイターのようなパンチを詰め込むことができます.すべてのレア エスパー (フレディと同点) の中で最も攻撃力が高く、一部のエピック エスパーをも凌駕しています。 SPDに関しては、彼女は最もSPDの高いエスパー(トリキ)よりわずか2ポイント下にあり、ほとんどの戦闘で最初に攻撃します.彼女は、ロックンロールの ATK Up でチームをバフしたり、コールド エッジで敵の SPD を下げたり、アドベント オブ ゴッデスで敵をフリーズしたりすることで開始できます。彼女の最後のスキルは、攻撃力の 300% ものダメージを与えることができ、アセンションでアップグレードすると敵に DEF ダウン デバフを与えることさえできるため、素晴らしいディフェンダーおよびボス キラーになる可能性があります。
Brynn はどのチームとも連携できますが、HP と DEF が低いため、彼女は簡単なターゲットになる可能性があります。彼女は、彼女を癒して防御力を高めることができるサポート、または彼女の代わりに敵を攻撃するように操作できるディフェンダーと組み合わせるのが最適です.
ドリュー (アヌビス)
役割: ファイター
サブロール: ヌーカー、デビリテーター、バッファー
バフ: —
デバフ: 防御ダウン
その他の能力: クールダウンを減らす
船長の能力: —
属性:
良い攻撃力
HP、DEF、SPDが低い
スキル:
| 突き刺す一撃 | シャドウ ショック | 死の審判 | |
| ターゲット | 敵1体 | 敵1体 | 敵1体 |
| ダメージ/回復 | ダメージ:攻撃力の 130% (最大レベル) | ダメージ:攻撃力の 220% (最大レベル) | ダメージ:攻撃力の 260% (最大レベル) |
| 効果 | 死の審判のクールダウンを 1 ターン短縮 | 85% (最大レベル) の確率で DEF ダウンを付与、2 ターン | ターゲットが死亡した場合、ランダムな敵を攻撃し、攻撃力の 150% のダメージを与える 2回発動可能 |
| トリガー / クールダウン | — | 2ターン(最大レベル) | 3 ターン (最大レベル) |
| アセンション アップグレード | — | — | 敵のDEFを無視 |
推奨 x4 レリック セット:
ウォーマシン、トールのハンマー
推奨 x2 レリック セット:
マスターグローブ、燃えるような白熱、ソードアヴァタラ
Drew は 3 番目のスキルで、1 ターンで最大 3 体の体力の低い敵を一掃するのに優れています。強力な打撃を自身で与えることができる彼の 1 番目と 2 番目のスキルを使用すると、3 番目のスキルがより効果的になります。ピアシング ストライクがクリティカルになると、デス ジャッジメントのクールダウンが 1 短縮されます。 Ascension でアップグレードすると、Death's Judgment のボーナス攻撃は敵の DEF を無視できるため、特に HP と DEF の高い敵に対してはさらに強力になります。
スキルを最大限に活かすにはATKを上げるのが理想的ですが、SPDを上げると死の審判をより早く使用できるようになるため、有利になる可能性があります。ただし、HP と DEF が低いことが問題になる可能性があるため、属性として HP と DEF を持つレリックを選択し、彼を回復およびバフできるサポート エスパーとペアにすることで、戦闘で生き残るのに役立つ可能性があります。また、ドリューが最後のスキルを使用する前に、ほとんどの敵の体力を低下させることができる AoE スキルを持つエスパーと組み合わせるのが最適です。
リー・アオ(タオ・タイ)
役割: ディフェンダー
サブロール: 障害者、ヒーラー
バフ: —
デバフ: 挑発、むさぼり
その他の能力: バフを削除
船長の能力: ポイント戦争で味方のSPDを20%増加
属性:
高 SPD
HPが良い(レアエスパーの中で一番高い)
防御力と攻撃力が低い(全エスパーの中で最も低く、Unky Chaiと並ぶ)
スキル:
| 貪欲な者 | どんちゃん騒ぎ | 檻から出された野獣 | |
| ターゲット | 敵1体 | 敵1体 | 敵1体 |
| ダメージ/回復 | ダメージ:攻撃力の 100% (最大レベル) | ダメージ:攻撃力の 200% (最大レベル) 回復:自身に最大 HP の 5% | ダメージ:最大 HP の 18% (最大レベル) |
| 効果 | 60% (最大レベル) の確率で挑発を与える、1 ターン | 100% (最大レベル) の確率で、ターゲットに影響するすべてのバフを削除 | むさぼり、1ターン 対象のHPが50%以上の場合、むさぼりが2ターン持続する Li Aoが死ぬか、他のチームメイトが生きていない場合、ターゲットはすぐに解放されます |
| トリガー / クールダウン | — | 3 ターン (最大レベル) | 4 ターン (最大レベル) |
| アセンション アップグレード | — | 解除されたバフごとに最大HPの3%のLi Aoを回復 | — |
推奨 x4 レリック セット:
ウィンド ウォーカー、オーシャン ウェーブズ
推奨 x2 レリック セット:
マスターグローブ、アダマンティン
Li Ao の最も重要なステータスは HP です。Binge スキルは HP の 5% を使用して自分自身を回復します (また、Ascension でアップグレードすると、バフを解除するごとに追加で 3% を使用します)。Uncaged Beast スキルは、HP の最大 18% をダメージ。
彼の ATK は彼の最大の特徴ではないかもしれませんが、無効化するデバフと高い SPD でそれを補っています。彼の Ravenous One スキルの Taunt デバフは敵のターゲットを彼だけにし、Uncaged Beast スキルの Devour デバフは敵が能力を使用できないようにします。 Binge を使用すると、ターゲットに影響を与えるすべてのバフを解除する機会があり、バフに依存するエスパーにとっては悲惨な結果になる可能性があります。その上、彼の高い SPD により、彼は貪欲と挑発を頻繁に使用し、戦闘の開始時に敵がスキルを使用するのを防ぎます.
ハードヒッターがそれを利用する可能性があるため、彼の低いDEFは問題になる可能性があるため、DPSの多い強力なチームと戦う場合は、それを防ぐために彼を別のディスエイブラーとペアにするか、彼を生き続けるために彼を癒すかバフできるサポートをペアリングする必要があります、特にチェーンストライカー。遺物については、彼の HP、DEF、または SPD を増やすことに集中してください。
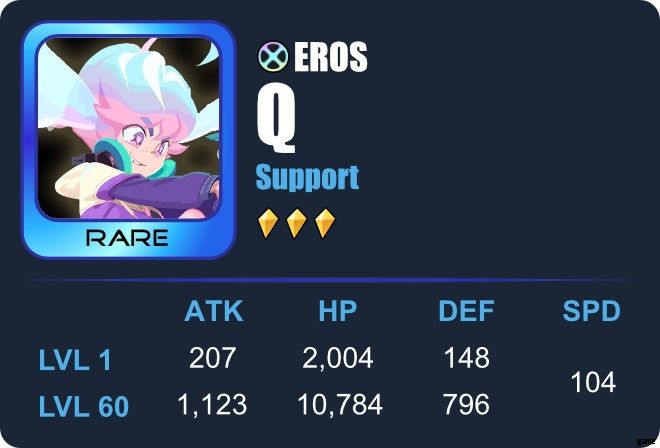
Q (エロス)
役割: サポート (ファイター候補)
サブロール: AoE、デビリテーター
バフ: —
デバフ: DEFダウン、ATKダウン、リンク
その他の能力: —
船長の能力: —
属性:
優れた SPD
平均攻撃力
HPとDEFが低い
スキル:
| 恋人の呪い | ハートブレイカー | オードのジョーク | |
| ターゲット | 敵1体 | すべての敵 | 選ばれた敵 1 体 + ランダムな敵 1 体 |
| ダメージ/回復 | ダメージ:攻撃力の 120% (最大レベル) | ダメージ:攻撃力の 100% (最大レベル) | ダメージ:攻撃力の 180% (最大レベル) |
| 効果 | 75% (最大レベル) の確率で DEF ダウンを付与、2 ターン | 75% (最大レベル) の確率で攻撃力ダウン、2 ターン | 2 体の敵をリンク、2 ターン |
| トリガー / クールダウン | — | 2ターン(最大レベル) | 3 ターン (最大レベル) |
| アセンション アップグレード | — | — | リンクは3ターン続く |
推奨 x4 レリック セット:
ウォーマシン、海の波
推奨 x2 レリック セット:
燃えるような白熱、マスターグローブ
Qはサポートに分類されるかもしれませんが、彼のスキルは彼がファイターであることを証明しています.彼の攻撃はそれぞれ良いダメージを与え、戦闘で彼を致命的にするデバフを持っています. Lover's Curse は DEF Down を与えることができ、Heartbreaker は ATK Down を与えることができ、Joke of the Aether は 2 人の敵をリンクし、両方の敵が他のペアに 80% のダメージを共有します。彼のスキルは、1 つのターゲットに対して 1 つ、すべての敵に対して 1 つ、2 つの敵に対して 1 つあるため、非常に用途が広いです。
Joke of the Aether は、さまざまな敵に対していくつかの戦略で使用できます。リンクを使用すると、敵がステルス モードの場合など、場合によってはターゲットにできない敵に Q でダメージを与えることができます。付着した敵を攻撃するとステルス状態の敵に80%のDEF無視ダメージを与えるので、DEFの高いエスパーにとってはまさに悪夢です。 2 人の敵が AoE スキルで攻撃された場合、両方にほぼ 2 倍のダメージを与えます。
残念ながら、リンクする敵は 1 つしか選択できず、もう 1 つはランダムに選択されます。運が良ければ自分に不利な属性の敵と自分に有利な属性の敵がペアになることもあります。不利な敵に集中すると、リンクなしで通常攻撃するよりも、有利な敵により多くのダメージを与えることができます。 Q に Ocean Waves を装備して 30% の確率でクールダウンを短縮するか、クールダウンを短縮できるエスパーとペアにすると、一度に複数のリンクを設定できるようになります。
Q を使用する際の主な欠点の 1 つは、HP と DEF が低いことです。そのため、高ダメージを与える敵のターゲットになりやすいため、レリックに HP と DEF 属性を装備することを検討してください。彼は、彼を生かし続けることができるヒーラーまたはサポートと組み合わせるのが最適です.
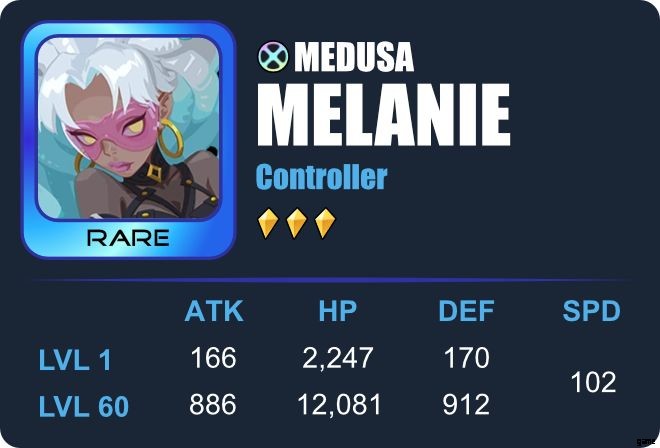
メラニー(メデューサ)
役割: コントローラー
サブロール: ディスエイブラー、AoE、ディスペラー
バフ: —
デバフ: 石化
その他の能力: APを減らし、ターゲットにデバフを転送
船長の能力: 味方のSPDを15%増加
属性:
優れた SPD
平均防御力
低攻撃力、低HP
スキル:
| 致命的な視線 | 罰の誓約(パッシブ) | 夜の女王 | |
| ターゲット | 敵1体 | 1 / すべての敵 | すべての敵 |
| ダメージ/回復 | ダメージ:攻撃力の 120% (最大レベル) | — | ダメージ:攻撃力の 100% (最大レベル) |
| 効果 | 75% (最大レベル) の確率でターゲットにデバフを転送 | 攻撃ごとに、ターゲットの AP が 15% 減少します ターゲットのAPが30%未満の場合、石化を1ターン与える | 100% (最大レベル) の確率で AP を 15% 削減 |
| トリガー / クールダウン | — | 4ターン | 4ターン |
| アセンション アップグレード | — | — | ターゲットがデバフされている場合、AP をさらに 15% 減らします |
推奨 x4 レリック セット:
ウィンド ウォーカー、オーシャン ウェーブズ
推奨 x2 レリック セット:
アポロの弓、マスター グローブ、ソード アヴァタラ
メラニーは、間違いなくゲームで最高のコントローラーの 1 つです。彼女の優れた SPD は、SPD を増加させる船長の能力、AP を減少させるスキル、デバフ転送、石化と組み合わされており、彼女と彼女のチームは、敵が攻撃する前に攻撃を次々と行うことができます。クイーン・オブ・ザ・ナイトの使用中に罰の誓約が発動された場合、AP減少はスタックし、敵のすべてまたはほとんどを石化させる可能性が高くなります.ゲームの開始時にこのスキルを使用して、チームに優位性をもたらします。
メラニーの弱点はATKとHPが低いこと。無効化スキルを最大限に活用するために、より多くのダメージを与えることができるエスパーと組み合わせてください。また、彼女を治癒して生かしておくことができるサポートとペアにすることもできます。遺物で彼女の SPD をさらに増加させ、DEF または HP 属性を追加して生存率を高めることができます。
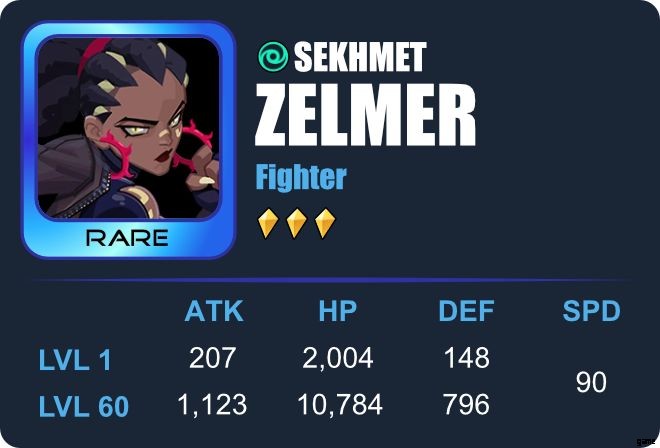
ゼルマー(セクメト)
役割: ファイター
サブロール: チェーンストライカー、デビリテーター、ヌーカー、ディスペラー
バフ: —
デバフ: DEFダウン、流血
その他の能力: 連鎖攻撃、ターゲットにデバフを転送
船長の能力: —
属性:
平均攻撃力
HP、DEF、SPDが低い
スキル:
| ビーストアタック | ハンター | 緋色の潮流 | |
| ターゲット | 敵1体 | 敵1体 | 敵1体 |
| ダメージ/回復 | ダメージ:2 ヒット、それぞれ攻撃力の 60% (最大レベル) | ダメージ:3 ヒット、それぞれ攻撃力の 80% (最大レベル) | ダメージ:攻撃力の 250% (最大レベル) 敵がデバフを受けている場合、デバフごとに +20% のダメージを与える (最大 120%) |
| Effects | 35% (max lvl) chance of inflicting DEF Down, 2 turns | 30% chance of transferring debuff to target | — |
| Triggers / Cooldown | — | 2 turns (max lvl) | 4 turns (max lvl) |
| Ascension Upgrade | — | If critical is triggered, inflict Bleed, 2 turns | — |
Recommended x4 Relic Sets:
War Machine, Hades, Hammer of Thor
Recommended x2 Relic Sets:
Fiery Incandescence, Sword Avatara, Master Grove
Zelmer greatly benefits from debuffs casted on both sides. Not only can she inflict debuffs (DEF Down with Hunter &Bleed with Beast Attack (when upgraded in Ascension)), but she can also transfer debuffs casted on herself back to her target. Aside from this, she deals bonus damage per debuff placed on the target when using her last skill, Scarlet Tides.
However, while her ATK is decent, her initial stats in HP, DEF and SPD is low and may spell trouble for her if she is put up against Espers that can hit hard and move fast. While supplementing her with relics that increase her ATK would help her destroy her enemies faster, giving her some relics with HP or DEF attributes could help keep her in battle. She is best paired with Controllers, Disablers or any Esper that can cast multiple debuffs in order to maximize her abilities.
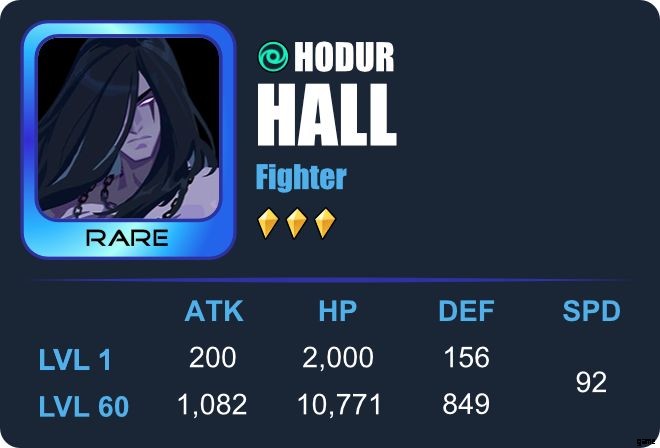
Hall (Hodur)
Role: Fighter
Sub Roles: Debilitator
Buffs: —
Debuffs: ATK Down, DEF Down, Poison
Other Abilities: Attacks a target after an ally does a 1 target attack
Captain Ability: Increase ally C. RATE in Ritual and Sonic Miracles by 20%
Attributes:
Average ATK
Low HP, DEF &SPD
Skills:
| Arrow of Eternal Solitude | Mistletoe Hunter (Passive) | Silent Night | |
| Target | 1 Enemy | Single targets that allies attack | 2 Random Enemies |
| Damage / Heal | Damage:110% (max lvl) of ATK | Damage:40% (max lvl) of ATK | Damage:180% (max lvl) of ATK |
| Effects | 40% (max lvl) chance of inflicting ATK Down, 2 turns | — | 80% (max lvl) chance of inflicting DEF Down and Poison, 2 turns |
| Triggers / Cooldown | — | Each time an ally attacks individual targets | 4 turns (max lvl) |
| Ascension Upgrade | — | Poison, 1 turn | — |
Recommended x4 Relic Sets:
War Machine, Hades, Hammer of Thor, Tyranny of Zeus
Recommended x2 Relic Sets:
Fiery Incandescence, Apollo’s Bow, The Enchanter
Hall makes for a good Fighter as his skills can deal a good amount of damage but also debilitate his enemies with ATK Down, DEF Down and Poison. His passive skill, Mistletoe Hunter, can be a real game changer when paired with the right Esper. Each time Hall’s allies attack individual targets, he attacks the same target straight after. Once upgraded in Ascension, his passive can also inflict Poison. Unlike other Espers with passives, this one does not have a cooldown and will always trigger, letting him deliver strike after strike. Since the ATK percentage of the passive skill is not very high, increasing this Esper’s C. RATE and C. DMG or equipping him with relics that can add more debuffs or extend its turns can make it more effective.
Hall has low HP, DEF and SPD so he needs to be equipped with relics that can increase them and be paired with Espers that can keep him from dying. He is also best paired with Espers that have strong 1-target skills, especially Chain Strikers.

Tang Yun (Six-Eared Macaque)
Role: Fighter
Sub Roles: Disabler, Chain Striker
Buffs: —
Debuffs: Stun
Other Abilities: Pursuit
Captain Ability: Increases ally ATK by 18%
Attributes:
Average ATK &SPD
Low HP &DEF
Skills:
| Iron Polearm | Talisman of Inward Devilry | Avatara | |
| Target | 1 Enemy | 1 Enemy | 1 Enemy |
| Damage / Heal | Damage:130% (max lvl) of ATK | Damage:2 hits, 120% (max lvl) of ATK each | Damage:3 hits, 100% (max lvl) of ATK each |
| Effects | 40% chance of inflicting Stun, 1 turn 30% chance of triggering Pursuit through Iron Polearm | 50% chance of triggering Pursuit through Iron Polearm | Critical hit triggers Pursuit through Iron Polearm |
| Triggers / Cooldown | — | 3 turns (max lvl) | 3 turns (max lvl) |
| Ascension Upgrade | — | Ignores 40% of enemy DEF | — |
Recommended x4 Relic Sets:
War Machine, Hades, Hammer of Thor, Tyranny of Zeus
Recommended x2 Relic Sets:
Fiery Incandescence, Sword Avatara
Tang Yun’s skills revolve around Pursuit through Iron Polearm which triggers chain attacks. With Talisman of Inward Devilry, his second skill which attacks the enemy two times, Pursuit has a 50% chance to trigger and may even ignore 40% of enemy’s DEF once upgraded in Ascension. With Avatara, his third skill which lets him attack an enemy three times, Pursuit is triggered when he gets a critical hit.
Equipping him with relics that increase his C. RATE (Fiery Incandescence) or grant him counterattack (Sword Avatara) when taking damage can let him fully utilize his Pursuit ability. He is best paired with Support Espers that can heal and buff him or Espers that can play off his Pursuit ability like Hall (Hodur)’s Passive, Mistletoe Hunter, which makes him attack right after an ally attacks a single target. There are even instances where he will trigger a Pursuit right after it.

Freddy (Fenrir)
Role: Fighter
Sub Roles: Buffer, Chain Striker, Nuker
Buffs: ATK Up, Standoff
Debuffs: —
Other Abilities: Deals more damage the lower his HP is
Captain Ability: —
Attributes:
Good ATK (Highest ATK among all Espers, tied with Brynn)
Low SPD, HP &DEF (Lowest DEF among all Espers)
Skills:
| Claw of Greed | Wolf Strike | Thrill of the Hunt | |
| Target | 1 Enemy | 1 Enemy | 1 Enemy |
| Damage / Heal | Damage:120% (max lvl) of ATK | Damage:210% (max lvl) of ATK | Damage:260% (max lvl) of ATK + 5% damage per 10% HP Freddy has lost |
| Effects | If Freddy has less than 50% HP remaining, attack again with: 120% of ATK as damage 30% C. RATE Ignore 20% DEF | ATK Up, 2 turns | Remove 2 buffs from enemy |
| Triggers / Cooldown | — | 3 turns (max lvl) | 4 turns (max lvl) |
| Ascension Upgrade | — | Standoff, 2 turns | — |
Recommended x4 Relic Sets:
War Machine, Hades
Recommended x2 Relic Sets:
Fiery Incandescence, Sword Avatara
Freddy may have low DEF, but he uses this to his advantage since he gets stronger the lower his HP percentage is. When he uses Claw of Greed, he will attack again if he only has 50% HP remaining. His third skill, Thrill of the Hunt deals an additional 5% damage for every 10% HP lost while dispelling 2 of their buffs.
Having low HP for a significant period of time may be disastrous for most Espers, but once his second skill has been upgraded in Ascension, Wolf Strike will let him gain not only ATK Up but also Standoff which lasts for 2 turns. This would be enough time for him to deal lots of damage to his enemies. Target enemies with the highest HP and DEF or the ones that can heal to make the most of it. He is best paired with Espers that can revive or Espers that can heal him once or before his Standoff buff wears off. You may also consider equipping him with a relic set that can give him a chance to counter attack (Sword Avatara) so he can get more attacks in before the buff expires.
David (Jason)
Role: Fighter (Possible Defender)
Sub Roles: Disabler, Debilitator, Chain Striker, Dispeller
Buffs: —
Debuffs: ATK Down, Taunt, Stun
Other Abilities: Steals Buffs, Remove Debuffs
Captain Ability: —
Attributes:
Average DEF
Low ATK, HP, SPD
Skills:
| Roundhouse Dance | Moonwalk (Passive) | Curtain Call | |
| Target | 1 Enemy | Self + 1 Random Enemy | 1 Enemy |
| Damage / Heal | Damage:130% (max lvl) of ATK | — | Damage:3 hits, 60% of ATK each + Finishing Strike Damage:85% (max lvl) of ATK |
| Effects | 100% (max lvl) chance of inflicting ATK Down, 2 turns | Remove a debuff Taunt a random enemy, 1 turn | Steals 3 buffs from enemy, each buff empowering finishing strike to reduce the target’s AP by 30% Stun, 1 turn |
| Triggers / Cooldown | — | If David is disabled from taking action before his turn starts | 5 turns (max lvl) |
| Ascension Upgrade | — | Skill has 30% chance to trigger after David is attacked | — |
Recommended x4 Relic Sets:
War Machine, Wind Walker, Snow Dowager
Recommended x2 Relic Sets:
Apollo’s Bow, Fiery Incandescence, Stoneveins Set
David may be categorized as a Fighter but his stats and skills show that he can be a Defender. His Roundhouse Dance skill’s ATK Down paired with his Moonwalk skill’s Taunt and ability to dispel debuffs create a powerful combination that works well for a Defender. Once Moonwalk is upgraded in Ascension, this ability will have a chance to trigger after David is attacked. His third and strongest skill, Curtain Call, lets him attack an enemy three times while stealing up to 3 buffs which empowers his finishing move to reduce the target’s AP by 30% while also stunning the target.
Based on his skills, he may be a strong counter against groups of enemies that cast a lot of buffs and seems to pair well with low HP or DEF characters since he could Taunt enemies into focusing their attacks on him. Increasing his DEF or SPD with relics may potentially be useful if you decide to build him as a Defender. Alternatively, you can focus on building his ATK and equipping him a Fiery Incandescence Set for critical hits.
Lauren (Heket)
Role: Support
Sub Roles: Healer, Disabler, Reviver, Buffer
Buffs: —
Debuffs: SPD Down
Other Abilities: Increase AP, Single-Target Healing, Bonus Turn, Revive
Captain Ability: Increases ally DEF by 18%
Attributes:
Average HP &DEF
Low ATK, SPD
Skills:
| Leapfrog | Brush of Vitality | Healing Water | |
| Target | 1 Enemy | 1 Ally | 1 Ally |
| Damage / Heal | Damage:120% (max lvl) of ATK | Heal:40% (max lvl) of ally’s max HP at the cost of 20% HP | Heal:20% (max lvl) of ally’s max HP |
| Effects | 40% chance of inflicting SPD Down, 2 turns | Increase target’s AP by 50% | Bonus Turn (Self) |
| Triggers / Cooldown | — | 3 turns (max lvl) | 4 turns (max lvl) |
| Ascension Upgrade | — | — | If selected teammate is dead, revive with 30% of their max HP |
Recommended x4 Relic Sets:
Abiding Panacea, Ocean Waves
Recommended x2 Relic Sets:
Master Grove, Adamantine
Lauren is a Healer that has decent HP and DEF and one of the only Espers that can revive fallen allies. Her Brush of Vitality skill sacrifices some of her own health in order to heal an ally while her Healing Water skill heals and grants a bonus turn. Once upgraded in Ascension, she can resurrect a dead ally with 30% of their max HP remaining, making her a hidden gem among Rare Espers. Aside from her healing skills, her Leapfrog skill can deal damage and has a chance to inflict SPD Down which balances out her low SPD.
Since her skills can decrease her HP by a percentage with her second skill, equipping her with relics with HP attributes is ideal. She may also benefit from relics with SPD attributes. She is best paired with other Fighter Espers that have low HP and DEF that need a lot of Support.
Chalmers (Idun)
Role: Fighter
Sub Role: Disabler, Nuker, Chain Striker
Buffs: —
Debuffs: Diseased, Buff Blocker
Other Abilities: Sacrifices HP to attack
Captain Ability: —
Attributes:
Average ATK &SPD
Low HP &DEF
Skills:
| Gold Ray | Vita Lightbeam | Gold Pulse | |
| Target | 1 Enemy | 1 Enemy | 1 Enemy |
| Damage / Heal | Damage:120% (max lvl) of ATK + 3% of target’s max HP (should not exceed 100% of Chalmer’s ATK) | Damage:2 hits, 75% (max lvl) of ATK each | Damage:120% (max lvl) of ATK + 10% of target’s max HP (should not exceed 300% of Chalmer’s ATK) |
| Effects | Consumes 5% of Chalmer’s current HP | 60% (max lvl) chance of inflicting Diseased, 2 turns | Consumes 40% of Chalmer’s current HP Inflicts Buff Blocker, 2 turns |
| Triggers / Cooldown | — | 3 turns (max lvl) | 4 turns (max lvl) |
| Ascension Upgrade | — | If target’s HP ceiling is higher than Chalmers, each strike deals extra damage equal to 3% of target’s max HP (should not exceed 100% of Chalmer’s ATK) | — |
Recommended x4 Relic Sets:
Hades, War Machine
Recommended x2 Relic Sets:
Fiery Incandescence, Sword Avatara
Chalmer’s skill set greatly depends on his enemies having more HP than him and him having more ATK.
All of his skills deal extra damage equal to a percentage of the target’s max HP but it cannot exceed a certain percentage of his ATK. For his Gold Ray and Gold Pulse skills, it’s important to note that they sacrifice Chalmer’s current HP and not max HP which means the lesser the HP Chalmer currently has, the lesser the HP sacrificed will be.
It may be good to build up his ATK with relics and pair him with a Healer since his skills will keep eating up his HP. While the way his damage output is calculated seems odd, this actually makes him really strong against high HP enemies or Bosses since he benefits greatly from it for his extra damage.

Berenice (Bastet)
Role: サポート
Sub Roles: Chain Striker, Disabler, Buffer, Debilitator, Healer
Buffs: Shield, Recovery
Debuffs: DEF Down
Other Abilities: Reduce AP, Chain Attacks
Captain Ability: Increases ally RESIST by 20%
Attributes:
Good SPD
Average HP &DEF
Low ATK
Skills:
| Feline Grace | Instant Combo | Moon Dance | |
| Target | 1 Enemy | 1 Enemy | All Allies |
| Damage / Heal | Damage:3 hits, 40% (max lvl) of ATK each | Damage:3 hits, 60% (max lvl) of ATK each | — |
| Effects | 30% (max lvl) chance of inflicting DEF Down, 2 turns | 50% (max lvl) chance of reducing target’s AP by 15% | Shield:22% (max lvl) of Berenice’s max HP, 2 turns If ally is buffed, grant +30% shield |
| Triggers / Cooldown | — | 3 turns (max lvl) | 3 turns (max lvl) |
| Ascension Upgrade | — | — | Recovery, 2 turns |
Recommended x4 Relic Sets:
Wind Walker, Ocean Waves
Recommended x2 Relic Sets:
Adamantine, Master Grove
Berenice’s first and second skills both deal 3 hits with Feline Grace inflicting DEF Down and Instant Combo reducing AP. Moon Dance on the other hand grants all allies a shield equal to a percentage of Berenice’s max HP, granting even more if the ally is buffed. Once upgraded in Ascension, it grants Recovery, allowing her to heal her allies.
Healing, chain attacks, debuffs, buffs and AP reduction paired with her good SPD and average HP and DEF makes her a sturdy Support that can also fight back. However, her downside lies in the fact that her starting ATK is low and you need to build it up with relics to make the most of it if you want to give her more fighting power. Concentrate on HP to increase her Shield’s effectiveness. Adding more SPD or equipping her with a relic that reduces cooldown (Ocean Waves) will allow her to use her skills more often. Because of the flexible nature of this Esper, she can be added to any team.
Layla (Medjed)
Role: Fighter
Sub Roles: Chain Striker, Disabler, Debilitator, Nuker, AoE
Buffs: —
Debuffs: Stun, Diseased, Poison
Other Abilities: Bonus damage to Poisoned targets, Chain Attacks
Captain Ability: —
Attributes:
Average HP &SPD
Low ATK &DEF
Skills:
| Fainting Lightwave | Berserker Ray | Gaze of the True God | |
| Target | 1 Enemy | 1 Enemy | All Enemies |
| Damage / Heal | Damage:120% (max lvl) of ATK | Damage:200% (max lvl) of ATK | Damage:2 hits, 55% (max lvl) of ATK each |
| Effects | 40% (max lvl) chance of inflicting Stun, 1 turn | Transfers 1 debuff from each ally to an enemy 75% (max lvl) chance of inflicting Diseased, 2 turns | 100% (max lvl) chance of inflicting Poison, 3 turns |
| Triggers / Cooldown | — | 3 turns (max lvl) | 4 turns (max lvl) |
| Ascension Upgrade | — | Deals +100% bonus damage to Poisoned targets | — |
Recommended x4 Relic Sets:
Wind Walker, Ocean Waves
Recommended x2 Relic Sets:
Apollo’s Bow, Master Grove
Layla’s build centers around inflicting debuffs with an inclination to Poison. Berserker Ray, once upgraded in Ascension, would let her deal 300% damage to poisoned targets. Pair that with the skill’s Diseased debuff and her two other skills’ Stun and Poison debuffs, Layla can have a significant effect on long battles against high HP and DEF enemies. Her Diseased debuff alone is a Healer’s nightmare.
Layla’s skill set also makes her a great Esper to use against enemies with debuffs and works well paired with allies that can inflict Poison. While ATK bonuses are usually the focus of most Fighters, in Layla’s case, she works best when equipped with relics that increase her SPD (Wind Walker), or decrease her cooldowns (Ocean Waves).
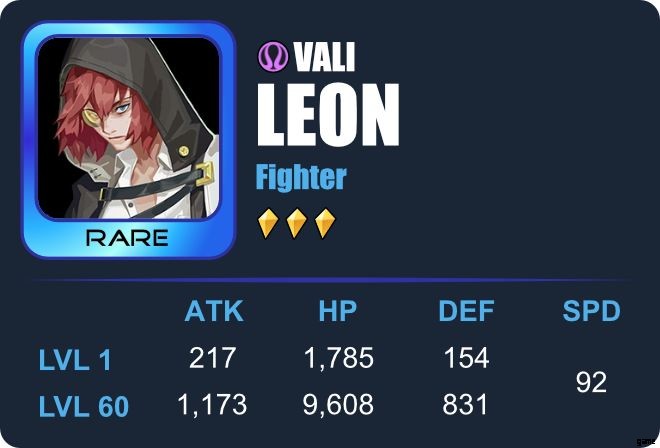
Leon (Vali)
Role: Fighter
Sub Roles: Debilitator, Nuker, Dispeller, Disabler
Buffs: —
Debuffs: Diseased, Sear
Other Abilities: Transfers Debuffs to target
Captain Ability: Increase ally C. RATE by 15%
Attributes:
Good ATK
Low DEF, SPD &HP (Lowest among all Espers of all rarities)
Skills:
| Coldhearted | Eye for an Eye (Passive) | Marked | |
| Target | 1 Enemy | 1 Enemy | 1 Enemy |
| Damage / Heal | Damage:140% (max lvl) of ATK | — | Damage:300% (max lvl) of ATK |
| Effects | 100% (max lvl) chance of inflicting Diseased, 2 turns | Transfers 1 debuff from Leon to the target | Sear, 2 turns |
| Triggers / Cooldown | — | Before each attack | 4 turns |
| Ascension Upgrade | — | — | If target is affected by any debuffs, attack will crit |
Recommended x4 Relic Sets:
War Machine
Recommended x2 Relic Sets:
Fiery Incandescence, Apollo’s Bow, Sword Avatara
Leon is a strong Fighter with a good ATK starting stat and relies on debuffs to make his skills more effective. His first two skills can make his third skill scarily effective once it has been upgraded in Ascension since it will make the attack more likely to trigger a Critical Hit if the target is affected by any debuffs.
Pairing Leon with Disablers and any other Espers with debuffs will make him a force to be reckoned with, especially when he is assigned Captain which increases ally C. RATE by 15%. However, his low HP, DEF &SPD can make him an easy target by other Fighters so keep that in mind when choosing which attributes to put in his relics. Pairing him with Supports that can buff and heal would also benefit him in battle.
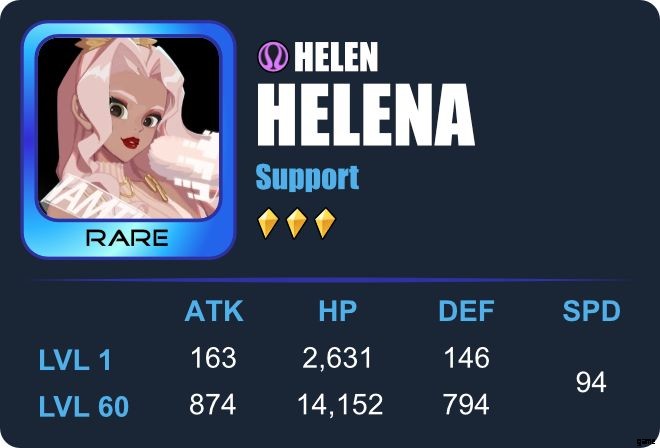
Helena (Helen)
Role: Support
Sub Roles: Healer, Disabler, Chain Striker
Buffs: C. RATE Up
Debuffs: —
Other Abilities: Reduces AP, Removes Buffs, All-Ally Healing, Chain Attacks
Captain Ability: —
Attributes:
Average HP &SPD
Low ATK &DEF
Skills:
| Downfall | Poetry | Whispered Blessing | |
| Target | 1 Enemy | 1 Enemy | 1 Chosen Ally + Other Allies |
| Damage / Heal | Damage:120% (max lvl) of ATK | Damage:2 hits, 90% (max lvl) of ATK each | Heal:30% (max lvl) of Chosen Ally’s max HP Heal:15% (max lvl) of Other Allies’ max HP |
| Effects | 100% (max lvl) chance to dispel a buff | Reduce AP by 15% | — |
| Triggers / Cooldown | — | 3 turns (max lvl) | 3 turns (max lvl) |
| Ascension Upgrade | — | — | C. Rate to all allies, 2 turns |
Recommended x4 Relic Sets:
Abiding Panacea, Wind Walker, Ocean Waves
Recommended x2 Relic Sets:
Master Grove, Adamantine, Stoneveins
Helena’s best skill is Whispered Blessing which can heal one chosen ally up to 30% of their max HP while the rest of your allies get 15% of their max HP healed. Once upgraded in Ascension, it can grant all allies C. RATE Up which can benefit a lot of Fighters, especially ones that have high C. DMG. Since her ATK is pretty low, this skill balances that out and makes her two other damage skills, which dispels an enemy’s buff and reduces an enemy’s AP, deal more damage.
She may have decent HP &SPD but low DEF so it may help her survive longer if equipped with relics that can increase her HP or DEF. The Abiding Panacea Set, which increases Healing Efficacy, may be your best bet to maximize her third skill. Alternatively, you can equip her with Wind Walker to increase SPD or Ocean Waves for a chance to lessen cooldowns. She can be placed on any team but is best paired with Fighter Espers.
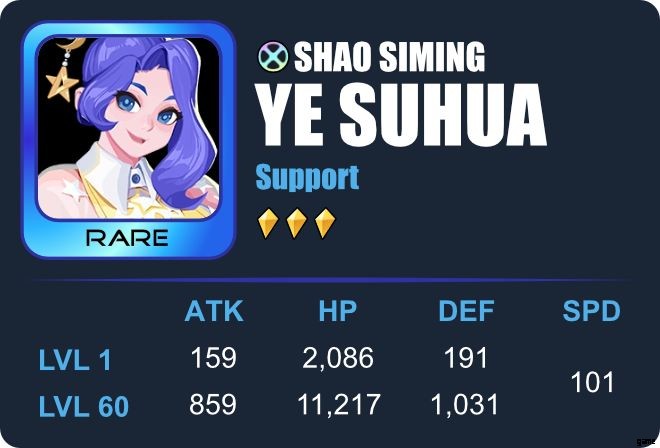
Ye Suhua (Shao Siming)
Role: Support
Sub Roles: Healer, Buffer, Debilitator
Buffs: Invincibility, Recovery, ATK Up, DEF Up
Debuffs: ATK Down
Other Abilities: Single-target Healing
Captain Ability: —
Attributes:
High SPD
Average DEF
Low ATK &HP
Skills:
| Stardust | Astral Guardian | Star Dancer | |
| Target | 1 Enemy | 1 Ally | All Allies |
| Damage / Heal | Damage:130% (max lvl) of ATK | Heal:30% (max lvl) of target’s max HP | — |
| Effects | 70% (max lvl) chance to inflict ATK Down, 2 turns | Invincibility, 1 turn | ATK Up + DEF Up, 2 turns |
| Triggers / Cooldown | — | 3 turns (max lvl) | 3 turns (max lvl) |
| Ascension Upgrade | — | If teammate has less than 50% HP, healing amount doubles + Grant Recovery, 2 turns | — |
Recommended x4 Relic Sets:
Wind Walker, Abiding Panacea
Recommended x2 Relic Sets:
Master Grove, Adamantine, Stoneveins
Ye Suhua is a sturdy Support with average DEF and high SPD. Her most important skill is Astral Guardian, which can heal a teammate for 30% of their HP while also granting them Invincibility. Once upgraded in Ascension, it would double the healing amount and grant Recovery if the target has less than 50% HP, making it one of the strongest healing skills in the game. As for her two other skills, Stardust, her only offensive skill, deals damage and has a chance to inflict ATK Down while Star Dancer buffs her allies with ATK Up and DEF Up.
While her SPD is already pretty high, raising it even more will let her pass her turns quickly, letting her use her buffs and healing skills more often to aid the team. She may work well when paired with Unky Chai since he can decrease cooldowns if allies already have an ATK Up buff on them which she can also cast.

Unky Chai (Yue Lao)
Role: Support
Sub Roles: Buffer
Buffs: C.RATE Up, ATK Up
Debuffs: —
Other Abilities: Reduces Cooldowns, Increases AP
Captain Ability: Increases ally HP by 18%
Attributes:
High SPD
Good HP
Low DEF &ATK (Lowest among all Espers, tied with Li Ao)
Skills:
| Under That Moon | Ties that Bind (Passive) | Ropes of Destiny | |
| Target | 1 Enemy | 2 Random Allies | All Allies |
| Damage / Heal | Damage:130% (max lvl) of ATK | — | — |
| Effects | Increases AP by 25% | C. RATE Up, 2 turns | ATK Up , 2 turns Reduces ability cooldowns of an ally by 1 turn if an ATK Up buff is already present Cooldown will not be affected by unit abilities |
| Triggers / Cooldown | — | Triggers at the start of each turn | 4 turns (max lvl) |
| Ascension Upgrade | — | ATK Up, 1 turn Reduces skill cooldown by 1 turn if an ATK Up buff is already present | — |
Recommended x4 Relic Sets:
Wind Walker, Ocean Waves
Recommended x2 Relic Sets:
Adamantine, Master Grove
Unky Chai may seem like a weak Esper, with his low ATK and DEF, but he makes for a very capable Support, helping your team by granting ATK Up and C. RATE Up buffs and reducing ability cooldowns.
This Esper can last long into battle with his HP and high SPD but cannot be depended on when it comes to dealing damage. His only offensive skill, Under That Moon, deals decent but not amazing damage but does increase his AP, giving him a speed boost to his next turn. He is best paired with strong Fighters that have skills with long cooldowns.
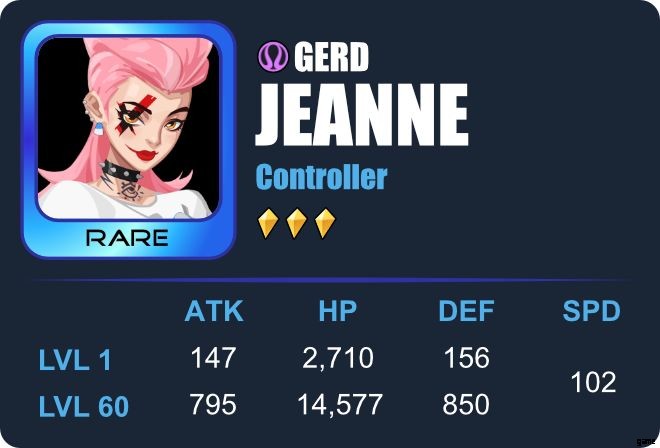
Jeanne (Gerd)
Role: Controller
Sub Roles: Disabler
Buffs: —
Debuffs: Stun
Other Abilities: Absorbs AP, Removes buffs
Captain Ability: Increases ally ACC by 20%
Attributes:
Excellent SPD
Average HP
Low ATK &DEF
Skills:
| Punk | Cool Rhythm | Beat Burst | |
| Target | 1 Enemy | 3 Random Enemies | 1 Enemy |
| Damage / Heal | Damage:40% (max lvl) of ATK | Damage:90% (max lvl) of ATK | Damage:120% (max lvl) of ATK + 12% (max lvl) of max HP |
| Effects | 25% (max lvl) chance to inflict Stun, 1 turns | 100% (max lvl) chance to inflict Stun, 1 turns | Removes all buffs Inflicts Stun, 1 turn |
| Triggers / Cooldown | — | 3 turns | 4 turns (max lvl) |
| Ascension Upgrade | — | Absorbs 30% AP from each target | — |
Recommended x4 Relic Sets:
Wind Walker, Ocean Waves, War Machine
Recommended x2 Relic Sets:
Apollo’s Bow, Master Grove
Jeanne’s skills revolve around Stunning her enemies. Once upgraded in Ascension, Cool Rhythm lets her absorb 30% AP from each of her targets (up to 3) allowing her to get to her next turn quickly and potentially Stun even more enemies.
The downside to using this Esper is dealing with enemies that have Immunity or cannot be affected by her Stuns. Fortunately, her Beat Burst skill has the ability to remove all buffs from her target.
Since her HP is higher than some Espers and you can focus on increasing it since her last skill, Beat Burst, can convert up to 12% max of her Max HP to damage. Equipping her with relics that increase her HP and ATK is a must. She is best paired with Fighters that deal more damage in order to efficiently utilize her disabling skills.
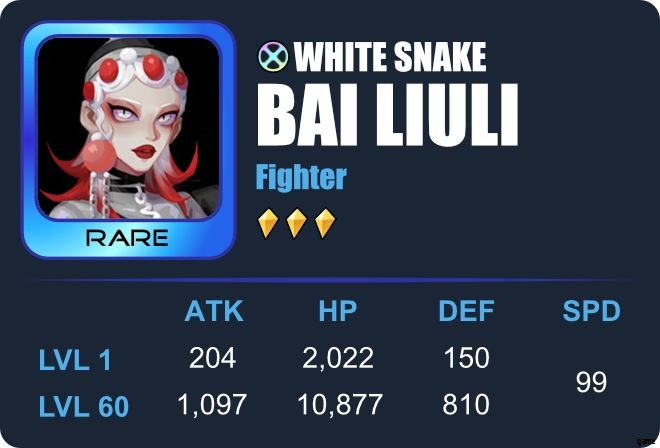
Bai Liuli (White Snake)
Role: Fighter (Possible Supporter)
Sub Roles: Disabler, AoE / Chain Striker, Healer, Debilitator, Dispeller
Buffs: —
Debuffs: Silence, Sear
Other Abilities: Removes debuffs, Steals buffs, All-Ally Healing
Captain Ability: —
Attributes:
High SPD
Average ATK
Low HP &DEF
Skills:
| Hiss | Shedding | Incorporeal | |
| Target | 1 Enemy | Self, All Allies | Up to 5 Random Enemies |
| Damage / Heal | Damage:120% (max lvl) of ATK | — | Damage:5 hits, 110% (max lvl) of ATK each Prioritizes new targets and deals -15% damage per attack to the same target |
| Effects | 60% (max lvl) chance to inflict Silence, 1 turns | Removes a random debuff (Self) | 70% (max lvl) chance to steal 1 buff + inflict Sear, 2 turns |
| Triggers / Cooldown | — | Start of each turn | 4 turns (max lvl) |
| Ascension Upgrade | — | Restores team-wide HP by 5% of max HP of target at the start of each turn | — |
Recommended x4 Relic Sets:
War Machine, Hammer of Thor
Recommended x2 Relic Sets:
Fiery Incandescence, Master Grove, Sword Avatara
Bai Liuli is a Fighter-Support combo that can not only deliver blows with debuffs such as Silence and Sear, but can also dispel debuffs inflicted on her and steal her target’s buffs. Her skills make her a good counter against enemies that are reliant on buffs and debuffs while also dishing out her own debuffs. Being able to restore her allies’ health at the beginning of her turn with her high SPD of 99 makes her a fairly good minor healer but cannot completely take the place of other more effective Healers. Her third skill, Incorporeal, works like an AoE when against 5 enemies but a chain attack when there are lesser targets.
She seems to fit in with any team but does not seem to have a solid build that makes her an expert in a field. She can fit many roles, but not one completely. She feels like a jack of all trades, which is not necessarily a bad thing but it makes her an Esper that you need to definitely invest in to get the most out of her abilities. Focusing on ATK and SPD for her relics would benefit her abilities while putting some points on HP and DEF will help her stay alive. The Sword Avatara Set can be a nice match for her since her basic attack has Silence which will be applied to every counterattack.
And this concludes our guide for Rare Espers. We hope that this guide helped you in understanding what makes each Rare Esper special, what relics to equip them and what type of Espers they are best paired with. If you have learned other tips and tricks regarding the Espers discussed in this guide, feel free to leave your discoveries in the comment section below!