Dislyte 伝説のエスパー ガイド:各伝説のエスパーの完全な説明
3 つのエスパー ガイドの最後の部分へようこそ!このガイドでは、ゲーム内で現在入手および遭遇できる 21 人の伝説のエスパーの長所と短所について説明します。まだお読みでない場合は、レア エスパー ガイドもチェックしてください。さまざまなエスパー ロールとサブ ロール、およびこのガイドとエピック エスパー ガイドで頻繁に登場する基本属性の範囲について説明しています。
このガイドは、あなたがしばらくの間 Dislyte をプレイしており、いくつかの用語に精通していることを前提としています。ただし、ゲームに慣れていない場合は、Dislyte ビギナーズ ガイドをチェックしてください!
伝説のエスパー属性
| ESPER | 攻撃力 (レベル 1) | 攻撃力 (レベル 60) | HP (レベル 1) | HP (レベル 60) | 防御 (レベル 1) | 防御 (レベル 60) | SPD |
| ドナー (トール) | 261 | 952 | 2,985 | 10,862 | 341 | 1,243 | 94 |
| ジン・ユヤオ (王妃) | 236 | 860 | 4,583 | 16,680 | 245 | 887 | 99 |
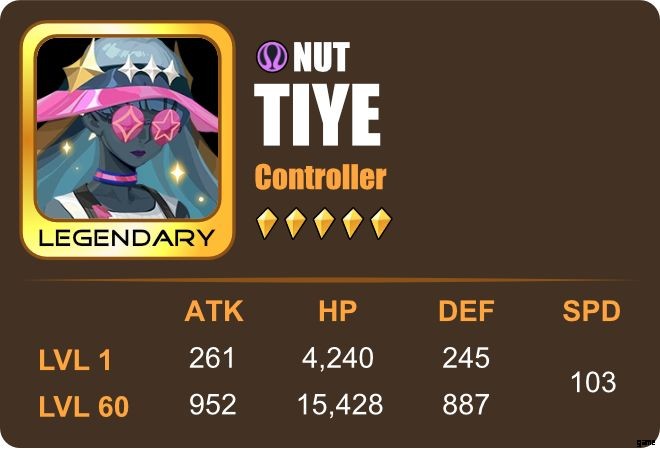
| Tiye (ナッツ) | 261 | 952 | 4,240 | 15,428 | 245 | 887 | 103 |
| ルイス (アレス) | 356 | 1,301 | 3,283 | 11,946 | 226 | 829 | 96 |
| 唐玄 (孫悟空) | 318 | 1,160 | 3,406 | 12,392 | 251 | 912 | 99 |
| レイヴン (オーディン) | 341 | 1,243 | 3,304 | 12,026 | 236 | 860 | 104 |
| Narmer (Ra) | 366 | 1,332 | 3,223 | 11,728 | 218 | 795 | 96 |
| Li Ling (Nezha) | 331 | 1,204 | 3,406 | 12,392 | 237 | 861 | 105 |
| トリキ (ロキ) | 240 | 874 | 4,472 | 16,273 | 250 | 911 | 107 |
| ハイド (ハデス) | 340 | 1,242 | 3,677 | 13,383 | 213 | 780 | 96 |
| ビオンディナ (ポセイドン) | 340 | 1,242 | 3,071 | 11,176 | 255 | 926 | 104 |
| ガブリエル (ニヨルド) | 264 | 961 | 3,850 | 14,005 | 275 | 1,002 | 106 |
| サリー (シフ) | 226 | 829 | 4,481 | 16,304 | 265 | 963 | 96 |
| オリー (オシリス) | 322 | 1,173 | 3,715 | 13,521 | 227 | 830 | 93 |
| ウナス (シュウ) | 298 | 1,084 | 3,406 | 12,392 | 271 | 992 | 106 |
| ルーカス (アポロ) | 278 | 1,013 | 4,012 | 14,602 | 249 | 910 | 105 |
| クララ (ヘラ) | 232 | 849 | 4,335 | 15,777 | 272 | 992 | 106 |
| セシリア (イシス) | 232 | 849 | 4,537 | 16,510 | 255 | 926 | 95 |
| シエナ (ガイア) | 271 | 992 | 3,751 | 13,646 | 275 | 1,002 | 100 |
| Tevor (スフィンクス) | 335 | 1,224 | 3,057 | 11,126 | 218 | 795 | 97 |
| アーメド (Geb) | 249 | 910 | 4,382 | 15,948 | 207 | 754 | 94 |
凡例:
| すべてのエスパーの中で最高 | 伝説のエスパーの中で最低 |
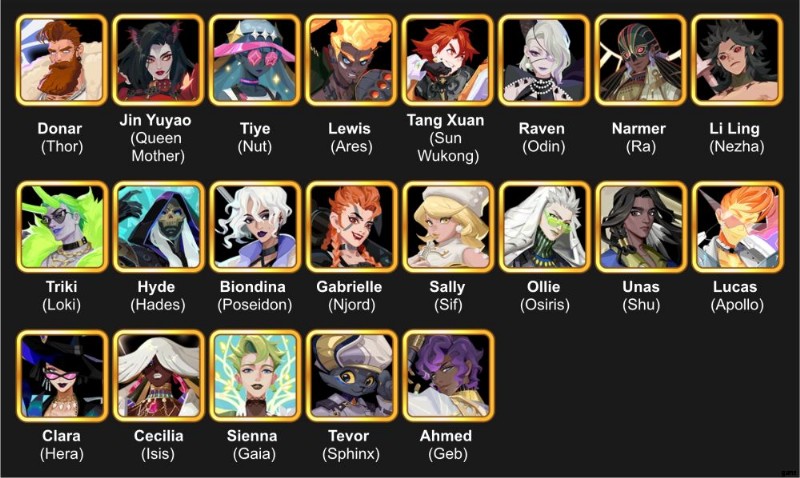
伝説のエスパー
伝説のエスパーは入手が非常に難しく、入手が保証されるまでに最大 120 スピンかかる場合があります。低ステータスはなく、平均ステータス (SPD の場合のみ) はほとんどなく、通常、良いステータスから神のステータスまでの範囲です。 1 つの複製を取得できれば、非常に幸運です。
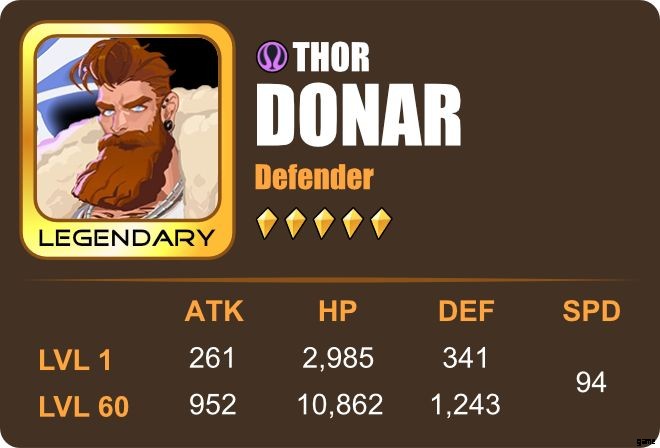
ドナー(トール)
役割: ディフェンダー (ファイター候補)
サブロール: AoE、ヌーカー、デビリテーター、バッファー
バフ: DEFアップ、免疫、指揮者、雷の祝福
デバフ: 攻撃ダウン
その他の能力: クールダウンを減らす
船長の能力: 味方のDEFを30%アップ
属性:
Godly DEF (全エスパーの中で最高)
高い攻撃力
良好な HP (すべての伝説のエスパーの中で最も低い)
平均速度
スキル:
| 上向きの稲妻 | サンダークラック | 空での爆発 | |
| ターゲット | 敵1体 | すべての敵、自分 | 敵1体 |
| ダメージ/回復 | ダメージ:攻撃力の 30% + 防御力の 50% (最大レベル) | ダメージ:防御力の 90% (最大レベル) | ダメージ:攻撃力の 80% + 防御力の 100% (最大レベル) |
| 効果 | 45% (最大レベル) の確率で 攻撃ダウン、2ターン | コンダクター、1ターン(セルフ) コンダクター発動中に攻撃を受けるとサンダーブレッシング1スタック(最大5スタック) 警告:固定すると指揮者が削除されます | DEFアップ&免疫、2ターン |
| トリガー / クールダウン | — | 4 ターン (最大レベル) | 5 ターン (最大レベル) |
| アセンション アップグレード | — | アクティブ アビリティがクリティカル ヒットをトリガーした場合 =Thundercrack のクールダウンを 1 減らす | — |
推奨 x4 レリック セット:
ハデス セット、ウォー マシン、オーシャン ウェーブ
推奨 x2 レリック セット:
石脈、ソード アヴァタラ、燃えるような白熱
DEFをダメージに変換するDonarの能力により、彼は攻撃力が高く、倒すのが難しいDefenderになります。彼の攻撃ダウン デバフ、免疫バフ、チームの DEF を 30% 増加させるキャプテン アビリティを組み合わせることで、彼はほとんど貫通できなくなります。パッシブがアクティブなときに彼を攻撃すると、防御力が増加し (最大 5 スタック)、次のターンの開始時にすべての敵にさらに壊滅的な打撃を与えることができます。デバフで彼を動けなくすると、彼はひるむかもしれませんが、それは彼が 2 ターン持続する免疫バフをアクティブにする前に敵がそうすることができた場合です.
クールダウン短縮のための Ocean Waves またはライフスティールのための Hades はレリックに最適です。彼の最初と最後のスキルのダメージのほぼ半分であるため、より多くの ATK を得るために War Machine を装備することもできますが、主な焦点は彼の DEF である必要があります。ストーンベインは 2 レリック セットの必須アイテムですが、ソード アヴァターラは彼の最初のスキルで ATK ダウンを与える可能性があるため、代わりになる可能性があります。クリティカル ヒットは Thundercrack のクールダウンを短縮するため、C. RATE 属性または Fiery Incandescence を装備することもできます。
関連: Dislyte ティア リスト:すべてのエスパーの完全なランキング
DEFアップとC.RATEアップバフを持つエスパーと組み合わせるのがベスト。ただし、敵を誘導する挑発を持っているほとんどのディフェンダーとは異なり、ドナーはそうではなく、攻撃を受けた場合はチャンス次第です。これは、チーム内でHPとDEFが低いエスパーを防御するのに役立たないことを意味します.挑発を持っている別のディフェンダーと組んだ場合、彼はさらに役に立たなくなります.
ジン ユヤオ (女王母)
役割: サポート
サブロール: ヌーカー、ディスエイブラー、バッファー、ヒーラー
バフ: —
デバフ: 気絶
その他の能力: AP の増加、デバフの転送、デバフの削除、無効化への耐性
船長の能力: 味方のHPを30%増加
属性:
神のHP(全エスパーの中で最高)
高防御&速攻
良い攻撃力
スキル:
| 血のタリスマン | イモータルの住処(パッシブ) | マウント 崑崙 怒り | |
| ターゲット | 敵1体 | 味方全員、自分 | 敵1体 |
| ダメージ/回復 | ダメージ:攻撃力の 110% (最大レベル) | ダメージ:最大 HP の 13% (最大レベル) | |
| 効果 | 50% (最大レベル) の確率で 気絶、1ターン | 無力化への耐性(自身) 味方がデバフを受けた時、APを20%アップ(最大Lv)(1ターンに1回)(自身) 不動以外のランダムなデバフを削除 + 最大 HP の 5% を回復 (味方全員) | すべての味方からすべてのデバフをターゲットに転送 |
| トリガー / クールダウン | — | ジン・ユヤオのターン開始 | 4 ターン (最大レベル) |
| アセンション アップグレード | ターゲットにデバフがある場合、APが25%増加 | — | — |
推奨 x4 レリック セット:
ウィンド ウォーカー、アストラル ウィッチクラフト
推奨 x2 レリック セット:
マスターグローブ、アダマンティン
Jin Yuyao は、すべての障害者にとって最悪の悪夢です。彼女のパッシブ スキルである Abode of Immortals は無効化に対する免疫を与え、味方のすべてのエスパーからランダムなデバフを取り除き、各ターンの開始時に最大 HP の 5% を回復します。味方に付与されたデバフごとにAPが増加し、順番が早くなり、毎回パッシブがアクティブになります。彼女はまた、敵を気絶させ、チームのすべてのデバフをターゲットに転送し、最大 HP の 13% をダメージとして与えることができます。
彼女にウィンド ウォーカーを装備してターンを速めたり、アストラル ウィッチクラフトを装備して無効化されている場合は味方の SPD を増加させたりします。マスター グローブを使用して生存力に集中し、HP ダメージ変換を増やすか、アダマンティンを使用して味方にシールドを付与し、彼女をサポートに集中させます。 HP と SPD は、改善すべき最も重要な属性です。
関連: Dislyte Squad フォーメーション ガイド:推奨されるチーム フォーメーション
彼女は、デバフに依存するエスパーに対して最もよく使用されます。彼女は、SPDアップバフを持つエスパー、回復できるエスパー、およびそれらの部門が不足しているため、大量のダメージを与えることができるエスパーと組み合わせるのが最適です.
Tiye (ナッツ)
役割: コントローラー
サブロール: AoE、ディスエイブラー、バッファー
バフ: —
デバフ: 気絶、SPDダウン
その他の能力: APを取る、味方にAPを分配する
船長の能力: 味方のSPDを25%増加
属性:
神のHP
優れた SPD
高い攻撃力と防御力
スキル:
| ナイトブリンガー | スターストラック | むさぼる虚無 | |
| ターゲット | 敵1体 | すべての敵 | すべての敵 |
| ダメージ/回復 | ダメージ:攻撃力の 110% (最大レベル) | ダメージ:攻撃力の 80% (最大レベル) | ダメージ:攻撃力の 105% (最大レベル) |
| 効果 | 60% (最大レベル) の確率で 20% の AP を獲得 | 60% (最大レベル) の確率で 気絶、1ターン | ターゲットの AP の 30% を受け取り、味方全員に均等に分配します |
| トリガー / クールダウン | — | 3 ターン (最大レベル) | 5 ターン (最大レベル) |
| アセンション アップグレード | — | SPDダウン、2ターン | — |
推奨 x4 レリック セット:
ウィンドウォーカー
推奨 x2 レリック セット:
アポロの弓、アダマンティン、マスターグローブ
Tiye は、敵が最初のスキルを使用する前に倒すことができます。 103 の初期 SPD ステータス、チームの SPD を 25% 増加させるキャプテン アビリティ、敵の AP を吸収するスキル、SPD ダウンとスタンを与え、さらにはターゲットの AP の 30% をチーム メンバー間で均等に再分配するスキルを備えたこのエスパーは、チームに与えることができます。敵に対して非常に有利です。
SPD は Tiye のすべてなので、SPD に重点を置いた属性を持つ Wind Walker を彼女に装備させます。アポロの弓または属性を持つレリックでACCを改善すると、スタンとSPDダウンのチャンスが高くなります。または、序盤のバトル シールドにはアダマンティンを、HP にはマスター グローブを選択できます。
彼女は、1 ターンに 2 回以上攻撃する強打の敵に対して優れたカウンターを行います。 SPD が低いか、クールダウンが長いエスパーと組み合わせるのが最適です。
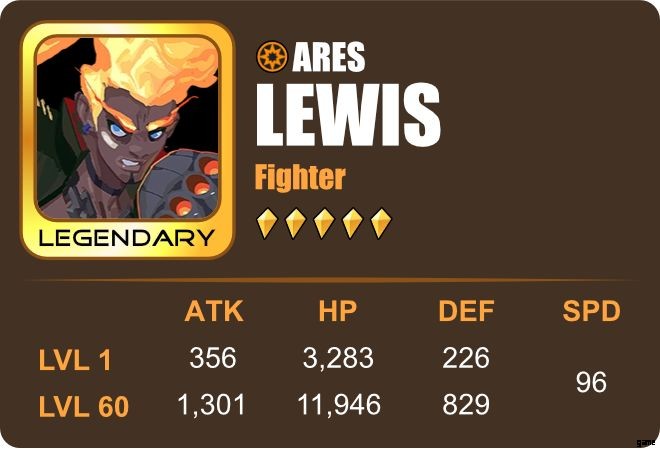
ルイス(アレス)
役割: ファイター
サブロール: チェーンストライカー、ヌーカー、バッファー、ヒーラー
バフ: C.レートアップ
デバフ: —
その他の能力: AP の増加、回復ダメージ、ボーナス ターン、クールダウンの短縮
船長の能力: 味方の C. RATE を 25% 増加
属性:
神の攻撃
高HP
優れた防御力と速さ
スキル:
| 鉄拳 | 怒りの炎 | レイジ アバター | |
| ターゲット | 敵1体 | 敵1体 | 敵1体 |
| ダメージ/回復 | ダメージ:攻撃力の 130% (最大レベル) 回復:与えたダメージの 50% を回復に変換 | ダメージ:攻撃力の 180% (最大レベル) | ダメージ:3 ヒット、HP が 10% 失われるごとに攻撃力の 260% (最大レベル) + 5% |
| 効果 | クリティカル ヒットの場合 =AP が 20% 増加 | C.レイトアップ、2ターン クリティカル ヒット =ボーナス ターンの場合 | — |
| トリガー / クールダウン | — | 4 ターン (最大レベル) | 4ターン |
| アセンション アップグレード | — | — | ターゲットが死亡した場合 =すべてのアビリティのクールダウンが 1 減少 |
推奨 x4 レリック セット:
ウォーマシン、トールのハンマー
推奨 x2 レリック セット:
灼熱の白熱、ソード アヴァターラ
ルイスはクリティカル ヒットとキルを使用して AP を増やし、ボーナス ターンを獲得し、スキルのクールダウンを短縮します。彼は船長のアビリティと C. レートアップバフで簡単にクリティカルをトリガーできます。彼が失う HP が多いほど、彼のレイジ アバターが与えるダメージが大きくなります。彼が死なないようにするために、彼の基本スキルには、ダメージの一部を回復に変換する能力があります。
Hades はおそらく生存性のために人気のあるレリックの選択肢のようですが、Lewis の 3 つ目のスキルを強化する目的は HP を下げることであるため、Lewis にとっては良いことではないかもしれません。代わりに、ウォーマシンで彼のATKを向上させるか、トールのハンマーでC. DMGを向上させることに集中してください。カウンター攻撃はクリティカルをトリガーする追加のチャンスであるため、追加の C.RATE またはソード アヴァターラを得るために彼に白熱光を装備します。
HPやDEFの高い敵に最適で、スタンドオフとATKアップを付与できるエスパーと組み合わせるのが最適です。ヒーラーやリバイバーは、彼が死にそうになったときや死んでしまったときに、彼を戦闘に引き留めるのにも役立ちます。

唐玄(孫悟空)
役割: ファイター
サブロール: チェーン ストライカー、AoE、ヌーカー、ディスエイブラー、デビリテーター、バッファー、ヒーラー
バフ: スコーチ、デス、シャックル、シールド
デバフ: 病気、DEFダウン
その他の能力: —
船長の能力: 味方の攻撃力を30%アップ
属性:
優れた攻撃力
HP、DEF、SPDが高い
スキル:
| 正義の怒り | 魅惑の夢 | 打ち砕く夢 | |
| ターゲット | 選ばれた敵 1 体 + ランダムな敵 2 体 | 敵1体 | すべての敵 |
| ダメージ/回復 | ダメージ:攻撃力の 120% (最大レベル) (選ばれた敵) ダメージ:攻撃力の 80% (最大レベル) (ランダムな敵 2 体) | ダメージ:攻撃力の 200% (最大レベル) | ダメージ:2 ヒット、それぞれ攻撃力の 60% (最大レベル) |
| 効果 | 各攻撃の前にスコーチ、デスまたはシャックル、1 ターン | 現在のエンチャント (スコーチ、デス、シャックル) をすべて吸収します。 吸収したエンチャントごとに 15% DEF を無視 吸収したエンチャントごとに唐玄の最大 HP の 10% を回復 | 攻撃前にスコーチ、デス、シャックル、2 ターン |
| トリガー / クールダウン | — | 2ターン(最大レベル) | 3 ターン (最大レベル) |
| アセンション アップグレード | — | シールド (強さ:10% + 吸収したエンチャントごとに最大 HP の 5%) + 攻撃を 10% 増幅 | — |
推奨 x4 レリック セット:
ハデス、ウォーマシン
推奨 x2 レリック セット:
灼熱の白熱、ソード アヴァターラ
Tang Xuan の攻撃は、Scorch、Death、Shackle という 3 つのユニークなエンチャントの力を利用しています。 Scorch は敵を回復不能にし、Death はターゲットの HP の一部をダメージとして与え、Shackle はターゲットの防御力を低下させます。エンチャントを吸収すると、Tang Xuan も回復し、Shield が付与され、サポートなしで生き残ることができる自給自足のファイターになります。
Tang Xuan は、レリックによるダメージと HP によるシールドと生存率の向上による ATK ブーストの恩恵を大いに受けます。ウォー マシンと Fiery Incandescence は彼の攻撃をより強力にし、ATK と C. RATE を増加させますが、Hades は同様に致命的な打撃を持つ敵に対して推奨されます。彼の基本攻撃は 3 体の敵にヒットするので、Sword Avatara も彼と相性が良いです。
彼はどのチームにも配置できますが、ATK、SPD、または C. RATE をバフできるサポートまたは敵を無効にできるコントローラーと組み合わせると、さらに効果を発揮する可能性があります。彼が生き続けるために助けが必要な場合は、ディフェンダーを追加してください。
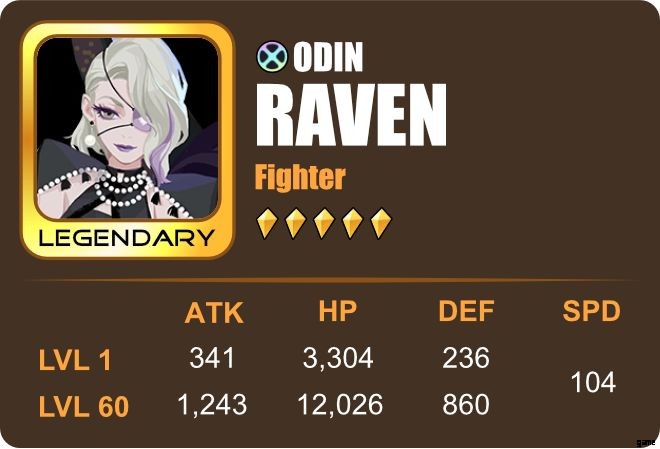
カラス(オーディン)
役割: ファイター
サブロール: チェーンストライカー、AoE、ディスエイブラー、デビリテーター、ディスペラー
バフ: —
デバフ: シアー、バフブロッカー、DEFダウン
その他の能力: バフを受け取り、HP上限が減少し、デバフを削除し、バフを削除します
船長の能力: 味方の攻撃力を30%アップ
属性:
神の攻撃力
優れた SPD
良好な HP と防御力
スキル:
| 永遠の彗星 | サンセット | スレイプニル | |
| ターゲット | 敵1体 | すべての敵 | すべての敵 |
| ダメージ/回復 | ダメージ:2 ヒット、攻撃力の 70% (最大レベル) | ダメージ:2 ヒット、攻撃力の 50% (最大レベル) | ダメージ:攻撃力の 120% (最大レベル) (ダメージ前にバフとデバフを解除) |
| 効果 | 70% (最大レベル) の確率で ターゲットからバフを 1 つ取得します (成功した場合、1 ターンの Sear を付与します) | バフ ブロッカー、2 ターン (先制攻撃) 与えたダメージ量に等しい HP 上限減少 (2 回目のストライク) | バフを解除 (すべての敵) デバフを解除 (自分) |
| トリガー / クールダウン | — | 3 ターン、(最大レベル) | 4 ターン (最大レベル) |
| アセンション アップグレード | — | — | 50%の確率でDEFダウン、2ターン |
推奨 x4 レリック セット:
ウィンドウォーカー、ウォーマシン
推奨 x2 レリック セット:
灼熱の白熱、アポロの弓
レイヴンはサポートを恥ずかしく思います。彼女のスキルは敵の防御力を下げるように構築されており、DEF ダウン、バフ ブロッカー、シアーを与えます。彼女はまた、敵からバフを盗んだり取り除いたり、自分からデバフを払いのける力を持っています.
ATK、SPD、ACC、場合によっては C. RATE は、彼女のビルドとスキル セットを補完する属性であるため、彼女にどの役割を集中させたいかに応じてレリックを装備します。ウォー マシンとファイアリー インカンデセンスでダメージを与え、ウィンド ウォーカーとアポロで無効化とデバフを行うか、それらを混ぜ合わせます。
彼女は、バフまたは高い DEF を持つ敵に対して最もよく使用され、彼女のデバフを最大化するために、少なくとも 1 つの AoE または DPS エスパーとペアになっています。彼女の HP と DEF は彼女の最も低い属性であり、戦闘を維持するためにヒーリングまたはバフ サポートを利用することで恩恵を受けることもあります。
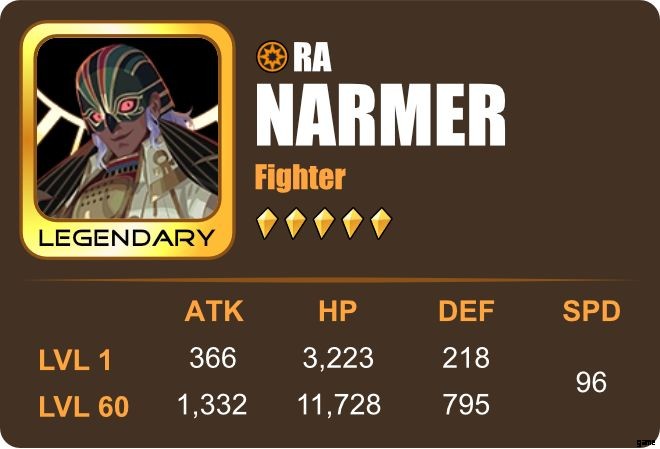
ナーマー (Ra)
役割: ファイター
サブロール: AoE、ディスエイブラー、バッファー
バフ: ATKアップ、バーニングサン
デバフ: —
その他の能力: バフを受け取り、クールダウンを減らします
船長の能力: ポイント戦で味方の攻撃力40%アップ
属性:
神の攻撃力 (全エスパーの中で最高)
高HP
優れた防御力と速さ
スキル:
| サンホイール | 運命の輪(パッシブ) | 紋章入りストライク | |
| ターゲット | 敵1体 | 自分 | すべての敵 |
| ダメージ/回復 | ダメージ:攻撃力の 130% (最大レベル) | — | ダメージ:バーニングサンごとに攻撃力の 100% (最大レベル) + 10% |
| 効果 | バフを1つ獲得 100% (最大レベル) の確率で攻撃力アップ | 燃える太陽を 2 個スタックする (最大スタック:8) | バーニングサンをすべて消費する バーニングサン3体以上=敵防御力40%無視 5 つ以上のバーニング サン =すべてのアビリティのクールダウンを 1 短縮 |
| トリガー / クールダウン | — | ナルマーのターン開始 | 3 ターン (最大レベル) |
| アセンション アップグレード | — | 受け取ったバフごとにバーニングサンを1スタック | — |
推奨 x4 レリック セット:
ウォーマシン、トールのハンマー
推奨 x2 レリック セット:
ソード アヴァターラ、ファイアリー インカンデセンス
Narmer は考慮すべき力ですが、それは適切な条件が整った場合に限られます。彼のスキルセットは、アルティメット スキルであるエンブレム ストライクを使用し、バーニング サン バフを積み重ねて強化することを中心に構築されています。彼はターンの開始時にバーニング サンをスタックできます。アセンションでパッシブがアップグレードされると、基本スキルを使用するたびにスタックできます。
彼のユニークなスキル セットを最大限に活用するために、彼はより多くの ATK とソード アヴァターラのウォー マシンを装備するのが最適です。 SPD に投資するのは良いことですが、Wind Walker の代わりに Hammer of Thor が効果的であるため、敵が動かない間、より頻繁にターンを通過できます。 Burning Suns のスタックが問題にならない場合は、追加の C.RATE を得るために、Fiery Incandescence を Sword Avatara の代わりに使用することをお勧めします。
ただし、通常攻撃でバーニングサンをスタックするにはバフを盗む必要があるため、バフに依存していない敵に対してはそれほど効果的ではありません.これを補うには、敵を減速させて気絶させることができるコントローラーとペアリングするか、SPD と AP ブーストでサポートをペアリングして、スタックを構築できるようにするのが最善です。
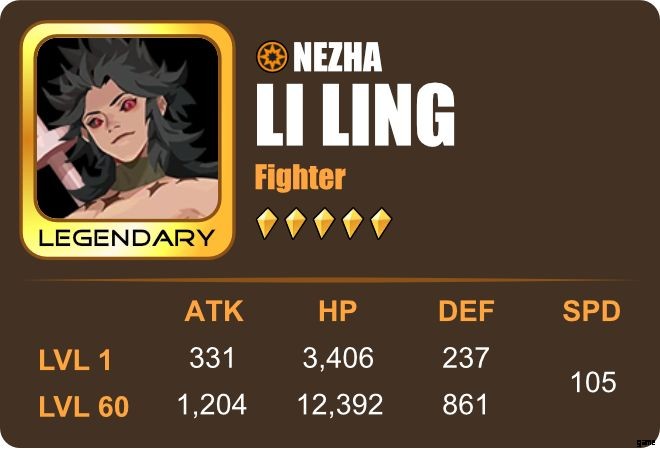
リー・リン(ネザ)
役割: ファイター
サブロール: チェーンストライカー、AoE、ディスエイブラー、ヒーラー
バフ: —
デバフ: —
その他の能力: APを消費し、ダメージを回復
船長の能力: 味方の攻撃力を30%アップ
属性:
神の攻撃と速さ
高HP
優れた防御力
スキル:
| ランスバーナー | 太極拳 | 祭壇 | |
| ターゲット | 敵1体 | 敵1体 | すべての敵 |
| ダメージ/回復 | ダメージ:攻撃力の 130% (最大レベル) | ダメージ:5 ヒット、攻撃力の 36% (最大レベル) + ターゲットの HP の 6% を真のダメージとして (Nezha の攻撃力の 80% を超えない) | ダメージ:3 ヒット、攻撃力の 38% (最大レベル) + ターゲットの HP の 6% を真のダメージとして (ネザの攻撃力の 80% を超えない) + ターゲットの AP の 10% |
| 効果 | AP 15% 消費 | — | — |
| トリガー / クールダウン | — | 3 ターン (最大レベル) | 4ターン |
| アセンション アップグレード | — | ダメージの 50% を回復に変換 | — |
推奨 x4 レリック セット:
ウォーマシン、ハデス
推奨 x2 レリック セット:
灼熱の白熱、ソード アヴァターラ
Li Ling のスキル セットはすべてダメージに関するものです。彼はATK、ターゲットのHP、さらにはAPから統計を取り、途方もない量のダメージを与えます.彼はまた、最初のスキルで敵をAPバーに押し戻し、アセンションでアップグレードすると、2番目のスキルでダメージを回復に変換することができます.彼の 1 番目と 2 番目のスキルの優れている点は、攻撃対象に応じてダメージが増減することです。これにより、ボス戦に対する素晴らしい味方になります。
ATKは彼の最も重要な属性であり、次にC.RATEとC.DMGが続きます。ウォー マシンと Fiery Incandescence は最初の 2 つの属性で非常に役立ちますが、Hades のライフスティールや、AP を盗む基本能力で敵のターンを遅らせる可能性のある Sword Avatara のカウンター攻撃と交換することもできます。
彼はどのチームでもうまく機能し、チームの最も強い打者の位置を占めています。サポートが彼のATK、SPD、またはC.RATEをバフすることで、彼のパフォーマンスはさらに向上します。
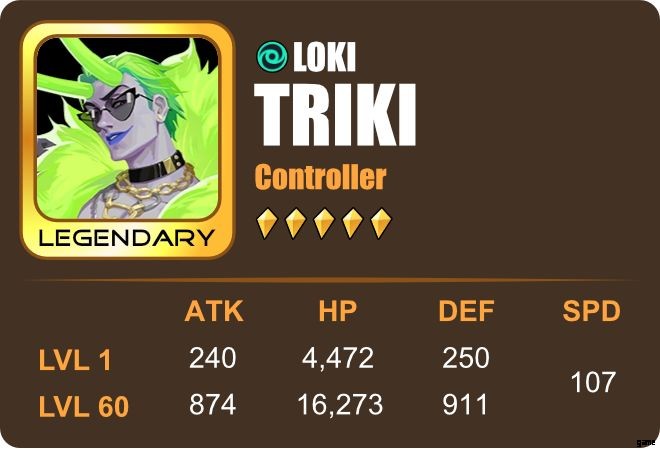
トリキ(ロキ)
役割: コントローラー
サブロール: チェーンストライカー、AoE、ヌーカー、ディスエイブラー、デビリテーター、ディスペラー
バフ: —
デバフ: 気絶、石化、ミス率アップ
その他の能力: デバフの転送、デバフの延長、バフの削除、ミスなし
船長の能力: 味方のACCを40%増加
属性:
神のHPとSPD(すべてのエスパーの中で最高)
高防御
良い攻撃力
スキル:
| 緑の炎 | ガンビット(パッシブ) | リボルバー | |
| ターゲット | 敵1体 | すべての敵、デバフを解除する敵 | すべての敵 |
| ダメージ/回復 | ダメージ:2 ヒット、攻撃力の 30% (1 ヒット目) &110% (2 ヒット目) (最大レベル) | — | ダメージ:3 ヒット、それぞれ攻撃力の 40% (最大レベル) |
| 効果 | 各攻撃は、トリキからターゲットにデバフを転送します デバフ転送の成功 =70% (最大レベル) の確率で気絶、1 ターン | ロキの攻撃は絶対に外さない (デバフとは関係ない) (すべての敵) 敵がデバフを解除 =敵は現在の HP の 30%、バフ + 石化、1 ターンを失う | 75% (最大レベル) の確率で、ヒットごとに 1 つのバフを削除します ミス率アップ、2ターン |
| トリガー / クールダウン | — | — | 4 ターン (最大レベル) |
| アセンション アップグレード | — | — | 対象全員の弱体効果を1ターン延長(1段目) |
推奨 x4 レリック セット:
ウィンド ウォーカー、オーシャン ウェーブズ
推奨 x2 レリック セット:
アポロンの弓、剣アヴァターラ
トリキのスキルはデバフが得意です。デバフを付与、転送、拡張することから、敵のバフを取り除き、デバフが解除されたときに敵を罰することまで、彼は万能のアンチサポート エスパーです。
彼のスキルは敵を無力化する素晴らしい仕事をしますが、トリキの攻撃自体はあまりダメージを与えません.ただし、ATK を上げようとする代わりに、彼の強みに集中し、Apollo's Bow で ACC を向上させたり、Wind Walker で SPD を向上させたり、Ocean Waves でクールダウンを短縮したりしてください。ソード アヴァターラは、デバフを転送して敵を気絶させる可能性が高くなるため、まともな代替手段です。
彼は無効化に重点を置いているため、彼の無効化スキルを利用できる強力なファイターとペアにすることができます
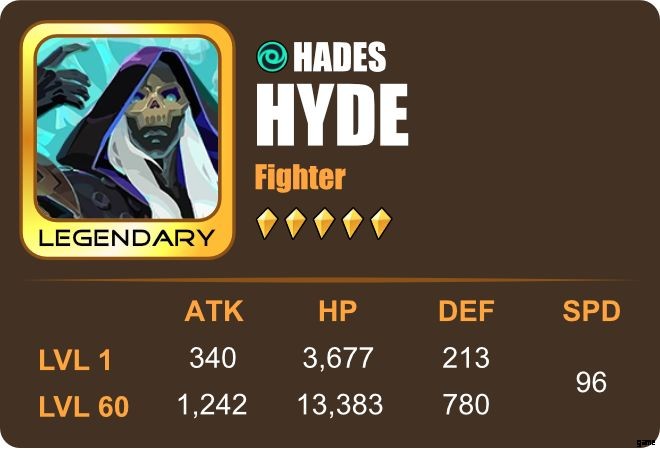
ハイド (ハデス)
役割: ファイター
サブロール: チェーン ストライカー、AoE、ディスエイブラー、デビリテーター、ヒーラー、バッファー
バフ: ブレス オブ ザ ディープ
デバフ: —
その他の能力: バフを受け取り、HP シーリングを減らし、バフとデバフへの免疫、ダメージ軽減、回復ダメージ
船長の能力: ポイント戦争で味方の耐性を 50% 増加
属性:
神の攻撃
優れた HP
優れた SPD と DEF (すべての伝説のエスパーの中で最も低い)
スキル:
| 冥界の呪い | 死神(パッシブ) | ケルベロス | |
| ターゲット | 1 Enemy | Self | All Enemies |
| Damage / Heal | Damage:2 hits, 65% (max lvl) of ATK | — | Damage:110% (max lvl) of ATK |
| Effects | Take 2 buffs Reduce HP Ceiling by 100% (max lvl) of damage dealt | Immune to buffs and debuffs 10% reduced damage from all sources Attempts to buff or debuff Hyde will stack Breath of the Deep 10 Breath of the Deep stacks upon death of an ally (max stacks:50) When taking first deadly hit in battle (and survives) =restore HP based on Breath of the Deep stacks (1% of max HP per stack) | Take 1 buff each |
| Triggers / Cooldown | — | — | 4 turns (max lvl) |
| Ascension Upgrade | — | — | 30% of damage dealt converted to healing |
Recommended x4 Relic Sets:
Ocean Waves, Hades
Recommended x2 Relic Sets:
Sword Avatara, Fiery Incandescence, Master Grove
Hyde gets stronger as the battle goes on. His Breath of the Deep buff gives him 5% ATK per stack and 3% damage reduction per 10 stacks with a max count of 50 which cannot be dispelled. However, each wave resets the number of stacks. This buff stacks up whenever someone attempts to buff or debuff Hyde or if an ally dies. Paired with buff-spamming allies or used against debuff-happy enemies, those stacks can quickly max out, making him a scary damage dealer that’s hard to kill. He is also capable of lifesteal once Cerberus is upgraded in Ascension and his basic skill can continuously shorten his enemies’ max HP per attack.
His damage reductions can make up for his lack of DEF, but you may need to build up his SPD through your relic’s attributes or equip him with Ocean Waves since his third skill takes 4 turns to cooldown. Alternatively, equip him with Hades to give him lifesteal which is best paired with Sword Avatara so he can use his basic skill more often. Alternatively, you can use Fiery Incandescence for C.RATE or Master Grove for more HP.
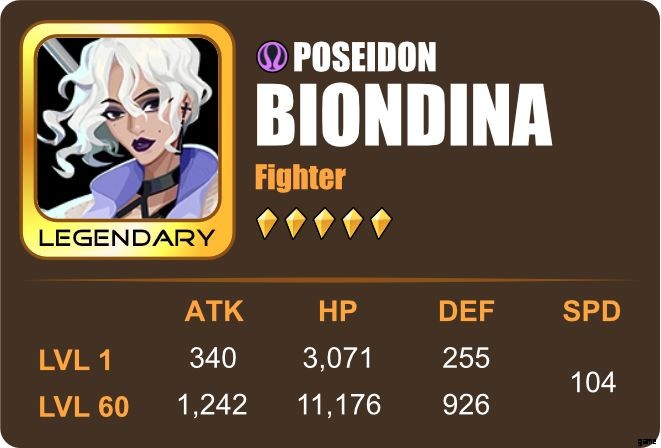
Biondina (Poseidon)
Role: Fighter
Sub Roles: AoE, Disabler
Buffs: —
Debuffs: Buff Blocker
Other Abilities: Removes Buffs
Captain Ability: Increases ally ATK in Point War by 40%
Attributes:
Godly ATK
Excellent SPD
High DEF
Good HP
Skills:
| Tidal Wave | Tsunami (Passive) | Neptune’s Wrath | |
| Target | 1 Enemy | 1 Random Enemy | 1 Enemy + All Other Enemies |
| Damage / Heal | Damage:120% (max lvl) of ATK | — | Damage:65% (max lvl) of ATK (1 Enemy) Damage:30% (max lvl) of ATK (All Other Enemies) |
| Effects | 80% (max lvl) chance to Buff Blocker, 2 turns If unbuffed =50% damage increase | Remove 1 buff 100% (max lvl) chance to remove 1 more buff Effects are guaranteed not to miss Prioritizes buffed targeta | Ignores 100% DEF of unbuffed targets (reduced a certain amount for each buff a target has) |
| Triggers / Cooldown | — | Start of Biondina’s turn | 3 turns (max lvl) |
| Ascension Upgrade | — | Removes all other buffs instead of just 1 more buff | — |
Recommended x4 Relic Sets:
War Machine, Hades
Recommended x2 Relic Sets:
Sword Avatara, Master Grove, Fiery Incandescence
Biondina never gets intimidated by her enemies’ buffs or high DEF as her first two skills can easily remove those buffs and her third ignores their defenses as she attacks. She can even prevent enemies from buffing and gets a damage increase each time she attacks an unbuffed enemy.
War Machine and Fiery Incandescence will make her deal more damage along with relic attributes for ATK, C.RATE and C. DMG. However, her biggest weakness is her HP which is only just as high as most Epics. Equip her with Hades for lifesteal and Master Grove for more HP along with attributes that can increase HP and DEF to increase her survivability. Sword Avatara could potentially be good since counterattacks will give her more chances of blocking buffs but it may prove to be risky unless she has Healers and Buffers who can support her. Aside from heals, SPD Up buffs or cooldown reductions will greatly improve her performance in battle.
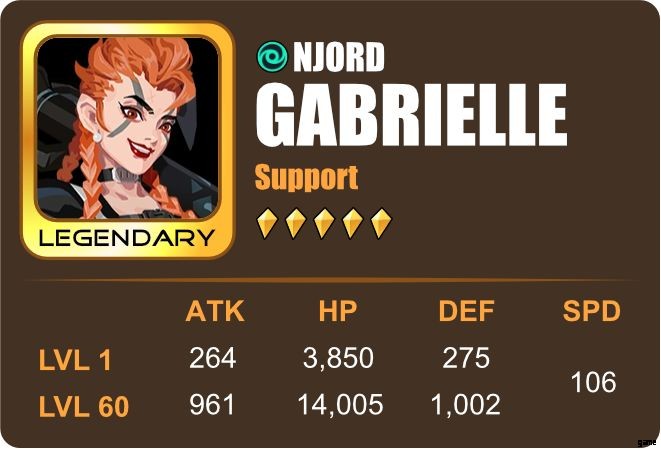
Gabrielle (Njord)
Role: Support
Sub Roles: Chain Striker, AoE, Debilitator, Buffer
Buffs: DEF Up, Immunity
Debuffs: ATK Down, DEF Down
Other Abilities: —
Captain Ability: Increases ally HP by 30%
Attributes:
Godly SPD
Excellent ATK, HP &DEF
Skills:
| Wavebreaker | Broadside | Rush | |
| Target | 1 Enemy | All Enemies | All Enemies, All Allies |
| Damage / Heal | Damage:140% (max lvl) of ATK + 0.45% ATK per point of SPD | Damage:3 hits, 80% (max lvl) of ATK total | Damage:105% (max lvl) of ATK |
| Effects | — | 50% (max lvl) chance of DEF Down, 2 turns (each hit) | DEF Up, 2 turns (All Allies) ATK Down, 2 turns (All Enemies) |
| Triggers / Cooldown | — | 3 turns (max lvl) | 4 turns (max lvl) |
| Ascension Upgrade | — | — | Immunity, 2 turns (All Allies) |
Recommended x4 Relic Sets:
Wind Walker, Tyranny of Zeus
Recommended x2 Relic Sets:
Apollo’s Bow, Adamantine
Gabrielle may be categorized as a Support but she also has the makings of a Fighter. She can not only grant her allies DEF Up and Immunity, she can also debuff her enemies with ATK Down and DEF Down while dealing damage in the process.
Wind Walker seems to be the ideal relic for her since her SPD can be converted to ATK. This also helps her get to her turns a lot quicker which she needs since her skills have long cooldowns. If SPD is not too much of an issue, Tyranny of Zeus is a great alternative, giving her skills a chance to Stun enemies. To make her buffs and debuffs more likely to stick, increase her ACC attributes and equip Apollo’s Bow. Alternatively, you can equip her with Adamantine for early battle Shields.
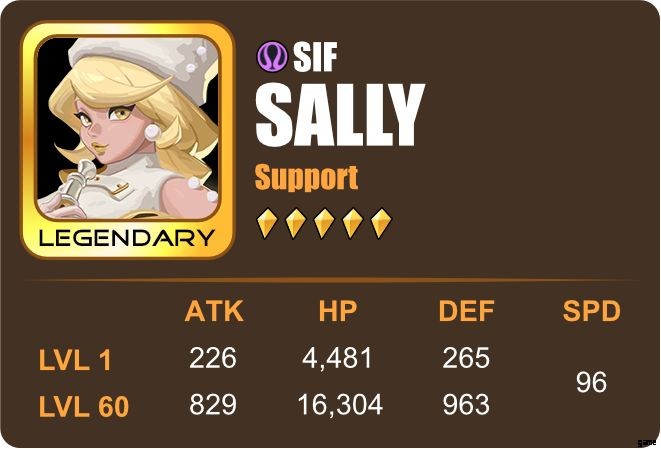
Sally (Sif)
Role: Support
Sub Roles: Chain Striker, Buffer, Healer, Dispeller
Buffs: Immunity, Sweet Harvest
Debuffs: —
Other Abilities: Removes Debuffs, Balances HP Ratio
Captain Ability: Increases ally RESIST by 40%
Attributes:
Godly HP
High DEF
Good SPD &ATK (Lowest among all Legendary Espers)
Skills:
| Light Call | Universal | Ode to Joy | |
| Target | 1 Enemy, Self | All Allies | Self, All Allies |
| Damage / Heal | Damage:3 hits, 45% (max lvl) of ATK each | — | Heal:26% (max lvl) of HP (start of each ally’s turn until Sweet Harvest ends) |
| Effects | 60% (max lvl) chance to gain Immunity, 2 turns (Self) | Removes all Debuffs Balances HP Ratio ATK Up, 2 turns | Sweet Harvest, 2 turns (makes Sally Immobile) (Self) Removes a debuff (start of each ally’s turn until Sweet Harvest ends) |
| Triggers / Cooldown | — | 3 turns (max lvl) | 4 turns (max lvl) |
| Ascension Upgrade | — | — | Take 25% less damage (All Allies) |
Recommended x4 Relic Sets:
Ocean Waves, Abiding Panacea
Recommended x2 Relic Sets:
Master Grove, Adamantine
Sally’s final skill, Ode to Joy, gives her a Sweet Harvest buff which puts her in an immobile state for 2 turns in exchange for the ability to remove a buff and heal an ally up to 26% of max HP at the start of each ally’s turn. Once upgraded in Ascension, this skill allows all Allies to take 25% less damage. When her third skill is not available, her second skill can redistribute and even out all allies’ HP and also remove all debuffs.
Unlike most Supports that benefit from higher SPD, Sally would actually benefit from lower SPD. Her heals happen at the start of each ally’s turn, which means that a higher SPD Esper will potentially be able to heal for more than 2 turns if they move faster than Sally. However, her last skill has a long cooldown so if your team is reliant on her heals, you may need to equip her with Ocean Waves for a chance to lower them. If it is not an issue, you could concentrate on improving her healing efficacy instead with Abiding Panacea.
HP is her highest stat and investing in it will be helpful when she uses her second skill so equip her with Master Grove or relics with HP attributes. Alternatively, you can give her Adamantine for early battle Shields for the team.
Her biggest weakness is her inability to heal herself often or move during her Sweet Harvest state so pairing her up with another Healer, even a minor one, would keep her afloat. She may also benefit from Defenders who can take the damage instead or Controllers who can slow down enemies. She also doesn’t deal much damage so it is essential that you pair her up with hard-hitting Fighters to balance the team.
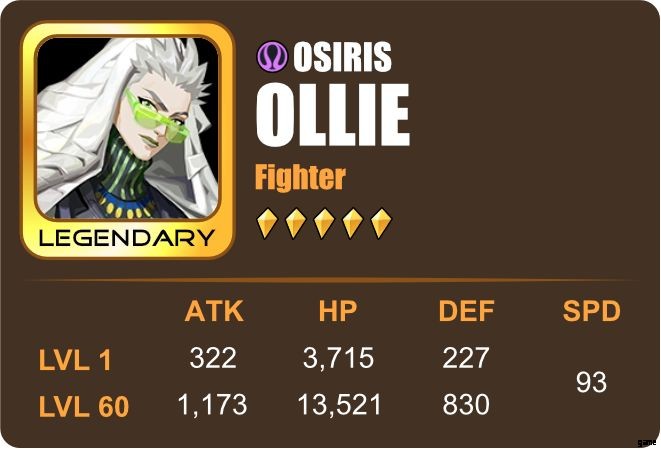
Ollie (Osiris)
Role: Fighter (Possible Defender)
Sub Roles: Nuker, Disabler, Debilitator, Buffer, Healer
Buffs: Invincibility, Recovery
Debuffs: Silence, DEF Down, Taunt
Other Abilities: Prevents Ally Death, Counterattack
Captain Ability: Increases ally SPD by 25%
Attributes:
Excellent ATK &HP
Good DEF
Average SPD (Lowest among all Legendary Espers)
Skills:
| Hookstrike | Salvific Judgements (passive) | Law of Duat | |
| Target | 1 Enemy | 1 Ally (fatally hit), Attacker | 1 Enemy, Self |
| Damage / Heal | Damage:120% (max lvl) of ATK | — | Damage:200% (max lvl) of ATK + portion of target’s max HP |
| Effects | 80% (max lvl) chance to Silence, 1 turn | Prevents Ally’s death + Invincibility &Recovery, 1 turn Casts Law of Duat on attacker | DEF Down, 2 turns Taunt, 1 turn |
| Triggers / Cooldown | — | When an ally is fatally hit 5 turns (max lvl) | 4 turns (max lvl) |
| Ascension Upgrade | — | — | Invincibility, 1 turn (Self) |
Recommended x4 Relic Sets:
Ocean Waves, Wind Walker
Recommended x2 Relic Sets:
Fiery Incandescence, Adamantine, The Light Above???
Master Grove, Stoneveins
Ollie’s skill set and stats suggests that he has the makings of a Defender, having high HP, the ability to Taunt and a unique passive that can keep an ally from dying.
While increasing Ollie’s ATK is ideal for damage, it may be best to prioritize increasing his SPD since his long cooldowns and Average SPD will make it almost impossible to use his last two skills more than once in battle. Equip him with Wind Walker for faster turns or Ocean Waves for cooldown reductions and build up his SPD and ATK attributes. If you are able to raise his SPD attributes and pair him with Espers with SPD boosts or cooldown reductions, you could equip him with War Machine instead. As for his 2-relic sets, you can change it up based on the situation. Fiery Incandescence for extra damage (C. RATE), Adamantine for early battle Shields or Master Grove for extra HP.
He is best used against enemies that deal fatal or critical blows like bosses since his passive is sure to save at least one ally. However, since his DEF is not that high, he may need Supports to buff and heal him.
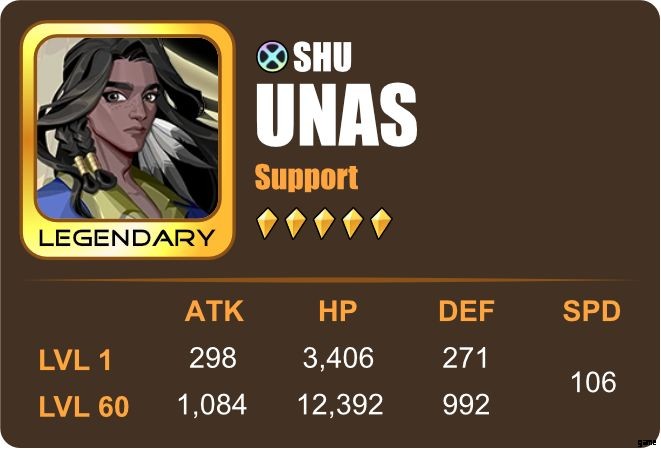
Unas (Shu)
Role: Support
Sub Roles: Chain Striker, AoE, Debilitator, Buffer
Buffs: Immunity, Haste
Debuffs: DEF Down
Other Abilities: Increases AP
Captain Ability: Increases ally SPD in Holobattle by 35%
Attributes:
Godly SPD
Excellent ATK
High HP &DEF
Skills:
| Follow the Wind | Zephyrus (Passive) | Gale Force | |
| Target | 1 Enemy | All Allies | All Enemies, All Allies |
| Damage / Heal | Damage:3 hits, 35% (max lvl) of ATK + 1% per 10 SPD of ATK each | — | Damage:90% (max lvl) of ATK + 1% per 10 SPD of ATK each |
| Effects | 60% (max lvl) chance to DEF Down, 2 turns | Immunity, 1 turn | Increase AP 30% (All Allies) |
| Triggers / Cooldown | — | At the end of Unas’ turn (if he is not immobile) | 3 turns (max lvl) |
| Ascension Upgrade | — | 1 Haste (max stacks:3) Haste stacks are dispelled after attacking | — |
Recommended x4 Relic Sets:
Wind Walker
Recommended x2 Relic Sets:
Master Grove, Adamantine, The Light Above, Immensus Peak
Unas’ skillset is all about SPD. Each of his attacks convert every 10 SPD points to 1% ATK and his passive, once upgraded in Ascension, will grant him Haste. This unique buff can stack up to 3 times, with each stack giving him 30 SPD. Adding all his stats when Haste is maxed without relics, he could get up to 19% additional ATK. Equip him with Wind Walker and add SPD and ATK attributes to make him both speedy and hard-hitting in battle.
He may have a hard time against Controllers since his passive cannot trigger if he is immobile. To prevent this, at least at the start of his turn, equip him with The Light Above for early battle Immunity. This may also help against debuffs that can damage him for each turn (like Bleed or Poison). Immensus Peak is also a good alternative as it gives him 25% RESIST. If no Controllers or enemies with damaging debuffs are present, you can opt for Master Grove for HP or Adamantine for early battle Shield instead.
He is best paired with Espers that have ATK Up or SPD Up which can stack on top of his Haste along with Supports that can cleanse debuffs. He is best used against slow enemies.

Lucas (Apollo)
Role: Controller
Sub Roles: Chain Striker, AoE, Disabler, Buffer
Buffs: —
Debuffs: Stun
Other Abilities: Increase AP, Reduce AP, Remove Buff
Captain Ability: Increases ally ACC by 40%
Attributes:
Goldy SPD
Excellent HP
High ATK &DEF
Skills:
| Lightpulse | The Blessing of Phobos | Pillar of Light | |
| Target | 1 Enemy, Self | All Enemies, Self | All Enemies |
| Damage / Heal | Damage:3 hits, 115% (max lvl) of ATK total | Damage:80% (max lvl) of ATK total | Damage:3 hits, 100% (max lvl) of ATK total |
| Effects | If Critical Hit =Increase 15% AP | 85% (max lvl) chance to Stun, 1 turn | 50% (max lvl) chance to Remove 1 buff each hit + Reduce 10% AP |
| Triggers / Cooldown | — | 3 turns (max lvl) | 4 turns (max lvl) |
| Ascension Upgrade | — | Each Stun Increases 15% AP (Self) | — |
Recommended x4 Relic Sets:
Wind Walker, Tyranny of Zeus
Recommended x2 Relic Sets:
Apollo’s Bow, Fiery Incandescence
Apollo’s AP Boosts paired with his Stuns, AP reduction and buff removal for enemies makes him a very competitive Controller. His disables make it easy for his allies to pick apart the enemy team but his boosts will only affect himself when he triggers crits or Stuns an enemy.
SPD is his greatest asset and is best improved with Wind Walker and SPD attributes on relics. Alternatively, you can choose Tyranny of Zeus instead to add chances to Stun in every skill. However, his ATK and DEF are his weakest links. It may not be worth investing much in ATK since you will need a lot just to make him a capable Fighter. It may be smarter to go for C. RATE and C. DMG with Fiery Incandescence since critical hits using his basic skill gives him AP boosts. If you want to focus more on his chances to Stun, equip him with Apollo’s Bow.
He is best used against enemies reliant on buffs since he can remove one buff each and reduce AP on one skill and Stun all enemies with another. He is best paired with Espers that can boost his SPD, ATK and C. RATE with buffs. Since he doesn’t deal too much damage, he will need a stronger damage dealer on the team to take advantage of his disables.
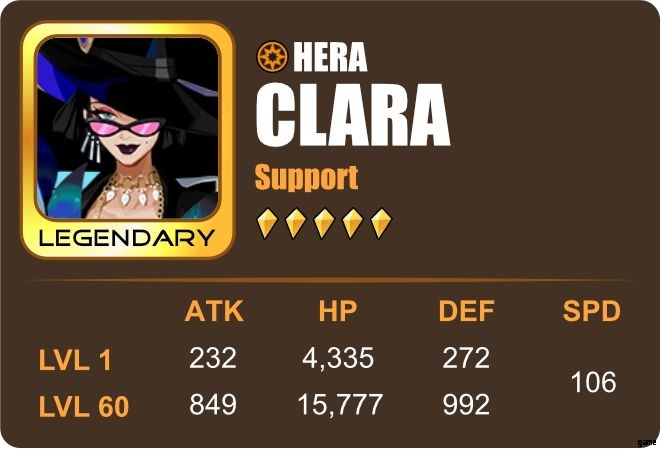
Clara (Hera)
Role: Support
Sub Roles: Chain Striker, Buffer, Healer, Dispeller
Buffs: Shield, Immunity
Debuffs: —
Other Abilities: Increase AP, Removes Debuffs
Captain Ability: Increases ally DEF in Point War by 40%
Attributes:
Godly HP &SPD
High DEF
Good ATK
Skills:
| Queen’s Blessing | Queen’s Protection (Passive) | Hymn of Life | |
| Target | 1 Enemy, 2 Lowest HP Allies | Healed Ally / Allies | All Allies |
| Damage / Heal | Damage:2 hits, 110% (max lvl) of ATK total Heal:5% of Clara’s max HP (Allies) | — | Heal:35% max HP |
| Effects | — | Removes 2 debuffs If no debuffs =Immunity, 1 turn | Increase AP 20% |
| Triggers / Cooldown | — | Whenever Clara heals | 4 turns (max lvl) |
| Ascension Upgrade | — | 120% of overflow healing is converted into a Shield, 2 turns | — |
Recommended x4 Relic Sets:
Wind Walker, Abiding Panacea
Recommended x2 Relic Sets:
Master Grove, Sword Avatara
Clara makes heals easy as she can heal 2 lowest HP allies while damaging an enemy with just her basic skill, making it available in each of her turns and usable outside turns through counter attacks with Sword Avatara. However, if you want higher heals, HP is one of the most important attributes to improve since it affects her first skill. You may also decide to equip her with Abiding Panacea to improve that aspect or Wind Walker for faster turns and more chances to heal.
To add to her heals’ usefulness, her passive can remove 2 debuffs from her target/s or grant them Immunity if there are no debuffs. Overflow heals can also turn into Shields once this skill is upgraded.
She would work well in any team but will perform best against boss enemies or long battles as her consistent heals will keep her allies going.
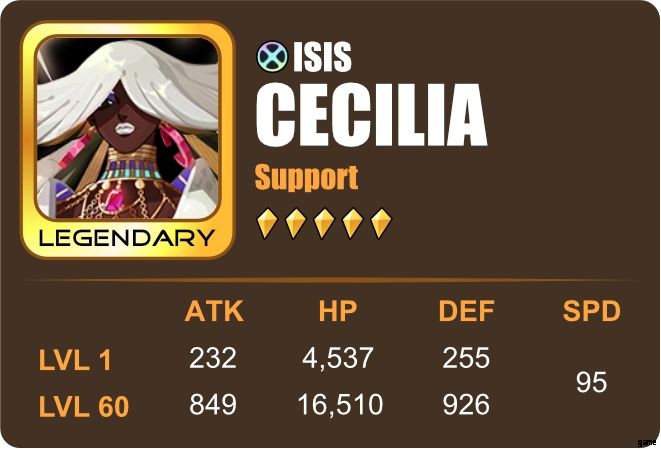
Cecilia (Isis)
Role: Support
Sub Roles: Buffer, Healer, Reviver, Dispeller
Buffs: Shield, Immunity
Debuffs: —
Other Abilities: Damage to Heal, Increase AP, Removes Debuffs
Captain Ability: Increases ally HP in Point War by 40%
Attributes:
Godly HP
High DEF
Good ATK
Average SPD
Skills:
| Gemstone Feathers | Crimson Protection (Passive) | Ruby Coronet | |
| Target | 1 Enemy, Self | All Allies (except Cecilia), All Dead Allies | All Allies |
| Damage / Heal | Damage:30% of ATK + 5.5% (max lvl) max HP Heal:100% of damage dealt (Self) | Heal:15% of max HP Revive + Heal:15% of max HP (All Dead Allies) | Heal:35% of allies’ HP |
| Effects | — | Shield (50% of ally’s max HP), 1 turn | Removes all debuff Immunity, 1 turn |
| Triggers / Cooldown | — | When Cecillia dies (triggered only once) | 4 turns (max lvl) |
| Ascension Upgrade | — | Increase AP 50% | — |
Recommended x4 Relic Sets:
Wind Walker, Ocean Waves, Abiding Panacea
Recommended x2 Relic Sets:
Master Grove, Adamantine
Cecilia has the potential to change the outcome of battle with her death, triggering her passive to heal, Shield and boost AP of all allies and even revive dead ones. Her basic skill can heal up to 100% of damage dealt which makes her self-sufficient. However, the heals she can cast on her allies take up to 4 turns even when upgraded which may be too late by that time. Equip her with Ocean Waves for cooldown reductions or Wind Walker for faster turns and add SPD attributes to relics to combat that. If you have Espers that can boost your SPD and AP, you may choose to equip her with Abiding Panacea instead, increasing healing efficacy. For 2-Relic sets, Master Grove is a good choice as it affects the amount of damage her first skill does. Alternatively, go for Adamantine for early battle Shields.
Her biggest downside is the fact that she needs to die for her passive to work, making it completely useless if she doesn’t die and could leave you with a blank in your team if she does. You could bring in another Reviver, but her passive won’t trigger again if she dies again. And since her heals for allies are not always available, it is best to pair her up with another healer that can support the team while she waits for her cooldown or in case she dies. She is also not damage heavy so be sure to add Espers that are to the team.
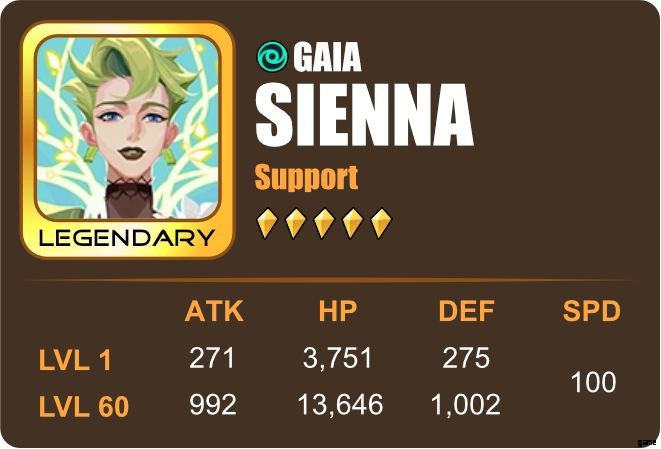
Sienna (Gaia)
Role: Support (Possible Controller)
Sub Roles: AoE, Disabler, Buffer
Buffs: ATK Up, SPD Up
Debuffs: Stun
Other Abilities: Increase AP, Reduce AP, Bonus Turn
Captain Ability: Increases ally RESIST by 40%
Attributes:
Excellent HP &DEF
High ATK &SPD
Skills:
| Guardian Vine | Earth’s Blessing | Wrath of the World | |
| Target | 1 Enemy, Self, 1 Random Ally | All Allies | All Enemies |
| Damage / Heal | Damage:125% (max lvl) of ATK | — | Damage:120% (max lvl) of ATK |
| Effects | Increase AP 15% (Self + 1 Random Ally) | ATK Up &SPD Up, 2 turns | Reduce AP down to 0% If target’s AP gets to 0% later, 60% (max lvl) chance to Stun, 1 turn |
| Triggers / Cooldown | — | 4 turns (max lvl) | 6 turns (max lvl) |
| Ascension Upgrade | — | — | Bonus Turn (Self) |
Recommended x4 Relic Sets:
Wind Walker, Ocean Waves
Recommended x2 Relic Sets:
Adamantine, Master Grove, The Light Above
Sienna has the ability to boost up AP along with the most important attributes for most Espers:SPD and ATK. She would make a fantastic pairing with Unky Chai who could reduce cooldowns of every ally with ATK Up with his last skill. She can also bite back against enemies with her last skill, dealing damage and reducing AP which may stun them while getting a bonus turn.
However, you may have problems with her long cooldowns so be sure to equip her with Wind Walker for faster turns or Ocean Waves for cooldown reductions. As for 2-Relic slots, you may use Adamantine for early battle Shields, Master Grove for more HP or The Light Above to avoid early debuffs.
Since damage is not her strong suit, she would benefit from having stronger damage-dealers in her team.
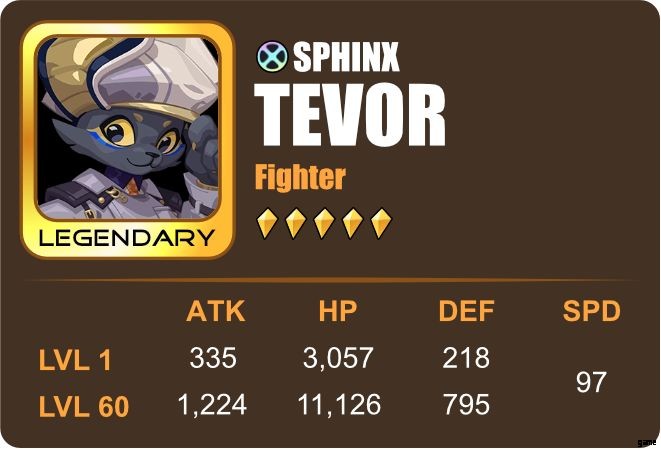
Tevor (Sphinx)
Role: Fighter
Sub Roles: Chain Striker, AoE, Nuker, Debilitator, Buffer
Buffs: Neko-Sense
Debuffs: Neko-Curse, Sear
Other Abilities: Repeat Ability, Damage Reduction
Captain Ability: —
Attributes:
Godly ATK
Good HP, DEF &SPD
Skills:
| Uncovered Truth | Neko-Analysis (Passive) | Neko-Giftbox | |
| Target | 1 Enemy | Attacked Enemy | 1 Enemy |
| Damage / Heal | Damage:130% (max lvl) of ATK | — | Damage:210% (max lvl) of ATK |
| Effects | Neko-Curse, 1 stack | If target’s HP is above 50% =Repeat Ability If target’s HP is below 50% =Gain 1 Neko-Sense (only 1 stack per turn) (max stack:2) | Sear, 1 turn |
| Triggers / Cooldown | — | Whenever Tevor attacks | 5 turns (max lvl) |
| Ascension Upgrade | — | Each stack =+15% Damage Reduction | — |
Recommended x4 Relic Sets:
Hammer of Thor, War Machine
Recommended x2 Relic Sets:
Fiery Incandescence, Sword Avatara
Tevor’s skills revolve around his unique buff, Neko-Sense, and debuff, Neko-Curse. Neko-Sense resets all ability cooldowns and attacks a target twice the next turn once he has two stacked. Each stack reduces damage taken by 15% and will reset once activated. Neko-Curse deals 40% of Tevor’s ATK as True Damage to all enemies once the carrier dies. This debuff stacks up to 5 and increases the multiplier by 40% each.
His base ATK is extremely high compared to the rest of his attributes. You could equip him with War Machine to increase it even more or equip him with Hammer of Thor and Fiery Incandescence to improve his C. DMG and C. RATE. You may also equip him with Sword Avatara so he can use his basic skill more, triggering Neko-Curse more often.
However, the rest of his stats are way lower compared to his ATK which makes him easy to kill and too slow for his turns. He may be best paired with a Support that can increase his SPD or one that can lower cooldowns. Defenders could also keep him from dying while Controllers could slow down his enemies so he could catch up and play his turns.
He is best used against enemies with high DEF as his Neko-Curse debuff, once activated, will completely ignore their DEF.
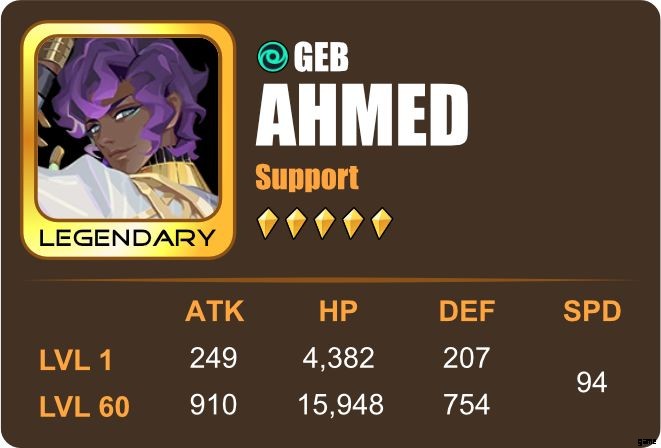
Ahmed (Geb)
Role: Support
Sub Roles: Chain Striker, Buffer, Healer, Dispeller
Buffs: Supporting Song
Debuffs: —
Other Abilities: Removes Diseased debuffs, Restores HP threshold
Captain Ability: Increase ally HP by 30%
Attributes:
Godly HP
Good ATK &DEF
Low SPD
Skills:
| Prelude To Life | Warm Harmonics (Passive) | World Stage | |
| Target | 1 Enemy, 1 Lowest HP Ally | 1 Lowest HP Ally | All Allies (Prioritizes Lowest HP Allies) |
| Damage / Heal | Damage:3 hits, 15% of ATK + 2% (max lvl) of max HP each Heal:4% (max lvl) of Ahmed’s HP (Ally) | — | Heal:10 heals, 8% of Ahmed’s HP |
| Effects | — | Ahmed’s heals always target Lowest HP Allies first If target has HP Ceiling Penalty =Restore target’s HP threshold by 5% + Remove Diseased debuffs + Supporting Song (1 stack) (max:25) | Reduce Cooldowns by 1 turn Skill is not affected by cooldown buffs / debuffs |
| Triggers / Cooldown | — | Each time Ahmed casts a healing ability actively | 4 turns (max lvl) |
| Ascension Upgrade | — | If target’s HP is less than 50% =Supporting Song (+1 stack) | — |
Recommended x4 Relic Sets:
Abiding Panacea, Wind Walker
Recommended x2 Relic Sets:
Master Grove, Sword Avatara
Ahmed is all about healing and less about attacking. His first and last skill heals his allies while his second skill is a passive that improves them, making him the ultimate support. ATK is not important to this Esper, merely using 45% total ATK for his basic skill and taking the rest from a percentage of his max HP. You are better off concentrating on HP attributes, equipping him with Master Grove for even more HP and Abiding Panacea for more effective heals.
Also consider adding SPD attributes to his relics as it is his lowest stat. Alternatively, you can choose Wind Walker for faster turns or Sword Avatara for counterattacks that will trigger his heals every time.
His Supporting Song buff gives +2% base ATK which can stack up to 25 times, making him an ideal support for Fighters, especially if paired with another Esper that has ATK Up and possibly one with C. RATE Up. However, even with all these buffs, he is not very reliable when it comes to dealing damage.
And this concludes our guide for Legendary Espers. We hope that this guide gives you insight in using your Legendaries, what relics to equip them and what type of Espers they are best paired with.
However, the game is constantly changing and new discoveries on how Espers are used are made each day so feel free to deviate from our suggestions and have fun experimenting with different builds. If you have learned other tips and tricks regarding the Espers discussed in this guide, feel free to leave your findings in the comment section below!