HUMANKIND – 決定的な地図編集ツール

Ulimate マップ エディター ガイド
基本
人類地図エディタの起動
メイン メニューで、[エクストラ]、[コミュニティ]、[マップ エディター] の順に移動します。
そこから、次のいずれかを実行できます:
- [Launch Editor] をクリックして、デフォルトのマップでエディタを起動します。
- プリセット マップ (Tiny、Small、Normal、Large、Huge サイズ) のいずれかを読み込みます。
- 編集済みの地図を読み込む
注:現在のバージョンのエディタでは、これがマップをロードする唯一の方法です。
ショートカット
- 左クリック: カメラを動かしてください。
- 中クリック: タイルを配置します。
- 右クリック: ホバーされたタイルの値を選択します。タイルを右クリックし、マウスを動かしながら右クリックを維持してタイルを複製すると、この方法でタイルを「描く」ことができます。
- マウス ホイール: ズームイン/ズームアウト
- Ctrl + 右クリック: タイルを 1 つ選択してください。
- Ctrl + 右クリック &ドラッグ: 四角形のタイルを選択します。
- B: ブラシ サイズを小さくします。
- N: ホバーしたタイルの高さを上げます。
- わ: ホバーしたタイルの高さを減らします。
- X: ブラシのサイズを大きくします。
- Ctrl + Z: 元に戻す
- Ctrl + Y: やり直す。
- C: 次の編集モード
インターフェース
マップの構築
地形の配置
メニューの「タイル」ボタンをクリックし、タイルの種類 (森林、大草原など) を選択します。カーソルをビューポートに移動し、マウスの中ボタンをクリックして配置します。
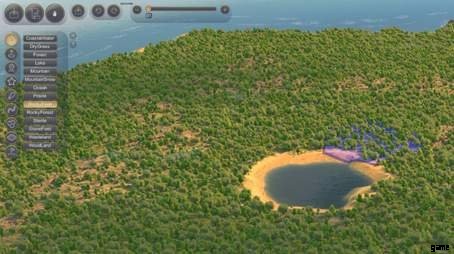
また、既存のタイルでマウスの右ボタンをクリックし、それを押したままマップ上を移動して、このタイルを好きな場所に描画することもできます。
画面上部のカーソルを移動するか、B および N ショートカットを使用して、ブラシのサイズを調整できます。
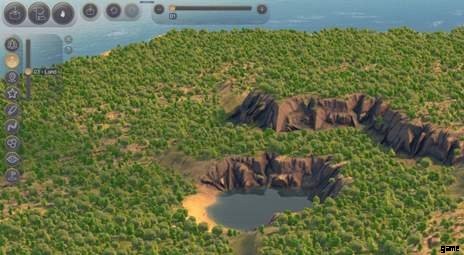
タイルの高さを調整してマップに深さを追加するには、メニューの [高さ] ボタンと高さ (0 =床レベル、-1 =海抜) を選択します。次に、調整するタイルにカーソルを合わせ、マウスの中ボタンをクリックします。
また、タイルを地形に合わせ、W と X のショートカットを使用してタイルの高さを調整することもできます。
川の配置
川を配置するには、メニューで「川」オプションを選択し、地図上で川を開始したい場所で中クリックし、海岸または湖にドラッグします。川を別の川にドラッグすると、2 つの川を接続できます。
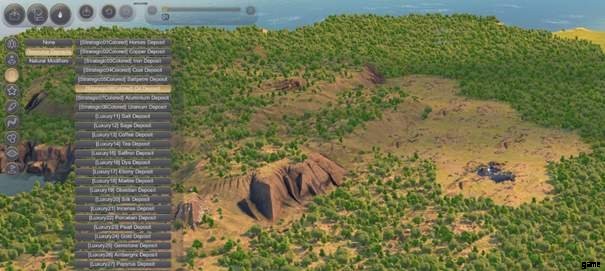
興味のあるポイントを配置する
関心のあるポイントを配置するには、メニューの「関心のあるポイント」ボタンを選択し、配置したいカテゴリをクリックします:リソース預金または自然修飾子。配置したい要素を選択し、配置したい領域にカーソルを合わせ、マウスの中ボタンをクリックして配置します。
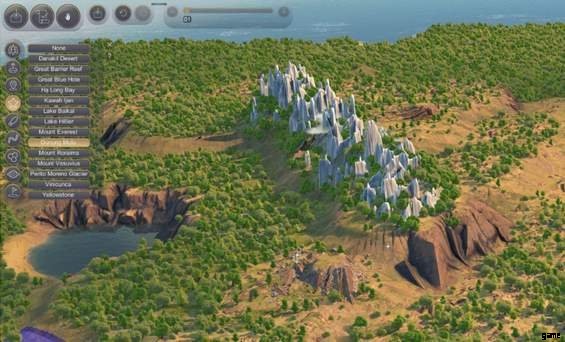
自然の驚異の配置
自然遺産を配置するには、メニューの「自然遺産」ボタンを選択し、配置したい遺産をクリックし、配置したい場所にカーソルを合わせ、マウスの中ボタンをクリックして配置します。
Importing a heightmap
The HUMANKIND map editor allows you to import heightmap images to automatically generate a terrain. You will need two images to do so:
- The heightmap itself, with clear colors or shades to define each height.
- The palette, a reference image which will be used by the Map Maker.
The two images must be in PNG and placed in the Documents/Humankind/Maps folder.
Depending on the map size, your heightmap image should have a 2:1 ratio.
There are 16 height levels, from –3 to 12, 0 being the first land level (-1 is the sea level).

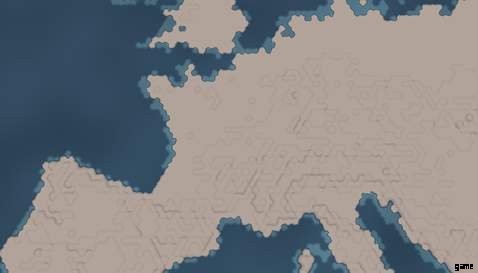
Colored map and palette, with only 7 levels defined, from -1 (deep sea) to 5 (mountains).
To create a palette from your heightmap, you can use the Humankind_Sample_Palette.png file and replace the colors by the ones in your heightmap, the fifth color being the floor level “0”.
You can simply pick the colors from your heightmap and drop them in the corresponding square on the palette.

Once your two files are in the Documents/Humankind/Maps, launch the editor and click on the “Import button”. The import interface is divided in two:
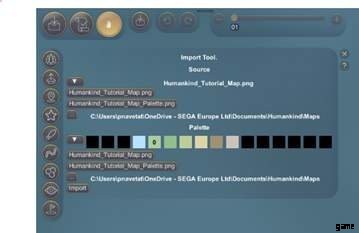
In the “Source” area, select your heighmap. In this example, this is the Humankind_Tutorial_Map.PNG file.
In the “Palette” area, select your palette. In this example, this is the Humankind_Tutorial_Map_Palete.PNG file.
Click on Import to complete the process. Your map should be showing in the viewport, time to customize it and make it playable!
Constraints
Basic constraints:
- All the strategic resources must be placed.
- Luxe resources must be placed.
- Natural wonders must be placed.
Gameplay constraints:
- Every player must have a starting point in every version of the map.
Territories must follow these constraints:
- Not too big, not too small (roughly 50 tiles for a Continent Territory). Ocean territories can be bigger than continents.
- Must be flagged as a continent or as an ocean.
- Only one global Ocean allowed, one Earth territory allowed.
- All “reachable” tiles (not mountains/wonder/water/ water/some POI) in a territory must be reachable from any other reachable tile without having to exit the territory. For example:a territory cut in two parts, separated par water is not a valid territory.
All territories with islands must be “Ocean” territories.
- Ocean Natural Wonders must be placed in the Ocean.
- Ocean POI must be placed in the Ocean.
- Natural Wonders shouldn’t be cut or partly erased.
- No underwater river.
Aesthetics constraints:
- A natural wonder should be placed on a flat surface.
- Avoid 3-level high cliffs, as it blocks visibility.
- Rivers must start from a terrain and end up in a lake or in the sea.
Placing Starting Points
You will need to place starting points in your map to be able to play it.
For example, if you want your map to be playable up to 3 players/civilizations, you will need to place starting points like this:
- Place the starting point #1 for the 1-player version.
- Place the starting point #1 and #2 for the 2-player version.
- Place the starting point #1, #2 and #3 for the 3-player version.
To do so in the editor, first click on “Starting Points”. The first row is the version of the map, the second row counts the number of Starting Points you placed:
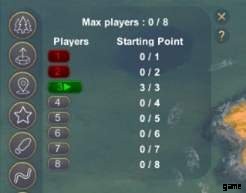
Green =Good, Red =Bad.
So, click on the “1” button for the “1-player version” of the map, then middle-click in your map to define the starting point. After that, click on the “2” button for the “2-player version” of the map, then middle-click in your map to define first starting point and a second time for the second starting point, etc.
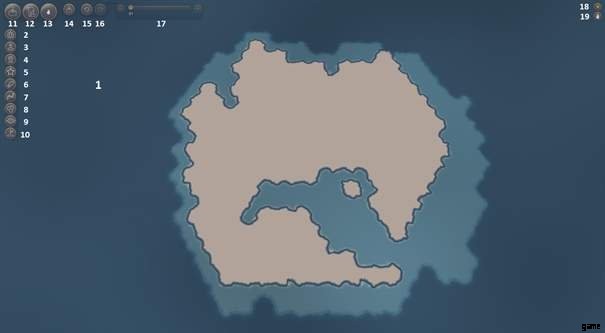
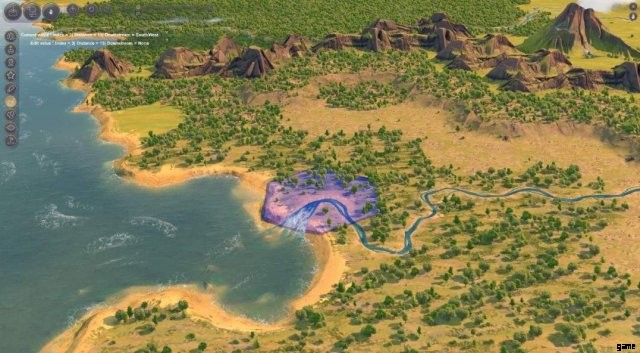
Adding Territories
To add territories, we recommend you to zoom out to have the aerial view of the map.
Adding territory is done in three steps:
<オール>You will need to define territories for the entire map, and these territories must not be too small or too big.
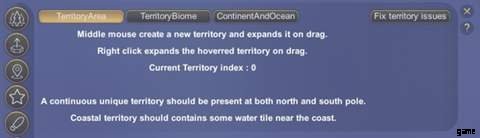
Click on the “Territory” button, then, when you are in the “TerritoryArea” map, you can draw territories on your map by clicking on the middle mouse button. Every time you click, you create a new territory, which has a different color.
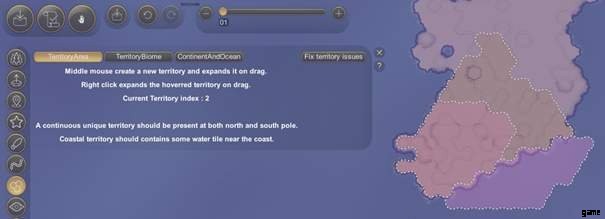
You can expand a territory by right-clicking in your territory, maintaining the click and dragging your mouse where you want to expand it.
The index of the current selected territory displayed in the tab:
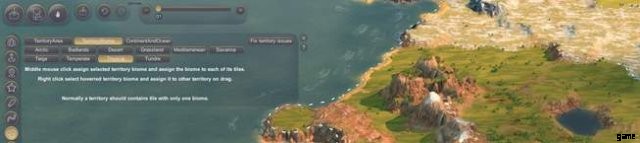
To determine which biome applies to each territory, zoom in back to a closer view of your map. Click on the “TerritoryBiome” tab, then select a biome and middle click on the territory you wish to apply this biome to.
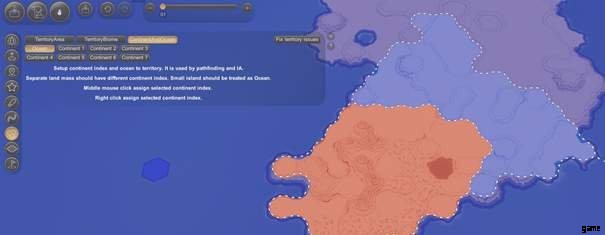
To define the territory type (Continent or Ocean), zoom-out to have a global view of your map, select the “ContinentAndOcean” tab, then select the territory type (Ocean, or Continent) and middle-click on the territory to define its type.
Validating Your Map
To validate your map, click on the “Validate” button on the top of the interface.
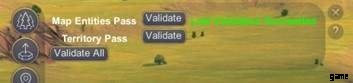
- Map Entities Pass validates that all the Starting Points are correctly set.
- Territory Pass validates that all Territories are correctly set, in terms of size, accessibility and type.
Note:the error message concerning territories is sometimes misleading, saying that “One of the Ocean territories contains more continent than water”, when it’s the opposite (a Continent containing too much water). It will be fixed soon.
The rules are simple:
- An Ocean territory must contain at least 50% of water tiles.
- A Continent territory must contain at least 50% of continent tiles.
- A Continent territory should be roughly 50-tiles big.
既知の問題
We have identified some issues with this early version of the editor. We will improve the tool following its release.
- The “Close the editor” button closes the game too.
- The “W” and “X” shortcuts are hard to use on a QWERTY keyboard, they will be replaced by other shortcuts in a future version.
- The “Visibility” tool will fully useable later.
- The “Landmark” tool has a UI bug when typing the name of the landmark.