Back 4 Blood – ベテラン / ナイトメア モードを生き抜く方法 (+ ティア リスト)
クリーナー / 武器の簡単な Tier リストと、ベテラン / ナイトメアを通過してすべてを詳細に分析するためのいくつかのビルドが必要な場合でも、このガイドでカバーできます!
武器とクリーナーのホットで速い層リスト
わかりました。使用する武器と避けるべき武器を知りたいだけなら、どうぞ。
よりクリーンな層のリストと詳細
わかりました。ここまでスクロールしてくださったので、基本的な概要を説明します。
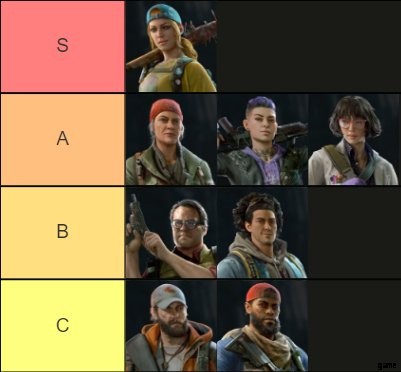
ベテラン / ナイトメア:
- S:ホリー
- A:ママ、カーリー、ドク
- B:ホフマン、エヴァンジェロ
- C:ジム、ウォーカー
理由:
ホリー:彼女を近接ビルドとして使用していますね。これにはいくつかの意味があります。
- 弾薬消費なし
- すべての難易度で同じようにプレイ
- 最大の潜在ダメージ、DPS、全体的なキル
- 本質的に殺すことはできません (トールボーイやその亜種で愚かなことをしないでください)
- 消防斧、ぶるぶるっ!
- いいえ、彼女は格闘マシンです。特にアドレナリン燃料 + Meth Head カードを使用する場合
Mom:チーム エクストラ ライフ。それはそれについてです。これにより、全員がベテランで 2 回ダウンするか、ナイトメアで 1 回ダウンしても死ぬことなく、生存率/ダメージ/成功の可能性が高まります。また、Doc 用の medkit を 2 つ持ち運べるのも非常に便利です。チーム サポート スロットを購入したり、カードを追加したりすると、利益は減少しますが、医療キットが 2 つ増えます!
Karlee:壁の後ろにいるスリーパーを検出し (Nightmare の大群を避けるため)、Tec9 から始めます (無限範囲の大群をクリアするために Ammo Stash カードと組み合わせます。または、他の誰かと調整して Ammo Stash を取り、Tec9 を渡してから行きます近接)
Doc:主に Team Trauma Resistance と 3 つの Free Heal 用です。追加のヒーリングが役立ちます
ホフマン:チームの弾薬容量、弾薬の生成 (一貫性はありませんが、少なくとも彼はそれを撃つことができます)、より多くのパイプ爆弾を運ぶことができます
エヴァンジェロ:チームスピード
ジム、ウォーカー:どちらもスナイパー武器と精密キルに依存していますが、B4B のような混沌としたゲームでは標準以下です。トールボーイはヒイラギに死に、大群はカーリー + Tec9 とホリーに死に、他のクリーナーははるかに優れたパッシブを持っています。また、これら 2 つのダメージ バフ (ジムのスタッキング バフとウォーカーの 10% バフ) は、弱点のダメージを増加させません!!!)。ジムはチームのウィークスポット ダメージで優れていますが、殴られるたびにボーナスを失います。
銃ティア リスト
PSA:「火力」統計は役に立たないので、無視してください。
B4B Discord で人々と話し、次の階層リストを思いつきました。
意図的なカードのロードアウト/最適化と理想的なアタッチメントを想定してください。
心に留めておく価値のある補足事項:アサルトライフルは、より高い難易度全体でプレミアムになっています。それを使用する事実上すべての武器(リボルバーとランチライフルを除く)は弱く、フルオートで撃ちます. AR弾薬が「プレミアム」または「レア」であると聞いた場合、これが理由です.ショットガンの弾薬は AA12 のユーザーにとっても多少早く使い果たされる傾向がありますが、SMG とスナイパーの予備弾薬は一般的にすぐに使い果たされることはありません。
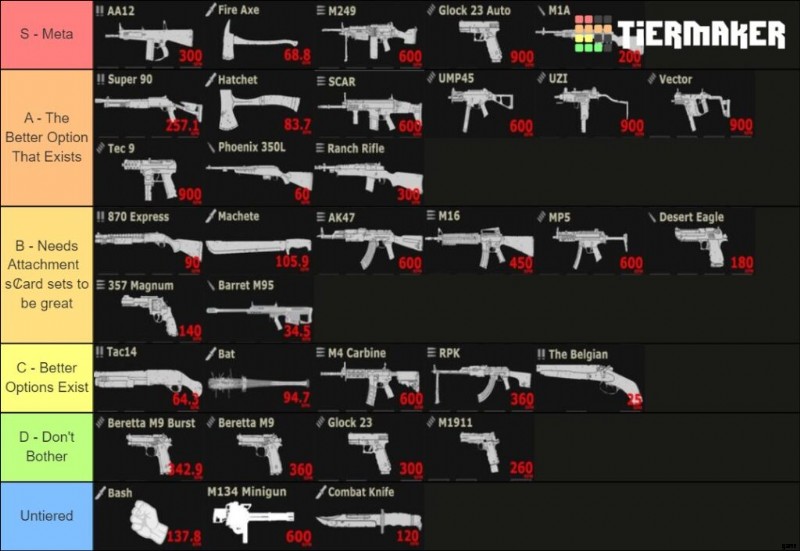
とりあえずティアリスト。
- S – メタ:AA12、消防斧、M249、オートグロック、M1A。
- A – すばらしい:Super90、Hatchet、SCAR、UMP45、Uzi、Vector、Tec9、Phoenix、Ranch Rifle。
- B – 良いですが、可能な場合はトレードアップします:870 Express、Machete、AK47、M16、MP5、Deagle、Revolver、Barrett。
- C – 普通:Tac14、Bat、M4、RPK、ベルギー語
- D – 気にしないで:ベレッタ、セミグロック、M1911.
- 階層なし:バッシュ、ミニガン、コンバット ナイフ
武器のカテゴリで説明すると、少し説明しやすくなります。似たような役割を持っているので、牧場ライフルと狙撃兵を組み合わせましたが、 ゲームに応じたアサルトライフル。
ショットガン
参考までに、AA12 と Super90 の射程距離は約 2.5 メートル、870 Express は 5 メートル、Tac14 と Belgian は 7.5 メートルです。
ダメージ値は、すべてのペレットが命中したことを前提としています。これは複数の精度カードで可能ですが、それらで 100% を超えないようにしてください。そうすると悪いことが起こります。
AA12 は 1 発あたりのダメージが弱いですが、フル オートで撃ち、ボックス マガジンを備えているため、シェルごとにリロードするのではなく、一度にすべてリロードします。弾薬の消費に関してはやや非効率的ですが、ボス以外で撃つものはほとんどすべて 1 つのマガジンで死んでしまいます.
- 白:69 - すべてのペレットが命中した場合のダメージは 23.4
- 緑:79.1 – 27.4
- 青:90.7 – 30.9
- 紫:104.2 – 35.9
- 弾丸の貫通力:2 列目は 17.5% のダメージを受ける
Super90 は、全体的な DPS で AA12 と競合できます (ただし、遅れをとっています)。2 つのポンプ ショットガンを引き継ぐ価値があります。
- ホワイト:73 – 24.7 ダメージ
- 緑:83.5 – 29
- 青:95.7 – 32.6
- 紫:109.5 – 37.7
- 弾丸の貫通力:2 列目は 17.5% のダメージを受ける
870 Express は…一度に 1 発の弾丸を装填するポンプ ショットガンです。 AA12 や Super90 よりも発射速度が遅く、わずかに多くのダメージを与えます。堅実ですが、素晴らしいとは言えません。
- ホワイト:73 – 24.7 ダメージ
- 緑:87.2 – 30.5
- 青:103.9 – 36
- 紫:124.1 – 42.3
- 弾丸の貫通力:2 列目は 25% のダメージを受ける
Tac14 は、他のショットガンよりもダメージの面でスケーリングが難しいことで注目に値します。生のダメージに関しては、基本的には 3 ショットのダブル バレル ショットガンです。 …しかし、あなたは3ショットしか持っていません。それはピンチで機能し、Purple Tac14 は細断されますが、常にリロードする必要があります。 Purple Tac14 と Purple Belgian は、すべてのペレットが当たった場合、ほぼ同じダメージを与えることに注意してください。また、Tac14 はある意味でスケーリングするため、2 回の Super90 ショットとほぼ同じダメージを与えますが、ショット間の顕著な落ち着きがあります。 Admin Reload と Power Swap をジャグリングする場合、2-Gun ビルドで実行可能になります。ただし、コモンに対しては使用しないでください。大群の排除にはかなり悪いです。代わりに +3 ラウンドを得て、容量を 2 倍にする紫色のマガジンの恩恵を受けましょう!
ああ、ちなみにこの銃はバレットよりもダメージが大きいです。
- ホワイト:130 – 44.3 ダメージ
- 緑:162 – 55.7
- 青:202.2 – 69.7
- 紫:257.1 – 87.9
- 弾丸の貫通力:2 列目は 32.5% のダメージを受け、3 列目は 7.5% のダメージを受けます
ベルギーは特別なケースであり、パワーリロード/アドミンリロードのペアのカードと組み合わせるべきです。このカードのコンボを使用する場合は、一度に 2 つのシェルを発射するため、弾薬の消費に注意してください。リロード カードも、この武器の DPS を直接ブーストします。
- ホワイト:134 – 45.3 ダメージ
- 緑:167.2 – 56.9
- 青:209 – 71.8
- 紫:260.9 – 89.9
- 弾丸貫通力:2 列目は 32.5% のダメージを受け、3 列目は 7.5% のダメージを受けます。
近接武器
消防斧は約です。バットの6倍のダメージと約。マチェーテの5倍のダメージ。ヘビーアタック/意地悪な酔っぱらいカードは、ワンショットスペシャルを可能にします.唯一の欠点は、垂直方向のスワイプです [しゃがみ、爆発する頭に対処するためにほぼ正確に下を目指します]。
Hatchet は Axe-lite であり、より速く移動できることで知られています。 Fire Axeの半分強のダメージ。垂直スラッシュ。
Machete-go-brrrrrrt ビルドは本当に楽しいですが、特別な感染したものに効果的に対処できないのはちょっと痛いです。水平スラッシュ。バットよりも速く、わずかに多くのダメージを与えます (白いレア度 iirc で 1 回のスラッシュで殺すのに十分です)。
バットの唯一の良い点は、必殺技に対するつまずきダメージが大きいことです。近接ビルドを使用する場合は、何もないよりはましです。できるときにアップグレードしてください。
アサルトライフルとLMG
アサルトライフルとLMGは似たような役割を持っているので同調しました。狙撃兵のセクションで牧場のライフルを見つけることができます
M249 は、適切なベース マガジン サイズ [「ベルト」の長さなど] に近い AR/LMG に次いで 2 番目です。腰撃ちの精度低下が逆なので、腰撃ちビルドで実行可能です [撃つにつれて精度が向上します!]。 6.5 秒 (白のレア度) のリロードは痛いですが、正直なところ、ビデオ ゲームで見たベルトガンのリロードの中で最も速いものの 1 つです。また、優れた基本弾丸の貫通力 (25% 程度のダメージしか失うことはありません) を備えています。これは、大群を掃除するだけでなく、装甲の必殺技 (およびトールボア) に対処するためにも重要です。あなたに向かってまっすぐ歩いてください!)
- ホワイト:13 – 8.3 ダメージ
- 緑:14.9 – 9.6
- 青:17.2 – 11
- 紫:19.8 – 12.7
- 弾丸の貫通力:2 列目は 75% のダメージを受け、3 列目は 50% のダメージを受け、4 列目は 25% のダメージを受けます
SCAR は、50% を超える弾丸貫通力を持つ唯一のアサルトライフル (RPK / M249 を除く) であることで注目に値します。フルオートでの射撃中に少しバウンドしますが、それ以外は基本的に AK47 への直接のアップグレードです。注:Purple SCAR は実際には LMG よりも優れた DPS を持っていますが、20 ラウンドのマガジンは痛いです。
- ホワイト:15 – 9.6 ダメージ
- 緑:18 – 11.5
- 青:21.6 – 13.8
- 紫:25.9 – 16.6
- 弾丸貫通力:2 列目は 61% のダメージ、3 列目は 36% のダメージ、4 列目は 11% のダメージ
AK47 は SCAR-lite です。わずかに悪いダメージ/ DPS(これも、火力の統計は無視します)、リロード速度がわずかに速いだけ、精度がわずかに悪いと言われています、弾丸の貫通力が悪い(SCARの39%に対して50%)...唯一のことは、完全に撃ったときの反動がいくらか良くなることです自動。注:紫の AK は実際には LMG よりも優れた DPS を持っていますが、20 ラウンドのマガジンは痛いです。
- ホワイト:14 – 9 ダメージ
- 緑:16.8 -10.8
- 青:20.2 – 12.9
- 紫:24.2 – 15.5
- 弾丸の貫通力:2 列目は 50% のダメージを受け、3 列目は 25% のダメージを受けます
M16 - 良くない - 良い理由よりも、良くない方が簡単に説明できます。バースト射撃武器であるという発射速度の上限は非スターターIMOであり、バーストを簡単に中断することさえできない(バッシュで-できますが、時間がかかります)ことは、弾薬を無駄にしていることを意味します.それがゴミではない唯一の理由は、それが実際に良いダメージと堅実な射程を持っているからです.必殺技に対して使用すると、この武器が輝く唯一の場所がほとんどわかります…ちょっと.
- ホワイト:14 – 9 ダメージ
- 緑:15.4 – 9.9
- 青:16.9 – 10.8
- 紫:18.6 – 11.9
- 弾丸の貫通力:2 列目は 38.5% のダメージを受け、3 列目は 13.5% のダメージを受けます
M4 は、プレミアム アサルト ライフル弾薬を使用しているときに SMG (uzi、Vector) ダメージを与えます。ヒップ ファイアが悪く、機動性が悪く、唯一の利点は弾丸の貫通力がわずかに優れていることです (-any- を持っている場合と同様に、他と比べて 50% のダメージ軽減) 67-82% のダメージ軽減を持つ SMG)。 D ティアではない唯一の理由は、フルオートで撃てるからです。
- 白:10 – 6.4 ダメージ [真剣になぜ SMG ダメージしか与えないのか]
- 緑:11.5 – 7.4 [最大範囲でモンスター コモンズに対して頭をポップできない]
- 青:13.2 – 8.5
- 紫:15.2 – 9.7
- 弾丸貫通力:2 列目は 50% のダメージを受け、3 列目は 25% のダメージを受けます。
正直なところ、RPK にはいくつかの利点があります。優れたダメージ [Range Rifle よりも優れています!]、優れた射程、適切なマガジン サイズ。残念ながら、発射速度とリロード速度は文字通りゴミです。生のダメージ出力に使用できます。単発で発射しますが、反動もかなり悪いです。レア度が高いほどスケーリングが難しくなります。青/紫の希少性で使用可能。
作者注:Admin Reload ビルドでは、特に 2-Gun を使用している場合、この銃は実際にはまったく悪くありません。その後、マガジン サイズのアタッチメントを使用して、ランチ ライフルよりも優れたダメージを与えることができます。
- ホワイト:18 – 11.5 ダメージ
- 緑:21.6 – 13.8
- 青:25.9 – 16.6
- 紫:31.1 – 19.9
- 弾丸貫通力:2 列目は 75% のダメージを受け、3 列目は 50% のダメージを受け、4 列目は 25% のダメージを受けます。
サイドアーム
AutoGlock:正直なところ、AutoGlock よりも Tec9 の方が好みなら、それで問題ありません。 Glock が優れている理由はいくつかあります。DPS がわずかに優れていること、生ダメージが優れていること (レア度が低い弾丸でヘッドショットするのに十分)、反動パターンが Tec9 より優れていることです。
Tec9 のマガジン サイズは AutoGlock よりもわずかに大きくなりますが、いくつかの悪い統計があります。ただし、手に入れる価値はあります!
ディーグルとリボルバーは、次のニッチで非常に似ています:ワン ショット ボディ ショット コモンズ、-良い- ダメージ貫通値、ある程度の成功で廊下をクリアできる、長いリロード速度のおかげで全体的な DPS を台無しにする、悪いヒップファイア
ディーグルは、一般的に必要とされるアサルトライフルの弾薬を使用するリボルバーに対して、素早いダメージ、弾丸の貫通力、より希少なスナイパーの弾薬を使用する点で優れています。
ベレッタ、セミグロック、M1911:文字通り拾わない。これはKilling Floorではありません。 M1911 は体にダメージを与えるのに適していますが、トラッシュ リロードがあります。また、新兵であっても、白いベレッタはヘッドショットを 1 発することはできません!
SMG
S ティアの SMG はありません。 S ティアの主砲に対抗するには十分ではありません。
Uzi、Vector、UMP45 はすべてさまざまな理由で A 層ですが、カテゴリとして、いくつかのサポート ビルドで使用する価値があります。
Uzi は、Vector や UMP45 ほどダメージに関しては優れていませんが、優れた DPS を備えています。
Vector は SMG の中で最高の DPS を持ち、低品質では SCAR/AK よりも優れていますが、生のダメージに関しては同様にスケーリングしません。反動が最も低く、レーザーサイトと併用すると優れたヒップファイアが得られます!リロードが必要になる前に、ほとんどの場合、1つのスペシャルのみを刈り取ることができます.要するに、常に堅実な選択です!
UMP45 は M249 と AK47 の間でダメージを与え、汎用の「アサルト ライフル」としてそれらと競合し、AK47 よりもわずかに速いリロード速度を誇っています。ダメージ貫通率もまあまあ (62-ish%) で、基本的にピストル弾薬を使用する AK47 であり、射程距離とダメージ貫通率がやや劣ります。
MP5 は、対空砲レベルの反動を持つ下位の Uzi です。 DPS は M4 よりわずかに優れています。
スナイパーと牧場のライフル
同様の用途があるため、ここにランチ ライフルを置いています。
M1Aは、複数のフォローアップショットを正確に打つ必要があるため、おそらく生のスキルを最も必要とするライフルです. M249 / RPK / AK47 / SCAR のすぐ後ろにある DPS の可能性。
Ranch Rifle は非常に楽しく使用でき、非常に優れています。 M1A のより速く、より弱く、反動の少ない弟分。 DPS は、ショットガン、RPK、およびその他の狙撃兵によってのみ生のダメージで打ち負かされます。
フェニックスは、より寛容で弱いバレットです。特別な感染削除ツール。リロード ビルドで使用します (リロード カードはボルト アクション サイクリングを改善します!)。これとバレットの好みの問題。
バレットは、寛容ではなく、より強いフェニックスです。特別な感染削除ツール。リロード ビルドで使用します (リロード カードはボルト アクション サイクリングを改善します!)
よりクリーンなクラス
ここまで来たら、何か良いカード ビルドがあるかどうか疑問に思っていることでしょう。
はい、私の友人、私はあなたのためにたくさんの良いビルドを持っています.実際、Veteran と Nightmare で何をすべきかについての知識を提供させてください。
ええ、これは「スピードランではない」ためですが、「合理的なでレベルを移動するためです」 時間枠、最小限のダウンなど」などです。ご存知のように、レベルを「通常どおり」通過します。
4 つの役割があります :
- 役割 1:スカベンジャー
- 役割 2:衛生兵
- 役割 3:近距離ダメージディーラー (DD) / DPS
- 役割 4:中長距離ダメージディーラー (DD) / DPS
スカベンジャー
あなたのスカベンジャー カーリーのはずです。エヴァンジェロは大丈夫です。
これがあなたのデッキです。必要に応じて、カードの順序をいじることができます。先に進むために、近接カードを前もって用意しておきます。
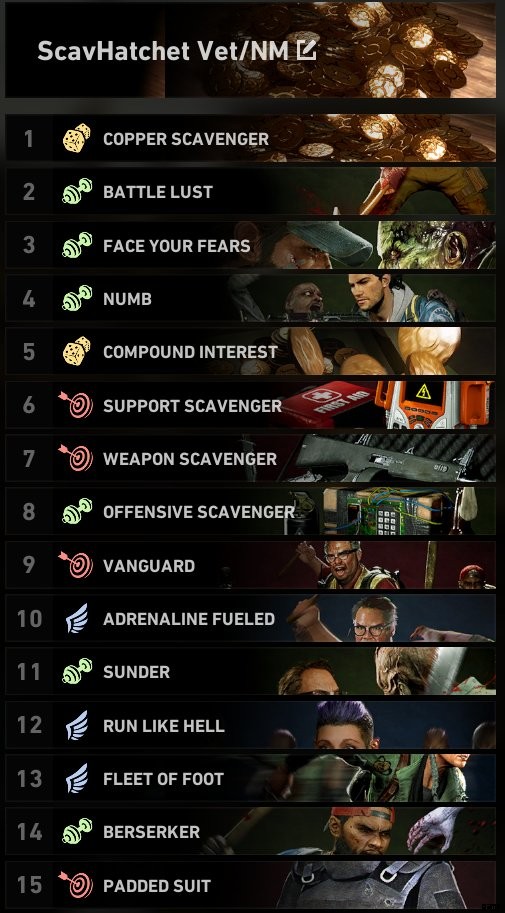
- 銅スカベンジャー
- 武器スカベンジャー
- 最前線!
- 攻撃的なスカベンジャー
- スカベンジャーをサポート
- 複利
- 地獄のように走る
- 艦隊
- バーサーカー
- ヴァンガード
- アドレナリン全開
- 戦いの欲望
- 麻痺
- パッド入りスーツ
- サンダー
Copper Scav は最初のカードです。
複利はできるだけ早く合理的に取られるべきです。各ラウンドの終わりに、セーフハウスのドアのそばに全員に現金を投棄してもらい、それを受け取ってボーナスを獲得します。
スカベンジャーとしての戦術
- ツールキットを持ち歩き、隠し扉で使用する
- あなたは二次です チームの近接ユーザー。 なたを見つけて運ぶことができます セカンダリ武器として使用し、Common Ridden に対して使用します。初期段階では、必ずしもメレー ガイとして真に輝くカードを持っているとは限りませんが、それは問題ありません。スカベンジャー カードを早めに入手してください。
- 銅スカベンジャーと複利は優先度の高い選択です。複利は、マップ トランジション間でキャッシュを乗算することによって機能します。 安全な部屋のドアを閉める前に、チームメイトにやめてお金を渡すように促すのはあなたの仕事です。
- あなたはプライマリ ダメージ ディーラーではありません。あなたはラバ/スカベンジャーです。無理に伸ばしすぎて死なないでください。
その他の注意事項
- 近接ビルドを実行したくない場合は、それで問題ありません。近接武器を交換するだけです。
- ただし、近接ビルドを実行していない場合は、ヘビー ヒッターを使用してください。一般的な敵を攻撃すると倒せます (ただし、HP の再生は得られません)。また、必殺技をやや簡単に気絶させることができます
- ユーティリティスカベンジャーは必要ありません。
- ダウン・イン・フロント!メインの近接ディーラーを除くすべてのビルドで必須です。他のプレイヤーの近くにいる場合はしゃがみます。特に、メインの近接攻撃の相手の隣にいる場合は特にそうです。
- まじめな話、ダウン イン フロント!できるだけ早く、近接攻撃の相手の近くにいるときはしゃがみ歩きます。あなたの近接兵は素のダメージのために構築しており、あなたを 2 発撃ちます。
- 収まる場合は、Money Grubbers を使用してください。最高のカッパー スカベンジング カードです。
メディック
あなたのメディック Doc である必要があります。ゼロの例外。これはあなたのチームの最初のピックである必要があり、Doc NEEDS を取る人は誰でもチームヒーラーとして機能する必要があります.これは必須です。最初にこれを理解してください。
これがあなたのデッキです。
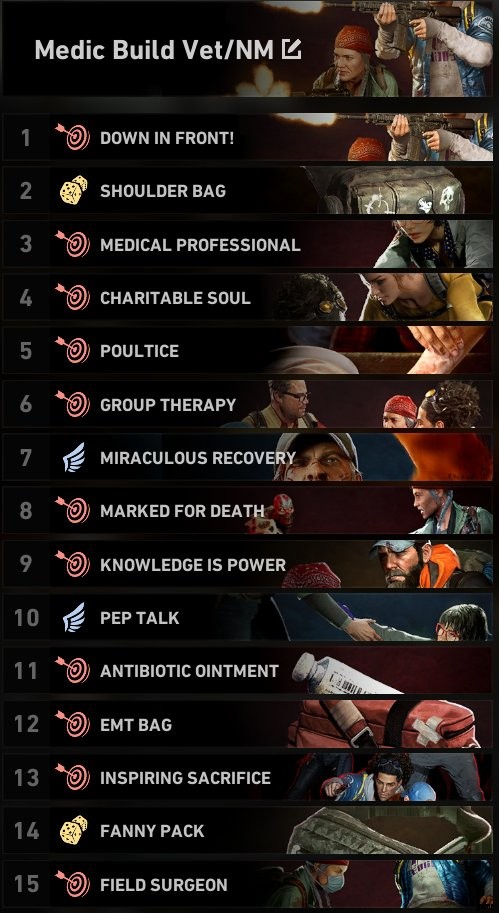
- 最前線
- ショルダーバッグ
- 医療専門家
- チャリタルブル ソウル
- 湿布
- 奇跡の回復
- Marked for Death [特記事項:この後は、チーム構成に基づいて順序を変更できます]
- 激励
- 抗生物質軟膏
- EMTバッグ
- 感動的な犠牲
- ファニーパック
- グループセラピー
- フィールド外科医
- 知識は力なり [交換可能;スナイパービルドにのみ有用]
デッキの順番について
- ダウン イン フロントが最初です。いつも。
- ショルダー バッグは最初のカード ドロー (2 番目のカード位置) として取る価値があります。与えられたダメージを気にする必要はありません。
- 医療専門家は必須の早期選択です。このカードを持っていない場合、持っていません ドクター / メディックの役割を果たす
- チャリタブル ソウル、グループ セラピー、湿布薬の順序はさまざまですが、できるだけ早く服用する必要があります。特筆すべきは、Poultice を使用すると、一時的な健康状態が回復し、追加の永久的な健康状態がゆっくりと回復するため、誰かに錠剤を与えるだけで実行可能なテクニックになります。
- Marked for Death の後にあるものは、順番が異なります。
メディックとしての戦術
- どの武器を使用するかはある程度自由ですが、近接武器を持ってはいけません (近接武器を一時的に持ち歩いている場合を除きます。たとえば、彼らが持っているものよりも高品質の武器を見つけた場合など)。
- 何かを攻撃したい場合は、しゃがみます。実際、積極的にどこかに速く移動していない場合は、しゃがみ歩きをする必要があります。 Down In Front! のおかげで、しゃがんでいるときにフレンドリー ファイアによるダメージを受けたり、ダメージを与えたりすることはありません。 THE LOVE OF GODの場合はしゃがんでください。何かから逃れるために積極的に移動しなければならない場合は例外ですが、真剣に、それを頭に突き刺し始めてください。これはすべてのクラスにとって重要ですが、特にメディックの場合は、人を傷つけるのではなく、治療する必要があります。
- 近接攻撃をしている仲間の近くにいると、これが 2 倍になります。
- 後ろにいて。チームメイトが怪我をした場合、彼らはあなたのところに来ます。
- チームメイトの健康状態に注意してください。けがをしたとき、彼らは自分がどれほど傷ついているかわからないことがあります。また、30以上のダメージを与える攻撃もあるので、気付かずに叩かれることもあります。マイクを使って彼らと話してください。あなたはする ありますよね?
- あなたは医療キットを持っています。あなたのスカベンジャーは医療キットを運んでいます。あなたの中長距離の男はmedkitsを運びます。あなたの至近距離の男は医療キットを持っています(タンクでない限り、治療薬がより効果的です)。彼らが治癒を望む場合、彼らは医療キットをドロップします。あなたは予備の 1 つを使用して回復し、ドロップした医療キットを拾います (必須ではありません)。
- あなたのスカベンジャーは、地面にある健康アイテムをより多く見つけるようになります。チームメイトの健康状態を維持するために何を使用するかはあなた次第ですが、健康キットの前に地面にあるものを使用する必要があります (医療キットを介してトラウマのダメージを癒すなど、例外が適用されます)。この種のことを見たときはいつでも、Doc プレーヤーとして状況を制御する必要があります。あなたの近接部隊が最初に行くのが良いことを確認するために調整してください.遠距離の相手が怪我をした場合 (まず第一に、チーム内で何か問題が発生していることは明らかです)、近距離の相手を治療することよりも優先順位が最も低くなります。
- プレイヤーごとに無料で回復できます。エンディングのセーフハウスのために取っておくようにしてください。ただし、早く「燃やす」ことを恐れないでください。
その他の注意事項
- カードを持っていない場合は、より高い難易度で Doc / Medic をプレイしないでください。最初にカードのロックを解除します (ヒント:中央のサプライ ラインのロックを解除して、すべての医療カードを取得します)
- 覚えておいてください。近接攻撃をしている敵の近くにいる場合は、しゃがんでください。
- 中長距離の男が使用していない武器を選んでいることを確認してください。彼らはあなたよりもはるかに多くの弾薬を必要とするでしょう。
- 攻撃する場合はしゃがんでください。
- いや、真剣に考えてみてください。リクルートの難易度であっても。誰かを撃つ前に、今すぐ習慣を身につけてください。
- マネー カードを取得する場合は、Money Grubbers が最適です。おそらく、抗生物質軟膏を捨てれば済むでしょう。
- 検討する価値のあるもう 1 つのカードは、ヘビーヒッターです。ただし、近接武器では使用しないでください。囲まれている場合は、コモンに対して基本的なバッシュを使用してください。
近距離ダメージディーラー(ジェネラリティ)
ホッケイ。至近距離で何をするかには少し余裕がありますが、アイデアを 1 つ選んでそれに固執してください。
判断に迷う場合は、いくつかの選択肢を提示して考えさせます:
- Melee Tank、Mean Drunk / Meth Head / Heavy Attackを利用
- ショットガン ビルド
- SMG ビルド
近距離駆逐艦が近接戦車として魔法を働かせることで、成功の可能性が大幅に向上します。
メレー タンク ビルド [Axe Go Brrrrrt]
近接タンクを選択した場合は、Axe Go Brrrrrt へようこそ。
あなたの近接戦車 ホリーである必要があります。ゼロの例外。 不要 あなたのスカベンジャーがコモンを扱うことから逃れることができるので、主要な近接タンク。ただし、LOT が得られます
これがあなたのデッキです。
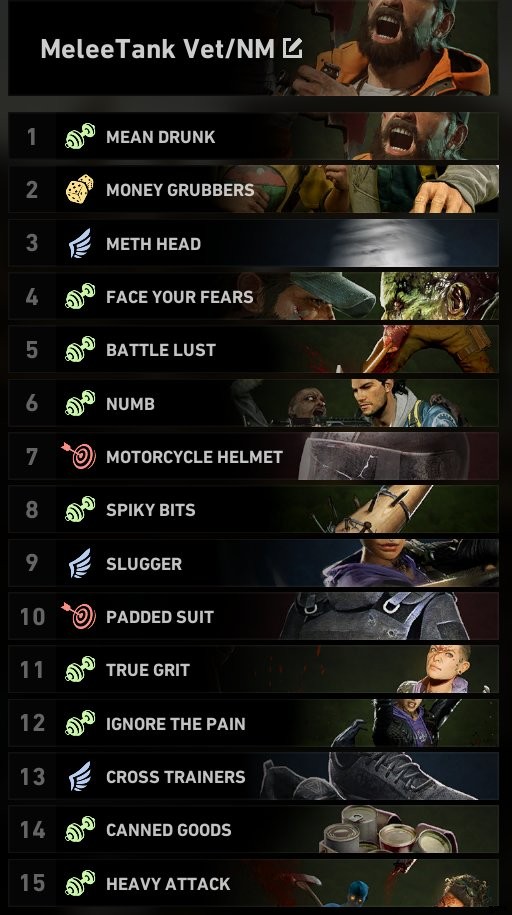
- 意地悪な酔っ払い
- 覚醒剤の頭
- 戦いの欲望
- 恐れに立ち向かう
- 麻痺
- オートバイのヘルメット
- とがったビット
- スラッガー
- パッド入りスーツ
- 真骨頂
- 痛みを無視
- クロストレーナー
- 缶詰
- 強攻撃
カードの順番について:
- 意地悪な酔っぱらいがあなたの最初のカードです。例外なく。スプリントでの敗北はゲーム チェンジャーであり、痛い 、しかしそれはあなたの近接攻撃を大きな AoE に変え、複数の敵を攻撃できるようにします.
- Meth Head はできるだけ早く選ぶ必要があります。近接スタミナ効率は、戦闘で常に使用することを相殺するのに十分ではありませんが、大いに役立ちます.
- Face Your Fears は Battle Lust よりも優れていますが、どちらの順序でも取得できます。 Numb とともに、3 つすべてをできるだけ早く服用する必要があります。
- 強攻撃は正直、できるだけ早く受けるべきです。ほとんどの突然変異を一発で解決できる、ゲーム チェンジャーです。
近接戦車としての戦術
- あなたはホリーを選びます。 Evangelo はブレイクアウトと機動力のおかげで問題ありませんが、他の誰かが Holly を選んだ場合、あなたは乱戦ではありません。
- あなたは、最もライデンな人を殺すことになります。あなたは最も多くのミューテーションを殺すことになります。これで問題ありません。戦いの栄光を楽しみましょう。
- 斧が見つかります。あなたはその斧を使います。あなたはその斧を気に入るはずです。少なくとも、非常識なレベルのダメージを与えられることに感謝するでしょう。
- 最初に手斧を見つけた場合は、それを使用しても構いませんが、優先度の高いものとして斧にアップグレードします (後) 最初に脅威を排除します)
- このビルドでは照準を合わせることはできません。これで問題ありません。銃は必要ありません。そうですね、そうかもしれません .
- あなたは遅いです。チームメイトにスプリントできないことを伝えます。チームメイトに自分の前に出ないように伝えます。チームメイトが近くにいる場合は、しゃがむように伝えます。チームメイトが射撃している場合は、しゃがむように指示します。
- Down In Front を持っていない場合!そして彼らはあなたを撃ちます、あなたは彼らに帽子をかぶせてそこに残す許可を得ています.
- チームメイトが邪魔をしても気にする必要はありません。フレンドリー ファイアに関係なく攻撃する必要があります。目の前の脅威に対処します。 彼らのです フレンドリー ファイア ダメージを受けた場合は違反となります。
- わかった、大丈夫、彼らが何かから逃げようとしているのなら、お尻にならないでください。少なくともやってみる 打たないように。
- あなたが人に乱闘しているときに彼らがあなたの前を歩いても、それは彼らのせいです.
オーケー、でもまじめな話、あなた以外のみんなはダウン イン フロントを奪うべきです!このために。ベテランであっても、より高いグレードの斧を使用してツーショットフレンドリーになる可能性があります.あなたの前に出るのは彼らのせいです。これをチームに明確に伝えてください。誰かが大騒ぎした場合は、できる限りの敬意とプロフェッショナリズムを持って伝えます。 1回の攻撃で彼らを捕らえることができるバットを振るつもりであり、彼らはあなたの仕事の邪魔になりたくない 近接戦車として。
- 事故は起こります。責任を負い、真摯に謝罪し、より多くの脅威にダメージを与えることに進みます。フレンドリー ファイア インシデントが頻繁に発生すると、チームメイトに腹を立て始める可能性があります。
- あなたは全力疾走できないので、彼らはあなたの後ろにいるべきです.
- If teammates are shooting commons, consider telling them to stop and “Let the tank (that’s you) do [your] job.” You get health back from killing commons as well, so it’s especially good for you.
- If they shoot a few common Ridden, on occasion, it’s fine; let them. After all dead enemies are best enemies. Better to clear the map safely and quickly.
- Heavy Attack the Mutations. Watch them fall under your might. Just make sure to hit the weakspot.
- You’re gonna wanna treat Tallboys / variants like you’re playing Dark Souls. Dodge their attacks, then slap their heretical butts.
- Fire and Acid commons hurt. Move far away once you kill them, as they leave ‘puddles’ that can keep hurting you after they’re dead.
Other Notes
- Emphasize to your team you can’t sprint or aim down sights. They need to be behind you, and they need to be taking out threats at longer ranges.
- You need the Axe since it’s doing 5-6 times the damage of the Machete/Bat.
- No seriously Heavy Attack Axe swipes do more raw damage than the Barrett. Or any of the shotguns, especially the Belgian / Tac14.
- Keep/Take/sometimes consider buying Pain Pills for yourself. Keeping Numb going is important on higher difficulties, since damage resistance is always good. Hopefully you’ll find a Team Support Slot in one of the safehouse buy stations and you can carry 2.
- Buy/Take Stun Guns as your Utility item. Try not to burn it if you have teammates nearby.
- If you get pinned, say “Holly is pinned and needs help!” instead of “I need help!” your teammates might not recognize who you are by voice, but they’ll know who Holly is. Also make sure you say whether you need to be bashed (Hocker) or have the Mutation shot (Stalker, Crusher, Hag)
- You might need to burn a Stun Gun if you get grabbed by a Hag.
- Chances are you won’t get many hits on a Hag before they run away.
- You have a good chance of one-shotting Snitchers with your Heavy Attack.
- Consider Stun Grenades for your Offensive Equipment.
- You probably won’t getting much use out of your primary weapon. Possibly consider it as a mule slot and let people know if you find anything good (whether it’s good attachments or weapons outright). You’re welcome to just hold onto that weapon until you find attachments to cycle through on the ground.
- If you have a gun with a good attachment, call it out to the team and ask if they want it. Blue, Purple, or Gold attachments are the good ones. If you want to drop the attachment, you’ll have to wait until you find another one of a similar slot [Barrel, Magazine, Stock] on the ground to exchange it with.
- The above two notes also works for the Scavenger, but keep in mind your Scav is worrying about other things, generally.
- Aside from buying stun guns, you probably don’t ever need to buy anything in safehouses.
- Don’t forget to scavenge ammo, and drop it for teammates if they need it.
Power Swap Shotgun Build A [ADS Allowed]
Because THATS A LOTTA DAMAGE!
Alright, so the general concept:We want shotgun stuff and lots of it. We’ll be showing off two builds here today. First one is a general purpose build that lets you stay pretty mobile while utilizing Power Swap.
Cleaners:
Evangelo is a decent choice for his Stamina Regen and Move speed.
Holly is a decent choice for the Damage Resistance and Stamina recovery on kill. You can stay super mobile with her.
Walker is a decent choice thanks to the bonus accuracy, improving hipfire spread when you get a Precision Kill. His damage, while it doesn’t boost Weakspot damage, is also decent since the shotguns will hopefully be collectively dealing triple-digit damage.
Hoffman is a sleeper choice for this build. His bonus offensive inventory isn’t something you build for at all,
Mom isn’t great for this kind of build but at least she can get going on Map 1 thanks to spawning with a Belgian. Her Team Extra Life also lets her do a lot of good, and she triples as a Support Inventory Mule, and will likely be on the front lines to revive someone if they go down and Doc can’t get there.
Jim loses his base damage stacks whenever he takes damage. He could make this class work, though, since he can get multiple stacks per Weakspot hit; one shotgun shell could be enough to bring him to full stacks. The bonus ADS and Team Weakspot damage is great, but really he should be doing something else.
Doc has better things to do.
Karlee has better things to do.
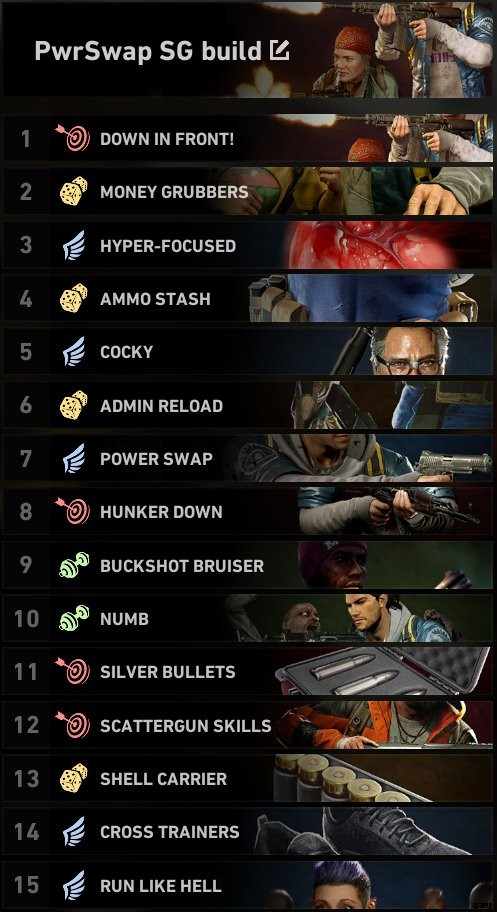
Here’s your Deck.

- Down In Front!
- Money Grubbers
- Hyper Focused
- Ammo Stash
- Cocky
- Admin Reload
- Power Swap
- Hunker Down
- Buckshot Bruiser
- Numb
- Silver Bullets
- Scattergun Skills
- Shell Carrier
- Cross Trainers
- Run Like Hell
Regarding Deck Order
- Down In Front! isn’t as necessary on this build since you’ll want to be close to enemies to deal max damage, but there’s a good chance you’ll accidentally hit someone else with your inaccurate shotgun spread or perhaps accidentally panic-fire enough damage to really screw someone else’s chance at life. We’re taking it anyway.
- Money Grubbers is best cash card. Get it, live it, love it.
- Hyper-Focused is third but isn’t a first-pick priority. However, take this ASAP.
- Cocky is an early grab to help start the Admin Reload as early as possible
- Ammo Stash to keep your Belgian from eating too far into your shotgun shell reserves.
- Admin Reload so you can keep shooting while your other gun is reloading, Dr. Freeman
- Power Swap completes the combo, so now your shotguns are doing +20% Damage.
- Hunker Down is more because you’ll be crouching anyway. The accuracy bonus only affects hip-fire, and the
- Buckshot Bruiser only is any good against mutations, since one pellet is needed to kill Commons
- Numb to take advantage of your temp health by giving bonus Damage Resistance
- Silver Bullets is multiplicative to both base damage and weakspot damage, so now your damage does even more damage
- Scattergun Skills can go anywhere really, take it whenever to keep the damage rolling. Can make fully reloading a Super90 during the Power Swap combo w/Belgian all the more fun.
- Shell Carrier is kind of late in the build but I couldn’t find anything earlier that i wanted to take ahead of it. Virtually everything else is more important to take.
- Cross Trainers, because the last few missions you’ll want some more speed
- Run Like Hell, because the last few missions you’ll want some more speed
Your Tactics as a Shotgunner
- Power Swap is love, Power Swap is life.
- You want a Belgian as your secondary.
- You want a AA12, preferably, but a Super90 is good too.
- You have exceptional damage capability but have a good chance of taking lots of damage from Mutations. Buckshot Bruiser will be the way you stay alive, as every shotgun blast will give you about half of a Pain Pill use against Mutations.
- Actually, you’ll likely take more True HP damage than you can buff with temp health due to the fact that commons die to one shotgun pellet (which means you only get 1 temp HP…which burns off quickly.
- Your job is simple. Blast stuff.
- Ok it’s mildly more complicated than that. You gotta get close to the bad guys to do your damage, right?
- And of course hit the weakspots.
- Remember to be quick and nimble when you need to be.
- Oh yeah, try to line up shots. While shotgun penetration isn’t all that great, they continue through and hit targets behind your initial target, and against common you only need one pellet to kill, so the rest should(????) continue on.
Other Options for filling out the rest of your deck
- Trading out Hunker Down is a possibility
- Large Caliber Rounds is better than Shell Carrier in terms of Raw Damage boost (since it boosts Weakspot Damage
- Ammo Stash isn’t mandatory, but this is taking into account the Power Swap combo.
- The 870 Express and Tac14 both benefit with a faster fire rate when taking reload cards / attachments. Since both guns do more raw damage than the AA12 or Super90, it’s possible to be somewhat competitive with the raw damage boost.
- Two-Gunning shotguns isn’t the best of moves, but replace Ammo Stash for this card if you choose to. See the Double Shotgun Build for that.
- True Grit is a decent option while fighting mutations. Taking a single burst over 15 is (hopefully) going to eat into your Temp HP, and then this activates and restores your True HP.
- I wouldn’t take Reckless Strategy, but Ridden Slayer is good for more Weakspot Damage.
- Large Caliber rounds may be good alongside Silver Bullets.
- Shredder?????? No idea, needs testing.
- Throw in some more movement speed cards to go FAST AS [censored], BOI. Fleet of Foot is a good choice.
- You have some extra wiggle room in here to include Team Support Inventory [Box O’ Bags] or Team Offensive Inventory [Surplus Pouches] or Needs of the Many [Team Extra Life]
Other Notes
- If you find a legendary Reload/Mag Size card, you’ll have good success on the 870 Express with it. Also the Tac14 but that’s not going to be something you use for this build.
- You don’t have to take a Belgian, but if you don’t, take either a Deagle, Revolver, Tec9, or AutoGlock. With this build, you have infinite ammo in your sidearm, so you can use whatever vs commons while your primary does a backpack reload.
Long Range Damage Dealer (Generalities)
Alright, Long Range! You’ll be squatting (Down In Front!) in the backline, using Snipers or Assault Rifles/LMGs to deal damage at range. You have a lot more leeway here with builds and even Cleaners here, but here’s a few worth thinking over:
Mom:For the Extra Life, and muleing extra MedKits.
Walker/Jim:their damage bonuses don’t apply to critical damage, but having more health or giving the team more Weakspot Damage is always welcome. You want preference to Jim.
Hoffman:Increase to Team Ammo is always nice, and occasionally causing ammo drops, even if it’s random which ammo drops, is nice.
Evangelo:Team Speed, and having Breakout helps
There’s a few ideas you can work with
- LMG build [M249 is Meta, but RPK is ok for the raw bullet damage as well. You can get away with a Blue-or-better Mag-Size attachment SCAR as well. AK in a pinch.]
- M1A Build
- Barrett Reload Build [Reload speed boosts weapon cycling speed:Pump Shotguns and Bolt Action Rifles!!!!!]
- Double Primary Build
Some other things to keep in mind (this also applies to SMG/Shotgun builds):
- Admin Reload will save you SO much time if you pair it with Cocky.
- Doing the above with Power Swap means you can drastically increase your DPS
- Belgian Power Swap / Admin Reload / Cocky sub-builds should be strongly considered.
- A lot of bad guns are made better with the Admin Reload / Cocky combo. RPK, Belgian, Tac14… Just remember to give it some time between weapon swapping (there IS a such thing as TOO fast!) to give the weapons time to reload.
- Either pick the Two-Primary card or Ammo Stash card.
- Power Reload requires you to HOLD the reload button to gain its benefit, but lets you have two volleys with the Belgian.
- If you can find space, throw Money Grubbers in.
- Don’t build for “Damage”. Build for Weakspot Damage (Hyper-Focused, always; Reckless Strategy if you can fit it) and Bullet Damage (Shredder, Silver Bullets, Large Caliber Rounds).
- Above note:“Damage” just boosts weapon damage, but doesn’t boost weakspot damage. You should be hitting weakspots anyway. Bullet Damage boosts BOTH
- The Ammo + Firearm-category-damage cards only boost base gun damage, not weakspot damage, but are worth taking if you’re going to be using that ammo type. Generally only take the AR one (Tactical Vest), maybe the Sniper one (Stock Pouch) if you’re planning on maining an M1A.
- Let your team know if you WON’T be using an Assault Rifle or LMG in your build. Assault Rifle ammo is at a premium on higher difficulties since there’s less of a reserve and it’s burned through so quickly.
- Try not to use C or D tier weapons if you can help it.
- Speaking of weapons, let your team know ahead of time what you’re looking for in terms of guns. You get priority as the Long Range Damage Dealer for weapon choice, and ideally you’ll have one or two guys running melee weapons (and your medic running an SMG/Shotgun/Sniping occasionally), so they can bring you ammo
- For the love of everything Holy, take Down In Front! and remember your ABC’s:Always Be Crouching.
- I’m assuming you’re not an idiot and know to walk / sprint when needed. You’re here for Veteran / Nightmare tips, right? So you know that you do friendly fire on higher difficulties. Look, just… don’t be an idiot. Down In Front! solves a lot of problems that are caused by shooting at enemies while you got your melee guys dancing around.
- Oh yeah, when you’re assuming this role, you are NOT point man. Unless your Scav / Close Range guy are idiots (find new friends) or distracted (let them take care of their priorities), they’ll take care of breaching and clearing. You can scavenge what’s there on your own time.
- Remember it’s a game. You’re here to beat a challenge and have fun with it. Try not to get angry for every little transgression.
- Remember your melee guys DON’T GIVE A FLYING CRAP about friendly fire when they’re swinging their Axe and Machete. You see them anywhere near you? Crouch.
- There will be times you’re next to your melee guys. Again, Always Be Crouching.
- Let the Melee guys do their thing, as well. They don’t need to be babied.
- Controller players might need to be babied.
- You don’t want to be playing on higher difficulties with people that use controllers.
- I’m sorry, the lack of turning speed and lack of precision are killers for a chaotic FPS like this.
- Speaking of melee players, you’d do a lot of good by shooting the Mutations for them. That’s kind of the reason you exist as a Mid-Long Range Damage Dealer.
- Like, that’s your job.
- You see a Mutation, you take it out.
- Except Snitchers of course
- but you knew that
- If they’re screaming already then yes you shoot them jfc don’t even ask
But yeah you got a few choices, just pick an idea and stick with it.
Barrett Reload Sniper Build
Hokay, here’s your general concept.
The Barrett Sniper is pretty slow, right? This build will boost its reload speed AND WEAPON CYCLING SPEED while boosting weakspot damage and giving you a few other options.
You preferably want Jim for the ADS speed and Team Weakspot damage. Mom is sub-par for damage, but helps with the extra support inventory slot and the Team life.
I don’t have a solid build 100% tested yet, but this’ll get you started:
Cards
- Down In Front!
- Hyper Focused
- Cocky
- Widemouth Magwell
- Steady Aim
- Admin Reload
- Ammo Stash
- Knowledge is Power
- Money Grubbers
- Variable after this based on preference. I’ll provide some ideas, and get back to you once I have a good build.
Regarding Deck Order
- Down In Front! is first, duh.
- Your 2nd to 6th cards will be your first draw. You want Admin Reload somewhere in there.
- Otherwise, your remaining cards from 2nd to 6th should be:Aim Speed, Reload Speed, Weapon Swap Speed, Weakspot Damage. Good Cards for this are:Steady Aim, Widemouth Magwell, Cocky, Hyper-Focused. Specific order is not important.
- Ammo Stash is 7th card, very important. You don’t have to take it as soon as it comes up, but having it early is always a boon. You won’t need it in the first map.
- Ideally you’ll have Money Grubbers early. Constantly getting bonus cash for the team is essential
- Knowledge is Power should be taken on the Mid-Long range build no matter the specialty. Letting teammates know how much health something has gives them the ability to execute on a kill or focus on something else.
- Mobility cards should be later. It’s ok if you move Cross Trainers up the list, but something like Run Like Hell should be a last draw.
Your Tactics as a Sniper
- …
- bruh
- Do I really need to spell it out for you?
- …
- HA
- GOTEM
- Okay, fine, here’s the basics.
- First off, the specifics to rocking a Barrett apply to Scavs / Medics that want to snipe as their primary as well. They just won’t be able to spec for it (Scavs have some wiggle room but honestly they should be taking SMG/Shotgun stuff since they’ll be taking the lead)
- You want to find a Barrett. A Phoenix is fine too but switch to the Barrett when you find one unless it’s two grades below the Phoenix. Like if you have a blue Phoenix, don’t pick up a white Barrett. If you have a purple Phoneix, don’t pick up a green Barrett.
- You want PURPLE RELOAD SPEED ATTACHMENT for that bad boy. A golden mag with reload speed bonus is ok too. Blue is fine too. But you NEED a reload attachment.
- Other Attachments:Purple ACOG (2x) or Sniper Scope (4x) for the +15% weakspot damage. Long Barrel will probably help, but consider a suppressor as well for those sneak attack hits. ADS stock; if you find a legendary stock that boosts ADS speed, take it.
- Every time you wanna shoot, you crouch. Remember your ABC’s, Always Be Crouching.
- Hit their weakspot.
- Using Snipers in hallways is OK; you have 100% bullet penetration, so one bullet will clear an entire line of enemies.
- For Christ’s Sake please remember your ABC’s:Always Be Crouching
- If you’re ANYWHERE NEAR THE MELEE DUDES, YOU WILL CROUCH, DO NOT TEST YOUR LUCK
- or just run away from them lol
- If they’re anywhere near you you’d better either:be in the saferoom, holding against a horde in a room (with you in the back of the room), them dropping ammo for you (after you ask POLITELY), or else you’re crouching.
- I mean use your best judgement if you’re just following them and there’s no threats then yes you can walk
- You’re not an idiot but I’m explaining for clarity/clearing my mind/covering my butt/humor’s sake
- oh yeah you want a Tec9 or AutoGlock as your sidearm unless you’re planning a Power Swap build (not all that viable for snipers).
- Revolver is less than ideal because it uses AR ammo, and if you’re not the one using it, someone else will be.
- Deagle is fine. Sniper ammo is uncommon anyway, and the Deagle one-shots commons.
Options for filling out the rest of your deck
- If you take Stock Pouch, you take it for the bonus ammo, not for the damage increase. The damage bonus doesn’t apply to Weakspot Damage.
- Large Caliber Rounds and Silver Bullets are still viable with snipers due to the multiplicative damage increase (boosts gun damage and then also double-boosts Weakspot damage) The Bullet Penetration is better served for other guns, as the M1A, Phoenix, and Barrett have Perfect Bullet Penetration and will do max damage in hallways.
- Using Power Swap with a Belgian isn’t as viable with snipers due to your…excessive range. But you could make it work.
- You’re going to want a few mobility cards. Run Like Hell and Cross Trainers are two solid picks. Mad Dash is alright as well but you might not have the cards for it.
- Try to fit Money Grubbers into your build and take it early, and remember to drop your cash for your Scav at the end-round safehouse.
- Heavy Hitter at the moment is bugged??? You can use your bash attack against Commons to one-shot them (aim for the head). It doesn’t count as a kill but has a HUGE cleave AoE AND knocks them back.
- You probably don’t need more than one ADS card. IMO you don’t even need that if you take Jim and take ADS stocks.
- With Hyper-Focused, Reckless Strategy, and Knowledge is Power, you probably don’t need Ridden Slayer.
- Consider:Confident Killer, Broadside, Guns Out if you don’t have Cocky, Tunnel Vision if you don’t have Steady Aim, Reckless Strategy if you don’t have Hyper-Focused, Pep in your Step. Ammo Belt, Ammo Pouch, Patient Hunter, Needs of the Many [Team +1 Life? Heck yeah!], Any Team Inventory Slots (Surplus Pouches, Box O’ Bags)
- You probably shouldn’t take:Sadistic, Shredder, In The Zone, Power Reload (but it’s a great option by itself!)
- You definitely shouldn’t take:Glass Cannon, anything that disables Aim Down Sights, Anything that increases Accuracy (that’s for Hip-fire. And lemme tell ya, while Hip-Fire builds are super fun, that’s not what you’re doing here), Hunker Down (You’ll be in the back anyway), Marked For Death (No room for it)
- Any card not listed shouldn’t be even looked at. Let the other guys take care of what they’re good at.
- Remember to specialize. Don’t be mediocre at a lot of things, be great at one thing.
Other Notes
- Remember to crouch
- Commons tend to swarm from all over so you’re gonna get hit from the back a few times. Annoying, but oh well.
- Not a hard rule but you should be conserving sprint for when you have to get out of Retch piles, get some distance from a Mutation that’s gotten WAY too close to you
- Build for Weakspot damage.
- Be Polite.
- Be Efficient.
- Have a plan for killing every Ridden you see.
- or you could just run lol
- Remember, you’re the gun guy. Let your melee dudes do their thing, sure, but you’re there to cover them vs larger threats. Your sidearm is to help keep them off your own ass.
- You won’t be the one doing the most damage or kills. You’ll be scoring the most important kills, though.
Misc. Card Selection Notes and Thoughts
This section is more or less just some random thoughts about certain cards. You may benefit.
- Someone should run Needs of the Many. The Extra Life is going to help so much. Your Medic can probably get away with adding it into their build, but so can your Sniper or AR build. This stacks if more players have it.
- Box O’Bags and Surplus Pouches should be considered. Your Scavenger probably has room for them, but they stack.
- Out of all the Copper cards, try to take Money Grubbers if you have space.
- Non-melee builds should consider Heavy Hitter; using Bash attacks (you know, the weak punch) will one-shot commons if you hit them in the head, does a whole bunch of AoE cleave, and stumbles specials! It won’t kill them either, giving you time to run away and shoot them (or throw a grenade).
- Buckshot Bruiser only gives 1 HP if you’re shooting commons because you’re one-shotting them with one pellet. The card becomes a TON better if you’re fighting Mutations or clearing hordes.
- Take Combat Knife out of your build. Either you’re going melee build or you’re going gun build.
- Remember to specialize. You can take a few team cards if you want but you’re gonna want to max out on what you’re doing.
- Keep in mind the penalties. Losing Stamina is fine if you’re not running Melee. Damage resistance loss is ok if you’re a long-range guy. Disabling Aim Down Sights is fine for hip-fire or melee builds. Losing ADS Move Speed is completely fine, this isn’t Call of Duty. Losing Accuracy when getting hit is fine if you’re always aiming down sights or never shooting at all (melee builds).
- BE CAREFUL ABOUT DISABLING ACCESSORIES. Medic taking Rousing Speech is the only one you really should even consider.
- Put a mobility card or up to 3 in your deck. Cross Trainers and Run Like Hell are probably the best two. Fleet of Foot is also good but should be taken after Run Like Hell; move movement means enemies don’t really get to you as much (since you can outrun them).
- Shredder should be considered on AR / SMG builds. They’re only useful against bosses and perhaps Tallboy variants, though.
- You don’t really ever need Utility Scavenger. Better to buy what you need and bring it through the level. The most Toolkits you’ll need is 2 in any level. Your melee guys might want additional Stun Guns, and your medic might want a defib or two, but they’d rather have Utility Slots [look for Team Utility Slots!]
Regarding Gun Damage, Especially Glass Cannon
- Cards that say they increase “Damage” only increase base damage, and they don’t increase weakspot damage. These include Glass Cannon, Shell Carrier, Tactical Vest, Stock Pouch, or Mag Carrier. Take the latter 4 for the specific ammo capacity boost, not for the damage.
- Bullet Damage (Combat Training, Large Caliber Rounds, Silver Bullets) DOES increase Weakspot damage on top of base damage, and applies twice! Kinda.
Btw use Knowledge is Power to see gun damage values.
Btw shout out to SwingPoynt for help with concepts here!
Lets say you’re using a white M4 Carbine (please don’t first off), dealing 10 damage per hit.
Hitting the weakspot of a Common does that 10 damage again (since that’s the Weakspot damage that the gun deals…or maybe it’s the damage modifier?
If you use KiP, you’ll see that you’re doing the base 10 damage, and then a second value of 11 damage (because +10% weakspot damage).
Now if you throw on Silver bullets, which increases BULLET damage by +10%…..
- The gun damage is now 11 Damage.
- But the weakspot damage is now 12.1 Damage.
What does this mean?
Bullet damage cards are multiplicative with Weakspot damage!
Incidentally, cards with the same “type” of damage (bullet damage, weakspot damage) are additive within their own “category”. So having Hyper-Focused and KiP will only give you +60% Weakspot damage, not 1.5*1.1=1.65x damage.
So in general, you want to take Bullet Damage over just Damage.
Glass Cannon is +25% damage but doesn’t boost Weakspot damage. Our crappy white M4 is doing 12.5+11 on Weakspot hit with KiP. And these numbers round up to the nearest Tenth. so really that’s 12+11=
Meanwhile Silver Bullets is doing 11+12.1 on weakspot hit with KiP
But the numbers start to really matter if you include other Weakspot damage cards! …And of course, better weapons.
Glass Cannon, KiP, Hyper Focused:12[s].5[/s]+16 Damage.
Silver Bullet, KiP, Hyper Focused:11+ 17.6 Damage! Not only are you doing more damage, but you also have far greater bullet penetration, and more health!
Okay but then lets use a stronger gun.
- A purple Barrett does 225 Damage.
- Glass Cannon, KiP, Hyper Focused:281.25+360=641[s].25[/s]
- Silver Bullet, KiP, Hyper Focused:247.5+396=643.5
Now, look. You’re probably telling yourself “what’s the difference?”
The difference is that:
In short, try to diversify your damage cards. Hyper-Focused and Reckless Strategy, maybe Knowledge is Power; Large Caliber Rounds and Silver Bullets, and then Shredder for automatic builds, Patient Hunter, Power Swap. Mind you, I’m unsure if Shredder/Patient Hunter/Power Swap is multiplicative, buuuuuuuuuut!!! Free damage!
Oh by the way! Melee damage works like bullet damage in which it increases raw melee damage AND Weakspot damage! Go crazy! But make sure you diversify your damage!
- Glass Cannon White Bat Weakspot hit:18.8+16.5
- Spiky Bits White Bat Weakspot hit:18.8+20.6!!!
Don’t take Glass Cannon.
Oh by the way Walker’s damage bonus does not boost Weakspot damage.
Jim’s stacking damage doesn’t boost Weakspot damage, either. His Team Weakspot Damage buff obviously does, though.
Against Mutations this gets crazy. In SwingPoynt’s Video, he takes a white M1A (38 damage), and with just KiP and Hyper-Focused, he does 60.8+91.2 Damage to a Bruiser.
So that means, what, exactly?
It means he’s doing 1.6x+3.26x base M1A damage.
Now according to statty.net, Bruisers have a 1.5x weakspot damage multiplier.
So what’s happening?
When you attack something, your gun does its normal gun damage.
When you hit a weakspot, your gun does additional damage according to your Weakspot multiplier. For all guns it’s a base 1.0x bonus damage, and this increases in an additive manner the more Weakspot damage cards you add. Hyper-Focused for example adds +50% damage, so that second impulse becomes 1.5x the normal damage, and now you’re doing 2.5x (about) damage. And yes, it’s a second impulse of damage.
By the way! Mutations also have a Weakspot modifier! The’re different between variants as well.
What this means to YOU is that with these two cards alone and precise aim, you’re doing at least 4.5x damage per bullet!
…verses Glass Cannon’s +25% damage.
Okay lets be fair.
- Glass Cannon+KiP w/white M1A:38*1.25*1.5+38*1.1*1.5=133.95
- Hyper-Focused+KiP w/white M1A:38*1.5+38*1.5*1.6=57+148.2
Wait why is that different than his numbers? he got 60.8+91.2=152
- 60.8/38 =1.6, which is his weakspot multiplier
- 91.2/38 =2.4 =1.5*1.6
So that must mean…
When you shoot a weakpoint, your base weapon damage is multiplied by Weakspot damage…
…and then that second impulse that you do for hitting the weakspot is itself multiplied by the Mutation’s Weakspot damage multiplier.
So in this case it’d be…
Glass Cannon Bruiser Weakspot hit with White M1A:38*1.25 + 38*1.5 =104.5 since Glass Cannon doesn’t boost Weakspot Damage.
Hyper-Focused Bruiser Weakspot hit with White M1A:would be:38*1.5 + 38*1.5*1.5 =142.5
And if we just do Silver Bullets:38*1.1 + 38*1.1*1.5 =104.5
Oh wow, Silver Bullets vs mutations (at least vs Bruisers or enemies that have a 1.5x weakspot multiplier) is the same. What if it’s a 2x?
- Glass Cannon:38*1.25 + 38*2 =85.7
- Hyper-Focused:38*1.5 + 38*1.5*2 =171
- Silver Bullets:38*1.1 + 38*1.1*2 =125.4
Don’t take Glass Cannon.