Back 4 Blood – 簡単なソロ ナイトメア サバイバリスト ビルドのガイド
ナイトメアの難易度の報酬と実績を手に入れたいですか?ここでは、オフラインで 3 つのボットを使用して難易度ナイトメアですべてのマップを完了するために個人的に使用したデッキとセットアップを共有します。
イージー ソロ ナイトメア サバイバリスト ビルド ガイド
はじめに
このデッキは、一貫したダメージ出力と体力の補充に重点を置いており、目的を達成して大群、ボス、タンクから生き残ることができます.
私は決してベテラン プレイヤーではありません。執筆時点で、このゲームを購入し、ベテランですべてのマップを終了し、すぐにジャンプしてナイトメアでゲームを終了しました。 P>
もちろん、マップの知識 (何を期待するかを知るため) と、戦術的かつ忍耐強くプレイすることは依然として必要です。
デッキ、カード、理由
まず、これが私のデッキの概要です。各カードの目的を説明します。自由に自分のプレイスタイルに変更してください。私にとってうまくいくものでも、うまくいかないこともあります。
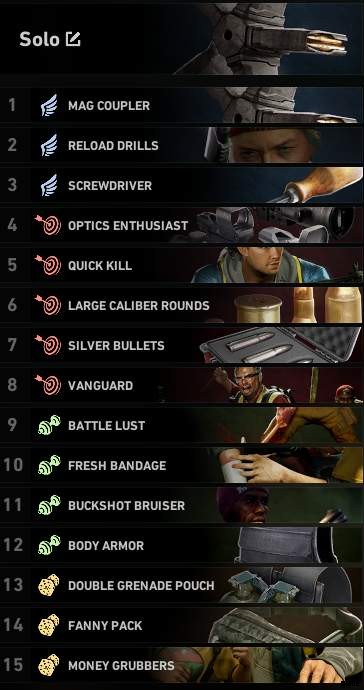
このビルドの最も重要な 2 枚のカード:
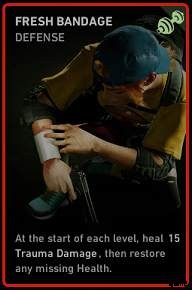
- 新鮮な包帯 – レベルごとにトラウマを 15 回復し、HP を回復します。
- バックショット ブルーザー – ショットガンは、ペレットが命中するたびに 0.5 の一時的な HP を与えます。
最初のカード、トラウマを回復するために何も支払う必要はありません。マップが短く、トラウマによるダメージを受けなかった場合は、救急ステーションの費用を節約できました。
より多くのお金 =生存性 (チーム ヘルス/より良い回復アイテム) または DPS (アップグレード グレネード) のためのより多くのアップグレード。
私の意見では、2番目のカードは、AA12のような速射ショットガン(レアリティ/アタッチメントは関係ありません)を入手し、それを以下のカードと組み合わせると、完全に壊れます.皮肉なことに、このカードは実際に大ボスの出現を有利に変えてしまいます。なぜなら、あなたは途方もなくオーバーヒールされ、文字通り殺せなくなるからです。
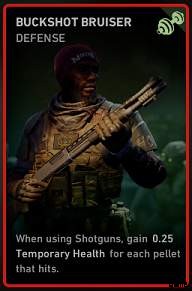
このビデオでは、ボスをマグダンプするだけで、失われた HP を回復し、オーバーヒールの上限に到達するまでの時間を示しています。
DPS関連カード:
<オール>現在、最高の銃でさえリロードする必要があります。私たちは皆そこにいました – 拡大されたマグ M249 で大群やボスを刈り取っている最中に枯渇しました。これら 2 枚のカードは、リロードによるダウンタイムの原因を減らす =より安定した DPS 出力 =より多くのヘルスを得るためのものです。
- スクリュードライバー – +50% 使用速度、+10% スタミナ
生活の質カード。あなたは唯一の人間なので、すべての目的と行動を行います。その上、それらをより速く行う =被弾の可能性が低くなり、より多くの時間を撃つことができます
- 光学愛好家 – +30% 精度
- クイックキル – +50% 精度
基本的に、照準を合わせずにピンポイントの精度で撃つことができます。 「無効化」ペナルティを無視し、ADS を使用しない =より速く移動し、L4D のようにポイント アンド シュートするだけです。
- 大口径弾 – +7.5% 弾丸ダメージ、+200% 貫通力
- Silver Bullets – +10% の弾丸ダメージ、+15% の効果的な弾丸の射程
直接ダメージによってDPSがさらに増加し、貫通により頭のレベルをスプレーして大群を破壊し、射程はショットガンに役立ちます.
その他のサバイバル カード:
- ヴァンガード - 近接キルで HP を 1 回復
- バトル ラスト - 近接キルで 1 HP と 0.1 トラウマを回復
ボス以外で避けられない HP の損失を補充する方法が必要なので、これら 2 枚のカードは非常に簡単です。限界に達している場合は、一時的なオーバーヒールさえ受けます。
唯一の制限は、HP から得る以上の HP を失わないようにすることです。これを利用する簡単な方法は、出入り口で大群を遠ざけることです。
しかしナイトメアでは、ゾンビは酸/火/爆発の頭を与える腐敗カードを持っている可能性があります。その場合、近接ゾンビはあなたに良いことよりも害を及ぼす可能性があるため、通常は遠距離武器/ショットガンの使用に固執します.
- ボディアーマー – +20% トラウマ耐性
- ダブル グレネード ポーチ – +2 攻撃スロット (グレネード スロット)
- ファニー パック – +15% トラウマ耐性、+1 サポート スロット (ヒーリング アイテム スロット)
長期的にお金を節約し、フィナーレで最大ヘルスが 40 になるため、ランを失うのを防ぐため、外傷耐性は最も重要です。
追加のスロットは、ゲーム内で購入するのに費用がかかるため、優れています。これらの 3 つのスロットは、すでに 4500 銅を節約しており、RNG に基づいてショップでどれを入手するかを決定します。また、ゲームの早い段階で多用途用品を買いだめすることもでき、良い銃が見つかるまでの移行がよりスムーズになります。
- ハイドレーション パック – +25 ヘルス
または Money Grubbers/Copper Scavenger/空きスロット –
正直なところ、これは個人的な選択です。 +25 HP は、チーム ヘルスのアップグレードを大幅に節約できるので、多額の費用がかかりますが、実際には必要ないことがわかりました。好きなようにやってください。
キャラクター/クリーナー
個人的には、このビルドは Doc で最もうまく機能すると思います。
- +15% ヒーリング効率 =生存率が向上し、テンポも増加します。過剰なヒーリング アイテムの使用による HP。
- +20% トラウマ耐性 =より多くのミスを許容し、より多くのダメージを受け、最大 HP が長期的に影響を受けることはありません。 (カードを重ねる)
しかし、Holly はこのビルドでもうまく機能すると思います。
ホリーはダメージ耐性を与え、ヘルスを回復します - 後者はすでにカードでカバーされています.
ホリーの場合はゾンビを倒す必要があり、カードの場合はショットがヒットする必要があることを忘れないでください.
ウォーカーも効くかもしれませんが、余分なダメージは本当に必要ないと思います.
一般的な考え方
まず、私のビルドの背後にあるいくつかの一般的なアイデア/哲学:
- 私は通常、ダメージ耐性や体力を低下させるカードを避けます。 This is Nightmare difficulty, zombies hit hard enough and healing is rare and far in-between. The point is to SURVIVE and win. Health is priority.
- Similarly, Trauma poses the biggest challenge because while HP can be healed back up with healing items, trauma can only be removed by first aid stations (pills/first aid kit heal insignificant amount of trauma). They are rare and cost too much for what they are worth – better to just avoid getting it than spending thousands to fix your mistake.
- But if you accumulate too much/ignore trauma (you remember the times when you reach the Act finale with a maximum health of 40?), the run is over – one horde swarm you cannot manage/without a room to defend, or one boss hit, you go down; twice, you die.
You can’t accomplish any objective at that state, so you need to avoid trauma at all cost. - Trauma also limits the MAX overheal you can go up to.
For example, if your max overheal is +100 above normal HP, and your trauma limits your max HP to 50, then the maximum overheal you can reach is only 150.
If your max HP is 200, you can go up to 300 HP with healing items and cards.
Playing with 3 bots offline also allows you to ignore certain aspects of the game.
- For a start, end-map money everyone gains goes to you (supposedly you should also pool your money as a team in MP but…good luck in pubs) so you can decide alone what you need to buy.
- Ammo is essentially infinite – when you run low, bots will drop ammo for you so you can safely ignore “ammo capacity” penalty in cards.
- Bots make for great damage absorbers – I feel that they take much less damage than me when swarmed or hit by mini-/bosses, but I did not bother to check this. Who cares anyway.
But one thing for sure – they get 2x Downs before they die and we get 1. - Bots actually save you. They always stick around you, wherever you go, they go – you get pinned they will react actually quickly (compared to L4D bots I tried playing with in the past)
- After you die, you can actually take over a bot and keep playing. You will be swapped back to your own character when yours respawn or is rescued. The downside is that you will be using that bot’s deck of cards meanwhile.
Weapons &Attachments
From my own experience, shotgun is necessary long term (even when superior LMG was lying around). Your survival depends literally on it.
The beauty is that you dont need to kill it, you just need to connect your shots and hit, and you will get your HP.
For this reason, the best shotgun is obviously AA12.
The Benelli Super 90 will work too – rate of fire/mag dump speed> actual damage for HP purposes, and the bots will do quite decent damage against special infected anyway. But the magazine capacity is much lower so trigger discipline is required.
870 Express also works but barely since reloading and pumping takes the momentum off.
As for attachments, since you are using a shotgun and certain cards, you will never ADS =you don’t need ADS time, or ADS movement attachments.
Get the ones that give you reload speed, bigger magazine, bullet penetration, accuracy, movement speed and you are good. To be honest, I don’t think attachments matter that much in my runs anyway – the gun is more for self defense, the bots will do a lot of heavy hitting for you.
The Belgian is a personal choice, but I prefer having a machete or baseball bat for wide swing – after all, thats what my melee cards are for – if for any reason, the shotgun is out of ammo, or I am swarmed in an open area from all directions, a melee weapon will do much better than a gun.
Spending Money
Not much I can say here. Obviously Toolkit is a must to open locked treasure rooms.
As for team upgrades, I prioritize getting Quality Upgrade for grenades and healing items, then Team HP (for myself).
I do not really see the point of upgrading for more slots or higher quality of Toolkits.
And with the cards, 3 grenade slots and 2 healing slots should be sufficient most of the time – remember your toolkit allows you a mid-round resupply in the locked room, and 99% of the time there is a first aid station there.
With this build and bots, there is no reason to pay for HP or ammo. There should be more than enough money to spend.
結びの言葉
Disclaimer:
- Just because this is a survivalist build, it does not mean you can run around, get caught out of position and expect not to be punished. Playing with tactics and cautions is still compulsory.
- horde incoming? get a room and hold the doorway.
- Triggering a car alarm for 25 bucks? not worth it.
- A boss is spawning 100m after you stepped out of the saferoom? just backtrack…
As I said above, feel free to change some things to suit your own needs and playstyle.