Defender's Quest:Valley of the Forgotten – NG+ のヒントと戦略

このガイドの目的は、キャラクターを特定する最善の方法、特定のスキルが良い/悪い理由、および NG+ とゲームが提供する最も困難な課題を乗り越えるための一般的なアドバイスです。
キャラクター ビルド (アズラ、バーサーカー、レンジャー、ヒーラー)
各キャラクターのスキル ポイントをどのように消費するのが最適かを判断するのは少し難しい場合があります。ここでは、推奨されるビルドのスクリーンショットを示し、特定のスキルが他のスキルより優れている理由を説明します。これはヒーロー モード向けではありませんが、これらの推奨事項のほとんどはヒーロー モードにも当てはまります。
アズラ
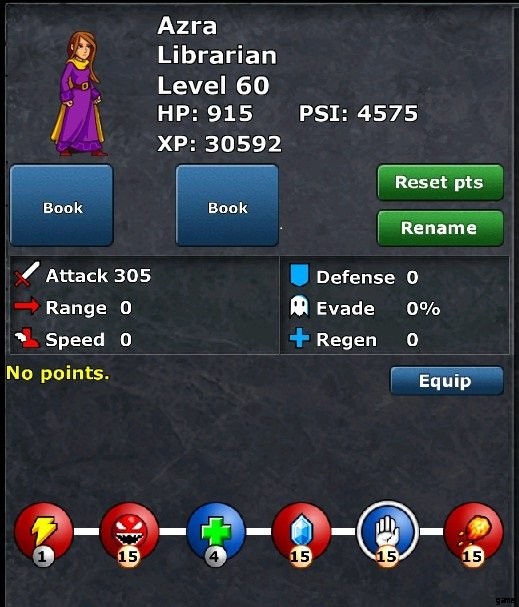
ドラゴン ファイア、プッシュバック、クリスタルはパニック ボタンです。これらの 3 つの呪文は、圧倒されたときにあなたを救うのに最適です。 Frenzy も非常に優れており、問題が発生したときにあなたを救うのではなく、圧倒されるのを防ぐのに優れた大規模なダメージバフを提供します.
残りのポイントは、ライトニングの代わりにヒーリングに費やします。 Abominations のデス スプラッシュ効果のように、ヒーラーが十分に速く反応できない場合、ヒーリングを使用してバースト ダメージからユニットを救うことができます。一方、稲妻は、かなりの数のポイントを沈めない限り、ほとんどダメージを与えず、それを使い続けるために大量のPsiを費やす余裕があります. 6 人のディフェンダーを完全にアップグレードしたものの、まだ十分なダメージを与えるのに苦労しているヒーロー モードの課題に最適です。
バーサーカー
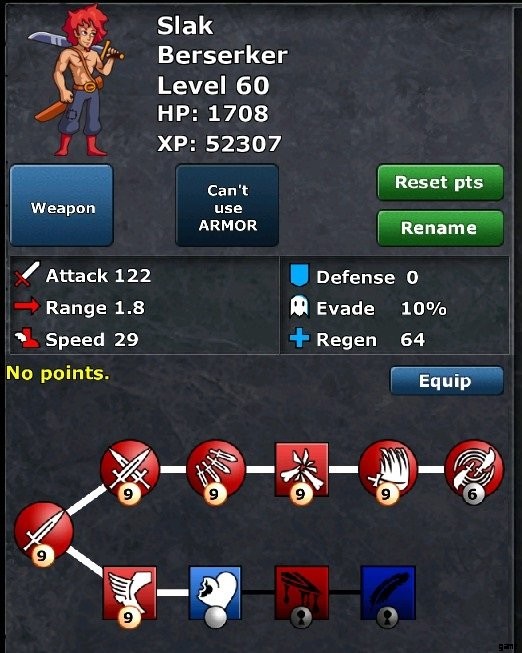
バーサーカーの場合、いくつかのオプションがあります。バーサーカーは、とげのある敵が完全に細断されていること、一部の敵が持っている巨大な鎧、すべてが持っている強力な攻撃により、NG +で大幅に弱くなるため、それらを適切に使用するのは難しくなります.左側のビルドはバーサーカーから良いダメージを与える方法を示し、右側のビルドは敵に流血を与えるためのものです。流血を与えるために使用するバーサーカーは、効果的に仕事をするためにブースト Lvl 3 を超えてアップグレードする必要はほとんどないため、必要に応じてより高いレベルの攻撃を無視することができます。流血ユニットを敵のスポーン ポイントのできるだけ近くに配置し、他のバーサーカーをナイトの後ろに配置します。これは、トゲやアーマーに当たる可能性が最も低い場所です。
リジェネと回避スキルは非常に状況に左右されます。 Regen に 9 ポイントを費やすと、+16 HP/秒が追加され、合計で +80 HP/秒の回復が得られます。ユニットがヒーラーの射程内にいる場合、回復が 25% 増加しただけではほとんど違いはありません。回避スキルははるかに強力で、攻撃をかわす確率を 10% から 40% に引き上げることができます。これにより、バーサーカーが受けるダメージが大幅に減少します。残念ながら、それはとげから私たちを守ってくれません。これらの 2 つのスキルは、生存性が絶対に必要な場合、またはバーサーカーを完全にアップグレードする予定がなく、ポイントに余裕がある場合にのみ投資する必要があります。
レンジャー
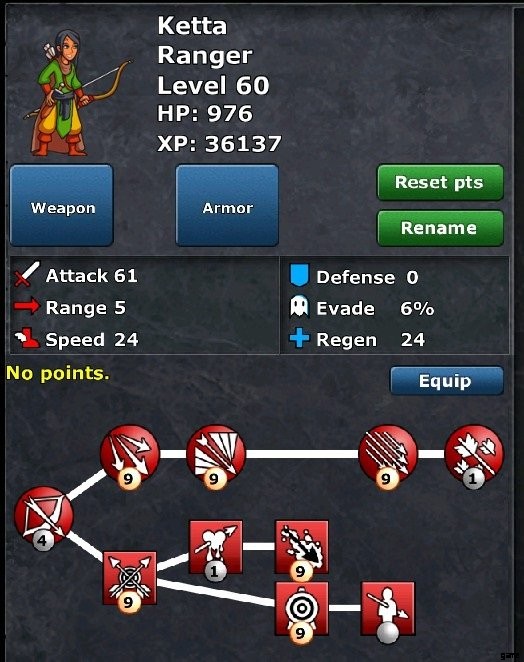
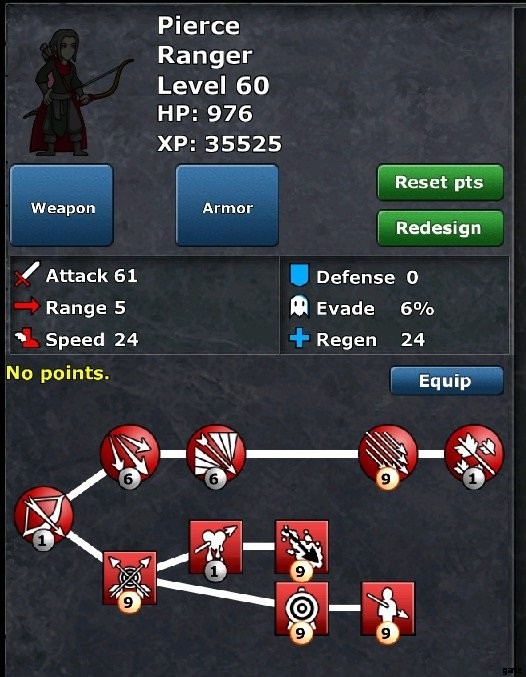
レンジャー用に 2 つのビルドがあります。ほとんどのレンジャーでは、Crit、Range、Poison を最大にしたいと考えています。範囲特性により、マップの非常に大きなセクションをカバーできるため、ほとんどの敵が遠距離攻撃を回避または抵抗するようになりましたが、これはレンジャーが射撃を止めないという事実によって打ち消されます.クリティカルとポイズンのスキルは、すべての攻撃に対する無料のダメージ ブーストです。
Bleed スキルをアップグレードしないでください。敵が受けるダメージが 30% 増加するのは上限であり、私たちにとってはそれだけの価値はありません。アーマー ピアスは、アーチャーのうち 1 人を除くすべてに対して無視する必要があります (右の写真を参照)。 NG+ でアップグレードすると、Armor Pierce 効果を高める Unique Bow があるため、その弓を使用する Unique Archer が 1 人います。
残りのスキル ポイントは、レベル 4 の攻撃であるスプレッド ショットを最大化するために使用し、必要に応じて他の攻撃に分割する必要があります。スプレッド ショットは、レンジャーのすべての攻撃の中で 1 ヒットあたりのダメージが最も高いため、最も強力な毒を与え、最も多くのアーマーを貫通することができます。
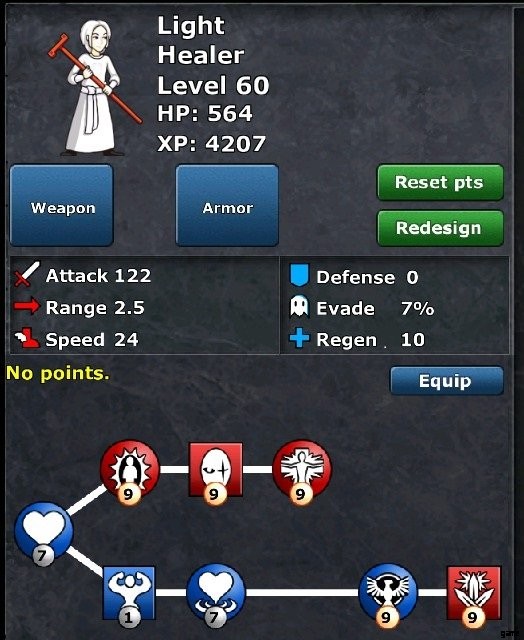
ヒーラー
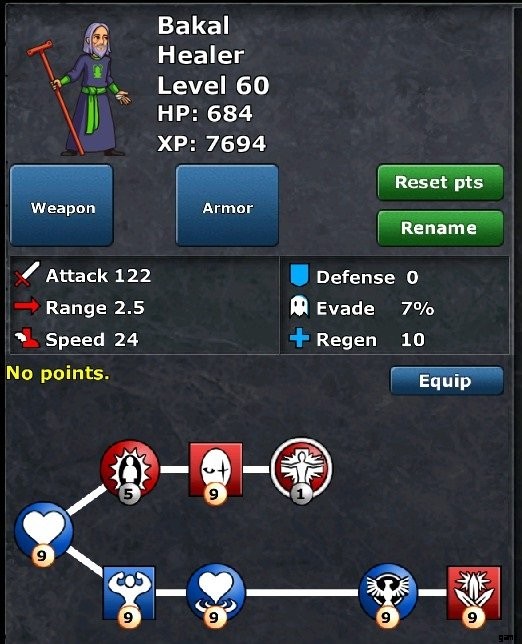
左側のビルドは、最も頻繁に使用するビルドです。ダメージ バフの熱意を最大にし、ヒーリング スキルを最大にし、ヒーラーの HP を最大にして、敵の攻撃を受けないようにします。盲目状態は、ユニットがダメージを受けるのを防ぐのにも役立ちます。そのため、攻撃に費やす時間は、他の防御側の生存を維持するのに役立ちます。
右側のビルドは、シャドウ ユニットのあるレベルで切り替えることができるものです。ヒーラーの最大 HP と一部のヒーリング パワーを犠牲にして、光の効果によって影の敵により良いダメージを与えます。最大HPが低いと、敵がバーストダメージでヒーラーを倒しやすくなります。このようなヒーラーを敵の進路から 1 タイル離すか、最高の軽鎧を与えるようにしてください。
キャラクター ビルド (アイス メイジ、ナイト、ドラゴン)
アイスメイジ
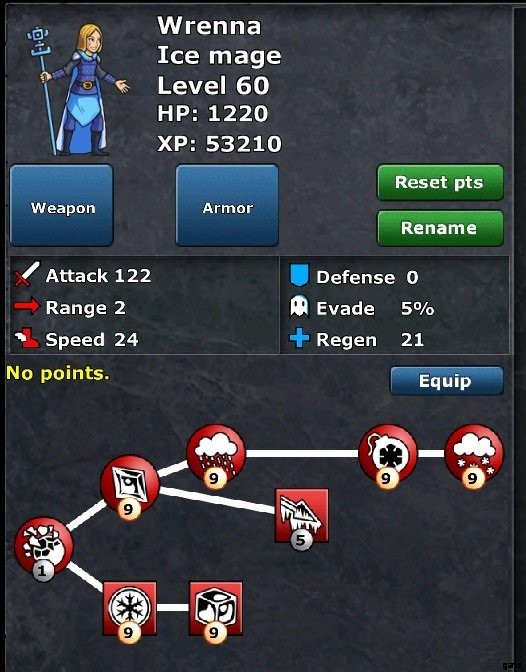
素早いワームタイプの敵は攻撃を回避できず、他のユニットが攻撃できるほど減速するため、これらのユニットは NG+ で生き残るために重要です。 AOE 攻撃を最大にしたいと考えています。これにより、優れたダメージが得られ、敵のグループを減速させることができます。次に、アイス ボールのチルとフリーズを最大にして、単一のターゲットを減速させます。これが完了したら、Ice Shard をアップグレードして、DPS の貫通力を与えることができます。他にできることはほとんどありません。
騎士
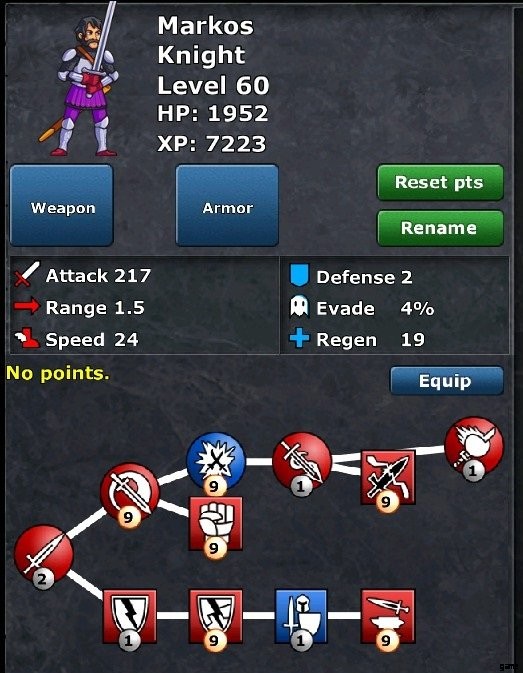
バーサーカーはトゲで敵に触れた瞬間に死んでしまうため、戦場を一掃するためにナイトにもっと頼る必要があります. Max Armor Break and Sword Training on the bottom row to destroy enemy defense and increase our damage. We don’t need Armor Piercing since we’re destroying the armor just as fast without it, and our equipment will give us enough defense for almost any situation.
For our offensive skills, we want to max out the Knockback and Stun abilities. Knockback is great for slowing down armored enemies like Fallen Knights, which are immune to Chill and Freeze in NG+. Stun is for dealing with tougher enemies like Cultists, who are immune to Knockback. You should also fully upgrade your 2nd attack, Smash. Your Knights should always be starting the battle at at least level 2 to break armor effectively on higher difficulties, and to make use of Knockback as early as possible.
Your remaining points should usually be spent on Swing or Lunge, though in some rare situations you may want to upgrade Counter instead. Counter with 1 skill point has the same power as Smash with 9, and a significantly shorter cooldown, making it an amazing attack. If you’re getting hit. Only upgrade Counter if you can guarantee your Knights are going to be facing lots of enemies who attack, and those enemies will choose to attack your Knights.
Dragons
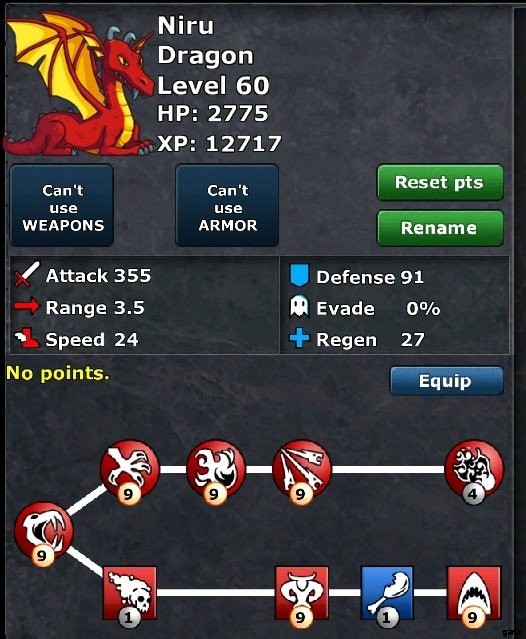
Dragons are incredibly expensive, and this means using them incorrectly will result in wasting a huge amount of Psi. To make up for how expensive they are, Dragons are also incredibly powerful, especially in groups.
On the bottom row, max out your attack and the Devour skill for Bite. Devour lets our Dragons instakill enemies with <18% HP left, provided they aren’t immune to it. Against tankier enemies, like Cultists and Cultist Priests, this can let our Dragons do over 10k damage in a single attack. Cultist Priests are one of the most dangerous enemies in the game, so for them alone this skill is worth it.
Max out Bite, Claw, Fire Breath, and Roar. Your last couple points can go into your lvl 5 attack, buffing Bite’s poison effect, or boosting your Dragon’s HP. Every level except boost Lvl 5 gives us something valuable, so we don’t really care about that last attack. Lvl 1 Dragons have a strong attack with more range than Berserkers or Knights, providing good damage. We can use their Devour to efficiently clean up enemies, provided our Dragons target the correct ones. Lvl 2 Dragons get a nice boost in damage in the form of their second attack, while not being too expensive. Lvl 3 Dragons have a brutally strong ranged attack, and Lvl 4 have the best move in the game, Roar. Placing multiple Dragons near each other can let them stunlock hordes of enemies. We can also put a single Dragon near a Knight or two and, once they’re all level 4, they can consistently stunlock the strongest enemy in a group.
Azra’s Equipment
The 3 best books for Azra are the Book of Blood, Slow Start, and Furious Start. Let’s focus on those last 2 first. Furious Start applies Frenzy to units you summon. With a maxed Frenzy spell, this means units you summon get +75% attack speed for 24 seconds. Incredibly helpful if you’re moving units around, or placing units and immediately boosting them a couple times. Slow Start slows enemies down when they first spawn in, which can be incredibly helpful in many maps by letting you spawncamp the monsters.
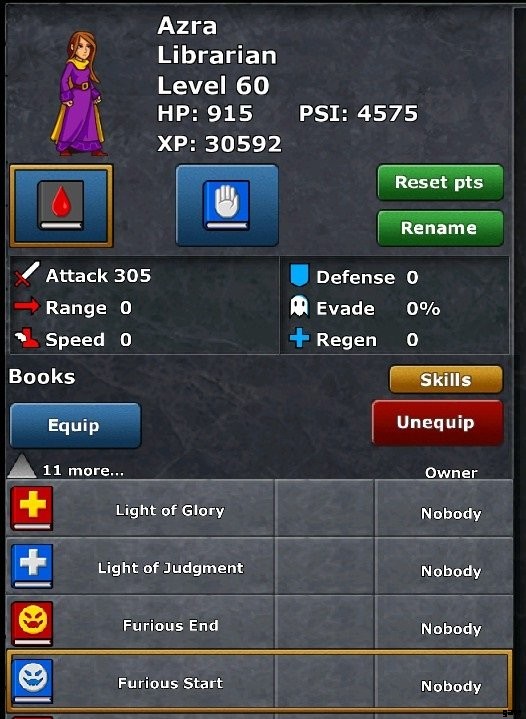
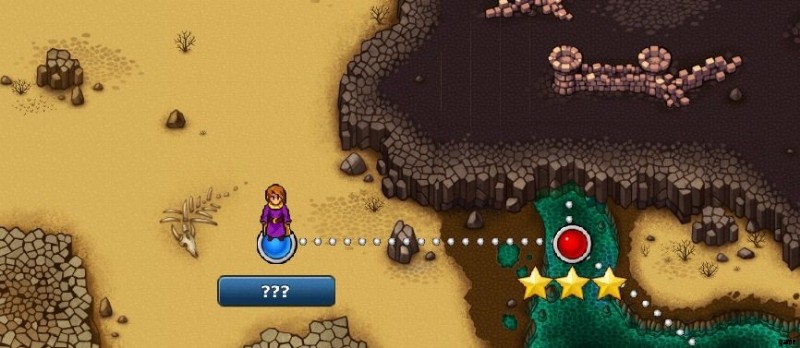
Now how the hell do you get the Book of Blood? By clicking some buttons on the main menu you can unlock 3 books for Azra on all save files, one of them being the Book of Secrets. Equip this book, and then go to the location that appears on the map next to where you first fought Zelemir. You’ll find a secret area where you can enter codes to get skulls which you trade for books, one of them being the Book of Blood. Of the options available, the Book of Synergy is bad (hidden effect where it reduces the Psi enemies drop by 15%), the Book of Plagues is highly situational, and the Book of Blood is amazing. It makes all enemies and defenders always take 25% more damage. Because it applies a permanent bleed effect to enemies, if our Berserkers try to apply their stronger 60% bleed to an enemy, that enemy now takes 60% more damage FOREVER. I recommend always using this book once you have it.
Aside from these, the only other book I think is any good would be Slow End, which is like Slow Start but applies to enemies when they get close to Azra. Whether you want Slow Start or Slow End obviously depends on the level and where you position your defenders, and Furious Start is amazing if you can’t really benefit from either of those.
Equipment (Upgrade Priority)
In NG+, all unique weapons and armor we obtained earlier on can now be upgraded, at the cost of skulls. Skulls are obtained from defeating levels on advanced or extreme difficulty. Some of the hardest levels in NG+ are nearly impossible if you haven’t upgraded the correct items, so here we’ll talk about what equipment you should upgrade first and how you should use it.
Stone Skulls
First off, this game has an issue where you cannot upgrade all weapons and armor which require Stone Skulls in a single playthrough, you’ll be 1 skull short. This means you cannot get both achievements for upgrading all weapons and upgrading all armor on the same file. To 100% the game you’ll need to do 2 playthroughs, one where you upgrade all weapons and one where you upgrade all armor. Since you can’t use all the weapons in Hero Mode, and upgrading all armor takes less Obsidian Skulls, I recommend getting all armors in your Hero Mode playthrough.
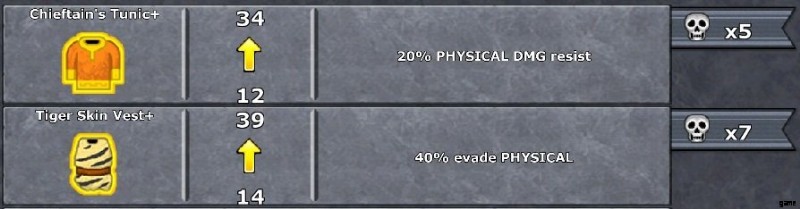
With that said, the first thing you should spend Stone Skulls on is the Hunter Warrior+. Follow this up with the 2 Swords and the 2 cheaper pieces of Light Armor. The Hunter Warrior+’s extra range is great, and both swords give solid buffs to our Berserkers. The Chieftain’s Tunic+ and Tiger Skin Vest+ will make your healers much more durable. The remaining weapons and armor you can upgrade with Stone Skulls all have lackluster effects, though the Relic of the North bow is nice for just a bit more damage on one of your Rangers.

Bronze Skulls
Start out with the Beast’s Weapon. It’s effect massively boosts damage against worms and splitters, like Abominations. This weapon lets one Ice Mage of your choice shred them with ease. Next you should upgrade the Warlord’s Triumph, which is an absolutely amazing bow. I’m genuinely not sure if this bow or the Gilded Death+ deals more damage, but the Warlord’s Triumph is cheaper to upgrade.


You can then upgrade the 2 swords, which boost our Knights’ abilities, and the other staff, the Executioner’s Bludgeon. The best armor to upgrade is the Strength of Wocolan for the 40% physical resistance, which can make one of your Knights virtually indestructible. After that, everything left is fairly mediocre.
Obsidian Skulls
These are the really important ones, and we need to be careful how we use them or we’ll struggle to complete the toughest challenges and get more. Your first priorities should be Evni and Kozomon’s Scepter. Evni’s speed boost and high damage, along with the ability to Devour enemies, are amazing and simply give a massive damage boost. Kozomon’s Scepter boosts the effectiveness of Inspire. Place a Healer with this staff near all your Rangers to massively boost their damage output.


Now, the Fountain heavy armor, Keeper of the Flame staff, Gilded Death bow, and Eye of the Flame sword are all good choices. If you’re struggling to beat the Super Sheep+ or Eztli-Tenoch’s Right Hand+, then grab Keeper of the Flame staff to slow them down more and make those two fights easier. Otherwise, I would save Keeper of the Flame for last and upgrade the other 3 in whatever order you choose.
The Platinum Fleece is the last item we spend an Obsidian Skull on, because the weapons all help significantly more with beating challenging levels to get Obsidian Skulls, and the Fountain armor has a much better effect than the Fleece. This is still a great light armor for a Healer or Ranger to have, but those units just don’t need the defense as much as your Knights do.
Equipment (Who Do I Give This To?)
It can be hard to keep track of all the special abilities of weapons and armor. I recommend you rename/redesign your units to easily be able to tell what the effect of their weapon and/or armor is without having to summon them first.
Swords
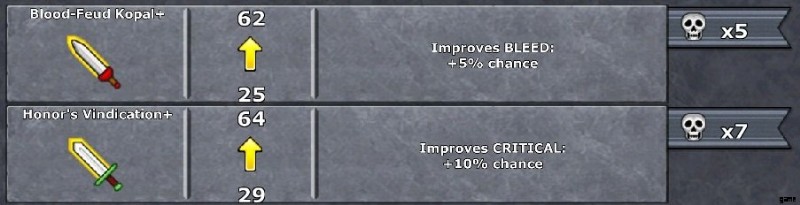
- Blood-Feud Kopal+:Put this on a Berserker who has the Bleed skill maxed out, and this will be your go-to unit whenever you really need the extra damage on some tougher enemies.
- Honor’s Vindication+:Put this on a Berserker who has the Crit skill for Flurry and Flurry maxed out. Try to always have them at at least boost Lvl 3 so they’re always taking advantage of the sword’s effect
- Edge of Order+:Give this to a Knight, and plan on them being the first Knight you upgrade to boost Lvl 4 to use this weapon’s effect as early as possible
- Commander of Legions+:Give this to a Knight, and make sure they start at boost Lvl 2 like they should to use the effect
- Eye of the Flame+:Give this to a Knight. Most armored enemies that you want your Knights to target are immune to freeze and chill, so by placing this on a Knight we reduce the chance of it cancelling out status effects. Some shadow enemies have thorns, which Knights can mostly shrug off due to having armor and hitting fewer times for more damage, making them much better at taking advantage of the Light effect.
- Evni+:Give it to a Knight. I know this is Slak’s sword, but the higher damage and attack speed are better used on a Knight to rapidly break down enemy armor so the rest of your units can deal damage as well. In cases where armor and thorns aren’t a huge concern, you can give this to a Berserker who will be much better at using the Devour effect thanks to their Lvl 4 and 5 attacks hitting all enemies in range.
Bows
All your bows will go to Rangers. Shocking, I know. You may want to keep track of who has Hunter Warrior+, as their higher range lets you place them in spots where other Rangers might struggle to reach anything from.
Staffs
- Charlatan’s Staff+:Give this to a Healer. They’re more likely to need the evasion to survive. You can combine this with the Tiger Skin Vest+ for a Healer who’s virtually immune to melee attacks.
- Archsheperd Stave+:Give this to a Healer as well. The extra HP will help them survive the death splash effects of enemies, which I find to be the biggest threat to my own Healers in game. Ice Mages have higher defense and far more health than Healers, so they have very little trouble staying alive as long as they’re near a Healer.
- The Beast’s Weapon+:Give this to an Ice Mage and pay close attention to who has it. Position them where the most worms/splitters will be appearing/passing through and try to always have them at at least boost Lvl 3 for AOE attack.
- Executioner’s Bludgeon+:Ice Mage for higher attack
- Keeper of the Flame+:Ice Mage for slowing single targets or groups with AOE attacks
- Kozomon’s Scepter:Healer for stronger Inspire. Make sure to position this Healer near as many other units as possible, especially Rangers, and always have them start at boost Lvl 5.
Light Armor
Just give it all to the Healers, they need it the most. The Chieftain’s Tunic+ and Tiger Skin Vest+ may have less defense than NG+ armor, but their effects make up for it I find. Combine the better armor with the Evasion and HP Staffs to make 2 Healers that are incredibly hard to kill.
Heavy Armor
- Glory of War+:Garbage, give it to whoever you want
- Horseman’s Lamellar+:Garbage, give it to whoever you want
- Traitor’s Harness+:Knights are going to get hit more, so give this to a Knight
- Strength of Wocolan+:The best defensive armor thanks to it’s massive physical resistance. Give this to whoever is getting hit the most, though that’s usually a Knight.
- Lord Warden’s Harness+:Good armor, can be used for Ice Mage or Knight
- Purity of Flame+:Give this to the Knight who has the Eye of the Flame+ so you can keep both burn effects away from your Ice Mages
- Guardian of the Fountain+:Amazing thorns effect should be given to the Knight who has the Edge or Order aka Stun Sword. The longer Stun combined with the Freeze effect will do wonders to slow down Cultists and Cultist Priests.
Tips and Tricks
More is Better: Having more units at lower levels is usually better than having 1 high boost unit. A Knight costs 40 to summon, 60 to boost once, then 120 to boost to Lvl 3. It’s cheaper to get 2 Knights to Lvl 2 than to get one Lvl 3 Knight.
Cooldown Reset: When you have a lot of Psi stored up, you can recall a unit then resummon them to reset the cooldowns on their skills. This can be particularly useful when fighting the Super Sheep+, as you can let your Healer Inspire your Rangers multiple times in succession.
Targeting Options: Changing up the targeting options for your units can make them much more effective, but you have to be careful because these options can cause defenders to make stupid decisions or ignore enemies close to Azra sometimes. Here are some settings I tend to use, and general tips
- Target Weakest:This is a great option for Dragons, as it encourages them to focus on targets they can Devour with bite. Sadly, they look at the amount of HP left, not the %, so this isn’t perfect
- Target Strongest + Optimize Effects:This is generally what I have my Knights set to. It tells them to target the strongest enemies, but to also focus on breaking armor.
- Bulldog Mode:Do you like micromanaging your defenders?いいえ? Then you probably shouldn’t be using this. Bulldog mode is best for when you want specific enemies finished off as fast as possible. I’ll sometimes turn this on to tell one of my Knights to finish off a Cultist Priest instead of spreading his damage out, or to focus on killing a Monstrosity so all 3 don’t die at the same time and kill my Healers with death splash.
- Advanced Settings Take Priority:I tend to think of the top row of options, like Target First, Target Last, etc. as the main setting, but that’s not really the case. Options in the bottom row are given priority, and this can cause some issues. If your rangers are set to Target First and Target the enemy with the lowest chance to resist or evade, they’ll basically never target worms, even if they’re practically on top of Azra.
Applying Bleed: While thorns will shred your Berserkers, that doesn’t mean they can’t attack anyways. It’s good to place Berserkers in range of a healer but ahead of your other defenders so they can try to apply bleed before the enemy reaches your main kill zone. With some micromanagement, you can have your Berserker attack a strong enemy with thorns until they apply 60% bleed or are almost dead, then disable all their attacks so they can stop and heal. It helps to have the Berserker be only level 1 or 2, and slow the game down for bit.
Counter: The Knights’ Counter attack is incredibly strong, doing far more damage than the level 2 attack, Smash, while having a shorter cooldown. The downside is Counter can only be used when an enemy tries to attack our Knight, and it’s hard to guarantee this happens. One way we can ensure our Knights get hit is make sure they’re the only unit that can be hit. Enemies also seem to keep attacking the same target over and over again until that defender is out of range. This means if your Knight is the first defender the enemy encounters, they’ll keep hitting your Knight again and again, even when they have other options available. The one issue with this is if you place 2 Knights near each other you may find that one of your Knights is getting all the attacks and the other is being ignored, so only one of them can use Counter.