Symphony of War:The Nephilim Saga – 新規プレイヤー向けのヒントとコツ

新規プレイヤー向けの役立つヒントとコツ。
初心者向けのヒントとコツ
全能のチルダ キー (~)
現在のバージョン 1.01.1 では、~ キーを押し続けると発生する「ターボ」よりも速い速度が隠されています。
AI がアクションを実行する際の待ち時間が大幅に短縮されます。
分隊テンプレート
第 12 章分隊の概要

- 合計:15
- 4x 戦車部隊:ダイアナ、リンドリー、ラクシャ、武将タタール
- 1x 泥棒:ステファン
- 2x 騎兵:ロランテ卿とバルナバス
- 1x 大砲:ライサンダー
- 1x ドラゴン (非飛行):アビゲイル
- 4x 弓騎兵隊:ジュールズ、備前将軍、ナリマ、エメリック
- 2x メディック:イゾルデ、シビル
第 30 章分隊の概要

- 合計:19
- 3x タンキング (騎兵):リンドリー、トリスタン、イゾルデ
- 2x 泥棒:ステファン、ダイアナ
- 大砲 4 基:ライサンダー、アーチボルド中尉、武将タタール、ラガヴィ将軍、
- 5x ドラゴン (フライング):ベアトリクス、アビゲイル、シビル、エマ、ブロム
- 3x 弓騎兵隊:ジュールズ、備前将軍、オットー
- 2x 騎兵:ジャロミール、ロランテ卿
以下は、私がキャンペーン中に使用した一般的な「テンプレート」分隊です。
戦車中隊
重要な要素は、分隊の脅威度が最も低くなければならないということです。これは、生存率を高める脅威の低いアーティファクトに固執する必要があることを意味します (私は将校のレガリア、ドナーの戦争論、そして時々ドナリの鎧を使用します)。
- 基本的な組み合わせは、前線タンク 3 体とヒーラー 2 体です。
- 歩兵バージョンの場合、最前線には 3 人のセンチネルまたはパラディン (ガーディアンを持っている) を使用し、ヒーラーには 2 人の巫女/模範を使用します。
- 騎兵バージョンの場合、最前線にヴァルキリー (HP が高い) と 2 人のホスピタラーがいます。
- 残りの 5 ユニットはあなた次第です。
- 暗殺者が心配な場合は、後衛のヴァルキリー/パラディン、またはセンチュリオン/チャンピオンを使用する必要があります。彼らの鎧は、彼らが受けるダメージを取るに足らないものにします。
- 魔法のダメージが心配な場合は、戦士の傲慢さをユニットに与えるか、ヴァルキリー/パラディンを使用するだけで、受ける魔法のダメージが劇的に減少します.
盗賊中隊
ヴァルキリーがいる最前線の高スキルユニット。

弓騎兵部隊
推奨:ホースボウ/レイダー 5 体、アーチャー/ウォーボウ 4 体。軽騎兵の移動力を持つため、7 タイル移動でき、攻撃後に退却できます。
I don’t recommend full warbow squadrons simply because cannon serve that role, and do far more damage (one-shotting everything but frontline enemies).
Cannon Squadron
Early game:4 cannons with Giant’s Thresher (+25% damage vs larger units). The main issue with this squad is that it is very vulnerable to getting attacked, although proper positioning can keep it safe.
End-game:5 cannons, 3 paladins, 1 priestess:A cannon squad that can tank hits, and has healing. Positioning is far less relevant as a result.
Flyer Squad
Maximum AoE output with 3 dragons on the frontline, a fire mage for more AoE, and 2 healers for survival.

Cavalry Squadron
3 valkyries/knights on the frontline, 2 hospitallers, 3 fire wizards, and 1 (anything).
This squad will have cavalry mobility be able to smash anything it faces, and sufficient healing to stay healthy. The ability to attack and retreat will prevent these squads from being targeted by the AI.

Squad Movement Type
Directly from in-game’s “Tutorial and Info” section

Intersting Squad Examples:
- A unit with 5 horsebows and 3 archers will have light cavalry mobility. Similarly, a unit with 5 Cavalry and 4 infantry will have cavalry movement (which can make Hospitallers worth using over Templars in certain circumstances).


- Dragons and Horses don’t mix. If they are together in a party, it will become infantry class (5 cavalry, 2 infantry, and dragon =infantry class).

- Cannons will similarly make a unit instantly either slow or infantry class (depending on techs).

- If your # of dragons =# of other unit types, it will be flying. However, if 1 of the other units is a cavalry, it will become infantry class (Dragons cannot make horses fly!).

- “Light” Classification comes from the number of light units vs heavy units. For example, this Stefan squad is “Light cavalry” because Stefan + Blademaster + 2 Raiders + Hussar =5 light units.

Unit Stats
Unit starting stats are random, but unit stat growth is fixed, which is dependent on the class of the unit, modified by the affinity of the unit (more on affinity later).
For example, Archers, Swordsmen, Spearmen, etc. all growth STR at 0.4/level, gaining 2 STR per 5 levels.
The impact of each stat is as follows:
- STR:Improves Physical Damage and Physical Resistance.
- MAG:Improves Healing / Magic Damage / Magic Resistance.
- SKL:Improves Crit Chance / Dodge Chance / Deflection / Status Effect Application.
- LDR:Only used by the squad leader, the squad’s maximum capacity is equal to his/her LDR.
Additional Notes:
In general, weapon value is combined with STR or MAG to determine damage output. However, there are exceptions, which are listed below:
<オール>Class Affinity
Affinity has 2 main effects:
<オール>The effect of affinities is shown in the image below, but what you need to know is this:
- Front-line tanks (typically Sentinels, Valkyries, and Paladins):Earth.
- Magic-based units where HP is not an issue:Water or Dark.
- High Skill and Str:Lightning.
- Physical DPS:Dark or Fire.
- Squad Leader:Light.
Finally, affinity stat changes are applied retroactively. For example, if you change from lightning to light affinity, you will see a big increase in your leadership stat, your STR and SKL will drop, etc.

Maximizing Hit Points
Unit hit points are affected by their starting class.
That is:
- Fighters =Militia> Medic> Bowman
Example 1:Cannons
If you want high HP gunpowder units, make them from fighters or militia, ideally with earth affinity (++HP), with Water Affinity (+HP) being a good 2nd choice.
307 HP Fighter / 317 HP Militia


259 HP Medic / 200 HP Bowman


Example 2:Samurai
High HP Samurai should be made from:
- Fighters> Spearmen> Samurai, instead of Bowmen> Archer or Horsebow> Samurai
Note:To class up these Water Affinity Samurais, I had to use “Roast beefs of strength” to raise their STR to 45+. Thus, the ideal affinity is Fire Affinity, since it doesn’t lose HP (unlike Lightning). Dark affinity is worth noting in that it provides ++STR, so you could have samurai faster, but with -HP.
366 HP Fighter / 275 HP Bowman


Earning Gold!
In SoW, there are 4 main methods to earn gold. Using these methods can allow you purchase all the mercenaries and artifacts you come across in the bazaars and markets.
The Thievery Squad
The thievery squad should be your initiator in combat.
They earn gold based on the skill of the characters in the squad, and the amount of damage the unit deals.
Best units to give thievery to:
- Swordmaster, Scouts/Hussars, Horsebow/Raider, Lightning Wizards.
- They should all be lightning class for maximum SKL (aka. maximum profit!).
Important characters that can benefit from thievery include:
- Rakusha, Beatrix, Narima, General Ragavi
Named Mercenaries that can benefit include:
- Konrad the Cold (change to lightning class, has Arcane speed which gives SKL based upon MAG stat).
- Teriq the Wicked.
An early-game (Chapter 8) thievery squad could be the following, with 3 thieves in the mid-line.

The late-game thievery squad would look like this (only 2 Valkyries don’t have thievery):

Surrenders
At the end of battle, every enemy unit that has surrendered will give you 1 tech point, and a large amount of gold.

To make a surrender succeed, you need to damage/destroy the enemy morale, with 100% chance of a successful surrender if they have “Shattered” Morale.
Thus, an effective tactic is to:
<オール>For a quick example, see:
Final tip
To maximum surrenders, you should use a party with many melee units with the overpower trait (Deals morale damage based on STR). The melee units will generally target the same enemy, reducing the number of killed enemies and leaving more alive for the surrender.
Treasure Hunter

This is a leader perk. If your unit perform surrenders (or enemy army kills) has Treasure Hunter, you are more likely to have items drop. They can be artifacts, or the really profitable Arena tokens.
Arena Fights
Every arena fight gives gold, XP Codex, CP Codex, and some random items.
Thus, buy the tokens in the market whenever you see them! They can also drop as a reward item from combat during battles.
Here are sample rewards from each of the 4 arena.
Bronze / Silver


Gold / Platinum


Unit Capacity Costs
Note:Squad leader’s capacity does not change from 10. A “knight captain” leader in cavalry class will still have 10 cap, rather than 8. Similarly, even if the squad leader is loyal, his capacity cost remains 10. Below is an image of Warlord Tatar, who has 10 capacity despite being loyal.
Squad Members
For squad members, their capacity costs are affected by the following factors.
Leader perks, like “Knight captain”, “Archer captain”, etc.
The squad member’s “loyalty status”
- Mercenary =12 cap
- Non-committal =11 cap
- Normal =10 cap
- Committed =9 cap
- Loyal =8 cap
The number of units in your squad
- 1st-5th unit:No extra cap cost
- 6th unit:+2 cap
- 7th unit:+4 cap
- 8th unit:+6 cap
- 9th unit:+8 cap
Therefore, for a 9-unit squad that is fully loyal with 0 artifacts or cap reductions, you need 94 LDR:
- Leader &4 members:10 + 8*4 =42
- 6th:40 + 8+2 =52
- 7th:50 + 8 +4 =64
- 8th:62 + 8 + 6 =78
- 9th:76 + 8 + 8 =94
This is why having characters that are knight/archer/infantry captains, artifacts that reduce capacity, and mentorship to boost LDR on squad members are all so useful.
Increasing Unit Capacity (Aka. LDR Stat) and Loyalty
There are several key points to understanding how Leadership gain works.

The above leadership gain occurred when I stayed within the time limits of each battle, simply from clearing 5 Gaiden missions + numerous arena battles.
- Think of Leadership as having a “Hidden” LDR XP Bar.
- Combat and captures increase LDR XP.
- Mentorship:A squad leader will provide LDR XP to all units in his party, until they reach [The Leader’s LDR -10]. Mentorship only applies with combat.
- When a LDR XP bar is filled, the unit gets +1 LDR. Light affinity has a smaller LDR XP bar, while Dark has a higher one.
Loyalty (which affects unit capacity cost) functions the exact same way, except there are only 5 states:Mercenary, Uncommitted, Neutral, Committed, Loyal.
Thus, the best way to increase both leadership and loyalty is:
<オール>You can also (indirectly) increase leadership via equipping 5 artifacts:
Elegant blade, Sergeant’s Uniform, Imperial Battle Armor, Imperial War Banner, and Ataraxia
Important
<オール>Bazaars
Always check them out.
They are nearly identical to markets, but you have a higher chance of getting rare items and named mercenaries. They also offer Drakelings for sale, which can be grown into mighty dragons and eventually, dragon riders.
Note:You can have a maximum of 15 dragon riders (11 from bazaars + Nibbler, the mercenary Cloudrender Athelis, Azuros, and 1 “surprise” dragon rider)
There are a total of 11 chapters with bazaars, which are the following:
- 3, 6, 9, 10, 12, 16, 18, 19, 21, 24, and 26


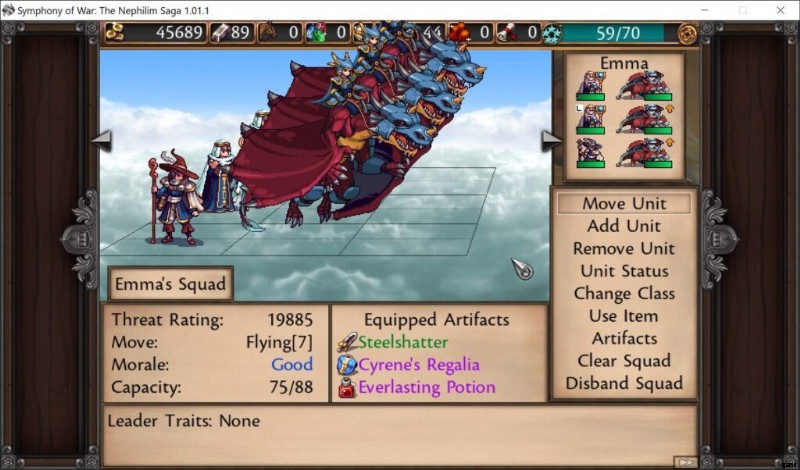
AI Target Selection
There are 3 simple rules that the AI follow when it comes to targeting.
<オール>In practical terms:
<オール>Below is 4 screenshots of the exact same party, but with 4 different artifact configurations, with the threat rating ranging from 15K, 19K, 23K and 33K.


