Spirits of the Hellements – 基本エンドレス キルボックス
エンドレス モードで 30+ に到達するためのキルボックスを構築するためのクイック ガイド。
はじめに
短くて甘い。あるスレッドで、エンドレスの高いスコアについて詳しく説明するように求められたので、ここで説明します。これは、各マップを完了する方法ではなく、エンドレスに関するガイドであり、ここで言及されているタワーは、各マップをクリアしようとしている場合とは異なる用途があります.これの良い例はスナイパーです。通常のゲームでは、これは S ティアです。いくつかのランダムなタワー + サイフォン パスを下るスナイパー タワーは、すべてのマップを打ち負かすことができます。ただし、エンドレスでは、敵の強さに比例する固有のスケーリングがなく、スナイパーが敵をデバフできないため、スナイパーのダメージは減少します。また、これはすべての Anarchy Mods がオンになっていることに注意してください。 Anarchy Mods がなければ、マップを Wind Mushrooms と Fire Curses で埋めるだけで、時間の終わりまで何でも殺すことができます.
タワーのアップグレードと効率
キルボックスをターゲットにできるタワー:
- 森 – 分解
- 爆発 – 火:エリート エクスターミネーション – 風:火の雹 – ショック:クラスター数/火の雹
- スナイパー – サイフォン
- ガトリング - タイタン スレイヤー
- 呪い – 疫病
- ディバイン – ウィンド:エネルギー ウェーブ – ファイア/ショック:ディバイン チャンピオン
- きのこ – デスクラウド
- サイクロン – 災害
Laser – Iconic Trio>Find Enlightenment>Fear No Elite – これはすべてマップによって異なります。 1 つまたは 2 つのビームをキルボックスと交差させることができる場合は、Iconic Trio を使用してください。そうでない場合は、他の高価値のタイルに囲まれる空のタイルの束を吸収する場所にタワーを配置できる場合は、Find Enlightenment を使用します。そうでない場合は、Fear No Elite を服用してください。
スキップするタワー:
Fire Forest と Lightning Explosive はほとんど何も提供しません。火の森は私を混乱させます。これは間違いなく通常のフォレスト タワーよりも悪く、間違いなくゲームで最悪のタワーです。 Fire Hellement をレベルアップすると悪化する理由がわかりません。 1 層目と 3 層目は素晴らしいですが、2 秒ごとに 1 回の攻撃にロックされる 2 層目はひどいものです。ライトニング エクスプローシブは、キルボックスにヒットする位置に押し込むことができれば問題ありませんが、ダメージ以外には何も提供せず、通常は通常の呪いの塔を追加するよりも悪いだけです.
力線操作ルートを下るのに十分な大きさの接続された塊が得られたら、スナイパー タワー、ディバイン タワー、フォレスト タワーでマップの残りの部分を埋めます。画面の横にある 10 個のアクティブな能力のスロットは、10 個しか持てないことに注意することも重要です。サイフォンでスナイパー タワーを 11 個配置すると、10 個しかアクティブになりません。すでに 3 つの Siphoner、1 つの Lightning Curse、1 つの Wind Cyclone をアクティブにしているので、そのルートに進むと、あと 5 つの Siphoner のスペースしかありません。フルオートは、キルボックスの後ろにいる遠くのスナイパーにとっては問題ありませんが、キルボックスの前にあるものにとっては、貫通力の欠如は良くありません.
何らかの方法で 3 つのサイクロンすべてに空中を恒久的にターゲットにする機能とキルボックスをターゲットにする機能の両方を与えることができない限り、+range で神の塔を構築します。範囲の広いレーザーを構築します。風の呪いは、すべての塔が呪われたフライヤーを攻撃できるようにします。アーマー減少でサイクロンを構築します。固定ダメージ ボーナスのガトリングを構築して、タイタン スレイヤーがより多くのダメージを増加できるようにします。 Tier 2 キノコのアップグレードは、配置範囲が必要かどうかによって異なります。
キルボックス画像
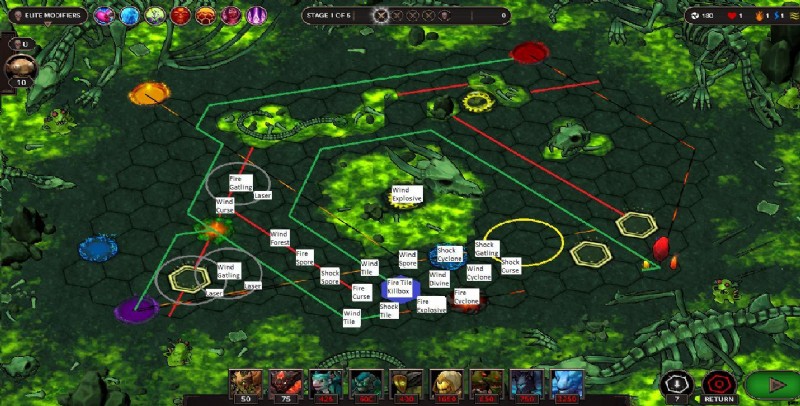
- 緑の線 =敵の進路
- 赤い線 =祝福
- 灰色の円 =ファイア/ライトニング ディバイン ビームの潜在的な配置
- 黄丸 =風神ビームの配置
- 青い六角形 =キルボックス
これは、配置されたすべてのタワーがキルボックスにヒットできるキルボックスの非常に基本的な例です。スナイパー タワーをグレー内の任意の場所に配置し、基本的なディバイン タワーを任意の場所に配置して、ショック スポアを中心としたダメージ用に構築されたビームを配置して、Fire Curse の射程距離を増加させます。敵の進路は調整可能です。
キルボックスの説明
ここでの目標は、航空ルートと地上ルートを組み合わせてできるだけポイントに近づけ、ダメージを無駄にしないようにすることです。 1 点に多くのものを組み合わせる必要があります。3 つのすべての Curse タワー、すべての 3 つの Cyclone タワー、すべての 3 つの Mushroom タワー (画像では Spore と呼ばれています)、Divine タワーの Energy Wave 範囲内、Wind Spore スタン範囲内、 the Wind Explosive tower initial stun range and within the Wind Cyclone and Wind Laser stun range. You also want a fire tile placed on the box, a lightning tile placed right before it and wind tiles after the box and before the lightning. Then you have to worry about towers that exist to deal damage rather then these that are here to debuff. This is a lot to get right and is only possible on 5 maps:Meadows, Tundra, Forest, Toxic Boneyard and Dojo. I’ve had the most success on Tundra but they all work.
Here’s what happens to enemies who hit the killbox:
Initial 2-second stun from divine beam> Wind Mushroom debuff starts building up> enemy is hit either by Mushroom stun or Energy Wave stun for 2 seconds> enemy hit by whichever stun they weren’t hit by the first time for another 2 seconds> enemy moves slightly into the divine beam and is hit by the 6-second stun of the Wind Explosive> enemy hit by a barrage of 2-second stuns from Energy Wave, Wind Mushroom, Wind Explosive, Wind Cyclone and Wind Laser(Get a sense of which Hellement is the best yet?). All of these stuns happen on a single tile and it’s important that this is a divine beam tile and it’s also important to remember that the Wind Mushroom is building up a constant increased damage taken debuff. The longer they stay on this tile, the more damage they are taking and the goal is to hit them more than once with a Fire Curse for the tougher enemies.
You’ll note how I listed that the Wind Explosive stun happens after the other stuns but how can that be?.これはとても重要です。 With the Hail of Fire upgrade we can manually decide where the Explosive tower hits and you want it to hit the tile AFTER the killbox. This is because of the explosion radius on the attacks of the tower. It extends naturally to about halfway through the tiles next to the impact zone. If we targeted the killbox, we’d actually be stunning enemies for 6 seconds before they entered the divine beam area. So the enemies get stunned by a few things entering the killbox, move to the halfway point of the killbox tile, then get stunned by the Wind Explosive tower.
Your main sources of damage are Fire Curse, the three Gatling towers and Fire Sniper. Fire Sniper effectively reduces the health of all enemies by 25% and is incredibly good. Fire Curse is going to be doing millions or billions of damage and is what’s going to actually kill most things. Your three Gatling towers are going to be dealing incredible amounts of damage thanks to Titan Slayer. It’s one of the few upgrades that scales with the enemies and will be increasing your Gatling tower damage with each wave. It’s important to try and place the Fire and Wind Gatling towers in the center of your Lightning/Fire Divine beams for maximum flat damage. The multiplier of Titan Slayer wants a big flat base number.
As for what’s going on in the killbox on the damage side of things:Three Cyclone towers lowering armor and increasing the damage enemies take by 100%, three Deathclouds increasing damage by 25%, Wind Mushroom stacking increased damage by 1%, three Curse towers lowering Health Regen and Armor which will cause enemies to take bonus damage from having negative armor, Fire Explosive lowering armor, Fire Laser lowering armor, the Fire tile increasing damage and lowering Health Regen, the Lightning tile chaining damage, the divine beam lowering armor and the Lightning Cyclone applying shock and increasing its own damage with each swing against a shocked elite.
Endless Modifiers (Important)
The last thing to talk about are the modifiers you’re going to be picking up at the end of each wave. There are four choices:Permanent enemy speed, permanent enemy Health Regen, permanent enemy Armor and permanent enemy Health.
We’ve discussed why giving them Health isn’t a problem – Titan Slayer. Speed and Armor are a different beast. We want enemies to have as little armor as possible so our Curse towers can increase the damage the enemies receive by having negative Armor. Giving them armor a few times is okay if it’s getting you something big like your last Hellement upgrade but I would hold off unless you absolutely need it. Health regen is laughable. Your Gatling towers will be doing 9999 many, many times a second and your Fire Curse will be chunking enemies for millions so 200 health regen or whatever a second means nothing. The real problem is enemy Speed. I’m still not exactly sure how it works but enemy speed is somehow tied to how long your stuns last. The internal speed of an enemy also seems to speed up how quickly they break out of being stunned. We want enemies to stay stunned as long as possible, so that’s a big no. On wave 3 or 4 you’re sometimes given the option of upgrading a Hellement for a very minor permanent enemy speed increase. This usually takes the enemies from a 5.5 to a 6 or 6.5. You can take this if you want but just know that way down the line this will eventually be what kills you.
So, in the order you want to take each modifier:
- 1 – Health Regen
- 2 – Health
- 3 – Armor
それでおしまい。 You’re never taking speed so it isn’t an option.
One last things before I go. Upon entering Endless Mode, the game will sometimes forget to give you your 1 Blessing at the end of each Boss Wave. If you enter Endless Mode, beat the very first encounter and then exit to menu and resume playing, you’ll get your Blessings at the end of each Boss Wave like normal. This occasionally has the adverse effect of starting a Boss Wave when you re-enter and I can’t explain it much better than seeing for yourself. It’ll give you the option of taking any of the very first Boss Wave bonuses of 600 souls, 4 blessings or a random hellement. I don’t know if this is somehow repeatable or abuseable but it’s either you live with the bug of not getting blessings anymore or the bug of getting a random small reward in exchange for getting blessings again so you’re damned if you do, damned if you don’t.