プラネット ズー – 初心者向けガイド (ツール、タブ、スタッフのトレーニング、乗り物、検査など)
このガイドでは、保護活動を行いながら、動物とゲストを幸せに保つことができる動物園を作成および管理する方法について、知っておく必要があるすべての情報を見つけることができます.
その他のプラネット ズー ガイド:
- フランチャイズ モードの初心者ガイド
- 新しい動物園を始めてお金を稼ぐ方法
- DLC の音楽と壁紙の場所
- バリア / スタッフ / ゲスト パス ガイド
- ベーシック スターター ビルド ガイド
- 給餌の仕組み
ゲームの開始
コントロールとその他の必需品
- 移動する WASD
- 懐中電灯のL
- 浮き沈みする Q と E
- Shift + WASD で動きをスピードアップ
- スクロールして拡大/縮小
- スクロール ホイールを押してピボットします (これを Ctrl に切り替えることをお勧めします)
- Ctrl+D でオブジェクトを複製
- オブジェクトを移動する M
- 商標登録された精密ウィジェットを開く X (高度な方向および回転軸の制御が可能)
- Ctrl+X でオブジェクトを複製してウィジェットを開く
- P はシミュレーションを一時停止します (メニューは開きません) ((これを Space に変更することをお勧めします))
- Z でオブジェクトを回転
- オブジェクトの高さを調整するシフト
注: 他にもたくさんのホットキーがあり、それらすべてを見ることをお勧めします。これらは、[コントロール] の下の [設定] メニューで表示および変更できます。
組み立て開始
- 大規模で複雑なものを構築する場合は、ゲームを一時停止してください。
- [建物] タブの右下隅に注意してください。通常、利用できる便利な構成があります (角度スナップ、パスの幅、長さ、バリアの長さ、曲率、ウィンドウなど)。
- オブジェクトまたは建物のグループを作成するときは、グループ化されているものとされていないものに注意してください。配置したものをグループから切り離したい場合は、そのうちの 2 つを Shift キーを押しながらクリックし、ツリーとプラス記号のようなアイコンをクリックします。
- 背景がグリッドのオブジェクトはグリッド システムに準拠しており、そのように変更することはできませんが、背景が白いアイテムは装飾オブジェクトであり、完全に制御して配置できます。
- 装飾アイテムを壁などの中央に配置するには、F キーを押します。
動物園の始まり
動物園に関して実際に何かを行う前に、次のような施設を用意する必要があります:
- 飼育員小屋 (飼育係が食事を準備できる唯一の場所)
- 動物取引センター (動物園への動物の入り口として機能します)。
- 研究センター (獣医が動物に関する動物園の知識を深めるために使用)
- ワークショップ (メカニックが研究を行うために使用)
- スタッフ ルーム (スタッフが休息してエネルギーを回復できる建物)
- 獣医外科 (獣医が動物の病気やけがを治療する唯一の場所)
- 検疫 (獣医の手術を受ける前に、病気の動物を安全に隔離するために使用されます)。
- 電力 (ソーラー パネルや変圧器など)
- 水処理 (水をきれいにする - 電力と同じように機能し、水に触れる必要はありません)
少なくとも、それらを要求するアラートを取り除くために、少なくともこれらすべてのものを配置する必要があります.飼育小屋は展示品の近くに置き、職員室は職員がアクセスできるようにしておく必要があります。施設が遠すぎるとスタッフは文句を言い、ゲストは施設の近くにいなければならないと文句を言います。
Zoo ツール
プラネット ズーで使用できる 2 つの重要なツールがあります:ズーペディアとビュー モード (またはヒート マップ、レーダー、その他の名前)。
ズーペディアはあなたの親友です
Zoopedia には、ゲーム内のすべての動物のリストがあります。以下が表示されます:
- 一般情報 (名前、絶滅危惧状況、一般的な略歴など)
- 自然生息地 (自然生息地の情報が表示されますが、最も重要なのは、動物福祉を維持するために重要な最小生息地要件です)。
- 種のデータ (一般情報のより詳細なバージョン - 社会的ニーズ、妊娠期間、ゲストが生息地に入ることができるかどうかなど)
- 研究ステータス (これは、その動物が好きで必要とする物と正確に一致する、種に関してあなたが研究したすべてのものを表示します)。
- 種間エンリッチメント (このセクションに展示されている動物は、この動物を展示することで利益を得ることができます。また、その逆も同様です)。
- 世界記録 (フランチャイズ モードでのみ作成したすべての世界記録を表示します)。
簡単に言えば、ズーペディアは一見の価値があります:
表示モード
左下隅にはレーダーのようなボタンがあり、クリックするとゲームのマップが作成されます。画面の上部中央に、マップが表示するデータの種類が表示されます。
動物福祉 (赤の動物が不幸で緑の動物が幸せな動物を除いて、すべてが白になります)
生息地 (動物をクリックして、通過可能なエリア、避難場所、避難所の質を表示します)
温度 (文字通りのヒート マップ)
水 (どの水が処理されていて、どの水が処理されていないか、どの水処理施設が稼働しているかを示します)
電力 (電力が供給されているものと供給されていないもの、およびどの電力設備が正しく機能しているかという電気の半径)
建物 (正常に機能している建物を青で、機能していない建物を赤で表示します)
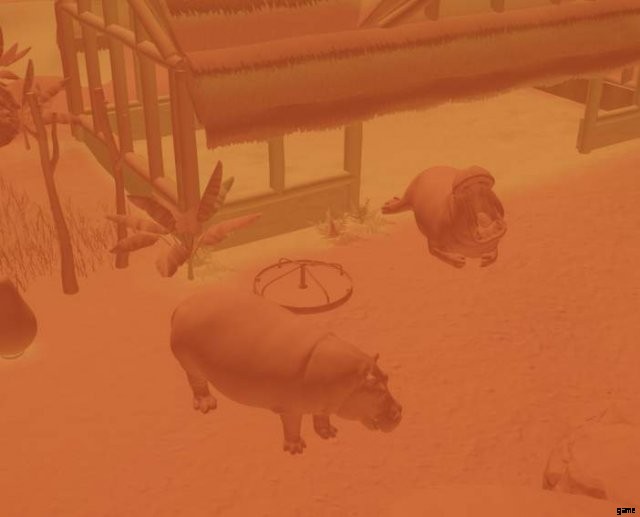
ゲストへの悪影響 (ゲストの幸福度 (青が良い) とスタッフの施設を赤と周囲の半径で表示するため、ゲストがその半径内にいる場合、施設の影響を受けています。
ゲスト教育 (電源が入っている、電源が入っていてコンテンツがある、または電源が入っていない教育デバイスを示し、教育スピーカーの範囲を示します)
ゲストのニーズ (ゲストのニーズを赤 ((悪い)) と緑 ((良い)) の色で表示します。幸福、エネルギー、空腹、喉の渇き、トイレ、教育などのニーズが必要です。
クマの必需品
ここでは、動物と、動物取引と展示取引の違いについて説明します
注意: プラネット ズーとは、障壁やライオンなどの動物を生息地とする展示や、イグアナのようなガラスの壁を持つ展示を展示または小さな展示と呼びます。
動物取引
これらは典型的な陸生動物です:ジャイアント パンダ、ツチブタ、イリエワニ。彼らは、障壁、食物、豊かさ、地形の好みを備えた生息地を必要とします.
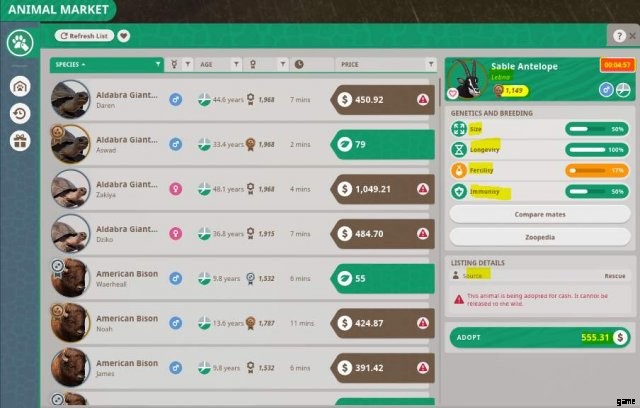
アニマル マーケットは動物が販売されていることを示しており、私の理解では、すべての動物が表示されるサンドボックスを除いて完全にランダムです。価格はドルまたはコンサベーション クレジットと呼ばれる緑の葉で表示され、動物を野生に放すと得られます (またはオフライン モードでは、動物園の評判を改善する必要があります)。
動物を選択すると、その動物の性別、名前、養子縁組、サイズ、寿命、繁殖力、免疫力、星評価、供給元 (動物を購入した場所など) が表示されます。
動物を引き取ると、その動物は動物保管庫に送られ、あなたが動物を移動させ、獣医または飼育係が移動させるまで、動物取引センターに留まります。このメニューの他のタブには、購入履歴と報酬が含まれており、報酬を受け取った動物にアクセスできます。
展示取引
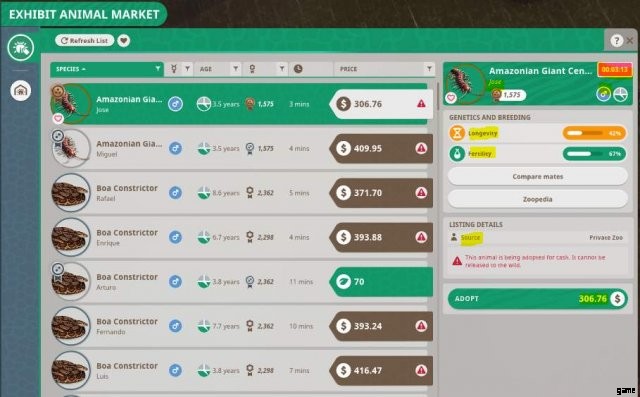
これらは、ゲームが展示と呼ぶものに存在する動物です。これらは施設タブと小動物展示サブグループにあります。展示動物市場は動物市場と似ていますが、動物の名前、星評価、性別、寿命、繁殖力、およびソースのみが表示されます。これらの動物は、展示以外のスペースを必要としません。
小動物の展示をクリックすると、動物の福祉にアクセスし、(研究した場合) 動物に岩などを提供できるレイアウト タブでエンリッチメントを提供できます。気候タブでは、温度と湿度を調整でき、推奨される温度と湿度が表示されます。窓タブでは、4 つの窓すべてを開閉したり、動物の 2 次元および 3 次元のファサードを作成したりすることもできます。その他のタブは、ログ (維持費を表示) とメンテナンス (作業ゾーンと前回の訪問からの時間を表示) です。
動物福祉
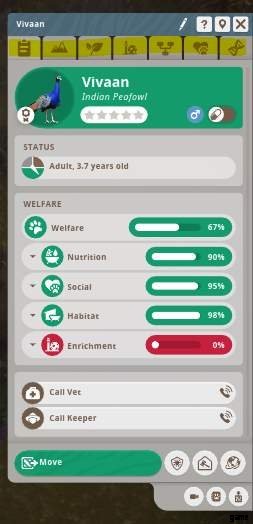
動物園の主な関心事:
動物をクリックすると、いくつかの重要な情報がタブに表示されます:
- 概要 (動物とその福祉の概要を提供します)。
- 地形 (ホワイト エリアでの地形、登れるエリア、水、およびハード シェルターの必要性を示します。たとえば、インドクジャクは、展示の約 30% を岩石にすることを望んでいませんが、それ未満でも問題ありません)。 .
- 環境 (動物が植物になりたがっている展示の割合と範囲を示します。また、植物にとって理想的な大陸とそれが理想的な生物群系であることも示します。最後に、生息地の植物と生息地の植物を示します。赤は福祉に悪影響を与える相反する植物です)。
- エンリッチメント (エンリッチメントの福利と、各エンリッチメント オブジェクトが福利にどれだけ貢献しているかを示します。動物のために 100 万個のボールを配置しても、エンリッチメントは向上しません。せいぜい、少しは役に立ちますが、本当に必要なのは各オブジェクト)
- Studbook (動物の出所とタイムラインを表示)
- 社会的 (動物が幸せになるために必要な大人の数や現在の仲間など、動物の社会福祉を示します。
- 遺伝学 (サイズ、長寿、生殖能力、免疫力、魅力、身体的統計、生涯統計を表示)
メイトの比較

育種プログラムと遺伝学:
動物の遺伝学タブで、繁殖結果メニューが開くボタン比較仲間をクリックできます。これは、左側の母親と右側の将来の父親の 2 匹の動物の繁殖結果の比較をサポートしています。それらを選択すると、中央に予測された遺伝的結果が表示されます。また、受胎率データに基づく受胎率も示しています。
動物の繁殖を成功させる方法
動物は同じ展示にある必要があり、良好な福祉を確保し、他の交配相手から気を散らさないようにし、獣医学的研究を行うことで、可能性を高めます。
注: これらの予測はどれも正確または保証されていません
避妊
避妊は、動物の物理的な分離または実際の医療避妊によって行うことができます。医療避妊を行うには、[動物園] タブと [動物] タブに移動し、行の右端に避妊スイッチがあります。 (または動物の概要タブで)

野生への解放
未成年者、不妊症、高齢者、または病気の動物は、野生に放すことはできません。
動物を野生に放すと、保護クレジットが生成され、動物園の評判が高まります。たとえば、8 個のエンドウ豆を次々にリリースすると、生成される保護クレジットが減少するため、間隔をあけて配置する必要があります。
Zoo、Barrier、Habitat タブ
自然、施設、建造物については説明しません
動物園タブ
動物園の全体像:
サブグループ:
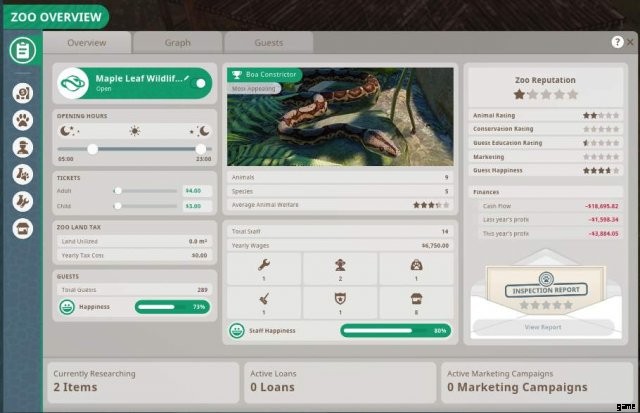
動物園の概要 – 概要
- 動物園のステータス、開園時間、評判、格付け、財務、税金、チケット価格、有効なローン、ゲスト、スタッフ、動物の幸福度、数、賃金を表示します。また、現在の調査、ローン、マーケティングも表示されます。
動物園の概要 – グラフ
- 今言ったことのほぼすべてのグラフ データ
動物園の概要 – ゲスト
- 考え、ニーズ、支出、年間データなどのゲスト情報
財務 – 財務とグラフ
- 財務データとそれぞれのグラフ タブを表示します
財務 – ローンとマーケティング
- 動物園のローンを申請し、動物園のマーケティング キャンペーンの費用を支払う
動物
- 動物園のすべての動物とそのデータ、動物園のすべての生息地と展示物とそのデータ、動物園のすべての検疫とそのデータを表示します。
スタッフ – スタッフとスタッフ ルーム
- 動物園のすべてのスタッフとスタッフ ルーム、およびそのデータとそのスタッフを雇う場所を表示します。
スタッフ – 作業ゾーン
- 作業ゾーンは、エリア、施設、展示物、生息地をグループ化できる作成可能なゾーンであり、それらにスタッフを割り当てて、そのエリアにとどまりそこで働くことができます。このメニューは、前述のワーク ゾーンを管理します。
施設
- 動物園のすべてのスタッフ、ゲスト、電力、給水設備とそれぞれのデータを表示します
調査
研究は重要であり、それが独自の情報を取得する理由です。
研究とは?
サンドボックス モードを使用している場合は、おそらくこれについて心配する必要はありません。
調査は、優れた動物園を作成するための最も重要なコラムです。調査には 2 つのタイプがあります:
獣医学研究

- あなたが持っているすべての獣医は、あなたができるすべての研究です.獣医は、特定の動物や、ウイルス、バクテリア、状態などの特定の医学的事項を調査できます。
- 動物を研究すると、新しいエンリッチメント、栄養などが得られます。
- 医学的なトピックについて研究すると、より良い診断、治療、薬理学が得られます (動物が病気になったときに役立ちます)。
機械研究
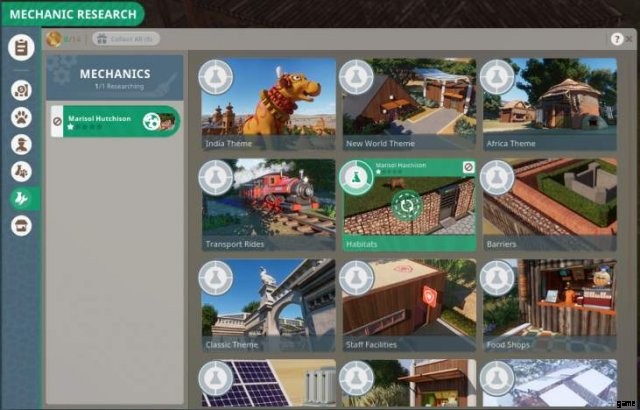
- あなたが持っているメカニックごとに、あなたができるすべての研究があります。メカニックは、特定のテーマや、生息地、バリア、食料品店などの特定の建設物を調査できます。
- 生息地、防壁、食料品店などを調査すると、設計図や追加のオブジェクトなどが得られます。
- テーマを研究すると、それぞれのテーマの風景と設計図が得られます。
バリア タブ
これはプラネットコースターに比べて新しいものですが、比較的理解しやすいものです。バリア タブで注意すべき最も重要なことは、角度スナップ、長さ、曲率、高さスナップ、ウィンドウ、ラベル、およびカメラを変更できる右下隅です。
生息地の作成
- 生息地を作成するために必要なことは、完全な回路にバリアを構築し、ゲートを追加することだけです。生息地をクリックする。
ヌルバリア
- 多くの場合、動物園ではフェンスの代わりに崖、岩、堀などの自然のバリアを使用します。 Null Barrier はまさにこの目的のためのものです。本質的に、それは目に見えない障壁です。 Null を使用して、ゲストが展示に入ることができるようにすることもできます。
生息地タブ
プラネット フランチャイズは初めてで、非常に重要です。
内部には次のものがあります:
- 食料と水 (水と食料のボウルとトラフを見つけることができます) ((調査した場合は、食料容器をクリックして食料の品質を変更できます)。
- ヒーターとクーラー (これらは電力を必要とし、オブジェクトをクリックして温度を調整できます)。
- ベッドとシェルター (動物のハード シェルターの福祉が恩恵を受けるためには、何らかのシェルターまたは構造物に寝具を含める必要があります)。
- エンリッチメント アイテム (食料、生息地、登山の 3 種類があります。すべての動物には食料と生息地が必要ですが、霊長類などの他の動物には登山エリアが必要です。
重要なヒント:
- フィルター ボタン (じょうごのような形) を使用して種ごとにフィルターをかけ、動物が必要とするアイテムを正確に確認できます。
教育と健康
教育
- 教育は非常に重要であり、信じられないかもしれませんが、ゲストは学びたいと思っています。
- 看板、スピーカー、テレビでゲストを教育できます。電源が入っている必要があり、教育用デバイス、ドロップダウン メニュー、目的の動物をクリックして、表示するコンテンツを選択する必要があります。
教育ツールの種類:
- 保全教育委員会 (これは展示固有のものではなく、どこにでも配置できますが、電源が必要です)。
- 教育用スピーカー (電源が必要、生息地固有、効果範囲に応じて音量を調整、スピーカー範囲が重複すると悪影響が生じる。
- 生息地教育委員会 (動物情報を表示するために電源が必要な生息地固有のテレビ)
- 展示教育委員会 (動物情報を表示するための電源が必要な展示専用モニター)
メモ
- 標識やスピーカーを 1 つまたは 2 つ配置しても、その教育効果を得るには不十分です。
- スピーカーの音量を最大 20 に設定しても、マイナスの影響はありません (最初はマイナスになると思っていましたが、文字通り半径のサイズが変わるだけです)。
- 教育は動物研究に基づいています。そのため、シマウマ草原の研究レベルが 1 つしかない場合、教育スピーカーのコンテンツは 1/6 に過ぎません。
動物の健康
動物が体調を崩す原因には、感染症と身体的損傷の 2 つがあります。
感染の原因には以下が含まれます:
- 同じ生息地にいる他の病気の動物からの感染。
これは、動物をすぐに展示するのではなく、隔離することで解決できます。 - 糞、腐敗した食べ物、死体、ゲストの食べ物、汚れた水によって引き起こされる汚れた生息地。
ゲストがポイ捨てをしないようにし、飼育員が展示を掃除するようにしてください。 - 地面からの給餌。
フード トラフと「給餌禁止」標識で解決
けがは、種同士の戦いや捕食者によって引き起こされます。
治療
軽傷や感染症の動物は介入しなくても回復できる場合がありますが、これは福祉やその他の要因に依存します。
問題を検出したキーパーは、問題に対処する獣医に電話します。獣医は飼育員よりも感染を検出するのに優れていることに注意してください。獣医は動物を手術に連れて行き、治療を試みます。この期間は、獣医の訓練レベル、動物の免疫力、病気の重症度によって異なります。これは身体的損傷にも当てはまります。
力と水
パワー
プラネット ズーのほぼすべてに電源が必要です。ベンダー ショップ、乗り物、水処理。
電力を生成するには 3 つの方法があります:
- トランスフォーマー
- 風力タービン
- ソーラーパネル
トランスフォーマーのみで動物園 (サンドボックス モードを除く) を開始し、次の 2 つの施設のために機械研究が必要です。
トランスフォーマー
わずか 500 ドルで手に入る変圧器は、電気の半径が大きいですが、再生不可能です。それらの維持費は、電力を供給しているシステムの数に基づいています。ゲストはトランスフォーマーが嫌いです。それらは彼らに悪影響を及ぼします。
風力タービン
風が強く寒い環境で最適に機能するラウド パワー システムは 2,000 ドルです。ランニング コストはかからず、再生可能ですがうるさいため、ゲストは軽度の嫌悪感しかありません。
ソーラーパネル
これらも 2000 ドルで、日当たりの良い暖かい環境で最適に機能します。 They don’t have a running cost and guests don’t mind them in the slightest. They have a very small electricity radius though.
Renewable Energy
You are encouraged to use renewable energy and doing so will also increase the zoo’s conservation rating.
Deterioration
All facilities will deteriorate and lose efficiency over time. Transformers are most resilient to this while solar panels are least resilient.
Once a facility’s efficiency reaches 50%, its electricity radius will shrink and when it reaches 0 it wil fail completely.
Zoo Entrance
The zoo entrance produces power to assist the early stages of a zoo and this source does not deteriorate.
Water
Water treatment facilities clean the bodies of water of your zoo.
Water treatment can benefit you in two ways:
- Reduce chance of animal disease (dirty water can increase the chance of disease in animals who swim and drink in it).
- Improve guest’s viewing underwater (guests can’t see your cool underwater viewing area if the water is all dirty and murky).
Just like the power, the water treatment facility can deteriorate and negatively affect guest.
Planet Zoo Complexities
This marks the end of the part of the guide that is super-essential. Granted, all of the information here is good to know for a successful zoo but if you only wanted or needed to know how to play the Sandbox mode then you can probably stop reading. The rest of this guide is going to get into the real nitty-gritty numbers and individual characteristics of elements in the game.
Zoo Economics
Primary Ways to Obtain Money
- Donations (Probably the biggest income source so make sure to put plenty of donation boxes especially where crowds form to view the animals).
- Admission (Make sure to increase this as you obtain more animals, in case you don’t, Planet Zoo will notify you if guests think they are underpriced or overpriced).
- Shops and Stores (You can also adjust these prices and even specify if you want to sell ice and condiments. ice is usually beneficial with no negative effect but condiments are).
- Loans (Don’t be afraid to use loans, the starting interest rate is pretty good and from my understanding it only changes when you can’t pay off the loans. Remember in real life, most zoos will take out a loan before constructing a new exhibit and I think that’s what the game wants you to do).
Expenses
Your Finance Report:
- Purchases (This will log the price of any animal you move and all of you construction costs with specific details of said construction).
- Ongoing Expenses (It’s all of your upkeep costs and ongoing payments, the biggest ones will be power, wages, and maybe animal food).
- Taxes (Only certain scenarios and whatnot have taxes and there are several types).
- Income (All of the money you’re making and where it’s coming from).
- Cash Flow (This is income – expenses, this will usually be equal to total profit).
- Total Profit (This is your net profit, you want this number to be green).
Recession vs Expansion
You need to keep in mind that zoos, like any business, fluctuate in economics and profit. For a couple months, your profit arrow may be down and red (that’s bad) but if it temporarily switches between red and green/up arrow (that’s good) then that’s okay. However, you have to watch and make sure that you are not losing money for too long.
Zoo Reputation
A zoo’s reputation is determined based off multiple elements:
- The number, variety, and welfare of animals in the zoo (Happy and appealing animals contribute to this)
- Conservation rating (Releasing animals to the wild, animal breeding, recycle bins, and renewable energies all contribute to this)
- Education Rating (This includes education, research, and zoopedia unlock progress)
- Marketing Campaigns (See Marketing)
- Guest Happiness
You can find your Zoo’s reputation in the Zoo Tab under Overview.
Protesters
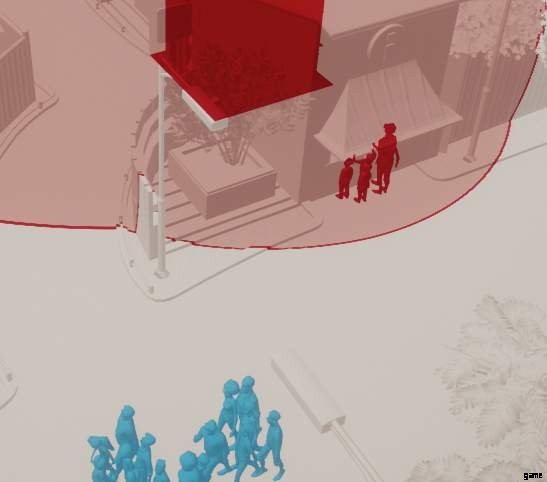
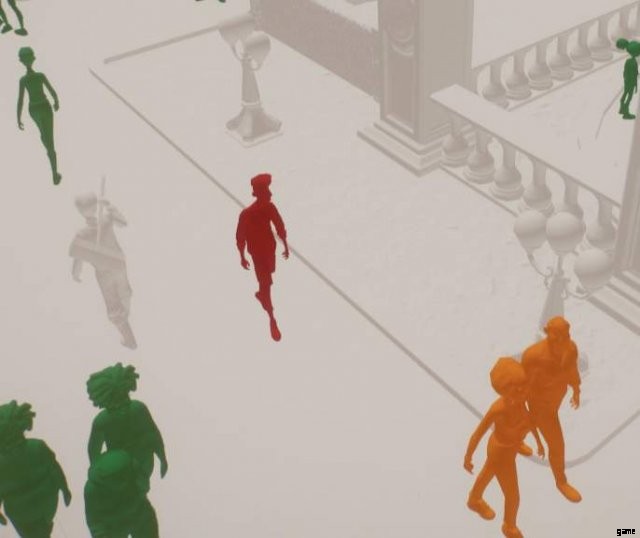
Protesters are guests who come to the zoo and provide a negative effect on any guests walking through their radius. They can be seen flashing signs on posts and chanting. You can see their exact negative radius in the Negative Impact on Guests view mode. Protesters will only come when an animal’s overall welfare is too low (red) for too long. As far as I know, they will protest any animal’s welfare. I’ve had some come in because one of my Giant Burrowing Roaches was hungry for too long.
You can click on a protester and they will tell you what animal’s welfare they are protesting. As soon as the welfare is restored, they will stop protesting and make their way towards the exit. The protesters cannot be removed from the zoo and will only start protesting when they arrive to the animal they are protesting. In some cases, they can cause guests to leave. Planet Zoo refers to them as a good thing as it promotes animal welfare by impacting profitability.
Zoo Location
Now this isn’t super important. For example, you can create quality zoos if a taiga or desert. However, zoo location/biome does determine a couple things you should keep in mind.
Planet Zoo lets you choose from the 7 continents except it groups Australia with New Zealand and the surrounding areas as Oceania.
There are 7 biomes to choose from:
- Tundra
- Taiga
- Temperate
- Grassland
- Tropical
- Desert
- Aquatic (this biome is only used for animal sustainability (i.e crocodiles) and you cannot choose it as a location)
Your choice of location and biome determine three things:
- Weather (Like if you choose a desert in Africa, you probably won’t get a lot of rain).
- Immediate Suitability for Animal Environment (Like if you choose a desert in Africa, you’re gonna have to place some coolers for Grizzly Bear).
- Animal Market Probability (I’m not sure how this is determined and its not strict. It actually doesn’t affect anything in Sandbox mode).
So this choice doesn’t affect much except weather (which can affect guest happiness). You can still have all of your favorite animals in your Tundra or Desert Zoo.
Staff Specifics
There are six types of staff (I’ll go into depth of each of their responsibilities and tasks further down this section):
- Caretaker (They look after the zoo and help with transportation of animals).
- Keeper (They maintain the welfare of the animals in the zoo).
- Mechanic (They look after the physical infrastructure of the zoo).
- Security (Security Guards protect the zoo).
- Vendor (They are assigned to shops and will serve guests).
- Veterinarian (They maintain the physical well-being of the animals in the zoo).
Notes
- Staff can be hired even if the zoo has negative funds.
- When placing a shop, vendors are automatically hired (Although I think there may be a bug where sometimes they aren’t so be aware of that).
Staff Duties
Each staff type have specific duties, the games calls tasks, and you can even determine which ones a specific staff person can do in the Employment Tab.
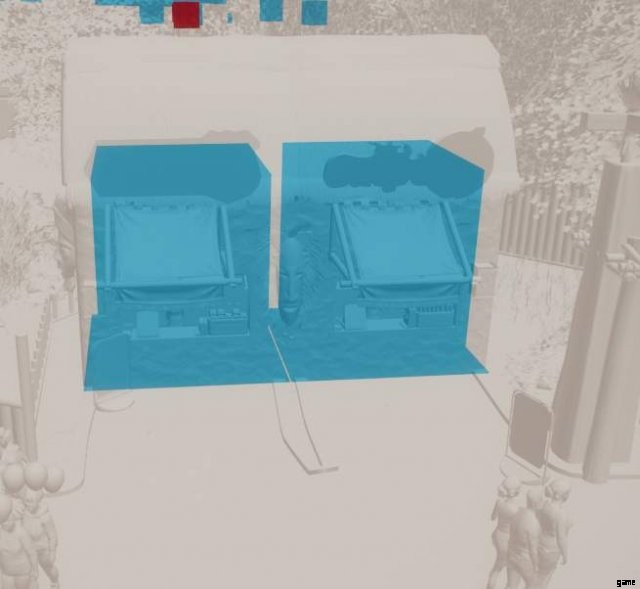
Work Zones
It is imperative to learn and use work zones in order to maximize staff efficiency. A work zone is a collection of facilities that can be assigned to one or more staff to limit where they will work. Any and all facilities from ATMs to rides to habitats can be included in a work zone.
Creating a Work Zone
You can create a Work Zone in the Zoo Tab under Staff and then Work Zones. When creating a work zone, you must pay attention to the colors of the facilities.
Essentially, anything green and blue is in the work zone.
Work zones can be assigned in the Zoo Tab under Staff or you can select a staff member and click the Employment Tab.
Note: If all of your staff are assigned to work zones, then they will ignore anything not in the work zone. Be Cautious of this, I’ve had animals nearly starve to death because no matter how many times I called the keeper they just wouldn’t go to the habitat because it wasn’t in a work zone.
Staff Facilties
I listed all of these previously in the guide so I won’t again but I am going to cover more specific things about the facilities.
- All staff facilities have different sizes except Vet Surgery, Workshop, and Animal Trade Center. You start every zoo (except Sandbox) with the smallest size and you can obtain the larger sizes through mechanic research.
- Small Staff Rooms hold 4 staff while Large can hold 12.
- Small Keeper Huts and Research Centers hold 1 Keeper while Large can hold 6.
- Small Quarantine hold 8 animals while Large can hold 24.
Staff Rooms
Staff Rooms are special. They are the only facility that all staff members can enter and the only one with Perks.
Perks
For 300$ (small) or 700$ (large) a year, you can have a passive buff on every staff that rests in a specific staff room.
These perks include:
- Staff Healthcare (Staff will be more resilient to being overworked)
- Social Club (Staff will gain happiness faster)
- Learning Resources (Staff that training and have this perk will have their training date moved forward)
- Security Office (Security will have better detection rates and ranges)
- Staff PR Course (Vendors will make their guests even happier)
- Rec Room (Staff will recover energy slightly faster)
Now can you run a quality zoo without ever using this?
Yes, you can.
I’ve gotten zoos to 200k income without ever using these but its a neat element they’ve added.
Staff Needs
Staff have needs that must be satisfied to keep them efficient.
They have an energy level which declines over time and will drop faster if the staff member has a heavy workload. This is replenished in the staff room.
This is found in the Zoo Tab under Staff. Red means heavy workload (bad) and Green means efficient workload (good).
They also have a happiness level. To keep staff happy, pay them well, keep their facilities covered in scenery, and don’t let them get exhausted.
This is how to change a staff’s salary and determine their opinion on their salary and it is found by selecting a Staff member and clicking the Employment tab.
Note: It takes a lot to get a staff member to quit. I’ve kept some very unhappy and very overworked and they never quit on me. The main thing with unhappiness is salary.
Staff Training
Training your staff is a good way of improving their happiness, efficiency, resilience, and work rate. All staff start with a one star rating and can be improved in the Zoo tab under the Staff Tab or by selecting an individual staff member. You can only train a staff member every so often. Meaning you can’t get your mechanic to five stars immediately. The training only takes effect the next time the staff member enters a staff room. There is a price cost to training a staff member. It’s not the same for each staff member but it ranges from 40$-200$ each level.
Note: Staff will expect an increase in salary with each new training level.
Staff Types
The Caretakers
- Transporting boxed animals (This is seen has the highest priority task for this staff).
- Cleaning Paths.
- Emptying Bins.
- Cleaning Toilets.
- Cleaning other facilities (Stuff like benches, tables, and staff rooms).
The key to keeping litter down is to either place a bunch of trash cans (I’m not even kidding, you need a ton. The Planet Zoo guest AI are just dying to litter then wait until they see a trash can like a regular person.) or hire a bunch of caretakers. The problem with the caretakers is that you can’t add a path to work zone so they can only be assigned to clean a specific bathroom but not a path section or trash can cluster so be aware of litter.
The Keepers
- Cleaning habitats and exhibits.
- Feeding animals.
- Watering animals.
- Reporting sickness and injuries.
- Removing skeletons.
After a keeper completes their current task, they will seek out the habitat that has been looked at the least (even if its on the other side of the zoo (which is super inefficient and why work zones are important)).
The Mechanics
- Repairing habitats, barriers, and boundaries.
- Repairing power and water facilities.
- Repairing vandalized items (kicked over bins, broken benches, cracked televisions, etc.).
- Researching new facilities and scenery items.
Don’t overlook mechanics. They don’t just repair stuff. They are the only way to obtain new food, drink, and gift shops, solar panels, shelter and climbing blueprints, and any themed scenery.
The Security
Security guards protect the zoo from:
- Vandals (Those hoodlums who come to a zoo just to kick over its trashcans).
- Thieves (Those hoodlums who pay admission just to steal people’s wallets).
- Guests feeding the animals (I haven’t actually seen this problem happen in game).
- Guests distressing the animals (Nor this one).
Security Guards literally just walk around the zoo staring at your guests. I’ve had zoos with several security guards hired but I would still get trash cans kicked over and pickpocket reports. I’ll go more in-depth on crime, security, and security cameras in a later section.
The Vendors
They sit in a shop and sell whatever that shop sells.
Yeah, they don’t do much but its important to know that when a vendor gets tired, they will leave their shop unattended and go to a staff room. To avoid this, you need to have another vendor waiting to take over. However, this does not mean a vendor will come to the shop and relieve that tired vendor (even though that would be a pretty good and sensical feature).
The Vets
- Treatment of illness and injury.
- Capturing escaped animals.
- Removing dead animals.
- Researching animals and diseases.
- Transporting animals (this is considered a low priority to this staff type).
Your vet should always be researching. It’s not even a joke how much your vets need to research. Vet Research is the only way to increase animal welfare (which I don’t have to remind you is the core element of this game). With research you can increase food quality, education quality, and add more enrichment for animals. You can’t have 100% welfare without research so literally as soon as an animal is available to research (which is right when an animal is put in a habitat, exhibit, or veterinary surgery.) research them.
Habitat That
A habitat is created, and only created, when there is a complete circuit of barriers with a staff gate attached. It won’t register as a habitat until you placed the gate.
When clicking on a habitat, you will get a menu with 6 tabs:
- Overview
- Terrain
- Environment
- Animals
- Log
- Maintenance
概要
Displays how clean an exhibit is, how much the barriers have degraded, the species report, the call staff button, and any guest thoughts about the habitat.
Terrain
Displays navigable area and terrain distribution.
Environment
Displays temperature, coverage, and any plants and their respective info.
Animals
Displays all animals in the exhibit grouped by species, food quality, and habitat contents.
Log
Displays finances like repair and feeding costs.
Maintenance
Displays used keeper huts, months since the last staff visit, and frequency of visits.
Notes
- You should make a mechanic’s routine visit more frequent than the default (Every year) because most habitats will break much earlier than a year.
- You should also name your habitats because the game will label then:Habitat 1, Habitat 2… and then any notifications will display this name (including the inspection report) and not, for example, (Gorilla Forest, Antelope, Grasslands, etc.).
- Habitats are the only place where one can change the Food Quality and determine Terrain Area.
Animal Escapes
An animal can escape for or from a variety of reasons:
- The barrier is broken or they have broken it (Solved by frequent check-ups and repairs by mechanics).
- The barrier is too short or climbable (Every animal Zoopedia entry states the length their barriers need to be. For example, a Snow Leopard’s barriers need to be at least 3 meters).
- The barrier meets requirements but they are still escaping (This requires some zoological troubleshooting).
Troubleshooting Your Escapes
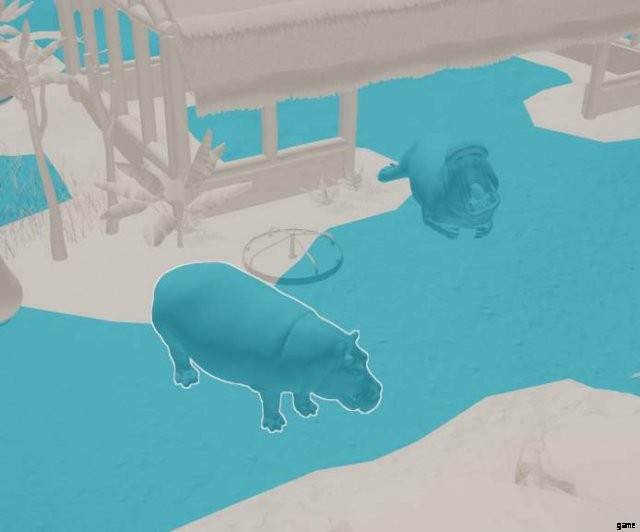
The best way to detect and find an escape point is with the Habitat view mode. Activate it and then click an animal and it will show their traversable habitat in blue and any escape point in red circles.
Ways an Animal Can Escape
So you’ve found the escape point. Now what could be causing it?
Planet Zoo deserves a lot of credit. They have coded their animals to be very intuitive.
Most of the time an animal has found a means to escape by climbing up a tree or anything and then jumping from there. I’ve had a Snow Leopard climb to the very top of a pine and make just a super bold leap out of the exhibit. I had paused it just in time to catch him. To resolve an animal climbing onto something and then jumping, all you have to do is remove the tree or object or move it away from the barrier.
Note: Any animal that steps on elevated path is immediately boxed and sent back to their exhibit.
Dealing with the Escape
There are several strategies to retrieving an escaped animal. Some are using game functions and one that is the kinda cheat-y.
Calling a Vet (From what I understand this doesn’t cost money but there is a latency since the vet has to, you know, get to the animal. Once the vet arrives, he will take out some sort of blow gun to tranquilize the animal, box it up, and send it back to its exhibit).
Emergency Capture (This costs 1,000$ regardless of the animal and results in immediate boxing and sending to the exhibit).
I call this the Barrier Method and it’s not really apart of the game; its just something I discovered. (When an animal escapes all you have to do is surround it in barriers again and it no longer shows the warning and menu for an animal escaping so then all you have to do is add a gate to your improvised barrier and move them back).
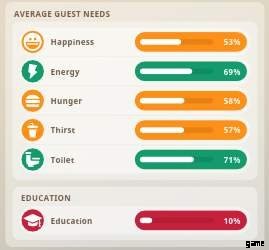
Guest Needs
Fun Fact:Every single guest in Planet Zoo and Coaster are randomly generated and completely unique.
However, all of them require 6 basic needs to be met:
- Happiness (Every need affects this need – its more of the general vibe of the guests).
- Hunger (Food shops and whatnot).
- Thirst (Drink shops and whatnot).
- Toilet (People need to pee).
- Energy (Benches, places to sit, and transport rides even some drink types).
- Education (See Education).
Happiness
There are other things that affect this besides the 5 other needs such as:
- Protesters
- Litter
- Vandalism
- Overcharging
- Nearby Staff Facilities
- Low Animal Welfare
This photo shows the Zoo tab under Guests
The one non-need thing that affects happiness is the animals. Specifically, their ability to view them. Guests are very particular on the views they have of the animals. A simple glass window seeing into an exhibit 2-3 feet away isn’t going to cut it. They want to be up close pretty much as close as possible. You can do this with some creative thinking and path placement or careful placement of feeders, toys, and other habitat items. For example, one could place a Grizzly Bear’s food tray right to the window and the bear will be forced to get close to the window to eat. Keep in mind, though, that this will cause stress in most animals and this can be prevented by using 1-way glass (requires mechanic research in barriers).
To find this menu:click on a guest and then the thought bubble tab.
Crime and Security
Planet Zoo calls guests who turn to crime within the zoo as Vandals. These guests turn to vandalism when they are unhappy or unsatisfied.
These vandals can damage the following things:
- Bathrooms
- Bins
- Benches
- ATMs
- Power Systems
- Water Treatment Facilities
- Signs
- TVs
- Speakers
If a guest walks near any of these damaged items they will be unhappy.
All of these items can be repaired by a mechanic but some like (bins, benches, signs, TVs, and speakers) can be replaced by clicking on them and then the replace button (This can cost from 10-300$ depending on the object).
Note: You can replace a damaged item and pay the fee even if you have negative funds (I’m not sure if this is a bug or not though)
Pickpockets are guests who enter a zoo with the intention of robbing guests. (Because that’s where the average pickpocket goes to steal, I guess)
Pickpockets can be prevented by Security Guards or Security Cameras
Security Cameras
They come in two forms:
- A standing pole type version.
- A wall mounted version.
There is no strict way of placing these but I suggest placing them overlooking high traffic areas.
You can use the cameras! — you can select a camera and see its perspective like a security manager guide and cycle through cameras (I think its pretty neat).
Inspection
The inspector (In one scenario, it was a reporter instead) periodically (usually every 24 months) enter zoos to make sure they are being well run and animals are being looked after.
They will choose up to five animals to inspect and will make their way around the zoo attempting to ascertain their well-being. Animals are assumed to have high welfare until proved otherwise. An animal that cannot be inspected is assumed to have zero welfare.
The inspector can issue spot fines for poorly performing habitats, dead or sick animals, any form of escape, and any protesters spotted.
Once the inspection is complete, a report is issued providing details as to the running state of the zoo.
Alerts
When playing Planet Zoo, you will receive A LOT of alerts. Just all the time.
For those who played Zoo Tycoon, they already know.
Planet Zoo has five categories for alerts:
- Visiting Player Alerts
- Animal Alerts
- Zoo Alerts
- Staff Alerts
- Notification Timeline
Most alerts will always be red but they are not always bad.
Visiting Player Alerts
When playing in any mode in Planet Zoo, you can get online visitors to your zoo. They can be your Steam friends or random people or even yourself. (I don’t know what determines it)
However, only in Franchise Mode, you can acquire Conservation Credits by greeting them. All you have to do is click on them and then the subsequent button. This generates 20 Credits and you can only greet 5 avatars every 24 hours. (You can’t greet your own avatar)
Animal Alerts
Anything animal related will be relayed here. They can alert some of the following things:
- Quarantine Passes
- Animal Escapes
- Alpha Disputes
- Low Animal Welfare
If you have a well-operating zoo then these should just pop up and then immediately go away especially if they are low welfare-related.
Zoo Alerts
These are more infrastructure-related. They can alert some of the following things:
- Zoo Pricing
- Disabled Systems
- Pickpocket Reports
- Research Completions
Staff Alerts
These are all about the staff and mainly there to say “hey you need a workshop!” or some of other things:
- Accessible Staff Room
- Staff Happiness
- Staff Vacancy
Notification Timeline
This is the big picture stuff and not really the most important to keep your eye on. It can alert some of the following things:
- Expectant Offspring
- Maturity
- Mortality
Inspector Arrivals
Notes
These alerts will tell you a little bit earlier when an animal dies, matures or anything of the sort than the animal alerts. This timeline will also tell you right before an animal inbreeds while the animal alerts will not.
Transport Rides
Because they just couldn’t let go of Planet Coaster
I’m not gonna explain how to work the Track Building Mode, if you need to learn that then I suggest going to the Help button> Build a Zoo> Transport Rides.
Anyway, transport rides are a fun and efficient way of getting money and getting guests to other places. The guests really think its a hoot.
There are four types of transport rides:
- Boat Ride
- Suspended Gondola
- Steam Train
- 4×4 Adventure Tour
To unlock all of them requires four levels of Mechanic Research
You can change the number of cars, ride mode, and maximum speed.
There are two rides modes:
- Continuous (Trains will move along the track in 1 direction, stopping at each station. Requires a completed loop of track and allows for multiple trains).
- Shuttle (A point-to-point travel mode, where a single train will move forwards and backwards between the first and last station, stopping at any stations along the way).
You can change the price of a ticket on a station to station basis.
Note:Guests are willing to pay 10+ a ticket especially for large zoos.
You can also change the Load Rules such as Minimum rider load, minimum wait time, maximum wait time, and minimum departure interval.