火の試練 – 戦闘ガイド
このガイドは、戦闘遭遇の一般的な流れと、適切な方法でそれに対処する方法を概説することを目的としています.戦闘に存在する傾向があるさまざまなフェーズと、それらを適切にプレイする方法について説明します。さらに、特定の敵タイプがこれらのフェーズを回避する方法と、これらの敵に対応する方法についても説明します.
ユニットの種類
戦闘の流れについて知る必要があることに入る前に、あなたと敵チームの両方が利用できるキャラクターの種類を知っておくことが重要です。ゲームに登場するユニットは大きく分けて4種類。もちろん、これらの標準的な分類から逸脱した敵、特にボスもいます。さらに、ユニットはスペクトル上に存在する傾向があります。これらの 4 つの主要なタイプは、ブルーザー、アーチャー、メイジ、サポートです。
ブルーザーは、強力な機動性、非常に強力な防御力、および強力な近接ダメージの可能性を備えた一般的な近接ユニットです。アーチャーは、妖精のように防御力が低く、動きは平均的で、遠距離ダメージの可能性が高い傾向があります。魔術師は、敵に関しては、一般的にエリートになる傾向があります。彼らは遠距離ではまあまあのダメージを与えることができ、近距離では大きなダメージを与えることができますが、防御力は低く、機動性の点で非常に強力な離脱オプションがあります。サポートに関しては、部分的にでもサポートとして分類できる敵はほとんどいません。これらの敵は、たまたまいくつかのサポート スペルを持っているメイジである傾向があります。
あなたが直面する敵の大部分は、ブルーザーとアーチャーの間のスペクトルにある傾向があります.通常、敵のブルーザーは遠距離攻撃能力を持たない純粋なブルーザーです。敵のアーチャーは、アーチャーとブルーザーの混合に傾倒する傾向があります。彼らは通常、純粋な射手のように振る舞おうとしますが、必要に応じて乱闘で十分なパフォーマンスを発揮できます.
プレイ可能なクラスについては、次の表を使用して説明するのが最善の方法です。ここでは、各クラスの役割について個別に少し説明します。
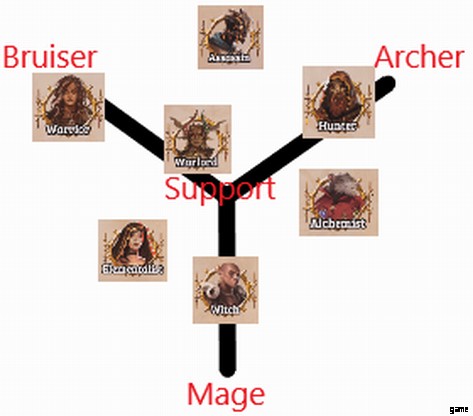
錬金術師: 主に射手ですが、彼はいくつかのマイナーなサポートを提供できます.さらに、彼は純粋な射手というよりも、アーチャー メイジ ハイブリッドのようにプレイする傾向があります。カードを選択するメカニズムにより、非常に予測不可能になり、ターンごとにランダムにスペクトルを飛び回る可能性があります。最も不安定なクラスです。彼らは、選択したカード メカニズムからランダムにサポートを提供することができ、一部のクラス カードはマイナーなサポートを提供することができます。
暗殺者: ブルーザーとアーチャーの純粋なハイブリッド。純粋なブルーザーまたは純粋なアーチャーとしてプレイできますが、両方のスタイルを利用するハイブリッドとしてプレイするのが最適です.暗殺者は、安全に殺戮のために突入できるようになるまで、敵の手の届かないところにぶら下がってポットショットを投げる傾向があります.次に、彼らは立派な近接スイートを解き放ち、哀れな防御のために罰せられるのを避けるために素早く後退し、サイクルを繰り返します。暗殺者をチャートのサポートセンターから遠くに配置しましたが、これは彼らのサポートカードが貧弱であることを意味するものではありません.シナリオが適切であれば、まばゆいばかりの閃光と発煙弾は、パーティーが必要とする種類のユーティリティを正確に提供することはできません。
エレメンタリスト: AOE 魔法攻撃に重点を置いており、中距離のジェネラリズムに重点を置いているゼネラリスト クラスです。エレメンタリストは最初は AOE 魔法のダメージに焦点を当てているようですが、彼女をどうするかによって、前述の AOE メイジや、彼女の土の呪文を使用したグローバル サポート、さらにはブルーザーに特化した場合のブルーザーなど、いくつかの役割に進化できます。彼女の防御は彼女を真のブルーザーにするほどしっかりしていませんが、ストライキを吸収するなどのこと.
ハンター: The hunter generally plays like a true archer who wants to keep a bit of distance between himself and enemies units. Some of his shots provide a little bit of utility however his primary focus is damage. He happens to be the best option for a summoner build though this is a very specific build.
Warlord: The warlords class cards are built purely towards support. Her equipment slots though push her very hard toward the bruiser role. As a result she tends to start as a pure support who slowly evolves into a hybrid support/bruiser due to her strong defensive capability combined with her easy access to heavy weapons. Generally she plays as a weak bruiser with solid support capabilities.
Warrior: The most pure bruiser. The warrior is an armored tank with very good mobility and strong melee attacks. As a trade off she has absolutely no ranged damage and very minimal support. The support she does have though is very worth while. She will pretty much always either be setting up to engage the enemy head on or taking part in a melee brawl.
Witch: The witch functions as a long range mage who transitions into a debuff based support. His early game is comparable to that of the alchemist, however as he slots in more and more of his advanced class cards he becomes better and better at supporting his allies not through direct support but rather by crippling enemies in a multitude of ways. He generally wants to spend time at mid range from enemies, just out of reach until he needs to contribute to a defensive formation. Against bosses and elites who like to bury themselves in corners where they can’t be surrounded by you’re whole party he will generally be the party member that stays out of the melee. I strongly advise against pairing him with an elementalist. Pick one or the other.
The Start of the Fight
As a general rule enemy melee attackers won’t be able to fully engage with you until their second turn. As a result this means in most encounters the entire first round will be a preparation period. Generally in the first round you will want to be taking potshots at the enemy with ranged attacks. Additionally you’ll want to be repositioning your heroes depending on their classes.
There tend to be two options for positioning on the first round. If you’re team is dead set on kiting the enemies as long as possible to inflict maximum ranged damage you’ll want to create as much distance as possible. If you’re team is more well rounded and the enemy team is a fairly average set up with primarily melee fighters you’ll want to take the strongest defensive formation you can get early. If you’re fighting a weird boss who wants to kite your party you need to rush it down with your entire party.
The best advice I can give here is unless you’re fighting a boss who’s weak to melee combos you want to avoid a melee brawl for as long as possible. This allows you to get get a good number of ranged pot shots onto the enemies as well as enabling you to get a good number of powers online before the real fight starts. If you’re trying to get powers online and the enemy has a lot of ranged attackers the best approach is to take the best best cover you can from the ranged enemies and if it’s not enough you should block your more vulnerable classes with classes who can block the damage easily.
In general it is super important you DO NOT let one of your heroes get isolated against multiple melee attackers. Even very tanky classes like the warrior will get torn to shreds if you let them fight multiple enemies at the same time alone. Never put any of your heroes in a situation where they can get surrounded by multiple enemies with no nearby supporting heroes because the ai will immediately corner them and tear them to shreds if you give them the opportunity to do so.
On the first round you can generally sit back and set up while waiting for the enemy team to approach you. If it’s feasible take your time to set up powers and take shots with ranged attacks. Generally on normal fights you want to kite the enemy melee gang bang for as long as possible. Once You suspect a large scale melee engagement will you need to proceed to the next phase of combat which is…
How to Play the Brawl
The most important thing about large scale melees you need to understand is how combo attack work. If you don’t understand the rules behind combo attacks you are screwed from the start in both your offensive and defensive plays. Fortunately the rules are extremely simple. Units can generally only combo attack off melee attacks and they can’t ever combo attack if they’re touching more than one enemy unit. With these rules in mind let’s loom at some important configurations for all out melees.
The most important aspect of these scenarios is ensuring that none of your heroes get surrounded. We’ll go over a few ways to achieve this goal assuming all of your heroes are in the formation.
Firstly we have the generic line formation:
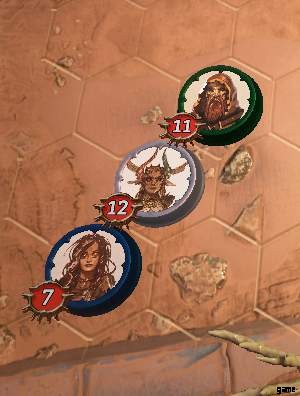
This is good strategy if either you have no terrain to work with and no other options for defending from a head on assault OR the enemy fighters have ways to get behind your formation. Generally this formation should only be used as a last resort when you’re getting overwhelmed and you need to defend the member in the middle of the lines.
Next we have the choke formation:
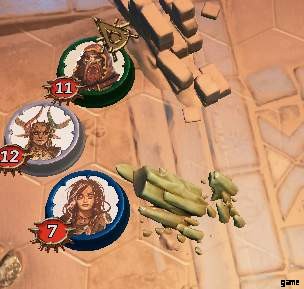
If the terrain allows for it this is a very potent formation. At first glance this seems like a good way to trick the enemy into getting killed one by one however the AI is smart enough to not fall into this trap. They will generally mirror your formation while taking ranged shots at you and attempt to send other units to flank you if their numbers are large enough. As a result this is a strong formation for postponing the inevitable brawl.
Finally we have the triangle formation:
This ones kind of a last resort. If you know you’re gonna get surrounded and there’s not a whole lot you can do to prevent it without serious losses. This tends to be a temporary set up that will move back into one of the prior two formations after you know how the enemy is attempting to surround you and you can quickly take out on of the antagonists. This formation is very useful against harpies. Generally you want to do this against walls in such a way that your tankiest hero should be at the most vulnerable corner of the triangle.