Gary Grigsby's War in the East – 基本的な初心者向けガイド
私のターン 9 計画に関する簡単な状況報告です。これは、東方戦争で枢軸国プレイヤーとして軍隊をどのように使用し配置するかについて、新しいプレイヤーにアイデアを与えるはずです.
はじめに
これは 1941 年の東部戦線の一部を簡単にまとめたもので、フォン・ボックと南軍集団 ( PzGr 1) von Rundstedt の下。ガイドというよりも哲学的なスナップショットとして始まりましたが、作成中に、ゲームのロジスティクスをできる限り説明しようとしました.どのボタンをクリックすればよいか、メカニクスなどについて詳細に説明することはまだありません。力をどのように使用し、今後の移動ガイドを計画するかということです。
枢軸軍の人間、ソビエトの AI、ソビエトの戦闘ボーナスなし、ロシアの冬の減少、統計の大幅なブーストを使用してゲームをセットアップし、ソビエトの統計をそれぞれ 95 に減らしました。結局のところ、それは私の最初のプレイスルーです!
メモ
用語と略語:
MP / MPs:移動ポイントまたはポイント
AB:空軍基地
KGr zbV:Kampfgruppe zur besonderen Verwendung – Battle Group Special Purposes or Operations.ドイツ航空輸送部隊
FBD:鉄道修理部隊
レールヘッド:鉄道がある最も近い機能している (ダメージ レベル ゼロ) ヘクスであり、同様のヘクスの切断されていないブロックされていないチェーンによって供給源に接続されています。
状況
ターン 7 で、ソビエト軍は大規模な部隊をプリペット湿地の端まで前進させました。私は北に第 2 装甲集団、南に第 1 装甲集団 (以下、PzGr と略す) を配備していましたが、当時の補給レベルと移動ポイントを考えると、この部隊を包囲するために使用できると感じました。 .さらに、この提案された包囲の進路を阻止する薄いソ連軍がありました。
はるかに徹底したマトリックス フォーラム/コミュニティでのコンセンサスは、赤軍を破壊し、できるだけ多くの人口密集地を占領してソ連への人員供給を拒否する戦略が、枢軸国の勝利のための健全な戦略であるということです。私は現在、私のゲームでこの全体的な戦略に従っています。したがって、ソビエト軍の動きは、古典的なドイツのケッセルシュラッハトまたは「大釜の戦い」の方法で包囲し、西から接近する歩兵でそれを減らすための大きな目標を提示しました.
これにはトレードオフがありました。
第一に、バルバロッサの成功に不可欠な PzGr 1 と 2 の機動力は、本質的に東部での戦争の最初の 6 か月間であり、せいぜい補給の限界に達し、最悪の場合は再補給を超えてしまうでしょう。そうすれば第 8 ターンに枢軸軍の機動部隊の半分が活動を停止し、第 3.PzGr がモスクワの西を制圧し、第 4.PzGr が歩兵を待っているレニングラードの外郭防衛に大部分対抗することになり、私は最後の機動部隊を少なくとも1週間、もしかしたらもっと長く放棄する。トレードオフはそれだけの価値がありましたか?
第二に、敵にもターンがあり、敵が実行できるアクションがありました…
私は、プリペト湿地の東にあるソビエト軍の編隊を包囲することが私の軍隊の最善の使用であると判断しました。私は包囲を実行し、部隊の間隔をできる限り広げましたが、ソビエトが包囲を破る可能性を否定しようとしました。
ターン8
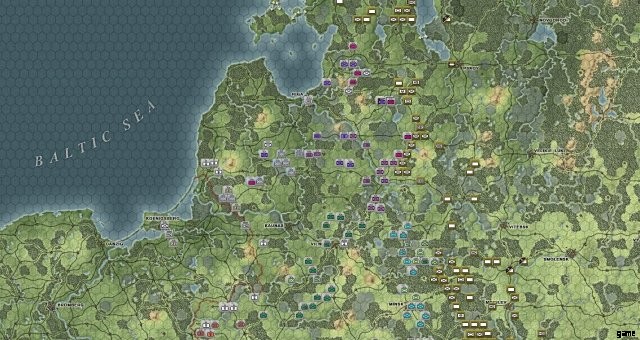
航空偵察に続いて、ターン 8 開始時のプリペット湿地の東の状況。
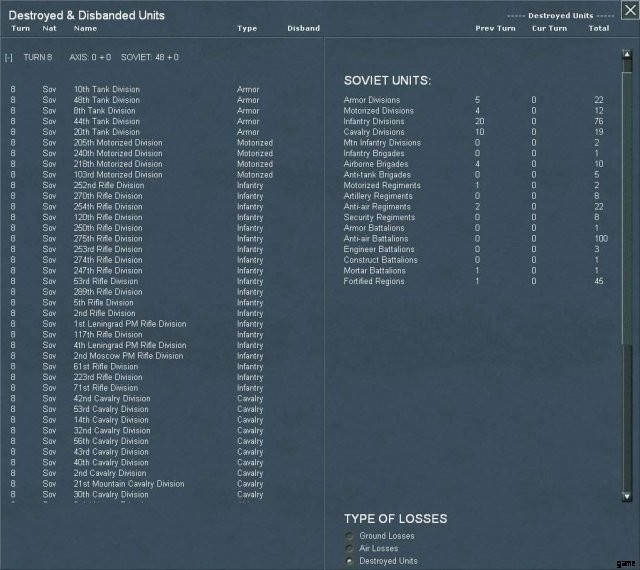
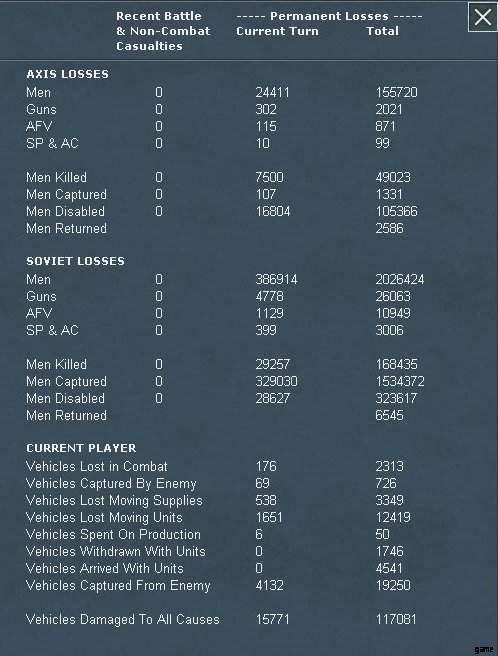
包囲が維持され、私の歩兵部隊は前進し、ターン 8 にソビエトのポケットを減らすことができました。ゲームは現在も進行中であるため、それが価値があるかどうかはわかりません。しかし、私はソ連の編隊 (39 個師団と 9 個の旅団、連隊と小規模部隊) と人員 (386,914 人) の大幅な削減を達成しました。損失のうち、枢軸軍にとって重要な 329,030 人を捕らえました。
捕らえられた人材は、Hiwi、Hilfswilliger、つまり「自発的なアシスタント」、またはより文字通り「喜んで手伝ってくれる人」 (ウィキペディア) の最大の早期プールを提供します。彼らの雇用が WitE でどうなるかはわかりませんが、私がずっとプレイしてきた WitW では、さまざまな Ost フォーメーションに出くわします。通常は質の悪い沿岸防衛ユニットや、時には戦闘に追い込まれたセキュリティ ユニットです。私は、すべてのドイツの地上編成と同様に、大部分が東部で使用されたと推測します.
私はドイツ兵が他の志願兵とは異なる扱いを受けているように見えるヒウィで構成された側の要素に沿って戦っていた通常のヴェルマハトユニットへの言及を見てきました.これらの他の志願兵は、SS に吸収され、SS には、ドイツが占領しているほぼすべての国と、ハンガリーのようないくつかの同盟国からの師団規模の部隊が含まれていたようです。
しかし、それらは最終的に WitE で使用されますが、人員は常に少ないよりは多い方が良いです.
ターン 8 の良いニュースはすべて、少なくともここで取り上げた前線のセクションではそうでした。他の場所では枢軸軍が前進し、オデッサを取り囲み、レニングラードの外郭防衛に到達し、バルト海から黒海までのほぼ全長に沿って前線を前進させました。
しかし、ミンスクの西で初めてパルチザンの攻撃を経験しました。これはソ連の予期せぬ動きであり、それがなくてもできたはずだった…
ターン 9
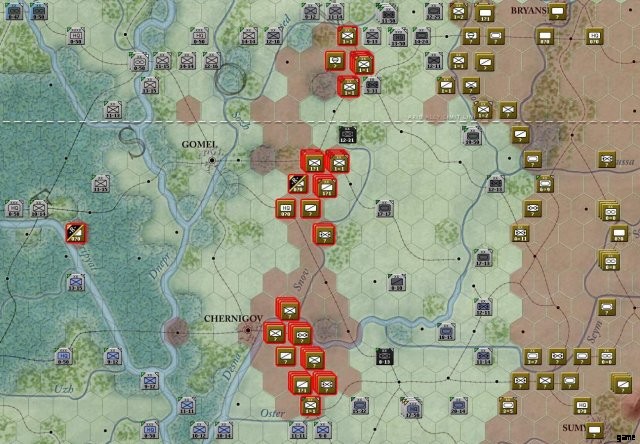
ターン 9 の開始時に、プリペット湿地の東で配置を強制します
ターン 9 で、第 1 装甲グループと第 2 装甲グループの両方の供給状況が改善され、修理が開始されました。彼らはターン7で薄く引き伸ばされ、プリペット湿地の東にあるソビエト軍を取り囲みました-40個近くの師団。ターン 8 で、それらは、レールヘッドから 25 ヘクス以内にある HQ ユニットへの補給のために統合されました。良くない。陸軍本部はまた、回復を支援するために、指揮下にあるできるだけ多くの従属戦闘ユニットから 5 ヘクス以内にありながら、可能な限り最良の補給位置に配置できる場所に移動しました。
ターン 8 (ヘクス 66,55) に発生したミンスク近郊のパルチザンの攻撃による大惨事は、多くの結果をもたらしました。フォン・ボックの北部 FBD 2 は、彼らの懸命な作業がさらに西へ約 10 ヘクス離れた場所で圧倒され、PzGr 3 がヴャズマとその近くに残され、第 9 軍と第 4 軍の要素が絶望的に不足していました。 FBD 2 は南に移動して、ブレスト - リトフスクから FBD 3 の東線へ分岐する作業を開始し、Osipovichi (72,61) で接続し、FBD 3 が東に進んでいる間、Mogilev に向かって北東に向かいました。
陸軍集団中央 FBD 位置、ターン 9。バラ色のヘクスは、選択された FBD が到達できる損傷したレール ヘクスですが、すべてを修復できるわけではありません。詳細については、ゲーム マニュアルのセクション 14.2 を参照してください。
一方、IV/KG zbV 1、KGr zbV 105、および KGr zbV 9 は、FBD 2 の北側の鉄道線を東に進めていたため、補給ミッションを飛行するための 5 ヘクス制限を超えて、レールヘッドから遠く離れていることに気付きました。これにより、Vyazma 近くの PzGr 3 または Pripet Marsh 近くの非常線にある PzGr 2 のいずれかに補給するのに役立つ 5 つの Tante Ju gruppen のうち 3 つが削除されました。南ドイツ空軍戦隊 4 の KGr zbV 50 と 104 は、IV と V Fliegerkorps He 111s と Ju 88s によるいくつかの供給ドロップに助けられて、PzGr 1 と第 6 軍の要素に可能な限りの燃料を運びました。
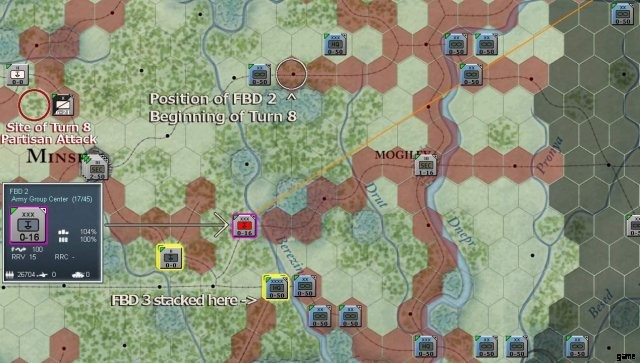
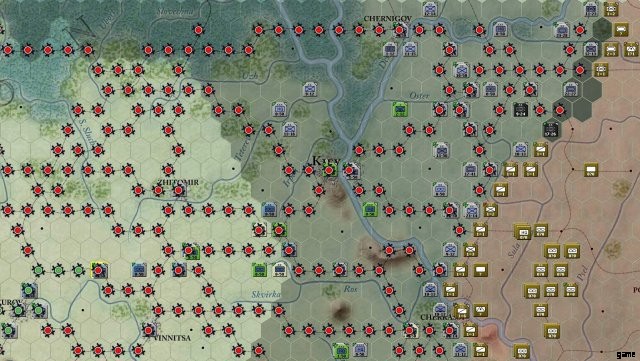
FBD 1 は V FliegerKorps AB と積み上げられ、陸軍集団南、ターン 9。 5 ヘクス距離のライン上の HQ スタックの東は、JG 3 (HQ とインライン) を含む V FK の前方航空基地であり、StG 77 の 2 個飛行隊が北にあります。 Telemecus は Matrix Forums で、前線基地は爆撃機の射程距離を延ばすことができる一方で、爆撃機を最も有利な補給位置に置いておくことができると説明しています。プロスクロフ近くの AG South Auto Rail Repair に注意してください。プロスクロフの AB NE には、KGr zbV 50 と KGr zbV 104 のドイツ空軍第 4 艦隊の Ju 52 が含まれています。
これにより、第 1 装甲師団の XIV および第 XXXXVIII 装甲軍団の機動師団が次の行動のために 23 ~ 28 MP を残し、さらに南にあり、フォン ルントシュテットの FBD 1 に近い第 III 戦車軍団が 31 ~ 50 の MP を残しました。
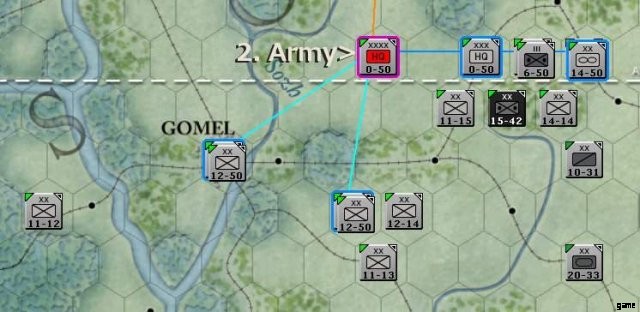
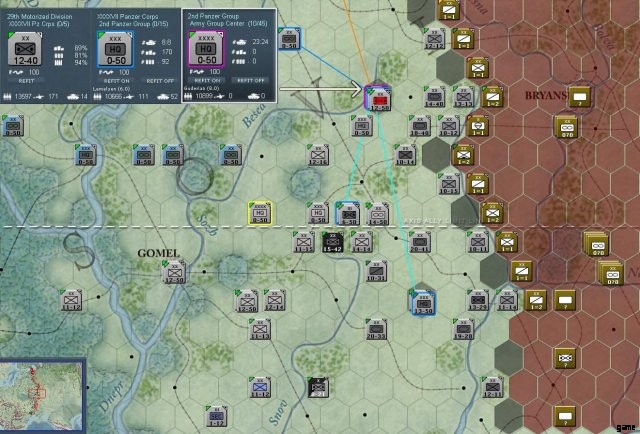
PzGr 1 HQ が選択され、下位の軍団と有機偵察 AB が強調表示されます。 6 軍の LI 軍団 HQ とスタック、ターン 9
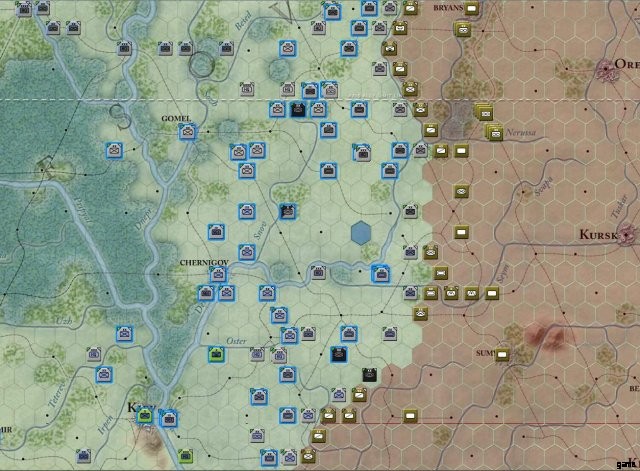
北部では、PzGr 2 の XXXXVII Pz Korps – 司令部 32 MP で、9 ターン目にレールから 15 ヘクス離れていた – の 3 つの機動師団がそれぞれ 40 MP を得た。 XXXXVI Pz Korps – 28 MP、16 ヘクス – 41/42/42 MP で、第 1 騎兵 (第 7 ターンに HQ から 5 MP を超えて立ち往生) は 31 MP でした。 32 MP/20 ヘクスの XXIV Pz Korps は、10 Mot に対して 29 MP でした。 Div.、4. Panzer は 28、3. Panzer は 33 です。 PzGr 2 の装甲軍団に所属する歩兵師団は、11 から 15 の MP を持っていました。
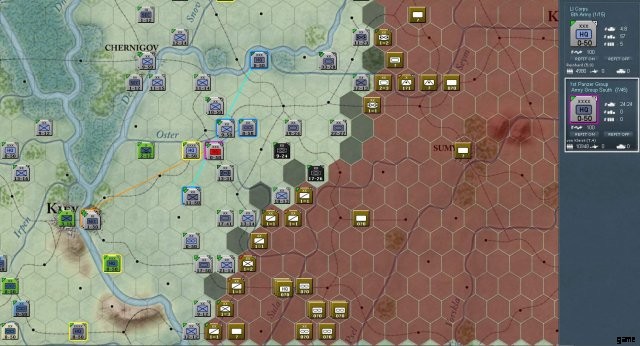
パンツァー グループ 2 が選択され、配下のユニットが強調表示されています。ターン 9。挿入されている航空基地の南は VIII FliegerKorps のもので、AB には 3 つのドイツ空軍第 2 Ju 52 飛行隊が含まれています。前方 VIII FK 航空基地には、JG 27 の Bf 109、Ju 87 の Geschwader、SKG 210 の Bf 110 が最東端の 3 つの基地に配置されています。
これらの編成を支援するのは、北部の第 2 軍と南部の第 6 軍の要素です。それらは、機動部隊が - すべてが計画通りに進めば - 10 ターン目に敵を圧倒する基地となるでしょう。旅団と単一の自動車化された連隊は、プリペット湿地の東に閉じ込められました。
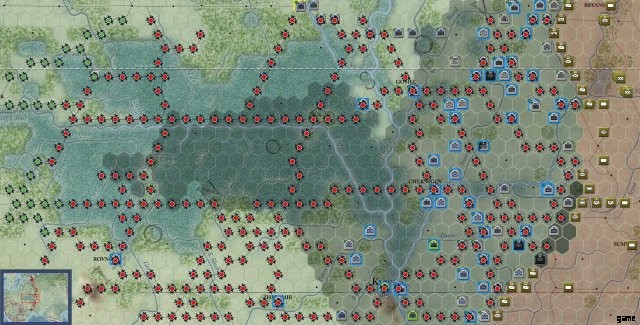
ドイツ第 2 軍の配置、ターン 9 の開始
第 2 軍と第 6 軍がソ連のポケットを縮小している間、ボルシェビキの同胞はさらに東に急いで防御線を確立していました。攻撃する強力な歩兵アンビルは言うまでもなく、燃料と物資が剥奪されたため、機動部隊はほとんどの場合、次のターンのために再編成して休息するために戻ってきました.
FBD は、1 から 4 までの番号が付けられた 3 つのドイツ陸軍グループ コマンドに割り当てられた 4 つのレール修理ユニットを指します。
さておき、またはあなたの新しい友達のロジスティクスとして供給してください!
ターン8の間、私の様々な装甲部隊司令部は、機動部隊の燃料タンクをさらに使い果たしたり空にしたりすることなく、可能な限り最良の補給位置を得るために、少なくともターン8の25ヘクスの鉄道線までの距離に戻されました。 「ターン 9」セクションは、ターン 8 の間、川を越え、森と沼地を通過するレール延長の後である。歩兵司令部も、補給範囲を念頭に置いて配置された.
このセクションで供給を使用する場合、燃料と供給の両方を指しています。 While Fuel is seperately tracked and shipped to a unit, Supply delivered to a unit will further be divided into generic supply (food, water, fodder for horses, grease, tires etc.) and ammunition according to your first new friend you made when entering WitE, A Formula in a Rule!!
Please read through the following, even if your eyes begin to glaze over, there is a happy ending!
When you’re executing a pull-back to regroup and resupply, or positioning your headquarters units before ending your turn, some things to keep in mind are:
There are two measurements in hexes which are important to a given HQ’s draw of supply:range to nearest functioning (repaired) rail hex connected back to a side’s supply sources, and Movement Points (MPs) to that supplied, functioning rail hex. To view the status of your rail network, and supply sources (which will be highlighted in red – not shown in images), and the supply status of hexes under your control, use the rail overlay (hotkey ‘r’). These will be explained further in this section, but the game manual is the place to go for a real understanding of these rules.
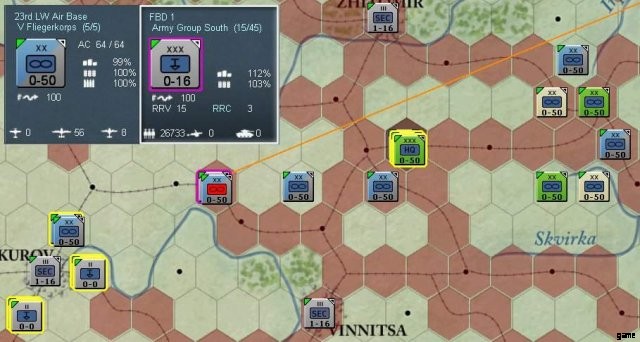
Army Group South’s Northern sector, rail overlay on, turn 9. Green dots are connected, functioning rail hexes which supply can be drawn from (lower left). Red dots are hexes with 100% damaged rail lines, and useless for supply. Hex shading can also be seen, with the dark hexes (upper right) over 25 hexes range from a railhead.
The two measurements to a railhead can be thought of like this:range to railhead is what you can easily count on the map by counting hexes from the unit or HQ to functioning railhead. Movement Points to railhead are displayed when you hover the pointer over the hex you want to know the stats about, along with the range. The MP figure will account for terrain such as rivers and forests the supply line must cross to reach the drawing unit. In practice, while a unit is selected (you can’t select a unit while the rail overlay is on – to do so closes the rail overlay) I simply look at the info pop-up when I hover the mouse over a hex I want info on.
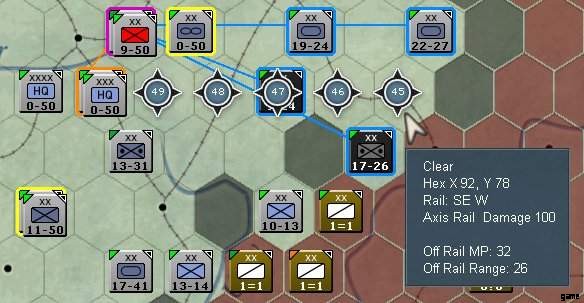
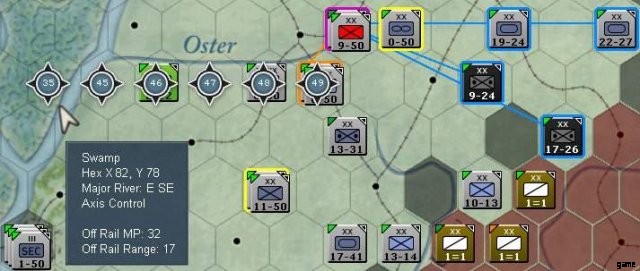
The XIV Panzer Korps has been selected in the stack (upper left, red NATO icon). Note the bottom two lines:Off Rail MP:32; Off Rail Range 26.
If the units highlighted in blue connected by blue lines to the HQ’s hex – XIV Pz’s combat units – advance more than 5 hexes into enemy territory, XIV Pz HQ will be forced to move to the hex line indicated by pointer and path of numbered dots (the numbers are the amount of MPs the HQ will have left when it arrives in that hex) or farther to remain in command contact with it’s units. It will, however, be beyond the 25 hex range from a supply source and will not receive supply during turn 10, nor will it’s units – unless a unit is within 25 hexes, in which case they will draw supply but at a disadvantage because their HQ is not in range to receive supply.
Again the XIV Pz Korps has been selected, but this time a path ostensibly closer to the rail lines is chosen. Notice that while the rail range is now 17, due to crossing a major river and entering a swamp the Off Rail MP remains 32 as in the previous example. Bear in mind that terrain effects the Off Rail MP number.
As range to railhead increases, supply received decreases, with a further decrease implemented past 10 hexes distance. This is in addition to movement point range, which also reduces supply received.
Use the rail overlay (hotkey ‘r’) to get a visual on where your supply limits are. Hexes over 10 hexes from a reailhead are shaded, hexes with a range of 26 or more to a railhead are darkly shaded and receive no supply but remain in supply for unit status purposes. A unit which is within 25 hexes but more than 100 MPs – or vice versa – remains in supply for status, but can not draw supply:a unit must be either within 100 MPs or 25 hexes range to railhead to avoid penalties for being out of supply, but within both to draw supply from the rail network.
Simply:getting no supply bad, status achievement ‘out of supply’ even worse!
Keep your units within the first shaded area and you should avoid major problems with supply. Your decision then is how far to push your forces, knowing that the further into the shaded areas, the worse the supply situation in your units will be going into the ensuing turn, and the shorter any of their movements are going to be (including ability to attack which requires MPs).
Push the limit and achieve a glorious victory or debilitating encirclement, or be cautious and remain well supplied and therefore more flexible? That’s your real choice in WitE, not ‘counting trucks’ or getting bogged down in the minutia of logistics. Those choices for the Axis player will, as was the case historically, become very important for the player around the time Army Group Center reaches Smolensk.*
While all this might seem complex to someone who’s not played the game, it’s not really as bad as it seems. It’s more important that you are familiar with these rules than it is that you can quote them from memory like a lawyer arguing a case before a judge.
Keep your units together. Not only is this necessary for the German doctrine of Schwerpunkt (an operational focus on getting the most forces they could to the decisive place on the battlefield they needed to be when they need to be there), it helps them recover supplies and readiness for future action.
It’s very important to remember the first and best supply source for your combat units – the ones that close with the enemy and impose your will upon them (or resist the enemy’s attempts to do same) – is the HQ they are attached to, which has a command range of 5 for supply purposes regardless of whether it’s a Corps, Army, or higher level HQ. Beyond 5 hexes distant from their HQ, units will try to draw supply from a railhead, but only on the second supply round – this gives the unit only one chance to draw supply and is far less efficient.
While a unit itself might be beyond the 25 hexes from a railhead which are in range to draw supply, if it’s HQ unit is inside that 25 hex range the unit will still draw much better supply than one who’s HQ is also beyond the 25 hex line – provided the unit remains within 5 hexes of their HQ as the crow flies. The Movement Point distance is also important, and must remain within 20 MPs from that unit’s HQ to draw supply.
The movement points from a railhead to an HQ are important to the supply the HQ can get to then pass along to it’s units or to stockpile. There’s a formula that reduces the amount of supply based on how many MPs are expended to get supply to the HQ, which in turn increases the number of trucks that are damaged and (fewer) destroyed in the movement of that supply.
Keep attached on-map units within 5 hexes of their HQ at all times unless there is a really very good reason not to! Not only will supply suffer, an HQ won’t be able to share support squad elements with an on-map unit which is more than 5 hexes from their HQ – support squads help in recovery of damaged equipment and recovery of your units’ stats.
While overall not as important as the HQ an on-map unit is attached to, a higher HQ (Army, Army Gruppe or Soviet equivalent) attached to the unit’s chain of command will also try to help with Support Squads during the appropriate section of the logistics phase.
Returning to this image of the 2. PzGr, it’s interesting to note that the units stacked with and closest to the PzGr HQ – XXXXVII Pz – got 40 MPs for each of it’s mobile units, while the XXXXVI Pz just to the South and one hex further in range yet 4 MPs closer to rail, got more than 40 MPs for every mobile unit save the 1. Cavalry, which is outside the 5 hex range of the 1. PzGr HQ but was also outside HQ supply range on turn 8. Furthest South is the XXIV Pz Korps, which is farthest ranged at 20 hexes, but the same 32 MPs from rail as the XXXXVII Pz., and has the least mobile unit movement points.
In the South, 2 out of 3 of 1.PzGr’s Korps ended turn 8 with their HQs at the 25 hex limit of supply, with a long MP haul from the rail as well. The exception, South-most III Pz Korps, ended up with the highest MPs of any of these formations for turn 9, and was the only 1. PzGr formation to have all it’s units within the 5 hex command range of their immediate higher HQ.
Support Squad help flows down the chain of command linearly, and is only shared between higher HQs and subordinates.
Note that ‘Support Squads’ referenced above are not support units such as artillery, pioneer, or StuG units. Support squads are listed in a unit’s TOE and are the organic non-combat elements of the larger formation. An HQ may share it’s Support Squads with it’s subordinates to help in recovery. This is doubly important for Air bases in WitE, so keep them as close to their command chain as possible.
Regarding Support Units, for them to be committed to a battle they must either be attached directly to the unit, or the HQ has to again be within 5 hexes of their combat unit or units involved in the battle. While I’ve glossed over the fact that closer is better for supply, it is very important for HQ commitment of Support Units. Note that Artillery units can not be directly attached to combat units.
To get you started and playing the game with enjoyment, this outline is really all you need to know about these topics, but of course there is much more to it, others more qualified than myself must take that form here.
The plan is to create as many encirclements as possible during turn 9 – as many as 3. Two big ones maybe, or perhaps only two small ones due to bad die rolls or other circumstances. Unlikely but maybe one big one to rule them all, or maybe just a small one because reasons. Point is, I tried to set up the combined Panzer Gruppe forces and infantry army backing to enable as good an encirclement of enemy forces as I can manage. Infantry form 6th and 2nd Army will punch holes where possible, then movement points will dictate what’s possible after that.
That is a strategy of destroying the Red Army and taking as many population centers as you can to deny manpower to the USSR is a sound strategy for Axis victory. We shall see to the best of my abilities. I’m optimistic about taking Leningrad, though the KV factory is gone as well as everything else the Reds can move. I would imagine that a push to Moscow might be feasible, though I read that taking and still holding Moscow after the Soviet Winter Offensive are two different things.
I should also mention that when I set up this game I set rather large benefits across the board for myself, especially in Administration because I want the extra APs. I find the APs – at least in WitW with all the command shake-ups prior to Overlord – are too few to do what was historically done. This being my first time through WitE, I wanted to give that boost ‘just in case.’ Otherwise I just don’t want to be shouting at my monitor in frustration at 2am and waking up the house, lol! For a newbie, I would definitely suggest boosting your stats to as much as 125 and reduce the Soviets a bit – I set them at 95 myself for, again, my first playthrough.
Also – historically the Axis did not win in Russia. From what I’ve read, it was probably impossible to have won, save for astute strategic reasoning and precise execution on the ground, which Hitler himself precluded with his decisions and decrees. Even with the large benefit I gave myself, I am still not sure of victory, given this is my first try. From what I’ve read on Matrix, it’s quite possible to win without an unbalanced setup and giving the Soviets an advantage (+1 defense or attack). I wanted to give myself a chance to win with all my known and unknown limitations going in.
I’m finding this game quite enjoyable, and beginning to worry that I might have set it up wrong(too easy), so I might change things going forward. I know I boosted things higher than I did when I played WitW, and in the West I didn’t cut the Axis stats at all. I believe all I did there was to boost the Administration stat to 105 or 110, and left the rest at 100.
The primary reason I played WitW first, with only enough WitE time to familiarize myself with the game’s legacy rules and system, is WitW is one of the very few detailed, interesting wargames which offers as interesting a play situation as the Germans typically start out with whether in 1936, 1939, 1940, or 1941. I can think of none other than War in the West.
I think this is the primary reason so many gamers play as the Germans generally across the greater WWII in Europe strategy video game spectrum. The Germans start out with a superior army, sometimes – like WitE – realistically reflected in terms of experience and organization more than (historically non-existent) hordes of armored and mechanized forces used by other games. I also enjoy a light game like Panzer Corps and own that complete set of extended German campaigns. I have also enjoyed the Making History series of games.
One thing I’ve seen is that the rules are daunting to some. I have been playing games similar to this in complexity since I was a kid, so for me it’s nice to find a computer game that ‘feels’ like an old paper game. It’s a challenge to get a grip on the rules, no doubt, but once you figure it out not only are WitE and WitW both great games that will provide hundreds of hours of entertainment (and historical education!) for you, you’ll also open the door to hundreds of games out there both computer and paper that will entertain, educate, and challenge you and your friends for years.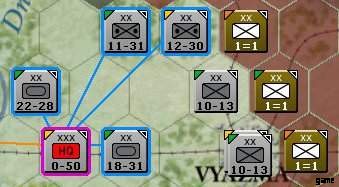


メモ
HQ Management / Support
Example:6 Army HQ may attempt to send Support Squads to a division which is in range and attached to a Corps which is in turn attached to 6 Army, as may Army Group South if in range. However, a Corps attached to 11 Army will only get support to it’s units from the Corps HQ, 11 Army, and Army Group South if in range – even if stacked with 6 Army HQ or one of it’s subordinate Corps HQs. Similarly, Corps HQs attached to the same Army may only attempt to support on-map units which are subordinate to it.The Turn 9 Plan
Final Thoughts for Now