復活した魔女ティア リスト:ゲームで最高のキャラクターの完全ガイド
よみがえった魔女はヨースターから発売されたエキサイティングなガチャRPGです。美しいピクセル アートワーク、読み応えのあるストーリー、そしてもちろん、たくさんのかわいいアニメの女の子がいます。そして、誰も他のホットなアニメの男を使わないので、約1人のホットなアニメの男.それらはすべて、見た目と性格だけでも手に入れる価値がありますが、戦闘において他のものよりも優れているものもあります.
そうは言っても、スケールの下端にいるキャラクターでさえ、ストーリーモードで実行可能です.キャラクターのゲーム内ティア (X-C ではなく、UR、SSR、SR、R) が低いほど、アップグレードと最大化にかかるコストが少なくて済むという事実もあります。とにかく、UR を獲得できるようになるまで続けてください。
低ティアでSSRまたはURの場合にのみ、キャラクターの使用を本当に避けるべきです.RとSRが提供する物流の容易さはまだ比較的弱いかぎくしゃくしている.それでは、アネモネには残念です!
それでは、ゲームで現在利用可能な最高のキャラクターを紹介してランク付けするため、包括的な復活した魔女ティアリストを始めましょう!
X ティア – バーン ザ ウィッチ!
これらの女の子はただ良いだけではありません。それらはS層のものと同じくらい優れていますが、使用して見るのが特に悪質または楽しいものにする少し余分なピザズがあります.または、アフォールンのようなキャラクターの場合、ほとんどの通常の状況で脳を滑らかにするように壊れています.これらの女の子を適切なチームに入れれば、勝つだけでなく、そうすることで顔に邪悪な笑みを浮かべることができます.
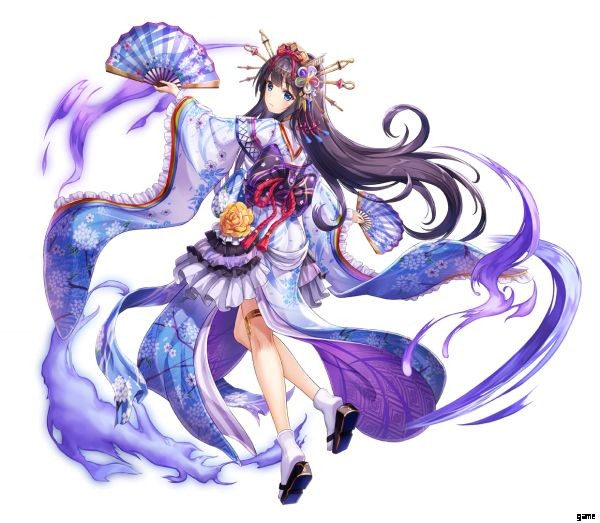
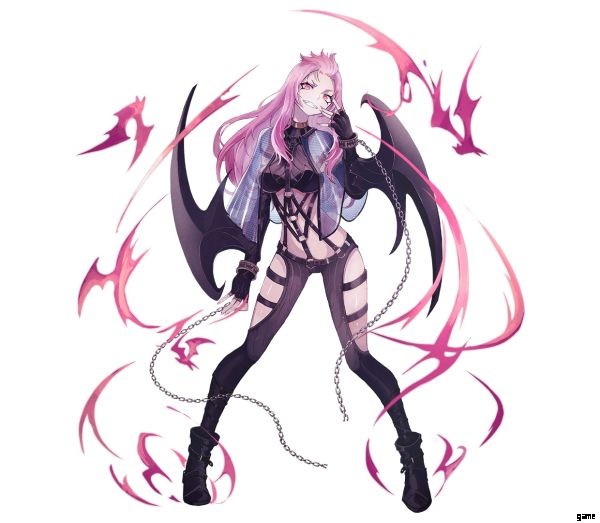
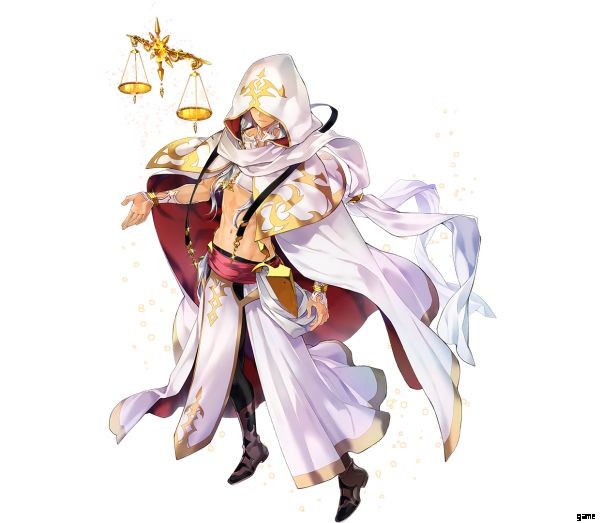
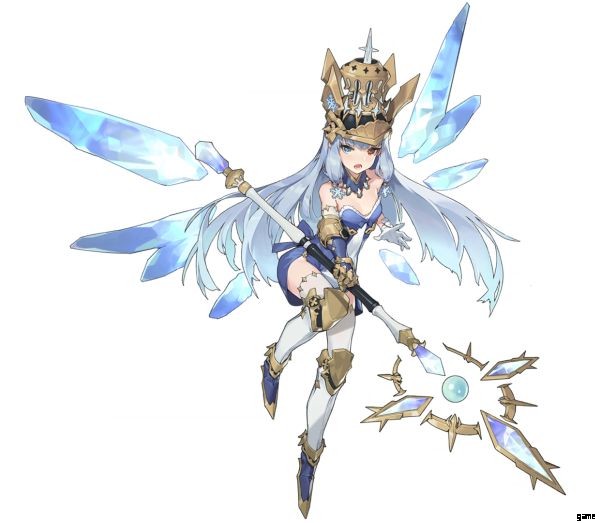
堕ちた
ガーディアン、マーキュリー、UR、オールターゲットアタック、メイジサポーター、アルティメットチーズの子

あなたのチームをほぼ不滅にすることができる真に壊れたタンクです。防御的なオーダースキルを際限なくスパムさせ、その過程で DPS を犠牲にすることを厭わない場合。彼女のカオス スキルは、ガーディアンとしてはごく普通のものですが、それでもかなり優れています。彼女は敵チームに枕を落とし、300% の魔法ダメージを与え、魔法防御を低下させます。
それには 3 カオス エネルギーが必要です。これは、彼女がここまで倒された本当の理由と結びついています。彼女のオーダー スキルは、彼女を 2 秒間ダメージから守り、自分の上にシールドを置き、すべてを吸収させます。 チーム全体が 10 秒間受けるダメージ。彼女が不死である 2 秒間を数えると、チーム全体が不死になります。また、これには 3 オーダー エネルギーが必要で、約 4 ~ 5 秒で充電されます。
Free Mode Auto を使用してこれをスパムするように彼女に伝えれば、対戦相手はほんの数秒でダメージを与えることができます。彼女のチーム全体が不滅ではないわずかな時間でも、彼らはまだ Afallen の HP シールド、増加したダメージ耐性、太った UR ガーディアンのステータスライン、および彼女が受けているあらゆる回復を乗り越えなければなりません。
その後、彼女は再び不死になり、回復して完全に回復し、明らかに貧弱なDPSで敵をゆっくりと拷問して死に至らしめます。これを機能させるには、通常、指定されたヒーラー (たまたま Compeller である可能性があります) にセカンダリ スキルを使用するよう伝え、Afallen に彼女の最初のスキルを使用するように指示する必要があります。つまり、ダメージ ディーラーは何もしていません…
関連: 復活した魔女の初心者向けガイド:運命を全うするためのヒント、コツ、戦略
エネルギー使用スキルの代わりにチャージスキルを持つヒーラーまたはダメージディーラーを使用しない限り。次に、チーズを動力源とするほぼ無敵の上に何らかの形のDPSがあるため、さらに激しく笑います. Afallen に対する最大の脅威は、その短い攻撃ウィンドウで彼女を気絶させ、それを拡大し、より多くのダメージを与えることができるものです.
または、非常に大規模で強力な攻撃であり、非常にタイミングの良い攻撃でシールドと抵抗を介してアフォールンを殺すか、少なくともヒーラーが無敵になるのを待つ間に修正できるよりも多くのダメージを与える可能性があります。彼女の盾を壊します。そして、信じられないほど珍しい戦闘タイマー。しかし、(ストーリー モードの大部分のように) バトル タイマーがない場合、彼女はゲームを非常に簡単にします。
トゥオネル
ヒーラー、ソルトストーン、UR、カオス バッテリー、チャージ スキル セカンダリ、チーム ヒーラー、シールド ジェネレーター、ピュア バニラ フレーバー
ゲームで最高のヒーラー、申し分ありません。彼女のオーダー スキルは、その上にシールドも生成するチーム ヒールです。シンプルでパワフルで効果的。彼女のチャージ スキルは、チーム全体の ATK を上昇させ、時間の経過とともに回復を提供し、ATK ステータス バフとは別に、彼らが直接与えるダメージの量を増加させるという点で、多くのヒーラーにとって当然のことです。
パッシブのロックを解除すると、彼女は本当に驚くべきものになります。彼女は 4 秒ごとにカオス エネルギーのバーを生成し始めます (maxx の場合は 2 秒)。チャージ スキルのセカンダリ ユーザーとして彼女自身がカオス エネルギーを消費しないという事実と相まって、これにより、分隊の他のメンバーがカオス スキルを過度にスパムすることができます。すべてのマナとスキル パクトを投入する価値のある 1 つです。
アカシャ
アサシン、ブリムストーン、UR、連続リアアタック、オーダー スパマー、カオス エネルギー クリアアウト セール
1 バー コストの基本スキルと、カオス スキルのコストを 3 バーから 1 バーに減らすチャンスを与えるパッシブを備えたスパムのようなバックスタバーです。群衆に対しても十分です。
彼女の基本的なオーダー スキルは敵の後衛を 2 回攻撃し、5 秒間、自身のクリティカル チャンスを 5% 増加させ、クリティカル ダメージを 10% 増加させます。このスキルを十分にスパムして、それらの統計を最大 25% の追加クリティカル チャンスと 50% のクリティカル ダメージまで積み重ねることができます。その後、彼女のカオス スキルでフォローアップできます。
彼女のカオス スキルは後方を 6 回攻撃し、敵が死亡した場合は次の男に攻撃し、次に敵が死ぬか生き続けることで攻撃をブロックするまで次の男に攻撃します。スラッシュもヒットごとに強くなり、キルチェーンの可能性が高くなります.キル チェーンが発生すると、笑わずにはいられません。
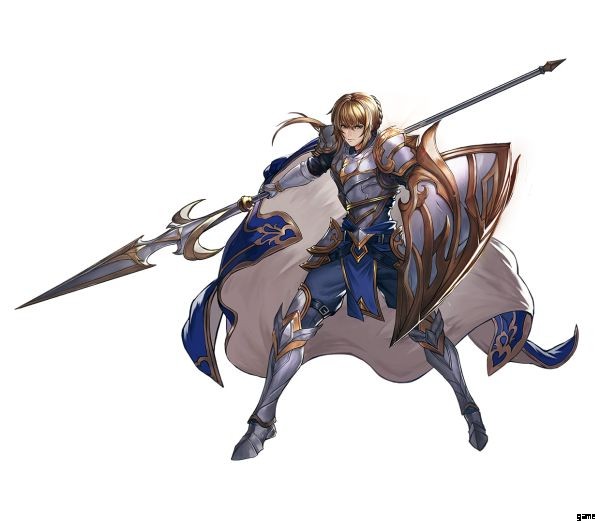
ユイ
デストロイヤー、ソルトストーン、SSR、防御貫通攻撃、単体DPS、セーラーミコ
他の戦車に顔面斬りを得意とする前線部隊。 Yui は、かなり普通ですが強力な Order スキル、Demonsbane Spear を持っています。これは 300% のダメージ ストライクで、バフを解除して 1 つのターゲットに命中し、3 Order Energy を消費します。彼女のカオス スキルは特に強力で、デモンズベイン スピアのダメージをさらに 50% 増加させる自己バフであり、通常攻撃を高速で約 2 倍のダメージ ブローに変えます。
彼女のパッシブは、オーダー スキルを使用した後、10 秒間、攻撃力の 20% の物理防御を無視するようになっているため、コンボは次のようになります。彼女の Chaos スキルを使用してから、次の 10 秒ほどの間にもう一度 Demonsbane Spear を使用してください。
エラ
デストロイヤー、ソルトストーン、UR、リジェネ タンク、全ターゲット ダメージ ディーラー、迷惑なドラゴン
すべてを対象としたスパマーであり、万能の戦車であるエラは、チームの前で歓迎される存在です。彼女のオーダースキルは、バフを解除し、敵のATKを3オーダーバーの間減少させる、物理ダメージ全体の火の玉です。彼女のカオス スキルは高価な 5 バーの変身で、彼女はドラゴンに変身します。これにより、彼女のすべての基本攻撃が敵チーム全体にダメージを与え、自身の攻撃力と最大 HP が増加します。
また、これによりオーダースキルが強化され、敵の物理防御力を低下させることができます。初期段階では、彼女は比較的大きなダメージ ディーラーですが、パッシブのロックを解除すると、毎秒 2.5 ~ 5% の HP を再生し、パッシブのレベルに応じて受けるダメージを 10 ~ 20% 減らします。これにより、彼女は正真正銘の戦車となり、攻撃をかわしながら敵チームに火をつけることができます。
マイナー
メイジ、マーキュリー、UR、リピーティング アタック、シングル ターゲット ヌーカー、ドルフィン ボタン オブ ドゥーム

彼女の攻撃で過度の暴力を好む、本当に奇妙で危険な魔道士。マイナーズ オーダー スキル、Overflowing Magic は、そのメカニズムにちなんで名付けられました。キャストするには最低 2 つのオーダー エネルギーが必要です。これをキャストすると、蓄積されたオーダー エネルギーがすべて消費され、冷酷な魔法の殴打が単一のターゲットに放たれます。
彼女は消費したエネルギー量に基づいてターゲットを繰り返し攻撃し、各打撃はレベル 1 で 90% の魔法ダメージを与えます。マイナーに攻撃されたときの追加ダメージ。 Chaos スキルを貯め、それをキャストしてから、彼女の Order スキルでそれらを核攻撃することで、1 人の犠牲者を引き裂くことができます。
彼女のパッシブはこれをより速く発生させ、ダメージを増加させ、何かを攻撃するたびに 1 バーの秩序エネルギーを生成するわずかなチャンスを可能にします。これには時間がかかるかもしれませんが、オーダーのフルチャージが 1 人の人物 (できればボス) に投げ出されるのを見るのはいつも面白いものです。
S ティア – ボーダーラインの異端
これらのキャラクターは、少なくとも一般的な有効性に関しては、X-tier に匹敵します。これらのキャラクターを選ぶことは(あなたがそれらを持っている場合、一部の人にとっては、幸運の女神の怒りから救うのに100チャンスの最初のロールでさえ十分ではないかもしれません)、一般的には良い、実用的な選択です.悪笑いをすることは少なくなるかもしれませんが。
キャサリン
ガーディアン、ブリムストーン、UR、物理ダメージ無視、自己HP再生、ダメージリダイレクト、フランスへの栄光
物理ダメージに依存している敵に対する絶対的なハードカウンターでありながら、魔法ダメージに対しては一般的な打撃を受けることができます.キャサリンのオーダー スキルは、彼女が受ける次の 5 回の物理ダメージ ブローを無効にし、チームが受けるすべてのダメージを次の 10 秒間自分にリダイレクトします。これにより、物理的なダメージだけを心配する必要がある場合、チームはほぼ無敵になります。
これに加えて、これがアクティブな間、彼女は毎秒自分の物理攻撃力の 30% だけ HP を回復するので、チームが代わりに魔法の打撃を受け始めた場合、彼女は簡単に自分自身を癒すことができます.彼女のカオス スキルに関しては、彼女はチームにシールドを与え、次の 10 秒間シールドを維持します。彼女または彼女のチームが受ける 5 回の打撃ごとに、敵チーム全体を 0.5 秒間傷つけて気絶させる攻撃をトリガーします。
物理ダメージの敵に対しては、キャサリンをアフォールンと同じように使用して、敵にダメージを与えるチャンスを無効にします。このスキルを使用すると、魔法攻撃と物理攻撃の両方に対する DEF が増加しますが、彼女の自己回復と組み合わせて、次の対戦相手がメイスであなたを壊すよりもあなたを輝かせて死ぬことを好むという理由だけで、彼女の上で寝てはいけません.
セラニア
アサシン、ブリムストーン、全ターゲット ダメージ、物理ダメージ アシスト、雪中の狩猟
物理ダメージを上昇させる能力があるため、デストロイヤーの友人と相性の良い暗殺者。 Celanya の攻撃は両方とも全体攻撃で、敵を複数回攻撃します。オーダー スキルは攻撃力の 30% で 3 回ヒットし、カオス スキルは攻撃力の 20% で 5 回ヒットし、両方とも物理ダメージを与えます。
彼女のカオス スキルは、チームメイトの物理ダメージを自身の攻撃力の 30% 増加させます。彼女のパッシブは、長時間の戦いで彼女を致命的にします:彼女が与えるすべての攻撃は彼女のダメージを 1% 増加させ、その 1% は物理防御を無視します.これは合計 10% までスタックされ、パッシブのレベルが最大になるとパーセンテージが 2 倍になります。
マハユエル
メイジ、マーキュリー、SSR、全ターゲットダメージ、ライトヒーリング、木を抱きしめて気に入りました
マルチヒット魔法のオールターゲット攻撃と、彼女のクラスの奇妙なパッシブを持つメイジ。彼女のスキルは普通ですが、強力であれば、複数回ヒットする全体攻撃です。特に彼女のカオス スキルは、敵の魔法防御力を彼女の攻撃力の 5% 減少させることができ、スタックすると敵の魔法防御力の半分で最大になります。
しかし、彼女のパッシブは、彼女を奇妙でありながら強力なものにしている理由です。それは、彼女自身の ATK 統計に基づいてチームが回復することで、彼女の両方のスキルを回復として倍増させることを可能にします。メイジである彼女にとって、このステータスはかなり大きいため、これは彼女の回復が相当なものであることを意味し、真のヒーラーのメイン ドリンクの優れたチェイサーです。
アマナミ
コンペラー、マーキュリー、UR、チーム ヒール、チーム バフ、デバッファー、全ターゲット ダメージ、チャージ アタック、サン パワー
自動キャスト攻撃呪文を備えた、ダブルワーミーの全ターゲットヒーラーとダメージディーラー。アマナミのオーダー スキルは、チームの ATK を上昇させるチーム ヒーリング スペルであり、3 つのオーダー エネルギーを消費しますが、生成されるオーダー エネルギーは 1 であり、かなり高いコストにもかかわらず簡単にフォローアップできます。
彼女はカオス スキルの代わりにチャージ スキルを持っています。これは、すべての敵にダメージを与え、魔法攻撃から 30% の追加ダメージを与えるもので、レベルアップする前です。これは誰からでも4つのスキルをチャージする必要があり、入力に関係なく準備が整うと自動的にキャストされるため、フリーモードの自動戦闘ユーザーにとって便利です.
変身
コンペラー、ソルトストーン、チーム ヒーラー、チーム バッファー、オール ターゲット アタック、スタンス チェンジャー、ワンレディ劇団
ほとんどの場合、Compellers は他のクラスよりも複雑であり、Metamorphoses がケーキを取り上げます。彼女にはスタンス システムがあり、オーダー スキルを使用するたびにマスクを変更します。これにより、彼女がチームに与えるバフの種類が決まります。
彼女のオーダー スキル、Borrow は、Rage、Joy、Sorrow マスクの間で彼女を交換します。Rage は Metamorphoses の ATK の 24% に基づいて ATK バフを与え、Joy は全員に 12% のダメージ ブーストを与え、Sorrow は全員に 12% のダメージ耐性を与えます。
これに加えて、メタモルフォーゼの攻撃ステータスの 120% に相当するチーム ヒールが付属しています。彼女のカオス スキルであるエモーション サージはよりシンプルで、敵チームの全員に 240% のダメージを与え、自分のチームのダメージと回復効果を 60% 増加させます。また、Borrow の効果を 2 倍にし、バフをより太くし、ヒーリングをより分厚くします。
ドリン
コンペラー、ソルトストーン、全ターゲット ATK、チーム バッファー、デバッファー、簡単に持続できるバフ、いたずらっ子のための石炭

ダメージを与えるオーダー スキルと非常に安価なカオス スキルを備えた非常に攻撃的なコンペラー。ドリンの命令スキルは、トローリングで満たされた素敵なギフトボックスを敵に与え、敵チームに 180% のダメージを与え、10 秒間、全員と他のすべてから追加で 20% のダメージを受けさせます。
これに続いて、チーム全体の攻撃力とクリティカルダメージを 10 秒間 20% 増加させる彼女のやや安価なカオス スキルである慎重な準備を行います。 Dorin の低コストの能力によって可能になった、Dorin の友人が独自のフォローアップ ストライクで敵を水たまりに溶かすのを見て笑いましょう。 10 秒後、敵がまだ生きている場合は、すすぎを繰り返します。
カプラ
デストロイヤー、ソルトストーン、UR、HP再生タンク、セルフ シールド、前方ターゲット ダメージ、カウンターアタッカー、自分を攻撃するのをやめる

最後に、彼らは正面の誰かに反撃パッシブを置きました! Kapla は攻撃的なフロント ユニットであり、典型的な Destroyer です。彼らはダメージを与えながら生き続けることに優れており、バックラインを生かしておくことは依然として優先事項ですが、ガーディアンほどではありません。彼女のオーダー スキルは、攻撃の 200% に相当する単一のターゲット ブローであり、その前に 10 秒間の大きなバフが続きます。 .これはすべて 2 オーダーのエネルギーです。
彼女のカオス スキルは 4 エネルギーを消費し、攻撃力の 150% に相当するシールドを 15 秒間与え、最前列の敵に攻撃力の 300% の物理的な打撃を与えます。敵の物理防御力を攻撃力の 30% 減少させるため、これに続いて他の物理攻撃を行うことができます。
彼女のパッシブは、一部の低 Tier ユニットに見られるものと似ていますが、彼女が前にいるので特に優れています。攻撃で 8 回攻撃を受けるたびに、カオス スキルをキャストします。彼女の殺しにくい性質と相まって、これは彼女にとって非常にうまく機能します.
ティア – 非常に魔法
ここのユニットは通常、X および S 層のユニットをバックアップし、X および S 層のユニットがないジョブのスロットを埋めるのに適しています。この層以上の場合、特に非常に早期に入手した場合は特に、長期的に見ても投資する価値があります。
最下層の人形 (戦闘能力では、ゲーム内のキャラクターの大部分は最上位層の愛らしい) を使用してもキャンペーンで十分にうまくいくことを考えると、餌を与えている限り、これは理解できます.
夜のトゥオネル
ガーディアン、マーキュリー、UR、シールド ジェネレーター、オール ターゲット アタック、クラッチ メカニック、ヒーリング、Tuonel with a Bear
ゲームで最高のヒーラーから… まあ、かなり良いタンクです。ダウングレードですが、それでもいいです! Tuonel of Night は、オーダー スキルとして安価な 2 オーダー (ほとんどのディフェンシブ オーダー スキルはコスト 3 ですが、少なくとも高 Tier ユニットではより強力です) のディフェンス スキルを持っており、HP の 24% に相当するシールドを全員に 15 秒間生成します。これにより、Tuonel of Night の攻撃ではなく HP に関連する 5% の ATK バフも付与されます。
シールドが壊れると、それを使用して人形を回復し、Tuonel のガーディアン ステータスラインの最大 HP の 18% を回復します。彼女のカオス スキルは、ゲーム内の強力なガーディアンにとってはごく普通のことです。全対象の魔法攻撃ですが、ATK ではなく、最大 HP の 30% に基づいています。
1 秒間のかなり安定したスタン (ほとんどのスタンは 0.5 秒間続きます) が付属し、敵の一般的なダメージ能力と魔法耐性の両方を 18% 弱めます。全体的に良いが、Tuonel は Tuonel of Night が Guardian よりも優れた Healer である.
ウシュピア
メイジ、マーキュリー、SSR、全対象攻撃、毒、マミー・スネークバイト
強力でありながらかなり標準的なダメージディーラーであり、両方のスキルは互いにかなり似ています。どちらも毒のスタックを与える全ターゲット攻撃を行います。カオス スキルはカオス バー 3、オーダー スキルはオーダー バー 2 を消費します。与えるダメージが少し少なくなります。
パッシブのロックを解除すると、彼女は著しく危険になります。これにより、カオス スキルで敵を 0.5 秒間 (最大にすると 1 秒間) 気絶させることができます。今、彼女はカオス スキルを使用して攻撃の途中で敵を妨害することができます。
サイネティア
ヒーラー、ソルトストーン、SSR、チャージ スキル セカンダリ、ATK バッファー、トイレットペーパー様
UR ヒーラーが 2 人いるゲームで 2 番目に優れたヒーラーに匹敵する SSR であり、小さな重要な詳細を除けば、ヒーラーと同じくらいシンプルで実用的です。彼女はオーダー スキルの 1 つのターゲット ヒールを持っており、カオス スキルではなく、彼女のチーム ヒール オーバー タイム スキルはチャージ スキルであり、他の人のスキル使用によって直接強化されます。
これにより、フリーモードのオートコンバットを使用する場合に特に便利です。彼女が仕事をするためにスキルを使用するように彼女に指示する必要がないためです。チームメイトは 4 つのスキル使用を蓄積します。その上、彼女の治癒力は非常に強力です。彼女のコメント セクションの人々が彼女をトイレットペーパー様と呼ぶのも不思議ではありません。
キフォン
デストロイヤー、ソルトストーン、SSR、全対象物理ダメージ、全対象魔法ダメージ、冥界最悪の職員
物理的または魔法的な敵と戦うためのオプションを備えた多目的なデストロイヤー。 Kyphon はかなり強力な Order スキルを持っています。これは、何かを殺すと自動的に自分自身を再キャストする全ターゲットの物理攻撃です。これは、PVE でムックをすばやくクリアするのに非常に役立ちますが、3 オーダーのエネルギーがかかり、かなり高価です。彼女のカオス スキルは、1 つのターゲットに魔法のダメージを与えます。
このスキルは、弱体化した敵にとどめを刺すのに適しています。Kyphon the Deathbringer バフを与えます。これにより、このスキルは重度に弱体化した (HP 20% 未満) の敵に対して 2 倍のダメージを与え、オーダー スキルは同じ敵に 30% の追加ダメージを与えます。このバフもスタックし、彼女のオーダー スキルは最大スタックで最大 90% のダメージを与えます。
マトベイフ
アサシン、ブリムストーン、UR、リアアタック、オーダースパマー、クリティカルベース、ディズニープリンセスからスターライトスーパーウェポンまで

コストがわずか 1 バーの非常に安価なオーダー スキルを持つクリティカル ヘビー アタッカー。マトヴェイフのオーダー スキルは、最大 5 回までクリティカル率を 5% 上昇させ、ターゲットに 120% のダメージを与えます。シンプルで、簡単にスパム可能です。一方、彼女のカオス スキルは 4 カオス エネルギー、6 ヒットで 54% のダメージを与える 7 ヒットの打撃、最後のヒットで 72% のダメージを与えるコストの高い側にあります。
一撃ごとに敵のCRIT DMG耐性が7%減少し、クリティカルバフ付きの攻撃に対して脆弱になります。彼女のパッシブは、すべての攻撃で 2000 (最大の場合は 4000) の物理防御を無視できるため、リストの上位に位置付けられます。
カレドニア
ガーディアン、ブリムストーン、UR、ヒーラー、チャージ スキル プライマリ、古い国家にちなんで名付けられた
全ターゲットノックバックスタン攻撃を備えた奇妙なタンクヒーラーハイブリッド。カレドニアのプライマリ スキルは、オーダー スキルではなくチャージ スキルであり、チーム全体を哀れな 12% のように回復します…通常の ATK 統計回復ではなく、彼らの強力なガーディアン HP 統計に基づいていることに気付くまでは、 .また、被ダメージが 30% 軽減され、非常に役立ちます。
また、カレドニアが何かを攻撃するたびに、次の 10 秒間、敵の物理防御力を自身の 5% だけ剥奪するカオス スキルを備えているため、物理ダメージ ディーラーともうまく機能します。ああ、それはまた、敵をその位置からノックアウトし、再び攻撃する前に後退させる全標的攻撃でもあります.彼女が敵を通り抜けている間、彼女はダメージを受けず、デバフを取り除きます.
サーシベイ
コンペラー、マーキュリー、UR、単一ターゲット攻撃、全ターゲット継続ダメージ、ザット ワン ボス

ゲームのストーリーで最初の本当に苛立たしいボスがプレイ可能になりました。彼女はコンペラーに分類されますが、彼女のスキルは間違いなくメイジです。彼女のオーダー スキルはメイジとしてはごく普通のスキルであり、単一ターゲットの魔法攻撃で、大きなダメージを与え、被害者に 10 秒間魔法防御低下を適用します。彼女のカオス スキルは、メイジの比較的標準的なキットであり、敵チームに向けられた継続ダメージ攻撃ですが、今回はキャストするたびに、キャストするたびに 15 秒間強くなります。
彼女のパッシブは彼女をコンペラーにするものであり、現時点で Cersivey が注目している敵は何であれ、死のマークが付けられ、あらゆるものから 30% の追加ダメージを受けます。これを単一のターゲット核兵器と組み合わせて攻撃のタイミングを合わせることができれば、実際にアフォールンのチーズ シールドを通り抜けることができるかもしれませんが、PVP の AI はそのチーズを使用するほど賢くないため、実際に直面する必要はありません.
アルカナ
コンペラー、マーキュリー、SSR、運ベースのバフ、オーダー バッテリー、魔法のサポート、マーキュリーの親友
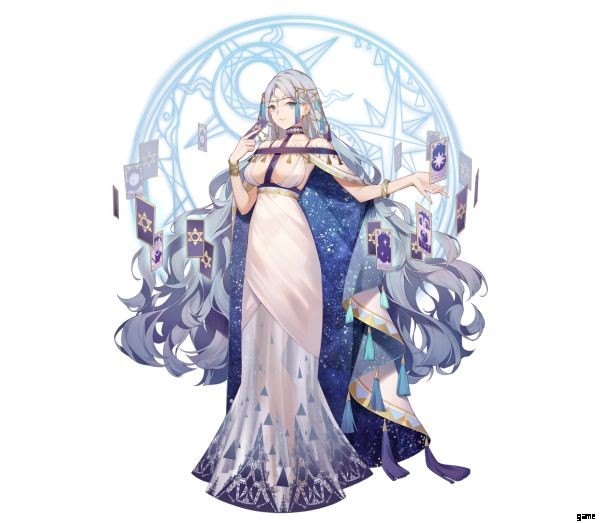
アルカナには非常に便利なヒーリング スキルと、奇妙だが強力な運ベースのバフがあります。アルカナのオーダー スキルは、チーム全体の 3 バー コスト バースト ヒールであり、エネルギー生成を増加させるバフを備えています。 70% の確率で 40% 増加し、30% の確率でまっすぐ 2 倍になります。レベルを上げると、強いバフを獲得する可能性が高くなり、弱いバフも強化されます。
同じことが彼女の Chaos スキルにも当てはまり、70% の確率で Magic Damage を 30%、30% の確率で単純に 2 倍にします。彼女のパッシブは、オーダー スキルを使用した後、両方のスキルがより良い結果を得る可能性を高めます (パッシブ レベルに応じて 5 ~ 10%)。 Arcana は Mercury チームにとって重大なギャップを埋めます。実際の Healer ユニットが不足しており、Compellers に頼ってヒーリングの仕事をこなさなければならないからです。
ゴーヴェイグ
Compeller, Mercury, UR, Healer, Chaos Battery, Transformation, Underworld's Employee of the Year Gone Gone Postal
Goorveig のオーダー スキルは非常に便利です。バースト ヒールと全ターゲット攻撃で、追加の 2 カオス エネルギーを生成します。すべて 3 オーダー エネルギーです。彼女のカオス スキルは彼女を厄介なモンスターに変身させ (ゲームではこれを深淵のクリーチャーと呼んでいます)、変身自体は全ターゲットの魔法攻撃を与え、魔法ダメージに対する耐性を 10 秒間 24% 弱めます。彼女のパッシブは、少なくとも最大化された場合、彼女自身にとって非常に大きなブーストです。最大化された場合、アビス フォームのクリーチャーの HP と ATK が 30% 増加します。重いもの。
ナンナル
ガーディアン、マーキュリー、UR、ダメージ リダイレクション、シールド ジェネレーション、マジック オール ターゲット、ミラー ミラー オン ザ ウォール、誰が一番壊れた?
「気が遠くなるほど圧倒される」のではなく、「非常に良い」ということを除いて、アフォールンを想像してみてください。彼らはかなり似たオーダー スキルを持っており、どちらもダメージ リダイレクト スキルであり、すべてのダメージがチームメイトではなく自分に当たるように強制します。しかし、Afallen が 2 秒間無敵になる間 (したがって、彼女のチームも同様です)、Nannar はより健全な 20% の DMG 削減とより強力な HP シールドを代わりに取得します。
安っぽい不滅のスパムのナンセンスをやってのけることはありませんが、彼女は仕事を成し遂げるのに十分です.彼女の弱い命令スキルを補うために、Nannar はより強い打撃を与えますが、それでも同様の Chaos スキル、敵チーム全体を攻撃してバフを払いのけ、魔法 DEF を弱める 5 ヒットの魔法ダメージ ストライクを取得します。
同様のパッシブもあります。Afallen は 15 回攻撃を受けると枕攻撃をキャストしますが、Nannar は打撃を受けるたびに 10% の確率で自身の Chaos スキルを使用し、発動すると 2 秒間のクールダウンが発生します。 Afallen のパッシブはより安定していますが、Nannar は運が良ければスキルを連鎖させることができます。
フローラ
ヒーラー、ソルトストーン、UR、チーム ヒール オーバー タイム、最大 HP ブースト、ジェネラル バッファー、ハープ プレーヤー エクストラオーディネア
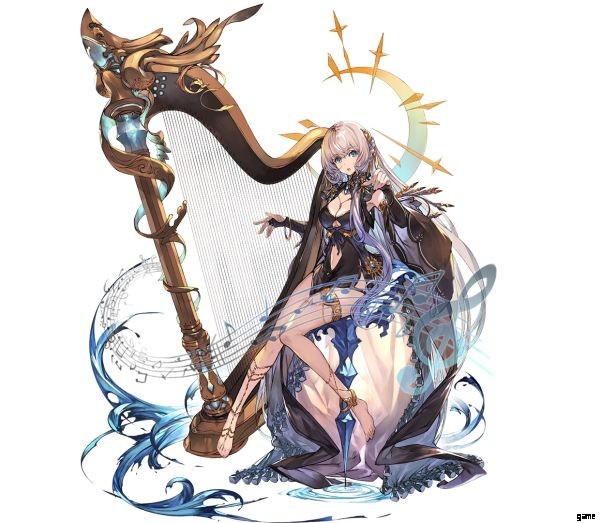
シンプルでありながら効果的なヒーラーであるフローラには、2 つの時間の経過とともに回復する呪文と、あらゆる状況に役立つ単純なバフが付属しています。彼女の秩序の呪文は、チームの最大 HP を 10 増加させながら、時間の経過とともにチームを 3 秒間回復します。チームを回復するだけでなく、早い段階で大打撃が予想される戦闘を開始するのにも役立ちます。
彼女の2番目のスキルであるチャージスキルは、時間の経過とともに持続するヒールであり、全員のATKと一般的なDEFにバフがあり、2回スタックできます.これがチャージ スキルであるということは、彼女がスキル スパマーとうまく機能することを意味します。彼女のパッシブもシンプルですが便利です。彼女がスキルを使用するたびに、彼女の仲間は 5 秒間 15% の DMG 耐性を獲得します。
シャー
ヒーラー、ブリムストーン、UR、アタック ブロッカー、バースト ヒーリング、独り言が好き

Sher は、連射スパマーよりも、ゆっくりとした非常にダメージの大きい攻撃を行う敵に対して送信された場合に役立つヒーラーです。彼女のオーダー スキルは、チーム全体を彼女の攻撃力の 180% 回復し、10 秒間シールドを張って、小さな指の突っ込みであろうと核ミサイルであろうと、あらゆるものからの 1 回の攻撃を完全にブロックします。
当然のことながら、これで巨大なメイスの顔面をブロックできれば問題ありませんが、彼らが千回のペーパーカットであなたを殺そうとする場合、もちろん分厚いヒールを除けば、あまり役に立ちません。 .彼女のカオス スキルとパッシブも、彼女をクリティカル ベースのチームでうまく機能させます。
いつものように、チームの分厚いバースト ヒールですが、今回は Sher 自身の Crit Chance の 30% を使用してチーム全体に渡し、その後 10 分間、Cher がクリティカル ダメージを与えるたびに Crit ダメージを増加させるバフを与えます。秒。彼女のパッシブは、Sher がスキルを引き出した後、チームメイトが 10 秒間クリティカルを発生させるたびに、ダメージと回復を増加させるのにも役立ちます。
アイドルフローラ
メイジ、マーキュリー、UR、ダメージディーラー、レイトアタッカー、ハープ奏者からボーカリストまで

Idol Flora は、クラウド ファイティングと単一のターゲットへのダメージの両方をうまく行うことができます。彼女のオーダー スキルは敵チーム全体に 4 回命中し、10 秒間、どの攻撃でも 30% の追加ダメージを与えるデバフを適用します。彼女のカオス スキルは、展開が遅れたときに最大の打撃を与えます。彼女は 1 つのターゲットに 4 回命中します。
シンプルに見えますが、カオス エネルギーを 4 つ消費しますが、実際にバーを消費することなく、カオス エネルギーの残りのバーごとにこの攻撃のダメージが 20% 増加するため、完全なカオス バーでキャストすると最も大きな打撃を受けます。 Once she gets her passive, her Chaos skill gets bumped down to just 1 Chaos bar cost every 3 uses, allowing it to hit much harder when cast late, or come out more quickly.
Lilia
Mage, Mercury, EX, Interrupt-Resistant, Buffer, Easily Mistaken For A UR
A mage that with similar abilities to a Compeller, all in aid to cause more damage as her job demands. Lilia’s Order skill is easy to understand, an all-target attack that hits enemies 3 times with damage worth 60% her ATK each blow, before upgrades. Timing this to coincide with an enemy stun could save her from trouble, as it also renders her immune to stuns and disables while she’s casting.
Her Chaos skill is odd for a Mage, as it’s a pure buff rather than an attack:She gives the Aurora’s Blessing to her teammates, allowing their skills to do 90% Magic Damage to all enemies everytime they cast a skill. You can pair this with the likes of Afallen so her cheese button also hurts the enemy, making her normally low DPS tanking tactic do some real damage.
The buff lasts 5 seconds and costs 3 Chaos energy, so it’s most useful when the purple star is filled and everyone can spam their skills. As for skill spamming, her passive charges a bar of Order energy every 6 (3 when maxxed) seconds.
Datheios
Mage, Mercury, SSR, Single Target Nuker, All-cost Attack, Shield Generator, The Dude
You remember how in the Beginner’s Guide we said there was only one guy in the game? Technically there are 2 of them, but we don’t talk about the other one since they’re bottom tier. Datheios has a single-target nuke attack, with a minimum cost of 2 order energy to cast. If you DO cast it though, it eats all your Order energy and converts each bar to an extra 120% magic damage, on top of the initial 180%.
Their Chaos skill is a self-buff, giving Datheios a shield, and increasing his Magic DMG by 24% for 10 seconds, before upgrades. If you want one guy out of the way early, wait for the Order bar to charge and watch Datheios delete the poor fool.
B Tier – A Good Parlor Trick
These Dolls have a hard time catching up to the ones up above, though they are solid enough choices. This is also where the SR tier dolls start appearing:SRs, while typically weaker than URs and SSRs, are generally cheaper and faster to upgrade.
Hilda
Destroyer, Saltstone, SR, All-Target Attack, Buffer, Lost A Lot Of Good Soldiers

One of the better SR’s, Hilda is a fairly basic Destroyer, with a little something extra that puts her above a lot of other SR units. Her Order skill is a fairly hard-hitting but costly Order attack, a 240% damage physical blow to the whole enemy team, but costing 3 Order energy for something rather simple.
Their Chaos skill makes them very useful though:A 3 chaos energy All-target attack that’s actually weaker than her Order skill… but it doubles the damage of whatever skill comes after it. If you want a big fat damage number to activate your neurons, use this before say, Datheios slaps someone with their incredibly bloated order skill. Her passive also makes enemies take extra damage for 5 seconds.
Inn and Lou
Assassin, Brimstone, SSR, Stance Swap, Rear Attack, 2v1 US BRO
A pair of assassins with a very cheap Order skill and abilities based on whoever is doing the skill between these two girls. Her order skill hits the enemy twice for 48% Physical damage per hit unleveled, so it really needs some Skill Pacts dumped into it before it really does much. It costs a measely 1 order bar though, so it can be spammed to get rid of the backline pretty fast.
Everytime the skill is cast, the character using it changes. If Inn is doing the stabbing, it straight up does an extra 20% more damage. If it’s Lou, the target loses 5% of their Crit damage resistance for 10 seconds, stacking up to 50%.
Their Chaos skill is also for hitting the rear, 6 times for 60% Physical damage each blow. It also gives the victim a pretty nasty damage over time debuff, worth 30% of Inn and Lou’s Physical Damage per second for 6 seconds.
Luan
Guardian, Mercury, SSR, Damage Redirection, Self-healing, All-target Magic Attack, Buff Remover, Torches Weirdoes
As far as Afallen-alikes go, Luan’s one of the middling options in general, sadly. Her Order skill costs 3 bars of energy, redirects all the damage to herself, and gives herself a 20% damage resistance buff and heals her for 6% of her HP per second, for the next 10 seconds.
Nowhere near a hilarious immortality spam shield, but it gets the job done. Her Chaos skill is an all-target magic attack worth 270% of her ATK, while cleaning out the enemy’s buffs. It also reduces the enemy’s Magic DEF by 100, stacking up to 5 times.
If you have one of the other higher-tier damage-redirection units, you can let Luan take a vacation. Her passive is pretty powerful thbough, a self-revive that increases her ATK and general DEF, and keeps her healing for 10 seconds. It could be enough for her to clutch a battle at the last second.
Norn
Healer, Brimstone, SSR, All-target Attack, Damage Resistance Buff, ATK Buff, Healing People Backwards
A strange, offensive Healer more reminiscent of a Compeller. Her weirdness immediately appears with her Order skill, which doubles as a damage over time attack for the enemy team, and a healing over time skill for her buddies, both being 7 instances of damage or healing within 5 seconds.
Her Chaos skill provides no healing, but gives a Physical ATK buff worth 24% of Norn’s own ATK power, and gives an 18% damage resistance buff, both for 10 seconds. Her passive is a constant HP regen for the whole team every 2 seconds, which can be useful.
Pakane
Mage, Mercury, SR, All-Target Attack, Damage Stacker, Counterattacker, A Likely Suspect
One of the stronger earlygame choices, Pakane is a fairly typical mage with a nasty surprise for anyone who attacks her, at least if she’s been given upgrades. Her order skill is an all-target attack that deals damage and slaps a stack of Frostbite on the target which does nothing… until she casts her Chaos skill anyway.
The Chaos skill deals damage to the whole enemy team, and detonates any Frostbite stacks on them for extra damage. Her passive is the nasty surprise, as it gives enemies a 10% chance to get frozen every time they hit her. Not much against heavy burst damage, but it’ll be funny to watch a rapid attacker get iced midway through their skill.
Dana
Mage, Mercury, SR, Healing, Damage Resistance Buff, Single Target Attack, Damaging People Backwards
Mage, ha, she’s a Compeller and the game can’t convince this writer otherwise! Her order skill is a straightforward healing skill, giving a burst heal to the whole team and giving them a damage resistance buff of 12% for 10 seconds, for 2 Order bars.
Her Chaos skill hits the frontmost enemy with magic damage 5 times, each blow worth 50% of her ATK and making the target eat a stacking Magic resistance debuff, 8% per blow for a max of 40%, for 10 seconds. Even her passive is less Mage and more Healer or Compeller:She has a 50% chance (fully guaranteed instead when upgraded) to remove all debuffs from the team when using her Order skill.
La Crima
Compeller, Mercury, SSR, Single Target Heal, Order Battery, Charge Skill Secondary, Please Do Not Commit La Crimes
La Crima is one of the weaker Compellers in the game. Her order skill is a slow (Costs 3 Order but generates 1 Order so it’s cheap but slow to charge) single target heal that gives a strong health regen buff and increases their damage resistance by 18%.
A pretty good buff, except it happens to only one target. Her Charge skill is much better than her Order skill though, an all-target magic attack that stuns the enemy for one second while weakening their defenses against other magic attacks for 10 seconds.
Overall, neither truly bad, nor truly amazing. As a side note, she has a 20% chance to generate 1 order energy when hurt, with a cooldown of 2 seconds. Considering she’s normally to be placed in the rear, you won’t see this happen often unless the enemy is dumping All-target attacks all over you.
Tama
Compeller, Saltstone, SSR, Buffer, Single Target Healer, A Painful Medical Bill
Four Chaos Energy to heal one person!? At least they get a hefty buff to their next skill, but that’s not economical in the slightest. To be specific, it’s a 180% heal based on Tama’s ATK stat, and it increases the damage or healing of the beneficiary’s next skill by 60%.
As for her Order skill, it’s a team heal-over time with a damage resistance buff of 24% Tama’s ATK. You’re gonna need her passive to make her good:Everytime she attacks, she heals an ally for 50% of her ATK.
C Tier – Sleight of Hand
Down here are the weaker units in the game. While even they may be viable when fed, you’ll usually find better units in a short enough time that you won’t be using them for long, unless they’re one of the SSRs or URs. In which case, avoid them since they’re weak or janky without having the advantage of being cheap to upgrade.
Witch
Witch, Aether, SR, Single Target Attack, Defensive Multipurpose, Our Lovely Heroine
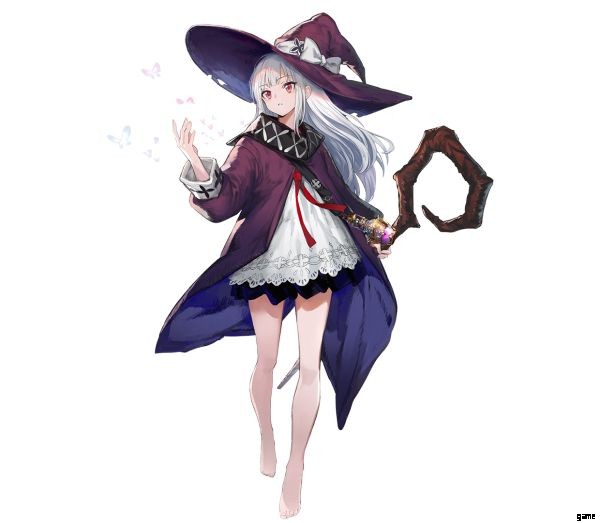
Sadly, the protagonist of the game is all the way down here, though it’s understandable as ironically, any stronger and they might jump to being overpowered due to how they work compared to Dolls. Unlike Dolls, the Witch is able to select between 4 different Chaos skills when fully upgraded. Sounds amazing, until you read the skill descriptions:None of them are particularly strong, especially considering they all cost 4 Chaos energy to cast. Chronospace Gate teleports any attack entering it to another Chronospace for 1.8 seconds.
Bloom heals all allies for 51% of her ATK while giving a 15% damage buff for 5 seconds. Time Freeze does exactly that, freezing time for the enemy for 1.5 seconds. Cleansing is a debuff remover and raises damage resistance by 12% for 5 seconds. Her Order skill is pretty basic too:Soul Arrow hits one target for 180% magic damage and makes the next Skill cast 20% more effective.
Their passive is okay, they have a 50% chance to make 1 Chaos energy every time they expend Chaos energy. The Witch is meant to be a highly versatile earlygame defensive support, though the fact you need to complete the story campaign to unlock all her upgrades makes this point moot. By the time you unlock even half of everything the Witch can do, you likely already have a pretty solid team to do all that unlocking with!
Octavia
Destroyer, Saltstone, SR, All-target Damage, Single Target Stun, Starter Muscle
The first front Doll you get. While she isn’t going to last very long on your team (especially with the game’s oddly generous true first gacha roll, keep rerolling until you get an X-tier UR and some good SSRs!), she’s there to teach you how to time stuns and disable bosses at the perfect moment, hence her skillset.
Her Order skill is a simple all-target Physical attack. Her Chaos skill is a stun against a single target, useful against early Bosses but a bit wasteful against mook teams. Enjoy your first Live2D girl, because she gets a free costume before anyone else!
Mortimer
Healer, Saltstone, SR, Single Target Healer, ATK Buffer, Starter Goth

Generally considered a bottom-tier healer AND top-tier cute at the same time, Mortimer is one of the first units you get in the game, teaching you the importance of healing and keeping the team alive. Both their skills are single target heals, with the Order skill prioritizing the most injured Doll and the Chaos skill prioritizing the frontmost Doll.
The Chaos Skill also comes with a simple ATK buff worth 30% of Mortimer’s ATK for 10 seconds. Not really that good in combat, especially as those skills are energy-inefficient, but as a newbie you’ll appreciate having a healer in the first place!
Miku
Destroyer, Saltstone, SR, Single Target Attack, Heavy Normal Attack, The Coolest Sprite In The Game
One of the better damage dealers… All the way down here on this tier, and proud owner of one of the best 2D pixel sprites in the game. Miku (not to be confused with a certain Japanese public domain android girl) is all about savage, brainless DPS and minimal utility.
Her Order skill is simply to stab one target really hard with their spear, for 300% Physical DMG. Her Chaos skill is expensive, but just as simple:For 5 Chaos energy, she makes her Normal attacks deal 195% damage and increases her Order skill’s damage by 24%.
Fey
Destroyer, Saltstone, R, Single Target Attack, Heavy Normal Attack, Miku In Black

In a nutshell, Miku but edgier. Fey has a very similar skillset to Miku, with a simple single target physical stab worth 300% ATK as an Order skill, and a Chaos skill that does the same job as Miku’s but in a slightly different manner. Instead of buffing the normal attacks directly, Fey’s Chaos skill changes her normal attacks into consecutive stabs, dealing an extra 54% of damage. Miku is the stronger choice, but there are better options than both of them.
Shuffle
Assassin, Brimstone, SSR, Cleanup Killing, Rear Target Attack, Skirt Full Of Bludgeony Objects
A quintessential assassin, and as basic as assassins tend to come, at least for an SSR. Their Order skill is a double physical attack against the rear target, doing 48% damage each hit and giving her a 6% boost to crit chance for 5 seconds, stacking to 30%.
Their Chaos skill targets whoever has the lowest HP, hitting them 6 times for 60% damage each blow. If the enemy is at less than half their HP, the attacks deal more damage. Sadly, you can do cleanup jobs too with All-target attacks, so you will rarely see use for this skill.
Nocturna
Assassin, Brimstone, SSR, All-Target Attack, Buffer, Self-heal, Nighttime Bloodsucker
A weird Assassin with the ability to heal themselves. Their Order skill is typical as far as all-target Assassins go, hitting each enemy 3 times for 36% ATK each. Her Chaos skill on the other hand is pretty weird:A self buff for 10 seconds, in which the team deals an extra 30% worth of Nocturna’s ATK stat while healing herself for 12% of the damage they deal. Pretty cool, but the main point of an Assassin is hitting hard, while leaving survivability to other units.
Elis
Assassin, Brimstone, SR, Rear Attack, Animal Whisperer

An incredibly simple rear-attack Assassin, both her skills do the same job:Hit the person out back several times. Both the Chaos and Order skill target the reat enemy, with the Chaos skill hitting 6 times worth 60% of her ATK per blow, and the Order skill hitting twice for 40% of her ATK, while being cheap at 1 Order Energy cost. If anything, her Order skill seems like the more special skill, increasing crit chance for 5 seconds, stacking to 25%.
Nemesi
Assassin, Brimstone, SR, Rear Attack, Crit-Based, Target Marker, Grew Up In The Streets
An Assassin that works well with other Assassins. In most other games this would be fine, but you’ve only got 3 slots on your team, so trying to take full advantage of this will lead to an unbalanced team with fairly low survivability. Her Order skill is pretty average for an Assassin, she teleports to the back of the enemy team and stabs someone with 210% of her ATK.
If it crits, it hits again, up to 3 times. Her Chaos skill marks a rear target for 10 seconds, increasing the crit chance of anyone attacking it by 24%. Great for her and other rear target assassins, a bit dull for anyone that doesn’t focus on the rear, unless you have a front unit with an all-target attack.
Cetess
Guardian, Brimstone, SR, Single Target Attack, All-Target Stun, Self-Shield, Debuffer, Cersivey’s Right Hand
One of the weaker Guardian choices, though it’s understandable since she’s an SR in a game where the main bulk of units tend to be SSRs and URs. Cetess’ Order Skill is a single target physical blow that puts a shield on herself worth half the damage she caused, which is 270% of her ATK. This shield lasts 3 seconds, which is pretty bad for a 3 Order cost skill.
Her Chaos skill has her bash the enemy with her shield, stunning and damaging all of them for half a second, and reducing their Physical DEF by 5% of Cetess’ own Physical DEF everytime they take a hit. This stacks to 100%.
She can pair well with rapid fire attackers for this. She also hits harder the more HP she loses, if she has her Passive. But since her job is to stay alive AND keep her teammates alive, this doesn’t work out too well in her favor.
Yurugu
Guardian, Mercury, SR, Damage Redirection, Shield Generation, All-Target Attack, Debuffer, A Rather Uncomfortable Bed
Likely the first damage-redirector Guardian you will get depending on your Gacha luck. Yurugu has the second simplest of the damage-redirect skills, with her Order skill generating a shield for everyone worth 30% of the unit’s HP while forcing all damage toward Yurugu for 10 seconds.
With only that shield protecting her, she may wind up needing her coffin to sleep in. Her Chaos skill is par for the course for other damage-redirector types, an all-target magic attack that dispels buffs and reduces Magic DEF.
Avil
Guardian, Brimstone, R, Damage Redirector, All-target Stun, Debuffer, The Other Dude
And just below Yurugu in the damage redirector contest, the other dude in the game:Avil. His Order skill redirects all damage to him, while increasing his Physical DEF by 5 seconds. He’s gonna die if the enemy uses Magic attacks.
Their Chaos skill is an all-target physical blow with a 0.2 second stun, while reducing their Physical DEF everytime they take a hit, maxing out at a DEF reduction worth all of Avil’s own Physical DEF. This is why we don’t talk about him.
Yothaya
Healer, Saltstone, SR, Team Heal, Single Target Heal, ATK Buffer, Passive Heal, Deadly Chef

As far as SR Healers go, she’s pretty decent, but there are better choices out there. Though she does have a pretty nice passive. Yothaya’s Order Skill heals everyone on the team for 120% of her ATK, and makes them more damage resistant, by 30% of her own ATK, for 5 seconds.
Her Chaos skill is a single target heal worth 300% of her ATK, while buffing the beneficiary’s ATK power by 30% of her own ATK for 10 seconds.Her passive is quite useful:Every 5 seconds, whoever on the team is the most badly injured gets healed by 50% of Yothaya’s ATK. Again, there are stronger healers out there, but you could do well with Yothaya early on.
Ruda
Healer, Brimstone, SR, All-target Attack, Team Heal, Buffer, Chaos Battery, Lost In The Tower Looking For Skin Cream
At once a basic and weird healer, Ruda has one of the simplest healing skills while possessing an offensive move, rare for Healers. Her order skill heals everyone for 144% of her ATK. Nothing more, nothing less.
Her Chaos skill, rather than healing anyone, hits the entire enemy team with a magic strike worth 180% of Ruda’s ATK, while buffing everyone else’s Physical damage by 24% of her ATK for 10 seconds. Any time she uses a skill, she has a 10% chance to make a bar of Chaos energy, once her passive is unlocked. Sadly, her SR stats don’t help with her weird loadout.
Croche
Healer, Brimstone, SR, Single Target Heal, Debuff Cleaner, Crit Booster, Luck-based Revive, Get An Excorcist!
What is it with this game making bottom tier units out of top tier waifus? Croche has a much nicer personality than her edgy, gloomy design and backstory implies, though sadly that doesn’t make her heal any better. Her Order skill is as simple as healing skills get, a burst heal targeting the most badly injured teammate, nothing else.
Her Chaos skill doesn’t even have healing:She cleans the team of any debuffs while raising the crit rate of her allies every time they attack with Physical DMG, for 10 seconds. The buff only stacks to a 12% crit chance without upgrades, not much at all. Maybe you won’t send her to combat, but if you really like her anyway, there’s no harm posting her as your secretary at the bottom of the tower!
Eulalia
Healer, Saltstone, R, Revive, Single Target Heal, Mortimer’s Shopping Buddy

Units with resurrection spells are pretty rare, but sadly Eulalia is hampered by her rather basic order skill. Her Order skill heals the Doll with the lowest HP by 180% of her ATK, a pretty simple healing skill. Her Chaos skill marks whoever has the lowest HP on your team for 5 seconds.
If they die within that time, they get revived and healed for 360% of Eulalia’s ATK. Revives are cool, but it might be better to just prevent the death altogether by getting a better healer.
Primula
Healer, Brimstone, R, Team Healer, Physical ATK Buffer, Wannabe Housewife
One of the better R-rank healers. While most R and SR healers are pretty simple, they’re usually hampered by being purely single target healers with fairly low percentages compared to higher tier healers with both single and team heals, or by having one skill or another that doesn’t do healing.
Primula has neither problem, since both her skills are team burst heals, with the Chaos skill also buffing the Physical damage of her team by 24% of her own ATK for 10 seconds. Again, there are better choices out there, but picking Primula over the other R and SR healers is a fairly common-sense plan until you get someone like say, her apothecary-school buddy Tuonel.
Acheronte
Mage, Mercury, SSR, All-Target Attack, Debuffer, Goorveig’s Boss
A simple damage dealer ultimately let down by their short-lived passive. Acheronte’s skills are both all-target magic attacks, with her Order skill being a burst hit with a magic resistance debuff of 5% for 10 seconds, and her chaos skill being a damage over time skill doing 120% damage pers second for 3 seconds.
An average kit for most Mages. Unfortunately, if a fight lasts long enough, she might as well not have a passive at all:She increases her atk by 12.5% (25% when maxxed) for 30 seconds upon entering the battle. So 30 seconds in, you have no passive anymore.
Since the really hard fights tend to last several minutes, this makes her passive rather weak for anything other than clearing mooks, which can be done with other characters just fine anyway.
Anemone
Mage, Mercury, UR, All-Target Stacking Damage, No Bully Please
To be a UR all the way down here. It seems poor Anemone’s fate is to be bullied, both in and out of the game. She faces the same problem as Acheronte:A basic, even decent skillset utterly held back by their terrible passive.
Her order skill is a simple all-target magic fireball, adding a stack of Burning for 10 seconds, to a maximum of 10 times. This ties in to her Chaos skill, which deals extra damage when the enemy has Burning stacks on them.
This would have been cool… If she didn’t have the same passive as Acheronte! A damage boost that lasts 30 seconds, after the battle starts. Again, in a game where the really rough fights may last several minutes, this doesn’t do much, and is better replaced with a more consistent passive.
Viola
Mage, Mercury, UR, All-Target Attack, Damage Splitter, Robot Girl
Viola is down here because her Chaos skill doesn’t make sense with the game’s mechanics. Her Chaos skill would be better but still a little risky in many other games (The large team sizes in certain gamemodes of Figure Fantasy comes to mind), as it splits the damage taken equally among all teammates.
Why it works so poorly specifically in Revived Witch? Because there are only 3 dolls to a team, therefore the damage is not split sufficiently to be helpful. This may even cause the rearline to die from attacks the front Doll is there to tank for them in the first place! At least it comes with an 18% damage resistance buff, but this isn’t enough to make up for giving the squad Guardian or Destroyer a hard time doing their jobs.
As a side note, her Order skill is pretty ordinary as far as Mages go, an all-target magic deathray that hits for 60% of her attack 3 times in one second. Her passive is a roundabout way of reviving:If Viola gets blown to bits, her core is revealed, which takes double damage. If it doesn’t get killed in 5 seconds, Viola puts herself back together. This can only be done once.
Cuspidata
Mage, Mercury, R, Single Target Damage, Self-Buff, Debuffer, No It Is Not Spelled Cupid’s Data
A very weak Mage, with a rather adorable design. Her Order and Chaos skills are both very simple. Cuspidata’s Order skill hits a single target thrice with the damage per blow being worth 60% of her ATK stat. Her Chaos skill buffs her own DMG by 30% for 5 seconds, highly inefficient for something that costs 3 Chaos energy.
Her passive spices things up a bit. Everytime she hits something with any sort of attack, she reduces the enemy’s damage by 3% for 6 seconds, stacking to a maximum of 15%. Overall, you have far better choices for combat.
Czerni
Compeller, Mercury, SR, Team Heal, Luck-Based Skill, Draw The Cards
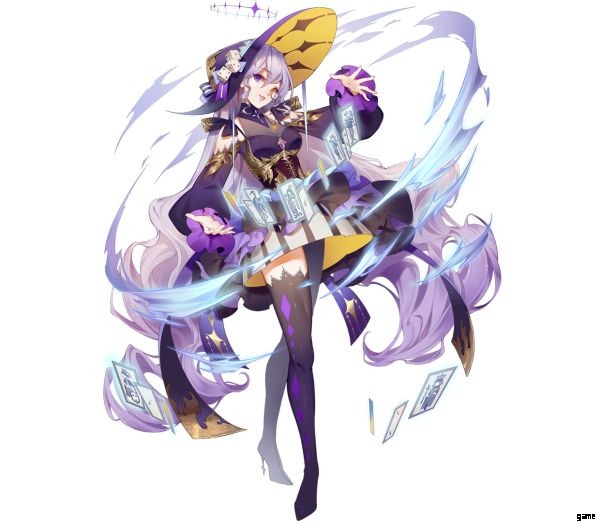
Compellers are already weirdoes in the game, and Czerni, unlike Metamorphoses, takes the cake in a bad way. Her Order skill is a 120% ATK team heal that debuffs the enemy and makes them eat more Magic damage, about 18% of it.
Her Chaos skill is what makes her painful to use:She either heals the team for 270% her ATK, or damages the enemy team worth the same, but never both at the same time, because it depends on whether she picks a Healing or Damage card from her deck.
If you desperately want to heal back your team by doing both her skills and get Damage instead on the Chaos tap, you might just kick her off the team in a fit of rage after the still-strong enemy bludgeons everyone. Metamorphoses’ mask-based skill being a set of buffs using Order energy rather than a direct heal or attack using Chaos energy makes her a lot safer to use than Czerni.
Mikoto
Compeller, Mercury, SR, Team Heal, All-Target Attack, Non-Sailor Miko
Now, Mikoto is also a rather weak Compeller, but at least you can trust her to do what she can do consistently, unlike Czerni. Both her skills are pretty simple:An Order team-heal worth 270% of her ATK while generating 1 Order Energy to make it slightly cheaper, and a Chaos skill dumping the same percentage on the enemy’s head as magic damage, while making them take 18% more magic DMG for 10 seconds.
Her passive is weird:everytime Mikoto takes a hit, she has a 20% chance to generate a shield worth 25% of her max HP on whoever has the lowest HP. Usually a skill like this would simply be directed toward Mikoto herself, but hey, the other injured Doll would appreciate it.
And that ends our Revived Witch tier list. If you have anything you would want to add, feel free to leave a comment below!