征服者:黄金時代の初心者向けガイド:十分なリソースを獲得し、強力な都市を構築するためのヒント、コツ、戦略
派閥と部族は、一度に 1 つのプロヴィンスで王国を支配しようとします。あなたの街のリーダーとして、あなたは傍観者であることを拒否し、ヒーローのバンドを結集し、富をかき集め、同盟に参加し、手ごわい軍隊を立ち上げて自分の栄光と領土を手に入れる機が熟したことを認識しています.
豊かなアラビア地域を舞台とする Conquerors:Golden Age は、中東の文化と文明からの歴史的、神秘的、神話的なインスピレーションをリアルタイム戦略と都市建設ゲームに見事に融合させています。それは、ほとんどのゲームが提示する通常のヨーロッパの剣とサンダルのテーマからそれることがどれほど素晴らしいアイデアであるかを理解させることができる独特の魅力を持っています.
Conquerors:Golden Age の開発者である IGG は、ロード モバイルやキャッスル クラッシュなどの象徴的なフランチャイズの背後にある同じチームとして、モバイル ゲームの世界で正当な動きを見せています。モバイル ゲーマーを夢中にさせるものを熟知していることは明らかです。なぜなら、その明確なテーマとは別に、Conquerors にはプレイヤーを夢中にさせる機能が真に搭載されているからです。
あなたの都市のリーダーとして、平和への脅威を排除し、反逆者を追跡し、無限の権力闘争の時代に尊敬される人物になるようにあなたの都市を発展させることを中心に展開するストーリーの課題が与えられます.この旅を通じて、ゲームは内部タスクに対処するのに役立つインターフェイス ガイドを常に提供します。外部の行動に関しては、ギルドに参加すると、志を同じくする個人とチームを組んで、危険な砂漠で成功する可能性を高めることができます.

Conquerors:Golden Age の課題の数を考えると、ゲームをマスターすることは巨人と戦うようなものであり、最初は威圧的に見えるかもしれません。しかし、より大きな敵に対してどのように行うべきかのように、最初に足を攻撃し、そのベースに対処し、上に向かって進むだけです.
Conquerors:Golden Age の課題の基本部分は、リソースを確保して軍隊を成長させ、技術と建物のアップグレードを継続できるようにすることです。このノートでは、この征服者:黄金時代の初心者向けガイドを開始します。このガイドでは、都市の物資を収集する方法と、それらを収集して生成する手段に関する事実とヒントを紹介します。
リソースを取得するための現在アクティブで利用可能なすべての手段とポイント、およびそれらに関する詳細なヒントとフィードバックについて説明します。 Conquerors:Golden Age に関する確かなガイドを探しているなら、これはあなたにぴったりのゲーム ガイド記事です。軍需品を準備し、鞍を付けましょう。これは戦いへの長い道のりです!
1.リソースの抑制
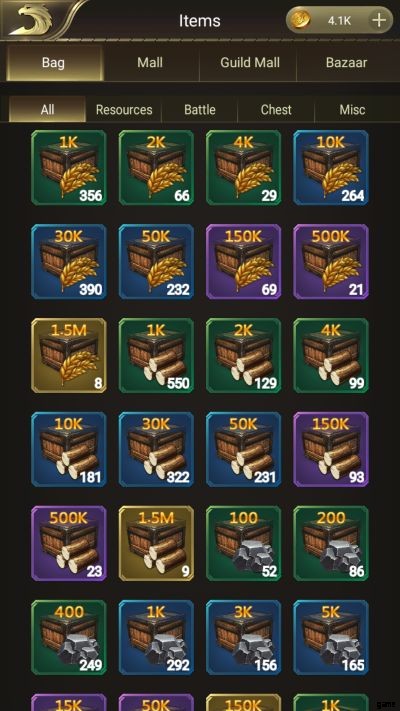
軍隊を編成し、進歩的な都市を運営するのに十分なリソースを持つことは、Conquerors:Golden Age での一般的な焦点です。現実の世界と同じように、ゲームには多種多様なリソースと消耗品があり、材料の作成について話すとリストが長くなるだけです.

このガイドをシンプルかつ充実したものにするために、基本的な型に焦点を合わせています。このセクションは、リソース タイプの関連性、それらを取得する方法、およびそれぞれの在庫を管理するためのヒントに取り組むことを目的としています。また、リソースを入手できるすべての機能の価値について、フィードバックを共有しています。
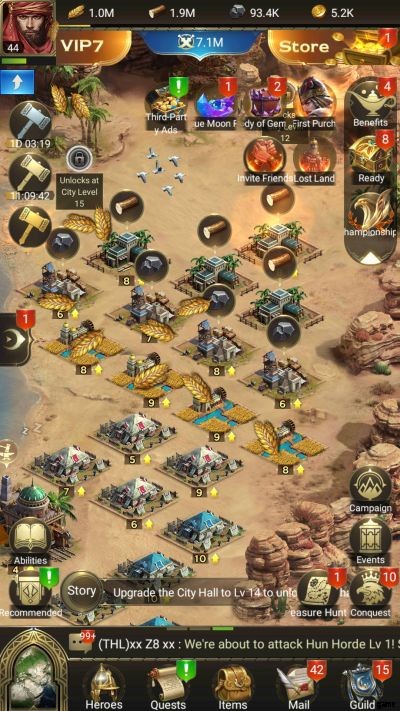
ゲームの基本的なリソースは、画面上部に表示されるものです:食料、材木、鉱石、および金です。技術の研究、軍隊の募集、構造のアップグレード/構築には、最初の 3 つのうちの 1 つまたは 2 つが必要です。一方、ゴールドは、ほとんどすべてを取得するために使用できる「ベース」プレミアム通貨です。
1.1 内部ノード – 本番環境
都市の壁の外にあるあらかじめ決められた区画に建物を建てると、食料、材木、鉱石が生成されることがあります。すべての農場、製材所、および鉱山からバッチごとに獲得できる量は、アカデミーの各施設のレベルと関連技術の影響を受けます。このような手段によるアップグレードは永続的です。
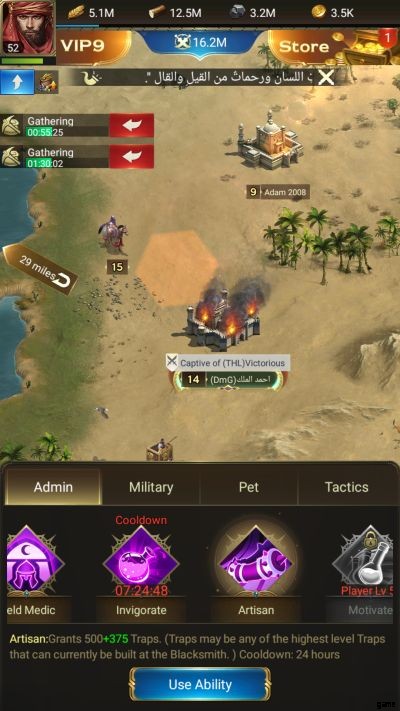
バンパー ハーベスト (24 時間のクールダウンがある「バースト」生成スキル) と呼ばれるリーダー アビリティのロックを解除してアクティブにすると、即座にリソースを獲得できます。さらに、生産ブースト アイテムを使用して、内部リソース ノードの生産速度を 2 倍にすることもできます。このブーストはコインで購入できますが、名誉ポイントを削って最も安いバリアント (8 時間ブースト) を「有機的に」購入することができます。これについては後で詳しく説明します。
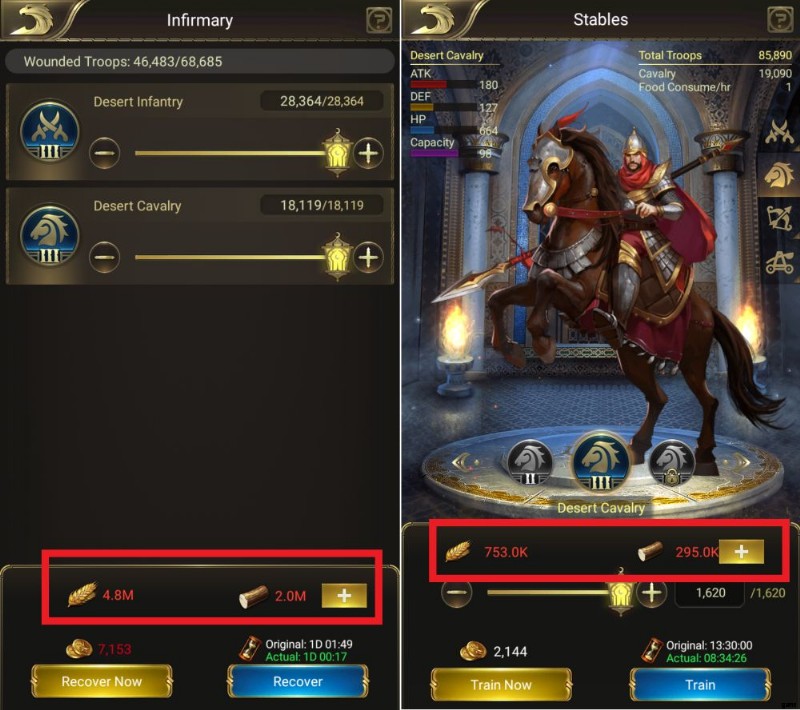
定期的に軍隊を訓練し、構造をアップグレードし、技術を研究すると、最終的には、内部リソース ノードから獲得できる量が、都市の着実な進歩を促進するのに十分ではないことに気付くでしょう。これは、プレイヤーをゲームの前提である征服または遠征の開始に向かわせるように設計されています。
実際には、食糧生産は軍隊を養い、負傷した軍隊を治療するのに十分です。材木は、トラップを構築して補充するのに十分です(都市の防御)。採掘された鉱石は、いくつかのヒーローの能力/技術のアップグレードしか維持できません。全体として、他の情報源を調べて、都市の進歩を後押しする必要があります。
ヒント: 空き地に建物を建てるときは、農場、製材所、鉱山、診療所、兵舎をスワイプして選択できます。鉱山と兵舎の許容数を最大にすることをお勧めします。これは、それらが最大の価値をもたらし、鉱石が最も希少な基本資源であるためです。兵舎、部隊の訓練サイズと速度を増加させます。
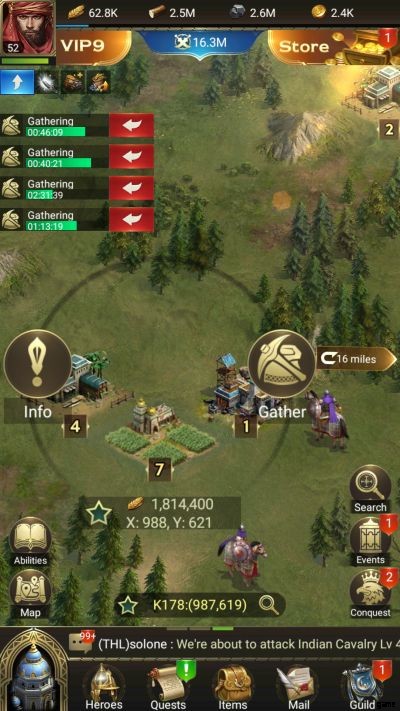
1.2 外部施設 – 収集
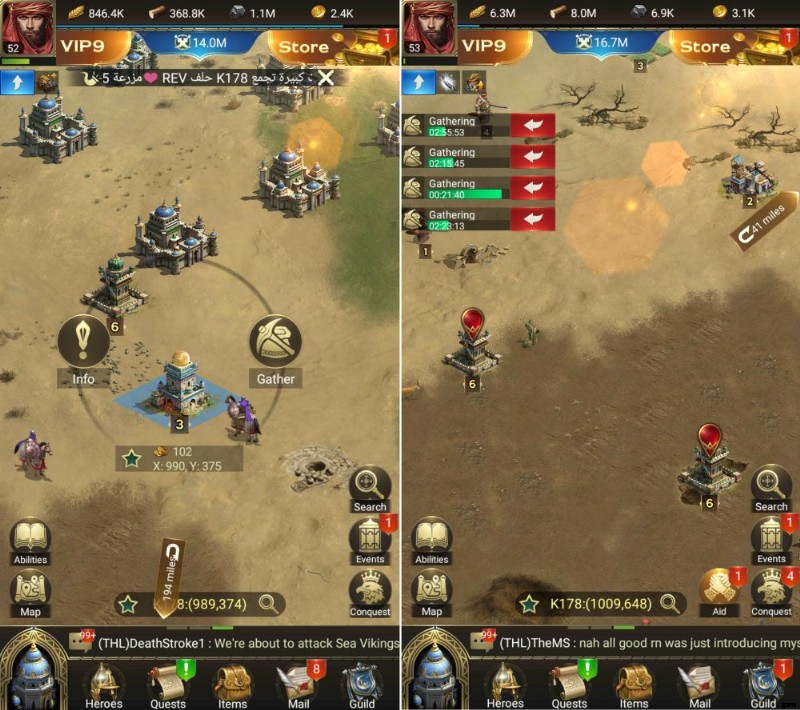
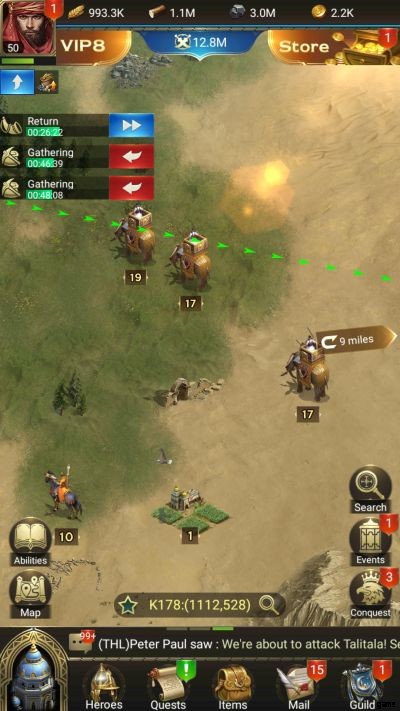
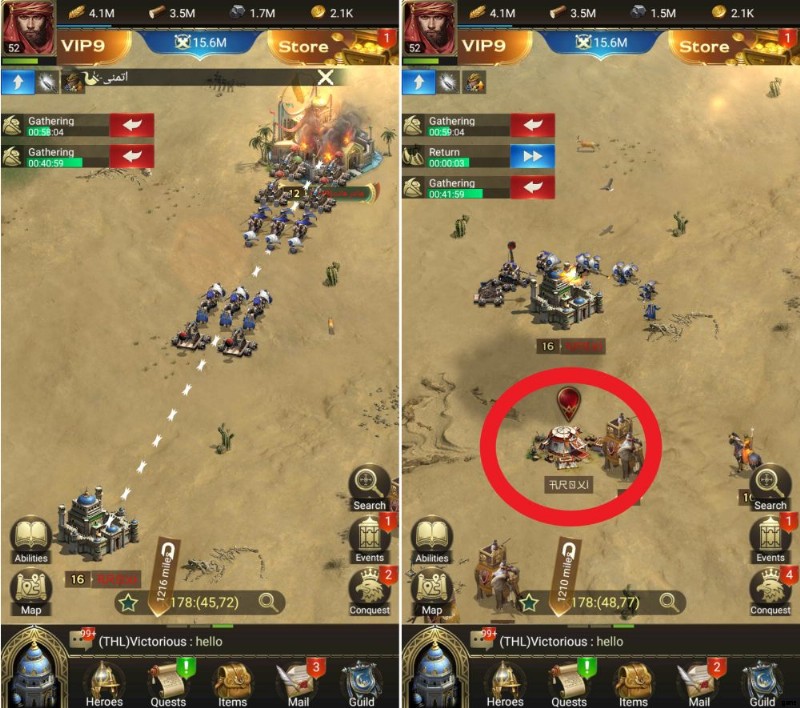
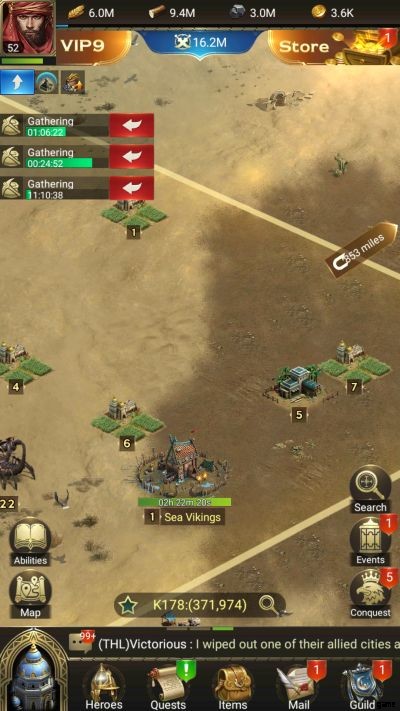
都市の外を探索すると、内部にあるさまざまな同様のリソース ノードが表示されます。短い時間間隔でリソースを収穫できるのとは対照的に、遠征チームがコンテンツを収集して家に帰るのを待つ必要があります.
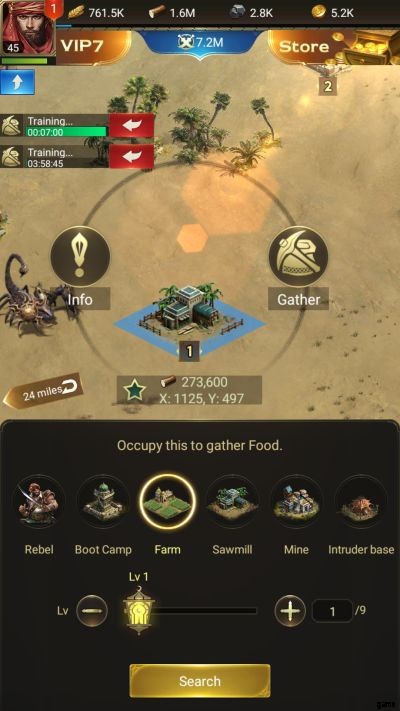
各外部資源施設が保有する資源量を確認できます。ヒーロー アーミー スキル、リーダー アビリティ、または装備によるブーストの助けがなければ、それらからすべてのリソースを抽出するのに最大 3 時間かかる場合があります。収穫までの時間が長いにもかかわらず、総収穫量は内部ノードが提供できる量よりも多くなります。

生産量の合計が高いことは利点ですが、外部ノードを使用することには欠点が 1 つあります。近くに攻撃的で非同盟都市がある場合、収穫元の外部ノードをハイジャックする可能性があります。攻撃されたノードのヒーローが勝った場合、彼らは追い出され、まだ収集が完了していないときに部隊を時期尚早に呼び戻すのと同様に、彼らが追い出されるまで収集する必要があるものだけを獲得できます.
膨大な量にもかかわらず、外部リソースノードを使い果たすのに必要な長い待ち時間は、建物や技術を積極的にアップグレードすることを制限します.もちろん、彼らからの流入は歓迎されるでしょう。
彼らの主な「機能」は、レベルの低いヒーローが生産的な何かを与えるための出口になることです.また、都市の遠征チームの許容数を最大化することをお勧めします。ヒーローを送ってリソースを集めるのは、エネルギー (反乱軍と戦うための通貨トークン) とスタミナ (キャンペーンの戦いのための通貨トークン) が不足しているときに最も理想的です。
ヒーローのアーミー スキルに注意してください。特定のリソースを収集する際にボーナス速度を与えるものもあります。あなたの遠征の努力を彼らの強みに合わせたいと思うかもしれません.ただし、アーミー スキル ボーナスは都市全体に影響を与えるブーストであり、そのようなヒーローが派遣される収集遠征に限定されないことに注意してください。
外部ノードを使用する際の主なアイデアは、許可されている遠征の数を最大化することです。スロットが 3 つある場合は、2 つをリソースの収集に使用し、残りの 1 つを反乱軍との戦いに使用します。エネルギーがなくなったら、最後のスロットも収集に使用します。 VIP 15 に到達するか、軍事>リーダーシップ技術を研究することで、遠征スロットを増やすことができます。
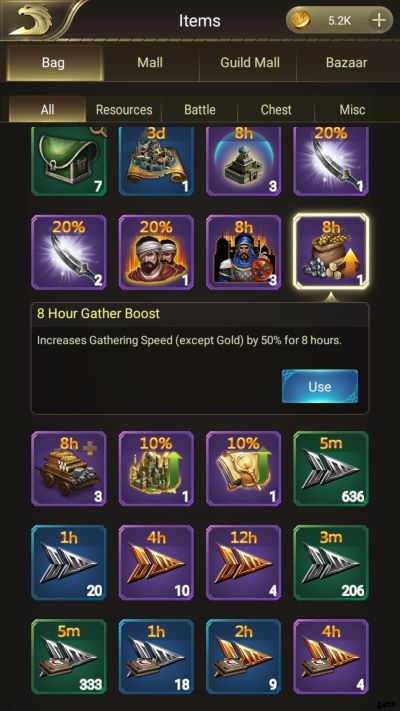
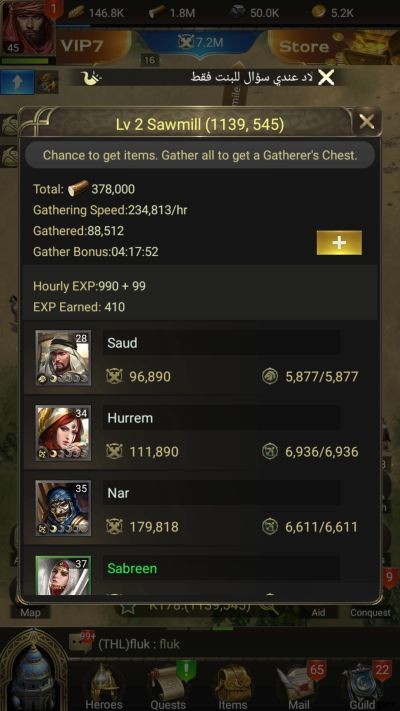
ヒント: レベル 1 では採集者のチェストが提供されないため、少なくともレベル 2 の農場 / 製材所 / 鉱山を探してください。タイム ブースターとヒーロー EXP カードの優れたソースです。さらに、Gather Boost を使用する場合はプロセスが大幅に短縮され、Expedite Gather と呼ばれるプレイヤー アビリティをアンロックしている場合は、それをアクティブにすると、2 時間以内に外部リソース ノードをはるかに速く空にすることができます。
農場、製材所、鉱石鉱山の他に、ブート キャンプ (ヒーロー EXP) とミント (ゴールド) の 2 つのリソース ノード タイプが存在します。これら 2 つの最低レベルは、消耗するのに最低 3 時間必要であり、Gatherer's Chests を提供しません。
さらに、紛争の温床やプロヴィンスを占める都市が密集する場所でスポーンすることがよくあります。あなたの総力が少なくとも 10M に満たない場合は、ハイジャックされる可能性が高くなるため、それらに近づかないことをお勧めします。
1.3 デイリー バウンティとリワード – インタラクション
テクノロジーや建物のアップグレードから採用コストまで、ゲームの奥深くに進むにつれてすべての価格が上昇し、それらはすべて比例して上昇します.かつては数千の食料/木材/鉱石しか必要としなかったものが、最終的にはゲームの後半で 6 桁以上の費用がかかるようになります.
特に戦闘でアクティブな場合は、内部ノードと外部ノードの両方から取得できるリソースが遅かれ早かれ不十分になることに気付くのにそれほど時間はかかりません.まともな勝率があっても、戦闘は避けられない損失をもたらします。
あなたのヒーローが指揮する部隊は間引かれ、補充には、負傷者を治療し、戦闘で殺されたものを置き換えるために余分なリソースを費やす必要があります(さらに必要な待ち時間).満員の軍隊を常に維持することは、あなたの都市に十分な富がある場合にのみ手に入れることができる贅沢です. Conquerors:Golden Age の優れている点は、リソースの問題に完全に対処できるいくつかの相互作用と報酬メカニズムがあることです。
リソース バンドルはゲームのすべてのポイントで共通の報酬であり、何十ものリソース バンドルを取得できるレートにより、アクティブである限り都市が枯渇することはありません。以下は、24時間サイクルごとに気をつけて使い果たすべき行動のリストです.以下の機能は、MMORPG タイトルの「デイリー」に相当します。
トレジャー ハント: ゲームには2種類のトレジャーハントがあります。 1 つ目は、シンドバッドのストーリーで紹介された島の発見で、到達範囲はシティ ホールのレベルに依存します。 2 つ目は、1 日あたり 6 つのステージ/試行に制限されている都市内からのものです。
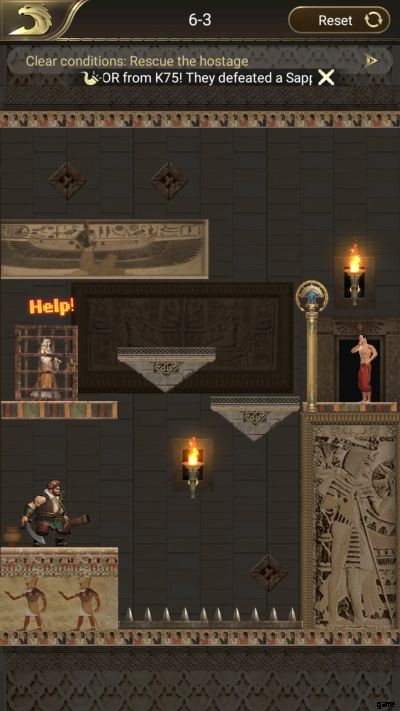
トレジャー ハントは、エボニーのトレジャー ルーム フェーズとまったく同じように機能し、数十年前のプリンス オブ ペルシャの一般的でノスタルジックな雰囲気を持っています。各宝物部屋はパズルのように機能し、シンドバッドが宝物にたどり着く方法、敵を排除する方法、または投獄された乙女を解放する方法を作ることが目標です。アイデアは、Homescapes で物事がどのように機能するかと同様に、レバーとスイッチの適切なシーケンスを見つけながら、明確な条件を満たすことです。
市内の宝探しでは、より多くの報酬とより良い報酬が得られます。上記は、1 日に利用可能な 6 つの実行のそれぞれで得られるものの例です。リソース バンドルは 1 ユニットしか提供されませんが、クレスト、エンハンサー、ドラフト通知は見逃せない非常に貴重なアイテムです。
ヒント: 広告を見て、すべてを 2 倍にします。ドラフト通知は、選択した部隊タイプを無料で即座に召喚できるアイテムです。ランクをすばやく補充する必要がある場合に特に便利です。シティ トレジャー ハントは、この貴重な消耗品を安定して入手できる場所です。
サードパーティの広告: オプションの広告視聴の機会と混同しないでください。 Conquerors:Golden Age には、サードパーティ広告専用のセクションがあります。通常、画面の右上部分にフローティング アイコンの 1 つとして独立したオプションが表示されますが、すでに 5 回以上請求している場合は、「準備完了」オプション内のタブを掘り下げる必要がある場合があります。
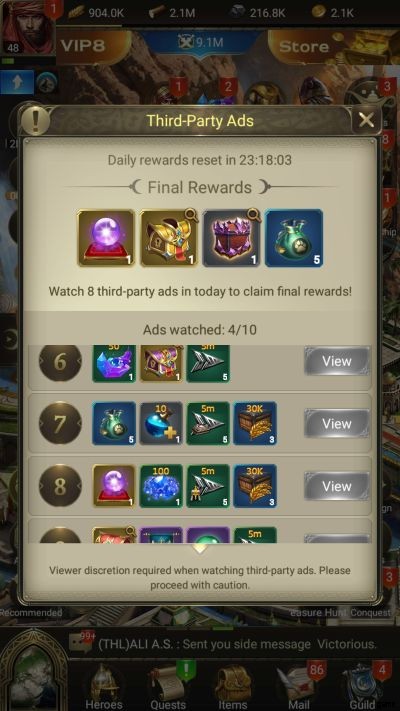
24 時間のサイクルごとに最大 10 個の広告が表示され、報酬の品質は常に良好です。傑出したものは、合計 300 ジュエル、2 つの英雄レリック ボックス、および 2 つのプレミアム英雄召喚書です。 10 個の広告すべてを毎日使用することを強くお勧めします。ただし、私たちの経験では、ゲームによって 8 または 9 しか表示されない「制限」が数日ありました。
ヒント: 10 のうち最初の広告を見る前に、まずプレイタイム ボックスを 1 つ獲得してください。そうすれば、2 つ目の広告の準備ができたら、すぐに別のボックスを獲得できます。また、発生したバグを回避するには、広告 7 から 10 を連続して視聴することをお勧めします。
プレイタイム ボックス: おそらく、Conquerors:Golden Age の開発者がいかに寛大であるかを最もよく示す景品の形でしょう。プレイタイム チェストは、1 日に無限に獲得できる報酬であり、受け取るものによって都市の在庫を十分に維持できるという自信が得られます。
1 つを要求すると、1 分から始まるクールダウン期間があり、1 日に何回要求したか、または要求する頻度の間隔に応じて、それに応じて増加します。戦利品には、常に複数の基本的なリソース バンドルとタイム ブースターが含まれています。
ヒント: これをアクティビティの「スペーサー」として使用するか、たとえば、1 ~ 2 人の反乱軍と戦ったり、キャンペーンの戦いに参加したりするたびに、確認または請求する必要があるものとして使用します。毎日のタスクとして扱うという点では、ログインしたらすぐに取得することを優先することをお勧めします。
VIP ボックス: ヒーロー コレクションを含むゲームでは、通常、無料の VIP ステータスがプレイヤーに提供されます (例:Blitz:Rise of Heroes)。征服者:黄金時代は、プレイヤーに同様の「無料ミアム」を付与し、その恩恵は、アカウントの VIP レベルを上げれば増加するだけです。
VIP であることの確実な特典は、VIP レベル 3 に到達すると受け取る資格がある VIP チェストです。運搬物には、ゴールド、タイム ブースター、および複数のアップグレードに資金を提供できるようにする基本的なリソースのいくつかのバンドルが含まれます。
サードパーティの広告やプレイタイム ボックスと同様に、画面の右上部分にある「準備完了」アイコンから VIP ボックスにアクセスできます (街にいるとき)。
ヒント: VIP ポイントを付与するアイテムは保管せず、インベントリに配置されたらすぐに使用してください。すでに複数の VIP チェストを開けている場合のクールダウン期間は 30 分です。したがって、プレイ時間が限られている場合は、まずチェストを取得して、ログアウトする前に別のチェストを取得できるようにしてください。
ご冥福をお祈りします: チャプター 7 では、あなたの街にもう 1 つの素敵なアイテム、噴水があります。ファウンテンは基本的に、「フリーウィッシュ」と呼ばれる消耗品を使用するためのアクセスを許可します。各ウィッシュ チャージは、食料、材木、または鉱石を得るために消費できます。

噴水の改善は、一連の成長/ストーリー クエストの一部です。アップグレードすると、最終的に毎日受け取る無料の願い事の数が増え、願い事をすることで得られるリソースの量も増えます。
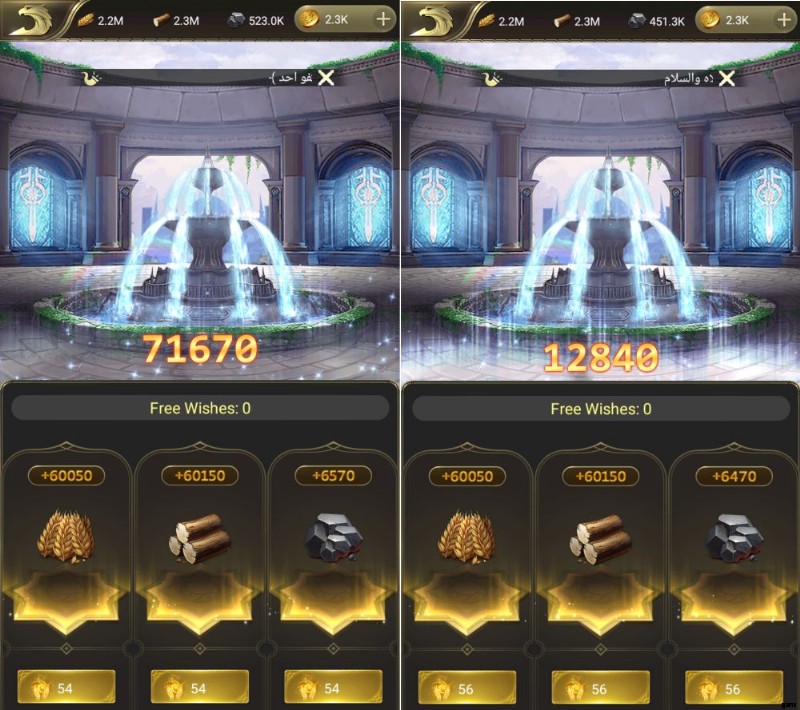
ヒント: 食料、材木、鉱石の願いを均等に分配するのは良い考えに思えるかもしれません。ただし、鉱石のリソース バンドルはすべての報酬ポイントの中ではるかに希少な戦利品であるため、鉱石のみを希望することをお勧めします。 5 つ以上のウィッシュを使用する場合は、一度に 1 つウィッシュした場合の成長に比べてボーナス額が大きくなるため、一括ウィッシュを使用することを強くお勧めします。
リーダーボード: 通常、リーダーボードはプレイヤーにインスピレーションを与え、誰もが参加することを熱望する何かを与えます。結局のところ、その中のスポットは自慢する権利とゲーム内報酬を与えます. Conquerors:Golden Age では、マイトと王国がまだトップ ドッグと一緒に飛べなくても、リーダーボードの恩恵を受けることができます。
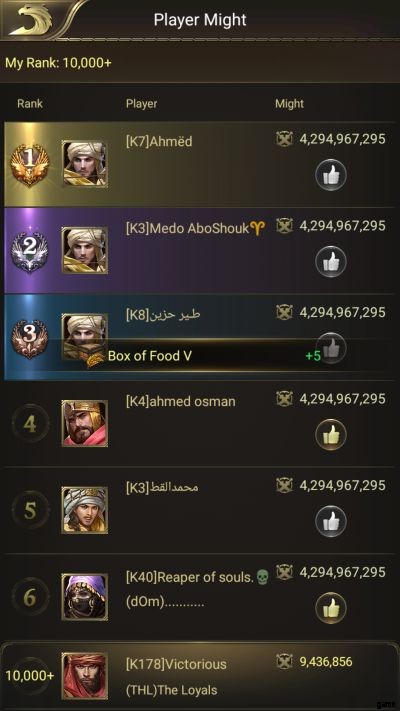
リーダーボードをブラウズすると (アバターをタップし、画面の下部にあるアイコンを探します)、多くのカテゴリで最高のプレイヤーを確認できます。赤い通知ドットのあるカテゴリーを選択し、2 つのカテゴリー (プレイヤー ランクから 1 つ、ワールド ランクから 1 つ) から最大 5 人のプレイヤーの「いいね」ボタンを押すだけです。
ヒント: 好みによる報酬はランダムで、主にタイム ブースターが得られます。ときどき、または許容される 10 個のいいねのうち少なくとも 4 個について、リソース バンドルを取得できます。
シークレット マート: この機能は、ゲーム内で実際の通貨をまだ使用したことがないプレイヤーにとっては嬉しいティーザーです。画面の右上隅にある [特典] オプションをタップすると、アクセスできます (自分の街にいる間)。内部には、プレーヤーが実際の通貨を使用するためのさまざまなオプションを紹介するタブが表示されます。 [デイリー] タブを探して、無料の宝箱を受け取りましょう。
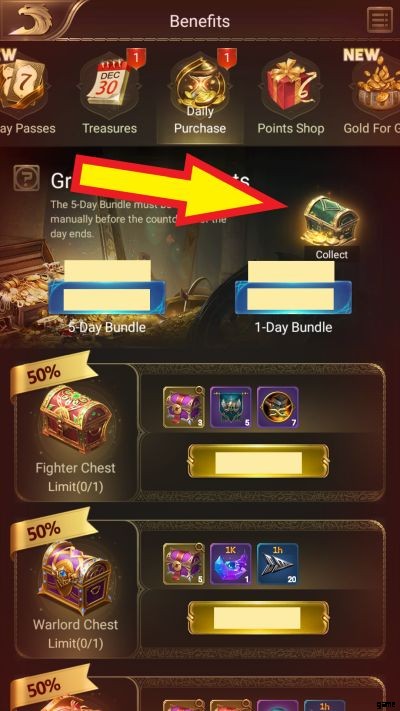
そこからの戦利品はランダムであり、リソースバンドルが含まれることはめったにありませんが、無料のものに「いいえ」と言う人はいませんよね?取得後 24 時間の厳密なクールダウンがあるため、1 日の早い時間に取得することをお勧めします。
クエスト> 毎日: これは、最も多くのリソースを取得できる場所です。対応する一連のポイントを持つアクションのリストがあります。一般的なタスクを実行するとポイントが貯まり、最終的に最大 8 つのチェストのロックが解除されます。
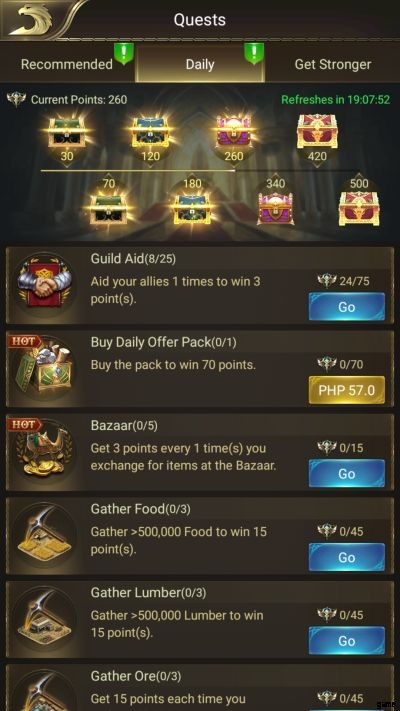
合計すると、毎日のチェストから何百万もの食料、材木、鉱石が得られます。それに加えて、EXP カード、タイム ブースター、イベント関連の消耗品などの貴重なアイテムが他にもあります。
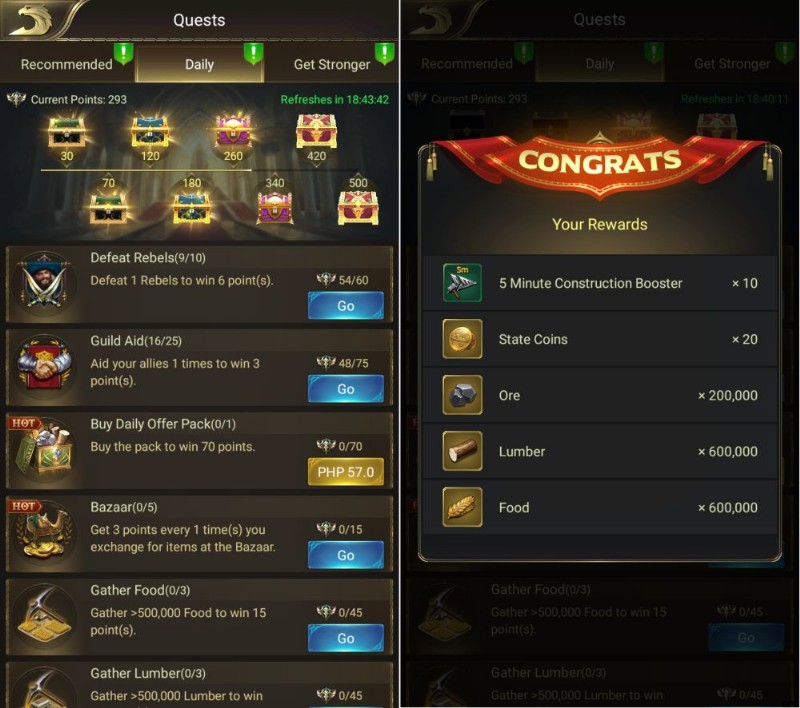
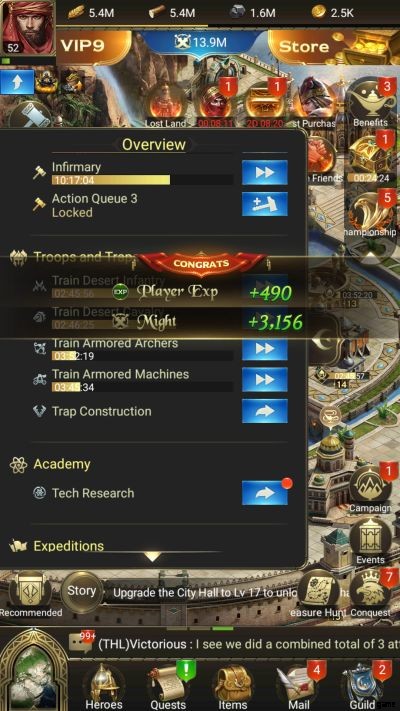
報酬を請求するウィンドウのほぼ 90% で広告を見る機会が提供されます。広告を見てわずかな特典しか得られない他のゲームとは異なり、Conquerors:Golden Age で広告を表示することの利点は、すべての事前設定された戦利品を 2 倍にします。上のスクリーンショットで、広告を利用してデイリー チェスト 3 から得た金額を確認してください。
ヒント: Questセクションの他の2つのタブ、RecommendedとGet Strongerをチェックする習慣をつけてください。何百万もの基本的なリソースと何千ものゴールドに加えて、建造物、ヒーロー、技術を積極的に改善する際に請求できるその他のアイテムがあります。
1.4 その他の日課と役立つアクション
ゲーム内には、タップと待ち時間が必要な収穫可能なアイテムが非常に多いため、都市を豊かにするために必要なものを収集するのはそれほど難しくありません。しかし、ファーミングは前のセクションで説明しただけにとどまらないことを知っておいてください。Conquerors:Golden Age には、プレイタイムのルーチンに含める必要がある他の機能があります。
毎日のログイン: ほとんどのゲームでは、毎日のログイン ボーナス ウィンドウが表示されます。多くの場合、進行状況が表示され、連続ログイン ボーナスで誘惑されます。 Conquerors:Golden Age では状況が少し異なります。Daily-Sign in のセクションに積極的にアクセスし、手動で行う必要があります。
景品を受け取るには、[特典]> [サインイン] に移動します。報酬のセットには基本的なリソースがほとんどないことに気付くでしょう (これが、前のサブセクションに含めなかった理由です) が、報酬の範囲は見逃すにはあまりにも優れています.報酬は、毎日のサーバーのリセットに合わせて進みます。
ヒント: 私たちの経験では、ゲーム開始から約 2 週間後に非自動請求に気付いただけだったので、最初の 1 か月は多くの日数を逃しました。 1 日スキップして、次の請求可能なアイテムが必要なものだと感じた場合は、「メイクアップ」サインインにゴールドを自由に使用してください。これは、ヒーローのレリックであるエンハンサーを請求する場合にのみ行うことをお勧めします。まだ所有していない、およびプレミアム募集スクロール。
ペット ハント: ポンドは、都市がレベル 20 に達するとロックが解除されることを意図した機能です。これにより、1 日に 1 回しか実行できない狩猟活動が開かれます。ポンドを介して、ペットを取得し、狩猟を開始できます。狩猟セッションごとにデフォルトで 25 本の矢が与えられます。
狩猟から得られる直接の戦利品や報酬はありませんが、獲得したポイントは、非常に希少な資源であるペット フードと交換できます。ペットフードは、所有しているペットに使用してレベルアップさせることができます。ペットのレベルが高いほど、ペットのスキルとボーナスが向上します。
ペットの狩猟とレベルアップによる主な利点は、戦闘の可能性を高めることができるボーナスの形になります。複数のペットを飼っている場合、ペットからのボーナスが積み重なるため、軍隊の攻撃力、防御力、HP が増加します。一部のペットは、トレーニング、旅行、研究、建設速度の増加など、戦闘外のブーストさえ提供します.あらゆるボーナスがあなたの街を助けてくれるので、利用可能なときはいつでもペットをアップグレードしてください。
ヒント: 狩りをするときは、必ずダブル ストラフェを行ってください。これは、並んでいる 2 匹の動物に矢が当たったときに発生します。場合によっては、トリプル機銃掃射が可能になることさえあります。主な戦略は、時間をかけて各動物の速度を観察してから射撃することです。矢は 25 本しかないので、各ショットがカウントされることを確認してください。また、発射体の遅延を考慮して、ノウサギや鳥などの素早いターゲットを撃つ場合は、事前に照準を合わせることをお勧めします。
市のメンター: メンターはあなたの街にランダムに現れ、彼女の存在はギフトシンボルのバブルで示されます。 Conquerors:Golden Age に関するあなたの知識をチェックするために、彼女はトリビアの質問をします。あなたが正しい答えを選んだかどうかにかかわらず、彼女はあなたに報酬を与えます。ただし、正しい答えを出すと、彼女が配るアイテムが何であれ、1つ以上のピースを確実に入手できます。彼女からの最も一般的な報酬はタイム ブースターです。
ヒント: メンターがしばらく表示されていないことに気付いた場合は、(ブースターを使用して) 建物のアップグレードを完了するか、反乱軍/キャンペーン バトルを 1 回戦ってみてください。漸進的な行動により、彼女はより早く出現するようになります.
Conquerors:Golden で言及されているすべてのデイリーを活用すると、内部および外部のリソース ノードから取得できるものとうまく組み合わせられるため、必ずすべてを実行してください。物事を次のレベルに引き上げて、より多くのリソース、タイム ブースター、およびその他の多くの有用な戦利品を手に入れたい場合に備えて、次のセクションをチェックして、栄光へのペースを少し速く押し上げるために何を磨くことができるかを確認してください。
2.あなたの道を磨く
達成すべき雑用が非常に多いため、赤い通知マーカーが付いたプロンプトやオブジェクトをタップするだけで、最も重要なタスクを見落としてしまう可能性があります。上記で説明した日課とは別に、プロンプトが表示されないアクティビティもありますが、一貫して行う必要があります。これらの活動により、「征服者:黄金時代」のグラインドが完成します。
2.1.反乱軍との戦い
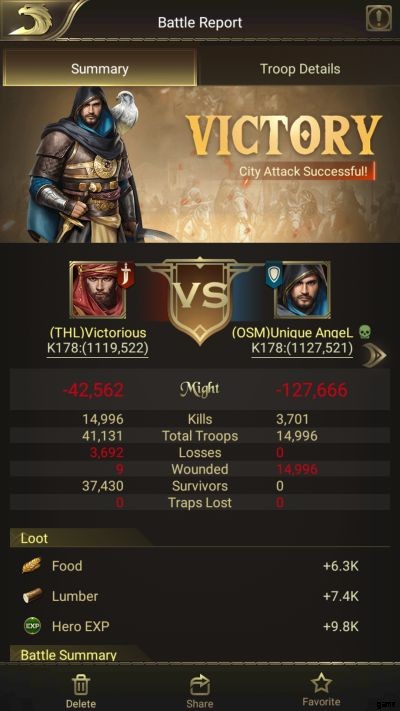
チュートリアル フェーズで紹介される基本的なタスクの 1 つである反乱軍との戦いは、楽しい義務として扱われなければなりません。砂漠には対処する準備ができている反乱軍があふれています。彼らを排除することで、プレイヤー EXP、ヒーロー EXP、リソース、タイム ブースターが確実に得られます。
幸いなことに、反逆者との戦いは簡単であり、行き当たりばったりの状況になることは決してありません。反逆者よりも総力の高いチームを使用する限り、勝利は保証されます。
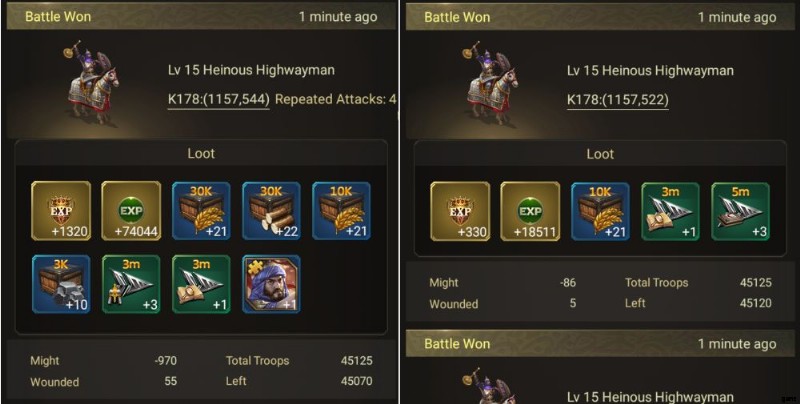
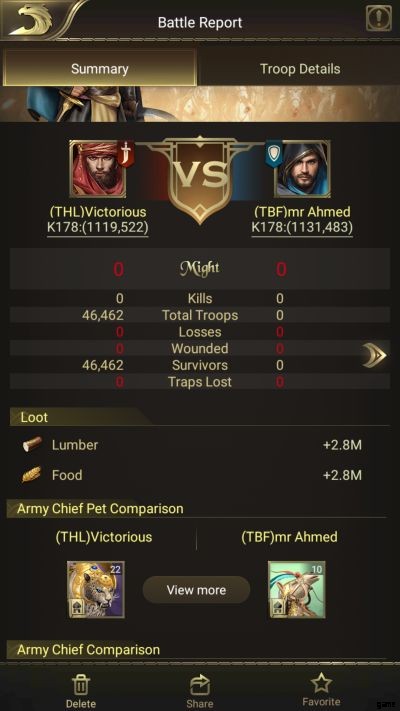
反乱軍と戦うには、シングルコンバットと X4 の 2 つの方法があります。上のスクリーンショットを参照すると、X4 オプションがより効率的な選択肢であることがわかります。それでも、5 人以上のヒーローに EXP を与えるためにエネルギーの使用を分散させたい場合は特に、1 人で戦うことも悪くありません。 400 を超える反乱軍の戦いに基づいて、2 つの戦闘オプションに関する結論から簡単な事実をまとめました。
2.1.1 Conquerors:Golden Age で反乱軍と戦うことについての簡単な事実
– 一騎打ちはマイトへのダメージが少なくなります。
– 単発戦闘は、余波で負傷する可能性のある部隊の数の点で、ユニットをよりよく保護します.
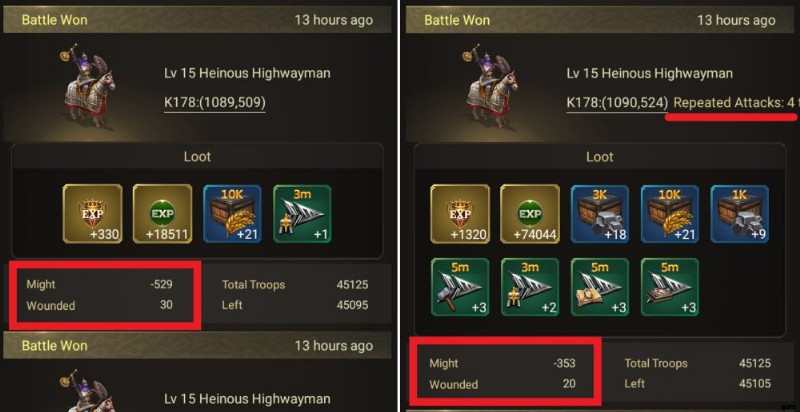
– 前の 2 つの事実にもかかわらず、時折「スパイク」が発生する可能性があります。これは、負傷者数と戦力控除の数が通常よりも突然大きくなる可能性があることを意味します。スパイクは、1 回の戦闘または x4 のいずれかで発生する可能性があります。 1 回の戦闘だけで発生した場合、1 回の戦闘での戦力と部隊数への影響が異常に大きくなる可能性があります。
– プレイヤー EXP とヒーロー EXP の獲得量は同じです。 x4 から得られる利益は、1 回の戦闘で得た利益の完全な合計に 4 を掛けたものです。特定のレベルの反逆者と一貫して戦っている限り、利益が変動することはありません。
- バトルレポートに表示されるプレイヤーEXPヒーローEXPは、まだ配布されていない合計ではありません;これは、各ヒーローが受け取った正確な金額です。
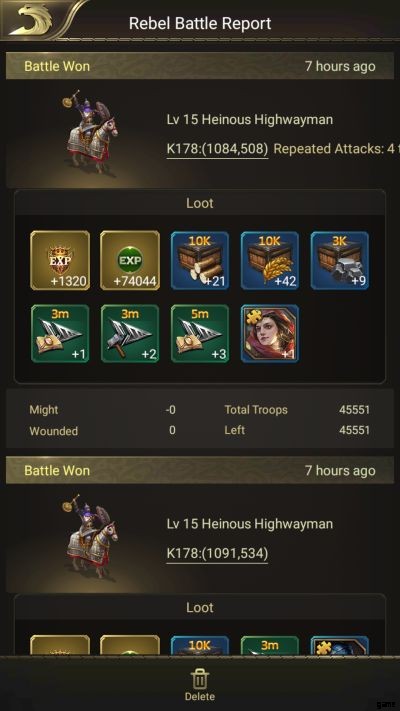
– 戦闘レポートに表示される勢力と兵力の損失は一定ではありません。特定のレベルの反逆者と常に戦っていても、変動する可能性があります。運が良ければ、まったくダメージを受けないこともあります。
– 当然のことながら、X4 オプションを使用すると、より多くの戦利品が得られ、ヒーロー レリックを入手できる可能性は、1 回の戦闘に比べてはるかに高くなります。

– 特定のレベルの反逆者に対する最初の勝利で、プリセットのヒーロー レリックが保証されます。ただし、そのような特定の反逆者タイプが、最初にドロップするヒーロー レリックの信頼できるソースになるという意味ではありません。その後のヒーローレリックのドロップは完全にランダムです。
– 反乱軍と戦うことは、EXP アイテムが不足したときにヒーローに EXP を追加するための最良の方法です。ただし、特にレベルの低いヒーローの「リーチ」経験値を作ろうとしている場合は、好みのチーム構成で可能な限り最高レベルの反乱軍と戦うようにしてください。
このサブセクションに記載されている内容で、Conquerors:Golden Age での反逆者との戦いについてのすべてを既に知っていると確信しています。このガイドで前述したように、ヒーローを遠征に参加させる前にまずエネルギーを消費する必要があることを忘れないでください。そのため、EXP と戦利品を活用するために積極的にヒーローを一掃してください。
2.2 キャンペーン ステージのやり直し
キャンペーン バトルを進める能力は、ヒーローのマイトによって制限されます。場合によっては、あるステージと次のステージの間の難易度のギャップが大きすぎて、プラトーまたは単に前進できない状況に陥ることがあります。しかし、心配する必要はありません。それは正常なことであり、キャンペーン バトルは引き続き有用です。
繰り返しキャンペーンの主な用途は、ヒーローの装備を集めることです。ヒーローの空のアイテム スロットをクリックし、まだ黄色の十字が表示されている場合、作成ウィンドウが開き、作成するために不足しているギアと材料が表示されます。必要な素材をタップすると、特定のキャンペーン ステージの開始を促すウィンドウに移動し、目的の素材がドロップされる可能性があります。
基本的に、フル スイープ (スタミナ 120 消費)、シングル スイープ (ノーマルでは 6 スタミナ、ハードでは 12 スタミナ)、またはステージの再戦 (本質的にはシングル スイープ) を行うオプションがあります。どのオプションを選択しても、戦利品はランダムになります。完全なスイープでは、必要なギア/マテリアルの量が得られない可能性があります.
一掃と直接戦は同じ量のスタミナを必要とするため、どちらが良い選択なのか知りたいと思うかもしれません.スイープは便利で速いので簡単に見えますが、戦闘はより多くのことをしたという感覚を与えてくれるので、より多くのものを受け取ることへの希望が大きくなり、ドロップが一致すると、それがより良いと信じる傾向があるかもしれません.
To end speculations, we’ve tested both options dozens of times and the results are consistent:the item drops remain random, there is no “better” choice that has a higher chance to drop gear/crafting materials. However, the individual Hero EXP awarded from actually fighting the stage versus the total EXP obtainable from the Hero EXP book drop varies.
At lower stages (refer to the previous screenshot), the EXP books will give a bit more, but in higher stages, the EXP each hero receives from actual combat trumps whatever the EXP books can give. The higher EXP gain is the upside, but since actual fighting happened, some troops will be wounded and killed.
In the end, the answer to which is the better choice are actually questions. Are you willing to spend extra resources and time to replenish lost troops in exchange for more EXP? Or perhaps, do you want to do things quicker and try your luck to get gears and crafting materials in just a few taps? The choice is ultimately up to you.
TIP: Unlike in other games where you can gear up the heroes you collected, Conquerors:Golden Age has no shop that directly sells hero equipment nor the crafting materials needed to upgrade them. That is why when you hit a campaign plateau, it is smarter to dedicate your Stamina to hunt for gears instead of repeatedly trying a stage you’re stuck at, especially when your best team’s Might have not dramatically increased yet.
2.3 Engaging in Guild Tasks
If you’ve been playing Conquerors:Golden Age for a while now and you have not yet joined a guild, join one as soon as possible. Yes, we are opening this subsection with a command! Belonging to a guild does not only put a tag by your name to warn would-be attackers that someone has your back, it comes with a handful of benefits to help you grind too.
The perks start with being able to collect Honor Points and Guild Credits for each time you donate. When there is an ongoing research, guild members will be able to donate 3,000 food or lumber up to 20 times. This limit will eventually reset, allowing you to donate more. If you are super active, you can approximately donate up to 60 times a day.
Donations will speed up the ongoing research, thus helping your guild. In return, you can use the Guild Credits you receive to initiate researching guild tech (if you are at least an R4) and spend the Honor Points in the Guild Mall.
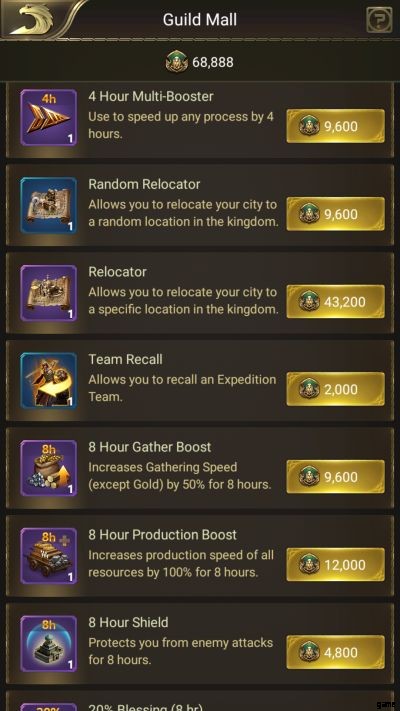
The Guild Mall offers a wide range of items that you can use to progress your city. It has time boosters, gathering and production boosts, and other tactical items that may help you in combat or protect your city. We won’t list the available items anymore as it may eventually change. It will be best to see it for yourself once you already have a guild to call your own.
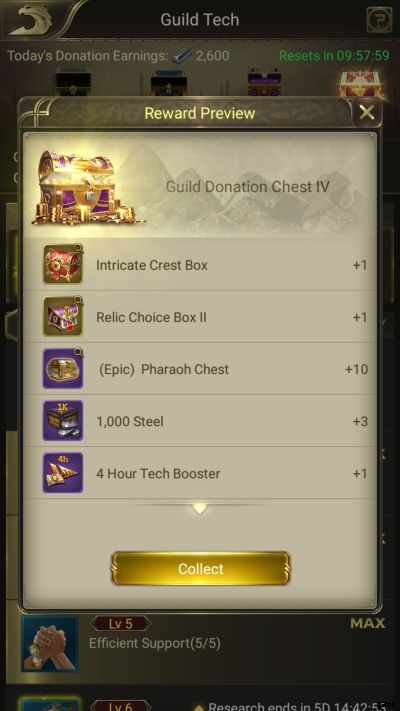
As you keep on donating, you will fill a progress bar with certain points that correspond to Guild Tech chests. From the first to the fourth, they contain Player EXP cards, Tech Boosters, steel, chests for different set-item player equipment, and Hero Relic boxes and their quality increase accordingly.
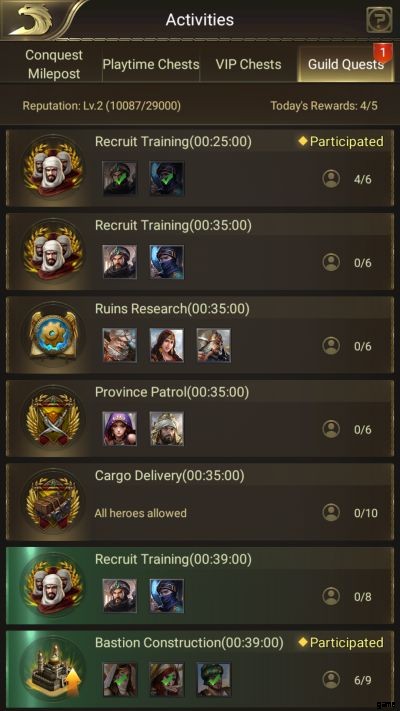
Another guild-related grind is joining in Guild Quests. These are risk-free, no-cost quests that you should always participate in. Each Guild Quest can only welcome certain heroes and you can send as much heroes as you want. The heroes you will field in Guild Quests will remain available for use; you can still send them to expeditions, campaign/rebel battles, and even coalitions.
Participating in a Guild Quest gives you a 30% chance of receiving a Guild Chest once the task is done. These chests may grant one hefty bundle of basic resource, some gold, time booster, or a Premium Recruitment Scroll. Apart from that, all the heroes you sent will earn a set amount of XP while you receive a certain number of Honor points. This feature is accessible through the Ready option when you’re in the city.
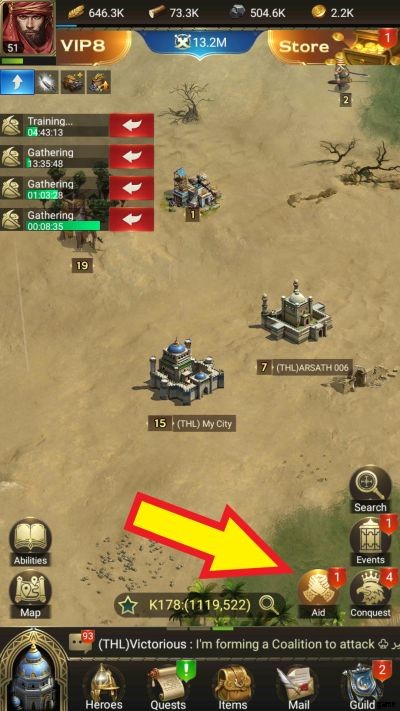
The grind opportunity in a guild does not end from obtaining item rewards and EXP points. Guild members will be allowed to aid each other’s tech researches and building construction/upgrades. When there is an opportunity to assist a guild mate, you’ll be prompted by a glowing icon on the bottom part of the screen; the same prompt will appear for everyone in your guild whenever you start researching or upgrading.
Giving aid awards you with Honor Points and given how easy it is to do, you’ll be able to effortlessly gather enough to afford items in the Guild Mall regularly, especially if the guild has at least 20 active members. On the other hand, each aid you receive will shave off at least 5 minutes of any ongoing construction or upgrades. When improvements happen faster, the smoother your grind will be.
Joining a guild, especially the powerful ones, will give you direct and indirect economical and strategic advantages and you will find that out if you have been in one long enough. Be in one and discover the benefits.
Grinding means going the extra mile to progress quickly and if you will actively fight rebels, wisely redo campaign battles, and become an active guild member, you can see your city’s Might go up in a steady pace. Do grind with passion and purpose and rise to be a great leader!
3. HEROES AND MIGHT MATTERS
On your pursuit to lift your city’s reputation, you will realize that the main body of the challenge in Conquerors:Golden Age is related to Might. As a leader, you are responsible to increase your city’s Might, exploring all possible and efficient means.
The Might of a city is an indicator of its military strength and overall development. Most guilds require a minimum Might to let someone in, the leaderboard has multiple categories related to it, and your best team’s Might dictates up to what level of rebel you can beat. It is your general badge of strength.
3.1 Contributors to Changes in Might
Might is the equivalent for what is universally known as CP or combat power. It can be increased through heroes (recruiting/leveling/equipping/promoting/upgrading skills and talents), structures (building/upgrading), and tech. Basically, any progress counts toward Might.
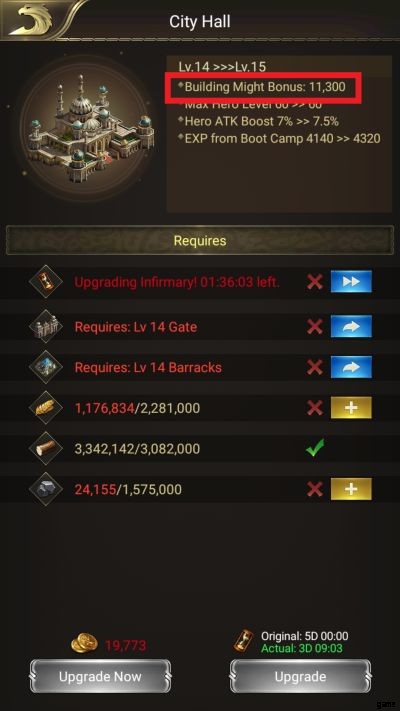
The more expensive a construction or tech research, the more Might it gives. If you are laser-focused on increasing Might, you should consider prioritizing the buildings that gives more.
Due to the construction max limit of only up to three projects at a time (on F2P it’s just 2), you have to carefully select the buildings to use the slots wisely. This means you may have to bump off upgrading ‘lesser’ structures like farms, sawmills, and mines in favor of buildings like the Watchtower, Gate, and City Hall.
Researches, although equally impactful for your city as building upgrades, does not give as much Might. This is true even for techs that are expensive and have long wait times. Another thing with tech, is that they branch from one another (tech tree), so upgrading lower tech is mandatory before improving more expensive and time-demanding ones.
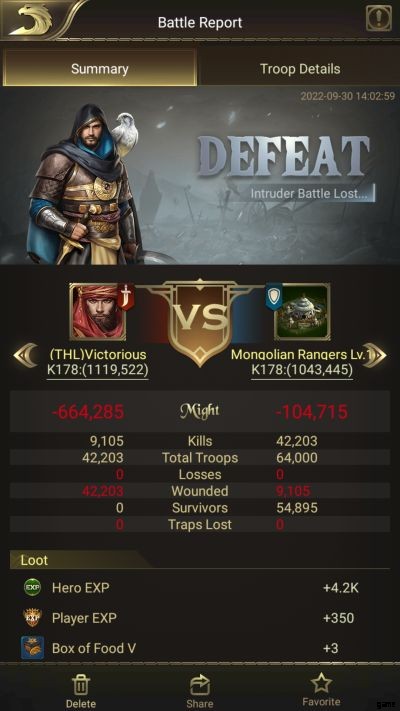
Your Might can also decrease; failing attacks/sieges/raids and losing battles are guaranteed to significantly reduce your Might. In the screenshot above, we did not send our best team to attack an Intruder Base and paid the price. The Might lost in defeats are based on how many of your troops died in battle and can only be regained once you have fully replenished the squads of the defeated heroes.
Although Might is merely a reflection of a city’s overall progress, it tells a lot about a player. It can act as a warning for any hostile cities near you or an invitation for friendly guilds to welcome you. Normally, players only attack cities that have a Might significantly lower than theirs, so there is a purpose and need to actually rush increasing Might.
3.2 Heroes’ Impact
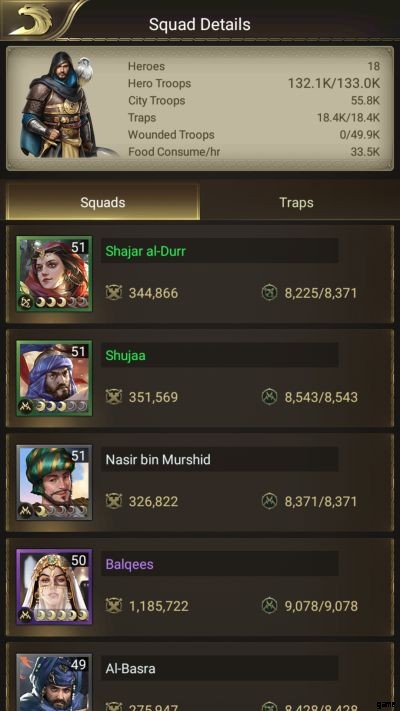
More than any other dynamic, your heroes define your city’s might. Heroes form and command a squad of their own so the more heroes you have, the higher your active troop count will be. The number of troops a hero can accommodate in their squad can be increased by leveling them up (Hero EXP), upgrading the training building for their troop type, researching troop-specific tech, and certain equipment.
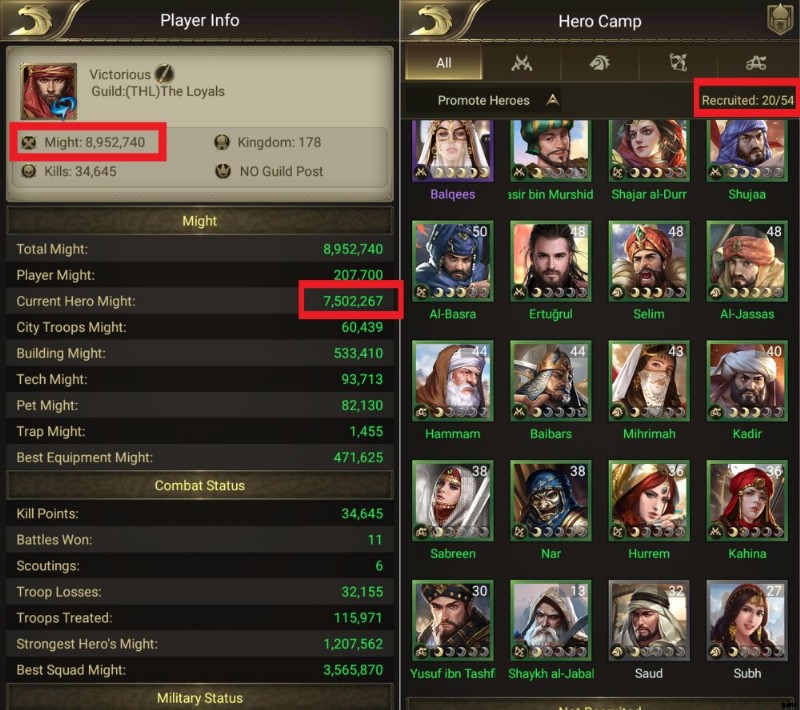
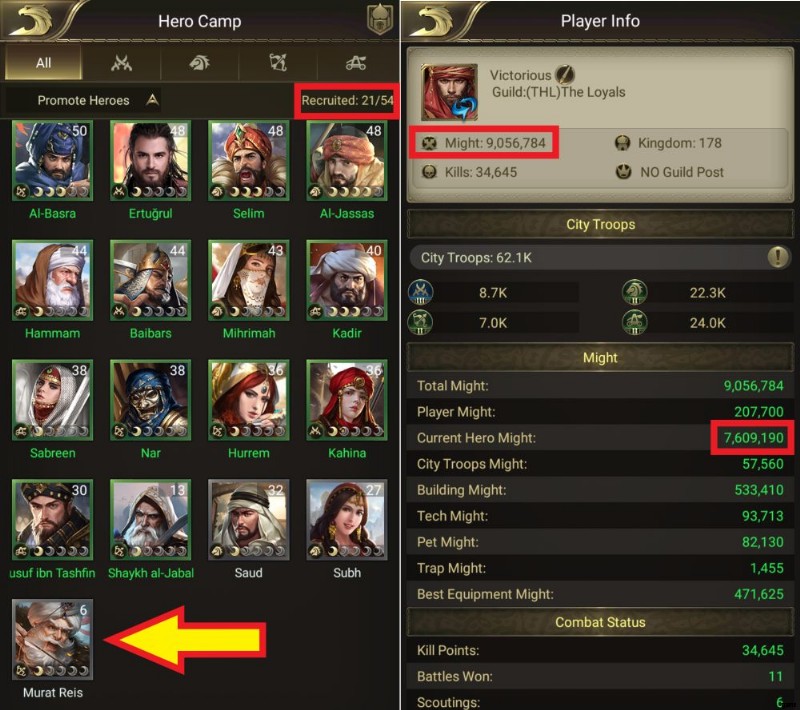
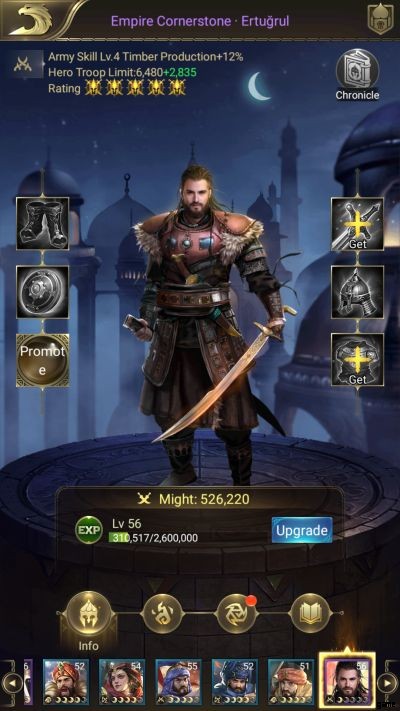
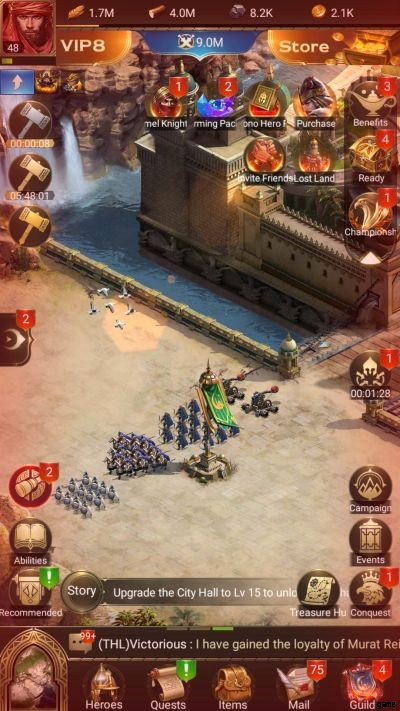
To give a concrete example, the screenshot above shows our Might with 20 heroes in our roster. We then decided to acquire another hero, Murat. Upon fielding Murat in a replayed campaign battle just once, giving him 2 equipment, and granting him a full squad of his own, our Might has dramatically increased.
Overall, every form of enhancement applied to a hero (leveling up, equipment> promotion, talent upgrade, crests) and upgrading the training facility of their troop type will all work to increase Might.
While battles and expedition only allow you to field up to 5 squads a time, the more heroes you have in your roster, the larger your army will be. As the greatest mover of the Might needle, you should give high importance to recruiting heroes.
3.2.1 Recruiting Heroes
Due to the sheer volume of items and resources you can get from multiple points of the game, it is understandably hard to keep track of what you have already acquired. This is particularly true with Hero Relics, the materials that serve as the counterparts to hero/character cards in hero collection games. To win a hero’s allegiance, you need at least 10 of his/her relics.
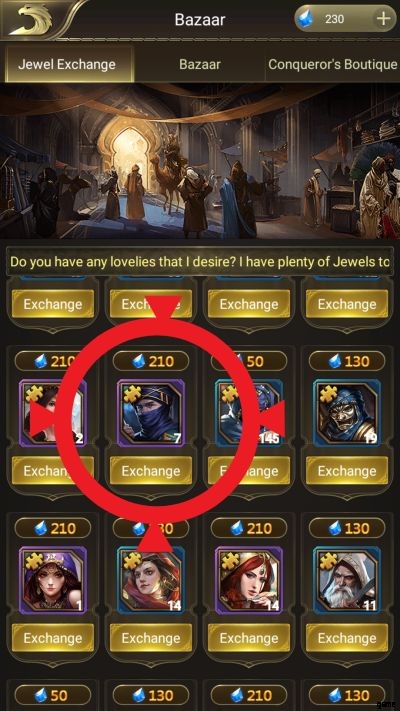
Apart from directly scrolling down when browsing the Heroes tab, another way to see the Hero Relics you have acquired is by checking the Jewel Exchange tab of the Bazaar. From there, check if there are relics of heroes you have not yet summoned. In the screenshot above, we noticed that we have 7 relics of Tariq, a hero we haven’t recruited yet.

We have proceeded to check our Bag (inventory) for Relic Choice Boxes. Luckily, we have three pieces of Relic Choice Box II and Tariq is one of the options. Once we have recruited him, we wasted no time to gear him up and promote him to Stage 2 to double his Army Skill bonus and further increase the Might his inclusion brought to our city.
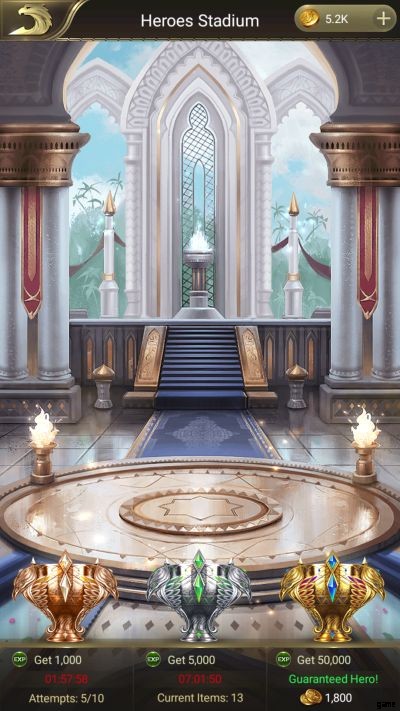
Another way to get heroes, of course, is through the Heroes Stadium, one of the features that the early tutorial phase will run you through. After the story-directed summoning, the draws will be totally random. Draws from the bronze and silver options may sometimes not even pull up a Hero Relic.
The gold option is the one guaranteed to give you a new hero. However, if the drawn hero is someone who is already in your roster, he/she will be converted to three Hero Relic pieces. You will also receive resource bundles and other items for choosing the most expensive recruitment option.
TIP: If you’re fairly new to the game and you only have about a dozen heroes under your command, spending 1,800 gold per summon in the Heroes Stadium is ideal because the chance of pulling out a duplicate is yet slim. Meanwhile, if you have 20 heroes already, it would be best to go for targeted summoning, check if the Hero in the Bazaar shuffle is someone you wish to recruit, then follow it up using the corresponding Relic Boxes in your bag.
3.2.2 Forming a Team
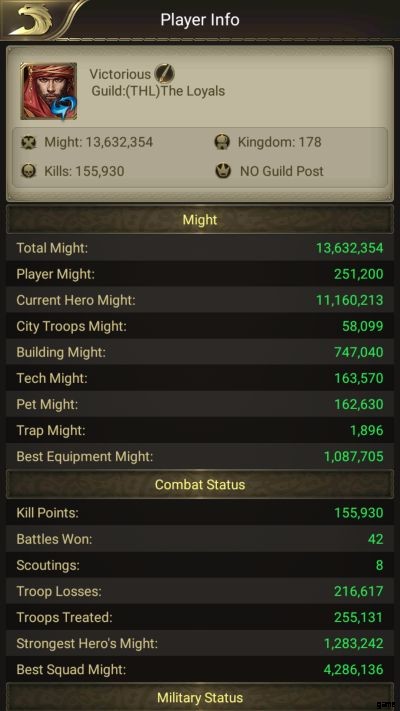
When you browse your profile and inspect your Might, you can see that one of the listed option will say “Best Squad Might.” It’s quite self-explanatory, your 5 heroes with the highest combined Might would be it.
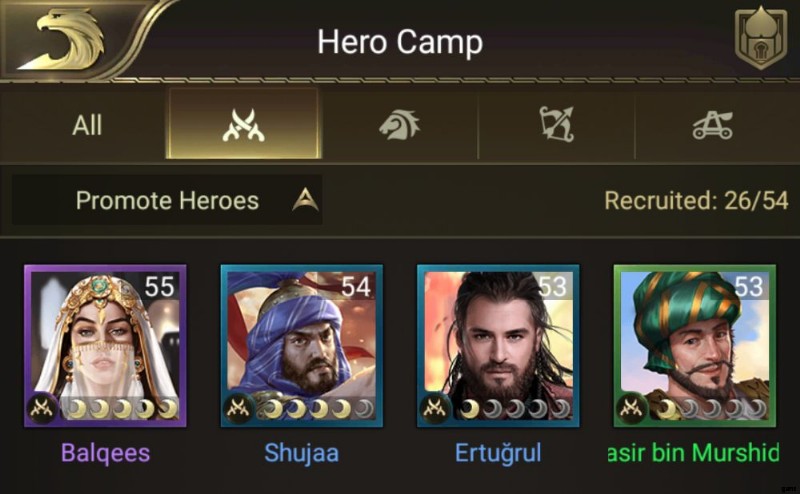
By default, players will have teams that are infantry-heavy because the majority of the story-given heroes are infantry:Balqees, Shujaa, Ertugrul, and Nasir bin Murshid. These 4 are already formidable fighters; apart from being naturally durable (Infantry is positioned in the game as tank), they possess tactical, offensive, and defensive skills which makes them mainstays in everyone’s army.
You can opt to veer away from an infantry-dependent lineup, but it would take time. No matter what troop type you plan to specialize on, you must prime your army production in a way that you can replenish the ranks. In an earlier section of this guide, we mentioned how expensive it is to deal with troop casualties; know that it will be a looming concern especially when you begin attacking other cities.
In our case, running an Infantry and Cavalry team caused a bad disproportion in our military. From all the city attacks, campaign stages, rebel battles, and raids we’ve engaged in, we ended up pulling our city’s Infantry and Cavalry ranks too frequently when refilling the squads of our main heroes.
The lesson here is to try and groom two heroes from each of the four troop types. Not only it will help ensure you can avoid a troop population imbalance, you also get to have a Team A and Team B dynamic. Having two ready teams is a good privilege to have because in the event you can’t afford to fully replenish a hero squad, his/her substitute can step up anytime.
Being forced to wait for a couple of batches from the training facilities is not a good situation to be in. It is better to always have a full team with considerable Might ready, so your stronger heroes can stay busy either doing campaign reruns or rebel battles.
3.2.3 Understanding Heroes
Knowing which heroes to build your army on is entirely dependent on who you get and what you have. If you plan to invest in the game and spend real currency, your possibilities are father and wider because you’d be able to use the gold hero recruitment option much more frequently. However, Conquerors:Golden Age is a game where being F2P is no handicap.
Taking advantage of what your heroes can offer is must. While some are better rated than the rest, all heroes in Conquerors:Golden Age have their own skills, talents, and Army Skill and it’s your role as a leader to leverage their strengths and that will only be possible if you understand what they can bring to the table. This subsection of our guide aims to explain the details you see when browsing a hero.

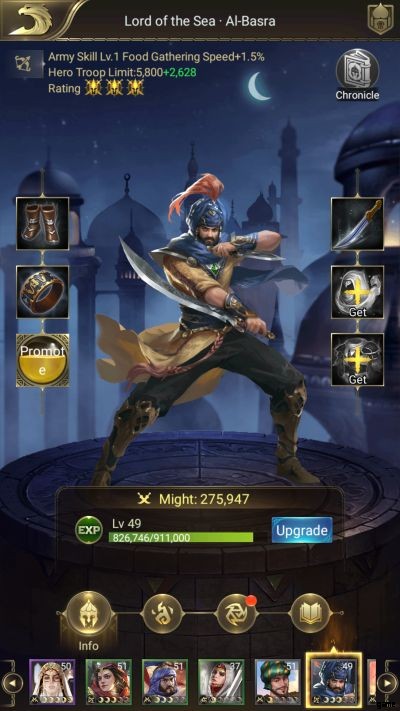
Army Skill – The bulk of text you see at the upper part of the screen. It is the passive, non-combat bonus that a hero can give. This fully stacks with other forms and sources of similar bonuses (other heroes, tech, pet bonus, player equipment). When you promote a hero (done by giving it all the 5 equipment it needs), it will increase for the amount of the base value.
スキル – This pertains to the skills only available in battle. Some heroes have skills in form of a nuke, others have buffs, and the best ones have a combination of both. They can only be leveled up once you have gathered enough Hero Relics to fill the progress bar.
Talents – They can be explored and upgraded in the same ‘tab’ with skill. These are passive boosts to the squad a hero commands; it can be in form of an increase in HP, troop count, and offensive/defensive capabilities. Some heroes can extend the bonuses to other squads.
The extent of how many upgrades you can do depends on the level of the training facility for a particular hero’s troop type, you can upgrade talents even for freshly-recruited or under-leveled heroes. Note that upgrading will cost a lot of ore at latter levels. Since you have to individually purchase upgrades for each hero, you need to mine and stockpile.
Crests – Accessible in the third tab, this feature acts as an extension of the passive traits of a hero. You can outfit a hero with crests that will synergize with their strengths or patch up any weaknesses. Technically, you can customize heroes by outfitting them with crests of your choice.
Unlike talents, crests slots will only unlock at preset points, so you have to level a hero up before making them wear crests. The certain places where you can acquire crests/crest boxes are the in-city Treasure Hunt, Daily Chest 8, Guild Donation Chest IV, and Third-Party Ads.
To cap this part of our Conquerors:Golden Age guide, you should focus on building an army around the heroes that you can benefit the most from, be it for the economy of your city or your ability to win battles/sieges. Take your time to read hero details, especially if you plan to use real currency; know that you can check information even for the ones you do not yet own.
More than just the flagbearers of Might, Heroes hold the key to your advancement in Conquerors:Golden Age. Do your best to make the right decisions with them so no expeditions, campaign battles, and wars against other cities can stop you on your way to be a recognized name in your kingdom.
4. COMBAT
A great portion of this Conquerors:Golden Age guide highlights the importance of resources and the points where to acquire them. However, none of those dailies and grind efforts can equal what you can haul when successfully attacking a city.
Most cities will have a hefty portion of their resources exposed. After all, the Warehouse, the facility responsible to safely store food, lumber, and ore, is not an enticing building to pour upgrades on. At level 10, a Warehouse can only store 500k food and lumber and 100k ore; the Might it gives is also inferior compared to most unique structures.
Leaving resources by the millions and upwards vulnerable, plundering another city can be profitable. At one point, after attacking 5 cities in a row within just 30 minutes, we were able to amass more than 10M food and 11M lumber. That is even after queuing in a couple of tech upgrades, ordering a full batch of troops, and utilizing the Bazaar trick (we will discuss it later in this guide).
The point here is Conquerors:Golden Age framed the idea of winning battles at the very heart of the game. To ace each battle, comprehending the key matters of combat is a must and this is the section of our guide aims to help you with that.
4.1 All About Offense
Since its release more than six years ago, Conquerors:Golden Age has grown a massive user base making its social aspect incredibly alive. The public chat for Conquerard (global) and kingdoms is running 24/7, teeming with users enjoying the game.
But beyond being social, the players of Conquerors can get truly competitive too. Millions participate daily in the PvP activities. This means that scouting, attacks, raids, and province invasions can happen often, especially in hotly-contested kingdoms.
Naturally, the players who have been in the game for a long time now already have developed rich cities, have a roster of strong heroes, in command of big armies, and belong to powerful alliances. That is exactly why, whenever you plan to attack, you have think carefully. Remember, raising an army takes a long time and a huge deal of resources so make sure that you will only make calculated risks.
In this subsection, we will share to you guidelines on how to estimate other cities so you can avoid biting more than you can chew (or taking on a foe that can easily wipe out your squads).
4.1.1 Study Your Targets
When looking for targets, the first thing you must check should be the signs of strength and development. The usual indicators for those will be the level of their City Hall and Might. The level of the City Hall implies how focused the leader is because each upgrade level has several conditions intertwined with upgrades of other buildings and such can only be met if the player is committed to the game.
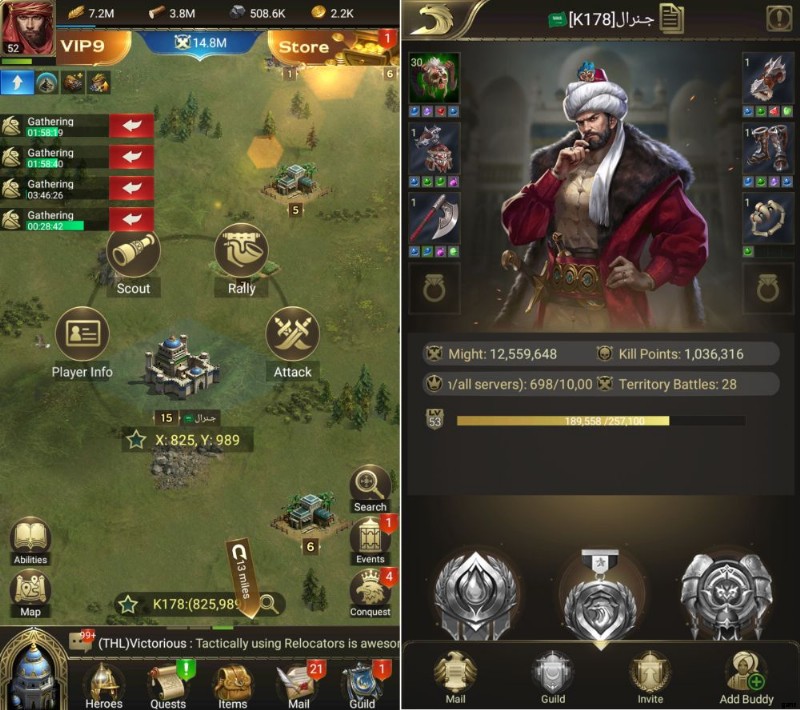
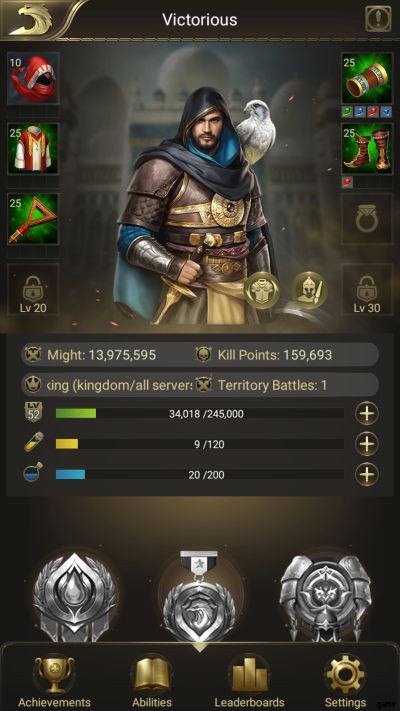
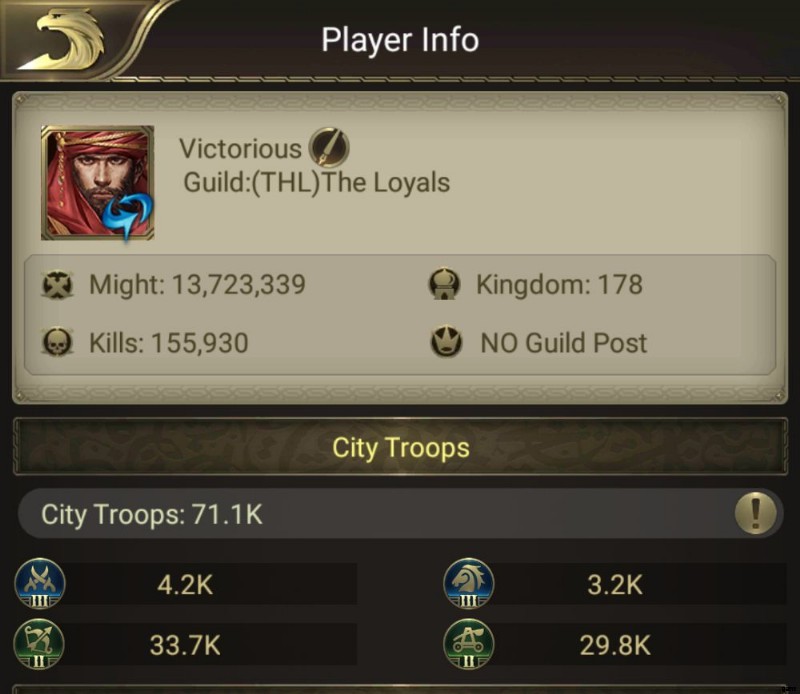
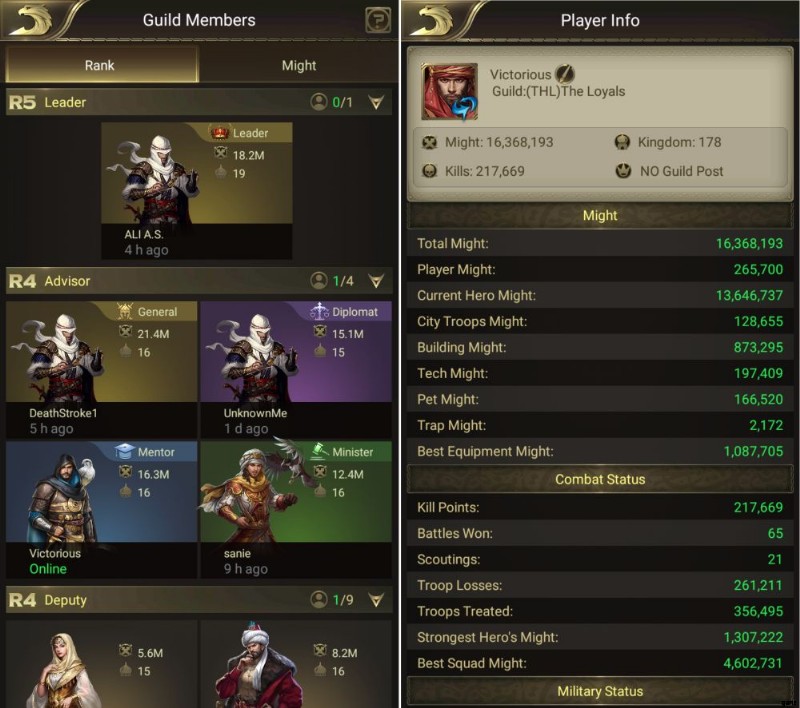
The second thing would be to analyze their Might. When you check on the Player Info, the details on total Might, Kill Points, Ranking, and Territory Battles are readily available. If there is wide gap in your favor in all your departments, treat that city as viable target. In the screenshot above, while we have an over 2M edge in Might and stands nearly 200 spots higher in the rankings, the other player is miles ahead in terms of Kill Points and number of Territory Battles participated in. The conclusion:this player can wipe out even my best team; its best to check another target and we did.
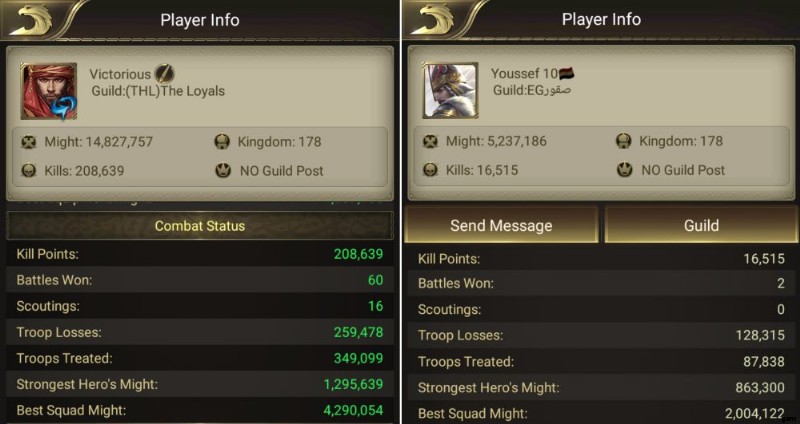
The third step is to see further info. From this view, you can check a player’s battle stats and guild, these are very important. Moving on to another target, we spotted the guild leader of a player who once attacked us. Viewing more info allowed us to see more than the lead we have in Might and kills; it opened our target to deeper analysis.
– Battles Won suggests the army’s reliability.簡潔でシンプル。
– The number of Scoutings tells if the player is a risk taker or prefers a calculated approach. Since it was 0, it suggests that the battles he initiated are poorly planned.
– Having a higher number in Troop Losses that Troops Treated signals that he forces gets wiped out often. Yet another indication of his military strength.
– Best Squad Might is the final telling sign, if his troops are all at home, the gap suggests that my contingent could eliminate them.
The fourth consideration is to check if your target has a guild. When you attack a player belonging to a guild, all of his guild-mates will be alerted. Most guilds, even the lesser ones, are responsive and retaliatory; when you go after a member, expect that your city will be attacked or at least be scouted shortly. Your main purpose here is to check the stats of the member with the highest Might and estimate their capability to get back at you.
The fifth and final angle to look at is location. Whether your target belongs to a guild or not, you must check around your own and your target’s surroundings. Location check is vital due to the following reasons:
Distance – Target city shouldn’t be too far from yours because if you’re out of Fast March buffs, your opponent has an opportunity to use Shield. This is particularly important if you’re attacking in response to a recent attack or scouting. Make sure that the travel time is less than 15 minutes (the duration of Battle Craze) because if you get lucky, you can imprison their city’s leader.
Potential Backlash – Some guilds are allied with one another (such arrangements are done over social media and Discord) and an unforeseen, brutal retribution might be awaiting for you. If there is a nearby city with a City Hall that is of equal or higher level than yours and has a greater Might, be prepared.
Post-attack Vulnerability – Attacking another city puts you in a Battle Craze turning your name on the map to red. There are advanced players who hunt for Battle-Crazed cities because they can net up to 300 gold from the leader’s capture. Check if there is a powerful city within your 200-mile radius.
Additionally, if your target is adjacent to his guild-mates, the chance of retaliation is much higher. There are two ways to deal with this:brace your city for a series of attacks or strike preemptively. As you can see in the screenshot above, we preferred the latter since we have superior military.
If you follow the above five-step target analysis before deploying your forces, you will be able to estimate your chances of winning even without sending a scout first. In Conquerors:Golden Age, scouting is considered as an act of aggression and it will put your city in a state of Battle Craze; sending scouts can provoke players because an attack usually follows next. If you are committed to attack anyway, storming in unannounced is sometimes better.
Whether to use scouts or not is up to you. It depends on what is your preferred approach to war. Speaking of which, let’s move to discuss tips that could further fine-tune your attacks.
4.1.2 Tips for Attacking
Although waging a war is linear, there are multiple ways to draw the line that connects point A (your city) and point B (your target). After all, Conquerors:Golden Age is classified as a real-time strategy game, so mixing up different approaches in your war efforts is ideal. Regardless if you’re prepping for an AI fight or getting ready to siege a human player’s city, the actions and strategies below will be useful.
Send scouts – Although we indirectly ‘advised’ against scouting earlier, sending a scout can prove beneficial. Upon successfully scouting, you will be able to know which heroes are present in the city/resource node/Intruder Camp that you plan to attack; the presence of traps will be identified too.

The intel you can get from scouting will allow you to tweak your attacking line-up to potentially counter the defenders or avoid being hit by their strengths. In the screenshot above, we learned that the target has 2 squads of cavalry and 1 squad of siege engine; we can then build a team that are strong against those troop types.
Cities will always be outfitted with traps and because scouting intel can identify their presence, you will have the opportunity to configure your attacking team. Based on the above image, the city we scouted have a lot of logs, this type of trap is strong against infantry. In response to that, the smart adjustment is to avoid sending infantry because he has enough to erase an entire infantry-type hero’s squad. <強い>
Use offensive buffs – There are a few offense-oriented buffs in the game that can give you some confidence when staging an attack. Learn here what they do and their strategic implications.

With the help of this buff, your army can fight with a much bigger force closing any numbers gap when you’re disadvantaged or further widening it when you have the upper hand. Note that this does not magically add troops to your squads, it rather allows you to pull some of your city troops (reserved forces) into active duty.
Blessing – It may have a blade for an icon, but it does not only temporarily boosts damage; this buff also boosts your troops’ defense and HP by 20% for 8 or 24 hours.
This is best used when you’re allotting time to attack cities, raid caravans, and fight Intruders. It is much more fitting to use when you are uncertain that you have the edge in the would-be fight. Note that despite the increase in attributes, it will not increase your Might.

Life Saver – Increases your Rescue Rate for an hour. Rescue Rate pertains to the troops injured in combat that can make it back to your city for treatment. The higher the rescue rate, the less troops you have to replenish and treat.
When you already feel the burden of losses from battles and fully understand the impact of losing a lot of troops, you can feel trigger-shy to use your best squads. This buff takes away some fear to go all-in. It is most suitable to use when attacking a province or when you really mean to attack another player, the types of combat where the game has no default ‘discount’ or protection rate for troops.
Activate Abilities – As you increase your Player Level, you can unlock abilities. The abilities that can help offense would be Demoralize (minor DEF and HP reduction to your enemies for1 hour), Combat Aid (+20% Rescue Rate for the next hour), and Battle Orders (a one-hour, 5% increase to Troop Limit).
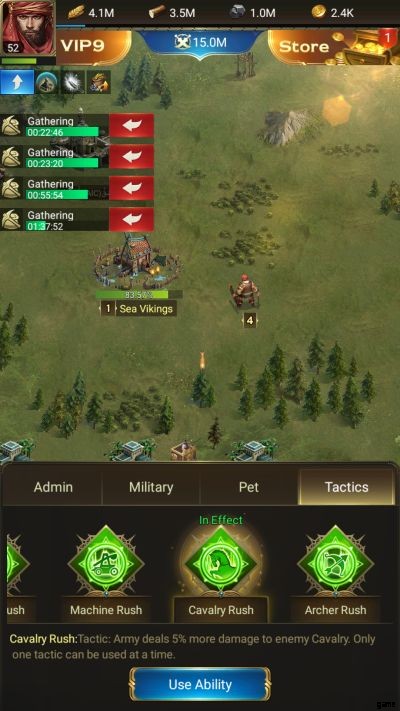
Additionally, if you have gathered intel from scouting, selecting the right Rush Tactic can also swing some favor to your side. For example, you are attacking a city with 10 squads and 5 of which are cavalry, selecting Cavalry Rush can ensure that you will deal more damage.
If you combine the steps in analyzing a target and applying the tips for offense shared in this guide, you’ll be on your way to become a leader capable of rampaging through cities within and below your Might. Happy hunting!
4.2 Details in Defending
The previous section acquainted you with how to mount an effective offense, but to truly thrive within your kingdom you should be equally versed with the ways to defend yourself.
Defense is an entirely different animal because you will be purely dealing with other players. As such, we will plot this subsection of our Conquerors:Golden Age guide differently. To fend off a sentient rival, we have prepared for you tricks you can employ to stay alive and elusive.
4.2.1 Defensive Considerations
No matter how engaged you are in the game, it is understandable that you can’t be online all the time. There will be hours that you will be unable to attend to your city, but before going offline, you have to take into account the following matters:
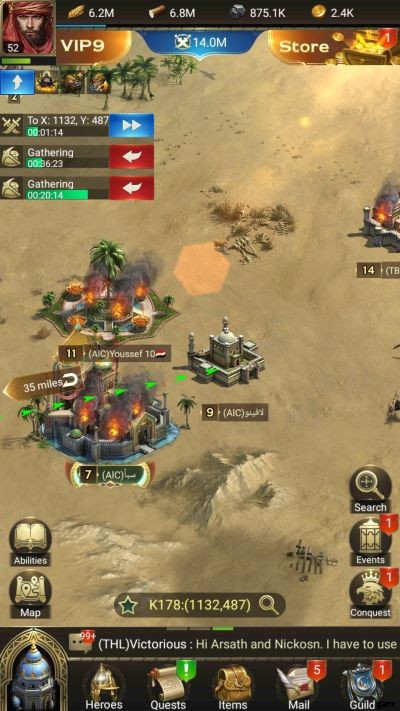
Your current resources stockpile – Like we have shared at the start of this guide’s section, plundering another city is the fastest way to earn food and lumber. If a hostile city has scouted yours and they saw that you have millions of resources exposed, you will likely be attacked, especially if your Might is lower than the scouting party’s.
This happened to us when our city was just days old. Back then, we didn’t know yet that every single drop of resource listed on the top screen total can be seized. Don’t do the same mistake; avert disaster by leveling up your Warehouse or spending as much resources as possible for expensive building and tech upgrades and a full batch of troops before going offline.
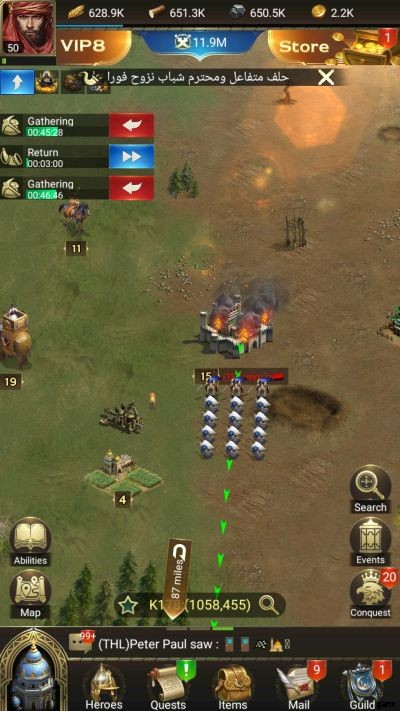
Your troops’ location – When your city or a resource node is about to be attacked, the game itself will give you a tip about sending your troops to expeditions to keep them out of the city/resource node. At the surface, it sounds like it doesn’t make sense because your troops are the combatants of your city and they are supposed to defend it, right? However, the main purpose for this is to prevent a wipe out.
We have witnessed this tactic when we saw two warring cities by chance. In the patched screenshots above, you can see that both players are sending troops to destroy each other’s cities. The other player did a clutch camp creation before his enemy reached the city.
In accordance to this tactic, you can send your spare troops (especially the under-leveled) ones to far expeditions or make them hold camp somewhere else on the map.
Length of offline time – Your city is much more vulnerable when you’re offline because you will not be able to entertain and respond to scouting/attacking alerts. As such, try to estimate how much time you will be off the game. Fortunately, the game has defensive buffs that can get your absence covered.
Shield – This offers absolute protection for your city preventing any scouting or attacks from other players for 8 or 24 hours (it has a 3-day variant only purchasable by gold). A true necessity for any city, even stronger players still use this. Note that it will only protect your city, any external resource nodes you’re using can still be attacked.
You can organically purchase the 8 and 24-hour versions from the Guild Mall just by being active in donations and aids. As this foils aggression, you will be unable to use it when you are in Battle Craze for balance reasons.
Fog – Works exactly similar to the Shield but only prevents scouting. It has 8 or 24-hour variants that can also be procured from the Guild Mall (it also has a 3-day and 7-day versions purchasable by gold). While it cannot stop attacks it is often a sufficient protection because almost all players would send a scout first before attacking cities.
Consider using the appropriate protective buff fitting to the length of time you will go offline. They are investments that will protect your other investments, so don’t hesitate to spend Honor Points or gold to always have one.
4.2.2 Dealing with Attackers
Being aware of the defensive considerations above is not enough; you also need to know what to do in the face of danger. We are sharing here methods on how you can respond to what the game considers as acts of aggression, scouting and attacks.
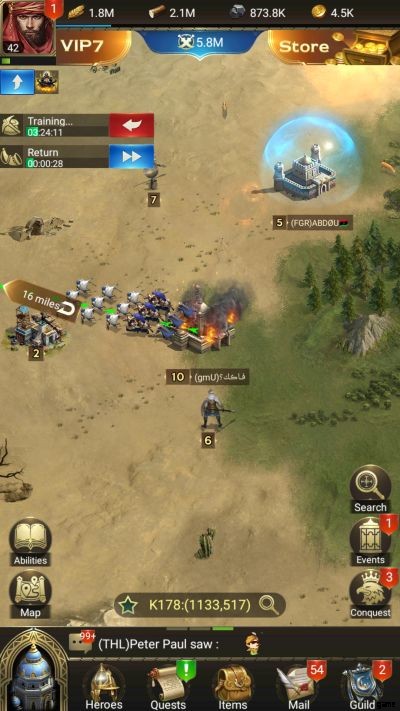
Scouting and attacks on a resource node – Resource nodes are rarely scouted; players usually attack right away especially the veterans. There are actually players who just teleport (use Relocate) around the map and look for occupied resource nodes to attack. They do this to rack up kill points.
When a player scouts a resource node first, it could mean that they are not confident with the force they are sending. But if the provocation turns to full aggression, here is what you can do.
1. Go to the resource node and pull out your troops. You have to do this quickly so the incoming attackers won’t catch your heroes. If you were not able to recall troops on time and they are defeated, the node gets taken over. Either way, observe the attacker.
2. If you notice that the attacker did not actually occupy the seized resource node, it means they are just looking for kills. Simply retake the resource node once the attacker has teleported away.
3. If the attacker stayed on the resource node, you can either choose to retaliate and retake it or simply go to another resource node, preferably one that is farther from the attacker. Estimate the enemy first by using the 5-step target analysis we shared earlier in this section. Should your force be superior, proceed to attack; if not, just move on.
Based on our experience, kill-hunters only go for resource nodes that are level 5 or higher. Steer away from danger, only go for a level 2 node until the tension in the area has mellowed down.
Scouting and attacks on your city – As we have mentioned earlier, scouting is a prelude to an attack. If you have upgraded your Watchtower, you’ll be able to learn who sent the scout. Don’t take chances and dismiss it as ‘just’ scouting, proceed to do the following defensive moves:
1. If you are able to react to the scout before it touches your city, activate Fog. Seasoned players know well the impact of failed attacks so when they are unable to scout, they suspend any attacking plans.
2. Should they push with a force to sack your city, use a Shield. Don’t ever think that using two defensive buffs is a waste, remember, there is an observation phase in this thought process and you are merely reacting.
In case you are in Battle Craze or you have no Shield available (or perhaps unable to buy one at the moment), there are two options. You can either brace for an attack or flee. We will break down the steps you can take for both.
Bracing for an Attack – Since you do not have a Shield,it means you have to fight off the attackers. You should then focus on finding ways to prevent your troops from being wiped out and securing your resources. Below are some of the actions you can do.
1. Minimize your troop losses by executing the earlier discussed trick of sending heroes to far expeditions or making them camp away from your city. Alternatively, if you belong to a guild, you can make your troops garrison in an ally’s base.
2. Call for help from your guild mates. Wealthy and powerful allies won’t hesitate at the chance to strike others and may even use Fast March buffs to get to you on time.
3. Have a complete set of traps. Consider using time boosters to instantly fill your trap storage. Additionally, you can use the Artisan ability to gain some traps instantly. Setting traps is of utmost importance especially if you won’t make your heroes stay and fight.
4. Use the leader ability Safeguard. Even if you lose the battle, you will at least keep your resources intact. Only use it when the enemy is about to reach your city to maximize its duration in case your opponent (and his guild) go for a series of attacks.
5. Ensure that you will only have a small number of resources displayed on the top of your screen. As suggested earlier, you can take a heap off your wealth by ordering a full batch of troops and starting expensive structure upgrades and tech research.
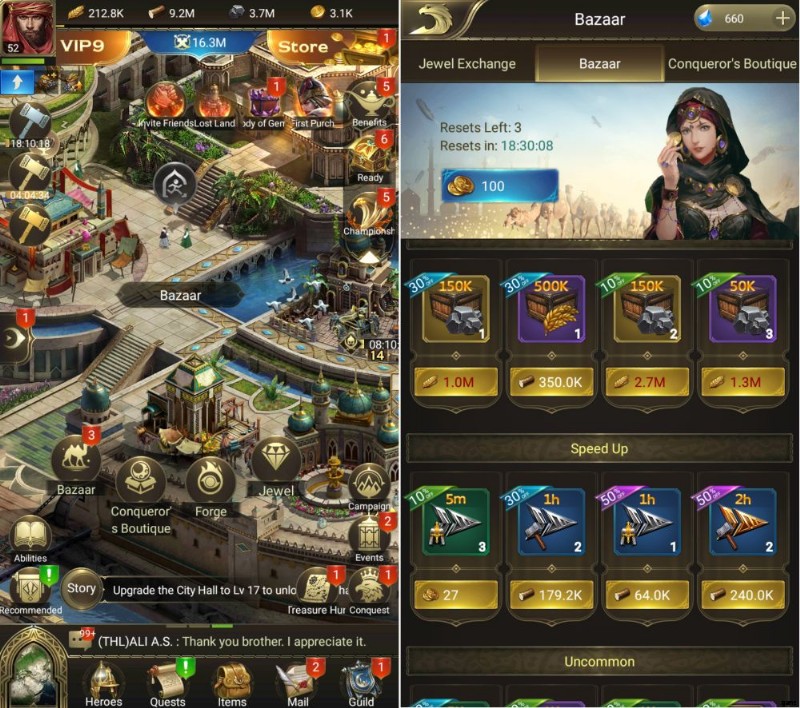
6. If there are still millions of resources left after spending, do the Bazaar trick. The trick essentially lets your Bazaar become an extension of the Warehouse. The Bazaar will often have deals that are priced by the millions, buy every single deal purchasable with food and lumber, use the reset for as many times as your gold can allow.
This is an ingenious way to ‘pack’ your resources and store them safely in your inventory. Don’t hesitate to use of up to 500 gold for resetting the offers. The total price of the resources you can save via the Bazaar trick is way too little compared to their actual prices at the Mall. After all, you can easily gain way more than 500 gold daily anyway.
When the only choice you have is to fight, make sure to perform all of the steps above especially if the attacker has far greater Might than yours. If the gap isn’t much and you have a full stock of traps, you stand a chance at holding a successful defense. Man your battle stations and do your best to defend your city!
4.2.2 Elusive Tactics
Fighting maybe cool but it is generally not advisable if it will likely be a one-sided encounter. If you’re new to the game, cannot speak Arabic (the main language used in the game), and have not checked the social network portals of Conquerors:Golden Age, it will take a while to know which guilds you should avoid conflict with.
In our experience, a player from a strong guild power-tripped to hunt us when we became wanted after capturing the leader of a city that attacked us. We were scouted by multiple cities but none of them were able to attack us despite being in Battle Craze.
What we did to avoid being destroyed? We played elusive. After all, they cannot kill what they can’t hit. The key to being illusive relies on the Relocator.
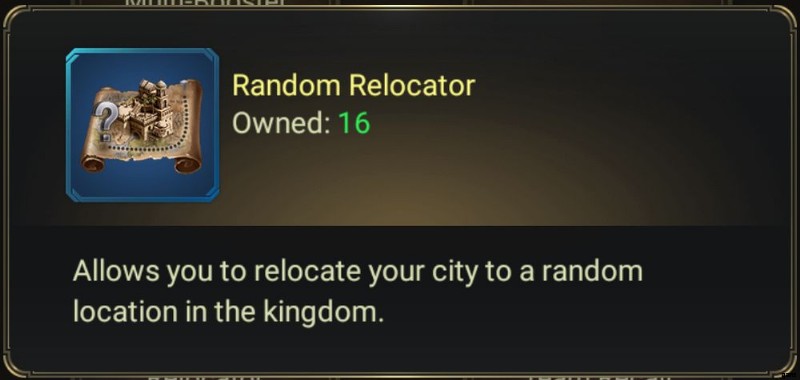
Acts in the same way as Fly Wing in Ragnarok:Eternal Love, this item randomly teleports you which you can use for escaping tight situations. Attacks and scouting commands meant for your city has a certain distance breaking point when you move. The key is to keep using the relocator and be more than 300 miles away from the source of attack/scouting.
The distance you gain can exponentially increase the time required for a marching army or a scout to reach you. Eventually, your pursuers will end pursuit. You don’t have to spam use Relocators, just simply be elusive until the Battle Craze duration is over and then use Shield.
Once you have a shield up, your pursuers will have no choice but to give up. After pulling off such an escape, players may still be persistent and wait out for your Shield to wear off; some may even go as far and message you to intimidate you.
If you found yourself being hounded by a persistent foe, there is another trick in the book:you can change your name using the appropriate item and include special characters to make it difficult for other players to simply type it out. The messaging system in Conquerors:Golden Age is tethered on names and not player data.
Transferring your kingdom plus changing your name is akin to moving places and getting an entirely new identity to shake off anyone going after you. We learned this when it was our turn to pursue another player; soon as he sent his last message to us, he changed names and we are unable to track him down after.
At this point, you are now well-equipped with ideas on how to handle scouts, attacks, and even threats from other leaders. You need to do what you can to stand your ground in the kingdom. Your city needs you to be brave and smart; be sharp in knowing when it is best to fight or flee.
4.3 Campaign Battles
Discussing about combat won’t be complete if we miss the fighting feature in Conquerors:Golden Age where players have the most form of control in, Campaign battles. Accessed through the Portal, this mode holds most of your way to progress in the game’s story line.

Campaign battles will be against the game’s AI (PvE), but unlike fighting rebels, selecting a team with a higher total Might will serve no guarantee for a victory. Conversely, even if you field a team with a lower total Might, you can still win.
The key in Campaign Battles is to send your best team with a relative Might to the enemy while minding what the intel says. The intel in the screenshot above suggests to use a hero with a multi-squad attack; since that particular hero is currently under-leveled for us, we used ones that have skills capable to hit multiple squads.

Might disadvantage is not really an issue as long as you understand the enemy’s strength and fit a counter to it. In the combined screenshots above, we are behind by a significant amount of Might. Despite that, we won because upon knowing the enemy will be cavalry-heavy, we used three squads of back-line damagers to thin out their numbers as they clash with our two-squad frontline.
Knowledge about heroes is crucial to succeeding in campaign battles. Take time to read what the skills of your heroes does. Some heroes have passives that kick in at the start of the match; some have active nukes and supportive skills.
The Arena is formatted in the same way as Campaign battles, but that is rather an optional mode of the game and it will take months to years of playing before can be truly competitive in it.
And that zips our Conquerors:Golden Age guide! If you have read the guide from the top up to this point, we want to thank you for taking your time in reading this extensive guide for Conquerors:Golden Age.
It took us some time to be familiar with the game and actually be good, so if you’re just somewhat starting out and you feel that your Might isn’t growing fast enough, just follow all the tips, tricks, and strategies we shared here. The knowledge we shared here enabled us to grow our Might by 1M every 1-2 days. In fact, when we joined our guild, we barely had 5M; now, we are the third strongest member!
Your growth in the game does not only depend on how much hours you play, knowing what to do on those hours is what will help your city develop fast. It is our pleasure to compile for you all the information you need to become an excellent leader in Conquerors:Golden Age.
Whether your new or an old Conquerors player and you think we missed something in this guide, feel free to share to the community what you know, Let’s help each other’s cities out.
Before we head out to attend to our cities, we are capping this article with a set of insightful FAQs that fellow leaders may need to know.
QUICK QUESTIONS ABOUT CONQUERORS:GOLDEN AGE
Q:How much time you need to play daily to become strong?
A: There is no hard-and-fast rule to answer this. However, what we can tell is, if you’re just starting in the game and you wish to improve your Might at a decent rate, playing two times for about two hours each day should be enough. The first one is to complete the dailies and the second is to ensure you can do all grind activities especially the guild-related ones.
Q:Some reviews said that you need to pay real money to be good in the game.これは本当ですか?
A: While spending real currency to buy items, promo packs, and passes can help a lot, Conquerors:Golden Age was designed to still be ‘friendly’ to free-to-play gamers. Follow the tips, tricks, and strategies we shared about daily actions and grinding and you can fare decently.
In the creation of this guide, we are purely F2P yet we are able to consistently gain 1M Might every 2 days and we have a decent winning rate in battles. Although, admittedly, we grinded hard and practically played all day every day. Still, you can advance at your own pace and the information we shared in this guide will remain applicable.
Q:I’m willing to spend real money in Conquerors:Golden Age, what should I buy?
A: If you are planning to take your Conquerors:Golden Age journey to the next level, the best features to purchase would be any of the following:
– Battle Support Pass because it automatically does administration tasks for you (basically all the dailies).
– 7-Day Windfall because of the unmatched mix of gold, Moonstone, and 12-hour time boosters.
– Arabic Moon because of the waiting time deductions and boosts for gaining Player and Hero EXP.
Note that there is a plethora of things one can purchase, but the three we listed would favor players who are just starting out and may not have too many hours to spare daily to actually play the game. Keep in mind that this is just a recommendation.
Q:I can’t seem to claim all the Daily Quest chests, how can it be done?
A: All of the chores mentioned in the Daily tab of Quests clearly mention their individual conditions; the confusing ones are those asking to gather resources. The sure way to do those is to clear at least a level 4 farm, sawmill, or mine to meet the ones requiring 500,000 food and wood and 50,000 ore (that’s three separate nodes for each in total).
The game does not check for the total output and that is why even if you finish a particular type of level 2 resource node using all your expeditions slots at the same time, you still cannot accumulate points.
Q:I am able to get all Guild Donation Chests, is there a point to keep donating after that?
A: 絶対。 Even if you have taken all four Guild Donation Chests for the day and there is no ongoing guild tech research to help with, donating will always give you Honor Points. There are items in the Guild Mall that you need on a daily basis and stocking up on Honor Points is a good idea so you can continue to afford them.
Q:How many heroes do I need for a gathering expedition?
A: A gathering expedition can be done even if you only send one hero. However, the more heroes you assign to an external resource node, the shorter the gathering process will be. Try it out, you can see that you can clear out a level 1 farm using 4 heroes a whole lot faster than you would if you just use one hero.
Q:Strong players always attack me, what can I do?
A: Being attacked is one of the bittersweet realities in Conquerors:Golden Age and you simply have to deal with it and adapt accordingly. For this, we have two suggestions.
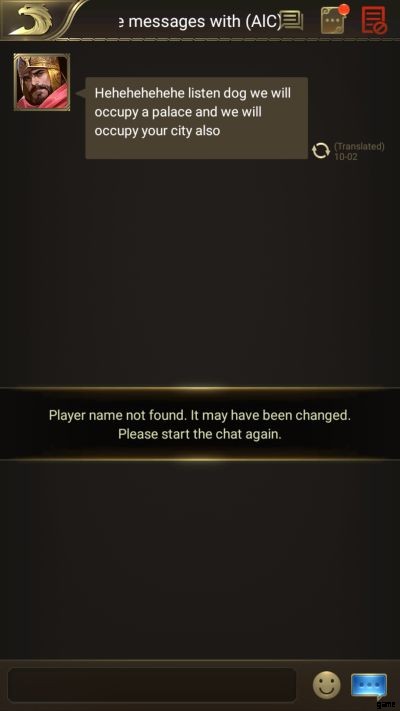
The first one is to go with diplomacy. You cannot fight back everyone especially against players who have been in the game for years already. Try messaging them and politely request to stop attacking. While the game’s combat nature can be toxic and some guilds (accordingly to veteran players) are ruthless, most of the players especially the ones of Arabic decent are honorable and they will keep their word.
The second way is to be elusive, refer to the defense-related information we shared in the Combat section of this guide.