鉄鋼部門 2 – 初心者向けガイド
このガイドでは、セットアップが重要ないくつかの重要事項についてアドバイスし、ゲームを学習するためのチュートリアルのセットアップ方法についても具体的に説明します。 2019 年 6 月の時点では、公式のチュートリアルはありませんが、このガイドはゲームを学ぶのに役立ちます。それはあなたが行う作業が必要ですが、簡単なスカーミッシュを設定する場合にのみ、簡単に学ぶことができます.ゲームを試して、払い戻しが必要かどうかを 2 時間以内に確認したい場合は、このガイドはおそらく適切ではありません.
第二次世界大戦のゲームが好きで、RTS ゲームを処理できる場合は、間違いなくこのゲームを取得する必要があります。
最後に、このガイドでは、スカーミッシュ モード、オプションの微調整、基本的な戦術について少し説明します。それだけです。他には何もありません。スカーミッシュ モードには、戦い方とゲームのインターフェイスの使用方法が含まれます。マルチプレイヤー、ヒストリカル バトル、ジェネラル モードの別の場所に移動します。ただし、スカーミッシュ モードに習熟していれば、これらすべてに役立ちます。
オプションを使用してゲームをセットアップする
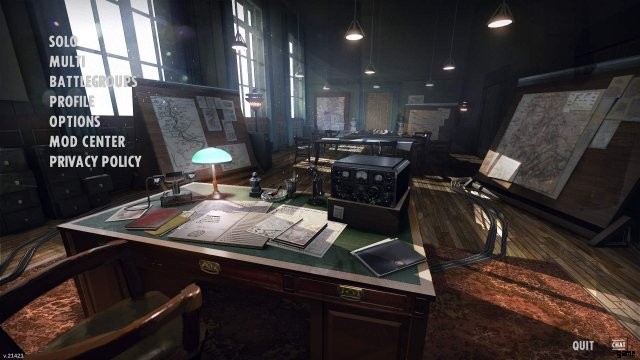
Steel Division 2 (SD2) を起動すると、この画面が表示されます。

[オプション] をクリックすると、下の次の画面が表示されます:この同じ画面がオプションの下に表示されない場合は、左上の [ゲームプレイ] という単語をクリックして、最初に下のスクリーン ショットが表示されるように調整しましょう。
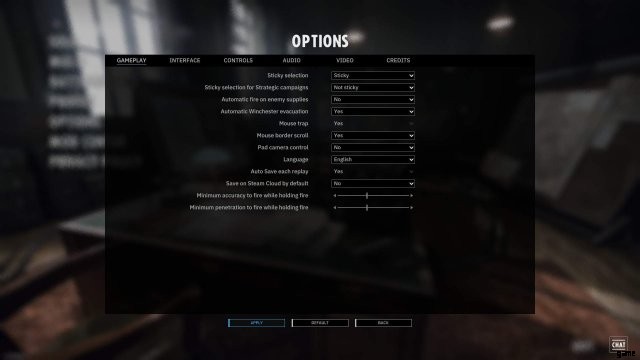
地図のスクロールを許可 – これは、ゲームプレイ画面に移動して行います。
ここで行う主なことは、「マウス境界スクロールの設定」を「はい」に設定することです。これにより、これが設定されている場合にマウスを画面の端に移動するだけで、マップを移動してマップを表示できますマップを移動するには、w、a、s、d キーボード キーまたはキーボードの矢印キーを使用する必要があります。これらのキーは、これを yes に設定した後も使用できます。したがって、「マウスの境界スクロールを設定する」と表示されている場所 (このゲームプレイ画面の約半分) を yes に設定します。小さな白い三角形が表示されるか、下向きの矢印をクリックして変更します。
ゲームプレイ画面のその他のオプションは、後で調整できます。
インターフェース – スタッフと nato カウンターのサイズを変更します。
それで、この画面(インターフェース)のオプションに残っている単語インターフェースをクリックして、マップラベルやその他のものに表示される多くのもののサイズを変更できるので、プレイ後にここに戻って、必要に応じて微調整してください. nato カウンターを使用することもできることに注意してください。一部の人はこれについてフェティッシュを持っており、フォーラムでは nato カウンターを使用するオプションがないという懸念が提起されましたが、おそらくこのオプションにより、これが最上位の選択肢の戦術アイコン タイプで行われるようになります。 . nato に設定して、必要なイベントで nato カウンターが表示されるかどうかを確認します。
コントロール – ここではキーボード ショートカットを使用してメモを作成します。
オーディオは私にとって非常に重要です ゲームをプレイしていないのは、ナレーションがばかげているからです とにかく、まずコントロールを見てみましょう
コントロールという言葉をクリックしてください– これらすべてを紙にコピーしますか?またはスクリーンショットを撮りますか?または、フラップがある場合は、その方法でスクリーンショットを撮ることができます.マニュアルがないため、これは注意すべきオプションの重要な領域です。オンライン マニュアルには、キーボードのホット キーを表示する領域もあります。
さて、オーディオという単語をクリックして、私のお気に入りのオーディオに進みましょう。
オーディオはすべてのサウンドを微調整します。
ここで、主に感謝してオンまたはオフにすることができます!!! 、音楽、声 - あなたのユニットが常にあなたに向けてバブリングするもの、雰囲気、これは、あなたが聞くことができる一定の背景の「戦争」ノイズのボリュームコントロールです - これは、ノイズが聞こえた場合にそれを取り除くことができます。あなたのユニットの 1 つが敵ユニットであるか、またはその両方である – 誰かが出てきた mod がこのバックグラウンド ノイズを改善する可能性があることを思い出してください。私はロケットが発射されるのを絶えず聞いています - とにかく十分な泣き声 - sfx のボリュームをオフにすると、ほとんどすべてが途切れてしまうようです.良いニュースは多くのオーディオオプションがあることです.私も動きがあるので、好きなように設定してください.オーディオに対する私の傾向について言及して、誰かを怒らせました。
動画 – マウス マップのスクロールを有効にします。
ビデオは重要です。ビデオをクリックして、必要に応じてガンマを調整、操作、設定できるようにするには、「ウィンドウ タイプ」をフルスクリーンに設定する必要があります。私にとってのゲームは暗すぎるので、ウィンドウの種類をフルスクリーンに設定してから、ガンマをいじります。
まともなモニターを持っている場合は、モニターを介して行うこともできますが、ゲームで欲求を満たしてみてください。オプションでそれを行ってください.
頻繁に適用をクリックして、変更をロックします。
カオスなしでゲームを学べるように、自分用のチュートリアルを作成する
このゲームにはチュートリアルが付属していないことが大きな問題のように思われるため、自分で「チュートリアル」を作成する方法については、ここで説明します。返金するかどうかに関係なく、このチュートリアルはおそらく時間の無駄になります。このチュートリアルは、スチール ディビジョン 44 ノルマンディーを所有してプレイしている場合、このタイプのゲームをプレイしたことがない人を対象としています。
わかりました。あなたが設定したこのチュートリアルは、ゲームがどのように機能するか、どのように物を殺して物を爆破するかについてのインターフェースを支援します。
小競り合いモードを使用してこれを行います。小競り合いモードを設定して、対処するユニットと対処する敵ユニットがわずかになるようにします。このようにして、インターフェースを学ぶために敵のいない小競り合いを設定したい場合にも、インターフェースを学ぶことができます。ただし、敵がいる場合でも、この小さな小競り合いを行うだけで十分です。次に、このガイドの他のセクションで、ユニットをマップに配置し、ユニットを移動させ、少なくともある程度効果的に使用するように適切に指示されることを願っています.
そのため、最初にこれを達成するために小競り合いを設定します。メイン画面にいることを確認します。これは、ゲームが起動したときに表示される最初の画面です。次にソロをクリックします。以前にオプションをクリックした可能性があります。ソロは一番上にあります。そこにソロが座っているのが見えない場合は、頭部移植をお勧めします。
次に、この次の画面で [写真にはありません] SKIRMISH をスリックします。この次の画面の上部に Skirmish という単語があるので、それをクリックすると、このようなものが表示されます

この写真の右側には、LOBBY in White が表示され、次に Player List が表示されます。このフレーズの最後に「Random Axis Premade Battlegroup」という単語が表示され、白い三角形のようなものです。この画面にある他のすべての白い三角形の外観に注意してください。これは、希望どおりに小競り合いを行う方法です。これらの三角形はしばしば下向き矢印と呼ばれ、「ドロップダウン ボックス」をクリックすると表示され、何かを選択できるようになります。コンピューターの専門用語で十分です
チュートリアルでは、画面を下の図のようにする必要があります。
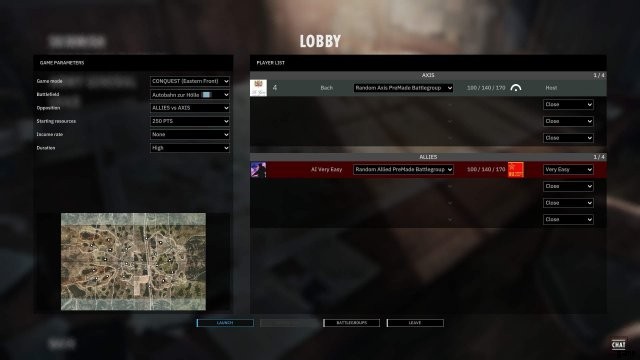
したがって、右端でこれを行うには、白い三角形の下矢印をクリックして、すべてが閉じていることを確認してください。いくつかのスロットはすでにこれを言っています。自分自身と敵を一緒に遊ばせておきたいので、軸をプレイしている場合は、バトルグループを含む味方スロットを残すことができます。次に、非常に簡単に選択することで、小競り合いマップにある敵のバテルグループを作成します。 AI が非常に簡単に設定されています。他のすべてのスロットに対して必ず閉じるを選択してください。
サイドまたはチームを切り替える方法
このチュートリアルでは非常に簡単なものを選択してください。あなたがホストです - チームを切り替えることもできます 画面の下部にチームを切り替えるためのボタンがあります ボタンがグレー表示されている場合があります、ホスト、この「スロット」であなたの名前またはスチームアイコンをクリックしますチームの切り替えボタンが点灯しますそれをクリックすると、あなたがいた場所に応じて味方または軸のいずれかである他のチームに移動する必要がありますチームの切り替えをクリックしました。
これは重要です – ゲーム パラメータ エリアでは、さらにカスタマイズできます。
この画面の左側 (左側のゲーム パラメーター) を非常に簡単に微調整するように設定された 1 人の敵との小競り合いに自分自身と自分だけがいるので、このエリアでは、この小競り合いに関する他のことを指定できます。小さな単語ゲームのパラメーターに注意してください。これが次に行うことです。こちら側の小さな白い矢印、「下向き矢印」もクリックします。
「開始リソース」、「収入率」、および「期間」をいじるだけです。リソースを開始するには、250 に設定し、収入率を [なし] に設定してから、期間を [高] に設定します
これは、オイゲン システムが提供する改善された小競り合いの選択肢の素晴らしい点です。設定したこの小競り合いは、各側に 250 の展開ポイントしかありません。時間が経つにつれて、各側に 250 の購買力があります。あなたは小競り合いをしているので、どちらの側もそれ以上の収入を得ることはありません.最後に、デュレーションを高く設定すると、低に設定した場合よりもずっと長く小競り合いが続くことになります。
したがって、250 展開ポイントを使用して購入することができます。
起動をクリックすると、小競り合いのマップ画面に移動します – 小競り合いに移動しますが、小競り合いはすぐには開始されません – まず、ユニットを配置してから小競り合いを開始します.
これが画面です。
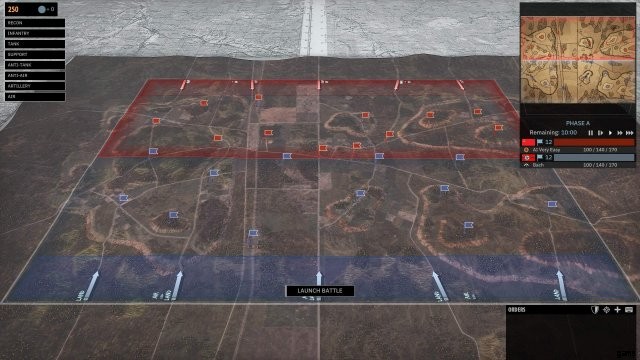
画面はマップによって若干異なる場合があります。また、左上のボックスをクリックしたので、さまざまなユニット名がすべて表示されます。とにかく、左上の黒いボックスの数字 250 に注目してください。これは配備量です。この小競り合いの開始時に利用可能なポイントと、収入率をなしに設定しているため、この小競り合い全体で展開ポイントを取得することはありません。つまり、250 個の展開ポイントが表示されているので、250 個のものを展開できます。
Again, you will not get more deployment points each “minute” of play – this timer will be shown at the top left once the skirmish starts – in future skirmishes you can make sure you get income each minute of play – this is what makes steel division so wonderful, among other things.
Suggestion:first put map on pause
now if you were to click on “launch battle” at the bottom of the screen the skirmish would start so let’s not do that yet; furthermore, the skirmish would start at normal speed, why? Because normal speed is selected by default. On the top right there is a mini map it reads “phase a” directly under this it shows remaining 10:00 this means 10 minutes are remaining in phase a next to remaining 10:00 are speed controls for the skirmish how fast the real time progresses – from left to right these buttons are pause [two ll), slowest speed [i>], normal>, faster, then fastest. Notice normal is in a brighter white so this is what is selected by default.
Turn off normal put it on pause – this way when you start the map if will be on pause then you can click slowest speed – make sure all your units are moving and go from there.
The blue and red flags on the map
In the forums you are not allowed to call these flags if you do your an idiot. They are strategic capture points {caps} which determine if you win the map or not. If you control more of these than the enemy you will eventually win. However he is trying to do the same thing if you move near one of the enemy caps you will probably wish you were never born as you may get attacked.
This is important about caps
Back to the top right again the mini map area you see two flags one of them is your flag it has your name next to it let’s suppose it is german that is what it is for me in this skirmish. There is the german flag then a blue flag then the number 12 below this is my war face name (bach) which means buddy, ah, … Charge , hither ??
It shows 12 for you and 12 for them you want it to be more for you and less for them – capture and keep captured more than 12 of the caps the more the merrier.
Making a Tutorial Continued B – Placing Units
Placing Units
Top left shows 250 your deployment points click on this which shows different types of units you can deploy click on recon – recon units are good for spotting enemy etc. Clicking on 250 toggles the view of the unit list clicking on a shown unit type such as recon shows all of the recon units in your battlegroup notice the screen shot below
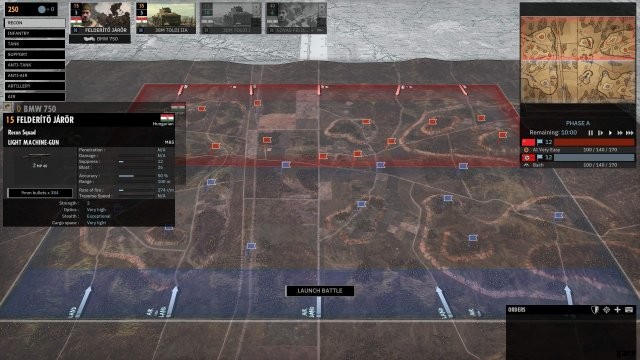
So if you click on Recon and hover your mouse over the 1st unit on the list the one on the left you also get info about that unit. There are 4 slots of Recon units in this battlegroup. The first two slots are clearly seen the 2nd two slots are greyed out. You can ONLY place units that are clearly seen IF you have enough Deployment Points to do so – Deployment Points is the number at the top left it should read 250.
When you click on a recon unit in order to place it on the map you must LEFT MOUSE CLICK the recon unit the one at the far left costs 15 deployment points so click on this and place it on the map. Place it on the map by Left Mouse Clicking again on the map – You must place it in your territory this is the blue area – place it BEHIND THE BLUE LINE the further back the longer it takes to get where its going also put it on a road to get there faster.
Left mouse click a unit in your battlegroup and left mouse click the map.
If you try to place it in front of the blue line you will get red text telling you that you cannot.
Important – explanation of the blue and red lines on the map.
The blue area is your side where you can place units the red line in the center of the map is the main front battleline the enemy is somewhere behind this line unless … unless an enemy recon unit is in your area of the map recon units do not move the battle line this means YOUR recon units do not move the battleline they can sneak around and …. recon. Also if you have a strong presence on the map the battleline may move over and past ENEMY UNITS for example if you have 4 infantry units and a tank near each other the battleline will move towards the enemy even though there may be one stupid enemy unit nearby maybe something like a bazooka team that you do not see that can take out your tank. NOTE:at map start there will be NO enemy units on YOUR side of the Battleline NOT even Recon I hope I did not confuse you earlier this was referring to after the skirmish has been going on for awhile and units have been moving around. Actually at map start the enemy as mentioned earlier can ONLY put stuff in its darker RED area at the top of the map – he to must give order for his units to move forward.
THE RED area at top or back of map is where the bad guys can place units. Now when the skirmish starts you will only see ONE LINE and your side of the map will be blue and the bad guys red.
More on Placing Units – UNPLACING A UNIT so when you placed this unit worth 15 the Deployment Points amount went down to 235. Because you have not started the skirmish yet you can Right mouse click – on the unit card of the placed unit and the unit will be taken OFF the map and placed back into its slot. THE UNIT CARD is the name of the thing you clicked on in order to place a unit on the map. What this means is that for you to unplace a unit you must Right Mouse Click on the correct unit card – of the unit that you want to take off of the map. If you Right Mouse Click a unit card that represents a unit that has been placed on the map then that unit will be removed from the map IF YOU HAVE NOT started or “launched” the skirmish. So make sure you double check yourself to ensure you have placed, unplaced, and placed correctly the specific units you want to start off with.
Go ahead and place all the units that you can on the map – things to consider:
- Recon units cannot move the Battleline so perhaps use them sparingly but they do have advantages.
- You only have a few units in this skirmish because you are starting off with only 250 Deployment Points AND this is all you get for the ENTIRE skirmish. Therefore perhaps pick low cost units.
- You could pick a massive tank that could hopefully take out anything – but this tank can only control part of the map and move the battleline forward but only in one area. Maybe 3 infantry would be better.
- Try to guess what the enemy is going to deploy if you have infantry with no bazookas, and you have no tanks, and you have no AT guns what are you going to do if a tank shows up. Some infantry have tank grenade type things but these work only in close range and if they get lucky.
- There are 24 Capture Points – 24 CAPS so pick many units that you can spread all over the mapt if you decide you need to do this or you may decide to spread them out at map start – you are the Commander.
Giving units orders prior to starting the skirmish
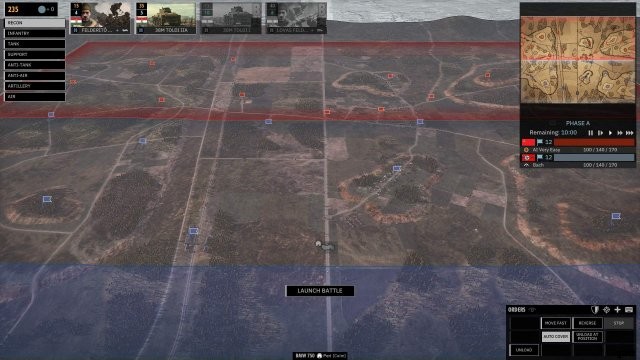
以下のスクリーンショットに注目してください:
This is an infantry unit a non recon infantry unit these guys when they move forward will move the battleline forward – the blue and red battleline – moving this line towards the enemy helps everything.
In order to give this units orders prior to starting the map you simply left mouse click [lmb] on the unit that you placed onto the map – lmb the icon – in this instance the truck icon then you will see at the bottom right of the screen the orders area – click on “move fast” left mouse button move fast make sure you are giving the correct order to the correct unit do this by making sure the unit that you clicked on has a lighter colored highlight – simply hovering your mouse over a unit will give it a lighter colored highlight but if you click on a unit – and move your mouse off it the unit icon color will be grey in color this unit is selected now click on move fast and tell it where to move fast to – when you click on move fast your mouse pointer will change and then left click on where you want it to go. Send the infantry unit to a flag a cap point. This unit will not move until you start the skirmish.
Ok, so all of your units are placed next section will cover starting the map, and more on giving orders prior to map start etc.
Starting the Skirmish Tutorial Fighting with Your Units – Winning
So at this point you have placed all units on the map you know how to give them movement orders so give them movement orders and then you are ready to start the skirmish so now click on “launch battle”.
You can before map start of even after that give elaborate orders that include waypoints that allows your unit to do something different at each way point for example move forward to a spot you choose unload then move into a building. (This is explained in a later section – let’s finish up so other junk first).
The real time begins your units should start moving out where you told them to go. Because cap points are important you are strategically moving to those areas taking into consideration what the enemy may think are the most important caps maybe you will confront him now maybe recon some and hit em later maybe control the map center maybe the left or right side or maybe just wing it.
Important:pause key is your friend
If you gave all units move orders and some or one are not moving then don’t panic hit the p key to pause the game then give your unit a move order hit a speed button either slowest, normal, etc then see what happens. Use pause whenever you want to use it. Maybe you need to stop and check something out maybe your getting attacked but you are focusing on a certain other part of the map.
Capturing a cap point – strategic point – a flag
Also info on the battleline!
Point number 1 irregardless of whether or not any unit yours or theirs is near a cap point a cap point can be captured you do not have to be within a certain distance this occurs as the battleline moves and changes. The battleline moves and changes according to how your units and the enemies units are moving on the map. The closer one or more of your units – unless a recon unit – gets near a cap point the battleline will move and can go past a cap point meaning a red flag is in a red zone but you move towards the flag and the blue red line moves and the line moves past the red flag changing the flags color to blue and wham you have captured the point. In the event the line is not moving though you are moving towards the flag this means … Enemy are somewhere … Aaahh!
So what does all of this mean it means a lot of things you can roll up to a cap point cap it and leave a unit near the cap point you can put units at cap points that you already “own” in case the enemy tries to do a push in that sector.
You win or loose according to controlling most of the cap points so this therefore defines your base strategy – control the most cap points.
Trucks are vulnerable when transporting troops and always so
When you move an infantry unit forward it is in a vehicle these are very vulnerable – especially if it is a truck – some transport vehicles have some armor protection and machine guns etc. Anwyway, so make sure you unload the unit when you get to the cap use the unload order there is an order unload at location and also an order that allows you to unload exactly where you are at now again, go to options> controls> and write down and learn the keyboard shortcuts.
Also at times you will feel its fine to drive all the way up to a cap and unload other times it may look fine but you may want to unload way before it and sneak in and recon the area.
Explanation on the phases of steel division and placing units.
I also failed to mention earlier the phases – so the skirmish mode has phase a, then phase b then phase c. Remember when some of the units at the start of the skirmish were greyed out and you could not choose them this is because they were going to be available during phase b the greyed out unit card should readily show a large letter b in the card. Or a card may even show a phase c. This card will be greyed out until phase c then you can deploy this unit if you have enough deployment points.
Basic Tactics, Waypoints (Multiple Orders to One Unit) and Game Info
Have a balance of forces tanks cannot see good unless another unit is able to spot for them so infantry is needed. If you are in a tanks sight range and you are another tank it seems like they always see you period.
How do you deal with one strong tank when you have two lighter or smaller tanks that can barely pierce the enemy tanks armor ? Tactics by ideally placing your two tanks behind cover on opposite sides of the tank or something similar use hunt move to move one of your tanks out to fire at the tank – then enemy tank will turn towards this tank and you will see its gun loading up to fire or in other words the tank sighing in. Pause the action and or quickly move your tank back into cover using the reverse move and at the same time move your other tank on or near the opposite side in a hunt move out the enemy hopefully will lose sight picture of the first tank and you will get a shot off and move back before the tank can turn onto your other tank. You can also use arty to “weaken” the tank then it will take less shots to finish it off.
Don’t forget to use smoke from arty units. Consider what infantry to bring it may be great to have some with smoke or some with anti tank grenades or flame throwers for tight areas of the map.
If you and the enemies tanks are basically the same strength meaning though they can take each other out it may take a shot or two because of the armor defense values of each is significant then you can usually group your tanks into twos or better yet three’s then you can move in hunt move in open areas and take out a lone enemy tank quickly before it takes out one of yours.
Ammo trucks are needed to fix tanks and replenish arty units.
You should not move a unit out by itself unless it can take care of itself otherwise assume it is going to get shot and then … What are you going to do about it. So maybe move infantry forward with a tank that has proper line of sight “protecting” it or in observation of the area the infantry are moving in. Have arty available when you are attacking to get pinned infantry out of a jam. Move in cover.
Learn the hotkeys go to options> controls> make note of all of the keys.
Waypoints
Give a unit an order hold down the Shift key give the unit another order you now have made a waypoint – release the Shift key now when you click on this unit that has been given waypoints you can then hold down the shift key this will show you the waypoints when a unit gets to the end of the waypoint it is currentlly doing it will do the next one. The colors of each type of waypoints have a specific color. For example, if you place a hunt waypoint it looks like the waypoint color is orange. Light blue is something else dark blue is I think move fast.
You can use waypoints to move fast to an area then unload a unit then move to a specific area to get set up like a building.
Line of sight and weapon range
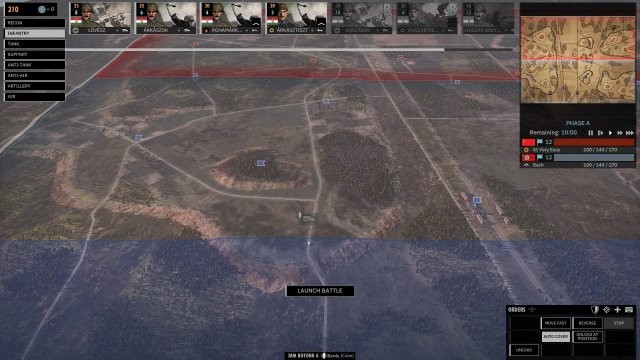
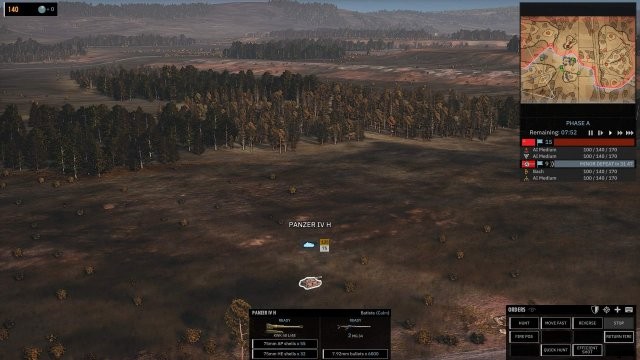
At the bottom right of the screen there is the order window thing next to the word orders there is an iocn looks kind of like and eye or something – click on a unit click on this – if it is an infantry unit it may need to be out of the truck – anyway click on a unit and click on this. You will see your units line of sight according to the location it is in at that precise moment so do this when a unit is stopped. The darker areas are the areas that the unit cannot see. Also and very important is the shaded circle line that is shown this is the range of the unit how far away it can fire at stuff. Units having multiple weapons makes this a little tricky. This line is the range of the weapon that this unit has that can shoot the most far. For example, click on an infantry unit it would be nice if this infantry unit has a bolt action rifle, a tommy gun type weapon, and a bazooka type weapon all these have 3 different distances. So you click on the infantry unit it shows a circle with the number 500 m – notice the screen below:
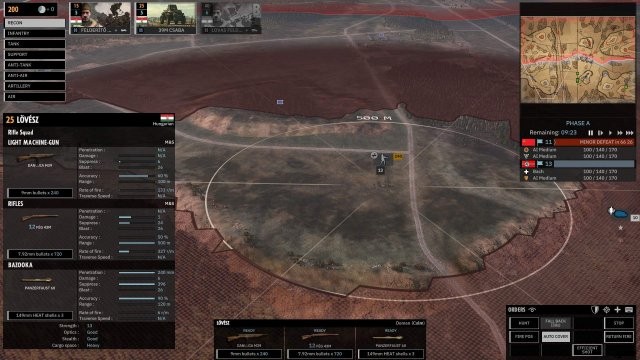
See the 500M ring this is the gun with the longest range of this unit. I have ALSO pressed the I key this is the letter i like I baked a cake. I =INFO so this info window shows you the 3 different weapons this infantry unit has AND in this info window it shows among other things the ranges of each of these weapons the bolt action rifle has a range of 500 meters which is the longest range so hence we see the 500 M greyed circle but ALSO there is a sub machine gun type weapon that has a range of 100 and the Panzerfaust has a range of 120. Notice that ONLY the rifle has the range indicator in BLUE in the info panel.
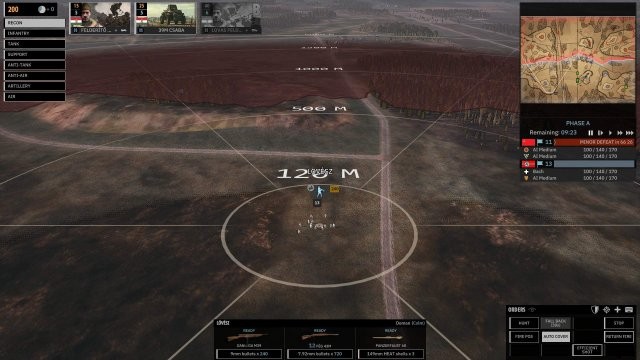
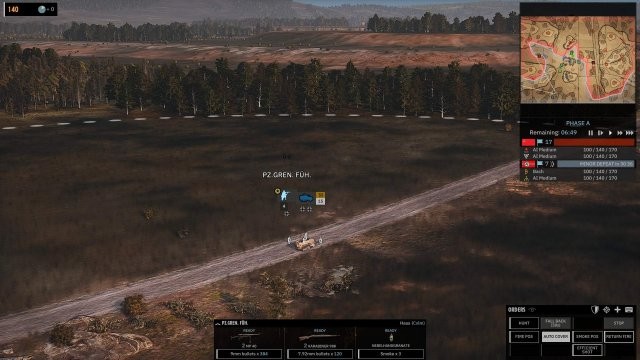
This Is Helpful – In order to get a quick perspective of the ranges of your Panzerfaust and submachine guns. click again on the eye icon looking thing next to orders then press the C key – the C key is the line of sight key for anywhere on a map a unit does not need to be clicked on you can put it in the middle of woods – the mouse pointer and press the C key – in the middle of the woods you will see the line of sight is about 120 meters. Anyway point is you can press the C key and move it over your unit and it will show how far 120 meters is this gives you a basic understanding of how far your shorter range weapons can fire this gives a reference point.
Here is the C key in action – I hope your drooling at this point.
Turning On And Off Specific Guns
You can prevent or allow certain guns to be able to fire that a unit has this is great when you for example want to light up a vehicle with small arms and not use your bazooka etc. So you press the H key to turn all guns off then Left Mouse Click on the guns you want to be able to fire. The ones that will not fire will be greyed out and will say deactivated. IF YOU PAUSE and press the H key it will not grey out anything but when you start back the battle they will be greyed out. Practice this in the tutorial battle you made.
Think outside the box so this means you can do this with your tanks too – YES. Sometimes you may want to save those special 5 rounds of deadly lethal armor piercing rounds so I think you can click that off maybe not but something like that you can do.
So learn the different waypoint colors of the orders you give – don’t just give the order shown in the orders area window but figure out the keyboard shortcuts and use those orders and keyboard commands too as needed. Make small tiny skirmishes to lean the best way you like to do things. You can set up a battle with maybe 500 to start off with that is it. or 250 then LOW as the amount of Deployment points you get after that. Keep the AI on Very Easy until your out of boot camp.
Armor Values and Units Being Transported
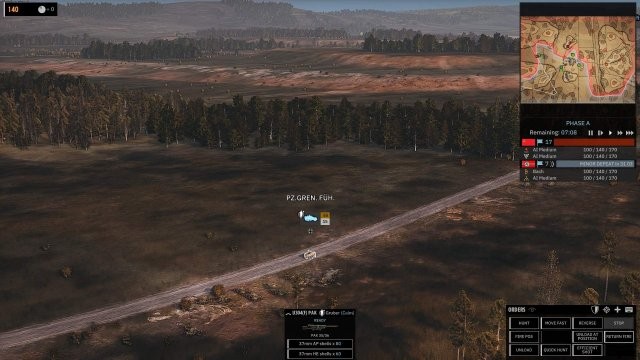
Look there is my cool looking unit below looks like a tank – see the pic below – but what is that at the bottom of the screen a PAK Gruber what …
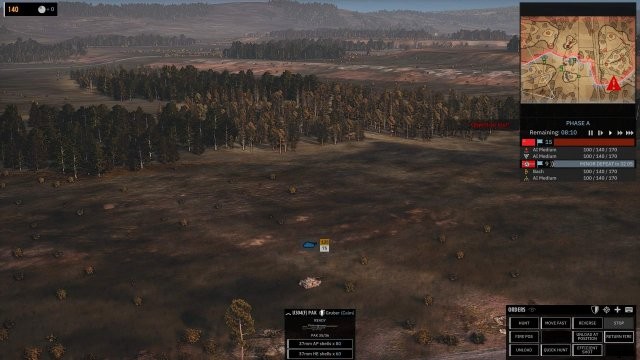
I have clicked on a unit not shown on this screen but have looked at my tank so let’s talk about the tank. The Top number in Orange shown next to the tank is the amount of armor this tanks gun can penetrate it means something like this basically this tank can supposedly take out another tank that has an amour rating of 135 or less. – what is the number 75 – THAT is MY armor thickness at its strongest point or my armor rating. – so beware. Anything packing a 75 orange number – anything having a gun that can penetrate 75 or higher can take my tank out – an enemy tank that has an orange number of 80 can take out my tank – WHAT YOU WILL FIND IN COMBAT IS THAT most anything can damage and suppress your tank but it will need in this example to be near to 75 or higher in order to quickly take it out. The higher the better and quicker.
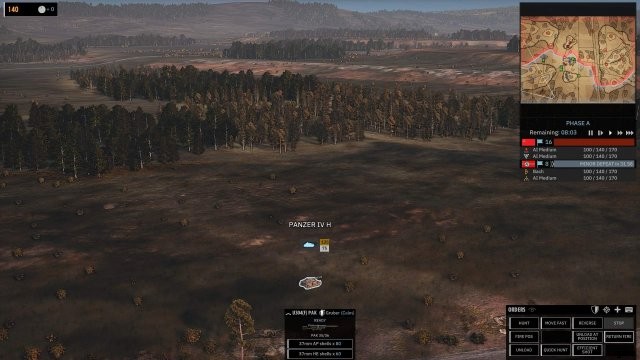
The screenshot below shows we have hovered the mouse over my unit so it tells it what it is a Panzer IV H – as you become an authority on WWII you can simply do this all over the map with each of your units AND the enemies and know that it is basically time to retreat.
This screenshot shows I have finally clicked on my tank notice the info box below showing the two guns this tank has so I get more info so hear I can press H and click on the main gun and keep it from firing endlessly at infantry and just let the tanks machine gun suppress and take out the infantry if so desired.
I should have screen shotted this tank with the I info key pressed in order to compare armor thickness vs the white number on bottom I think we would have found various armor thickness on various areas of the tank with the front being the most thick at a 75 rating yeah I just did that it read front 75 m and less thick areas were on other parts so the info key use it!
Main Gun Deactivated

Vehicles Transporting A Units
This shows my infantry unit outside my vehicle notice this vehicle also has armor ratings .. anyway
Shows Unit It Is Transporting
Notice the screenshot below clicking on a vehicle which is what I think I did hear shows you a name which is what the vehicle is transporting so learn the names the small start indicates by visual that this is an officer unit.
Read the online guide about officer units.