新しい Rise of Kingdoms ガイド、司令官ガイドとペアリング、Tier リストと司令官
ライズ オブ キングダムズ RTS(リアルタイムストラテジー)モバイルゲームです。世界中のプレイヤーが、利用可能な多くの王国の 1 つで一緒にプレイします。
ゲームをプレイすることを考えているか、ダウンロードしたばかりか、まだコツを学んでいるかどうかにかかわらず、あなたが望んでいる究極の都市を達成するために正しい道を進みたいと思うでしょう。
最高の指揮官を見つけて組み合わせる方法を学ぶ 、進行状況、才能の構築とツリーを計算し、コードを引き換えます 、および優れたゲーム体験を実現するためのヒントとコツ。
ライズ オブ キングダム コマンダー ガイド
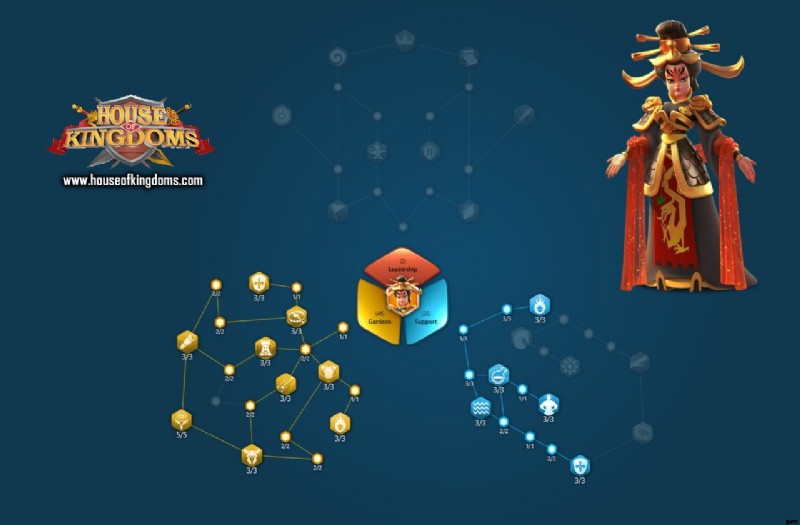
まず、戦闘に参加するには司令官が必要です。 3 つの専門分野によって、すべての指揮官のタレント ツリーを平準化できるタレント ツリーが決まります。すべての指揮官は、指揮官のスター レベルに応じてロックを解除できる 4 つのスキルを持っています。レジェンダリーおよびエピックの指揮官は、最初の 4 つのスキルの 1 つを向上させる 5 番目のマスタリー スキルを持っています。 4 つのスキルすべてをレベル 5 にすることがロック解除されます。星のレベルは、その司令官に固有の彫刻または一般的な彫刻を犠牲にすることでロックを解除できます。
司令官の層リストに関する情報の功績は、Rok Guide にあります。
レジェンダリー司令官ティア リスト
ティアS
| 司令官 | 属性 A | 属性 B | 属性 C |
|---|---|---|---|
 アッティラ アッティラ |  オープン フィールド オープン フィールド |  ラリー ラリー | -- |
 関羽 関羽 |  オープン フィールド オープン フィールド |  ラリー ラリー | -- |
 リチャード リチャード | シティ ディフェンス |  オープン フィールド オープン フィールド |  フラッグ/フォート ディフェンス フラッグ/フォート ディフェンス |
 イソンゲ イソンゲ |  シティ ディフェンス シティ ディフェンス |  オープン フィールド オープン フィールド |  ラリー ラリー |
 ジンギスカン ジンギスカン |  オープンフィールド オープンフィールド |  ラリー ラリー | -- |
 アレキサンダー大王 アレキサンダー大王 |  オープンフィールド オープンフィールド |  ラリー ラリー | -- |
 エドワード エドワード |  オープンフィールド オープンフィールド |  ラリー ラリー | -- |
ティアA
| 司令官 | 属性 A | 属性 B | 属性 C |
|---|---|---|---|
 武則天 武則天 |  シティ ディフェンス シティ ディフェンス |  フラッグ/フォート ディフェンス フラッグ/フォート ディフェンス | |
 サラディン サラディン |  オープン フィールド オープン フィールド |  ラリー ラリー | -- |
 トミリス トミリス |  オープンフィールド オープンフィールド |  ラリー ラリー | -- |
 武田 武田 |  オープン フィールド オープン フィールド |  ラリー ラリー | -- |
 レオニダス レオニダス |  オープン フィールド オープン フィールド |  ラリー ラリー | -- |
 マーテル マーテル |  オープンフィールド オープンフィールド |  ラリー ラリー |  フラッグ/フォート ディフェンス フラッグ/フォート ディフェンス |
ティアB
| 司令官 | 属性 A | 属性 B | 属性 C |
|---|---|---|---|
 曹操 曹操 |  バーバリアン/フォート バーバリアン/フォート |  オープンフィールド オープンフィールド |  ラリー ラリー |
 コンスタンティン コンスタンティン |  シティ ディフェンス シティ ディフェンス |  オープンフィールド オープンフィールド |  フラッグ/フォート ディフェンス フラッグ/フォート ディフェンス |
 ハンニバル ハンニバル |  オープンフィールド オープンフィールド |  ラリー ラリー | -- |
 フレデリック フレデリック |  ラリー ラリー |  オープンフィールド オープンフィールド | -- |
 メフメト II メフメト II |  ラリー ラリー |  オープンフィールド オープンフィールド | -- |
 エセルフレード エセルフレード |  バーバリアン/フォート バーバリアン/フォート |  オープンフィールド オープンフィールド |  ラリー ラリー |
ティア C
| 司令官 | 属性 A | 属性 B | 属性 C |
|---|---|---|---|
 エル シド エル シド |  オープンフィールド オープンフィールド |  フラッグ/フォート ディフェンス フラッグ/フォート ディフェンス |  ラリー ラリー |
 ジュリアス・シーザー ジュリアス・シーザー |  ラリー ラリー |  オープンフィールド オープンフィールド | -- |
 みなもと みなもと |  オープンフィールド オープンフィールド |  バーバリアン/フォート バーバリアン/フォート |  ラリー ラリー |
 シャルルマーニュ シャルルマーニュ |  ラリー ラリー | -- | -- |
ティアD
| 司令官 | 属性 A | 属性 B | 属性 C |
|---|---|---|---|
 ソンドク ソンドク |  収集 収集 | -- | -- |
 クレオパトラ クレオパトラ |  収集 収集 | -- | -- |
 石田 石田 |  収集 収集 | -- | -- |
エピック司令官ティアリスト
ティアS
| 司令官 | 属性 A | 属性 B | 属性 C |
|---|---|---|---|
 孫子 孫子 |  シティ ディフェンス シティ ディフェンス |  オープン フィールド オープン フィールド |  フラッグ/フォート ディフェンス フラッグ/フォート ディフェンス |
 オスマン I オスマン I |  ラリー ラリー |  オープン フィールド オープン フィールド | -- |
 ペラギウス ペラギウス | シティ ディフェンス |  オープン フィールド オープン フィールド | -- |
 ヘルマン ヘルマン |  シティ ディフェンス シティ ディフェンス |  オープン フィールド オープン フィールド |  フラッグ/フォート ディフェンス フラッグ/フォート ディフェンス |
ティアA
| 司令官 | 属性 A | 属性 B | 属性 C |
|---|---|---|---|
 ジョアン ジョアン |  収集 収集 |  オープン フィールド オープン フィールド | -- |
 スキピオ スキピオ |  ラリー ラリー |  オープン フィールド オープン フィールド | -- |
 バイバーズ バイバーズ |  バーバリアン/フォート バーバリアン/フォート |  オープン フィールド オープン フィールド | -- |
 ベリサリウス ベリサリウス |  オープン フィールド オープン フィールド |  バーバリアン/フォート バーバリアン/フォート | -- |
 乙支 乙支 |  オープン フィールド オープン フィールド |  シティ ディフェンス シティ ディフェンス | -- |
 楠 楠 |  シティ ディフェンス シティ ディフェンス |  オープン フィールド オープン フィールド |  フラッグ/フォート ディフェンス フラッグ/フォート ディフェンス |
ティアB
| 司令官 | 属性 A | 属性 B | 属性 C |
|---|---|---|---|
 ブーディカ ブーディカ |  バーバリアン/フォート バーバリアン/フォート |  オープンフィールド オープンフィールド | -- |
 ロハール ロハール |  バーバリアン/フォート バーバリアン/フォート | -- | -- |
Rise of Kingdoms 引き換えコード
Rise of Kingdoms の最新の有効なギフト コードは次のとおりです またはコードを引き換えて、ゲームを楽しくプレイしてください。
それらをコピーして以下のガイドを読み、それらの使用方法を学び、宝石、ゴールデン キー、リソース トークンなどの多くの貴重なリソースを取得してください。
最新作 Rise of Kingdoms コード
<オール>注:コードは、作成から 20 日未満の新しいアカウントに対してのみ機能します。
期限切れのコード
<オール>Rise of Kingdoms コードの使用方法
<オール>


- 報酬を受け取るには、メールボックスを開きます。
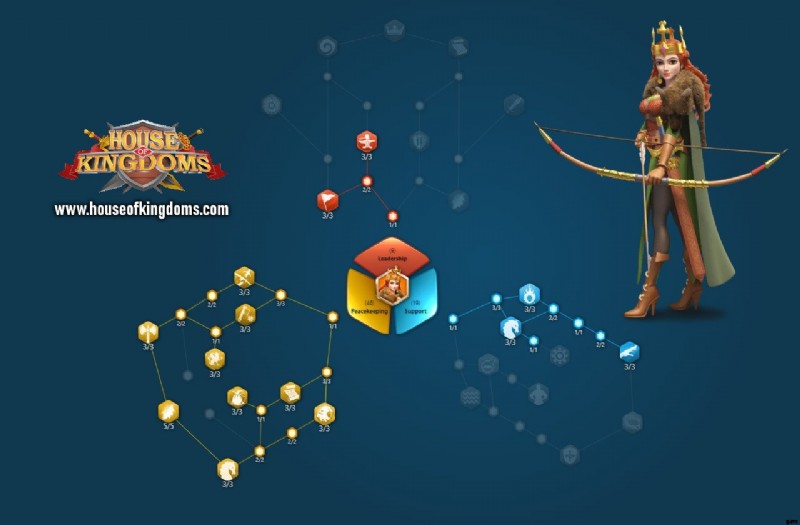
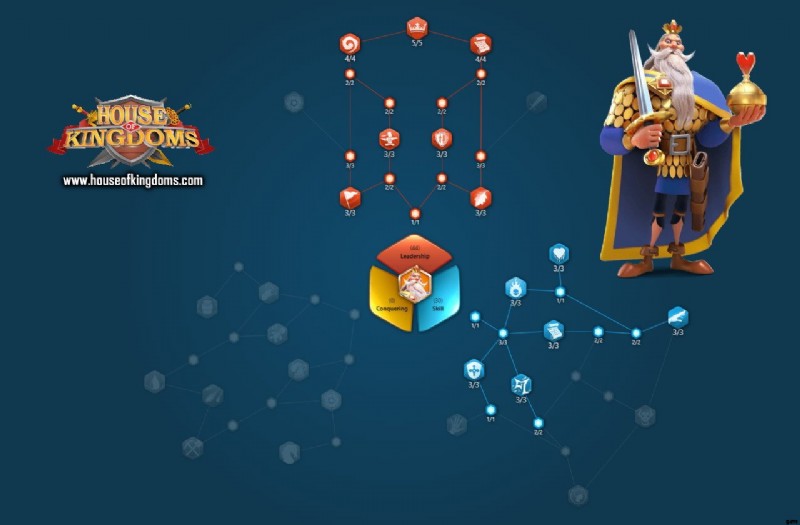
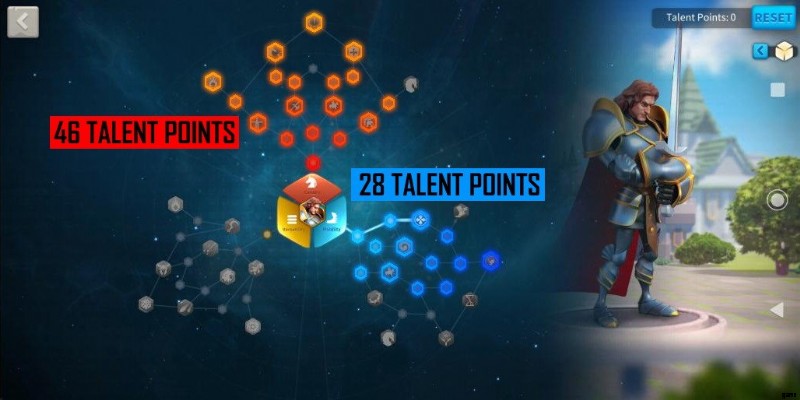
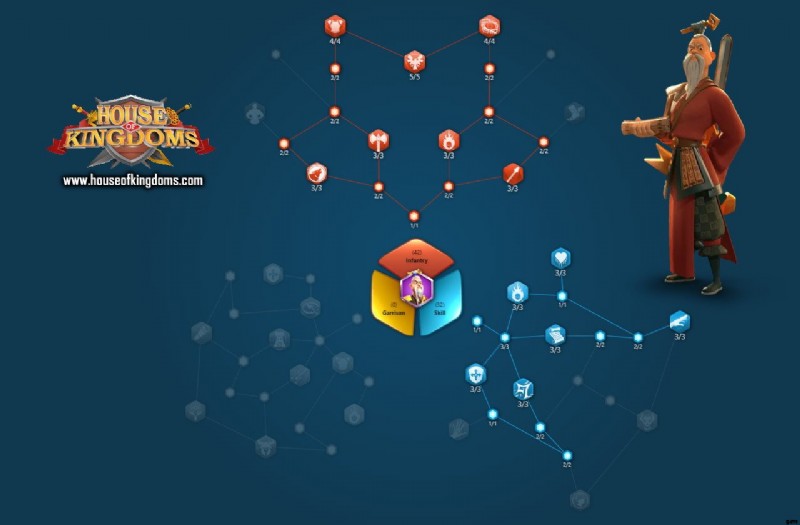
ライズ オブ キングダム タレント ガイド
ゲームには合計 45 人の司令官がいます。これにより、指揮官の才能ポイントを適切な才能に投資することの重要性を学ぶことが不可欠です.
以下は、すべての指揮官に最適なタレント ビルドとツリーです。
最高の司令官タレント ビルドとツリー
エゼルフレードのタレント ビルドとツリー


Alexander The Great Talent ビルドとツリー


アルテミシア I タレント ビルドとツリー


アッティラ タレント ビルドとツリー


バイバーのタレント ビルドとツリー


ベリサリウスのタレント ビルドとツリー


ブーディカ タレント ビルドとツリー


曹操のタレント ビルドとツリー


シャルルマーニュのタレント ビルドとツリー


Charles Martel タレント ビルドとツリー


クレオパトラ VII タレント ビルドとツリー

コンスタンス タレント ビルドとツリー

コンスタンティン I タレント ビルドとツリー


エドワード オブ ウッドストック タレント ビルドとツリー


エル シッド タレント ビルドとツリー


Eulji Mundeok タレント ビルドとツリー


フレデリック 1 世のタレント ビルドとツリー


ガイウス マリウス タレント ビルドとツリー

ジンギスカン タレント ビルドとツリー


関羽タレントのビルドとツリー


ハンニバル バルカ タレント ビルドとツリー


ハーマン タレント ビルドとツリー


石田三成のタレント ビルドとツリー


ジャンヌ ダルクのタレント ビルドとツリー


ジュリアス シーザー タレント ビルドとツリー


キーラ タレント ビルドとツリー


楠木正成のタレント ビルドとツリー


ランスロット タレント ビルドとツリー
レオニダス 1 世のタレント ビルドとツリー


ロハールのタレント ビルドとツリー


メフメト II タレント ビルドとツリー


源義経のタレント ビルドとツリー


ペラギウスのタレント ビルドとツリー


オスマン 1 世のタレント ビルドとツリー


サルカ タレント ビルドとツリー

サラディン タレント ビルドとツリー


スキピオ アフリカヌスのタレント ビルドとツリー


Seondeok Talent Builds &Trees


Sun Tzu Talent Builds &Trees


Ramesses II Talent Builds &Trees


Richard I Talent Builds &Trees


Takeda Shingen Talent Builds &Trees


Tomoe Gozen Talent Builds &Trees

Tomyris Talent Builds &Trees


Wu Zetian Talent Builds &Trees


Yi Seong-Gye Talent Builds &Trees


Rise of Kingdoms Best Commanders
Currently, the best meta commanders in the Rise of Kingdoms in ranking order are:
<オール>Rise of Kingdoms Commander Pairing
Among the ways to achieve a higher chance for winning battles in PvP as and PvE is through commander pairing.
All commanders in Rise Of Kingdoms have different roles and talents, making it essential to know what commander you will use as primary and secondary and what commander pairs have best synergies together.
You can find below the best commander pairings for field battles, destroying barbarian forts, defending, for a rally, and many more. Credit for this information goes to Rise of Kingdoms Guides.
Best Commander Calvary Pairs
Rise of Kingdom has many cavalry commanders; however, this doesn’t mean that you can pair them randomly. You must match cavalry commanders that hold synergy with the talent tree and skills.
| Commander | Best Paired With |
|---|---|
 Pelagius Pelagius |  Baibars Baibars |
 Baibars Baibars |  Cao Cao Cao Cao |
 Minamoto Minamoto | Cao Cao |
 Atilla Atilla |  Takeda Takeda |
 Khan Khan |  Saladin Saladin |
 Aethelflaed Aethelflaed |  Sun Tzu Sun Tzu |
| Saladin | Khan |
| Cao Cao | Minamoto |
Best Commander Infantry Pairs
Infantry commanders are easier to pair. It’s hard to choose wrong since they have related skills. However, still, they are commander pairs that have better synergy with skills and talent trees than other commander pairs.
| Commander | Best Paired With |
|---|---|
 Sun Tzu Sun Tzu |  Richard Richard |
| Richard |  Charles Martel Charles Martel |
 Alexander Alexander | Charles Martel |
 Constantine Constantine | Charles Martel |
 Guan Yu Guan Yu | Yi Seong-Gye |
 Leonidas Leonidas |  Charles Martel Charles Martel |
Best Commander Archery Pairs
In pairing archery commanders, you must be careful. Only pair those that have the best synergy with skills and talent tree. Otherwise, you will lose so much damage as well as survivability.
| Commander | Best Paired With |
|---|---|
| Yi Seong-Gye |  Ramesses I Ramesses I |
 Hermann Hermann | Yi Seong-Gye |
 Kusunoki M. Kusunoki M. | Yi Seong-Gye |
 El Cid El Cid |  Artemisia I Artemisia I |
| Ramesses I | Yi Seong-Gye |
 Edward Edward |  Tomyris Tomyris |
Best Commander Barbarian Fort
These are commanders with the best synergy with skills, talent tree, and bonus damage to barbarians forts. It is noteworthy to have the right talent tree build.
| Commander | Best Paired With |
|---|---|
 Belisarius Belisarius |  Cao Cao Cao Cao |
| Boudica | Cao Cao |
 Minamoto Minamoto | Cao Cao |
 Aethelflaed Aethelflaed | Minamoto |
Best Commander Defending Pairs
Below are commander pairings suited for defending flags, forts, and Ark of Osiris Objectives. They are great pairs against top tier rallying commanders.
| Commander | Best Paired With |
|---|---|
 Richard Richard |  Charles Martel Charles Martel |
 Constantine Constantine |  Wu Zetian Wu Zetian |
 Artemisia I Artemisia I |  El Cid El Cid |
Best Commander Rally Pairs
Below are commander pairings suited for rallying flags, forts, and Ark of Osiris Objectives. They have great synergy with skills and talent tree build.
| Commander | Best Paired With |
|---|---|
 Richard Richard |  Charles Martel Charles Martel |
 Saladin I Saladin I |  Atilla Atilla |
| Atilla |  Takeda Takeda |
 Yi Seong-Gye Yi Seong-Gye |  Ramesses I Ramesses I |
| Edward |  Tomyris Tomyris |
 Guan Yu Guan Yu |  Alexander Alexander |
| Ramesses I | Yi Seong-Gye |
| Alexander |  Charles Martel Charles Martel |
Best Epic Commander Pairs
Below are the best epic commander pairs that you can make, and they work great on new kingdoms.
| Commander | Best Paired With |
|---|---|
 Pelagius Pelagius |  Baibars Baibars |
 Belisarius Belisarius | Baibars |
 Sun Tzu Sun Tzu |  Eulji Eulji |
| Eulji |  Osman Osman |
 Kusunoki M. Kusunoki M. | Sun Tzu |
 Hermann Hermann | Sun Tzu |
Rise of Kingdoms City Hall Requirements
The central building in the city is the City Hall. No building in the city can be a higher level than the City Hall itself. That’s why it determines all of the structures’ maximum level.
In this way, it sets the upper limit for research that can be performed, determines how many troops can fit in hospitals, and many more.
Upgrading the city hall also increases the number of commanders/traders, which may be fielded simultaneously. It is also the primary factor in how many troops a commander may have in their army.
Credit for the information on the city hall requirements goes to Rok Guide.
| City Hall Level | Unlocks | Requirements | Troop Capacity | Cost | Time | Power |
|---|---|---|---|---|---|---|
| Stone Age | ||||||
| 1 | None | None | 2,000 | None | None | 7 |
| 2 | Lumber Mill (1st)Archery Range Scout Camp | None | 3,000 |  3.5K 3.5K  3.5K 3.5K | 2s | 21 |
| 3 | Farm (2nd)Alliance Center | Wall Lv.2 | 4,000 |  6.5K 6.5K  6.5K 6.5K | 5m | 59 |
| Bronze Age | ||||||
| 4 | Quarry (1st)Academy Stable Hospital (2nd) | Wall Lv.3 | 5,000 |  11.8K 11.8K  11.8K 11.8K | 20m | 154 |
| 5 | Lumber Mill (2nd)Shop Siege Workshop 2nd march queue | Wall Lv.4Hospital Lv.4 | 7,000 |  21.3K 21.3K  21.3K 21.3K | 1h | 383 |
| 6 | Farm (3rd)Courier Station | Wall Lv.5Scout Camp Lv.5 | 9,000 |  36.3K 36.3K  36.3K 36.3K  12.0K 12.0K | 2h | 852 |
| 7 | Quarry (2nd)Castle | Wall Lv.6Storehouse Lv.6 | 12,000 |  54.4K 54.4K  54.4K 54.4K  19.2K 19.2K | 5h | 1,847 |
| 8 | Lumber Mill (3rd)Monument Tier 2 troops | Wall Lv.7Barracks Lv.7 | 15,000 |  81.8K 81.8K  81.8K 81.8K  30.8K 30.8K | 10h | 3,706 |
| 9 | Hospital (3rd)Farm (3rd) | Wall Lv.8Alliance Center Lv.8 | 19,000 |  122.8K 122.8K  122.8K 122.8K  49.2K 49.2K | 15h | 6,504 |
| Iron Age | ||||||
| 10 | Quarry (3rd)Goldmine (1st)Trading Post | Wall Lv.9Academy Lv.9 | 23,000 |  184.3K 184.3K  184.3K 184.3K  78.7K 78.7K | 1d | 10,933 |
| 11 | Lumber Mill (4th)3rd march queue | Wall Lv.10Hospital Lv.10 | 28,000 |  277.5K 277.5K  277.5K 277.5K  120.0K 120.0K | 1d 6h | 16,723 |
| 12 | Goldmine (2nd) | Wall Lv.11Storehouse Lv.11 | 33,000 |  417.5K 417.5K  417.5K 417.5K  180.0K 180.0K | 1d 16h | 24,693 |
| 13 | Quarry (4th) | Wall Lv.12Archery Range Lv.12 | 38,000 |  627.5K 627.5K  627.5K 627.5K  270.0K 270.0K | 2d 2h | 35,213 |
| 14 | Goldmine (3rd) | Wall Lv.13Alliance Center Lv.13Trading Post Lv.13 | 44,000 |  942.5K 942.5K  942.5K 942.5K  405.0K 405.0K | 2d 12h | 48,838 |
| 15 | Hospital (4th) | Wall Lv.14Scout Camp Lv.14 | 50,000 |  1.4M 1.4M  1.4M 1.4M  607.5K 607.5K | 2d 22h | 66,400 |
| Dark Age | ||||||
| 16 | Goldmine (4th)Tier 3 troops | Wall Lv.15Academy Lv.15 | 57,000 |  2.1M 2.1M  2.1M 2.1M  912.5K 912.5K | 4d | 91,451 |
| 17 | 4th march queue | Wall Lv.16Hospital Lv.16 | 64,000 |  3.2M 3.2M  3.2M 3.2M  1.4M 1.4M | 4d 20h | 125,005 |
| 18 | ? | Wall Lv.17Storehouse Lv.17 | 72,000 |  4.8M 4.8M  4.8M 4.8M  2.1M 2.1M | 5d 20h | 170,590 |
| 19 | None | Wall Lv.18Stable Lv.18 | 80,000 |  7.2M 7.2M  7.2M 7.2M  4.7M 4.7M | 7d | 232,957 |
| 20 | ? | Wall Lv.19Alliance Center Lv.19 | 90,000 |  10.8M 10.8M  10.8M 10.8M  4.7M 4.7M | 8d 6h | 318,769 |
| Feudal Age | ||||||
| 21 | Tier 4 troops | Wall Lv.20Academy Lv.20 | 100,000 |  16.2M 16.2M 16.2M 16.2M  7.0M 7.0M | 11d | 442,735 |
| 22 | 5th march queue | Wall Lv.21Hospital Lv.21 | 110,000 |  24.3M 24.3M  24.3M 24.3M  10.6M 10.6M | 17d 3h | 630,860 |
| 23 | ? | Wall Lv.22Storehouse Lv.22 | 120,000 |  36.5M 36.5M  36.5M 36.5M  15.9M 15.9M | 23d 23h | 907,085 |
| 24 | ? | Wall Lv.23Siege Workshop Lv.23 | 130,000 |  54.8M 54.8M  54.8M 54.8M  24.0M 24.0M | 36d | 1,322,48 |
| 25 | Tier 5 troops | Wall Lv.24Trading Post Lv.24 | 150,000 |  82.2M 82.2M  82.2M 82.2M  36.0M 36.0M | 126d 8h | 2,195,458 |
City Hall Upgrade Rewards
| Level | Resources | Items |
|---|---|---|
| 1 | N/A | N/A |
| 2 |  10.0K 10.0K  10.0K 10.0K |  Universal Speedup (5m) x1 Universal Speedup (5m) x1 |
| 3 |  20.0K 20.0K  20.0K 20.0K |  Universal Speedup (5m) x2 Universal Speedup (5m) x2 |
| 4 |  30.0K 30.0K  30.0K 30.0K |  Universal Speedup (5m) x3 Universal Speedup (5m) x3 |
| 5 |  40.0K 40.0K  40.0K 40.0K  40.0K 40.0K |  Universal Speedup (30m) x1 Universal Speedup (30m) x1 |
| 6 |  50.0K 50.0K  50.0K 50.0K  50.0K 50.0K |  Universal Speedup (30m) x2 Universal Speedup (30m) x2 |
| 7 |  50.0K 50.0K  50.0K 50.0K  50.0K 50.0K |  Universal Speedup (30m) x5 Universal Speedup (30m) x5 |
| 8 |  50.0K 50.0K  50.0K 50.0K  50.0K 50.0K |  Universal Speedup (8h) x2 Universal Speedup (8h) x2 |
| 9 | 50.0K  50.0K 50.0K  50.0K 50.0K | Universal Speedup (24h) x1 |
| 10 |  50.0K 50.0K  50.0K 50.0K  50.0K 50.0K  10.0K 10.0K |  Civilization Change Civilization Change |
| 11 |  50.0K 50.0K  50.0K 50.0K |  Building Speedup (10m) x11 Building Speedup (10m) x11  Training Speedup (10m) x11 Training Speedup (10m) x11 |
| 12 |  100.0K 100.0K  100.0K 100.0K |  Building Speedup (10m) x12 Building Speedup (10m) x12  Training Speedup (10m) x12 Training Speedup (10m) x12 |
| 13 |  100.0K 100.0K  100.0K 100.0K |  Building Speedup (10m) x13 Building Speedup (10m) x13  Training Speedup (10m) x13 Training Speedup (10m) x13 |
| 14 |  100.0K 20.0K 100.0K 20.0K |  Building Speedup (10m) x14 Building Speedup (10m) x14  Training Speedup (10m) x14 Training Speedup (10m) x14 |
| 15 |  100.0K 100.0K  100.0K 100.0K |  Building Speedup (10m) x15 Building Speedup (10m) x15  Training Speedup (10m) x15 Training Speedup (10m) x15 |
| 16 |  100.0K 100.0K  20.0K 20.0K |  Universal Speedup (7d) x1 Universal Speedup (7d) x1  Gem (100) x1 Gem (100) x1 |
| 17 |  100.0K 100.0K  100.0K 100.0K |  Building Speedup (10m) x17 Building Speedup (10m) x17  Training Speedup (10m) x17 Training Speedup (10m) x17 |
| 18 |  100.0K 100.0K  20.0K 20.0K |  Building Speedup (10m) x18 Building Speedup (10m) x18  Training Speedup (10m) x18 Training Speedup (10m) x18 |
| 19 |  100.0K 100.0K  100.0K 100.0K | Building Speedup (10m) x19  Training Speedup (10m) x19 Training Speedup (10m) x19 |
| 20 |  100.0K 100.0K  20.0K 20.0K |  Building Speedup (10m) x20 Building Speedup (10m) x20  Training Speedup (10m) x20 Training Speedup (10m) x20 |
| 21 |  ? ?  ? ?  ? ?  ? ? | Information Needed |
| 22 |  100.0K 100.0K  20.0K 20.0K | Building Speedup (10m) x22  Training Speedup (10m) x22 Training Speedup (10m) x22 |
| 23 |  150.0K 150.0K  150.0K 150.0K |  Building Speedup (10m) x23 Building Speedup (10m) x23  Training Speedup (10m) x23 Training Speedup (10m) x23 |
| 24 |  150.0K 150.0K  30.0K 30.0K |  Building Speedup (10m) x24 Building Speedup (10m) x24  Training Speedup (10m) x24 Training Speedup (10m) x24 |
| 25 |  200.0K 200.0K  50.0K 50.0K |  Master’s Blueprint x1 Master’s Blueprint x1  Gem x500 Gem x500 |
Era Breakthrough event
You can get a lot of valuable rewards from the Era Breakthrough event by upgrading the City Hall. Among the rewards you can get are speedups, wood, and gold, which are used to scout people with higher scouting research unlocked.
| Requirement | Reward |
|---|---|
| Upgrade City Hall to Level 4 |  Universal Speedup (15m) x4 Universal Speedup (15m) x4  Builder Recruitment x1 Builder Recruitment x1 |
| Upgrade City Hall to Level 7 |  Universal Speedup (15m) x6 Universal Speedup (15m) x6  24-Hour Enhanced Gathering x1 24-Hour Enhanced Gathering x1 |
| Upgrade City Hall to Level 10 |  100 Gems x1 100 Gems x1  Universal Speedup (60m) x2 Universal Speedup (60m) x2  10,000 Food x3 10,000 Food x3  10,000 Wood x3 10,000 Wood x3  7,500 Stone x2 7,500 Stone x2 |
| Upgrade City Hall to Level 13 |  Universal Speedup (60m) x4 Universal Speedup (60m) x4  3,000 Gold 3,000 Gold  Research Speedup (60m) x2 Research Speedup (60m) x2 |
| Upgrade City Hall to Level 16 |  100 Gems x2 100 Gems x2  Universal Speedup (60m) x8 Universal Speedup (60m) x8  10,000 Food x10 10,000 Wood x10 10,000 Food x10 10,000 Wood x10  7,500 Stone x4 7,500 Stone x4 |
| Upgrade City Hall to Level 19 |  Universal Speedup (60m) x8 Universal Speedup (60m) x8  15,000 Gold x1 15,000 Gold x1  Stone Boost (24h) x2 Stone Boost (24h) x2 |
| Upgrade City Hall to Level 21 |  100 Gems x5 100 Gems x5  Universal Speedup (3h) x8 Universal Speedup (3h) x8  10,000 Food x20 10,000 Food x20  10,000 Wood x20 10,000 Wood x20  7,500 Stone x8 7,500 Stone x8 |
| Upgrade City Hall to Level 23 |  Universal Speedup (3h) x8 Universal Speedup (3h) x8  50,000 Gold x1 50,000 Gold x1  Targeted Teleport x1 Targeted Teleport x1 |
| Upgrade City Hall to Level 25 |  100 Gems x8 100 Gems x8  Universal Speedup (3h) x24 Universal Speedup (3h) x24  10,000 Food x30 10,000 Food x30  10,000 Wood x30 10,000 Wood x30  7,500 Stone x12 7,500 Stone x12 |
Rise of Kingdoms Tips and Tricks
Here are some tips and tricks you can use to make the most out of playing Rise of Kingdoms.
Pick The Best Nation
Choosing a suitable nation to your playstyle is a crucial first step in playing the game.
Rome
Rome is suitable for active players who like to have an aggressive, attacking play style. For you to reach target locations faster than other nations, use the marching speed bonus.
Germany
Germany also rewards active players, especially to those who just started. Because of its bonus to action points, you will be able to kill many barbarians and level up your commanders much faster than other nations.
Britain
Britain can be a good option in an alliance with many troops because of its 20% bonus to ally garrison capacity. Sadly, the wood gathering bonus is a bit underwhelming, as you will then hold a dedicated resource gathering commander.
France
France is an excellent option for high-level play. Other troop health and a 10% healing speed bonus enable a more liberal approach to fighting and attacking in general.
Spain
Spain is suitable for resource farming thanks to its 10% troops load bonus; however, it offers very little about fighting. It still might be the right choice if you prefer to avoid combat.
China
China is also a top tier nation, having a focus on troops defenses and faster building and resource production speed. It might be the best overall option for active players.
Japan
Japan is the right choice for you if you enjoy commanding massive armies. It has a 5% bonus to troops training capacity and a 2% attack bonus, and the downside is a rather ineffective 30% scout march speed bonus.
Korea
Lastly, Korea has a bit of a sub-optimal combination of bonuses – 2% research speed bonus, 5% archer defense, and 10% hospital capacity don’t lend themselves in favor of any particular play style. However, Korean architecture is, without a doubt, the most beautiful nation in the game.
Best Civilization For Starting
When you just started, you shouldn’t mind the buffs those civilizations provide. Instead, look for the featured commanders of those civilizations because they are the Epic Commanders that you will get after choosing a civilization for free.
It would be better if you looked for the commanders whose sculptures usually get offered through the events and quests in the game.
Thus, it is suggested that F2P players should start with either Boudica or Scipio. Rok Guide says they are the best starting Epic Commanders for F2P players because:
<オール>After having the starting commander, you can change your civilization to Japan once you have gotten to City Hall level 10. Japan increases your scouting speed, the attack of all troops you have, and resource gathering speed.
Rise of Kingdoms Zones
What is a Zone?
The image above shows that there are three areas in 3 different colors:
The Green area is called Zone 1:There are 14 green dots in total. Each dot is called “Pass,” you must cross the Pass to enter the new Zone or other Zone.
Blue area is called Zone 2:26 passes connect between Zones 1 and 3.
The middle purple area is Zone 3:Nine passes connect between Zone 2 and Zone 3.
What is Zone 1?
Zone 1 is located at the edge of the Kingdom and is surrounded by mountains. When you first create a character in the new Kingdom, your city will spawn randomly around Zone 1.
This Zone is divided into six small areas. Level 1 Passes separate the areas from each other.
Zone 1 only has a low-tier resource deposit and low-level barbarians since this Zone is the beginning area. However, this is a perfect place for new cities because you don’t have enough troops to beat high-level barbarians and enough troops to carry the load from high-level resource deposits.
The Sanctum and Altar can be found in Zone 1.
What is Zone 2?
Zone 2 is located between Zones 1 and 3.
In entering Zone 2, your Alliance must take control of a Level 2 Pass that connects to the area you want to access.
In order to bypass this requirement, the Alliance leader must pass their leadership temporarily to a trusted friend or a second account, leave the Alliance, and join the Alliance that controls a Level 2 Pass.
Afterward, they need to use a Targeted Teleport to transport to Zone 2, quit that Alliance and join the old Alliance. Lastly, the leader can build an Alliance Fortress inside Zone 2, allowing other Alliance members to move to Zone 2 through Territorial Teleport.
You will find better resources and stronger barbarians in Zone 2 than Zone 1.
In Zone 2, you can find Shrines.
What is Zone 3?
Zone 3 is located in the center of the map.
This Zone holds the most precious resource potential in all of the Zones.
Zone 3 has a level 5-6 resource deposit and level 24-25 barbarians.
This Zone is also the most oppressive place to contest for entry due to its abundant resources and the area with the Lost Temple. Who controls the Lost Temple will be the King of that Kingdom, and of course, there will be many benefits to the King and his Alliance members. So it is the goal of every player and Alliance in the game.
The Lost Temple is always in the middle of Zone 3.
Thank you for reading and welcome to your journey as a growing Rise of Kingdoms player!
Other Game Guides :
Coin Master ultimate guide