CAOS – 決定版ゲームプレイ ガイド (メカニズムと機能)
このガイドでは、CAOS の仕組みと機能について説明します。
ゲームプレイの総合ガイド
はじめに
このガイドでは CAOS のゲーム メカニクスを詳しく説明しており、機能の調整や追加、およびプレイヤーの要望に応じて拡張および更新する予定です。イラストも随時追加予定です。説明が必要な場合、または特定のトピックに注目したい場合は、お気軽に以下から質問してください。
また、新規プレイヤーにはゲーム内チュートリアルを完了して、CAOS の基本に慣れることを強くお勧めします。チュートリアルは、プレーヤーが初めてゲームを開始したときにデフォルトで有効になり、オプション メニューからいつでも再度有効にすることができます。
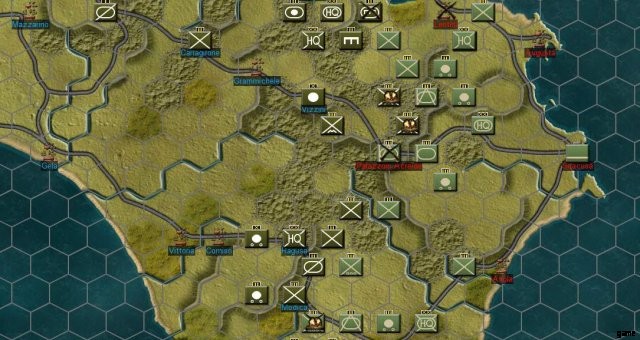
1.要請、配備、および命令インターフェース
ゲーム内ユーザー インターフェース
このセクションでは、要請画面、配置ボックス、上部/下部バー、注文メニューなど、ゲーム内インターフェイスの最も基本的な要素について説明します。ユニットの詳細シートや武器カードなど、インターフェースのより専門的な要素については、セクション 3.4/3.5 で説明します。よくわからない場合は、ほとんどのインターフェース要素やメニューの上にマウスを置くと、関連するメニュー、ボタン、またはゲームの仕組みを説明するツール ヒントが表示されます。
注:ボタンまたはメニューの青または黄色の文字は、ホット キーを示します。一般的なメニューと注文のホットキーを覚えておくと、順番が大幅に短縮されます。
1.1.ユニットプール/要請
- ユニットの購入:ユニット プールには、選択した国と年の戦闘順序で利用可能なすべてのユニットが一覧表示されます。使用可能なユニットは、ディスプレイの左側に、歩兵、機械、装甲、砲兵、HQ、航空、およびすべてとして分類されます。黄色い文字はホットキーです。ユニットを選択または選択解除するには、左クリックします。ユニットを左ダブルクリックすると、その詳細シートが開きます。マウスの中ボタンを押すと、現在選択されているすべてのユニットの選択が解除されます。本部を右クリックすると、その本部とその部下も選択されます。これにより、求人プロセスが大幅にスピードアップします。
- トレーニングの変更:ユニット プールの右側にある緑/赤のプラス ボタンとマイナス ボタンを使用して、選択したユニットのトレーニング レベルを上げ下げします。
- アタッチメントの変更:ユニット プールの右側にあるアタッチメント ドロップダウンにカーソルを合わせて、選択したユニットのアタッチメントを変更します。多数の司令部がある戦闘命令のアタッチメント リストを下にスクロールするには、マウスの中ボタンを使用する必要がある場合があります。購入済みの本社ユニットは、簡単にアクセスできるように添付リストの一番上に表示されます。
- 交換品の購入:ユニット プールの右下にある交換用ボックスの関連するプラス ボタンとマイナス ボタンを使用して、種類別に交換品を購入します。交差したライフルは歩兵を示します。パンサー戦車は装甲、榴弾砲は砲兵を表します。交換ポイントあたりの価格は、プラス ボタンとマイナス ボタンの間に表示され、戦年の順に表示されます。交換ポイントの合計は、画面上部のインテル レポート ボタンの横に表示されます。
- ユニット プールの再開:ユニット プールを終了した場合は、画面右下の [ユニット プール] ボタンをクリック (または U キーを押す) することで、プレターン中にいつでも再開できます。
1.2.配備ボックス
購入すると、ユニットは左上の配置ボックスに表示されます。ユニットを選択し、配置ボックスから開始ヘクスにドラッグできるようになりました。または、配置ボックス内でユニットを移動させ、ゲーム マップに配置する前に戦闘グループを形成することもできます。
注:配置ボックスは、ボックスの側面にある緑色の配置ボタンを押すか、Tab キーを押すことで開閉できます。
1.3.ユニットの選択/命令の発行
1.3.1.地上ユニットの選択
マップまたは配置ボックスでユニットまたはユニットのスタックをダブルクリックして選択します。選択したユニットは、下部のバーで黄色で強調表示されます。下部バーのユニットをシングル左クリックすると、そのユニットが選択/選択解除されます。
1.3.2.地上部隊の配備
配置ボックスからユニットを選択して、色分けされた配置ヘクスにドラッグします。青のプレイヤーは青の影付きのヘクスに配置し、赤のプレイヤーは赤の影付きのヘクスに配置します。
1.3.3.命令の発行
一度にスタック全体に注文を発行するには、マップ上のスタックを右クリックすると、注文メニューがポップアップ表示されます。個々のユニットまたは小グループに命令を出すには、左クリックしてスタックを選択し、次に下のバーで命令したいユニットを右クリックします。マウスの中ボタンを押すと、すべてのユニットの選択が解除されます。
1.4 オーバーレイ、レポート、基本ユニット情報
1.4.2.オーバーレイ
- 選択可能なオーバーレイ:ゲーム メニューの右側にある選択可能なオーバーレイを切り替えて、ユニット、ヘックスあたりの損失、ヘックスあたりのスタック値、またはヘックスあたりの凝集力を表示せずにマップを表示できます。
- 施設のオーバーレイ:施設のオーバーレイは、選択可能なオーバーレイの右側にあり、目的とそれぞれに割り当てられた勝利点の値を表示します。施設のオーバーレイがアクティブな間、目標ヘクスは黄色のストライプでマークされ、その目標の勝利点の値がヘクスの上に黄色の数字で表示されます。施設のオーバーレイには、都市、町、飛行場などのキャプチャ可能な施設の所有権も表示されますが、これらの施設のほとんどの所有権は、名前タグの色ですでに示されています。
- 名前のオーバーレイ:名前のオーバーレイは、町の名前のオンとオフを切り替えます。
- Zone of Control オーバーレイ:Zone of Control オーバーレイには、味方と敵の Zone of Control (ZoC) が表示されます。味方の ZoC は青、敵の ZoC は赤、競合する ZoC は青と赤のストライプでマークされています。
- 見通し線:見通し線 (LOS) オーバーレイには、ユニットによって投影された現在の視野が表示されます。ほとんどのユニットは 1 ヘクスの視界を持っていますが、偵察可能なユニットは 2 ヘクスの視界を持っています。
- サプライ オーバーレイ:サプライ オーバーレイには、既知の敵のゾーン オブ コントロールによって変更された現在の補給範囲が表示されます。供給範囲の拡大に関する詳細については、供給 (セクション 2.5) を参照してください。
1.4.3.戦闘リスト
戦闘リスト ボタンは、現在のターンのすべての戦闘、空爆、砲撃の完全なリストとキル/損失を表示します。これらのリストのいずれかをクリックすると、詳細な戦闘レポートが表示されます。
1.4.4.代替プール
利用可能な交換ポイントは、トップバーの中央に、タイプ、歩兵、鎧、大砲ごとに一覧表示されています。
1.4.5.インテル
インテル レポートは、各陣営の損失ユニット、各陣営の戦力ポイントの損失、各陣営の要求ポイント、各陣営の勝利ポイント、主な目的、勝利に必要な勝利ポイント、およびシナリオが終了した場合の予想される勝利結果をまとめたものです。このターン。
- ターン レポート:インテル レポート クリップ ボードの左上端にあるターン レポートには、ターン中に発生したすべてのイベントのインパルスごとの概要が表示されます。
- シナリオの概要:シナリオの概要は、インテル レポートの右上端からアクセスでき、シナリオの説明を繰り返します。
1.4.6.リプレイ
リプレイは、ターンが展開されたときのインパルスごとのリプレイを提供します。リプレイがアクティブになっているときに画面の上部に表示される赤と青の矢印を使用して、インパルス間を前後に移動します。リプレイは、CAOS を学習していて、アクションがどのように展開されたかを理解したい場合に特に役立ちます。
1.4.7.エアコマンド
航空コマンド画面では、航空グループを管理し、個々の航空グループが実行する航空ミッションの種類を変更し、すべての航空グループに焦点を当てた全体的なミッションを変更できます。航空司令部ディスプレイの右側にある航空報告には、両陣営の相対的な航空優勢の強さと、各陣営が攻撃または損失した航空任務の数が一覧表示されます。
航空グループの管理:航空コマンドの航空グループをクリックして、次のターンの任務の役割を変更できます。一部の航空機は複数のミッション タイプを実行できますが、個々の航空グループは 1 ターンに 1 つのミッション タイプしか実行できません。たとえば、P-40N は近接航空支援任務を遂行できますが、制空権を任務としている間はそうしません。各航空グループは、現在実施している任務の数と、最大の結束で実施できる最適な数をリストしています。下のスクリーンショットの P-40N は、結束力が低いため、4 つの制空任務のうち 2 つを提供していることに注意してください。
オペレーショナル エア フォーカス:オペレーショナル エア フォーカスは、すべての航空グループで選択したカテゴリのミッションの数を +25% 増加させますが、他のミッション タイプの利用可能性を減らします。たとえば、航空優勢の運用フォーカスを選択すると、航空優勢ミッションの総数が 25% 増加しますが、爆撃、攻撃、地上阻止、および偵察ミッションは -25% 減少します。
1.5.ボトムバー
1.5.1.地形表示
画面の左下にある地形画像にカーソルを合わせると、選択したヘクスの地形戦闘修正が表示されます。ヘクス間をクリック アンド ドラッグして、川、頂上、地雷原などのヘクス側の地形の効果を表示します。
地形移動コストの表示:地形画像の下に表示されるブーツの横の数字は、現在選択されているヘクスの歩兵/機械化移動コストを示します。
1.5.2.ユニットカード
選択したヘクスの各ユニットは、画面の下部に独自のユニット カードを表示します。選択されたユニットは、ユニット カードの周りに黄色の境界線で強調表示されます。ユニットカードを左クリックして選択/選択解除します。ユニット カードをダブルクリックすると、そのユニットの詳細シートが表示されます。マウスの中ボタンを押すと、すべてのユニット カードの選択が解除されます。
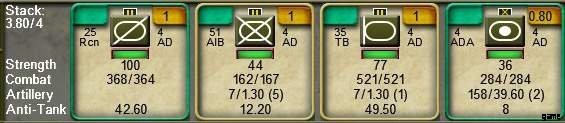
ユニット カードには、現在の命令、スタック値、名前、上位コマンドの名前、戦力、戦闘値、砲兵統計、対戦車値など、重要な情報が一目でわかるように表示されます。詳細については、セクション 3.4.1 を参照してください。
1.5.3.グループボタン
グループボタンを押すと、選択したユニットがバトルグループにマージされ、スタック制限が可能になります。下部のバーでユニット カードをドラッグして重ね合わせることで、バトルグループを形成することもできます。詳細については、セクション 3.3 を参照してください。
1.5.4.エアボタン
航空コマンドは航空グループを管理しますが、航空ボタンを使用すると、航空ミッションをマップに配置できます。エアボタンを押すと、エアオーダーメニューが表示されます。利用可能なミッションは、たとえば下のスクリーンショットのように括弧内に表示されます。 3回の空爆と2回の空中偵察任務があります。実施したいミッション タイプを選択し、マップ上に配置 (ターゲット) します。
航空任務のキャンセル:航空任務をキャンセルするには、航空ボタンをクリックし、マップ上で計画されている航空任務 (ターゲット) を右クリックして削除します。
2.主要なゲームプレイのコンセプト
2.1.衝動
CAOS はターンごとに 10 の移動/戦闘インパルス (インパルス 0 から 9) を使用し、1 日のさまざまな時間を反映して、ターンベースの環境でリアルタイムの移動をシミュレートします。双方が命令を発し、ユニットが移動して同時に戦う。その結果、敵の行動と味方のユニットが互いにブロックし合い、計画が遅れたり混乱したりする可能性があります。たとえば、敵の空爆によって大砲が重要な突破口を支援できなくなったり、重要な戦車連隊が味方の歩兵の後ろに隠れて目標に到達できなかったりする可能性があります。実際の戦闘と同様に、CAOS での計画が実際に完全に展開されることはめったにありません。優れた指揮官は、予期せぬ挫折や予期せぬ勝利に対応して適応し、即興で対応します。
2.2.スタッキング
各ヘクスには 4 ポイントのスタック制限があります。これを大局的に見ると、典型的な連隊は 2 スタッキング ポイントの価値があり、大隊はユニットのサイズとタイプに応じて 0.5 から 1 スタッキング ポイントまで変化する可能性があるため、平均的なヘクスは 2 連隊または 4 から 8 大隊を同時にホストできます。
4 ポイントのスタック制限は、2 つの状況下でのみ超えることができます。 1) ゲーム展開の開始時にスタック制限が一時的に無視されます。 2) ターン解決時に道路に沿って移動している間、スタッキング値が 6 に増加します。 If a hex is still over 4 stacking points at the end of the turn, excess units are automatically ejected into adjacent hexes.
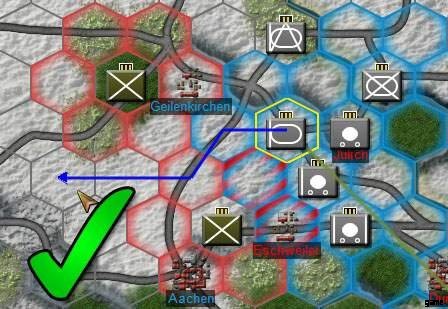
2.3. Zone of Control
Every unit stack with a value of 1 or more stacking points projects a zone of control (ZoC) into surrounding hexes. Under normal circumstances, units can move into and out of enemy Zone of Control hexes, but units cannot move between enemy Zone of Control hexes. See the images below for examples.
Enemy Zone of Control (marked in red) will block this move because we are attempting to move between two enemy ZoC hexes.

But this move will succeed because we are moving into enemy ZoC and then out into an open hex.
2.4. Negating Zone of Control
Zone of Control may be temporarily negated by pinning a unit stack by artillery, air attack, or ground combat. Artillery barrage, air strikes, and air bombardments that inflict casualties have a chance of suppressing the target stack’s ZoC the impulse after the barrage, strike, or bombardment – the stronger the bombardment, the higher the odds of ZoC suppression. Likewise, ground combat suppresses ZoC during the impulse after a battle. Consequently, with proper planning and a little luck, you can suppress enemy ZoC and infiltrate through their front line if they do not keep reserves behind the lines to stop you. A clever commander can equally use ZoC suppression to create a window of opportunity for their own forces to escape an encirclement. See barrage fire missions, section 5.5.2, for more information.
2.5. Supply
Maintaining line of supply and effectively use your mobile depots is essential to victory in CAOS. All combat units carry three full turns of supply, which they begin to consume when their connection to a supply grid is severed. Units that exhaust their local supply lose their Zone of Control, move at half speed, fight at half strength, and suffer cohesion damage every turn, until supply is restored.
2.5.1 Supply Grids
Each supply source projects supply around itself, so long as it still has the supply to do so. The full extent of your supply grid can be viewed using the Supply Overlay. View an individual supply source’s grid by clicking on it with the Supply Overlay active. Units within a supply grid do not consume their own 3-turn supply reserves.
2.5.2. Supply Units
Static Supply Dumps:Static supply dumps are inexhaustible sources of supply; they cannot be depleted or destroyed, and all other supply units must trace a line of supply back to an on-map dump to avoid depleting their own supply reserves.
Mobile Depots:Mobile depots are the primary means to extend a supply grid beyond the range of static dumps. However, mobile depots must be deployed before they may project supply; the deploy/undeploy button is located on the depot’s detail sheet. If a mobile depot is cut off from the supply grid of a static dump, it carries 5-turns of supply that it can share with any friendly units inside its own supply grid.
Corps HQs:Corps HQs can extend another unit’s supply grid, but they do not independently project supply themselves. For example, fully an encircled corps HQs cannot resupply units trapped with it.
3. Ground Units
Ground units carry out the majority of fighting in CAOS. Ground units come in a wide variety of sizes and mission roles, from commando battalions to heavy artillery brigades and player-made battlegroups. This section details ground units from the largest regiments down to individual weapon statistics.
3.1. Units
Most units in CAOS are composed of multiple attachments that move and fight as a single entity or be detached and employed independently. Units vary in size, the largest units, regiments, or brigades, consist of up to seven attachments, although regiments of 3-4 attachments are more common.
3.1.1. Unit Types and Movement
All ground units in CAOS fall into one of two movement types:1) Mechanized, encompassing all tracked and wheeled vehicles. 2) Infantry, including all leg infantry and cavalry units. Mechanized units are faster, but cannot enter mountains or marshes, or traverse escarpments, without the assistance of a road or trail. Old-fashioned infantry may be slow and be unglamorous, but it can enter any terrain and take the battle to the remotest locales.
Movements speeds are divided into 3 brackets:
<オール>Units with higher movement values not only move farther per turn, but they also move faster impulse to impulse. However, not all mechanized units are equally mobile; heavy tanks, infantry tanks, and many pre-war tanks move at the medium rate, due to slow speed and or excessive fuel consumption.
3.2. Unit Types and Combat
For the purposes of terrain combat modifiers and combined arms, all ground units fall into one of four unit types:armor, mechanized, infantry, and artillery. Memorizing these types is critical to understanding combined arms and terrain combat modifiers, see section 4.2.1.
Mixed-Type Units:Unit type is determined per attachment. Units with multiple attachments frequently include multiple unit types such as infantry, armor, and artillery, simultaneously. Each attachment is affected differently by modifiers such as combined arms and terrain.
3.3. Battlegroups
Battlegroups are player created units, formed by combining attachments from other units together into custom configurations. Battlegroups can be formed by either clicking and dragging unit cards on top of each other on the bottom bar, or by selecting a group of units stacked together and pressing the “Group” button, at the bottom right.
Battlegroup stacking rules:Up to 3 stacking points or seven units can be included in a Battlegroup. Note, a battlegroup formed from more than 2 stacking points of attachments will condense down to 2 stacking value once formed. This represents the improved tactical control of combining disparate units under a single command structure.
Battlegroups and divisional leadership bonuses:Units from separate divisions can be grouped together, but keep in mind they will lose their divisional leadership bonuses while battle grouped with units from other divisions.
3.4. Unit Cards and Unit Detail Sheets
3.4.1. Unit Cards
Unit cards are quick reference cards that appear at the bottom of the screen when a unit stack on the map is selected. Unit cards display the most important combat statistics of a unit, including current order, stacking value, abbreviated name, abbreviated name of higher command, graphic, approximate cohesion, strength, offensive/defensive combat value, fire support, barrage, artillery range, and anti-tank value.
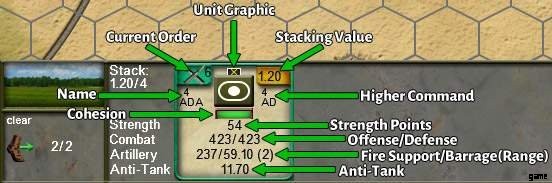
Note:The cohesion bar is color coded. A green bar indicates 70%+ cohesion, yellow indicates 50-69%, and red indicates 49% or less cohesion.
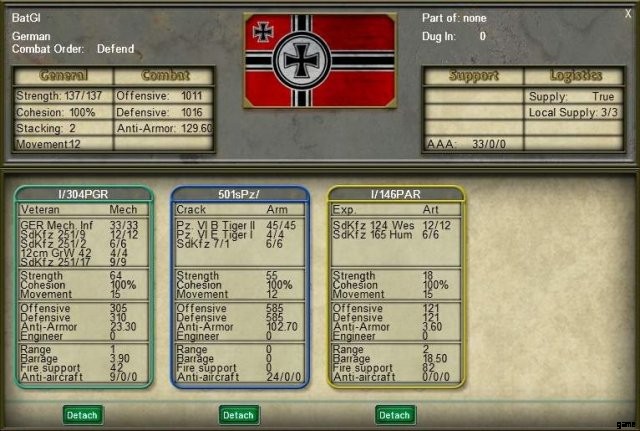
3.4.2. Unit Detail Sheets
Unit detail sheets report every relevant statistic for a combat unit. General details for the entire unit are listed at the top, specific details for each attachment are listed at the bottom.
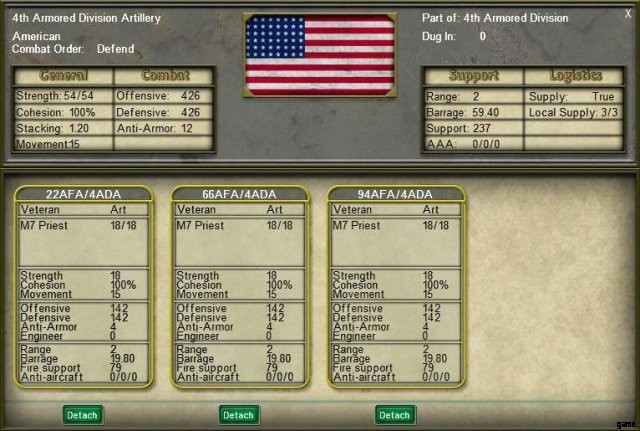
General Details:In addition to reiterating all the information listed on a Unit Card, detail sheets also display movement value, entrenchment status, anti-aircraft (listed as low/medium/high altitude), whether the unit is receiving supply, and how many turns of spare supply, it is carrying.
Battalion Details:Each of a unit’s attachments has its own battalion card, listed on the lower half of the detail sheet, displaying the individual subordinate unit’s name and combat statistics. Battalions can be detached from and re-attached to their parent unit using the appropriate buttons below the battalion card. Also note, when a unit is conducting a rest order, a replacement button appears underneath each battalion card, allowing them to accept replacement points if available.
Note:Battalion cards are color coded according to their unit type. Blue =Armor, Cyan =Mechanized, Red =Infantry, Yellow =Artillery, Orange =Anti-Aircraft.
3.5. Weapon Cards
View the individual statistics of any weapon system by clicking on its name on a battalion card. This opens the select weapon’s, weapon card.
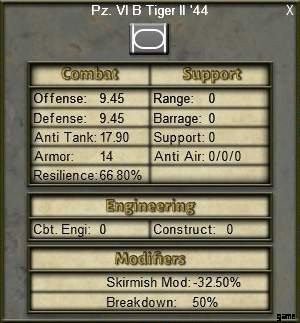
3.5.1. General Weapon Data
Weapon cards display general information for the selected weapon, such as offense, defense, range, barrage, support, anti-air, and engineering. These numbers are displayed ‘raw,’ as they would appear unmodified by training or cohesion.
3.5.2. Special Weapon data
Weapon cards also display special data such as armor, resilience, skirmish modifier, and breakdown rate.
- Armor:The anti-tank value required to suppress this weapon. Only armored fighting vehicles such as tanks and halftracks have armor values.
- Resilience:The percent chance that this weapon system will not be suppressed in armored combat or destroyed in close combat when a casualty roll is made against it in combat.
- Strategy:Resilience does not reduce the total casualties you suffer from combat. If a weapon successfully makes its resilience check, then the same “kill roll” will be made against another friendly weapon involved in the battle, usually a weapon with lower resilience, such as infantry. When possible, pair armor with infantry to sluff casualties off valuable tanks onto more expendable riflemen.
- Skirmish Mod:The Skirmish modifier indicates the percent bonus, or reduction, the weapon gains in skirmish combat. Reconnaissance units, commandos, and highly mobile vehicles such as armored cars, typically enjoy high skirmish modifiers. Whereas heavy armor suffers from severe skirmish reductions.
- Breakdown:The percentage chance that this weapon will suffer a mechanical breakdown for every movement point expended. Mechanical breakdowns incur extra cohesion loss. Units with lower training levels, and units that have exhausted their supplies, suffer greater cohesion loss from breakdowns.
4. Combat
All combat in CAOS consists of two stages, 1) Armored Combat, where armored vehicles are suppressed, and then 2) Close Combat, where strength points are destroyed, and the outcome of the battle is decided. While basic offense, defense, and anti-tank values form the foundation of the combat system, numerous combat modifiers help shape the outcome of battle.
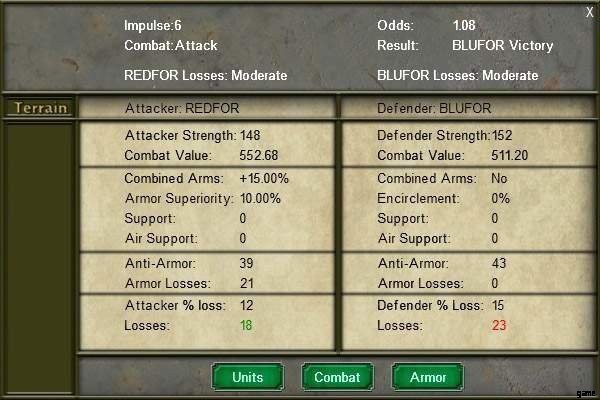
A detailed combat report can be accessed by either clicking on the battle marker on map (crossed rifles), or through the master combat list on the top bar. The combat report popup displays all crucial information from the battle, including odds, combat modifiers, and losses. The “Units,” “Combat,” and “Armor” buttons at the bottom open up additional screens allowing you to view the names of involved units, detailed losses in close combat, and armor suppressed in the armor combat phase.
4.1. Phases of Combat
4.1.1. Armor Combat
During the Armor Combat stage, both sides use their anti-tank value to suppress enemy armor. Suppressed vehicles only contribute half of their offense/defense value to the Close Combat stage. Through proper concentration of anti-tank capability, the threat of massed enemy armor can be significantly reduced.
Determining Armor Suppression:The higher the anti-tank value, the more enemy armor points will be suppressed, although anti-armor results vary. For instance, the same 57mm AT gun battalion will not always suppress precisely the same number of Panzer IVHs if the same battle is run repeatedly.
Role of Armor and Resilience stats:More heavily armored vehicles take more effort to suppress. For instance, a suppressing a single Tiger I subtracts twice as much anti-tank value from the opponent’s anti-tank total as a single Panzer IVH. Likewise, vehicles with a high Resilience stat can be very difficult to suppress. Typically, armored suppression falls disproportionately on lightly armored vehicles, such as armored cars, while heavily armored behemoths are far less likely to be suppressed. When heavily armored vehicles are suppressed, they disproportionately reduce the enemy’s remaining AT pool.
Impact of Terrain on Armored Combat:Some terrain types such as forests and mountains increase anti-tank values for both attackers and defenders. Likewise, some structures such as cities or improved positions also increase defender anti-tank.
4.1.2. Close Combat
After Armored Combat is resolved, Close Combat begins. Close Combat is the decisive stage of battle, where victory, defeat (or an inconclusive result), is decided. The ratio between the offensive combat value of the attacker versus the defensive combat value of the defender, called the odds, determines the losses suffered by both sides and the final outcome of battle.
Determining Casualties:Like traditional tabletop wargames, close combat casualties are determined proportionally according to the odds and randomized within reason. As in reality, combat in CAOS is inherently unpredictable; you might suffer 3% casualties in a 3 to 1 combat, and 6% casualties in the same 3 to 1 if you re-run the turn.
Role of Resilience:As mentioned in the Weapon Cards section (see section 3.5), weapon systems with Resilience have a percentage chance to ignore kill rolls made against them during casualty assignment, and instead pass the loss on to a unit with lower resilience.
Overrun Attacks:If the odds in close combat are 15 to 1 or greater in the attacker’s favor, the defending force is immediately destroyed, without incurring casualties or movement cost on the attacker.
4.2. Combat Modifiers
4.2.1. Combined Arms
Combined Arms significantly increases offensive and defensive combat value during the Close Combat stage. Combined Arms is frequently the single most powerful force multiplier available, and players should attempt to gain combined arms bonuses as often as possible.
4.2.2. Combined Arms Levels
Combined arms escalates in intensity depending on force composition, up to a +50% bonus. Achieving the most basic level of combined arms requires both infantry and armor to be involved on the same side of a combat. Adding artillery and air support increases this bonus further.
- Infantry + Armor + Artillery + Air Support =+50%.
- Infantry + Armor + Air Support =30%.
- Infantry + Armor + Artillery =+30%.
- Infantry + Armor =15%.
Minimum Infantry Quantity for Combined Arms:At least 15% or 30 strength points of a force present in a battle must be some form of infantry to fulfil the infantry requirement of combined arms.
Minimum Armor Quantity for Combined Arms:At least 15% or 30 strength points of a force present in a battle must be some form of armor to fulfil the armor requirement of combined arms.
Special Considerations for Artillery in Combined Arms:Only artillery units that have a range value and are part of a battalion that is type artillery, fulfil the combined arms requirement. Despite being type artillery, anti-tank guns that do not have a range value do not fulfil the artillery requirement for combined arms. Likewise, artillery (usually mortars) integrated inside infantry or armored battalions do not count for combined arms.
4.2.3. Encirclement Combat Penalty
When attacked from multiple directions defending forces suffer a -10% encirclement combat modifier for each hexside the enemy is attacking through.
4.2.4. Armor Superiority
If the defender cannot disable at least 20% of the attacker’s armor value in Armored Combat, then the attacker gains an Armor Superiority bonus. The Armor Superiority reduces defender combat value from -50% to -10%, depending on the terrain and aggregate morale level of the defender. Higher morale units, or units in terrain hostile to tanks suffer lower Armor Superiority penalties.
4.2.5. Supply
As mentioned in section 2.5, units that have exhausted their supply suffer a -50% combat penalty.
4.3. Terrain
Terrain impact unit types in different ways. For example, Light Forest provides a +15% defensive bonus to infantry, but it also incurs a -25% defensive penalty to armor. Check terrain modifiers on the bottom bar carefully when planning future combats.
4.4. Role of Fire Support
Artillery Fire Support and Air Support are added to combat value separately from combat modifiers. Thus, fire/air support is never arbitrarily more effective because of a combined arms modifier or reduced because of encirclement.
4.5. Retreat
Both attacking and defending units may be forced to retreat as a result of combat. The more unfavorable the odds, the higher the chance of retreat. When a combat result forces a retreat, one randomly selected unit immediately retreats, and every other unit on the retreating side individually rolls a retreat check. Units with higher stacking values, and higher aggregate training levels are less likely to retreat.
4.5.1. Inability to Retreat and Excess Losses
Units that cannot retreat for any reason automatically lose 15% of their total strength. Common causes of inability to retreat include:
<オール>
5. General Orders
5.1. Combat/Move Orders
5.1.1. March
March is the basic movement/combat order. Marching units engage any enemy stacks in their path if the odds are 1 to 1 or better. March combats are typically low-intensity, with relatively few losses per battle, but they can be used to devastating effect to punch through enemy lines or crush encircled units. Under optimal conditions, a marching unit can initiate up to nine combats in a single turn. March orders are marked by a light-red movement line on the map.
Strategy:Use March orders to advance to contact, probe for weaknesses in enemy forces, or annihilate encircled enemies by hitting them with many march orders in the hopes of rolling retreats.
5.2.2. Defensive March
This is a variant of the March order where units will only engage enemies in their path if the odds are 10 to 1 or better. Defensive March orders are marked by a black movement line on the map.
Strategy:Use Defensive March when you do not want to risk unplanned combat.
5.2.3. Force March
Force march moves further than normal march orders, but it can only move between road hexes and cannot initiate combat. Force marching units take extra losses from enemy air interdiction, bombing, and artillery, and they become disrupted, lowering their combat value by 50% for the rest of turn resolution if they are attacked. Force March orders are marked by a yellow movement line on the map.
Strategy:Use Force March to move units rapidly around your rear area when you enjoy air superiority, and you do not fear enemy ambushes.
5.2.4. Attack
The primary high-intensity combat order. Units conducting an Attack order engage all adjacent enemy units when they reach the target hex, on the designated impulse, and gain a +20% combat bonus. Attack incurs much higher casualties on both sides but is far more likely to force the defender to retreat, provided the odds high enough. Enroute to target, Attacking units engage enemy stacks like normal March orders. Attack orders are marked by a dark-red movement line on the map.
Strategy:Use Attack orders to breakthrough enemy front lines to create gaps for follow-on forces to exploit.
5.2.5. Skirmish
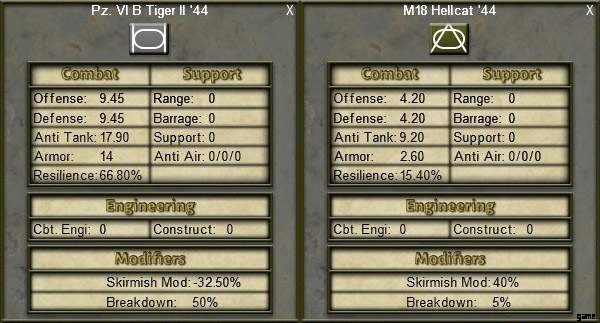
Skirmishing units harass any enemy units that come adjacent to them during turn resolution. Units engaged by a skirmish order may take casualties, but they also suffer from a +1 terrain cost on their next move. Each weapon system has its own skirmish modifier, which modifies combat and anti-tank value during skirmish combat. For example, fast M18 Hellcat tank destroyers enjoy a significant skirmish combat bonus, while slow King Tigers suffer a severe penalty. Skirmish modifiers can be viewed on a per weapon system basis on the weapon card.
Units conducting skirmish orders do not have to move, but if they do they engage enemy units along their path if the odds are 1 to 1 or better, in addition to their skirmish combats. While involved in non-skirmish combats, units with a skirmish order suffer a -20% combat value/anti-tank penalty. Skirmish orders are marked by a green movement line on the map.
Strategy:Use units that have high skirmish modifiers to harass enemies by inflicting small amounts of damage and wasting their movement points. In cases of extreme firepower disparity, the Skirmish order can be used to annihilate weak enemy units adjacent to their movement path.
5.2.6. Reserve
An order to support all adjacent friendly units. Units in Reserve contribute their combined arms modifier plus 50% of their combat and anti-tank value to all adjacent friendly units during turn resolution. However, Reserve units can also suffer casualties and cohesion loss in any combat they become involved in, and if they are directly engaged themselves then they suffer a -50% combat penalty. Units conducting a Reserve order can move, although they do not have to. Reserve orders are marked by a purple movement line on the map.
Strategy:Reserve is a great way to help units stuck behind the front line because of stacking limits contribute to combat. Armored units in Reserve right behind the front line are a great way to provide combined arms to multiple friendly stacks. However, be careful, units can quickly become exhausted (or destroyed) if they are dragged into too many combats while in Reserve.
5.3. Defensive Orders
5.3.1. Reinforce
This order targets an adjacent friendly unit to Reinforce if that unit is engaged, provided stacking limits and Zone of Control will allow it. Reinforcing units will move into the target hex the impulse after the target unit is attacked. If you expect part of a front line stack will retreat during turn resolution, Reinforcements can relieve the remaining defenders before the enemy can mount another attack. Additionally, through clever use of bonus road movement rules, Reinforce can be used to temporarily over-stack a hex.
Strategy:Use Reinforcement orders to plug holes in your line before they happen. Reinforce is a niche order, but when used properly it can mean the difference between containing a breakthrough and having a crucial strongpoint overrun.
5.3.2. Hold and Defend
A basic defensive combat bonus. Units in Hold and Defend gain a +10% combat and anti-tank bonus per turn, up to a maximum of +20%. This bonus lasts until the unit leaves the hex.
5.4. Ancillary Orders
5.4.1. Rest
Rest regenerates cohesion and allows units to absorb replacements. Resting units regain cohesion at an accelerated rate, but they lose their Zone of Control, and suffer a -50% combat penalty if attacked. Resting units can also accept replacements (if they are available) by opening the unit’s card.
Strategy:Whenever possible pull exhausted or damaged units out of the front line and rest them for a few turns to regenerate cohesion and restore their fighting capabilities.
5.4.2. Set Rally point
Designates the targeted hex as the preferred retreat destination for the selected unit. Zone of Control and stacking rules allowing, units will try to retreat into or toward their rally point. A unit’s current rally point is marked by a red flag while the unit is selected. Once set a rally point persists until a new rally point is set.
Strategy:Rally point is a niche and relatively seldom used order, but it can be highly valuable for micromanaging the direction of retreat for high value units. Or for instance, to ensure infantry retreats into favorable terrain like mountains where armor cannot pursue it.
5.5. Fire Missions and Engineering Orders
Fire missions are artillery specific orders that allow your big guns to support friendly units or bombard enemies from afar. Fire missions also give units a chance to move while conducting their fire missions, although the artillery fire movement rate is limited for non-self-propelled guns.
5.5.1. Fire Support
Target a specific friendly unit to support throughout turn resolution. As long as the artillery unit remains in range of the targeted friendly, it will provide fire support for every combat the target is directly involved in during the turn. However, the fire supporting artillery will suffer cohesion loss for every individual battle it assists. Artillery fire support satisfies the artillery component of combined arms.
Strategy:Fire support is a great way to strengthen your forces in any battle, defensive or offensive, from afar. For many nations it simply is not advisable to risk valuable artillery in the front line, so fire support offers a relatively safe method to provide the artillery component of combined arms to frontline forces.
Note, providing fire support to a unit conducting a Reserve order will not pass fire support to units assisted by the Reserving unit.
5.5.2. Barrage
Target a specific hex, preferred target unit type, and impulse, to rain high-explosive hell on. For example, if you target an enemy stack for an impulse 7 barrage, targeting Armor, then your artillery will fire at that hex on impulse 7, and inflict extra damage to armor in that hex. If the selected target type is not present when the barrage occurs, then another preferred target will be selected randomly.
- Barrage Strength and collateral damage:Barrages against the same hex, impulse, and target type, combine their barrage value. The greater the value, the higher the odds of damage to both the targeted unit type, and the higher the odds of collateral damage against other units in the same hex. Note, some terrains and structures reduce the efficiency of barrage, check the terrain display in the bottom left for details.
- Pinning Targets:Enemy units that suffer casualties from barrage have a chance to become pinned in the next impulse, thereby preventing them from moving, and negating their Zone of Control during that impulse.
- Strategy:When possible, concentrate your barrages on a few specific targets to inflict maximum casualties. With powerful barrages, and a little luck, artillery can negate enemy zone of control long enough to allow your forces to infiltrate and encircle enemy forces, or even bypass the front line entirely.
5.5.3. Counter-Battery
Counter-battery is functionally identical to barrage, except it specializes in destroying artillery and yields less collateral damage to non-artillery units in the target hex. Enemy artillery pinned by counter-battery cannot conduct barrage or fire support missions on the following impulse.
Strategy:Counter-battery can damage and even destroy artillery units, but its greatest strength is the ability to pin hostile artillery. For example, if you are confident that a specific enemy artillery unit is the only source of the artillery component of combined arms for a sector of the front, try to silence it with counter-battery the impulse before your ground forces launch a major assault.
5.6. Engineering Orders
Engineering orders include a wide range of options to create or bypass obstacles, ranging from destroying bridges to laying minefields. Building and destroying obstacles is handled by construction engineering, the more construction points you have devoted to a task, the faster it will be completed.
Combat engineering is used strictly for destroying or suppressing fortifications in battle and is discussed below in section 5.6.1.
5.6.1. Improve Position
Builds a battlefield fortification. Improved positions impede attackers, reduce the effect of enemy bombing/barrage, and provide defensive bonuses to attackers.
Combat Engineering:Improved positions can be suppressed or destroyed by enemy combat engineers in close combat. If an improved position is suppressed in close combat it does not provide combat benefits to the defender during that battle. Destroyed Improved Positions are removed from the map permanently.
5.6.2. Bridge
Build a temporary bridge across any river, major or minor. Infantry can cross a temporary bridge while it is under construction, but mechanized and armored units must wait until the bridge is complete, a full turn later. This temporary bridge will only remain in place as long as a friendly engineer unit is adjacent to maintain it at the end of each turn.
Strategy:Use temporary bridges to create new crossing points on major rivers, or to make passage across minor rivers easier. Because infantry can cross temporary bridges immediately, it is often wise to throw a regiment of infantry across while the bridge is under construction to secure a foothold before your opponent can respond. But be careful, the enemy can cross your temporary bridges too.
5.6.3. Destroy Bridge
Wire any adjacent bridge for detonation. Provided your engineers are not interrupted, the bridge will be destroyed on impulse 9.
Strategy:Consider destroying excess bridges that you do not believe you will need to use to force your opponent to waste time repairing them, or to funnel them toward stronger parts of your line.
5.6.4. Repair (bridge)
Repair a destroyed permanent bridge. Like temporary bridges, infantry can cross a repaired bridge the same turn repairs begin, but mechanized and armored units must wait a full turn.
5.6.5. Lay Minefield
Lay a minefield to slow down enemy forces. Minefields slightly increase the movement cost of a hex-side to friendly forces (+1 move cost), and significantly increase it for the enemy (+7 move cost). Additionally, minefields increase defense for all unit types by +10%.
Strategy:Use minefields to delay your opponent’s advance and strengthen your defensive positions. When combined with other terrain features such as mountains and rivers, minefields can make a hex-side nearly impassable to the enemy.
5.6.6. Breach Minefield
Breaching an enemy minefield reduces the movement penalty from +9 to +1. Breaching minefields is a quicker, but less effective alternative to completely clearing them.
5.6.7. Clear Minefield
Completely removes a friendly or enemy minefield. Clearing minefields is a time-consuming process, always consider whether your engineer’s talents would be better spent elsewhere.
6. Special Unit Rules
6.1. Shock Troops
German SS and Soviet Guards units receive powerful, but self-destructive, fanatic and shock combat modifiers.
6.1.1. Fanatic Units
Fanatic units gain a +40% close combat modifier, but suffer 20% higher casualties, when conducting Attack and Hold and Defend orders. All non-artilley units from SS panzer/panzergrenadier divisions, as well as independent SS armored units, gain fanatic combat modifiers.
6.1.2. Shock Units
Shock units gain a +25% close combat modifier, but suffer 12% higher casualties, when conducting Attack and Hold and Defend orders. All non-artillery Soviet guards units, and all non-artillery SS infantry units gain shock combat modifiers.
6.2. Mountain troops move bonuses
Mountain troops gain a 2 point cost reduction to move through broken, mountain, and escarpment terrain types. Consequently, mountaineers move through broken terrain like it is open plains and mountains like they’re normal broken terrain.
6.3. Commando/Paratrooper move bonuses
Commandos and Paratroopers gain a 2 point cost reduction to move through all terrain types. Consequently, commandos and paratroopers move through most terrain types like open plains.
6.4. Self-propelled artillery, fire mission movement bonus
Self-propelled artillery does not suffer any fire mission movement range reduction.
6.5. National Artillery Fire Support Restrictions
To represent historical artillery doctrines, or communication equipment shortages, Soviet, Italian, and French heavy artillery units cannot conduct fire support fire missions. The heavy artillery of these nations are still perfectly capable of barrage and counter-battery fire missions.
6.6. Unsupported Artillery Combat Penalties
If artillery becomes involved in close combat without support from infantry or armor, it suffers a -50% combat, barrage, and fire support penalty for the rest of the turn.
7. Air Units
7.1. Air Superiority
Controlling air superiority allows you to disrupt enemy air missions and protect your own. Air groups tasked with air superiority missions battle for control of the skies, while all other air groups carry out more specialized missions such as air bombardment, strike, air support, ground interdiction, and recon.
7.1.1. Determining Air Superiority
Each air group tasked with air superiority calculates its air strength as:(air weapon stat*morale *number of air superiority missions*cohesion) every turn. The air strength of every air group tasked with air superiority is then summed to determine a side’s total air combat value, and compared against the enemy. The greater your air superiority advantage over the enemy, the more hostile air missions will be attacked or lost, and fewer of your missions will be attacked or lost.
Note:Unlike other air missions, air superiority missions are automatically calculated, they are not targeted on a specific hex.
7.1.2. Air Missions Attacked
Air missions that are attacked suffer cohesion loss mitigated by their air weapon stat, but they still provide air missions.
7.1.3. Air Missions Lost
Air missions that are lost suffer high cohesion loss, mitigated by their air weapon stat, and do not provide air missions.
7.2. Air Orders
The number of air missions available to be tasked every turn is a result of orders given in the air command last turn, minus air missions that were lost during turn resolution.
7.2.1. Air Bombardment
Air Bombardment deals moderate damage against all enemy units in the target hex on impulse 0. The strength of air bombing scaled according to year. Air bombing can be targeted on any hex, even outside of your Line of Sight. Air Bombardment can be driven off or weakened by enemy fighters and high/medium altitude anti-aircraft. Terrain also reduces the lethality of bombing, the same way it reduces artillery barrage.
7.2.2. Air Strike
Air strikes inflict high damage on a single enemy unit in the targeted hex on impulse 0. The bombardment strength of airstrikes scales according to year. Unlike air bombardment, air strikes can only be targeted on spotted enemy units, you cannot call air strikes on hexes outside your Line of Sight. Air Strikes can be driven off or weakened by enemy fighters and low/medium altitude anti-aircraft. Terrain also reduces the lethality of strikes, the same way it reduces artillery barrage.
7.2.3. Air Support
Air support provides flying fire support and the crucial final component of the +50% combined arms modifier to the targeted friendly unit throughout the entire turn. Air support missions can be driven off or weakened by enemy fighters and low/medium altitude anti-aircraft.
7.2.4. Ground Interdiction
Ground interdiction eliminates the benefit of a road or trail to enemy units moving through the targeted hex during turn resolution. Interdiction can be targeted on any hex, even outside of your Line of Sight. Ground Interdiction missions can be driven off by low/medium altitude anti-aircraft and enemy fighters.
Ground Interdiction Bonus Against Forced March:Forced Marching units that run into an enemy ground interdiction mission suffer cohesion damage and are immediately forced to halt.
Strategy:Target Ground Interdiction missions on roads running through rugged terrain, or on roads you believe enemy reinforcements will move through during turn resolution. When properly used, Interdiction can slow down enemy advances, completely deny enemy armor access to roads/trails through mountains, and deny 6 point overstacking along roads during turn resolution.
7.2.5. Air Recon
Air Recon provides a 2-hex line of sight around the targeted hex. Air recon missions can be driven off by enemy fighters.
7.2.6. Maintenance
Aircraft inevitably suffer cohesion damage as they fly day after day without maintenance. Air groups suffer a base 5% cohesion loss per turn, but enemy air superiority and anti-aircraft can increase cohesion loss significantly. As cohesion depletes the number of missions each air group performs per turn decreases proportionately as well. Air groups regain between 20-30% of cohesion per turn when undergoing maintenance, depending on the nation and aircraft type.
Strategy:Exotic aircraft such as the German ME-262 jet fighter suffer from relatively low cohesion regeneration rates. Likewise, most Soviet aircraft possess lower cohesion regeneration rates than their Western adversaries. In both cases avoid flying air missions with all of your aircraft constantly, either hold them all back and flood the battlefield with a tide of aircraft during of a major offensive, or cycle air groups so you always have a few flying.